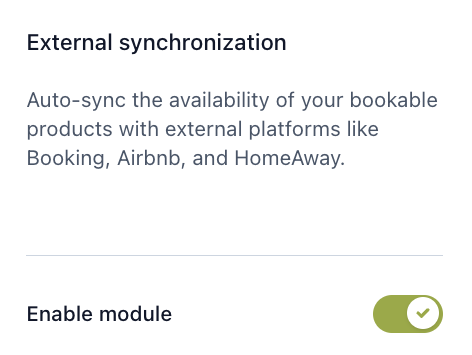
To synchronize your products’ calendars with any external platform like Airbnb or Booking, you need to activate the “External synchronization” module. Go to YITH > Booking and Appointment > Modules and enable it:
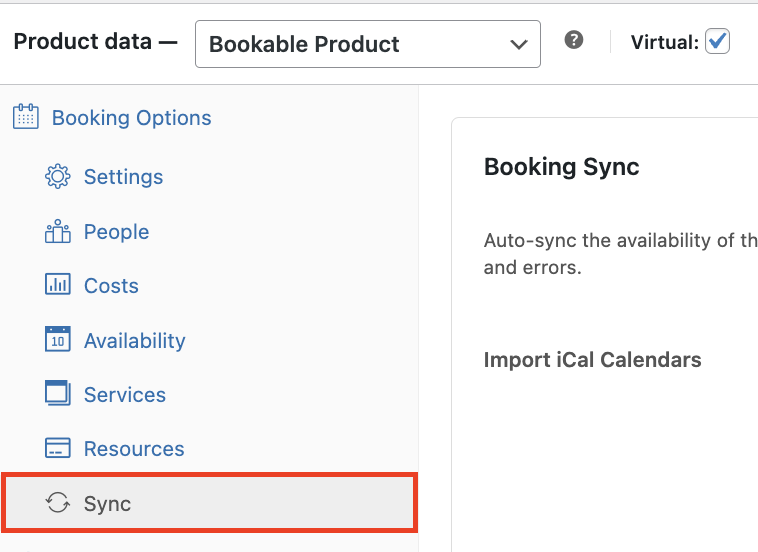
Then, for every product you want to sync, you can go into its product edit page and scroll down to Product data > Booking Options > Sync:
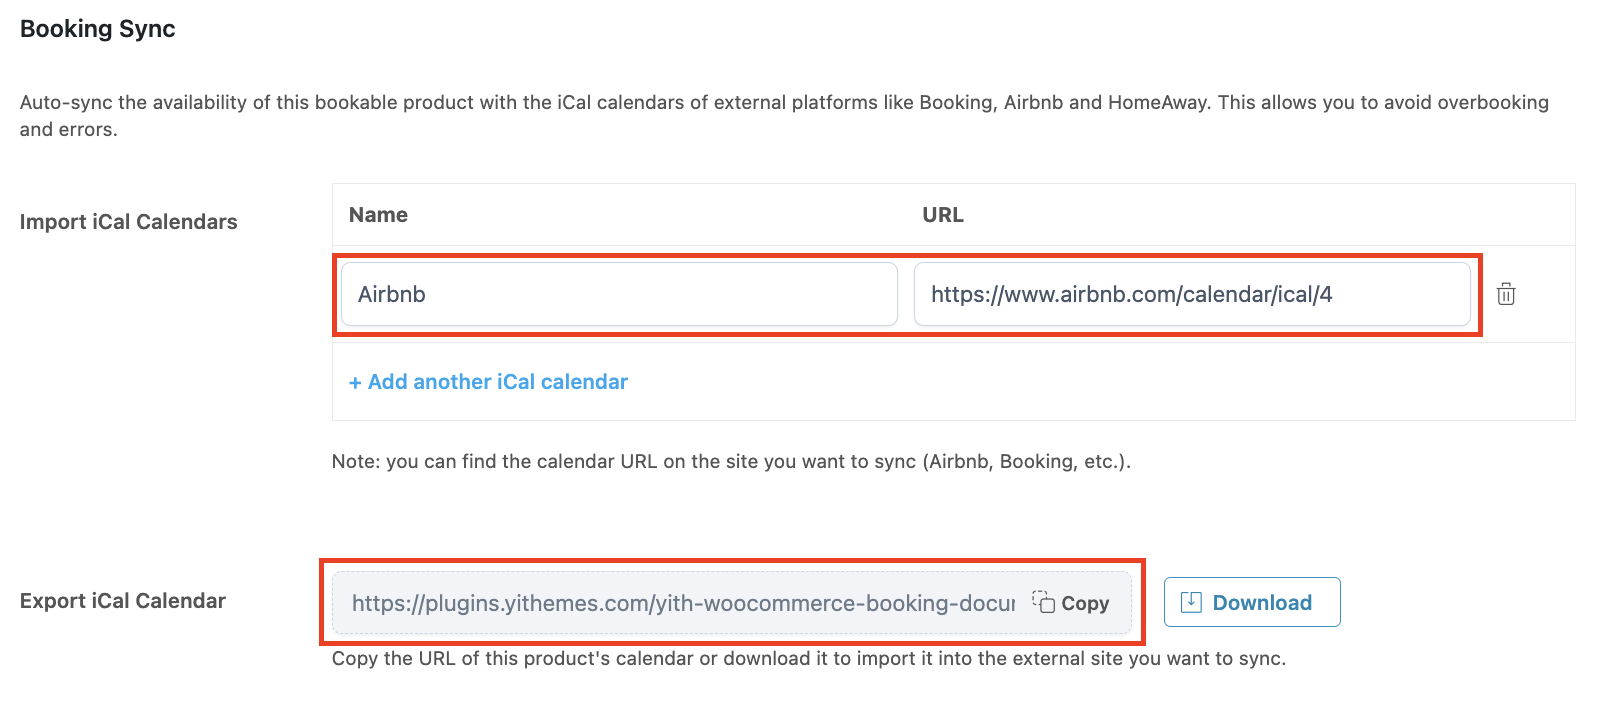
In that section, you’ll be able to enter the external calendar URL to synchronize it, and export the product calendar to import it into the external site and synchronize your product calendar there:
You can set the synchronization refresh rate in YITH > Booking and Appointment > Settings > Calendars > External Calendars as well as enable the option to show the bookings of external calendars in your own plugin’s calendar:
If you enable the option to show the external calendars’ bookings in the plugin’s calendar, you would be able to identify those bookings thanks to a tag shown before the bookable product’s name, just like this “Airbnb” tag:
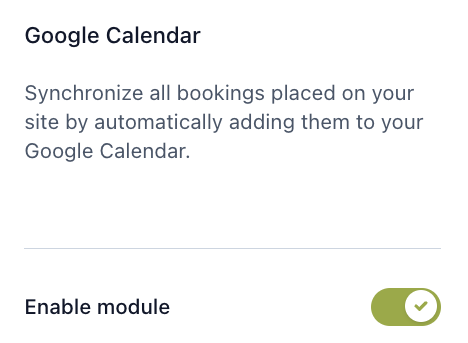
Now that you’re using our Booking and Appointment plugin to handle bookable products and services, you can synchronize the plugin’s calendar with your own Google Calendar. This is a one-way synchronization, from the plugin’s calendar to Google Calendar, so keep in mind this feature won’t work to prevent overbooking as it is not a two-way synchronization.
To synchronize your calendar to Google Calendar, the first thing you have to do is go over to YITH > Booking and Appointment > Add-ons > Modules and enable the related module:
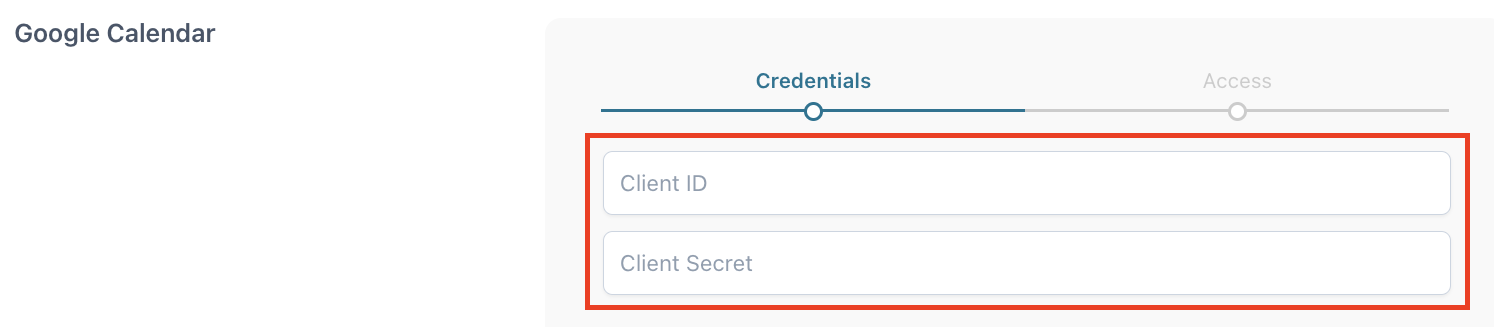
By enabling it, you’ll find a Google Calendar section in Settings > Calendars where you can enter your Google client ID and client secret, and then synchronize the plugin’s calendar by copying and pasting its URI into the Google Developers Console (don’t worry! We added instructions below):
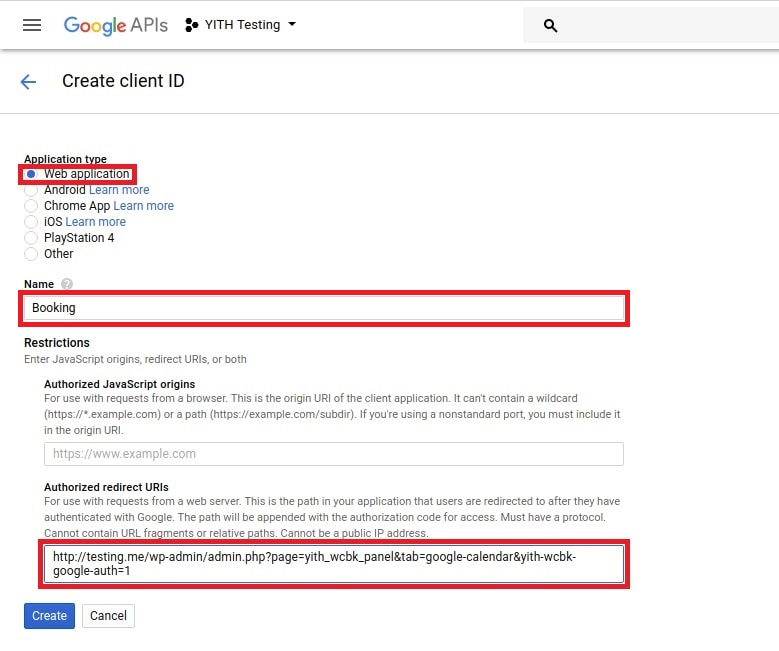
You need to create a project in the Google Developers Console and enable Google Calendar API in Your Project > Library. Then, create an OAuth Client ID for a Web application in Your Project and create your credentials:
When creating the client ID, select “Web application” in the Application type and enter a name. Then insert the link in the Authorized redirect URIs field:
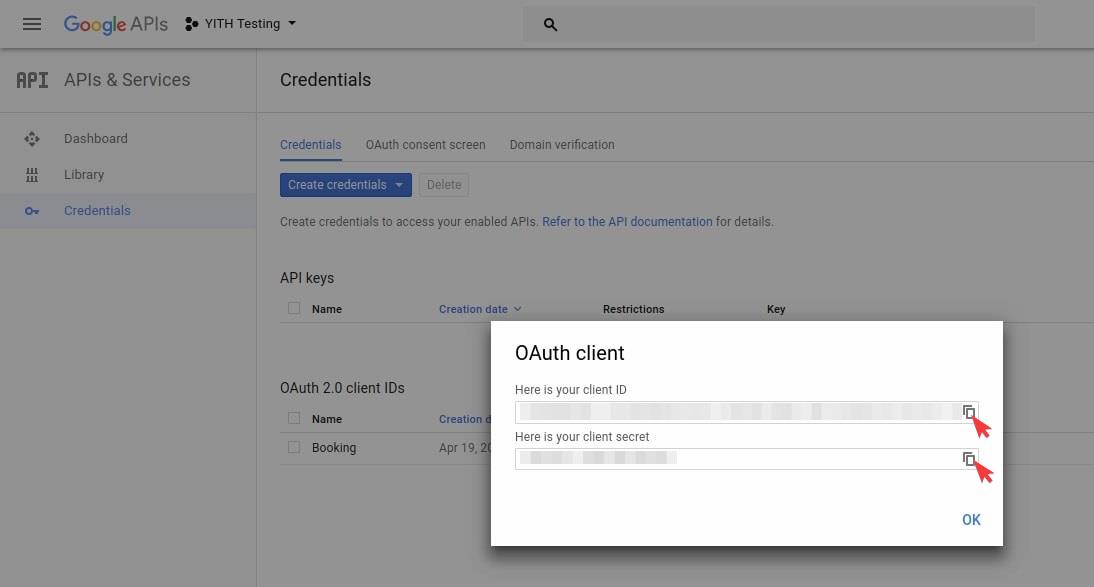
After creating your credentials, you can copy the client ID and client secret:
Then paste and save those credentials in the plugin panel (1). Once you do that, you can access your Google Calendar by clicking on the related button (2):
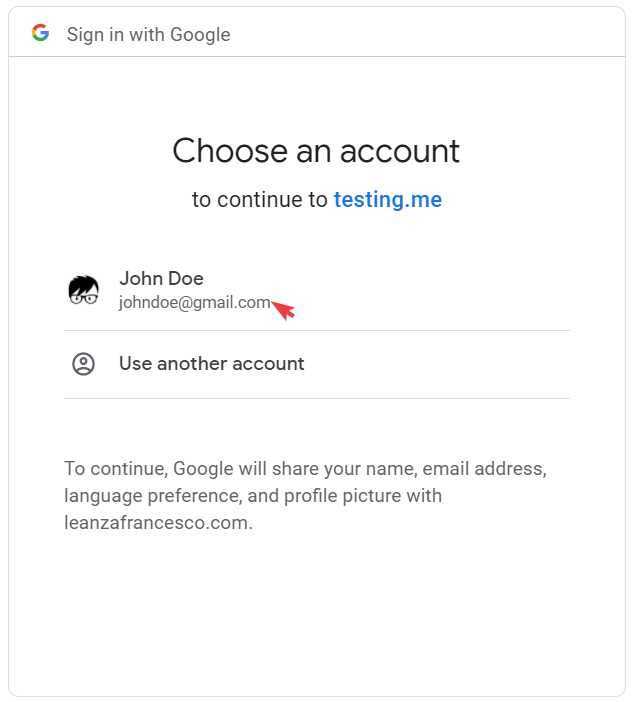
Select the account to synchronize:
Click on the “Allow” button to proceed with the calendar management and then select the calendar where you want to see all your bookings, and save options:
Then, the Google Calendar section in YITH > Booking and Appointment > Settings > Calendars will be updated, and you’ll be able to debug, choose when to synchronize your bookings, add a note to the bookings when they’re synchronized to Google Calendar, decide the booking name to show, synchronize bookings that have not been synchronized, and force synchronization on all of the bookings:
And that’s it! Now you’ll be able to track the bookings on your Google Calendar as well.
After you enable the “Search Forms” module in Modules, you will find the Search forms subtab inside the plugin’s Configuration tab. The plugin allows you to create unlimited search forms to help users quickly find the stay (or any other bookable product) that best meets their needs. Let’s review the steps to set up and manage the search forms.
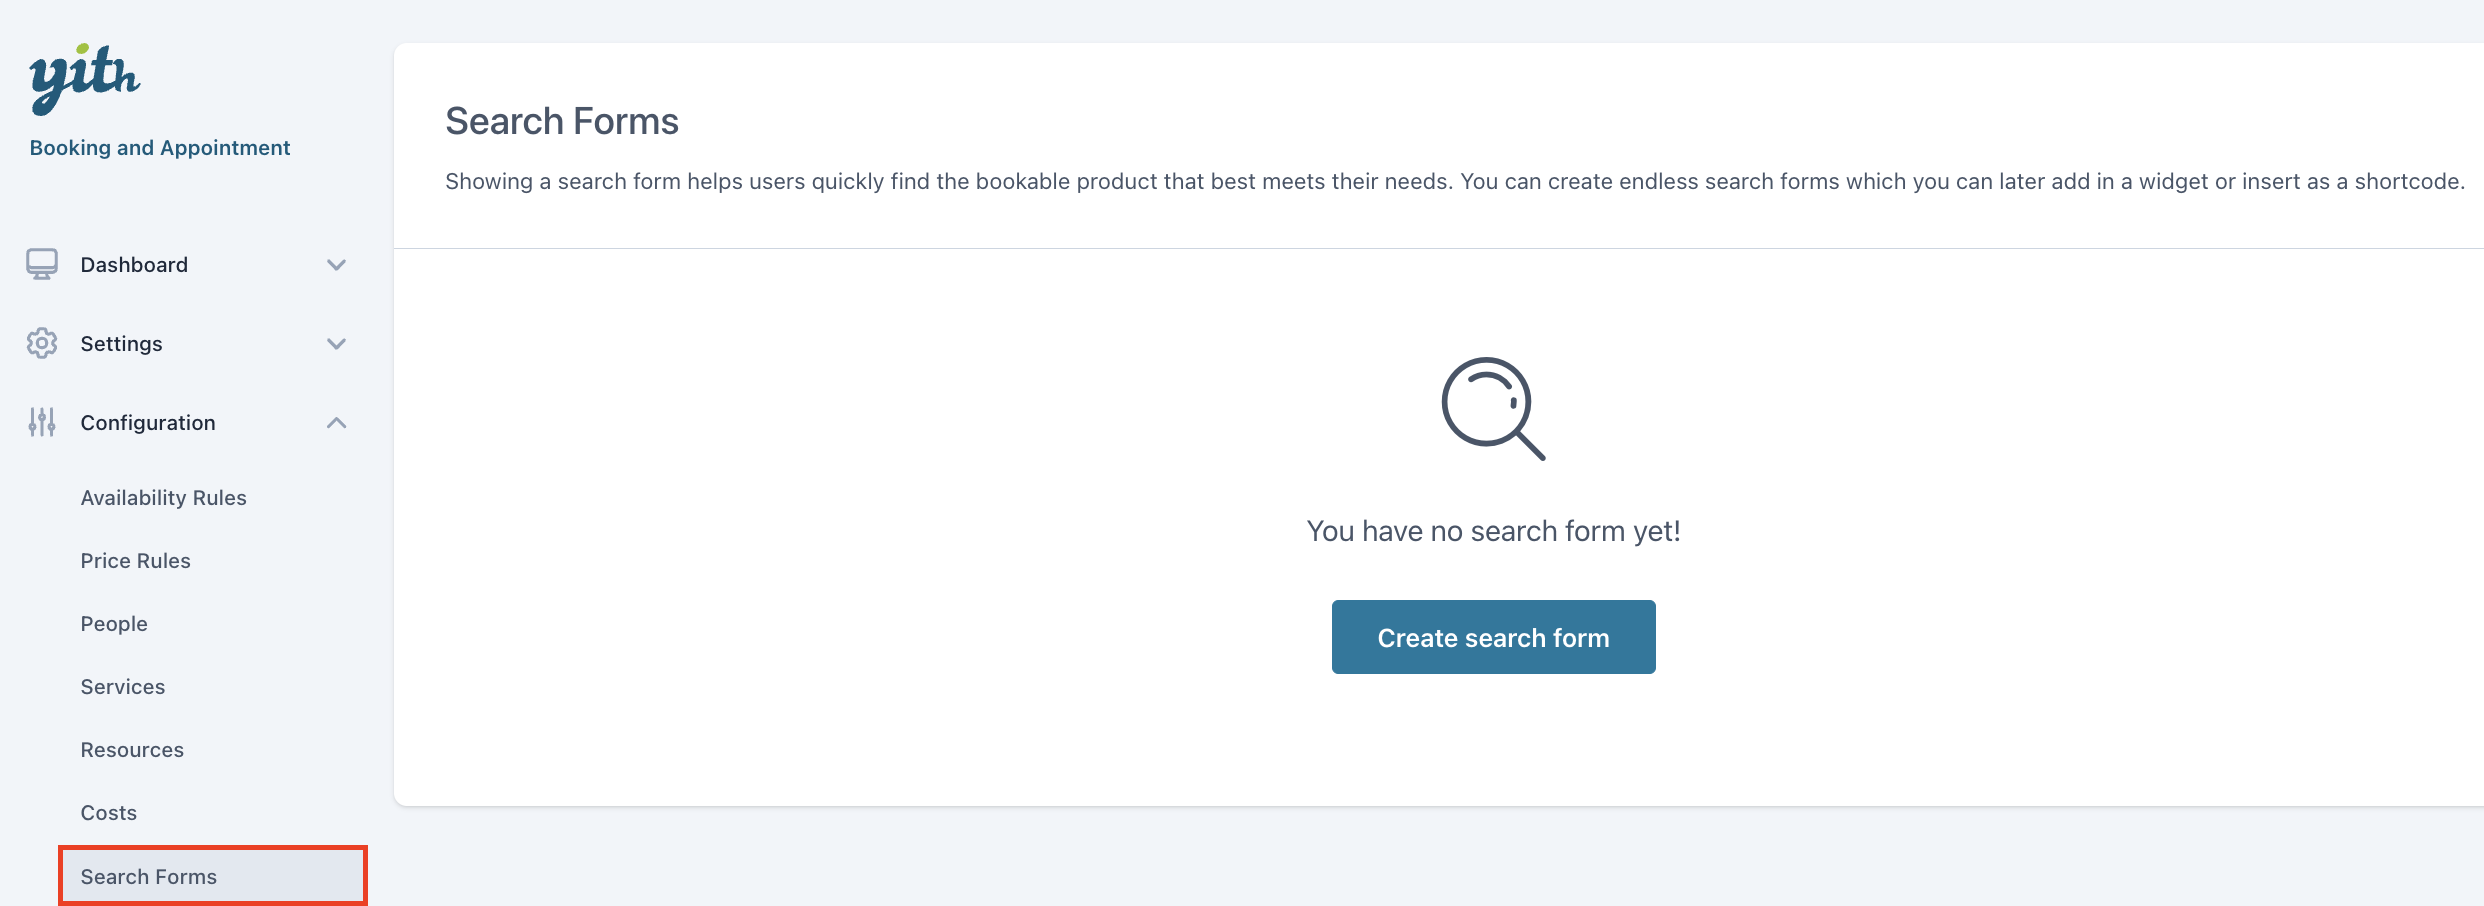
First, you need to go to YITH > Booking and Appointment > Configuration > Search form:
To create the first one, click on the “Create search form” button:
This will open a new page to configure the form. Here you can enter a name, enable/disable the fields you want to display and configure them, and customize the layout and style:
Now, let’s see in detail each field available. First, there is a ‘Search’ field you can enable to show a default search field inside the form and set a label for it:
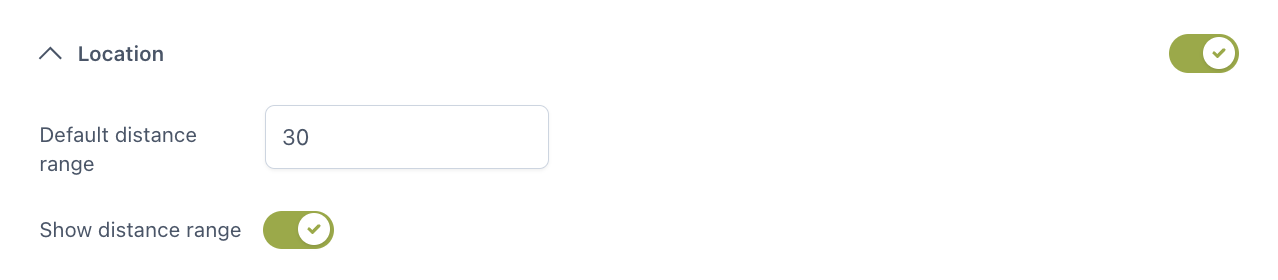
Next, if you have enabled the “Google Maps” module, there is a ‘Location’ field where you can add the default distance and decide to show/hide the distance range:
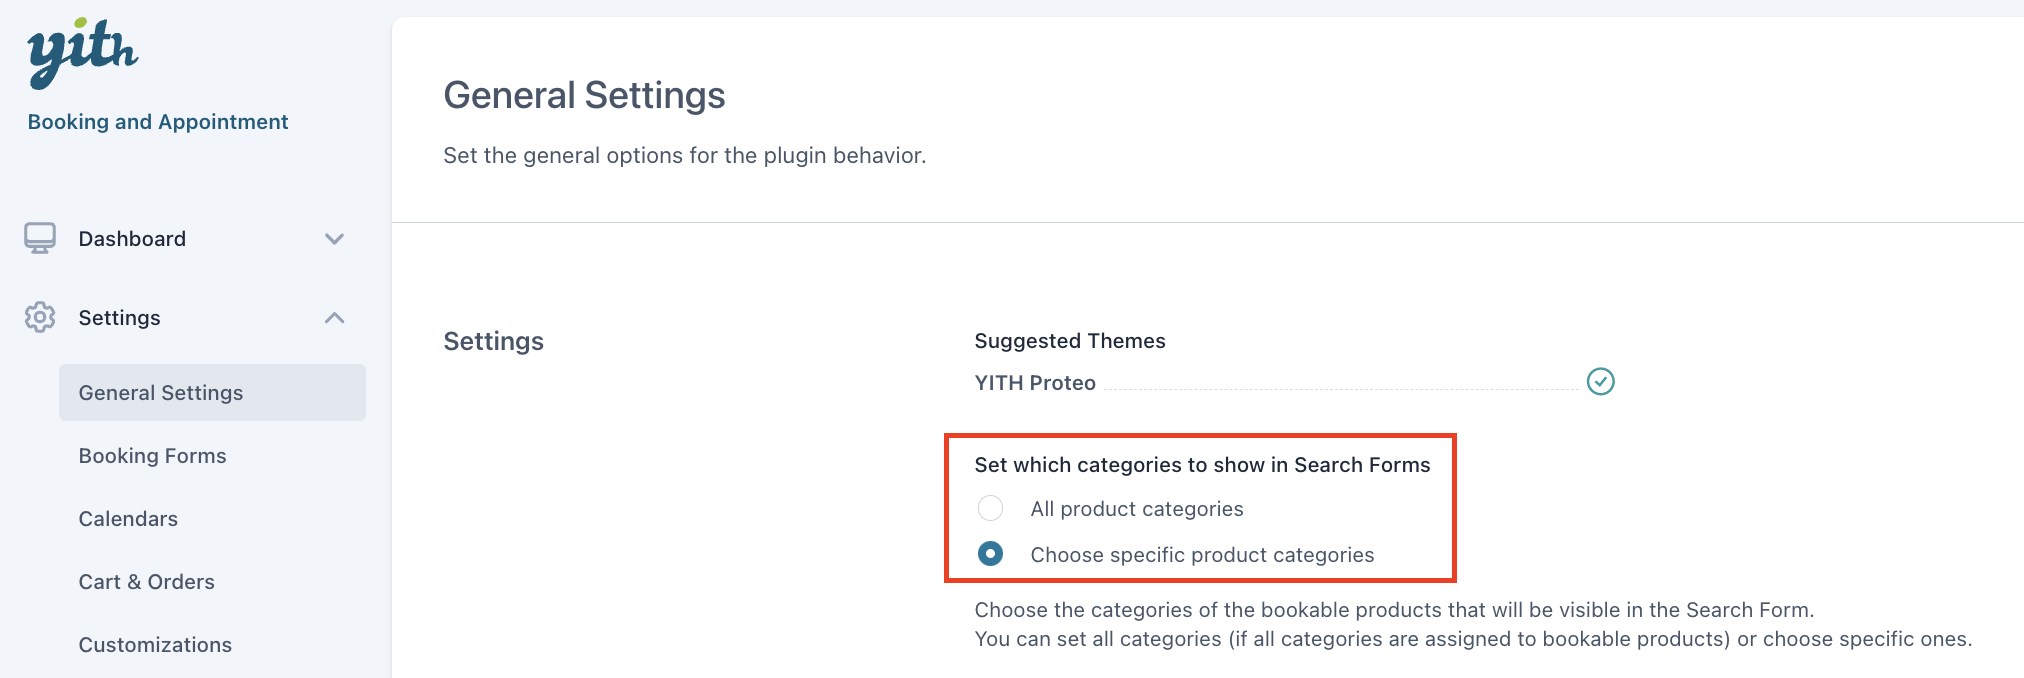
Also, you will find a ‘Categories’ and a ‘Tags’ field to allow users to search on categories and search on tags (only visible if you have created tags). For the categories, you can set which ones to show on YITH > Booking and Appointment > Settings > General Settings:
Another field you can include is ‘Dates’ which has two different alternatives, either Show 2 different date pickers (two different lines to select the start and end date – calendars are shown in a dropdown) or Show date range picker selector (one line to select the start and end date -calendar is shown in a dropdown):
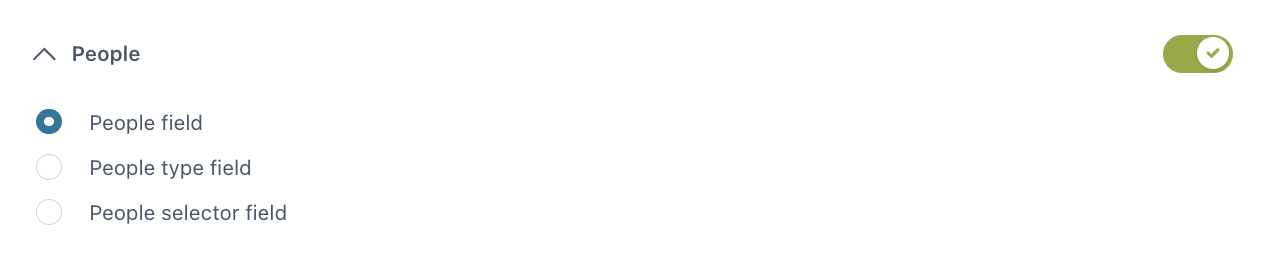
Next, if you have enabled the “People” module, you can show a ‘People’ field and decide how to display it. The options available are People field (to insert the number of guests regardless of the people type), People type field (to insert the number of guests by people type) and People selector field (to select the number of guests by people type):
Finally, if you have enabled the “Services” module, you can show a ‘Services’ field and decide how to display it. The options available are Show services as checkboxes (show the services you provide with an option to select them) and Show service selector (show the services you provide in a dropdown, with the option to select them – recommended when you have a long list of services):
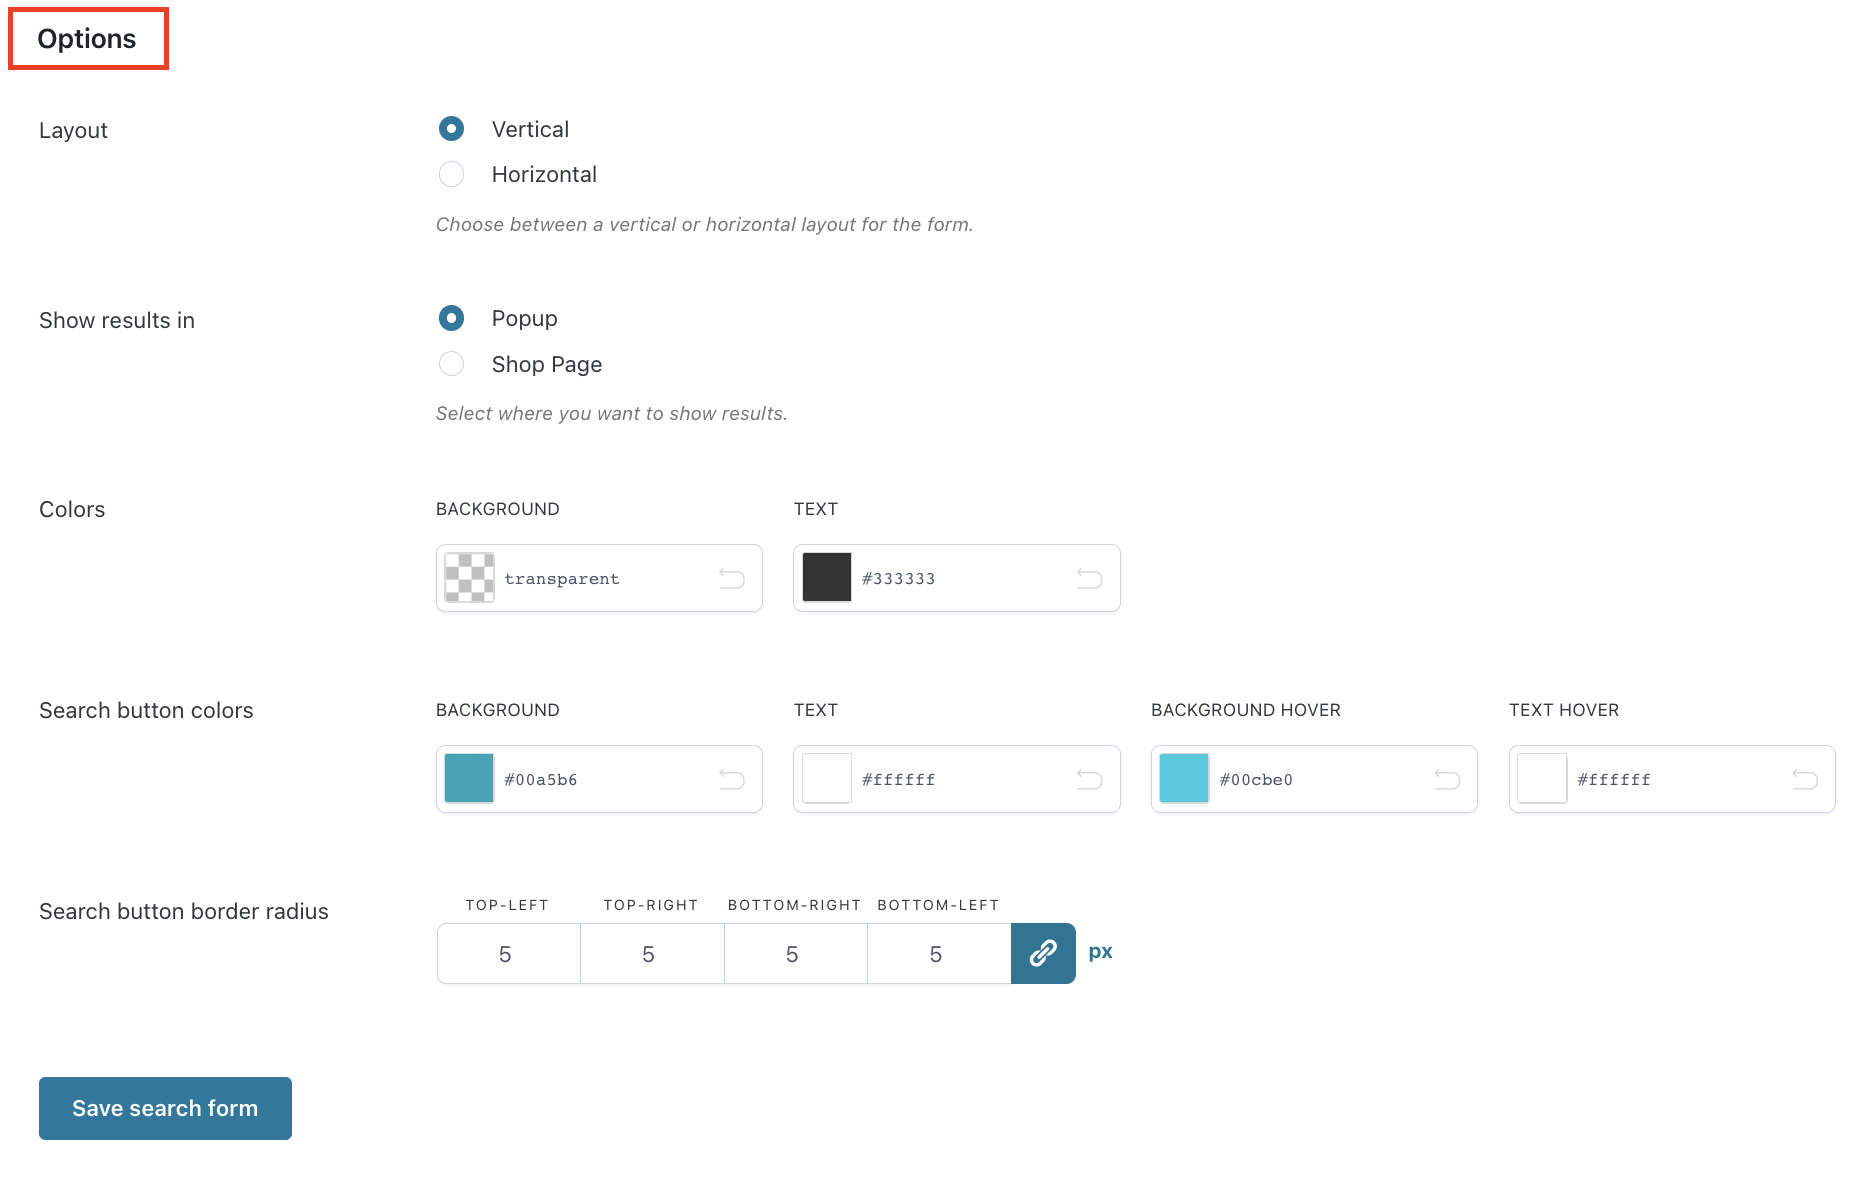
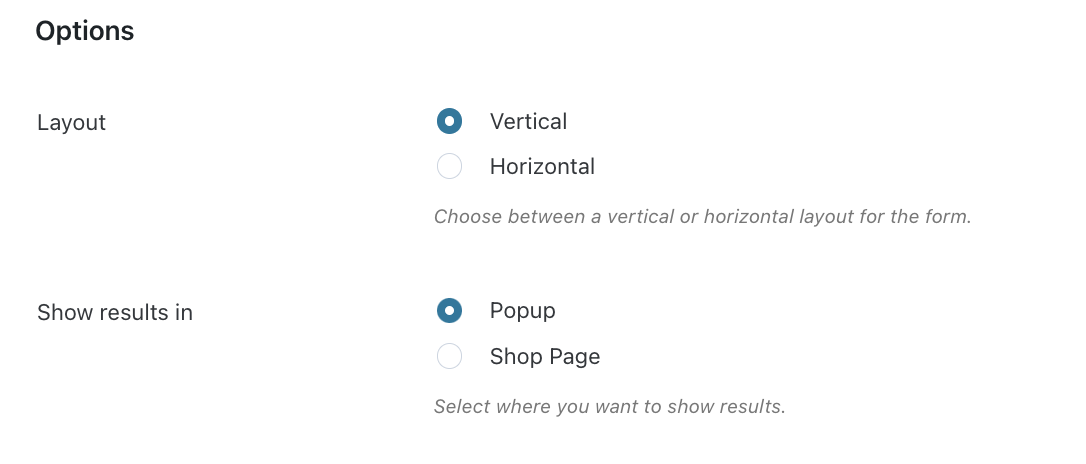
Besides the fields, there are additional options to customize the form. First, you can choose the layout, either vertical or horizontal, and choose how to show the results, in a popup or in the shop page:
Next, you can customize the search form and the search button colors:
Lastly, you can set the search button border radius:
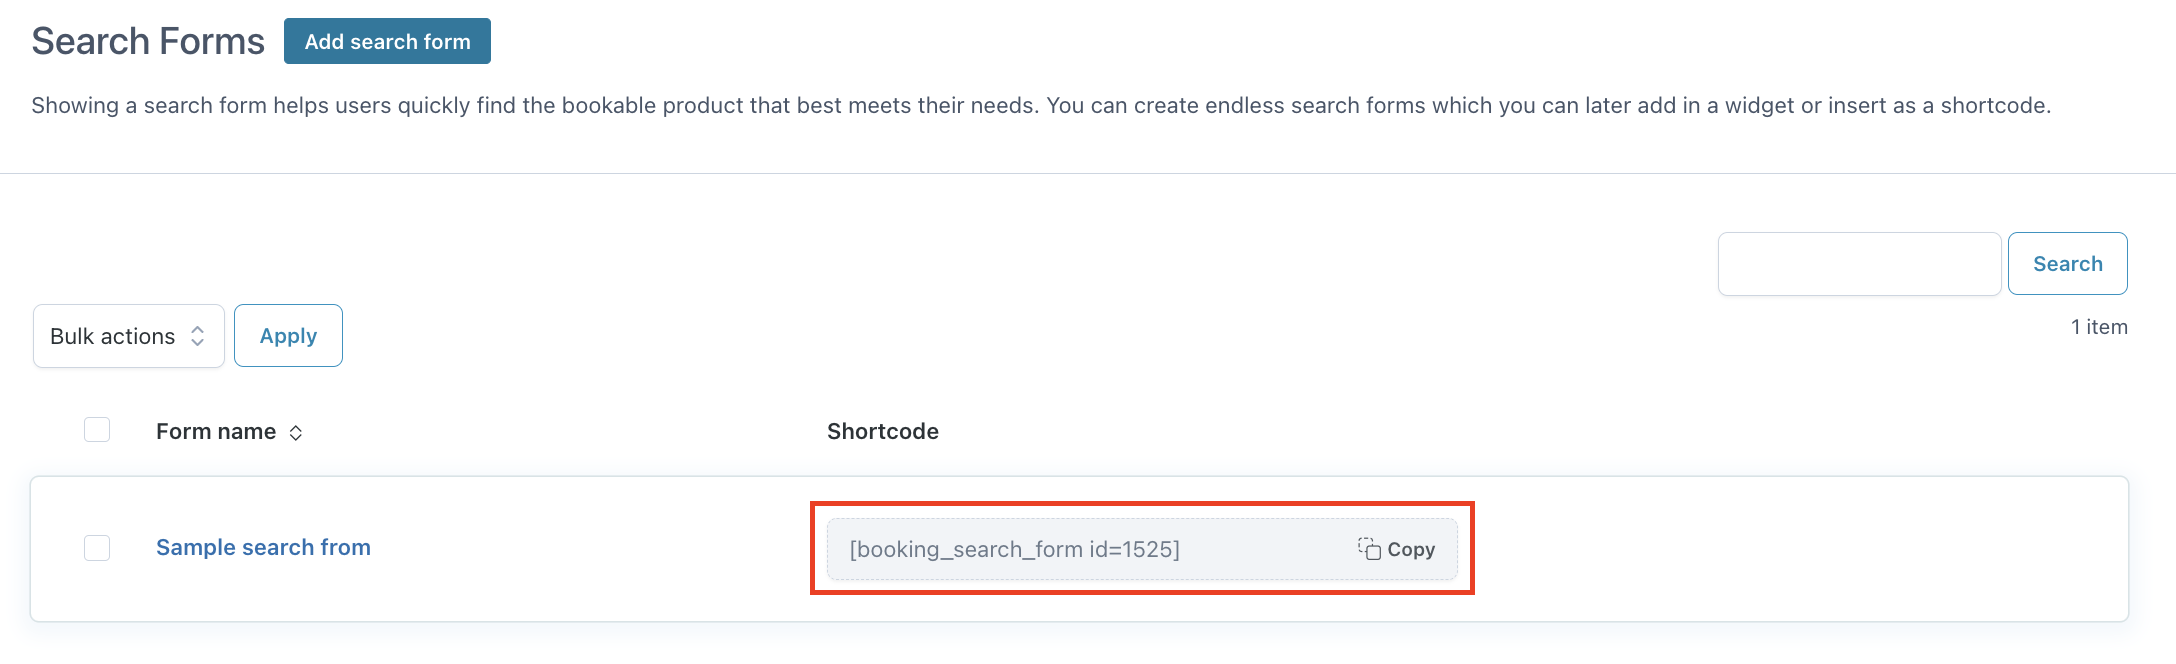
Once the search form has been created and saved, a shortcode will be generated to allow you to show the form on any page of your choice, using the Gutenberg block or the widget, or the created shortcode if your theme uses a custom builder, like Avada.
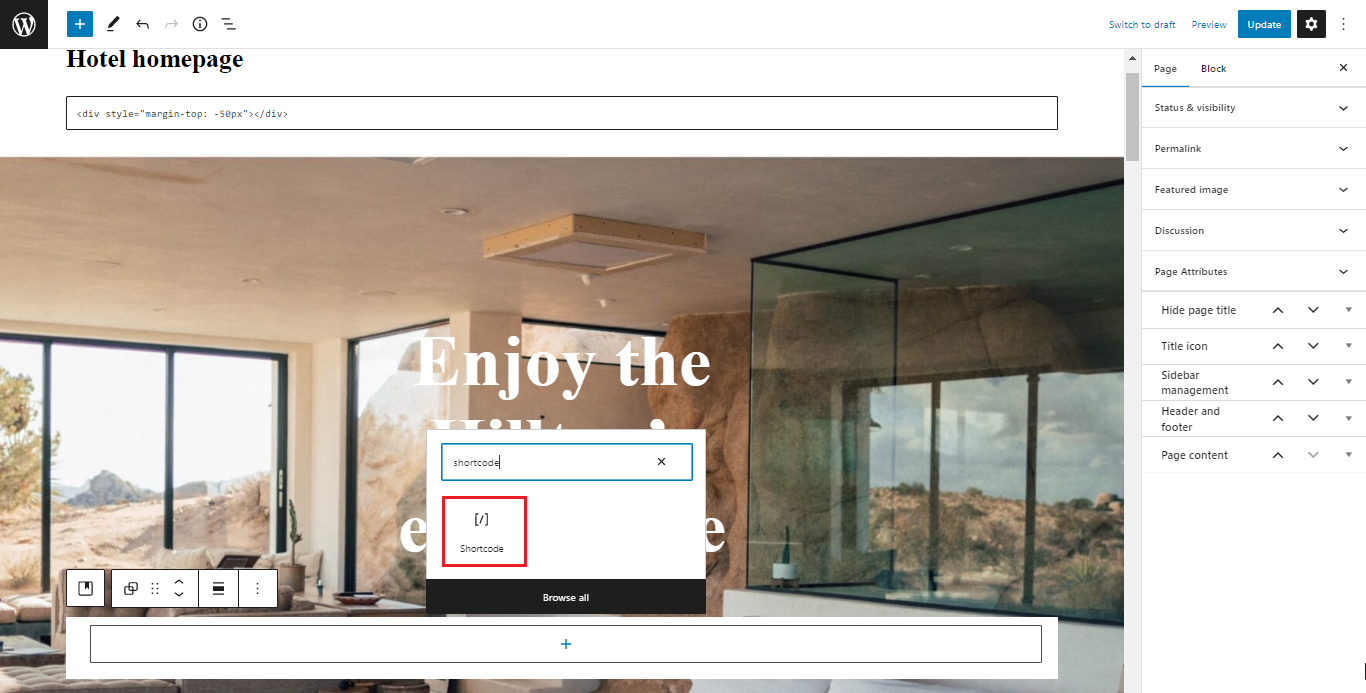
Let’s review how to add the form using Gutenberg. First, choose the page where you want to show the search form and open the edit page. Once inside, add a new block, select ‘shortcode’, and paste the shortcode generated for your form. After saving the changes, the form will be displayed on the frontend according to the settings configured:
Another option to show the search form is using the ‘Booking search form’ widget. In this case, from the page edit, you can select a specific sidebar to display the form:
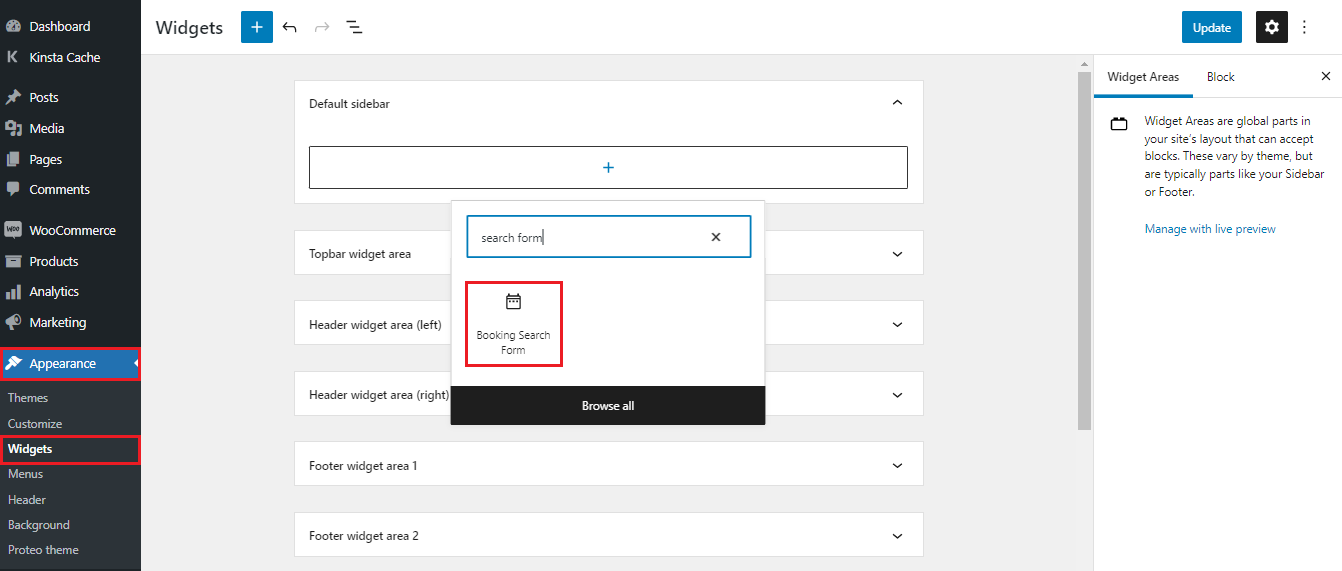
Then, you need to go to your WordPress dashboard > Appearance > Widgets, open the sidebar you have selected to show on the page, and insert the widget:
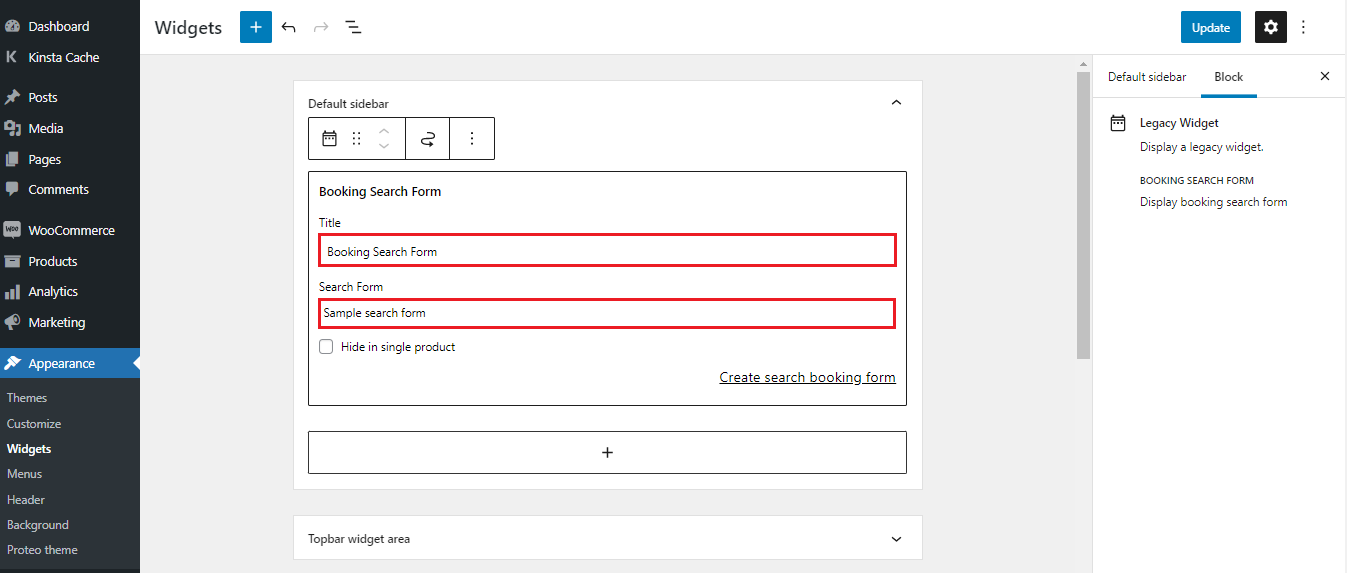
Now, you can set a title and select the search form to show:
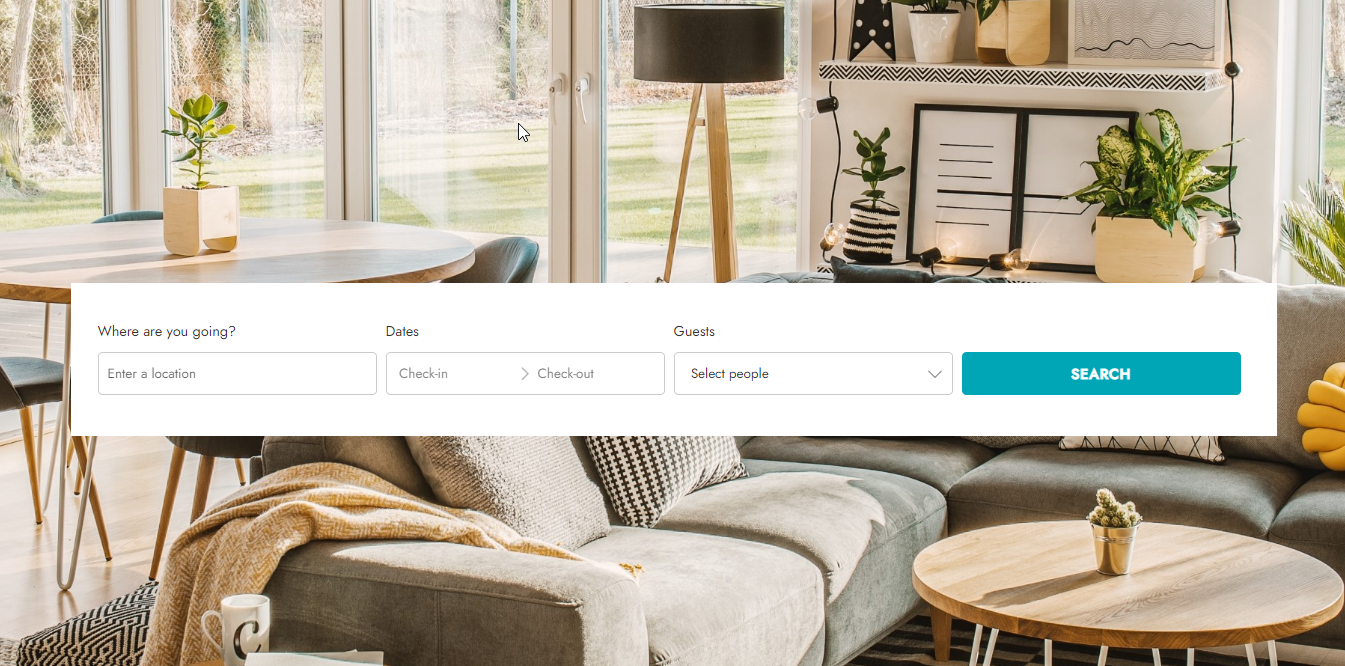
Finally, let’s see an example of a search form added using Gutenberg with 2 different layouts, vertical (1) and horizontal (2):
You can use the integration between YITH Booking and Appointment for WooCommerce and YITH WooCommerce Deposits / Down Payments to allow customers to pay a deposit when booking, instead of paying for the entire booking at once. Let’s see how to do it…
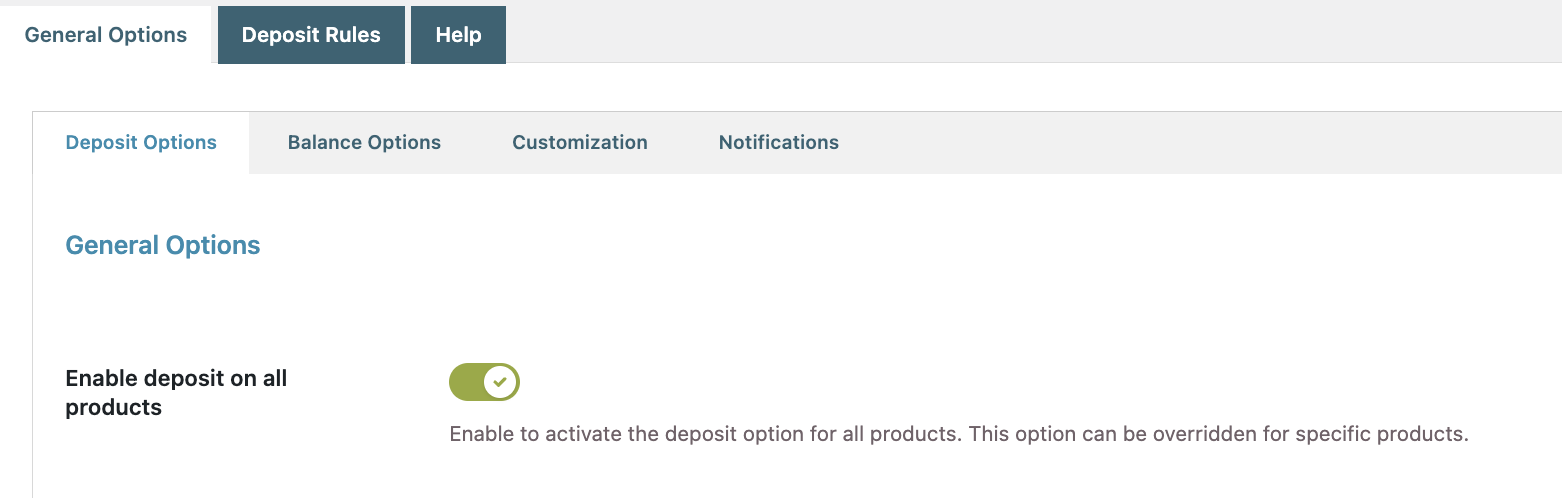
After installing and activating both plugins, make sure you enable the Deposits / Down Payments plugin features in your dashboard > Deposits / Down Payments > General Options > Deposit Options and configure the plugin (you can refer to this guide to learn how to do it):
In the same section, you can enter the default deposit for all of the products in your shop (of course, that option can be overridden at a product level). The deposit value can be set as a fixed amount or a percentage:
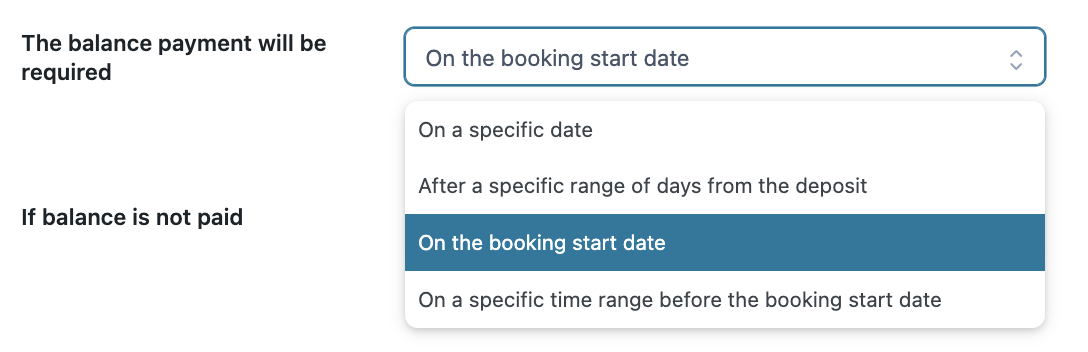
In the next subtab, Balance Options, you can enable the option to request the balance payment to customers. By doing so and thanks to the integration between both plugins, you’ll get a new option to decide when to request it. This is a great new feature already used by popular websites like Airbnb that request the balance payment seven days before the booking start date:
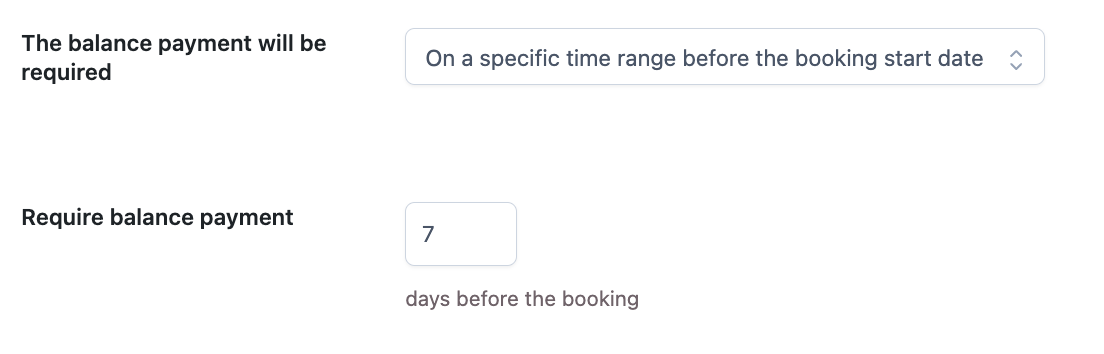
For example, if you choose to request the balance payment a specific time range before the booking start date, you’ll get a new option to enter the number of days before the booking to request that payment:
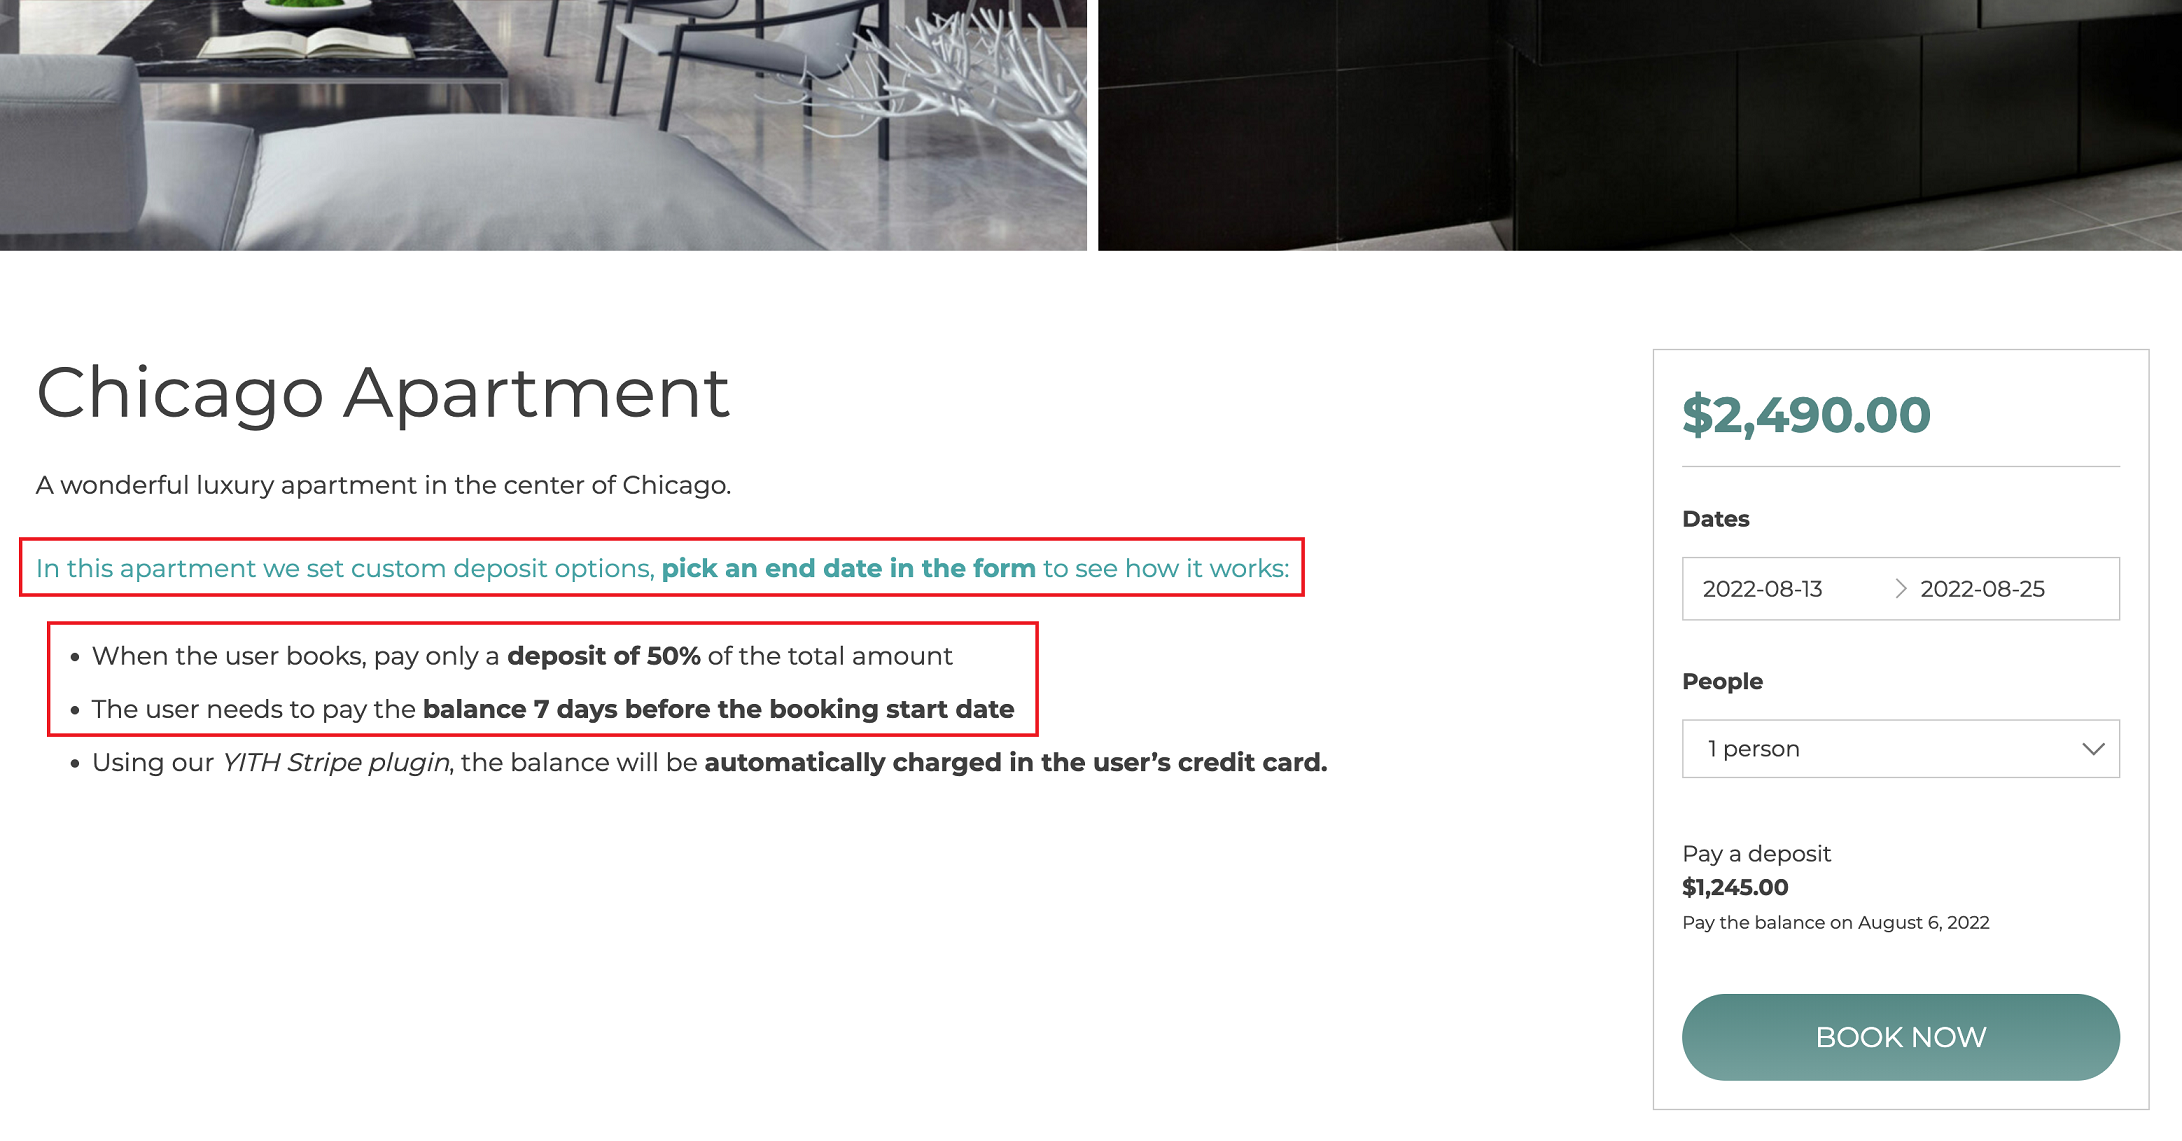
Once you’re done configuring the Deposit / Down Payments options, your customers will see the bookable products pages with the related information, that is, the deposit value and the timeframe to pay for the balance:
Finally, In YITH > Booking and Appointment > Settings > Cart & Orders, you’ll find a helpful option to decide when to mark the bookings as paid, either when the deposit is paid or when the balance is:
Let’s consider the example that you have a house near the beach and you want to rent it. The house has 3 rooms of the same type, a shared kitchen and bathroom. You want to rent it, but you’re happy with renting either single rooms or the whole house.
So, what’s the best way to set it up with your booking plugin?
We will need 3 resources and 2 products (one for the room, one for the house).
First of all, we will have to set up our resources. As the house is made of 3 rooms, each of which can be rented individually, we need to create one resource for each room.
So, let’s start with creating the resources first.
Resources
Go to YITH > Booking > Configuration > Resource and create a new resource.
We will call it Room 1, set an image, and set the availability 1.
We will not configure specific availability rules for this resource, because we will do that from the product settings.
Then, save and our resource is ready.
We will repeat the process for the other two rooms, Room 2 and Room 3.
Now, we can configure the two bookable products.
Product 1 – Rent a room
We are creating one product and we will give customers the possibility to select the room they prefer.
Open the product page, give it a title, then change the product type to “bookable product”.
Step 1 – booking settings
Then, from the Booking options > Settings tab, set the following:
Booking duration: customers can book units of 1 day.
Enable the calendar range picker.
Then, scroll down to the Booking terms section and configure the following:
Max bookings per unit: 0, which stands for unlimited, as the resources that we will associate will automatically restrict this availability value.
Minimum booking duration: 1 day (max is 0 for unlimited)
Min/max advance reservation 1 day and 1 year: so you can get bookings for the following day and not more than 1 in advance
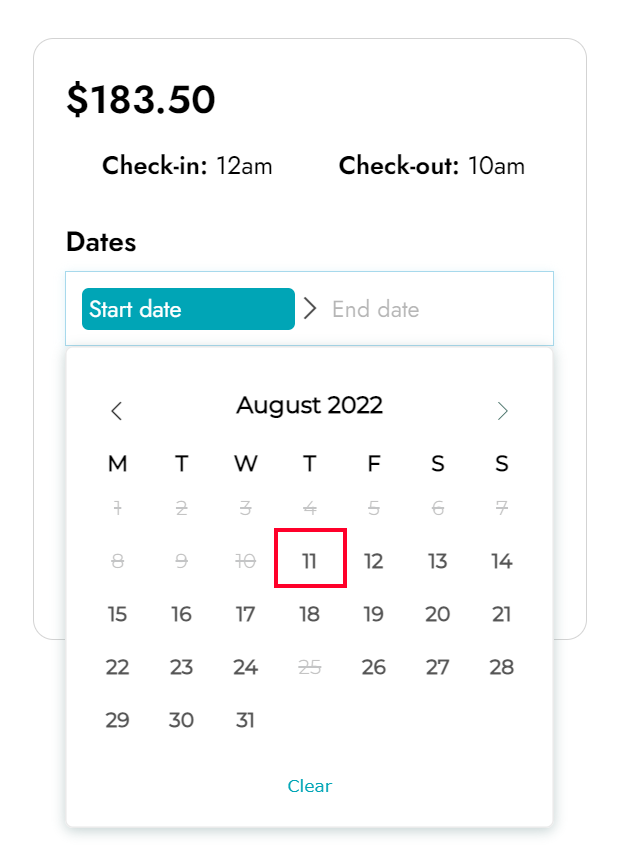
Check-in at 12 am and check-out at 10 am: to inform customers when they can access and have to leave the room.
Allow cancellation up to 7 days before the start date.
Step 2 – people
In the People section, we can enable a minimum of 1 person and a maximum of 2 people for this room. Even though we don’t want to charge any price difference based on the people, we will need this enabled to calculate the city tax correctly.
step 3 – costs
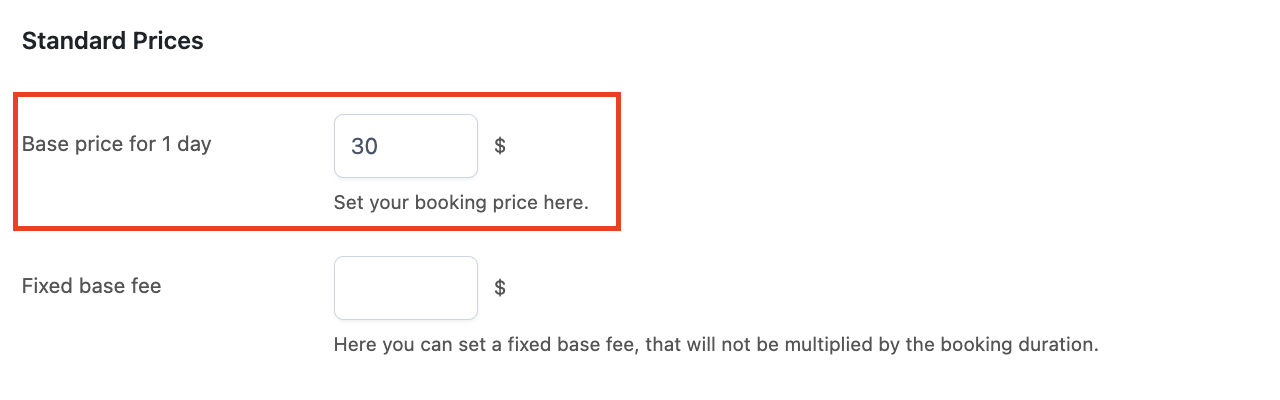
In the Costs section, we will set a base price per day of $90 (the multiply by people option is disabled as we don’t care if it’s one person or two).
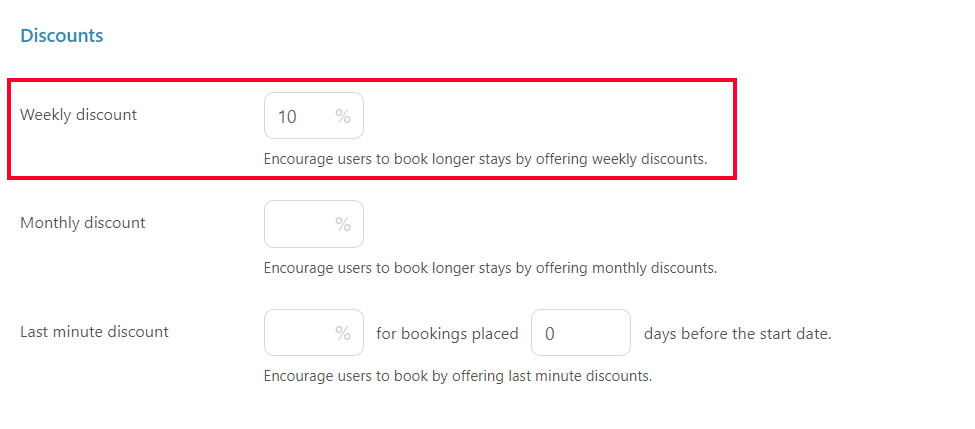
We want to encourage our guests to stay longer, so we offer a 10% discount on a weekly stay:
Finally, we need to charge a city tax of $2.50 per person per day, a fixed cleaning fee of $15 at the end of the stay and a daily cleaning fee of $4.
We can create these costs from the Configuration > Costs tab so they will automatically appear in every product in our site and we can set a price for each product and choose whether to charge them or not.
So, now in the product settings, we can set it up like this:
step 4 – availability
We want to rent the room only in summer, so make it available every day from 15th May to 30 September.
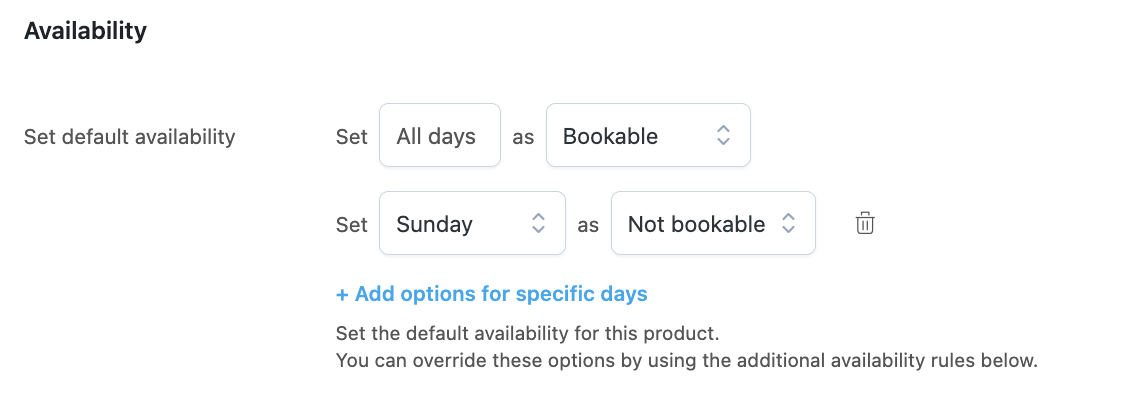
In the Availability section, we can set a default availability of all days as not bookable, as we will override these settings for Summer in an additional rule below, where 15 May to 30 September are set as bookable instead.
Step 5 – resources
From the Resource tab, we can enable the resources option and set it to Customer can select one resource, so he/she will be able to select one of the 3 rooms that we will add below.
We can also add a custom label to show on the frontend in the costs recap on the product page and in cart and checkout.
It’s important that we set the Required option, to prevent bookings without any resources selected.
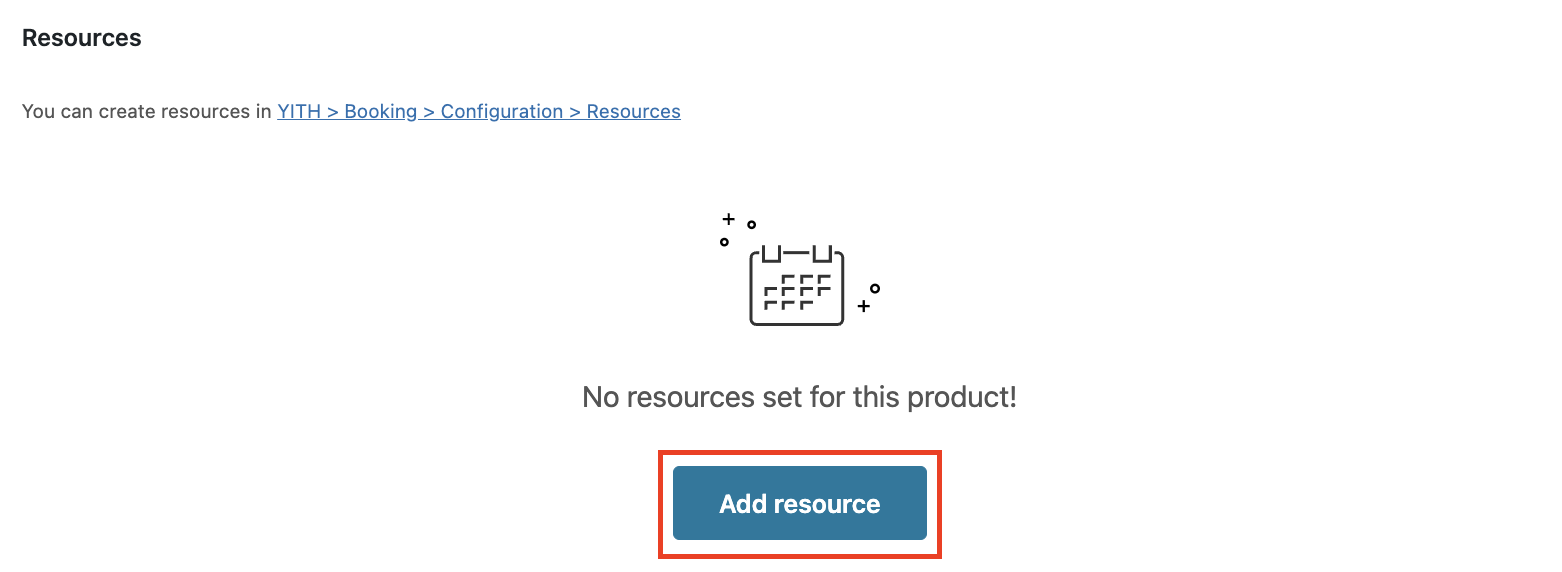
Now, we can add the resources to our product, from the section below, let’s click on Add resource.
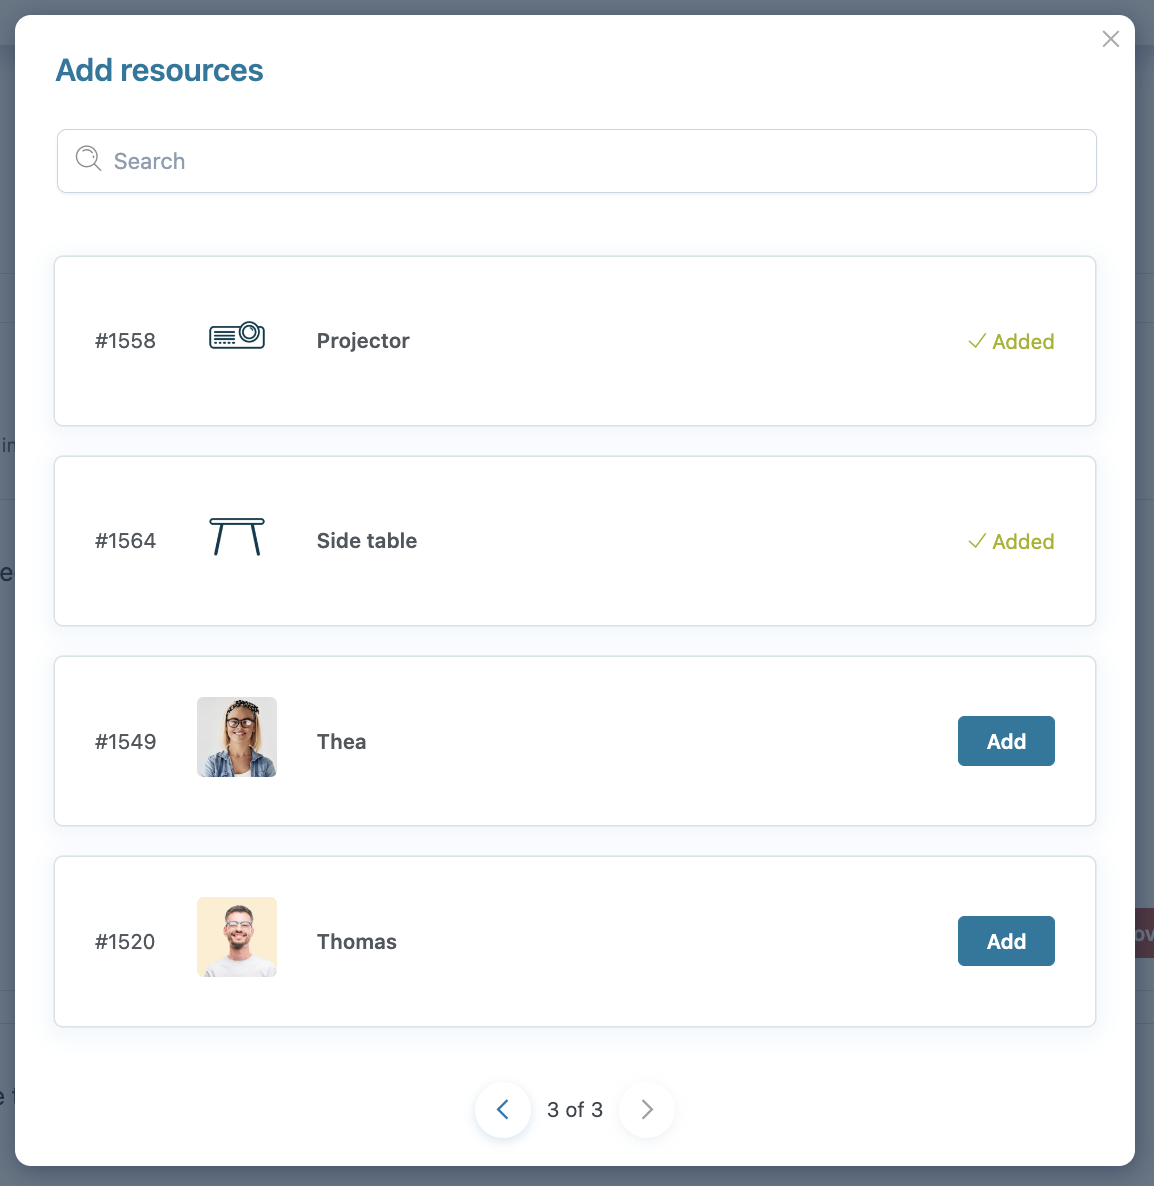
A modal window will open where we can select the three rooms:
We need to add a +$20 surcharge for Room 2 per night, which has direct access to the beach, so in the resource settings, we will add a $20 cost per day. We will leave other rooms without costs, so the base product price will be charged.
Let’s save the product, and we’ve got our room product, where we can select one of the three rooms available and all the additional costs will be added as well.
Product 2 – Whole house
We can now create the second product, the whole house.
Again, like for the room, we can set the product to bookable product and configure the booking settings as for the Room in step 1.
We will have different settings in the other steps though.
Step 2 – people
In the People section, we can enable a minimum of 1 person and a maximum of 6 people, because we can have a maximum of 2 guests per room.
step 3 – costs
In the Costs section, we will set a base price of $150 per day. Even though we don’t want to charge any price difference based on the people, we will need this enabled to calculate the city tax correctly.
Also, in this case, we want to encourage our guests to stay longer, so we offer a 10% discount on a weekly stay:
Finally, we need to charge a city tax of $2.50 per person per day, a fixed cleaning fee of $25 for the whole house at the end of the stay and a daily cleaning fee of $6.
As we have already created the costs globally, we will be able to find them already in the product, and simply adjust the cost and settings, like this:
step 4 – availability
The availability settings will be the same as the single room, as we want to rent the house only in summer, from 15th May to 30 September.
Step 5 – resources
From the Resource tab, we can enable the resources option and set it to Assign all resources because we need all rooms to be booked with this booking.
We can also add a custom label to show on the frontend in the costs recap on the product page and in cart and checkout.
Now, we can add the resource to our product, from the section below, let’s click on Add resource and let’s add the three rooms.
In this case, as we’ve already set a global price for the whole house, we will not need to increase the price of Room 2, so we’ll not add any extra costs in the resource settings.
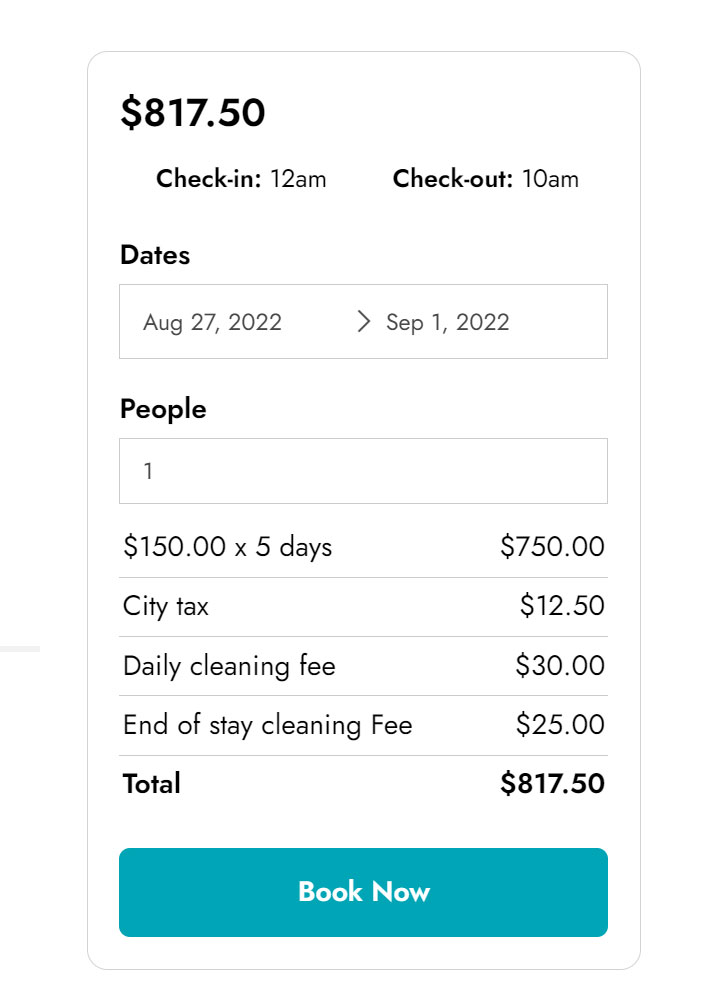
Let’s save the product, and we’ve got our house product. We can select the dates and the plugin will automatically assign the three resources and all the related costs to this booking.
Resource availability sync
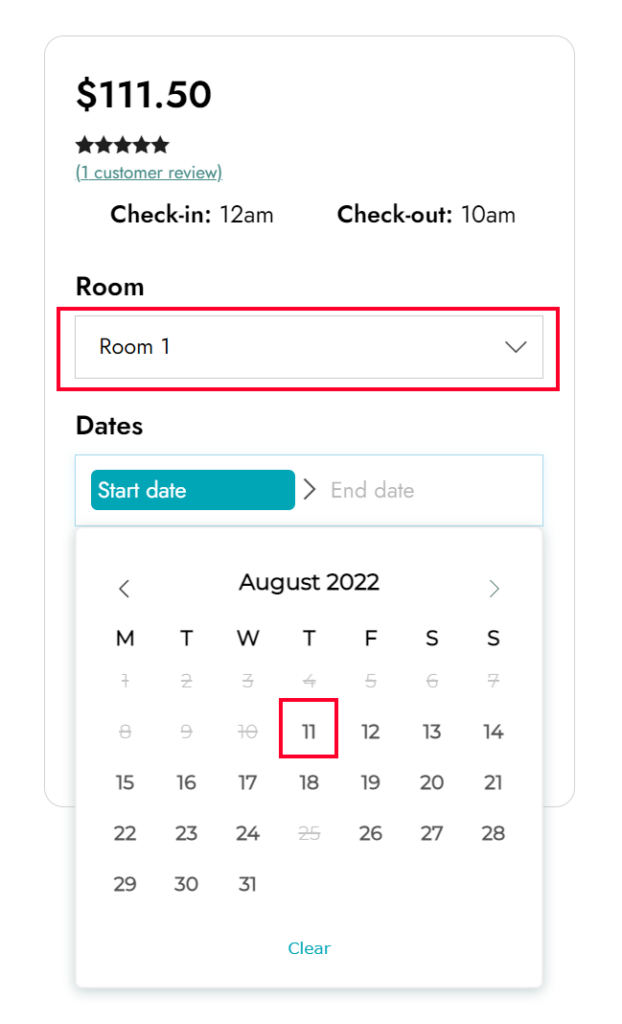
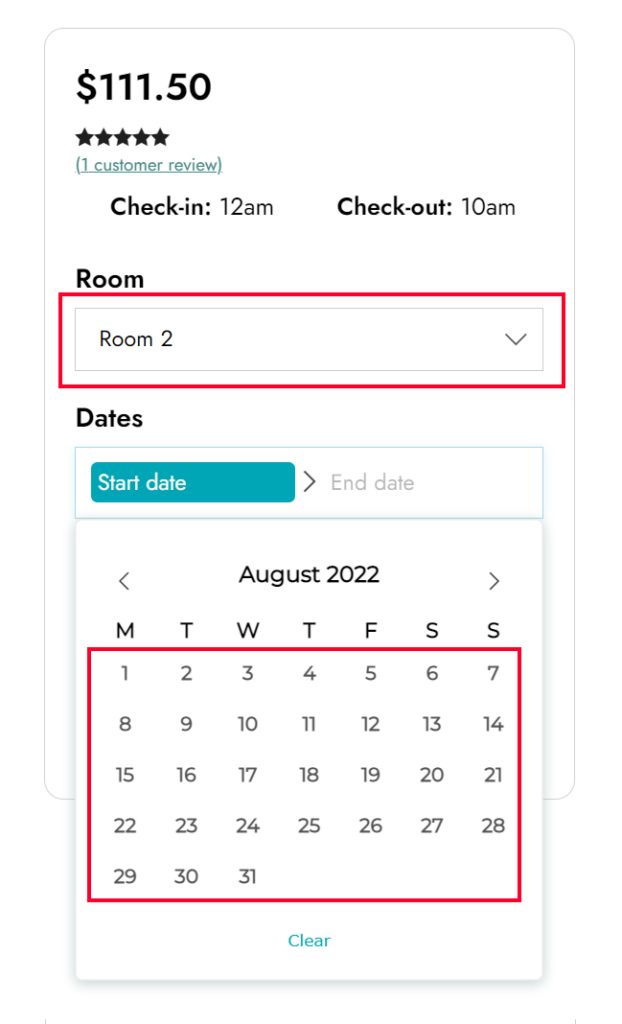
Let’s check the availability of the two products after we book Room 1 from July 31 – August 11.
Room product availability: this will be different based on the selected room. Room 1 is not available, whereas Room 2 and Room 3 will still be available for those dates.
Whole house availability: the house is no longer available on those days, because it needs all resources to be free to be booked. The first available date is then August 11.
Vice versa, if we book the house from August 12 to 15, though, all resources will be booked, and therefore no room will be available for those days.
Alternative settings for single rooms
In case you want to customize the single rooms, you can consider creating 3 different products, one for each room, so you can have:
an image gallery for each room
custom services for each room, like air conditioning, fridge, security lock etc.
custom people settings, like adding a child with no extra fees
etc.
In this case, you should create one product for each room and make sure that in the Resources section, you set only 1 room and the assignment to Assign all resources.
The settings of the Whole house product will be the same, though.
Do you have a hair salon and want to set up your booking system online? Do you want to list there all the services that you provide (hair cutting, coloring, highlighting, styling etc.) and let your users choose the date and time? Do you also want to give them the opportunity to choose among your staff members who may have different expertise (and prices) and time schedules?
That’s possible and easy with our YITH Booking and Appointment plugin. Let’s set up this specific use case together.
First of all, we have to clarify that:
staff members (the stylers) are Resources and
each service provided has to be a different bookable product.
Let’s start with the Resources configuration first, so make sure the Resources module has been enabled from YITH > Booking > Modules.
Resources
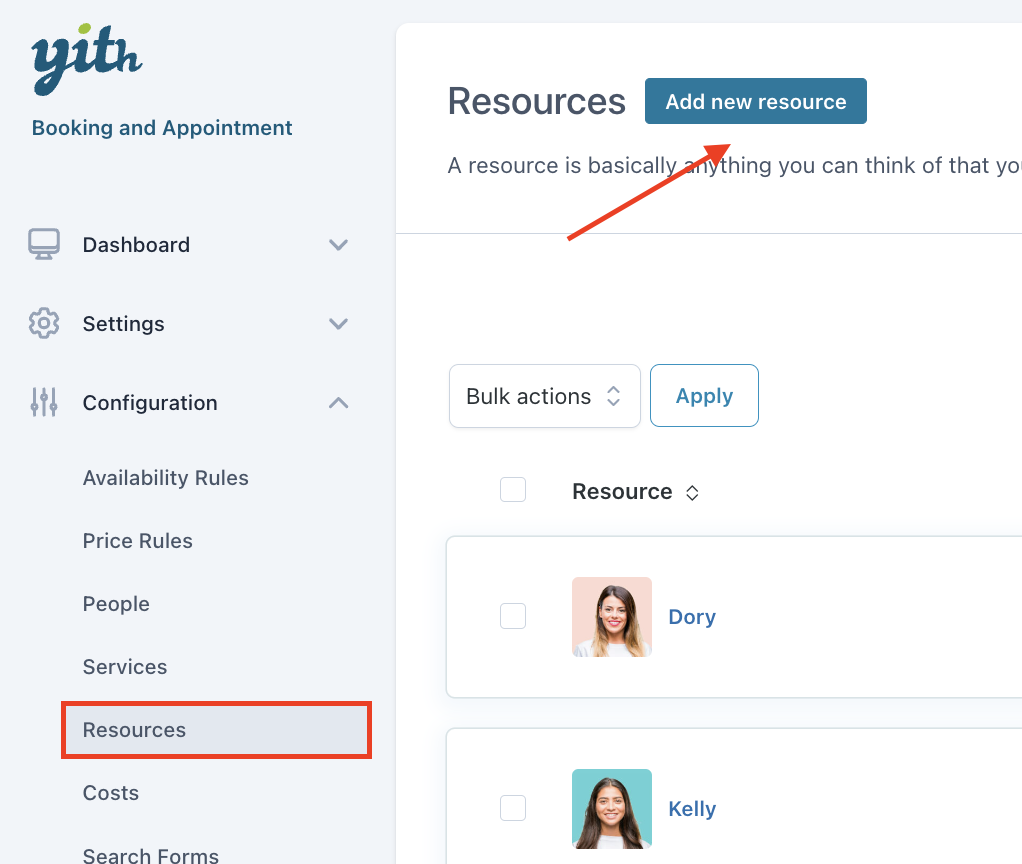
Let’s go to YITH > Booking > Configuration > Resources where we will create one resource for each of our hair stylists.
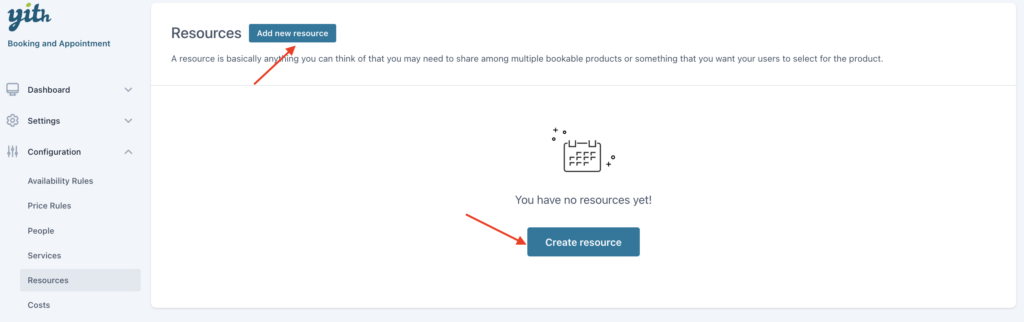
Let’s click on Add new resource.
Then, in the first step, let’s add the stylist’s name, picture, and set the availability quantity to 1.
Now, in Set default availability, we can configure Thomas’ shifts:
Monday
9:00 – 14:00
Tuesday
9:00 – 14:00
Wednesday
OFF
Thursday
9:00 – 14:00
Friday
9:00 – 14:00
Saturday
8:00 – 15:00
Sunday
all day (same hours as the salon)
So, we will create a first rule for all days bookable from 9:00 to 14:00 and we override these settings with one rule for every day that is different, so Wednesday, Saturday and Sunday.
Let’s save this resource and let’s add all other staff members.
Dory is available from every day 8:00 – 15:00, except for Mondays and Saturdays.
Kelly is available every day with the same opening hours as the salon, except for Monday and Saturday.
We can now move on to bookable products.
Products
We can now create one bookable product for each service that we offer in our hair salon. Products may have different duration and all of them will share the same resources (hair stylists), so, their availability will automatically be synced.
We offer, for example:
Hair color: 2 hours
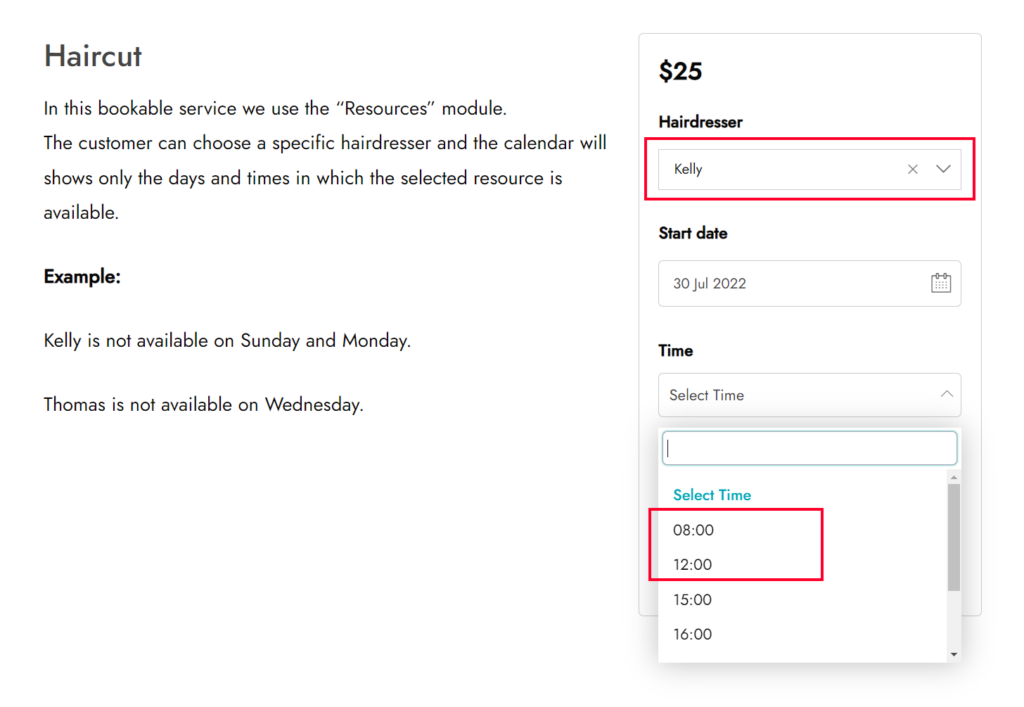
Haircut: 1 hour
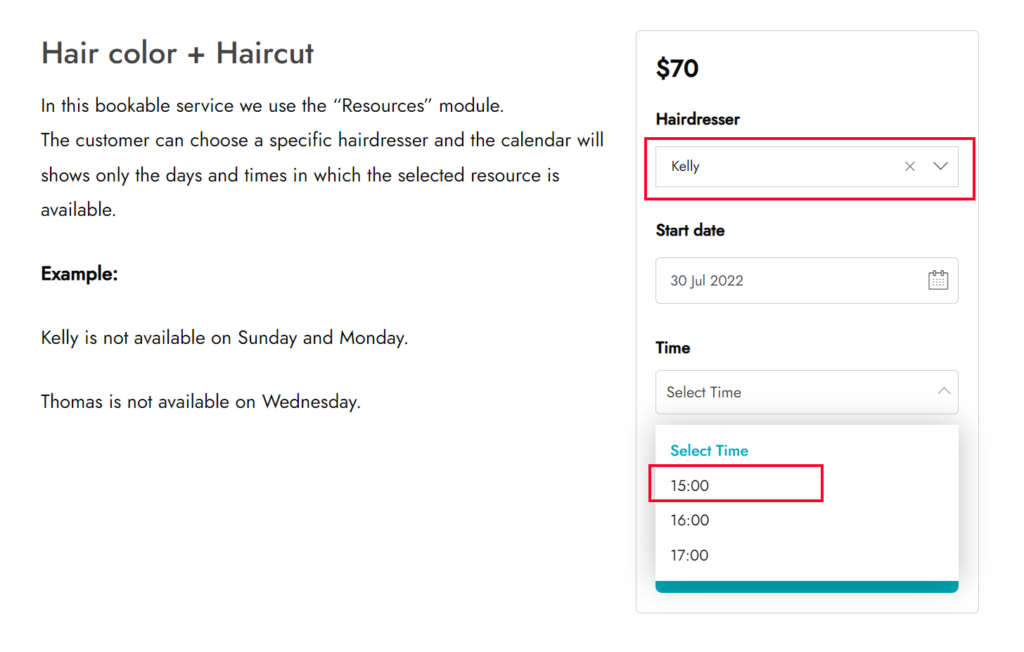
Hair color + hair cut: 3 hours.
Let’s see the product settings and start with the Hair color product.
Step 1 — settings
in the Booking settings tab, we will set fixed units of 2 hours and make sure that the customer will automatically see the first available option of the following day selected.
Additionally, let’s scroll down a bit to the Booking terms section. We want customers to be able to book this service based on how many hairdressers are available. As we’ve already set availability to 1 in each hairdresser, we can set it to 0 (=unlimited) here, so the plugin will automatically consider only the resource availability. Setting it to 0 will make the plugin faster on the front end.
On the other hand, if we only have 2 seats in our salon available for this service and we need to restrict this to a maximum of 2 bookings at the same time, we can set the Max bookings per unit to 2. With this setting, even if there are 3 hairdressers who can offer this service, a maximum of 2 can be booked.
step 2 — costs
In the Costs section, we can set the price of $50.
step 3 — Availability
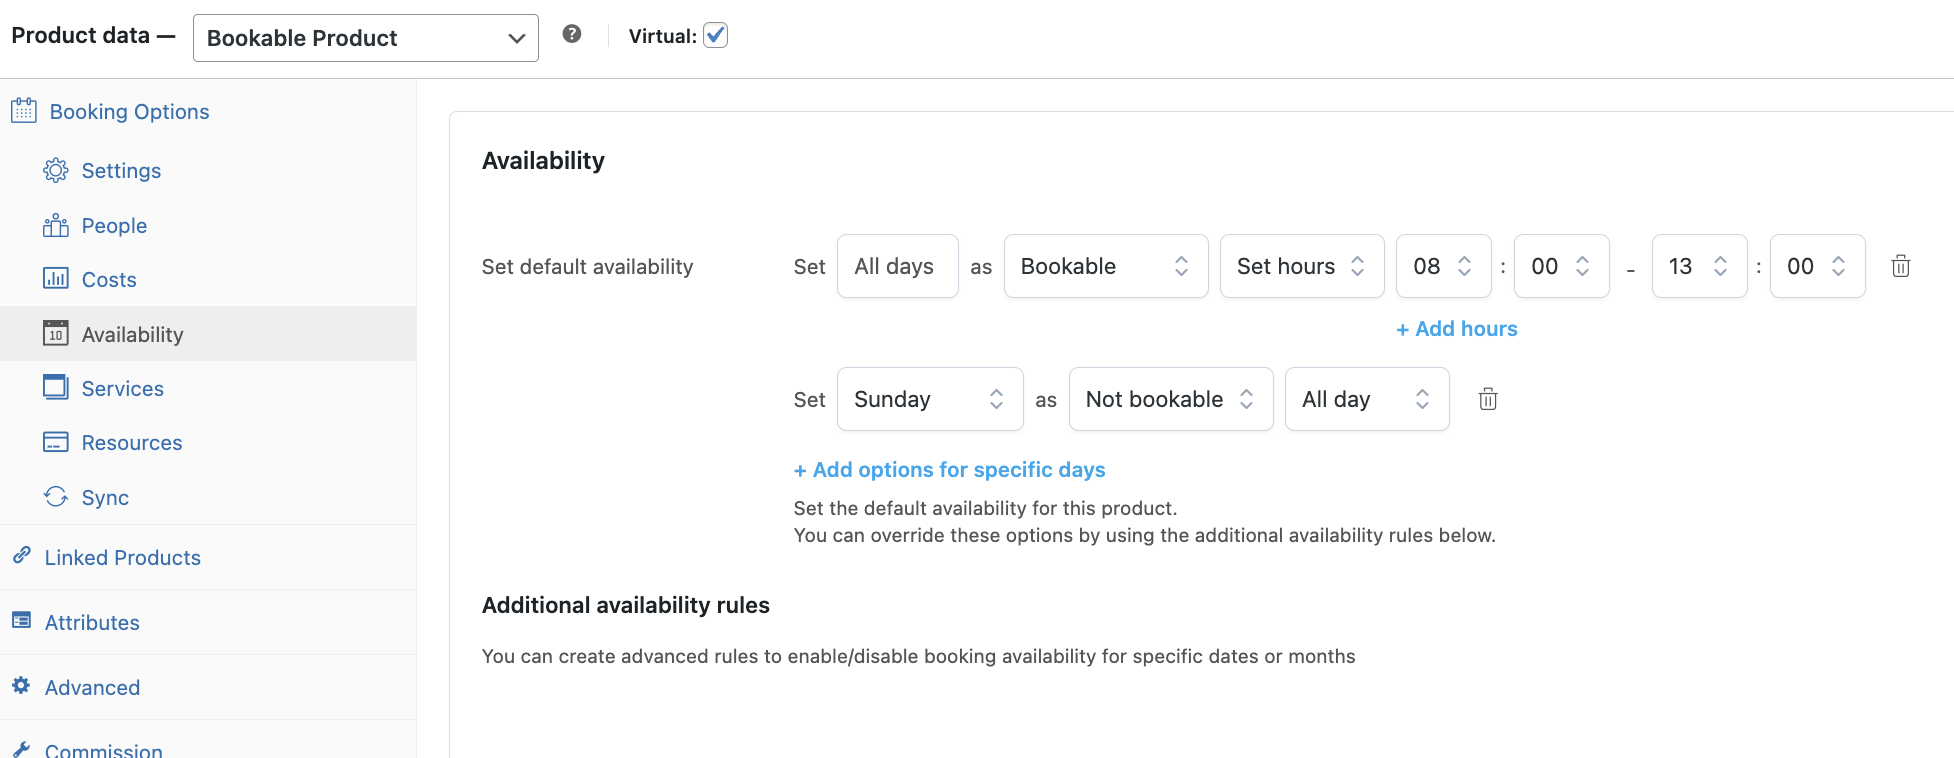
In the Availability section, we can set the time when this service is available, which basically corresponds to the salon’s opening times: every day 8:00 to 13:00 and 15:00 to 20:00 except for Mondays and Sundays.
This availability will automatically be merged with our resources’ availability, so the customer will only see time slots when at least one of the stylists is available.
Step 4 — Resources
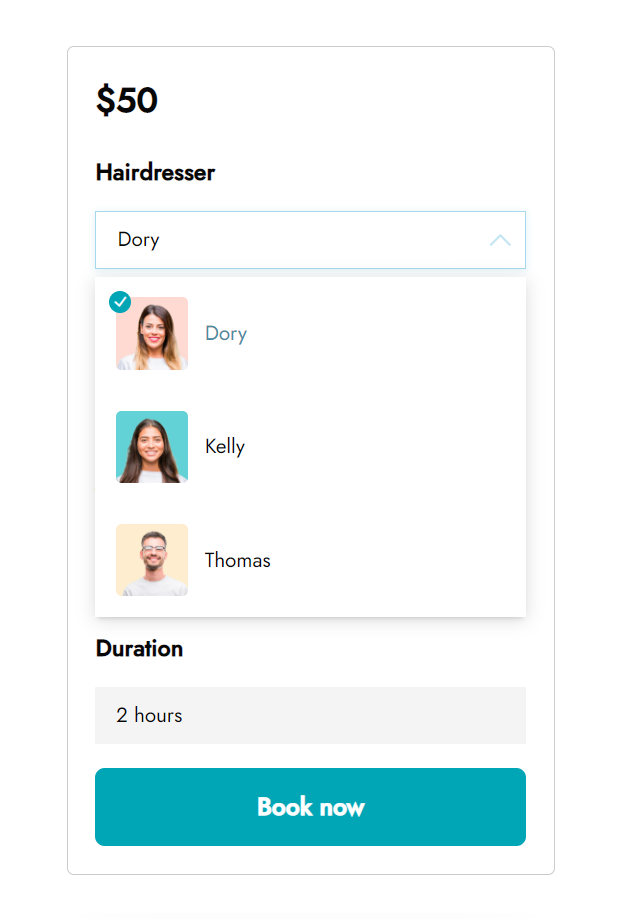
From the Resources tab, we can enable the resources and set the Resource assignment to Customer can select one resource. This way, customers will be able to choose the hairdresser first and then will see the availability.
Additionally, in the label, we will set the name that we want to show on the frontend before the resource dropdown.
And the Required option is enabled because in this way at least one of the stylists’ availability will be blocked.
1. Choose hairdresser
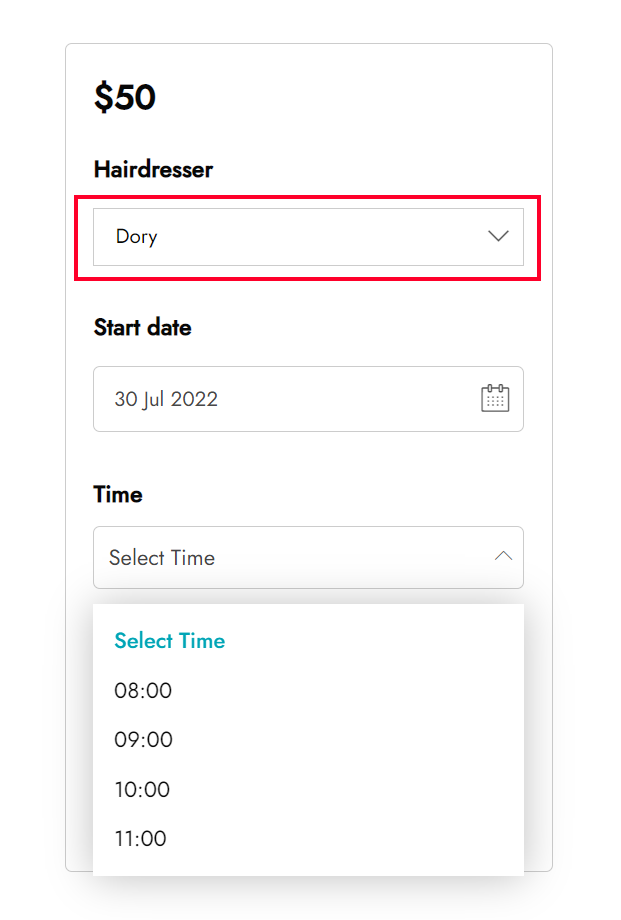
2. Set product and hairdresser availability
Availability sync
Similarly, I can set the other products, but make sure I change the time slot duration, which is different for each service. For example, the Hair color + hair cut has a 3-hour duration.
In this way, if I book a Hair color + cut with Kelly at 9:00, she will be busy for 3 hours, so until 12:00.
After booking this service, her availability will be updated in all the products where she’s been added as a resource.
Let’s consider that the salon closes at 13:00 and opens again at 15:00. So, even if she’s available from 8:00 to 9:00 and from 12:00 to 13:00, these time slots are not enough to book both a hair color and cut (3 hours). Therefore, her first available time slot for this product will be at 15:00.
Yet, she will appear as available at 8:00 and at 12:00 in the Hair Cut product, which lasts 1 hour.
In this tutorial, we want to focus on fitness session booking, where besides date and time, the customer can also choose:
the duration of the session
the trainer (and opt for the expert one at a higher cost)
We will also focus on an alternative where the trainer will be automatically assigned, instead of being chosen by the customer.
We’ll create one resource for each trainer and one product for the fitness session, where we will link the resources.
Let’s start then.
Resources
Let’s start with the resources’ configuration, so we can set each trainer’s availability.
Let’s go to YITH > Booking > Configuration > Resources and click on “Add new resource”.
Let’s call it with the trainer’s name, Jimmy in this case, set availability quantity to 1, and set his working days as available every day except for Mondays, his weekly day off.
As Jimmy is available for the whole day, we don’t have to set up specific hours here, we will set hours in the fitness session product, which will automatically restrict Jimmy’s availability as well.
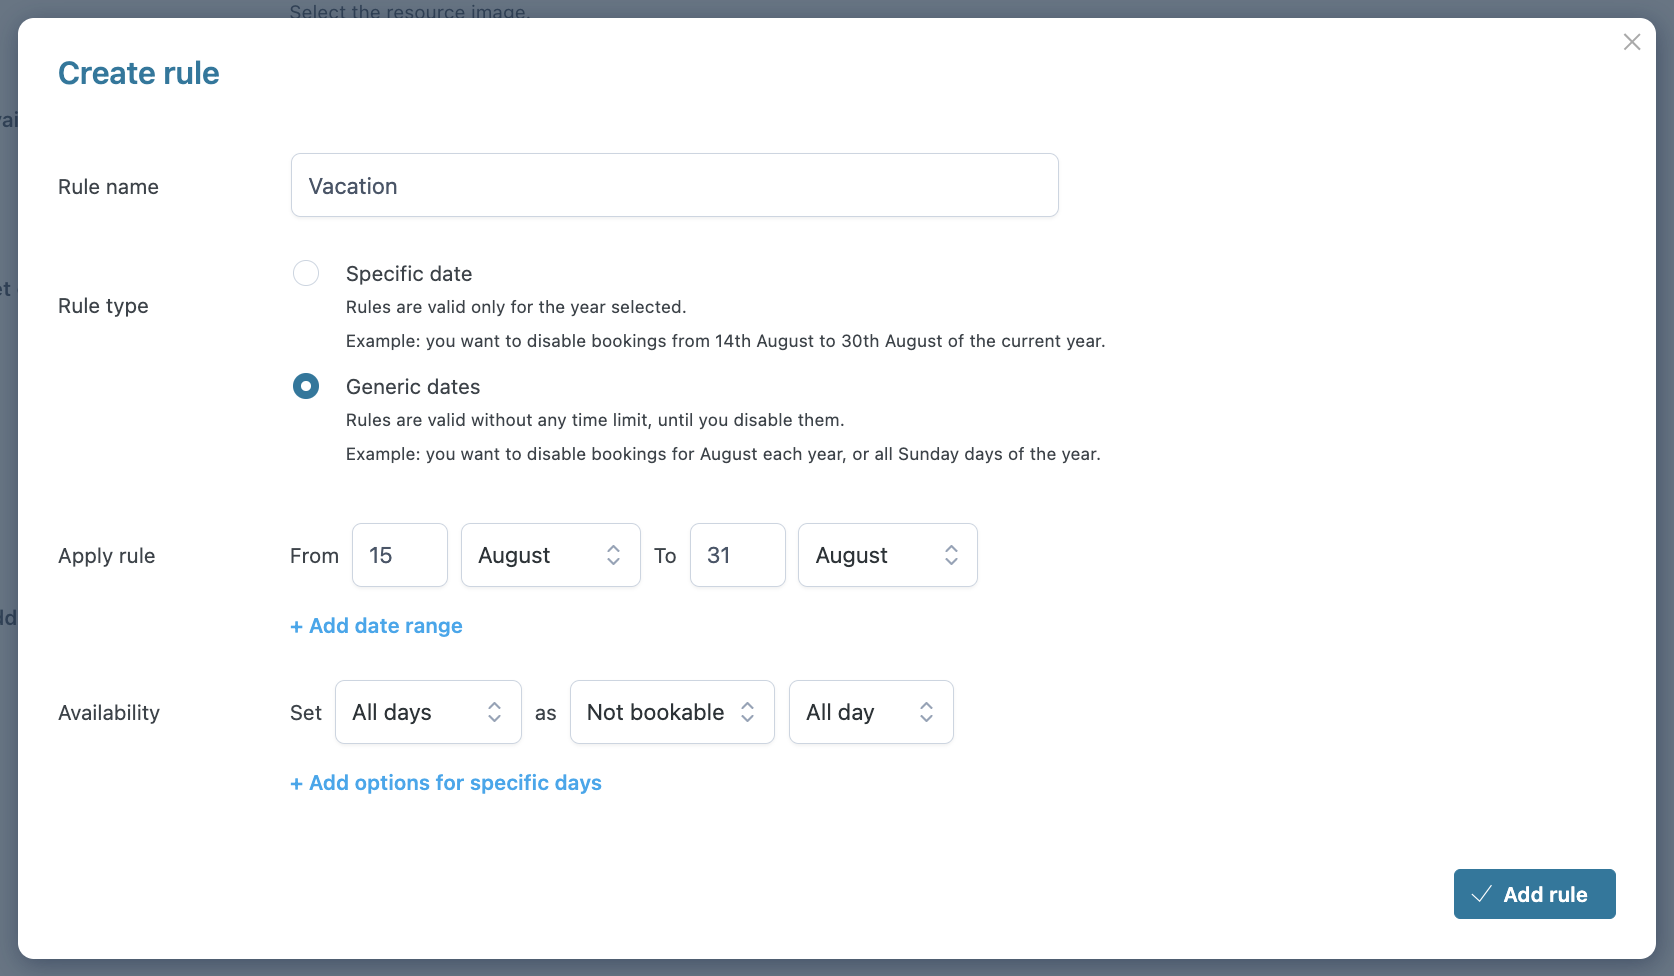
We will add some more extra rules for his vacation for August 15-31. Let’s click on +Add rule in the Additional availability rules, then set the rule type to Generic dates and add the time range. We’ll set these days as Not bookable.
We’ll set the other trainers similarly, but with different days off and vacations.
Product
Let’s move on now to the product settings.
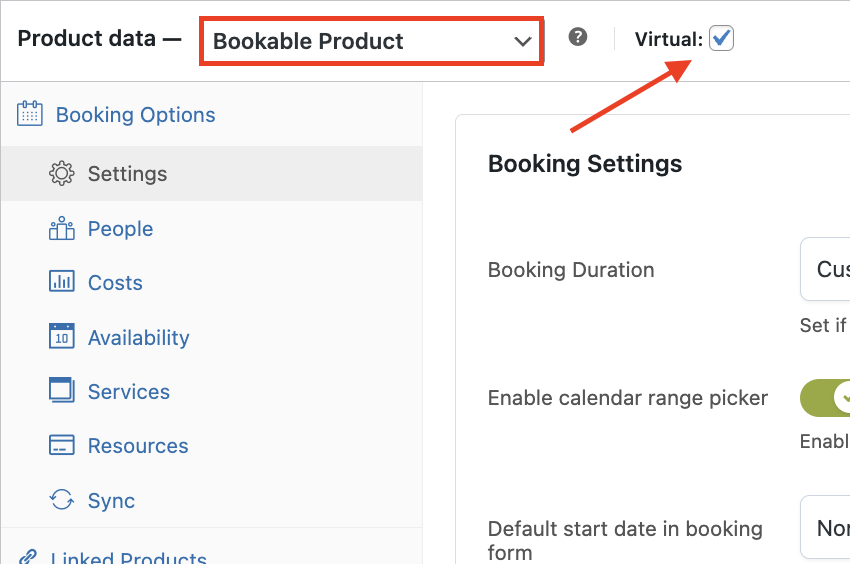
We can create a new product, give it a name, and set it to “bookable product” and “virtual“:
Now, you’ll see the Booking Options tab where you can add all your settings. If you can’t see one or more of the sections, make sure you have activated the related module as explained here.
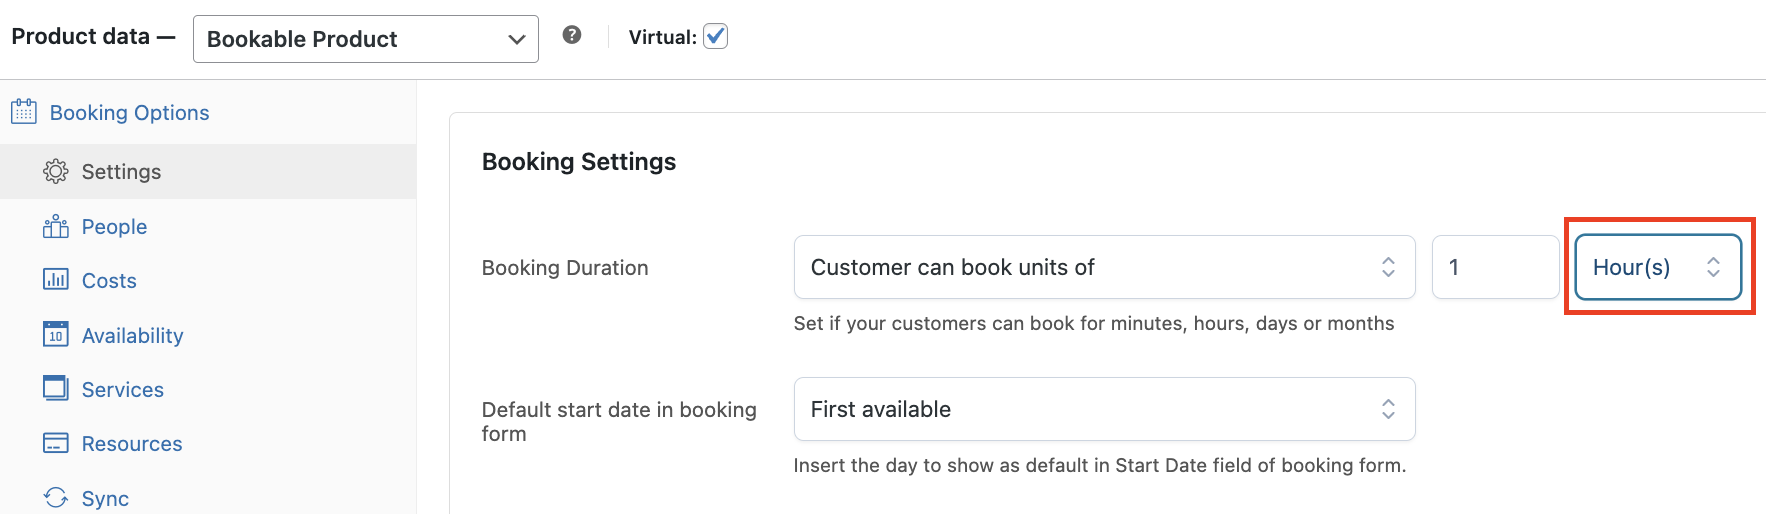
Step 1 — settings
In the Settings section, we will set the booking duration as Customer can book units of 1 hour, because our sessions by default lasts one hour.
Then, let’s scroll down to the Booking terms.
Here we’ll set up maximum bookings per units to 0, that stands for unlimited. Yet, this value will be further restricted by the resources’ availability, so, only free slots with at least one resource will be available.
Additionally, as we want to offer the opportunity to extend the session to a maximum of 3 hours, we will set a minimum booking duration to 1 and maximum to 3.
Step 2 — costs
In the Costs tab, we can set a base price of $30 per hour.
Yet, for customers who book a 3-hour session, we want to offer a 10% discount, so instead of $90, they would pay $81. For this, we can scroll down and add an advanced price rule based on the duration unit, as you can see below:
step 3 — Availability
In the Availability section, we will set the gym opening hours, so every day from 8:00 to 13:00 and 15:00 to 20:00 except for Sundays.
Step 4 — Resources
Let’s set up the Resources now, so our trainers. First of all, we have to enable the toggle button, then set the Resource assignment to Customer can select one resource and enable the Required option, so no bookings can be submitted without a trainer.
We can also set the labels as we want them to appear on the cart and in totals and on the product page.
Now, we can scroll down and finally add the resources, click on Add resource and select all the trainers who can offer this fitness session.
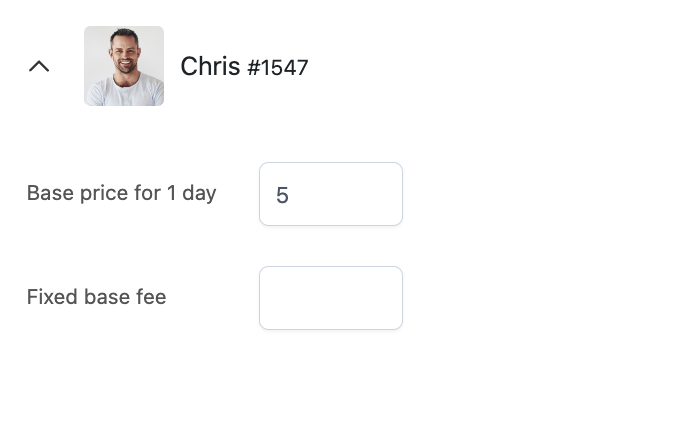
For the expert trainers, we can add an extra cost in the resource settings, for example, we will add an extra cost of $5 for Chris and Jane.
And that’s it!
Let’s check our product on the front end then.
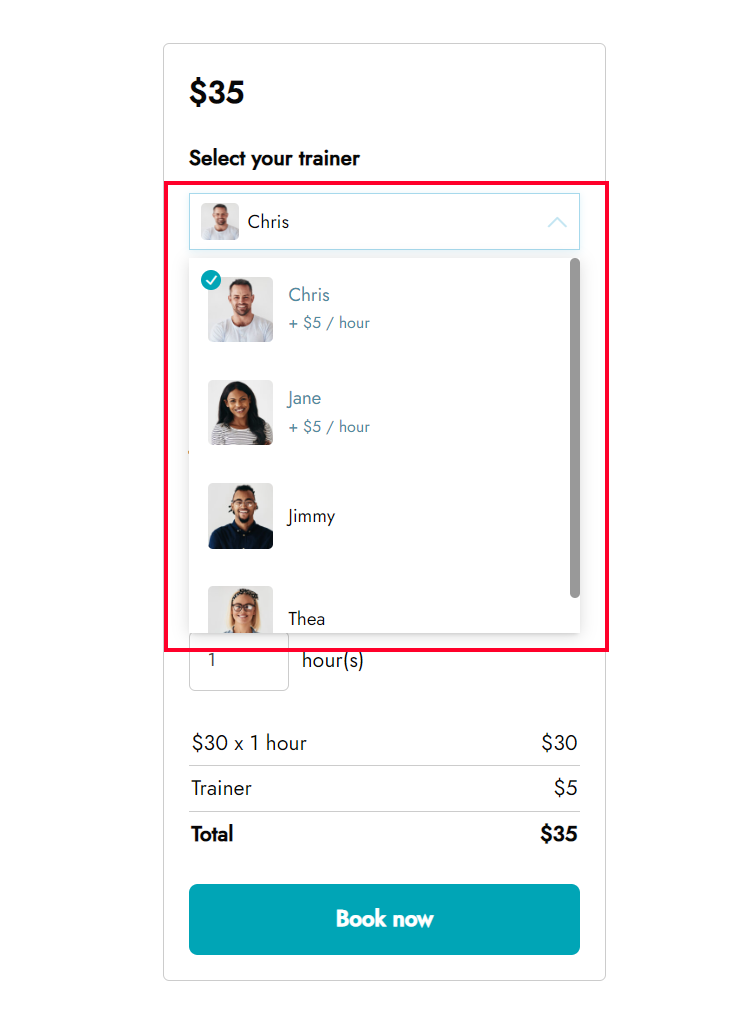
The customer will be asked to select the trainer first. Here I’ll be able to see the extra price for expert trainers.
Then, choose the date and time and the session duration.
Based on the resource and the duration, the calendar availability will be automatically updated.
For example, if I select Jimmy, who is on vacation from August 15 to 31, I will not see those dates visible in the calendar.
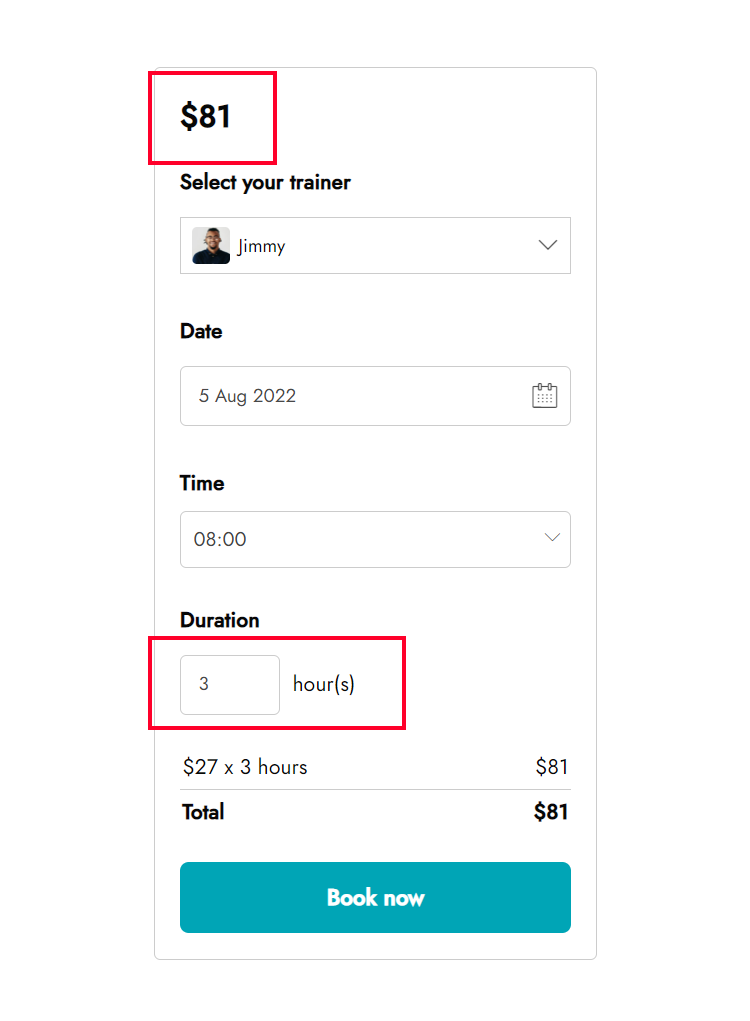
Also, if I want to book a 3-hour session, the only available times in the morning are 8:00, 9:00 and 10:00, because the gym closes at 13:00.
Finally, for a 3-hour session, I can also see the price discounted by a 10%, so pay $81 instead of $90.
Setting up a bookable product has never been so easy. Have fun!
In this tutorial, we’ll consider the case of renting a conference room for events. Specifically, we want to rent the room either for half day (morning or afternoon) or for the entire day. In the latter case, we want to offer the possibility to rent it for multiple days.
So, for this specific case, we will need to create one resource (the room) that is shared among two products, one for half-day bookings, and the other one for one or more days.
Let’s start!
Resources
First of all, let’s configure the resource, the room, from YITH > Booking > Configuration > Resources and let’s create a new one.
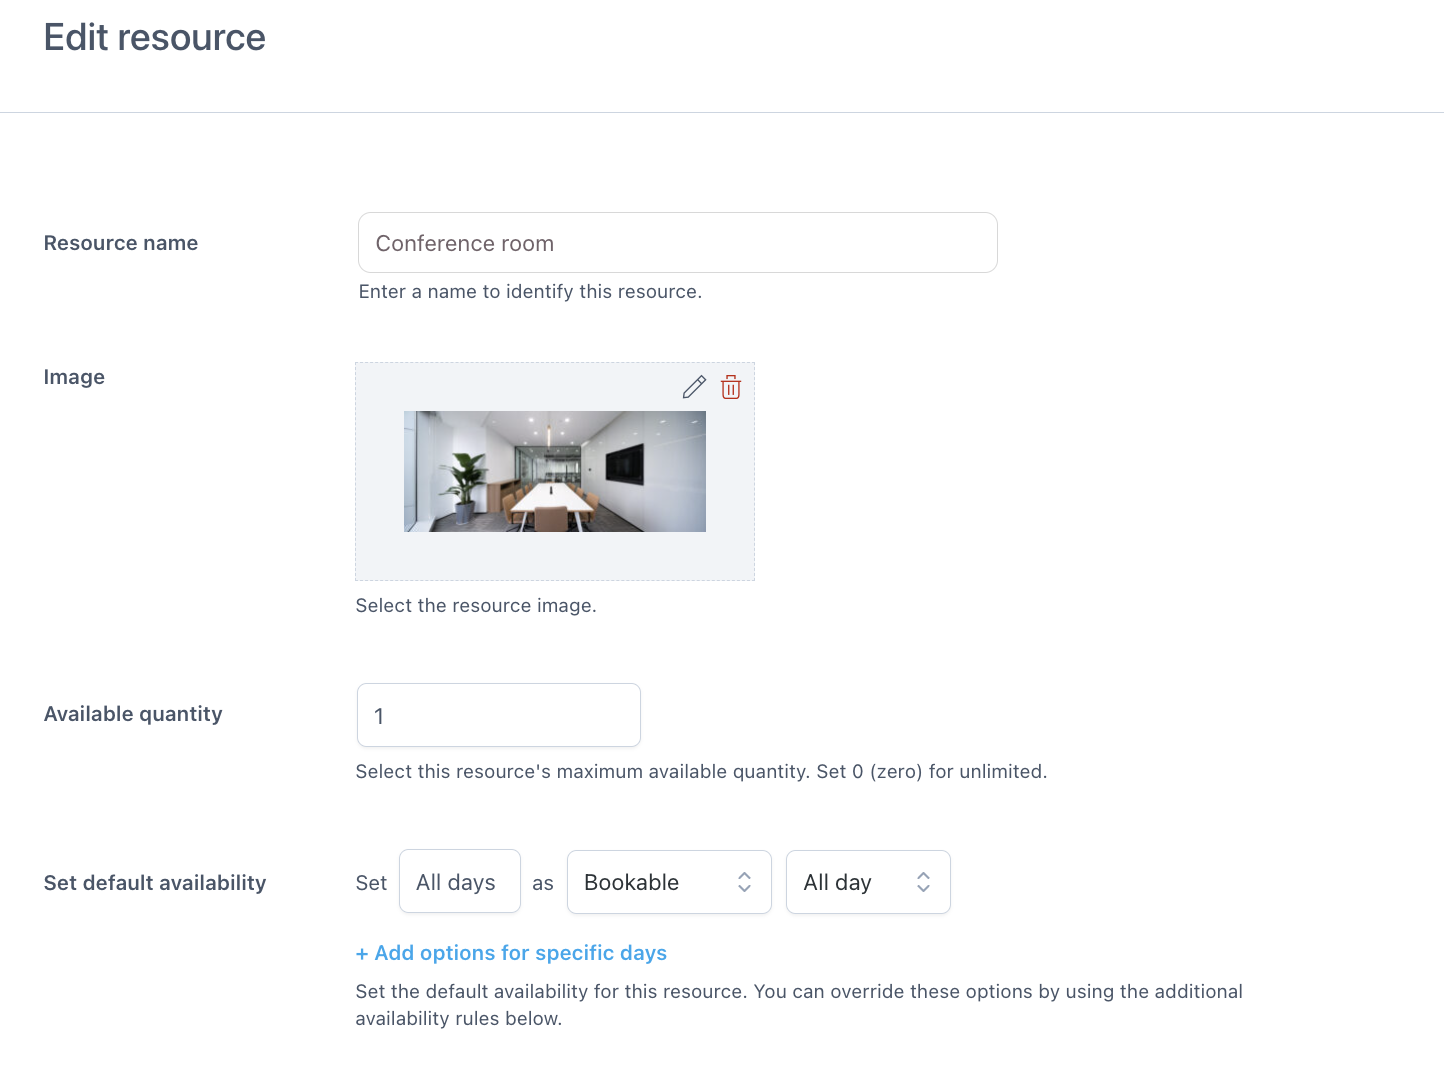
We can call it “Conference room”, add an image, set the quantity to 1 and leave the availability settings as by default, as bookable every day. We will further restrict this in the half-day product availability settings.
Products
Now, we can configure the two products that will share this same resource.
Product 1 – half-day rent
We can create a new product, give it a name, set it to “bookable product” and “virtual“:
Now, you’ll see the Booking Options tab where you can add all your settings. If you can’t see one or more of the sections, make sure you have activated the related module as explained here.
Step 1 — Settings
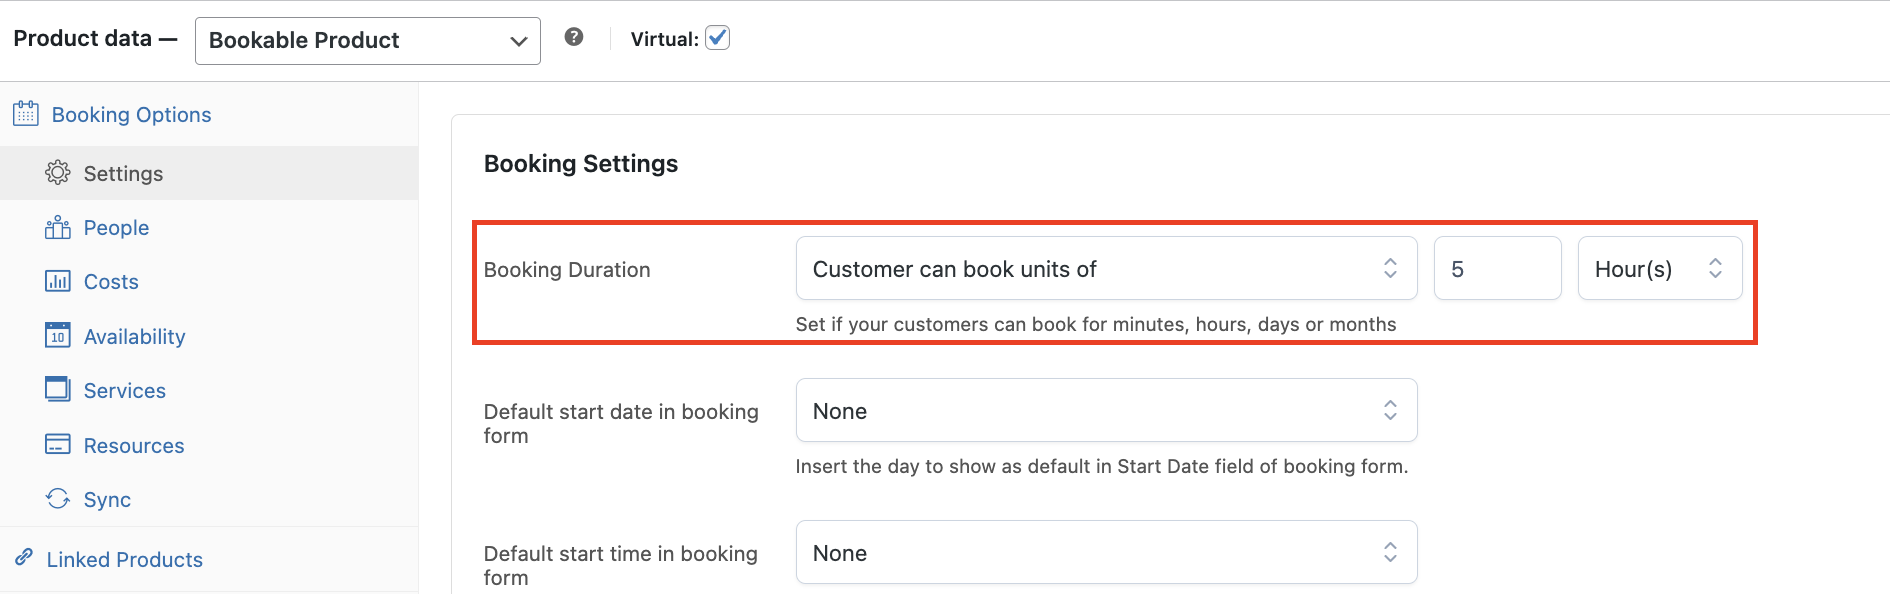
In the Settings tab, let’s set the booking duration to fixed units of 5 hours, because we have either morning from 8 am to 1 pm or evening from 3 pm to 8 pm.
And in the Booking terms, we’ll set the Maximum bookings per unit to 1 so to make sure it can only be booked once per time slot and set the maximum duration to 1, so only one time slot at a time can be booked.
Step 2 — Costs
Let’s set up a cost of $150 for 5 hours from the Costs tab.
step 3 — availability
Now, in the Availability section, we can set the hours we want to make it available. It has to be available every day, but in specific time slots:
8:00 – 13:00 15:00 – 20:00
So, we will set it as bookable all days, but we will set hours:
Step 4 — Resources
Now, let’s configure our resource, the room.
Let’s enable the resources and set the resource assignment to Automatically assign all resources, as we’ll add just one to this product.
And then, let’s add the Room from the section below:
We’re done with the first product.
Let’s see how it looks on the front end now.
After selecting the date, we will be able to choose between the morning slot (starting at 8:00) or the evening one (starting at 15:00) and see that the duration is for 5 hours.
Product 2 – full-day rent
Let’s set up now the second product that links to the same resource, the one that allows us to rent the conference room for the full day.
The settings are similar, but with some differences in steps 1, 2 and 3.
Step 1 — Settings
In the Settings tab, let’s set the booking duration to customer can select units of 1 day, as we’re going for the daily option this time.
Additionally, as we want customers to be able to select more than one day, we want to make the selection easier, so we will enable also the calendar picker and they will be able to choose the start and end date.
Finally, we will enable the Full day booking option to make sure they can select days (instead of nights).
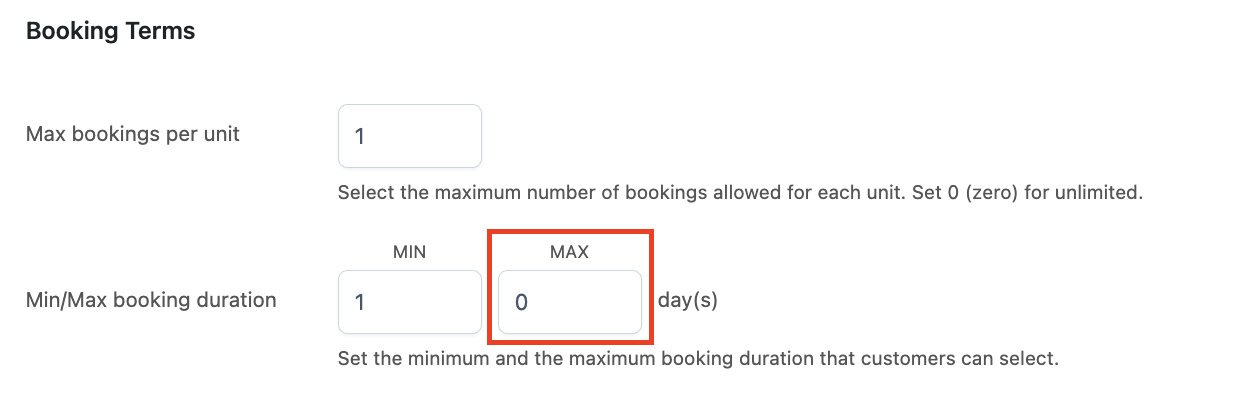
In the Booking terms, we’ll set the Maximum bookings per unit to 1, but we’ll set the maximum duration to 0, for unlimited, so the room can be rented for as many days as the customers wish.
Step 2 — Costs
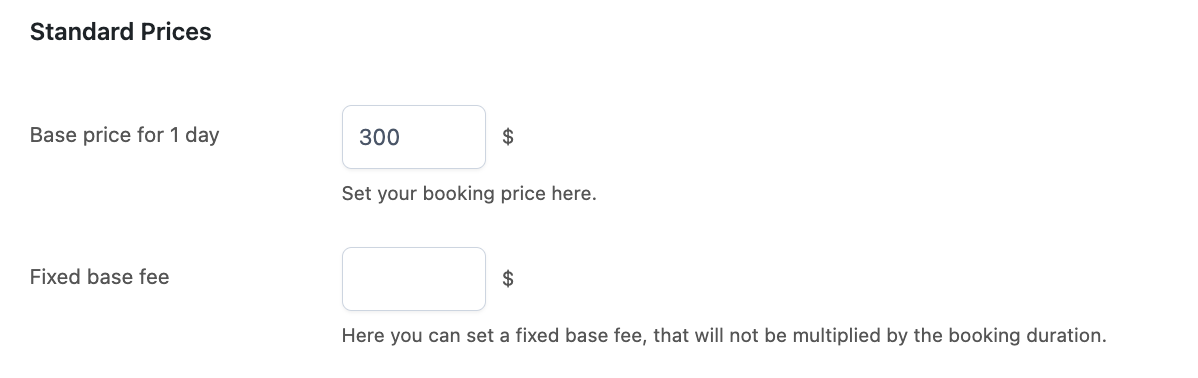
Let’s set up a cost of $300 per day from the Costs tab.
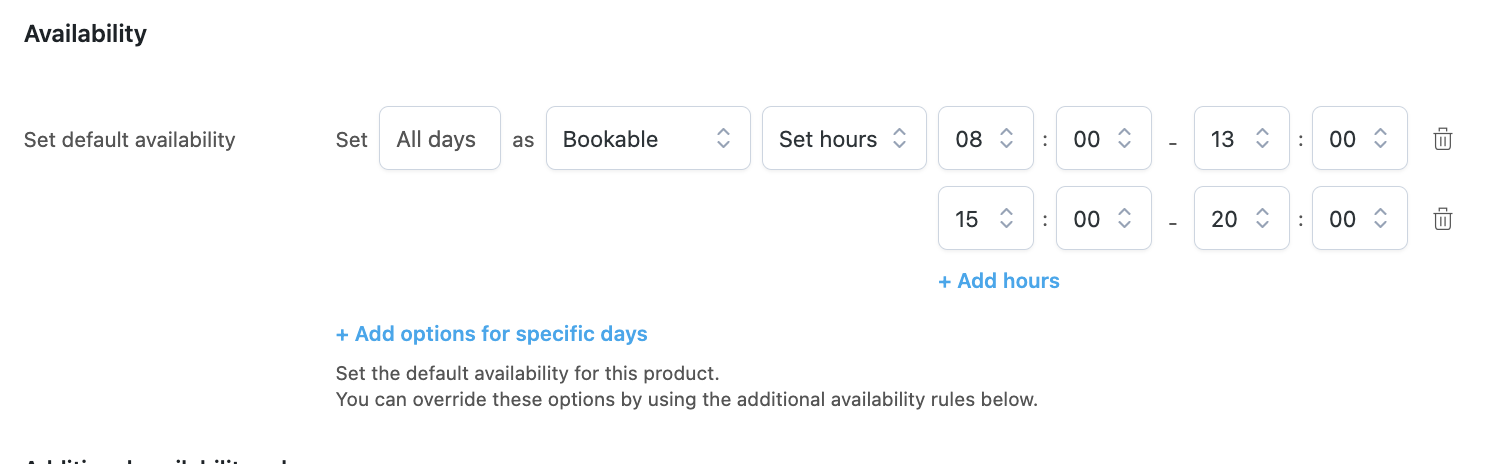
step 3 — availability
In the Availability section, we will have to simply leave the default availability to bookable all days without the possibility to set hours here, as this is the full-day rent product.
Step 4 — Resources
Same for the Resources tab, we can add the same settings, set the resource assignment to Automatically assign all resources, and add our Conference room as from the resources picker.
All done!
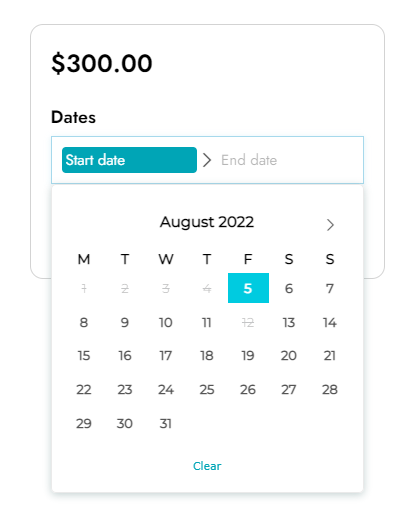
This is how the product appears to our customers.
Full day rent product with calendar picker
As you can see, we can easily choose the start and end date from the same calendar picker.
Resource synced availability
Moreover, as we have a half-day booking for August 12, the room will not appear as available here for full-day booking, as both products share the same resource, so the availability is synced.
Yet, the evening time slot at 15:00 appears as available in the Half day product.
In this tutorial, we will see how to configure a product to rent meeting rooms with optional equipment like a projector, a display, Dolby surround, a side table, etc.
We have a total of 15 rooms, but limited optional equipment.
So, we can create just one product for the room but make sure it can be booked up to 15 times, and then one need one resource for each of these optional pieces of equipment that will be added to the bookable product.
Let’s start by configuring the resources then.
Resources
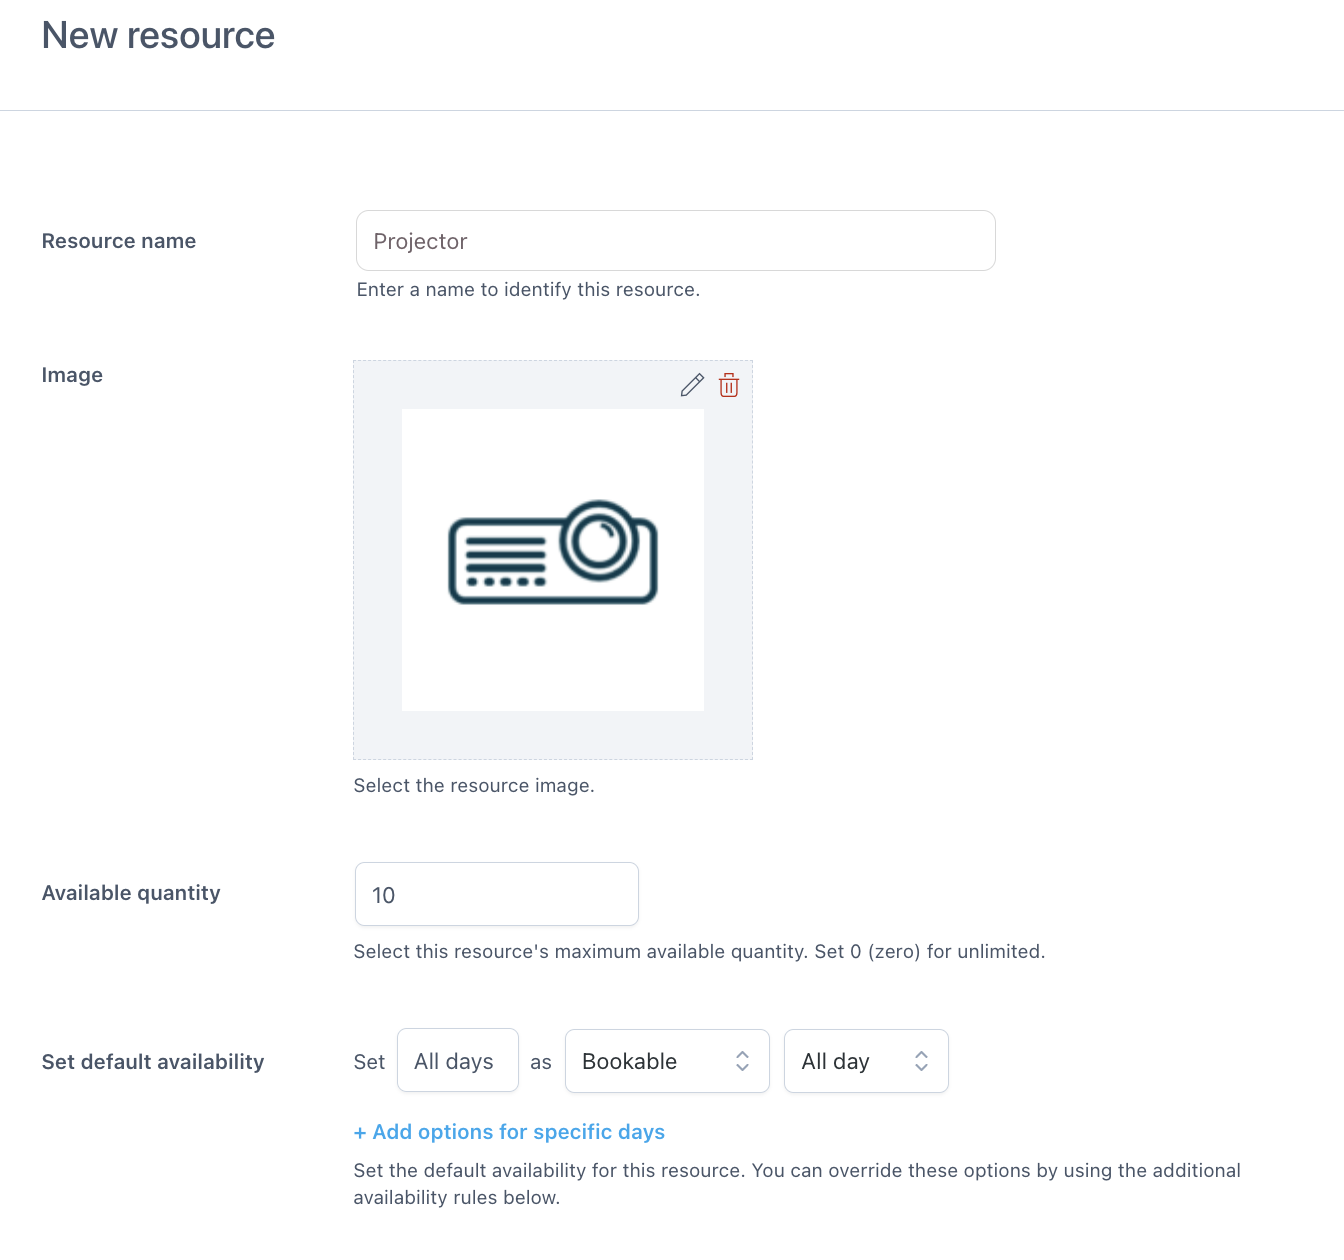
Let’s open the plugin settings and go to YITH > Booking > Configuration > Resources and click on Add new resource.
Let’s start with the first resource, the Projector. Let’s set a name, an image, the quantity to 10, as we have a total of 10 projectors, and the availability to every day.
We’ll have similar settings for the other resources, with the only difference related to quantity, as we have:
3 Dolby surround systems
5 monitors
8 side tables
Let’s move on now to the product configuration.
Product
As stated before, we have 15 rooms, with different equipment, so we will create only one product that can be booked up to 15 times on the same day and let the user choose the equipment optionally.
Let’s create a new product, give it a name, change it to bookable product and set itto virtual.
Step 1 — Settings
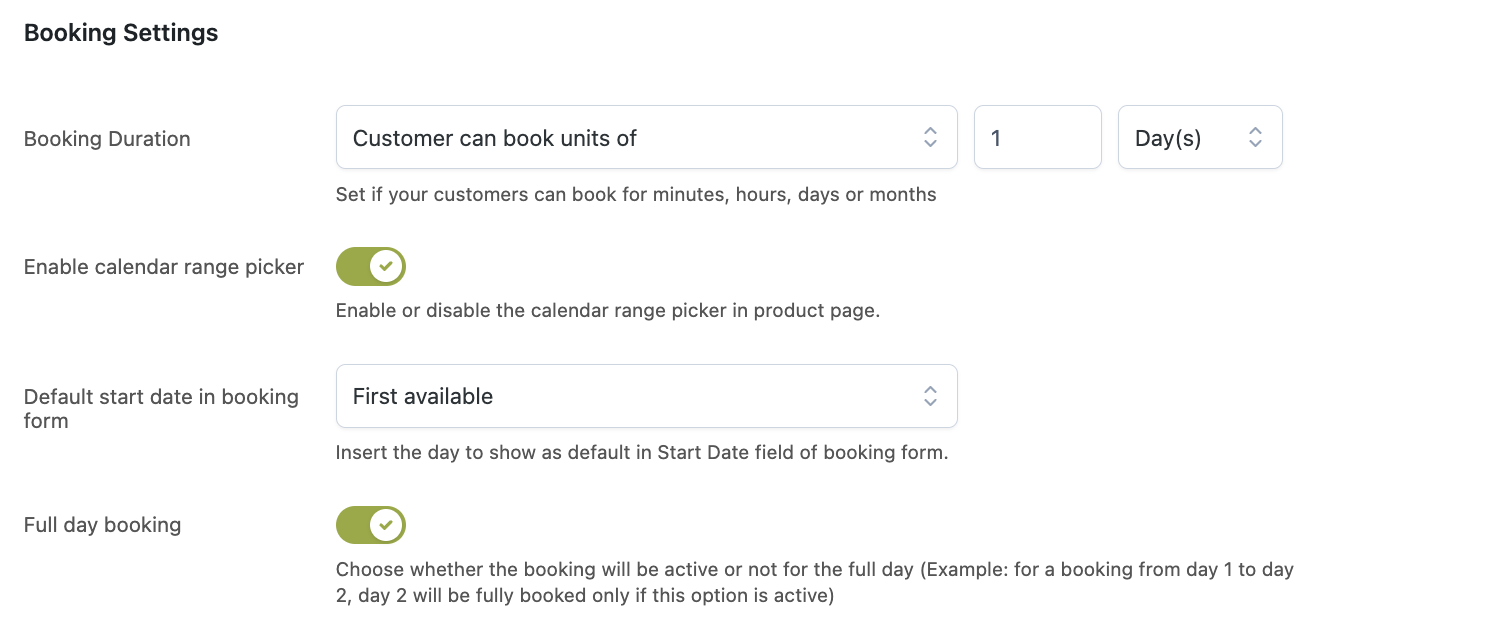
In the Settings tab, we can set up the following options:
Booking duration: customers can book units of 1 day, because we rent the room daily
Enable calendar range picker: so our users can select a start and end date from the calendar
Default start date in booking form: first available. This will automatically show the first date as selected.
Full day booking: we have to switch this to YES, so customers can book days instead of nights
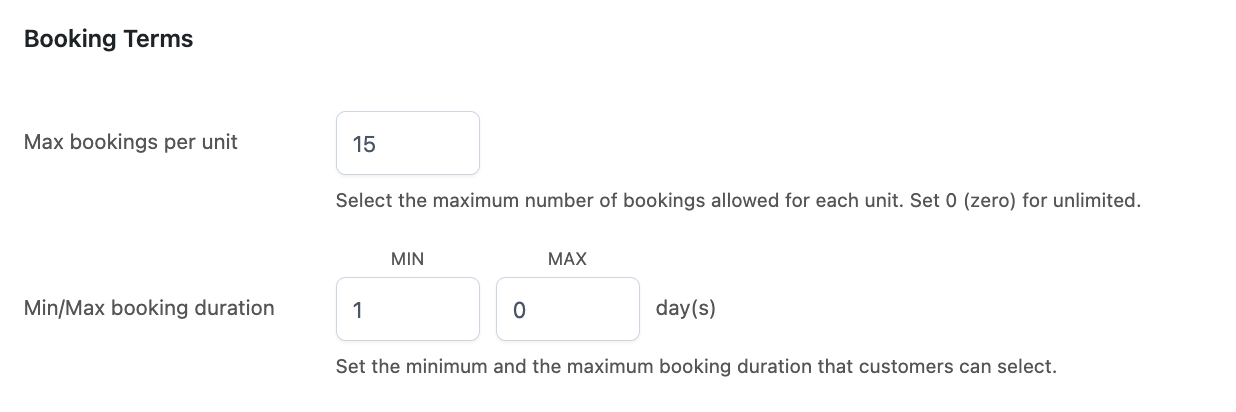
In the Booking Terms section below, we can set:
Max bookings per unit to 15, because we have a total of 15 rooms.
Minimum duration to 1 and maximum to 0 (for unlimited), so our clients can rent the room for as many days as they wish.
Step 2 — Costs
In the Costs tab, we can set a base price of $300 per day. We want to increase the price for rooms with Dolby surround or a 60″ display, but we’ll set these additional costs in the resources settings (see step 4 below).
Step 3 — Availability
In the Availability tab, we can set up some rules to make sure that the room is available every day except for Sundays.
To do that, we can create a first rule with every day set as bookable and restrict it with another rule where Sundays are not bookable.
Step 4 — Resources
In the Resources tab, we can enable the resources and set the Resource assignment to Customer can select one or more resources.
Additionally, we can set a custom text to refer to the resources for the Cart & Totals section, a custom one before the select drop-down menu and the placeholder in the picker.
And finally, from the section below, you can click on the Add resource button and select the resources to add to our product.
Now, we can add an extra price for some of the resources:
extra $20 per day for the 60″ 4K display and
extra $40(one-time) for the Dolby surround system, charged once, regardless of the selected number of days.
We’re done with the settings, let’s check now what our product looks like on the front end.
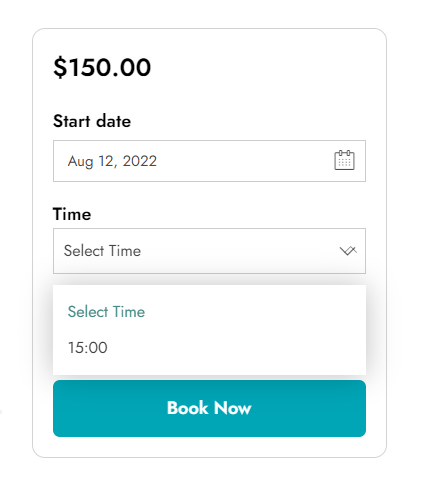
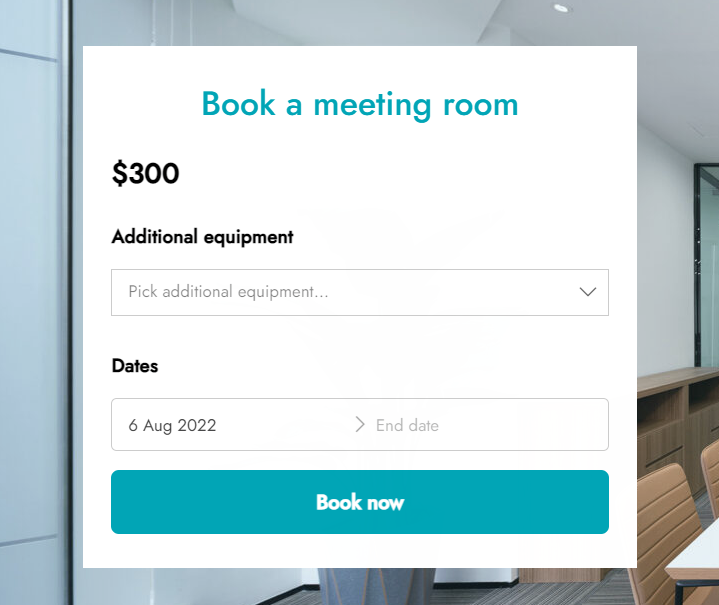
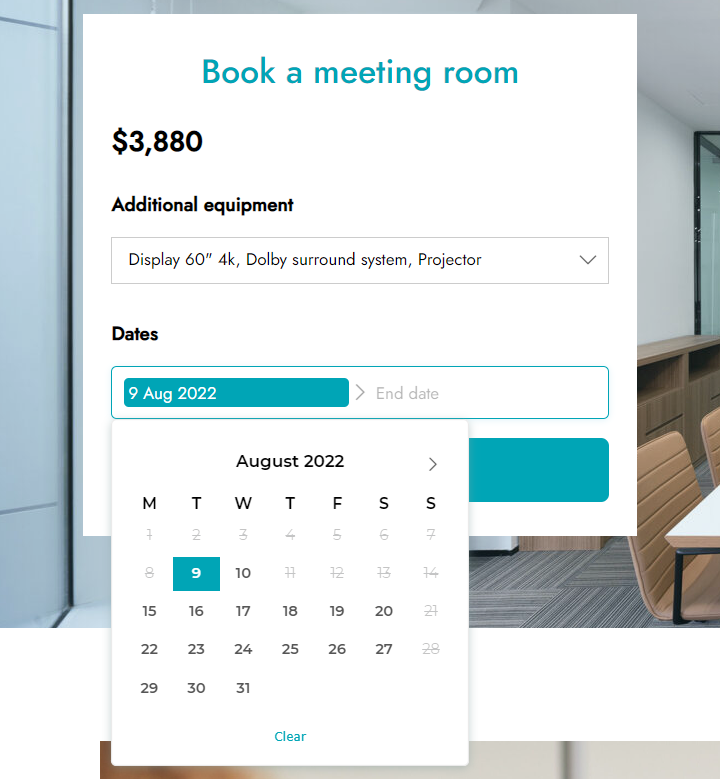
This is the booking form as it appears when you load the page, with the base price of $300, the custom texts and the pre-selected start date (the first available date).
If we want to add some equipment we can select it from the drop-down menu, and we will see then if the resource has an additional price. We can select one or more resources at the same time.
Based on the selected resources, we will see the calendar availability.
For example, in the above screenshot, we can see that rooms with Display, Dolby surround and Projector are not available from August 11 to 13.
Yet, if we remove the Dolby surround option, for example, those days are available.
We need the three of them, so we will opt for other dates, August 18-20, and we will see a summary of the prices, where we have:
In this tutorial, we will configure a bookable product where your users can book a tour or excursion in wild nature and optionally rent a bike for an extra fee of $5 per bike.
We can accept a total of 50 people, but the number of bikes is limited to a total of 30.
Let’s start then, with the bike settings.
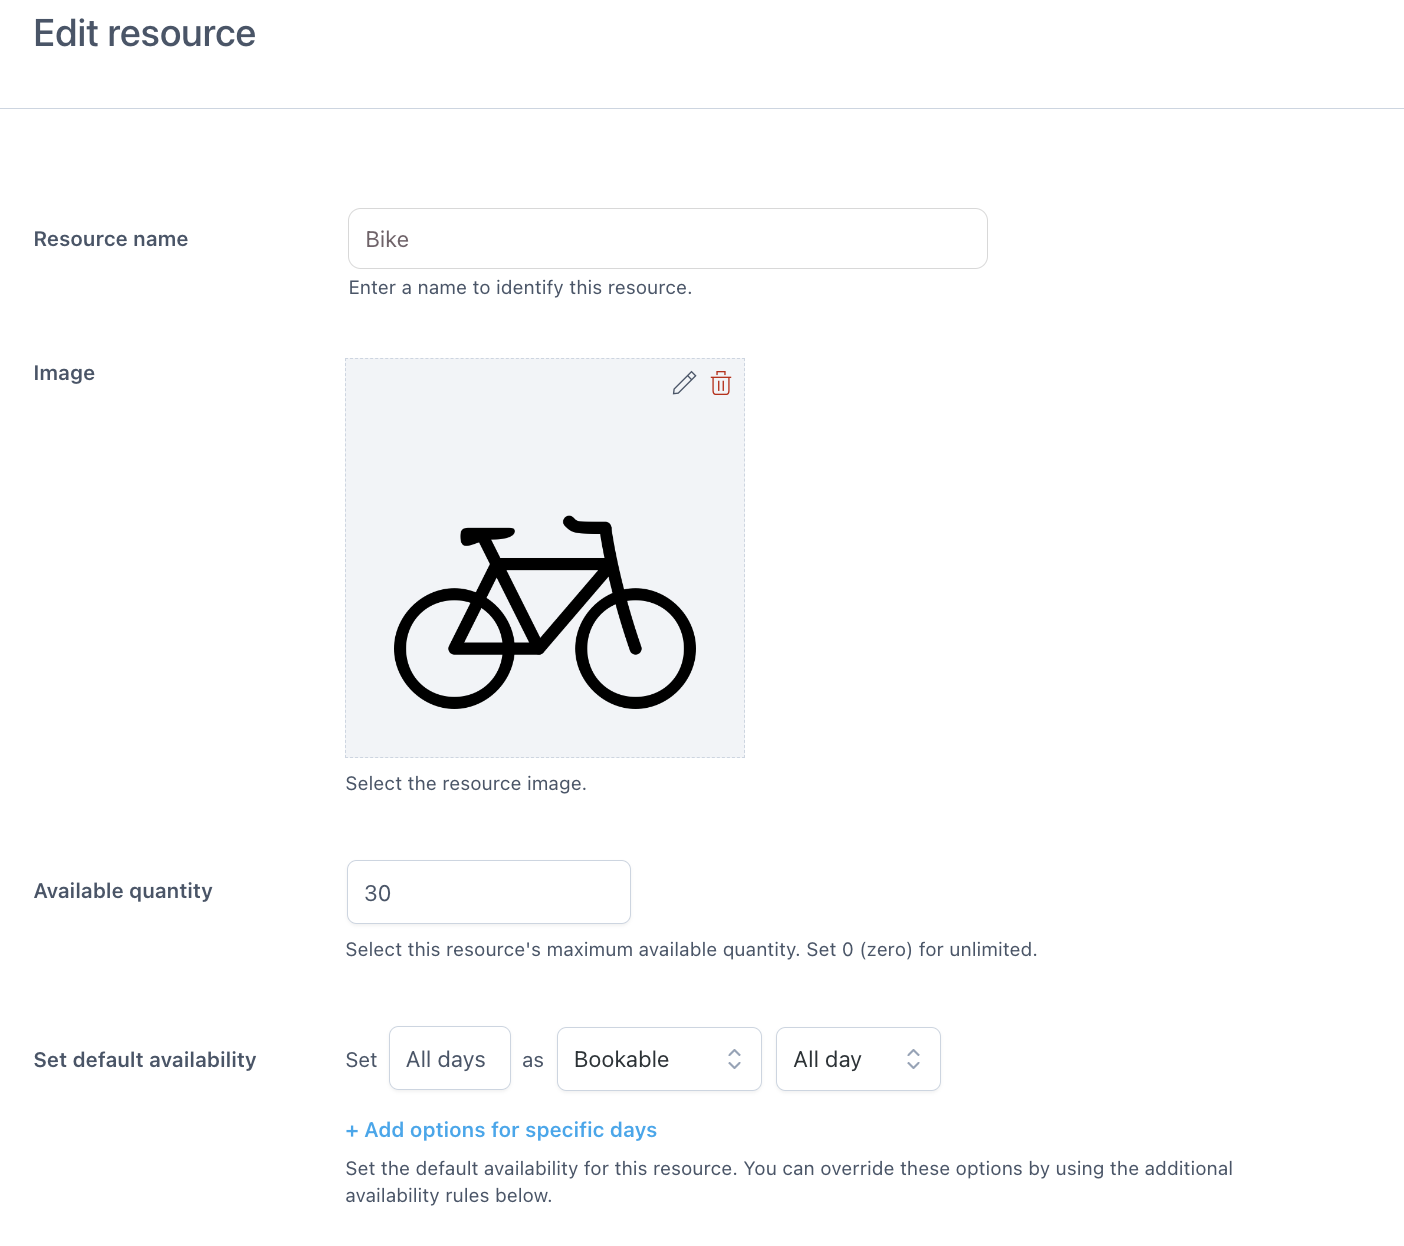
Resource
To configure the bike as a resource, let’s go to YITH > Booking > Configuration > Resources and click on Add new resource.
Then, we can give it a name (Bike), set the quantity to 30, the availability as by default (we will further restrict this in the bookable product) and save.
That easy! Let’s move on to the bookable product now.
Product
As usual, let’s create a new product, set it as bookable and virtual.
sTEP 1 — sETTINGS
In the first section of the Settings, we can set the duration of the booking as Fixed units of 1 day, make sure that the first available date appears as already selected and enable the Full day booking option.
Then, we can scroll down to the Booking Terms to set the maximum number of allowed bookings to 50 per day.
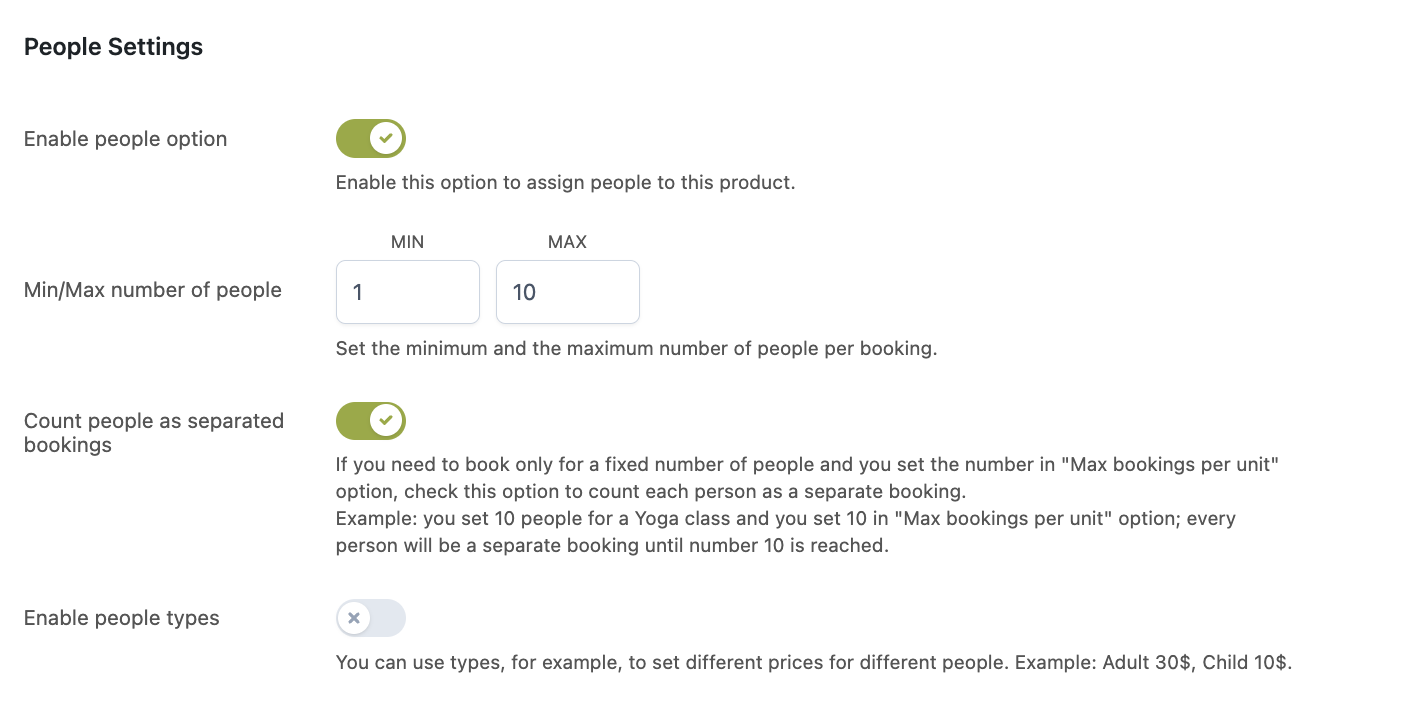
Step 2 — People
In the People section, then, we can make sure that one person cannot book for more than 10 people in one order, so, after enabling the people option, we will set Min/Max number of people between 1 and 10.
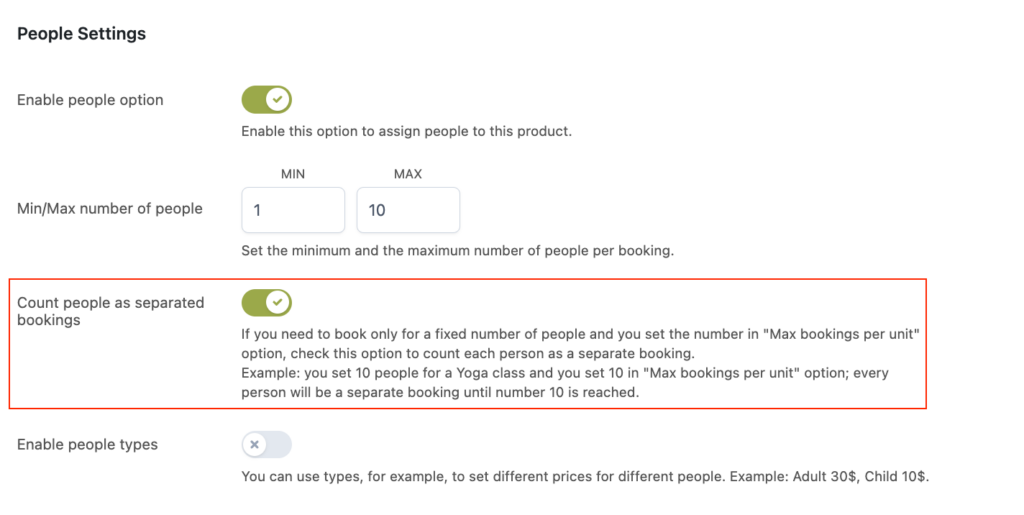
Additionally, we can enable the option Count people as separated bookings, so even if you submit just one order for multiple people, the product availability will be correctly updated.
For example, if I submit one booking for 3 people, still 47 other people can take part in the excursion, regardless whether they book individually or as a group.
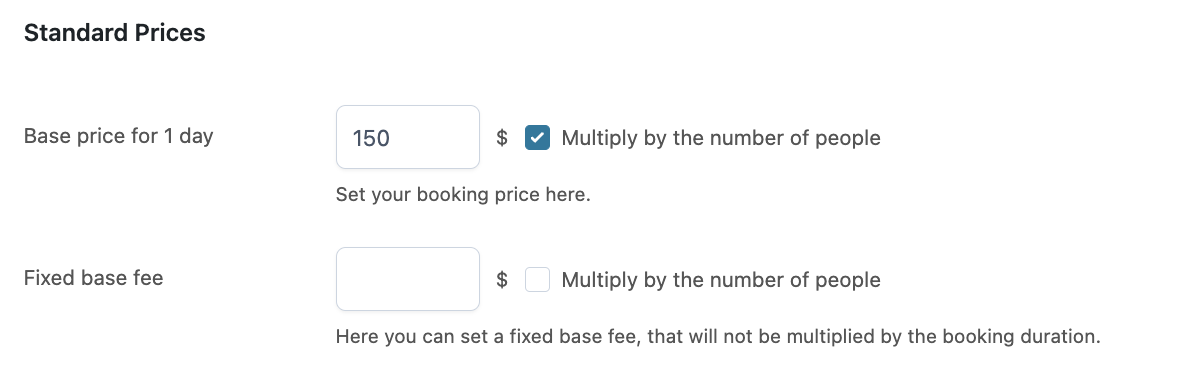
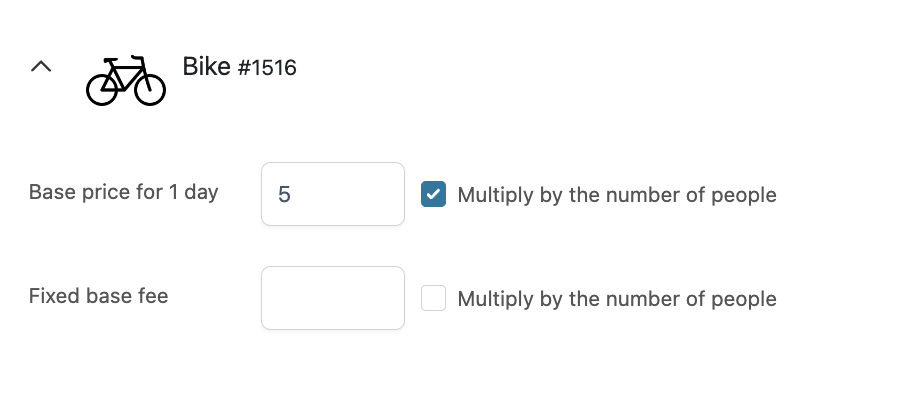
STep 3 — Costs
In the costs, we want to set up a base price of $150 and we’ll make sure to enable the Multiply by number of people option, so it’s $150 per person.
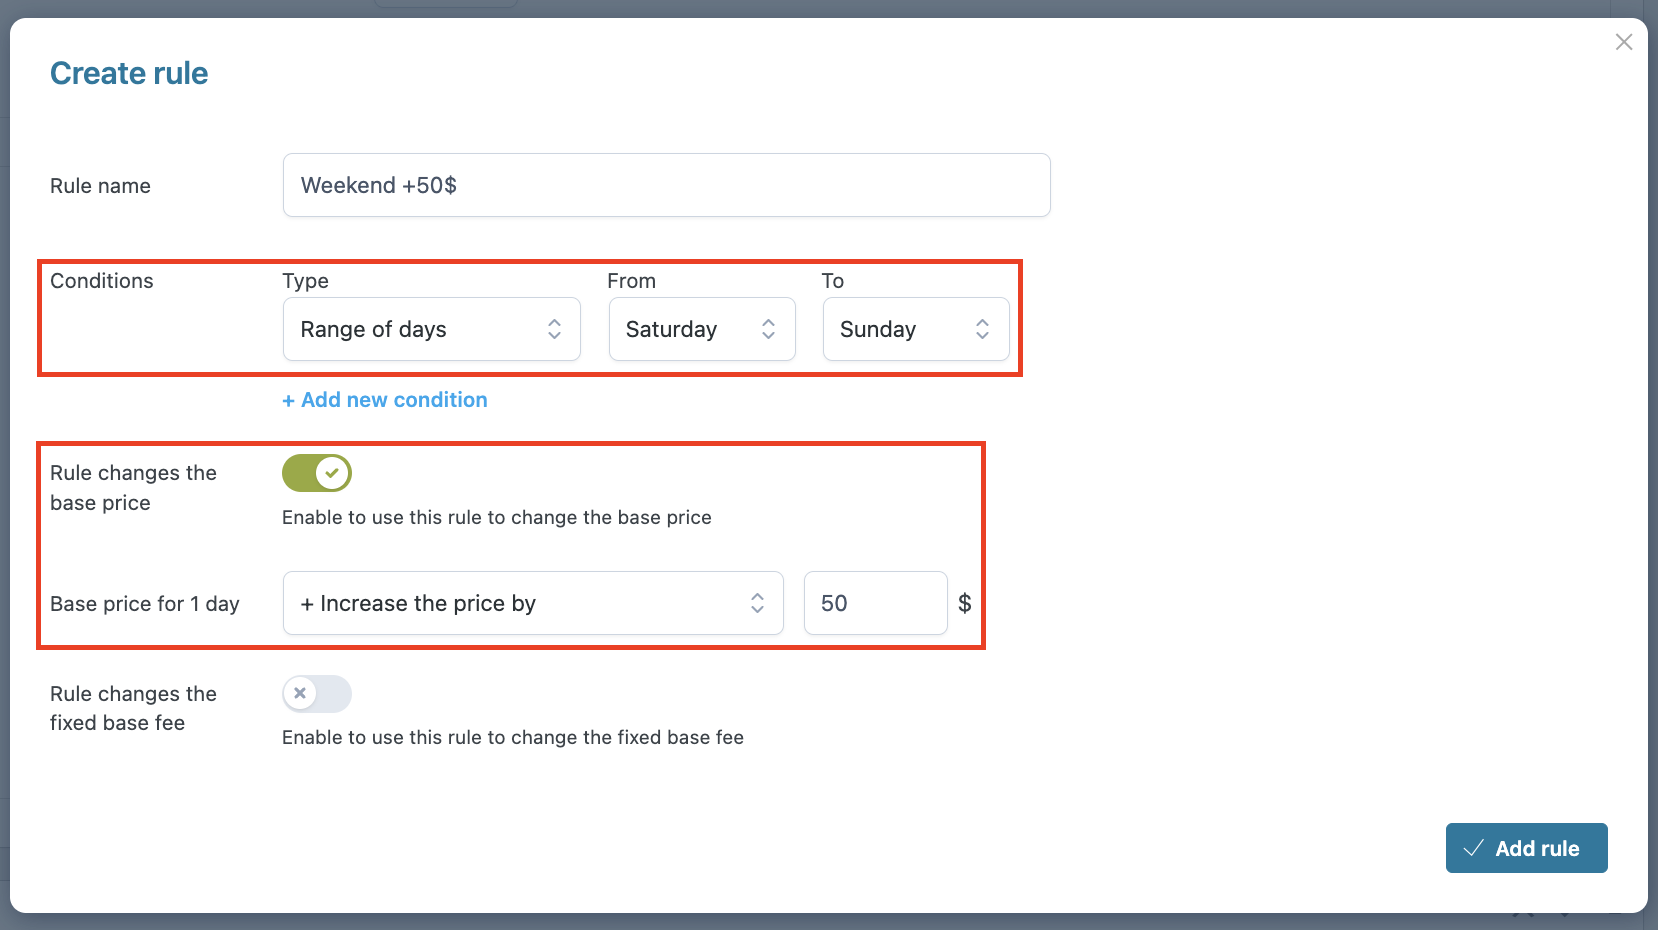
Additionally, we want to charge a different price, $200 per person, during weekends, so we will create an advanced price rule in the section below, and set:
a condition by Range of days from Saturday to Sunday,
enable the option to change the base price
+ Increase the price by $50
Step 4 — Availability
Now, we want the product to be available only from May to September, so in the Availability tab, we will leave the default availability to All days as bookable.
Then, we will restrict this with an additional availability rule, and set it to Generic dates, from October to April, as NOT-bookable.
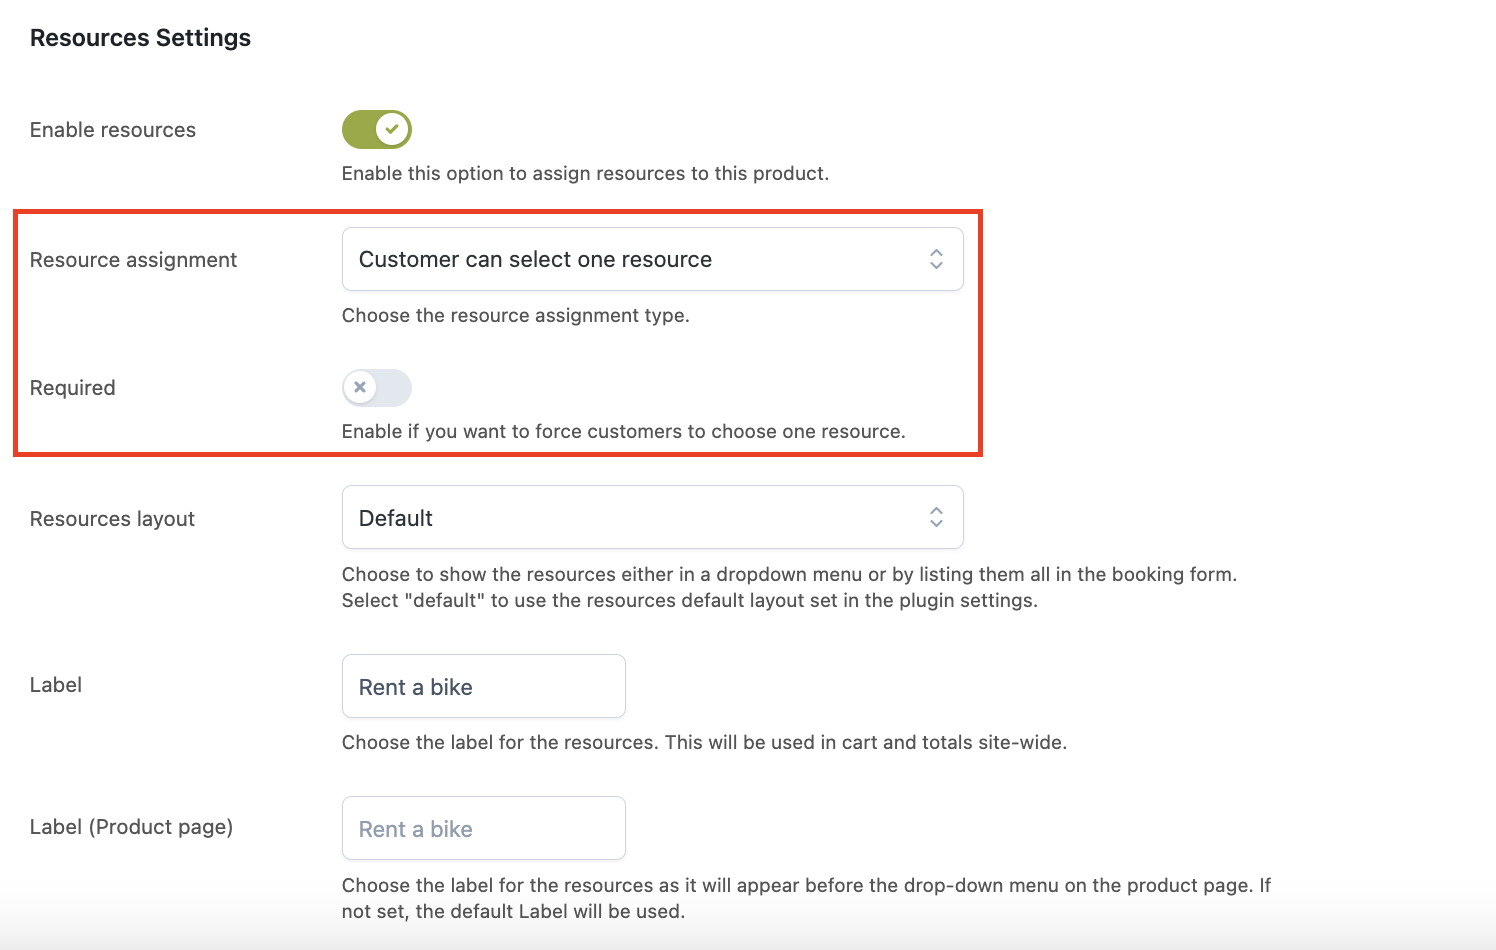
Step 5 — Resources
And now we can finally set our resources. First of all, let’s enable them from the toggle button. Then, in the Resource assignment we can set it to Customer can select one resource and leave the Required option set to NO. This is because this is a walking trail that you can optionally ride by bike.
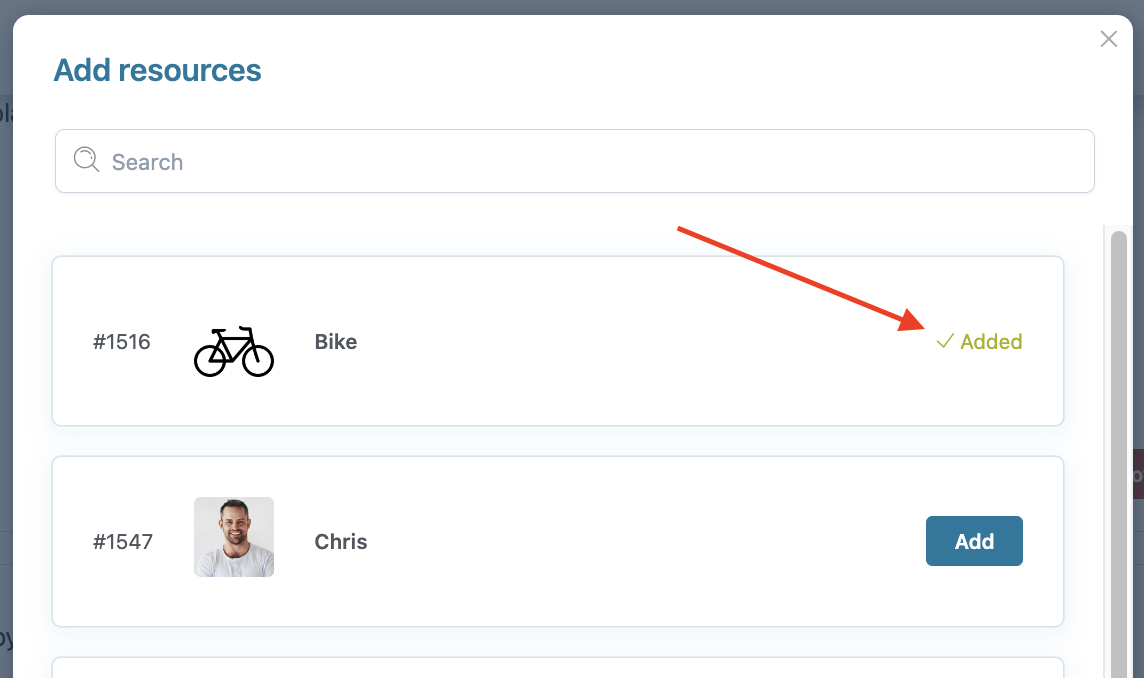
Now, from the section below we can add the resource…
… and set the extra $5.00 price per bike. We will also enable the Multiply by number of people to make sure this extra is charged for every person in the booking.
And that’s it!
Let’s see our product as it will appear to our customers.
First of all, we will be able to select if we want to add a bike at an extra cost or not:
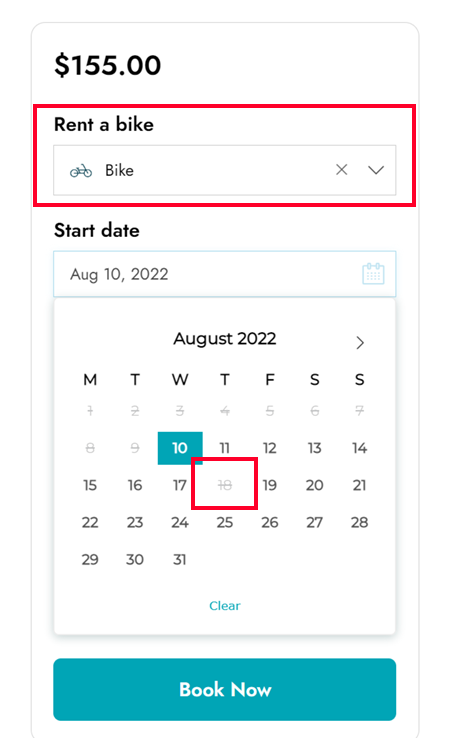
Based on the bike availability, we will see the dates and can pick one for our trip.
If we want to add a bike, August 18 is not available, as all bikes are booked. Yet, it is available if we don’t select any bike.
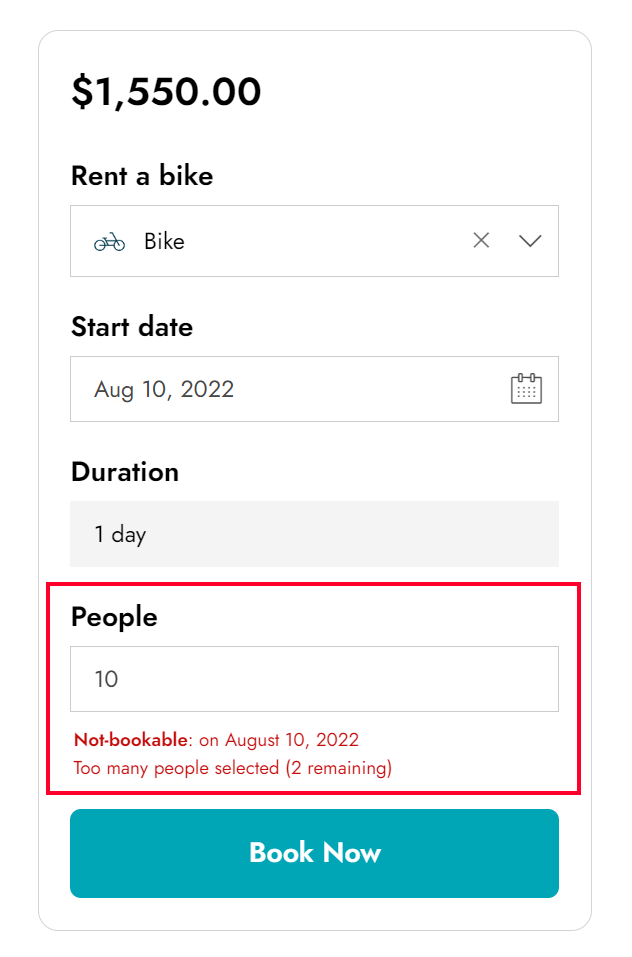
Also, if we want to book for 10 people and 10 bikes for August 10, we will see an error message informing us that there are only 2 bikes left for that day, so we can update the number of people selected.