Users make a booking based on the dates that the system shows as “available”. Availability can either be configured from within the specific “Bookable” product or globally.
Product availability
Note: When creating a booking, all the dates included must be available and consecutive. For example, users can’t book any product or service from October 1st to October 10th if the 5th and 6th have been already booked by another customer.
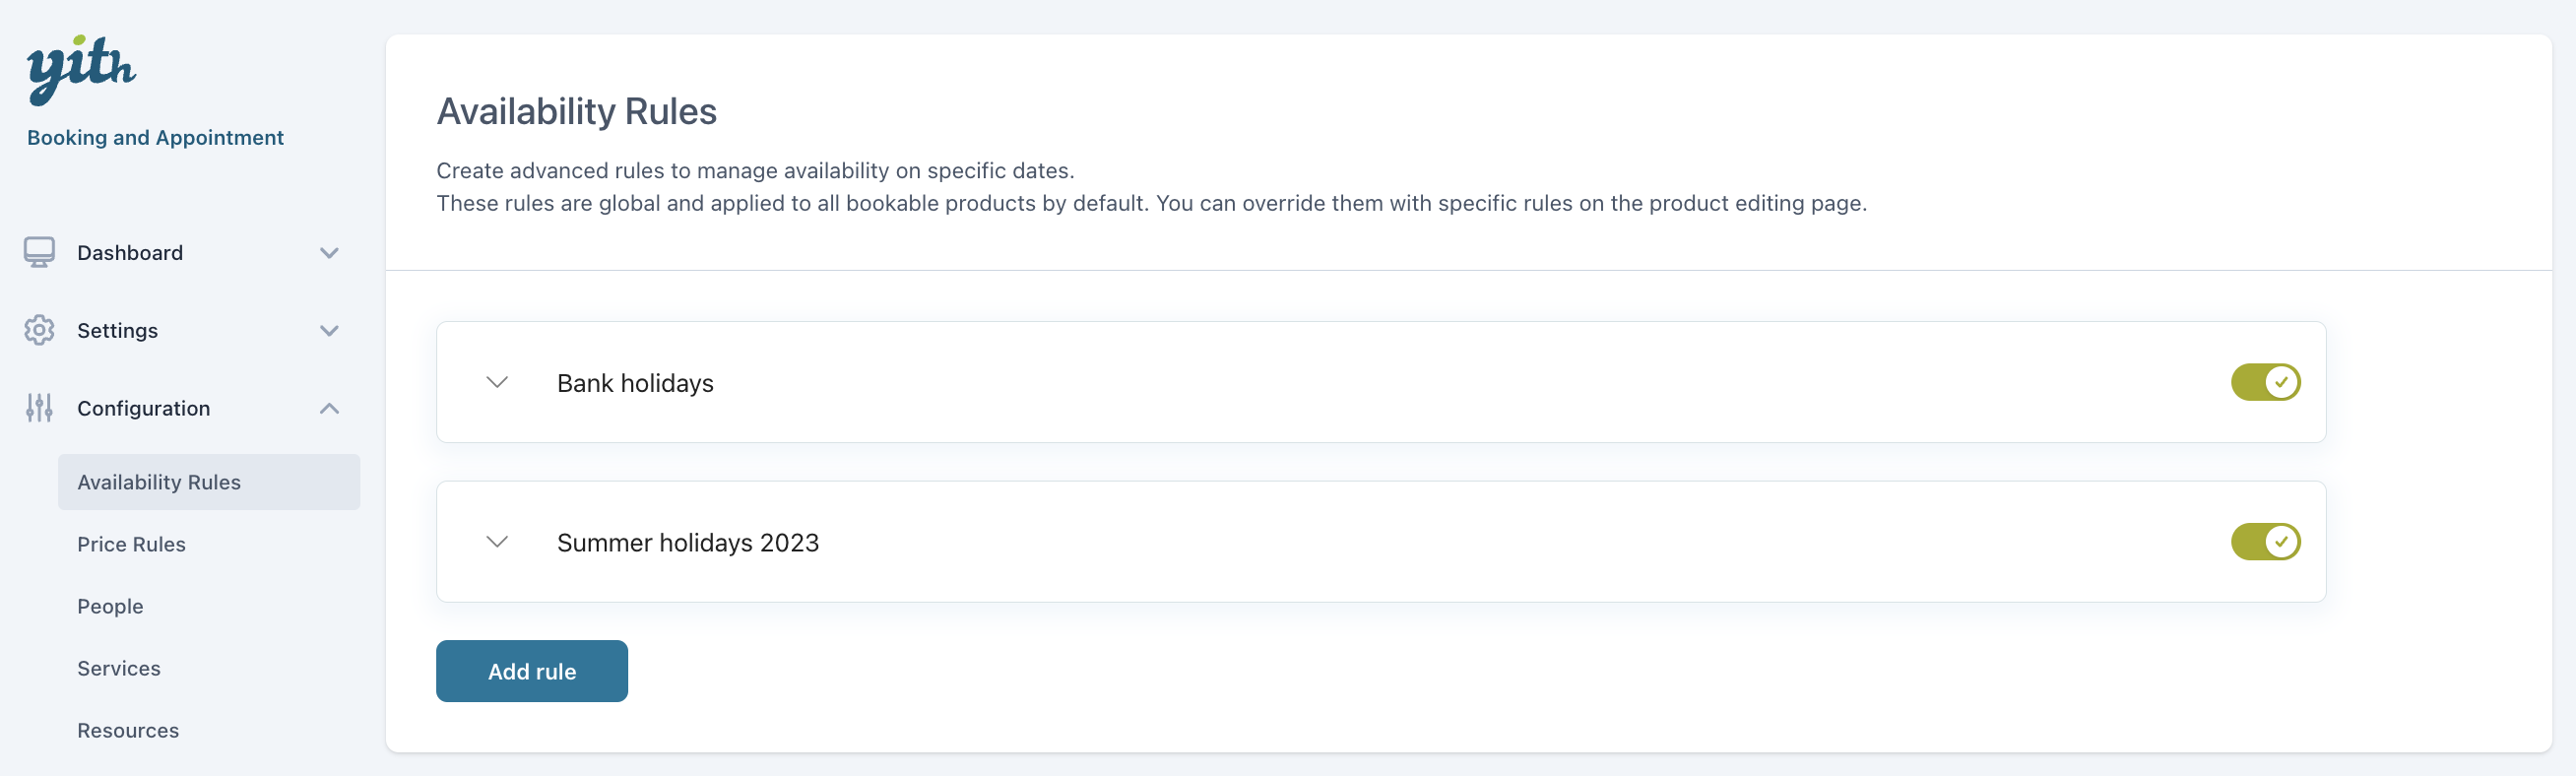
Global availability
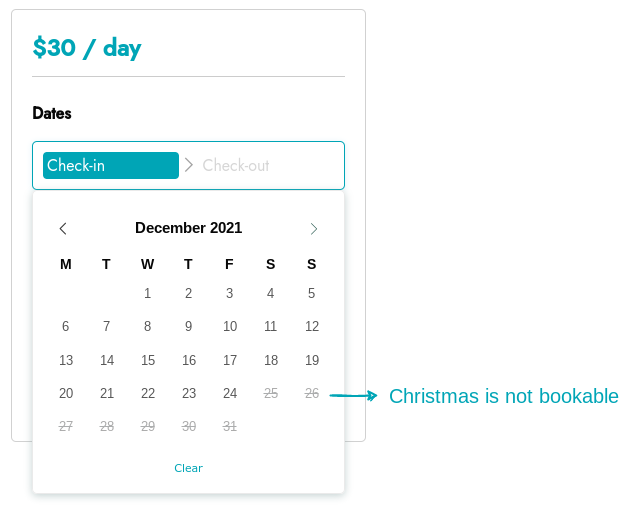
Unavailable dates become not-selectable for your customers.
Both the global (default) availability rules and the product availability rules have the same options. The only difference is that one applies to all bookable products and the other only applies to the specific bookable product.
Note: To set specific rules per period, use the ‘product availability rules’. Only use the “Global availability rules” for rules that you want to apply to all bookable products. We recommend using the default “Product availability rules” as much as possible, as they are easy to set on product level.
From “Booking Availability” we can edit the default product availability.
Let’s explain the options by using an example case, and set up some default availability rules for the bookable product we created.
Example case – rent a meeting room
Step 1 – Default availability settings
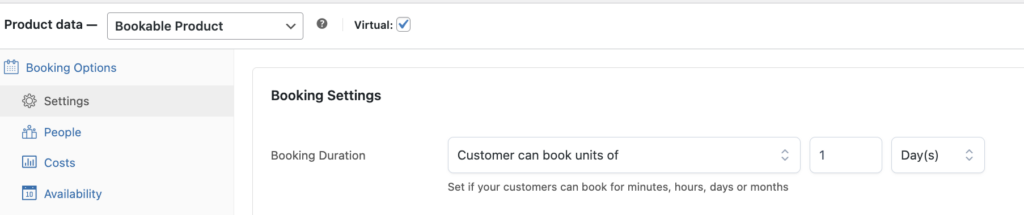
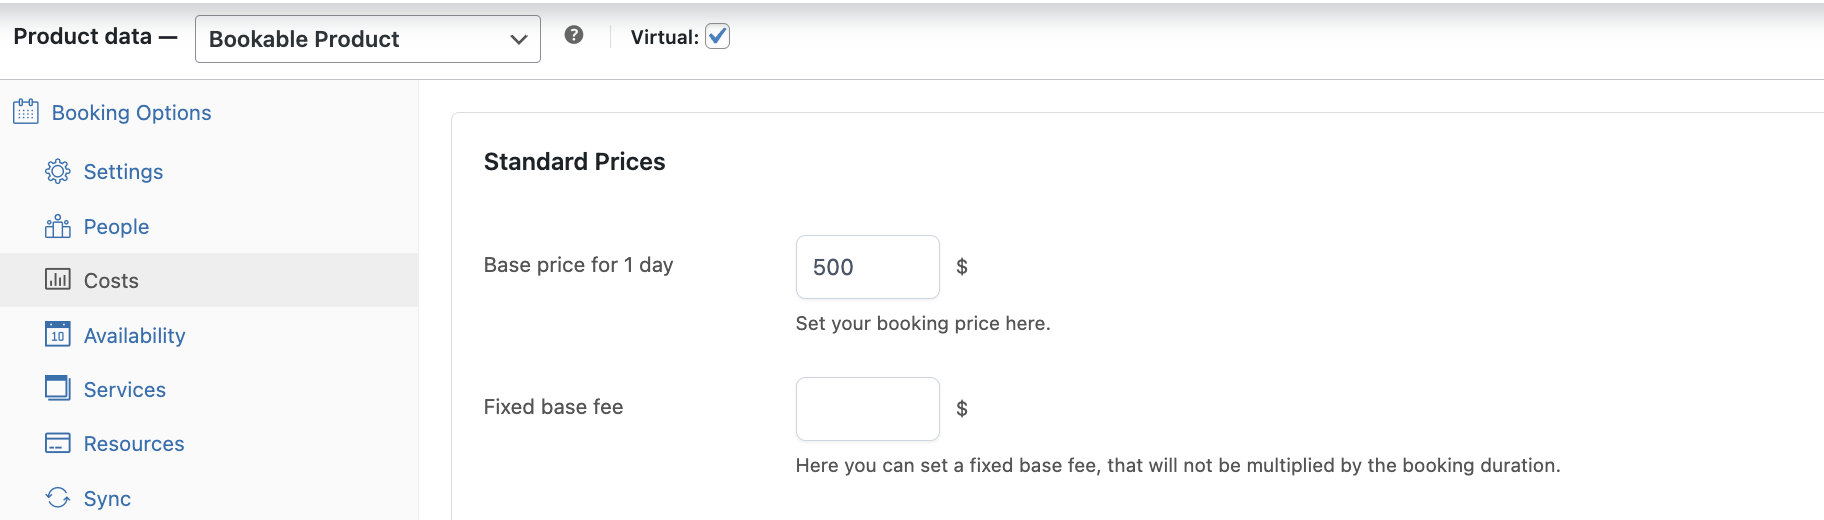
We create a bookable product that allows the customer to rent a room for meetings, the room can be booked for complete days and costs $500 p/d.
Now moving on to the availability. Besides the opening times during bank holidays (that we have set in the ‘Global availability rules), we want to set specific rules for this bookable product.
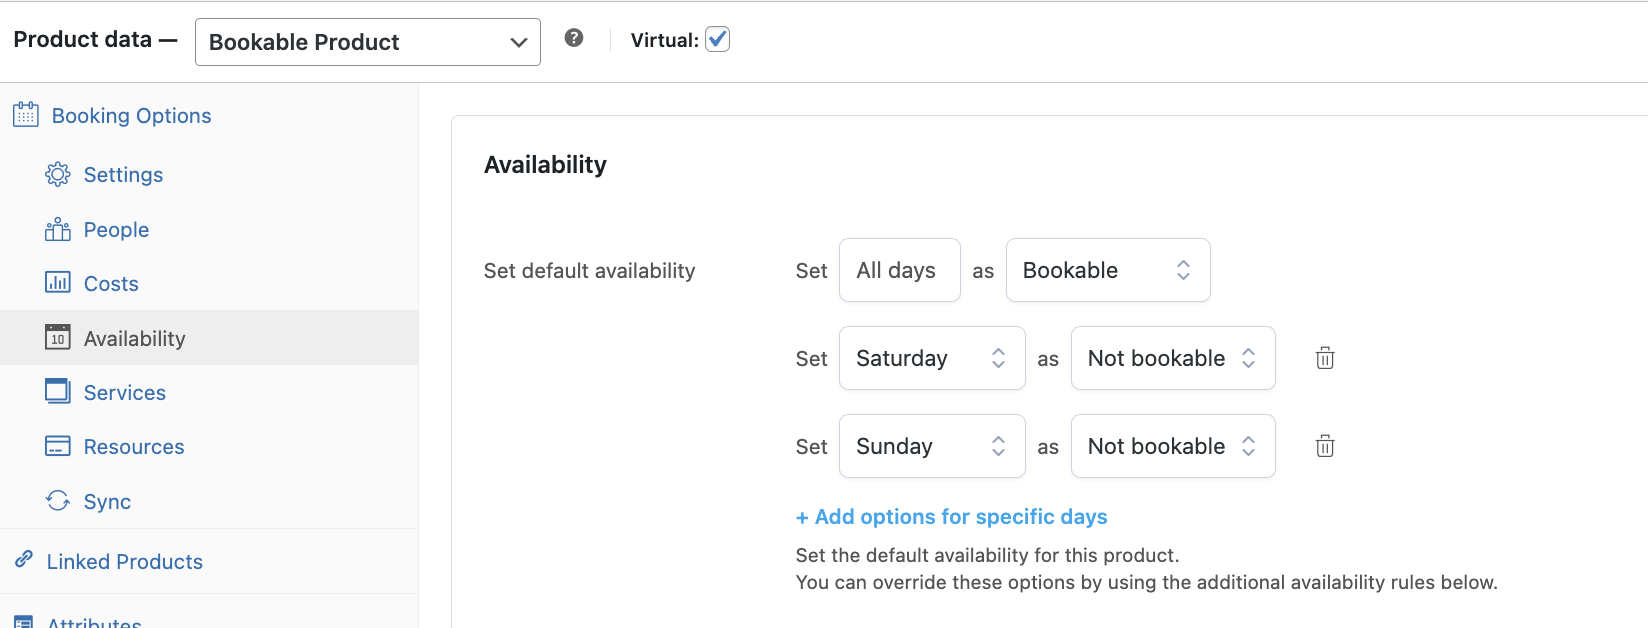
First, we set the default availability, which in our case will be Monday to Friday, weekends must not be available.
To achieve our goal, we will use multiple rules. We’ll create a rule for all days > bookable, and two rules for Saturdays and Sundays > not bookable. The rules will be merged from top to bottom, so in the calendar we will see Monday to Friday as bookable, whereas Saturdays and Sundays are not bookable.
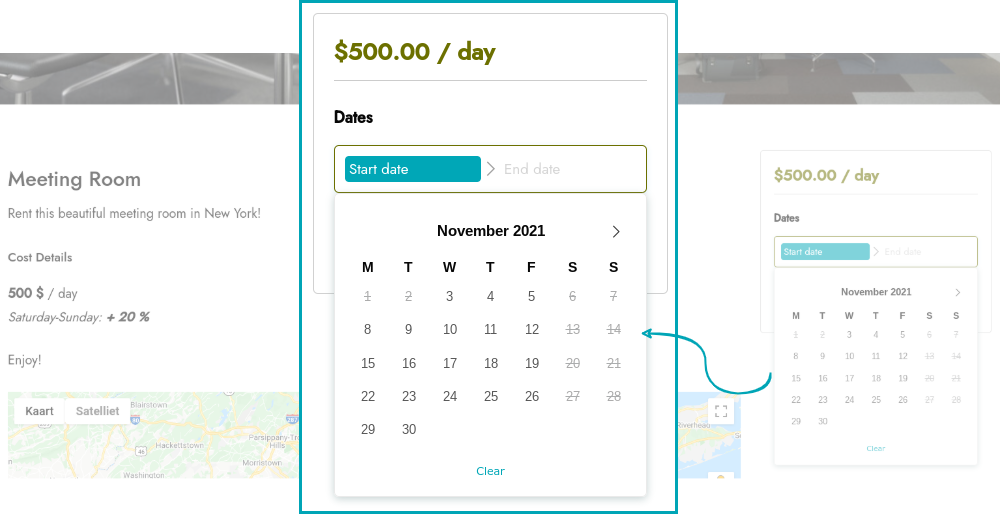
Let’s see what this looks like so far:
As you can see, it is not possible to select weekends, they are not bookable.
Step 2 – Additional availability rules
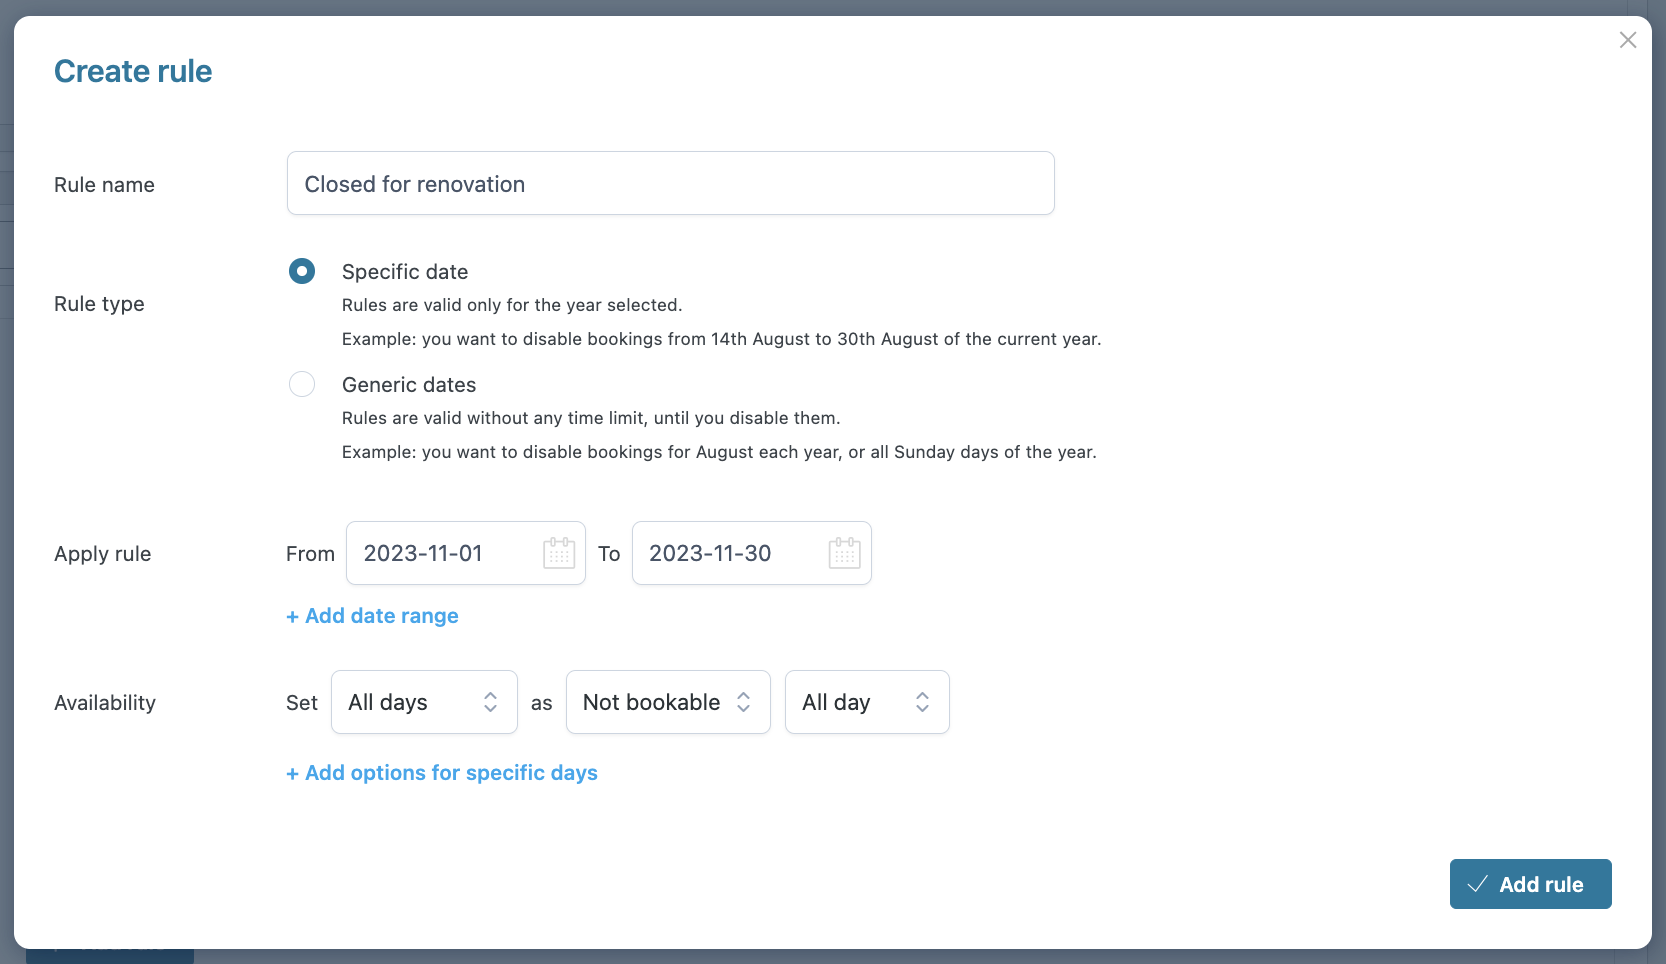
We just heard that the office building will be closed for renovations for 2 weeks in March, and the building is always closed on April 1. We have to add these specific rules that only apply to this bookable product using the “additional availability rules”.
In this case, we need to create 2 different rules, one using a generic date and one using a specific date.
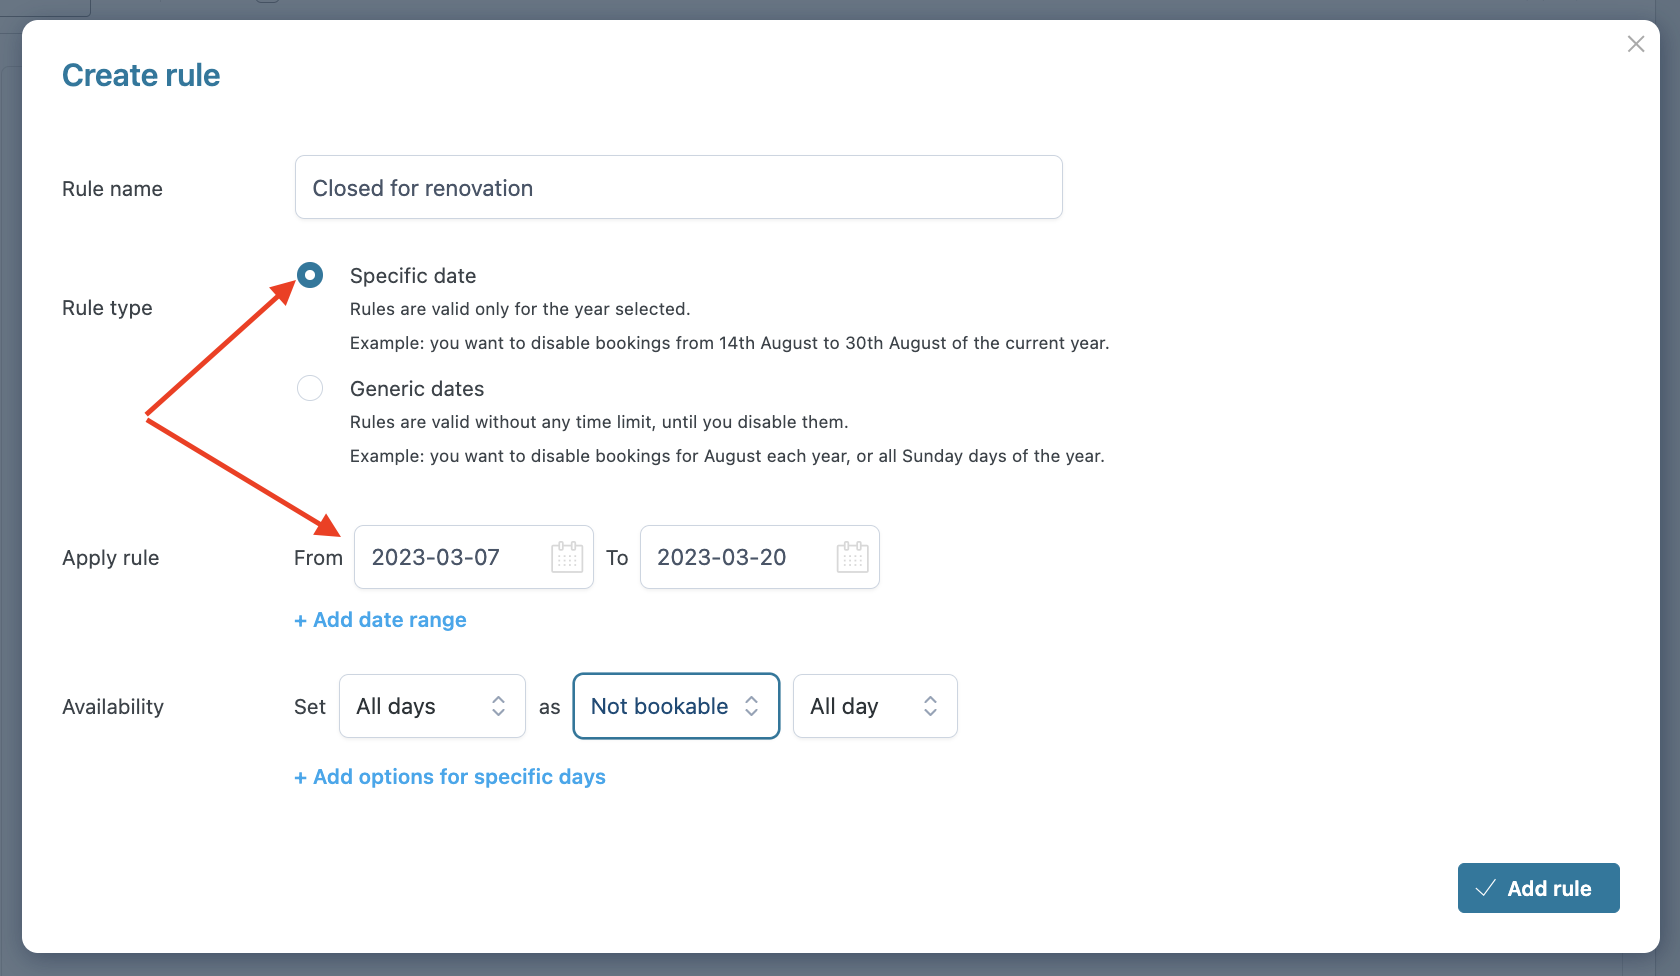
Specific date example
We have set the specific closing dates for the renovation, and in the booking form, the customer will see these 2 weeks as not-bookable.
Generic date example
We have set the specific day of closure to 1 April of each year, in the booking form the customer will see this day as not-bookable.
As mentioned before, we strongly recommend using the default product availability as much as you can.
However, it might occur that you need to set company-wide rules, besides your default product rules. In this case, the global rules that you set will override the default product availability.
On the other hand, if you want to make an exception to the global rules, you can use the ‘Additional availability rules’ on the product edit page.
So, what is the order exactly?
First: The global availability rules, from top to bottom (which override the default availability).
Second: The additional rules set in the product edit page, from top to bottom (which override the global availability rules).
This implies that at the same time frame more availability rules can apply.
Example case – Paris room
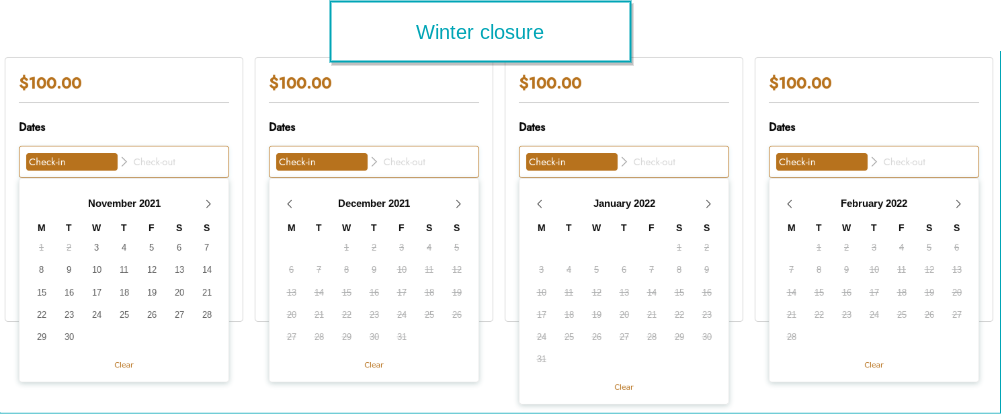
The default availability for our Paris room is that it is bookable during the complete year. However, now we have 3 separate rules we want to apply:
Each year, during the winter months (December, January, and February), it is not possible to book any of our rooms.
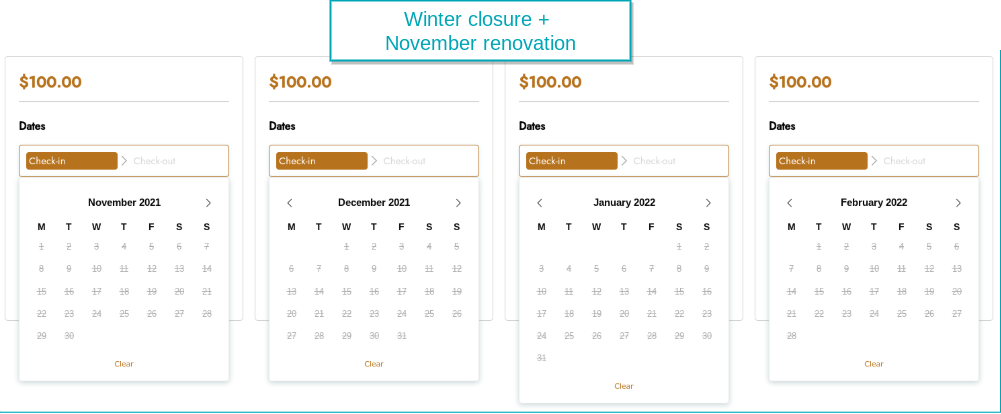
Due to renovations, the Paris room is not bookable in November 2023.
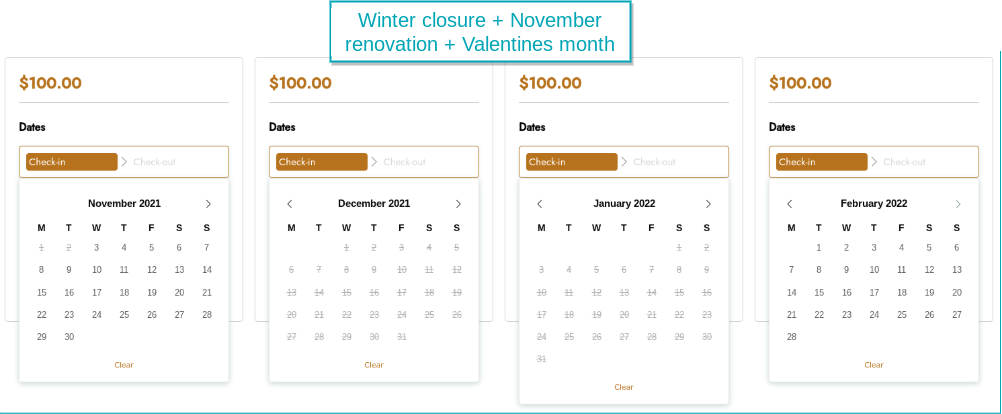
Due to Valentine’s day, the Paris room is bookable in February each year, unlike the rest of the rooms.
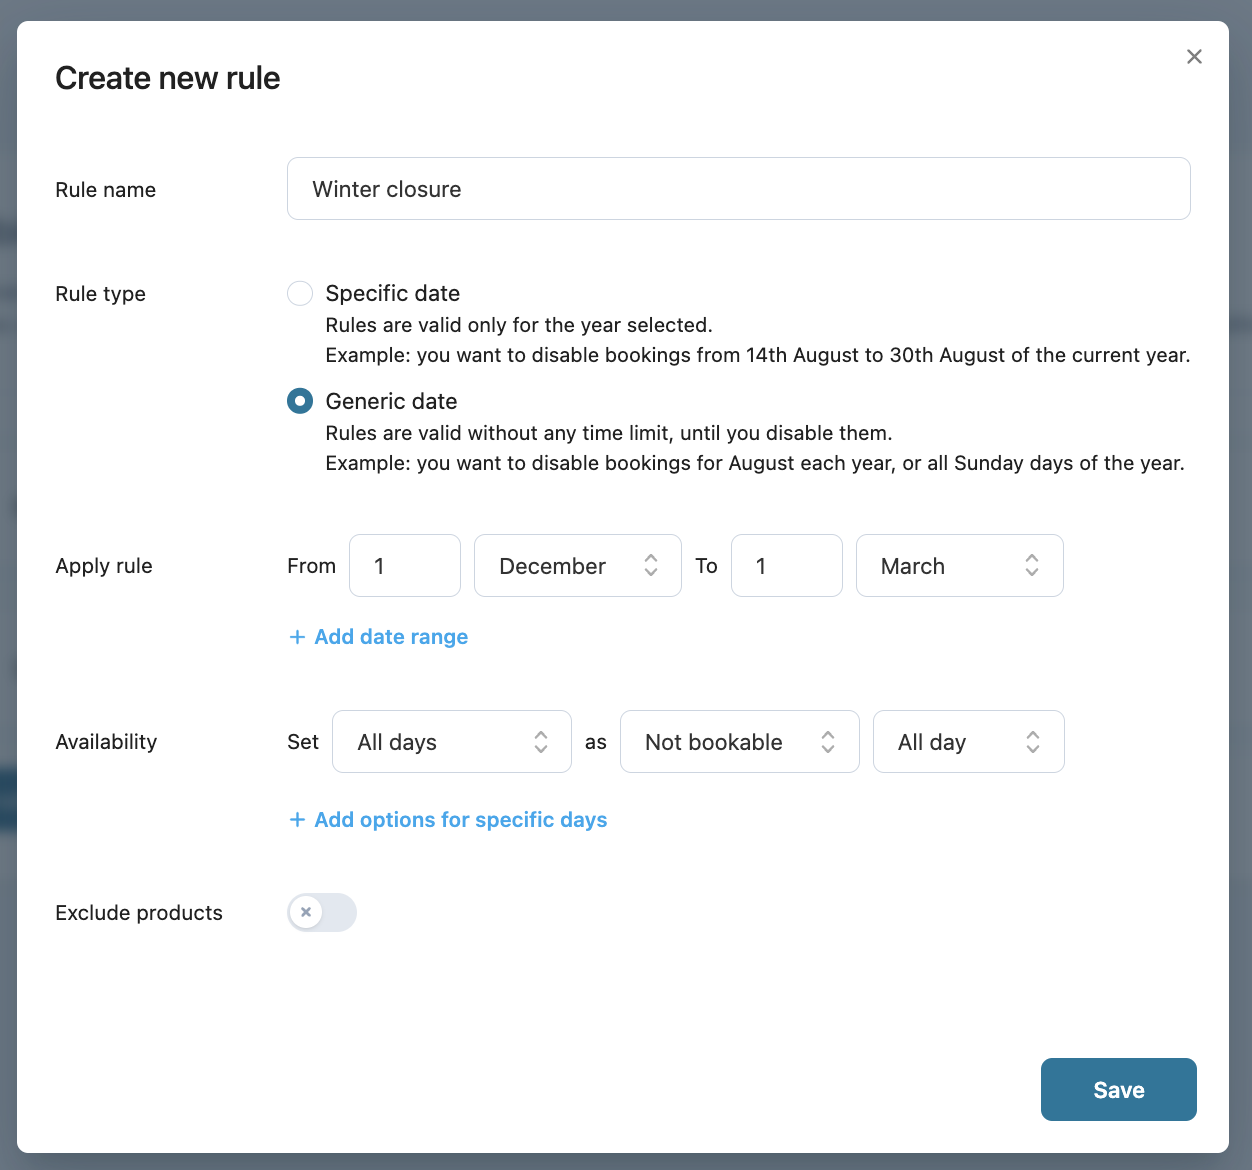
Rule 1 – Winter months closureThis needs to be a global availability rule, as this closure applies to the complete store. We have set all dates from 1 December to 1 March as ‘not bookable’.
Rule 2 – Renovation closure for Paris room
Because this rule will only apply to this specific bookable product and for this specific date, we create an ‘additional availability rule’ for a ‘specific date’, within the product edit page.
Rule 3 – Valentine’s day month
Because this rule only applies to this specific bookable product, every year, we create another ‘additional availability rule’ – ‘generic dates’, within the product edit page.
As you can see in this last calendar, the rules we have created on product level override the global availability rules.
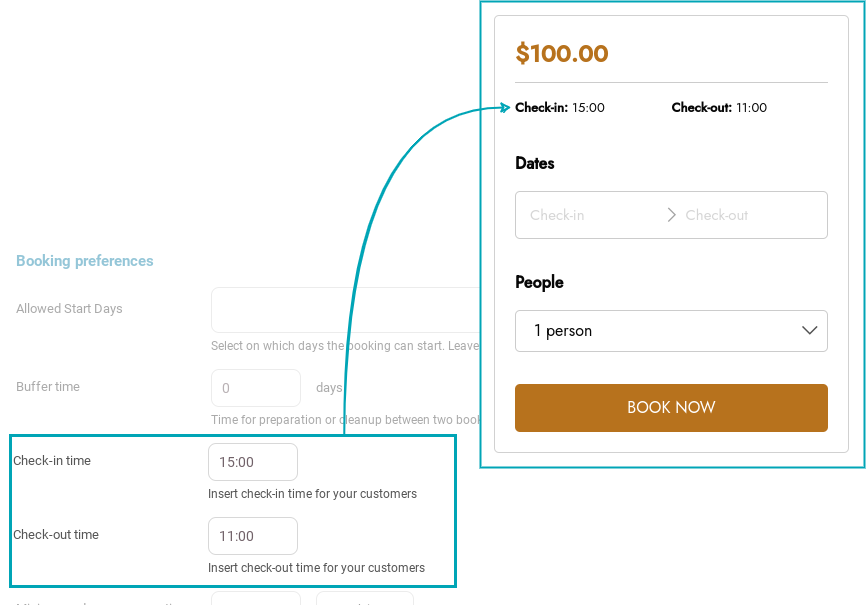
The information entered in the “Check-in” and “Check-out” fields is shown at the top of the booking form. This is just a way of sharing information with the customer. You do not manage actual times using this option.
You can edit the “Check-in” and “Check-out” labels from YITH > Booking > Settings > “Customizations”.
For example when you rent out bikes, you don’t need the check-in and check-out labels, but you want to show when to pick up and return the bike.
The “Full day” booking option is useful in the next cases:
Rental services
Day trips
When included the last day in the booking
Bookable products that don’t require different start- & end dates.
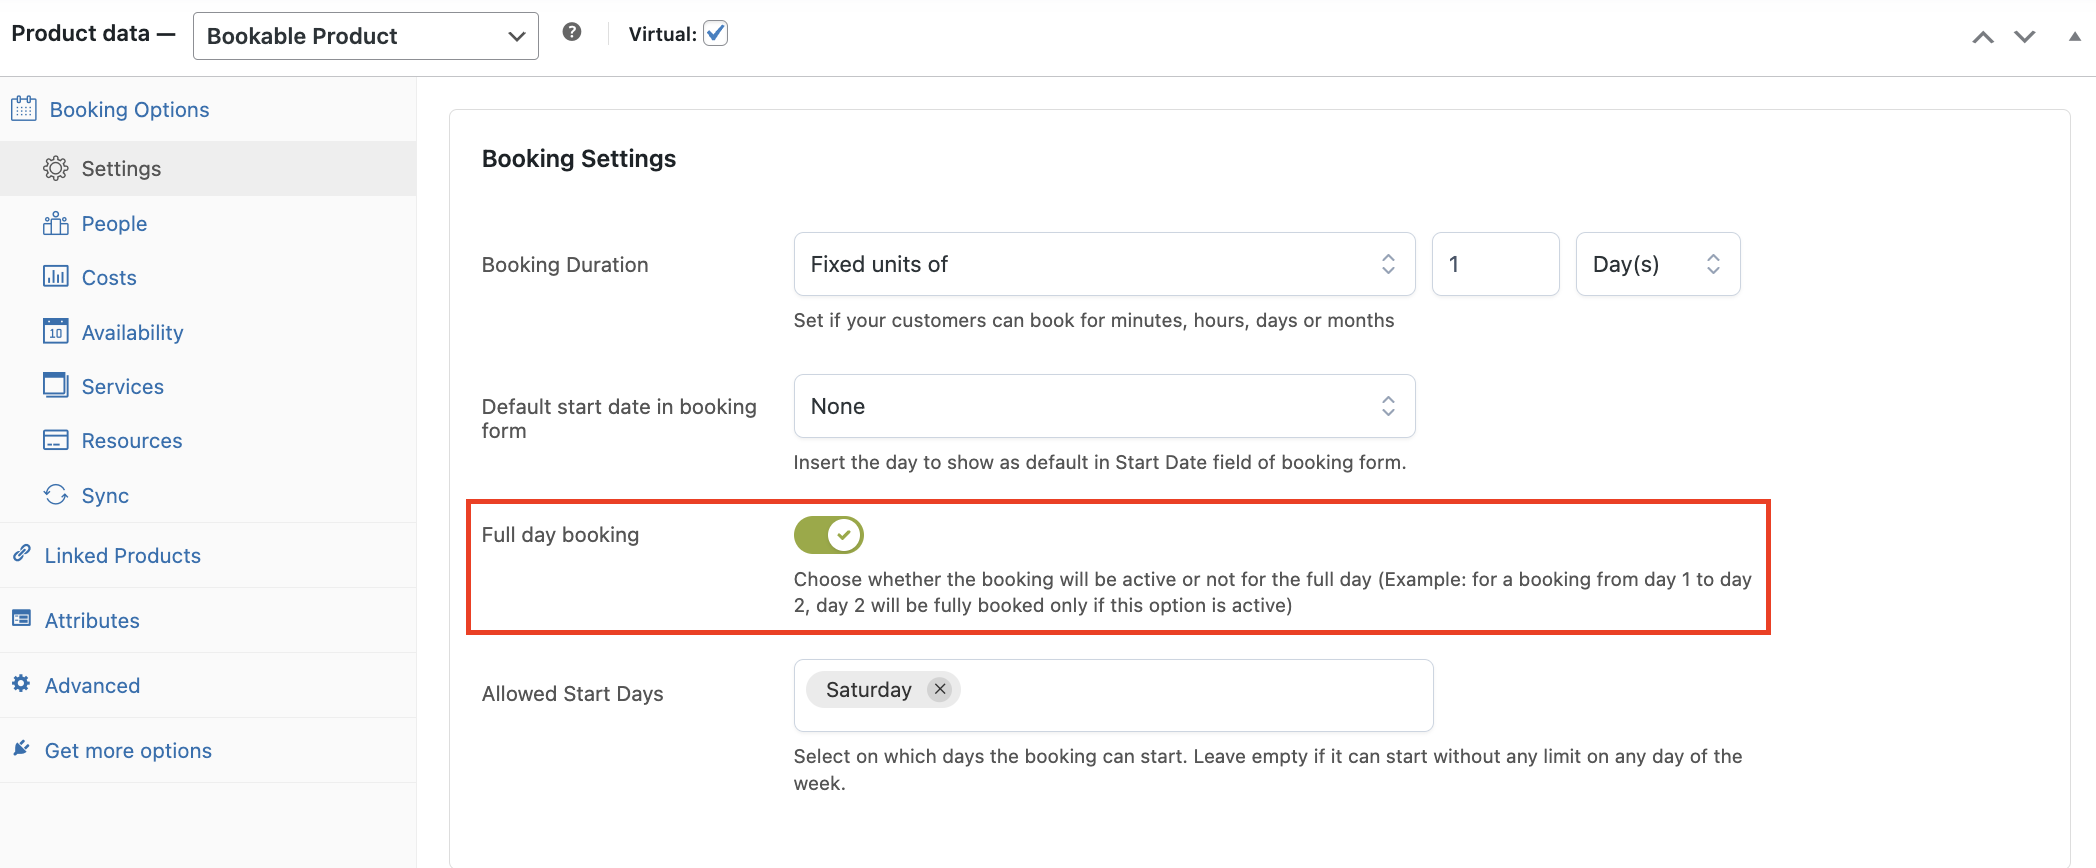
You can enable this option by using the toggle in the ‘Booking Settings’ tab.
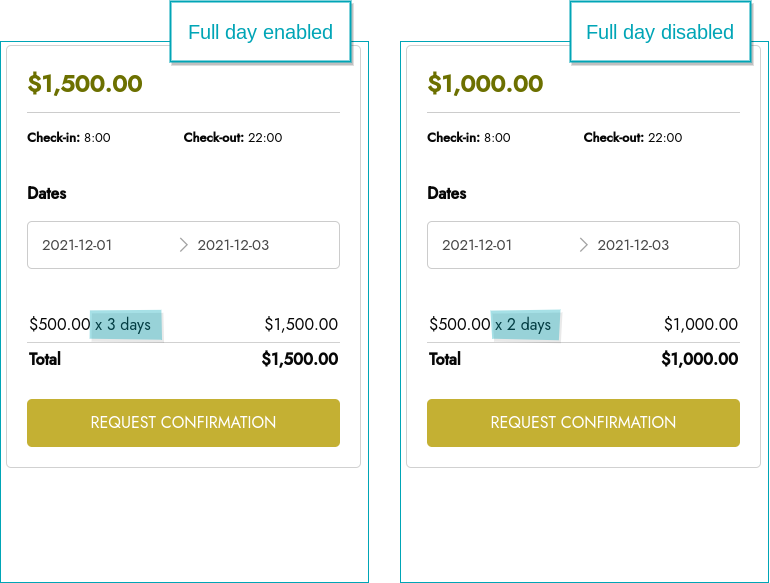
Example – Full day enabled vs disabled
You rent out an meeting room, and decide to include the last day (full-day booking). You do this because the last day, the room is often used almost the entire day, and you want to charge the people for using the room that day.
Full day enabled: By selecting the days from 1 December to 3 December, in the first example, 3 December will be calculated in the total price.
Full day disabled: In the second example, we select the same days, 1 December to 3 December, however in this case 3 December is not calculated as a full day.
The “Hourly bookings” are useful in the following cases:
Appointments
Lessons
Courses
Bookings whose duration can be configured by hours
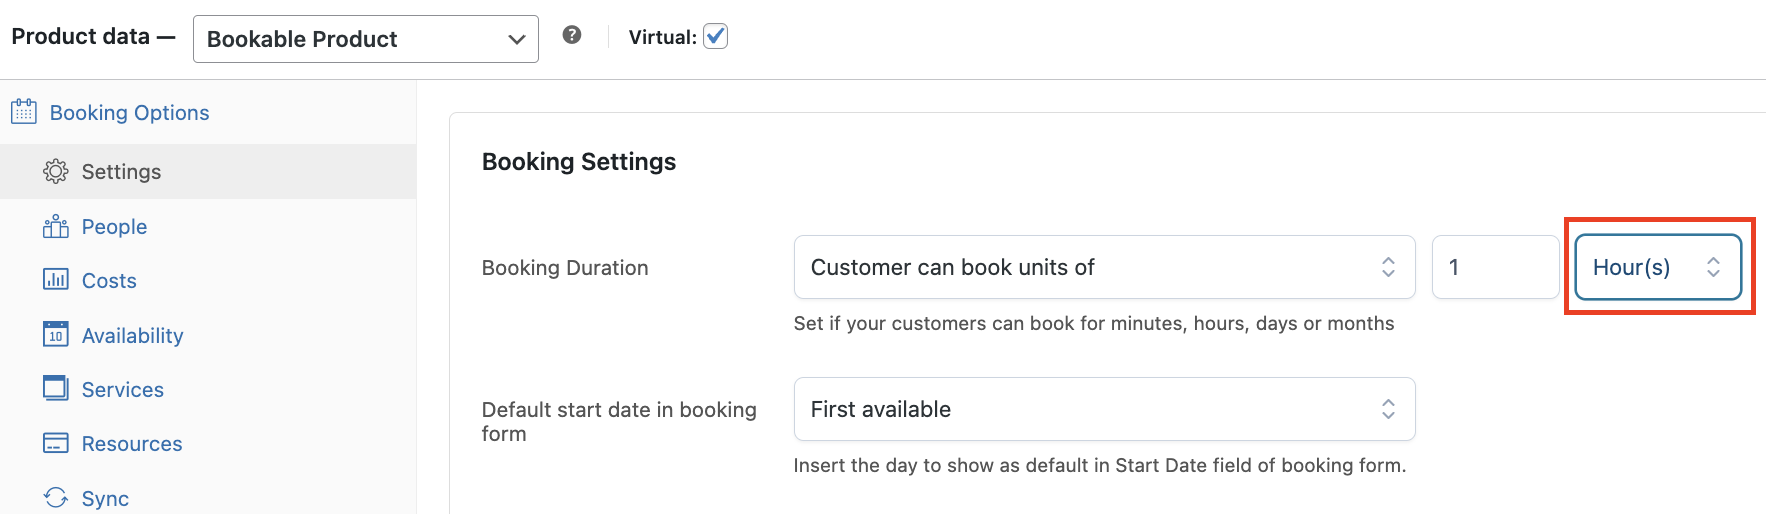
You can enable hourly bookings in the “Booking settings” by selecting “hour(s)”.
You can choose either ‘fixed units of’ or ‘customer can book units of’. Below we will give 2 examples using each one of the options.
Example for fixed units of – Restaurant booking
Example for customer can book units of – Tool rental
example – fixed units of – restaurant booking
We create a bookable product for a restaurant, brunch and dinner, where people can book fixed units of 2 hours. We are closed on Monday mornings and Tuesdays. From 14.30 – 16.00, we have our break. Our daily opening hours are; Brunch from 10.30 – 14.30 and dinner from 16.00 – 22.00.
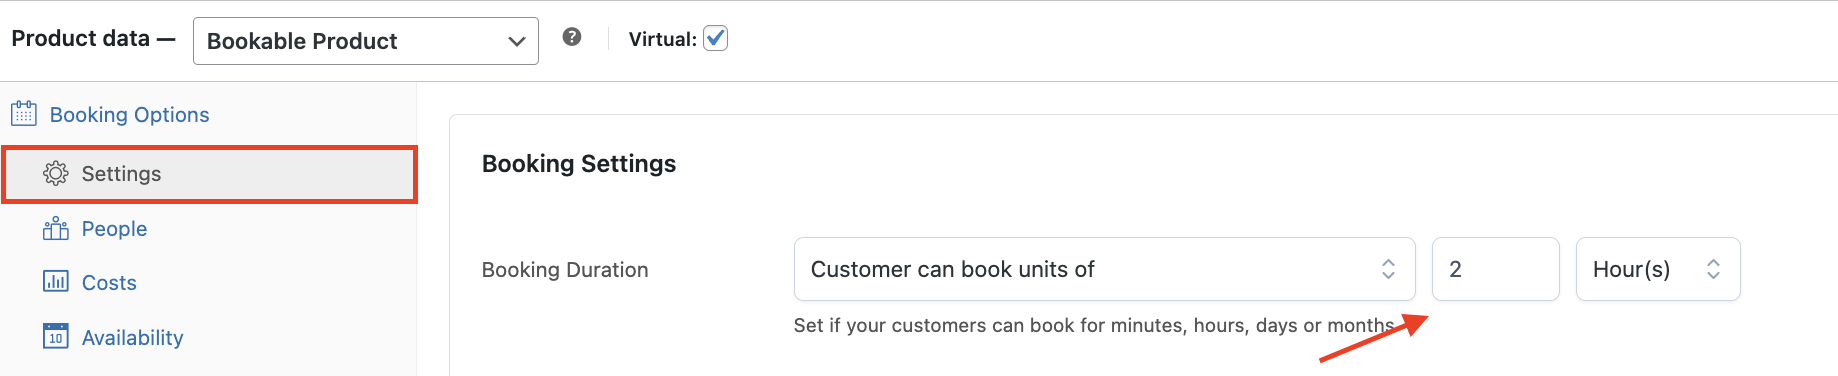
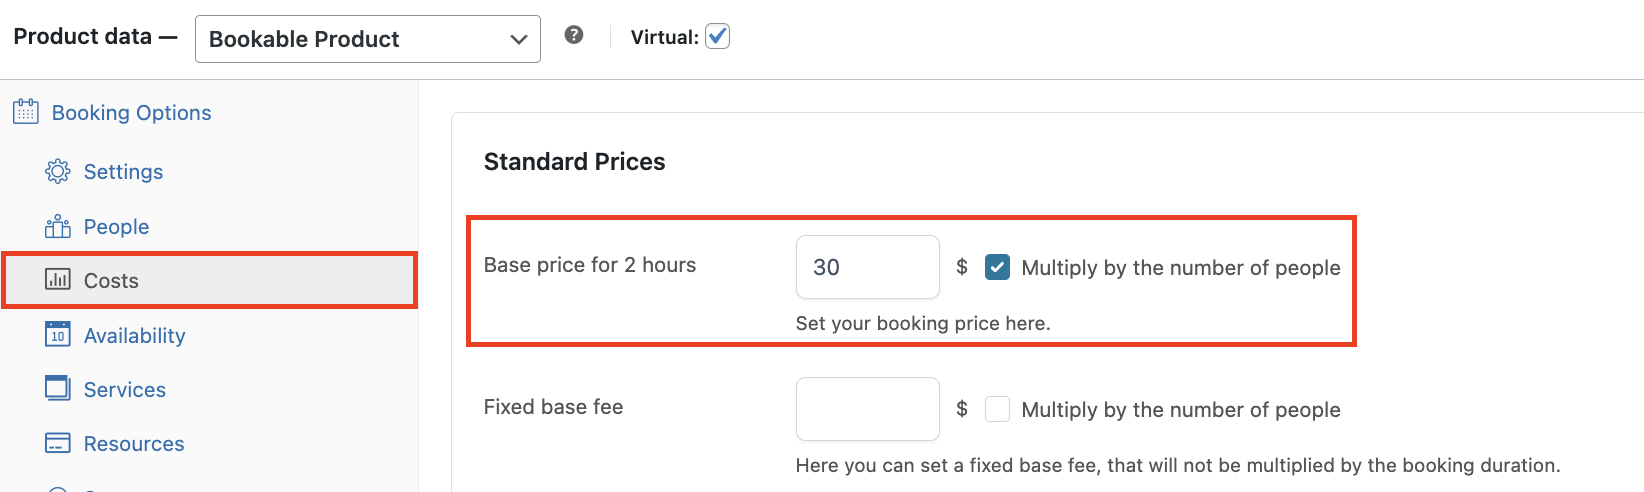
To start off, we set the ‘booking duration’ to “Fixed units of” 2 hour(s). And we set a price of $30 for 2 hours, multiplied by the number of people.
Now we move on to the default booking availability rules.
We set all days to “Bookable” and select “Set hours” so we can start applying our default opening hours. Below an example of what the booking form will look like for the customer:
Now that we have set our opening hours, we will use the “+ Add options for specific days” option, to decide our days of closure.
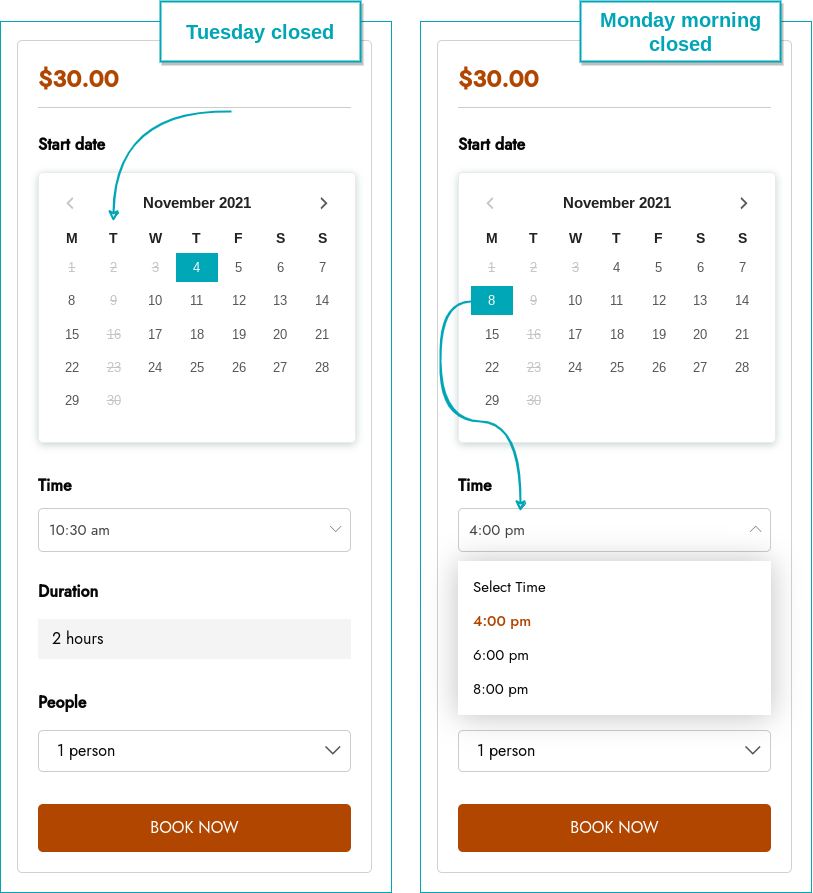
We set Monday to bookable from 16.00 to 22.00 as we are closed for the morning, and we set Tuesday to not bookable all day. These rules you add here will override the default availability rules you set before.
Below an example of what the booking form will look like when the customer wants to select one of these days:
example – Customer can book units of – tool rental
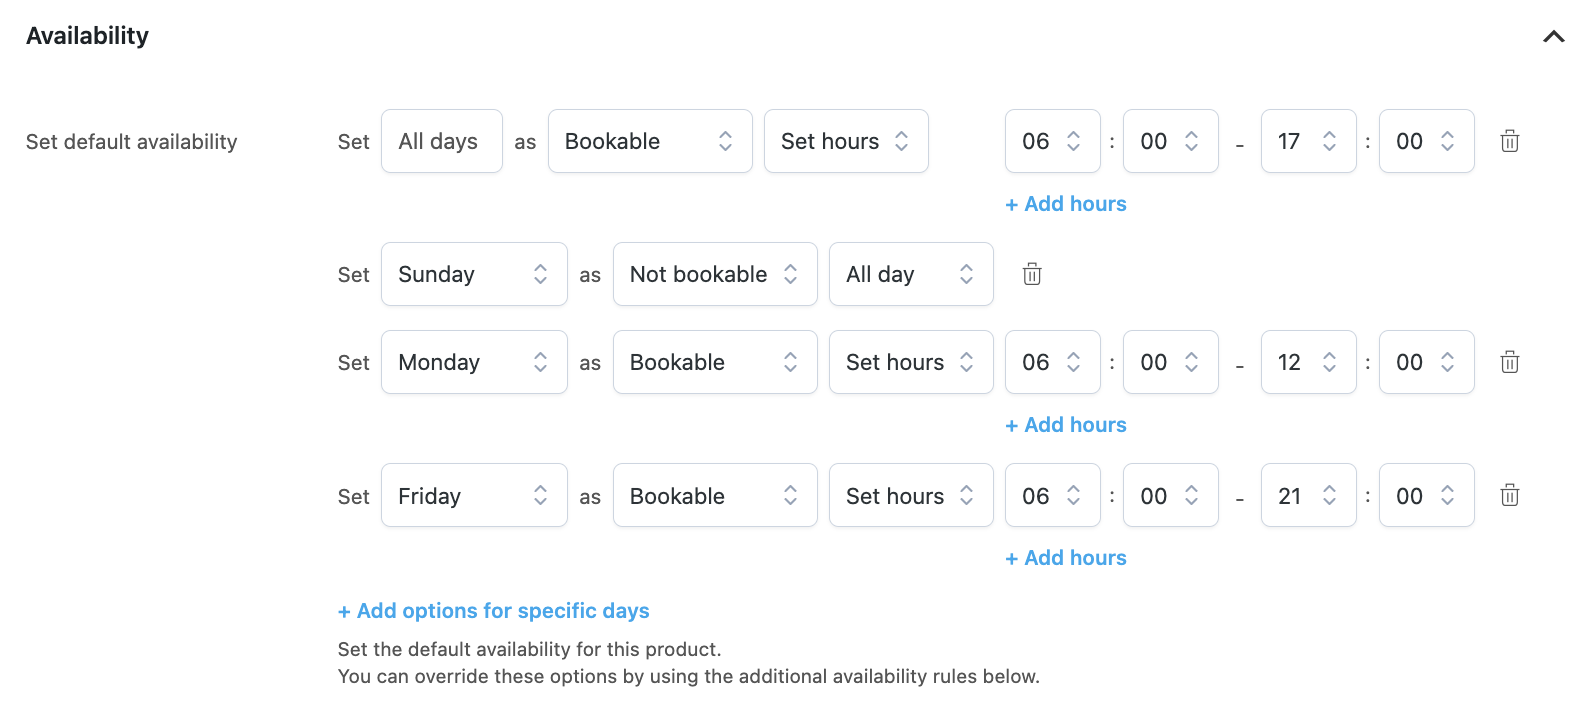
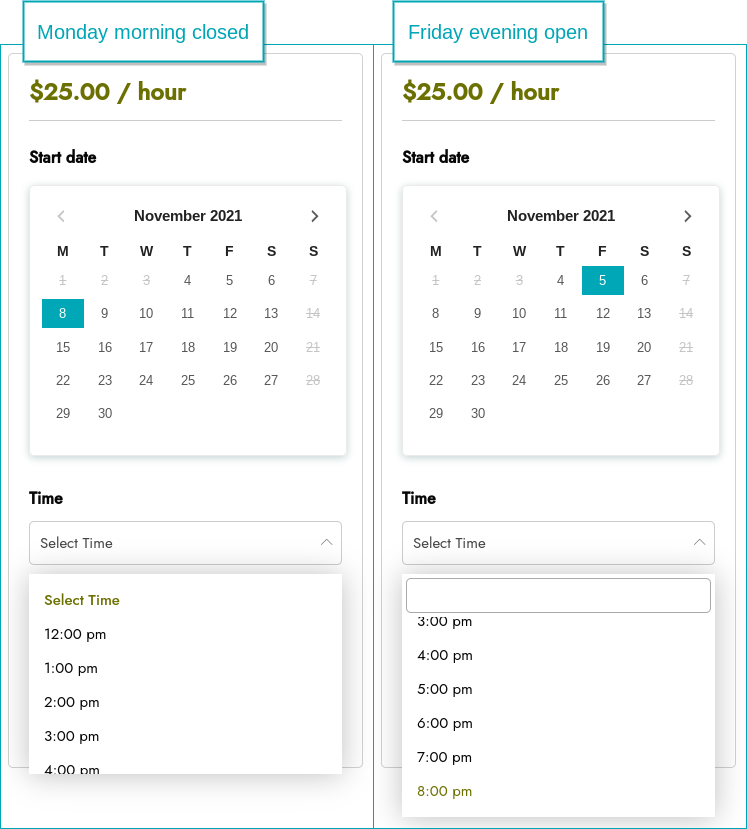
We create a bookable product for a floor cleaning machine rental. People can choose for how many hours they need the product. We are closed on Monday morning and Sunday, and open till late on Fridays. Our daily opening hours are from 06:00 to 17.00 and on Friday until 21.00.
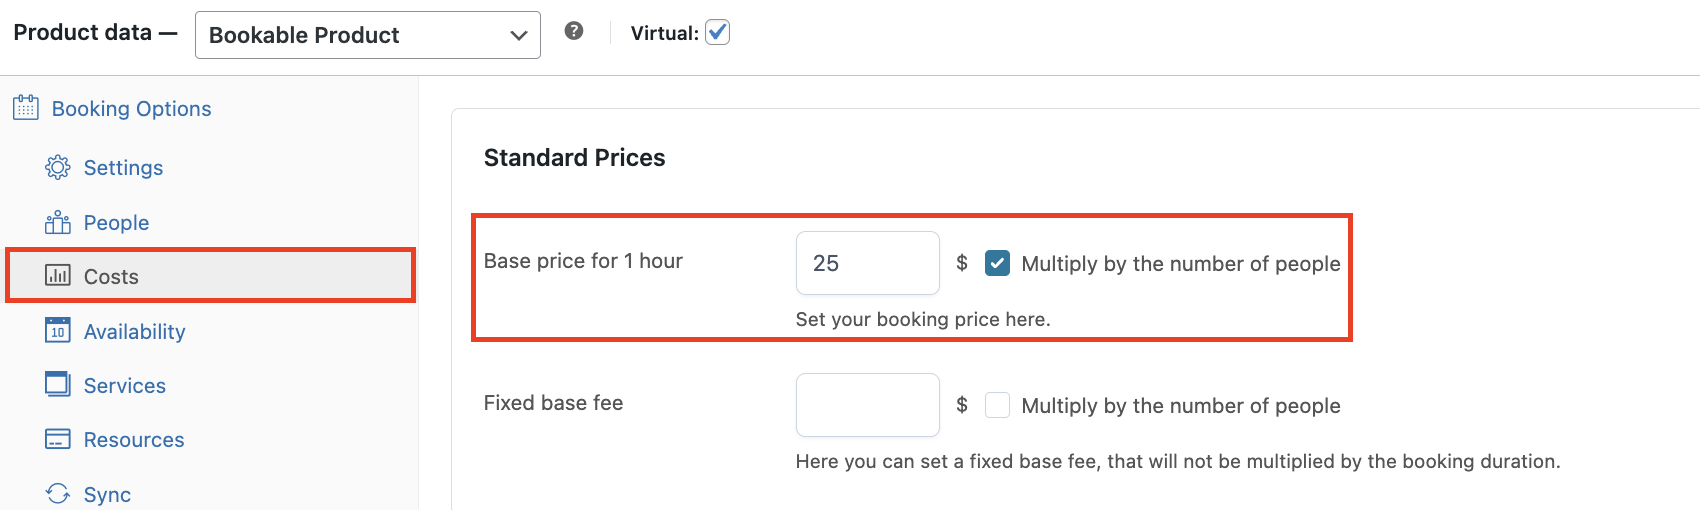
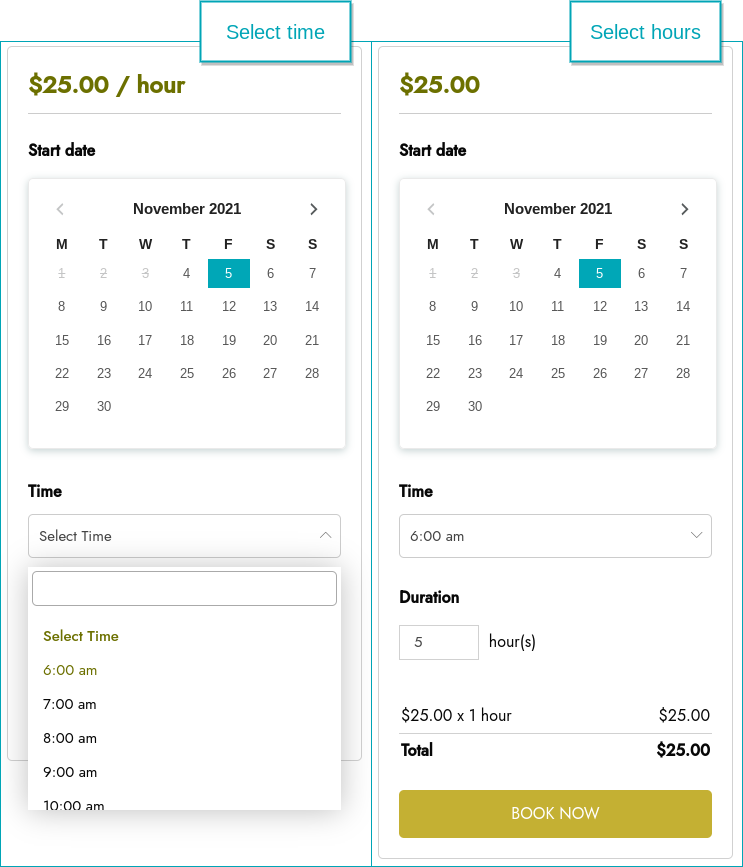
To start off, we set the ‘booking duration’ to “Customer can book units of” 1 hour(s). And we set a price of $25 per hour.
Now we move on to the default booking availability rules.
We set all days to “Bookable” and select “Set hours” so we can start applying our default opening hours. Below an example of what the booking form will look like for the customer:
Now that we have set our opening hours, we will use the “+ Add options for specific days” option, to decide our days of closure.
We set Sunday to not bookable all day, we set Monday morning to not bookable from 06:00 to 12:00 as we are closed for the morning. And we set Friday to bookable from 06:00 to 21:00. These rules you add here will override the default availability rules you set before.
Below an example of what the booking form will look like when the customer wants to select one of these days:
No time available in calendar
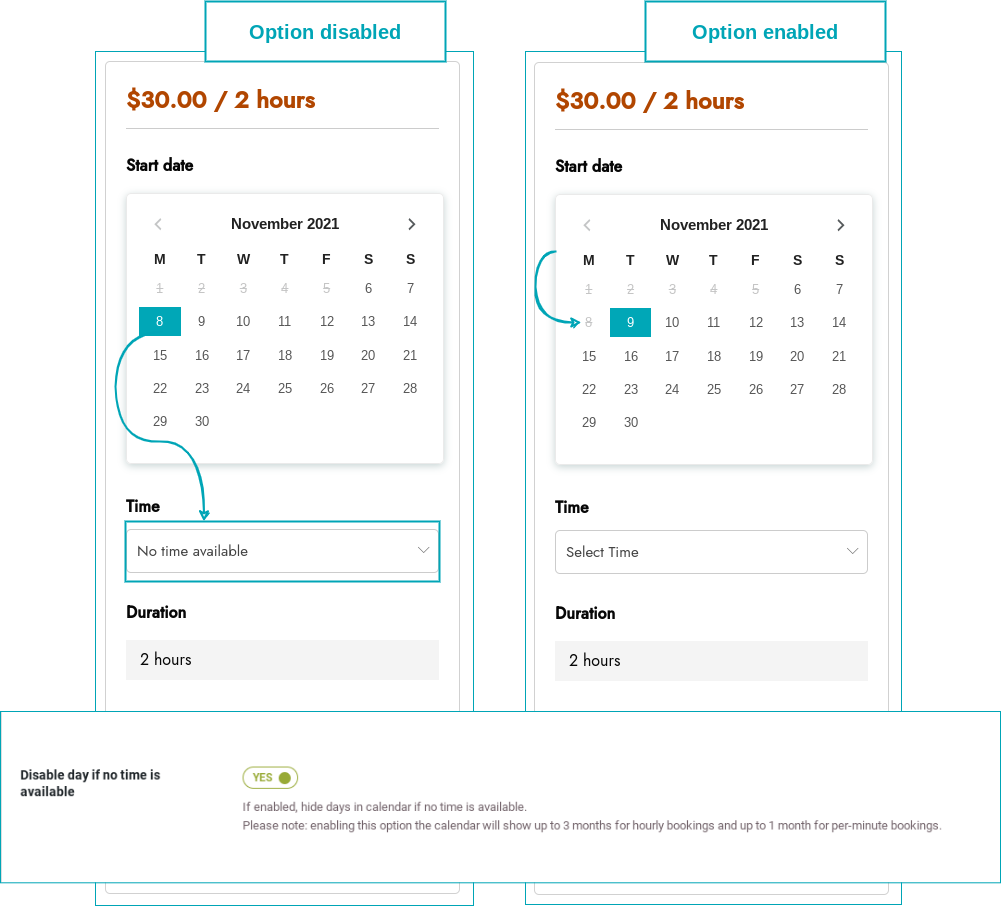
For per-minute bookings, the plugin adds the possibility to disable the complete day, if no time is available. You can do so by enabling the option “Disable day if no time is available“. From YITH > Booking > Settings > “Booking forms”.
We know that all hours of 8 November are booked, therefore it is no longer possible to book this date. In the example above you can see an example of the “Disable day if no time is available” option disabled and enabled. In the disabled image, you can see the date as ‘bookable’ but when you click on it you’ll see ‘no time available‘. In the enabled image, you directly see the date as “not bookable”.
Please note: if enabled, the calendar will show up to 1 month.
The “Minute bookings” are useful in the following cases:
Appointments
Lessons
Bookings which duration can be configured by minutes
You can enable minute bookings in the “Booking settings” by selecting “minute(s)”.
You can choose either ‘fixed units of’ or ‘customer can book units of’. Below we will give 2 examples using each one of the options.
Example for fixed units of – Call with professor
Example for customer can book units of – Massage
example for fixed units of – call with professor
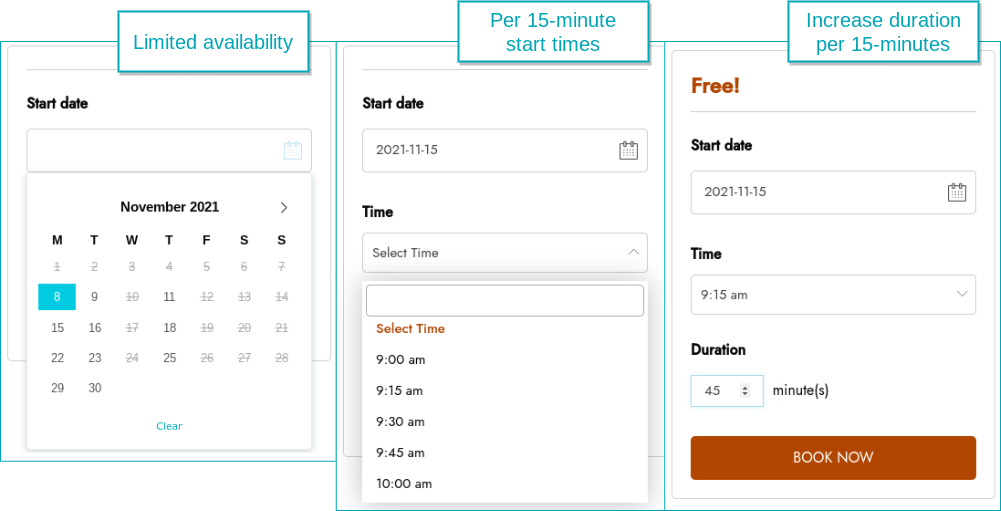
We create a bookable product for a call with the professor at your university. Students can book fixed units of 15 minute calls. The professor only works on Monday, Tuesday and Thursday morning, from 08:00 to 12:30.
To start off, we set the ‘booking duration’ to “Fixed units of” 15 minute(s). And we set a price of $0, as this is a free call with the professor.
Now we move on to the default booking availability rules.
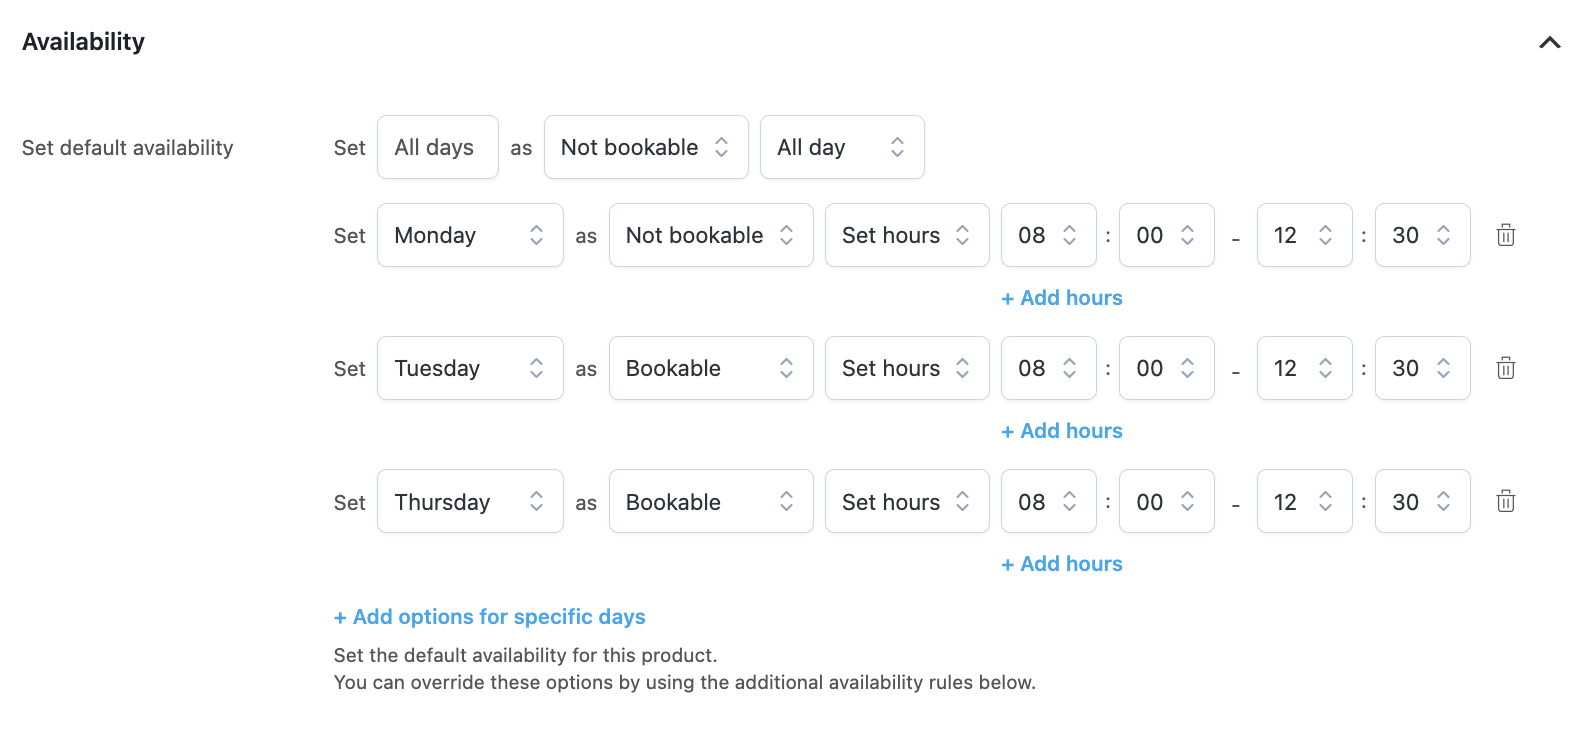
We set all days to “Not bookable” and select “+ Add options for specific days” so we can start applying our default availability hours. In this case, it is quite clear, we add the 3 days and their specific hours.
The options we set in “+ add options for specific days” will override the default availability (first line).
Below an example of what the booking form will look like for the student:
Example for customer can book units of – massage
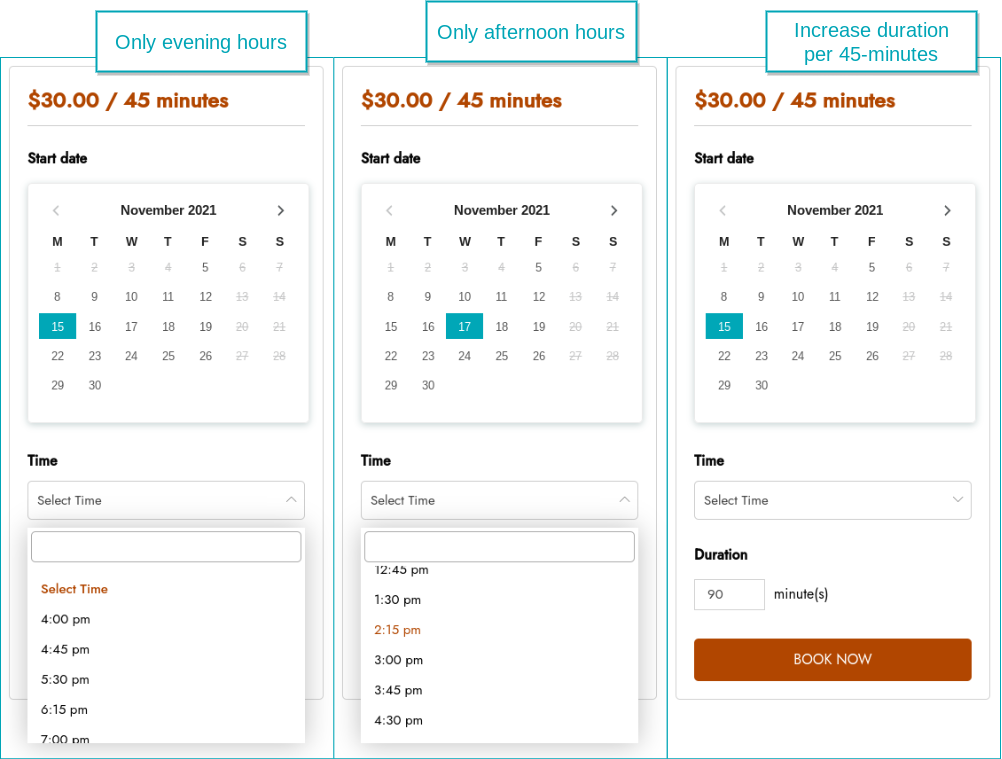
We create a bookable product to schedule a massage, where people can book sessions of 45 minutes. We are only open on weekdays in the late afternoon, except for Wednesday when we open only in the afternoon. Evening hours are from 16:00 to 22.00 and on Wednesday from 12.00 to 18.00.
To start off, we set the ‘booking duration’ to “Customer can book units of” 45 minute(s). And we set a price of $30 per session of 45 minutes.
Now we move on to the default booking availability rules.
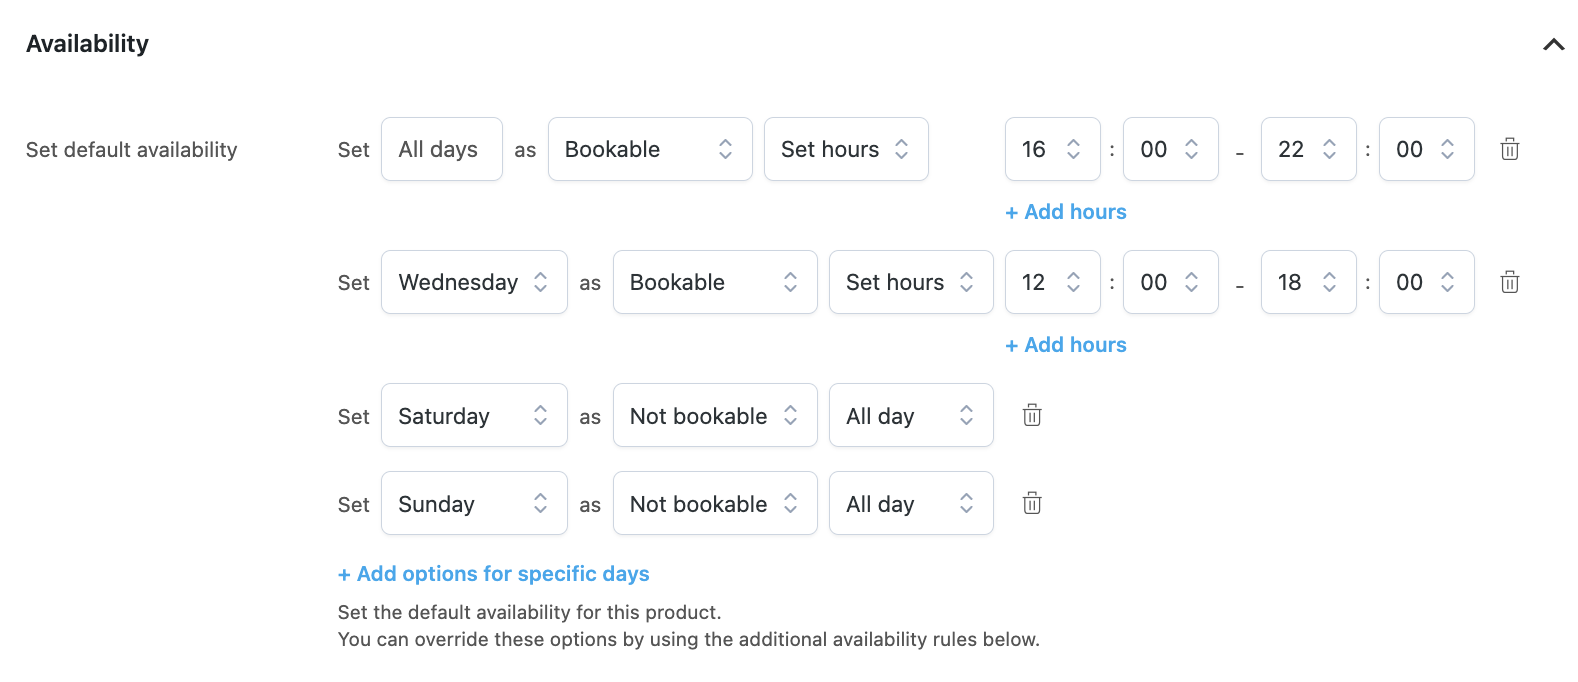
We set all days to “Bookable” and select “+ Add options for specific days” so we can start applying our default availability hours. We add the special hours for Wednesday (overriding the default hours) and the days of closure for the weekend.
The options we set in “+ add options for specific days” will override the default availability (first line).
Below an example of what the booking form will look like for the customer:
No time available in calendar
For per-minute bookings, the plugin adds the possibility to disable the complete day, if no time is available. You can do so by enabling the option “Disable day if no time is available“. From YITH > Booking > Settings > “Booking forms”.
We know that all times of 8 November are booked, therefore it is no longer possible to book this date. In the example above you can see an example of the “Disable day if no time is available” option disabled and enabled. In the disabled image, you can see the date as ‘bookable’ but when you click on it you’ll see ‘no time available‘. In the enabled image, you directly see the date as “not bookable”.
Please note: if enabled, the calendar will show up to 1 month.
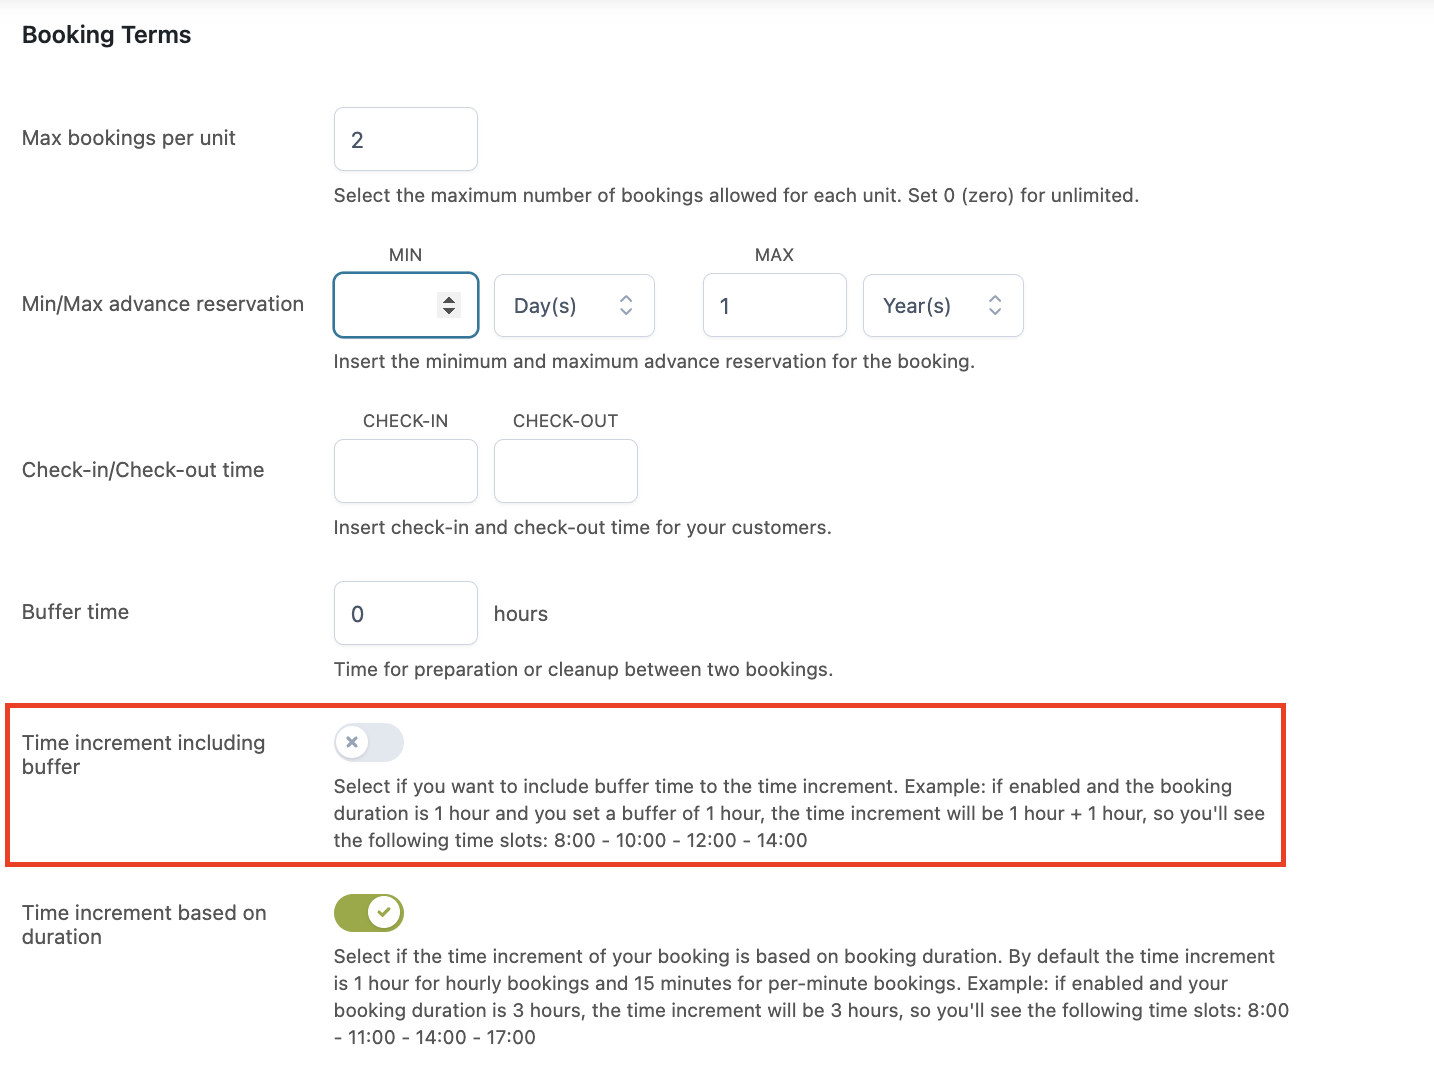
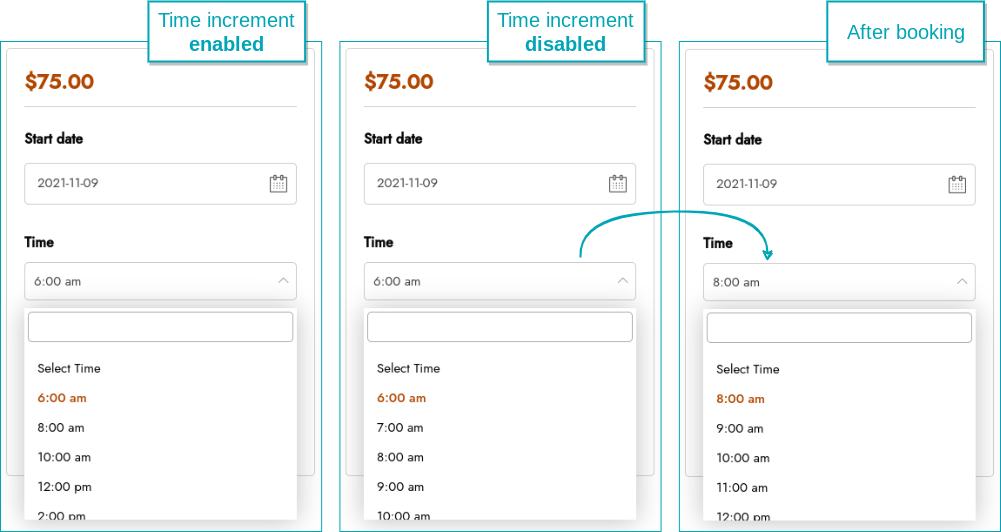
By enabling the option “Time increment based on duration” you can override the default time increment. The increment will be the same as the booking duration. Therefore, for a two-hour booking, the times shown will be 8:00; 10:00; 12:00; etc.
By default, the time increment for hourly bookings is 1 hour. In this example, we have created a two-hour booking and we activated the “Time increment based on duration” option (in “Booking availability).
This means that on the frontend, the customer will directly see time blocks of 2 hours when the option is enabled.
With the option disabled, the customer will see all available hours, and will only see the time increment of 2 hours after someone has placed a booking.
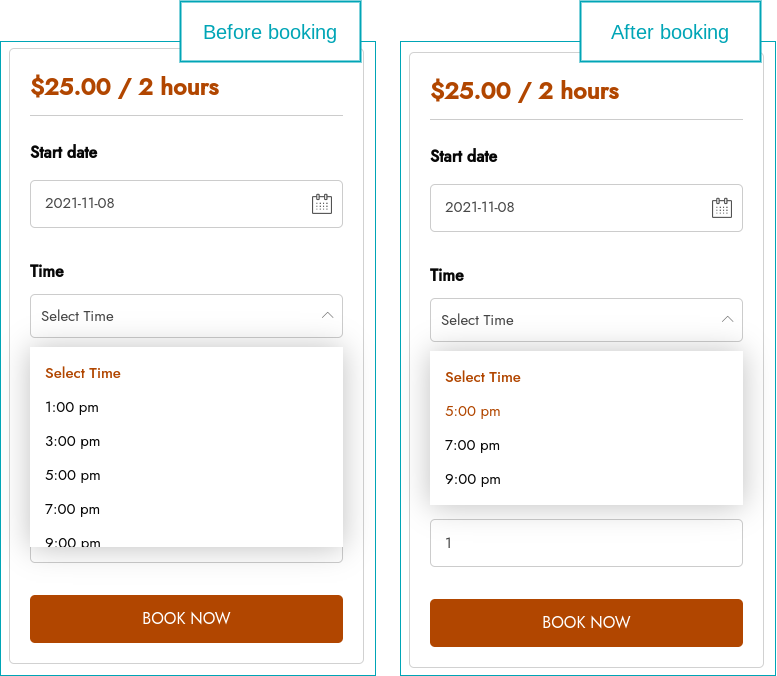
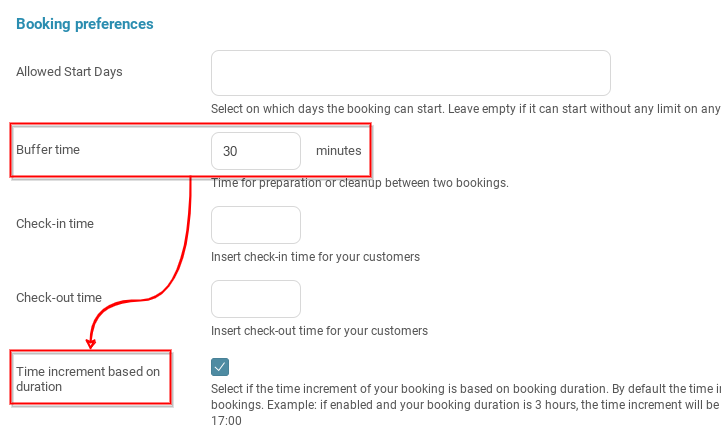
Hourly booking + buffer time
For this example, we have created a 2-hour booking and set the “Buffer time” to 1 hour.
The availability will consider both the booking duration of 2 hours (+ time increment) and the time buffer time of 1 hour after a booking is placed.
As you can see, before the booking you see all hours available. Now we book the 1:00 pm time frame for 2 hours. The customer that wants to make a booking after that, will see 5:00 as the next available time. Considering the 2 hour for the booking + 1 hour buffer time.
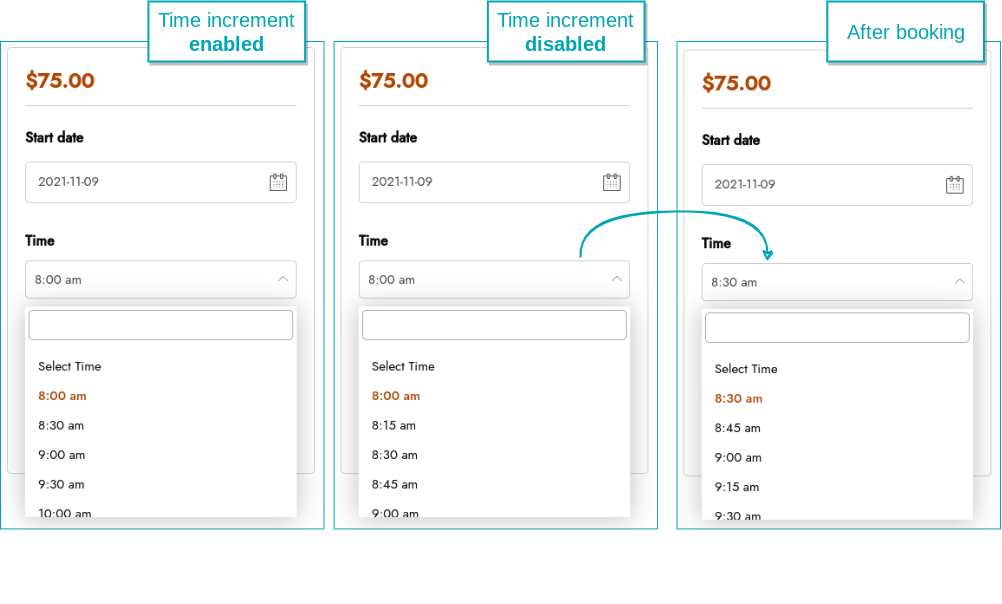
minute booking example
By default, the time increment for minute bookings is 15 minutes. In this example we have created a 30-minute booking and we activated the “Time increment based on duration” option (in “Booking availability).
This means that on the frontend, the customer will directly see time blocks of 30 minutes when the option is enabled.
With the option disabled, the customer will see all available hours, and will only see the time increment of 30 minutes after someone has placed a booking.
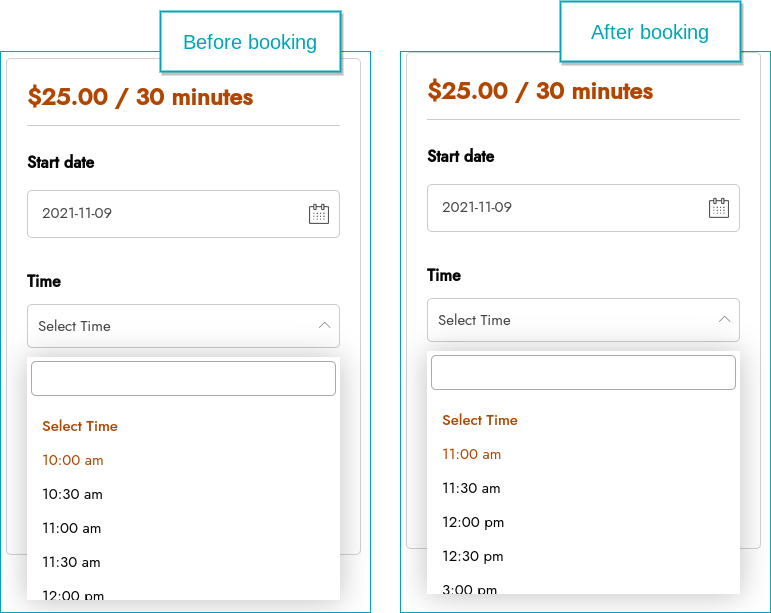
Minute booking + buffer time
For this example, we have created a 30-minute booking and set the “Buffer time” to 30 minutes
The availability will consider both the booking duration of 30 minutes (+ time increment) and the buffer time of 30 minutes after a booking is placed. As you can see, before the booking you see all hours available. Now we book the 10:00 am time frame for 30 minutes. The customer that wants to make a booking after that, will see 11:00 am as the next available time. Considering the 30 minutes for the booking + 30 minutes buffer time.
example Time increment including buffer
This option is available for both hourly and minute bookings. In this example, we use a case with a ‘minutes‘ booking.
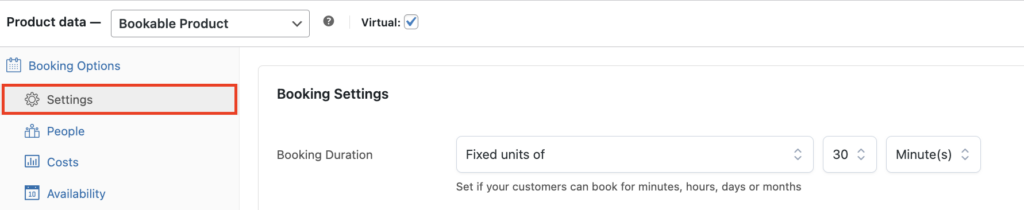
We have set the booking duration to a “Fixed unit of” 30 minutes.
Note: this option only becomes available when you select “Fixed units of” in the Booking settings > duration.
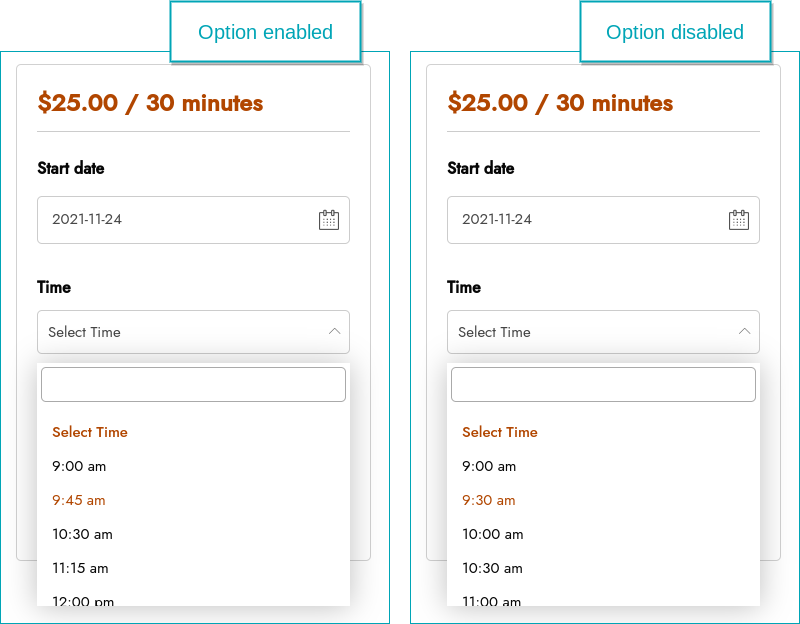
We have set an example using a buffer time of 15 minutes and enabled the “Time increment including buffer” option (in “Booking availability).
Above you see an example of what the booking form looks like when you enable and disable the option. With the option enabled, you can see the 30-minute booking + 15 minutes buffer included. With the option disabled, you will only see the 30-minute booking time frame, after the customer places a booking, the buffer time will be applied as shown in “Minute booking” and “Hourly booking” examples.


