View Product Page

All bookings

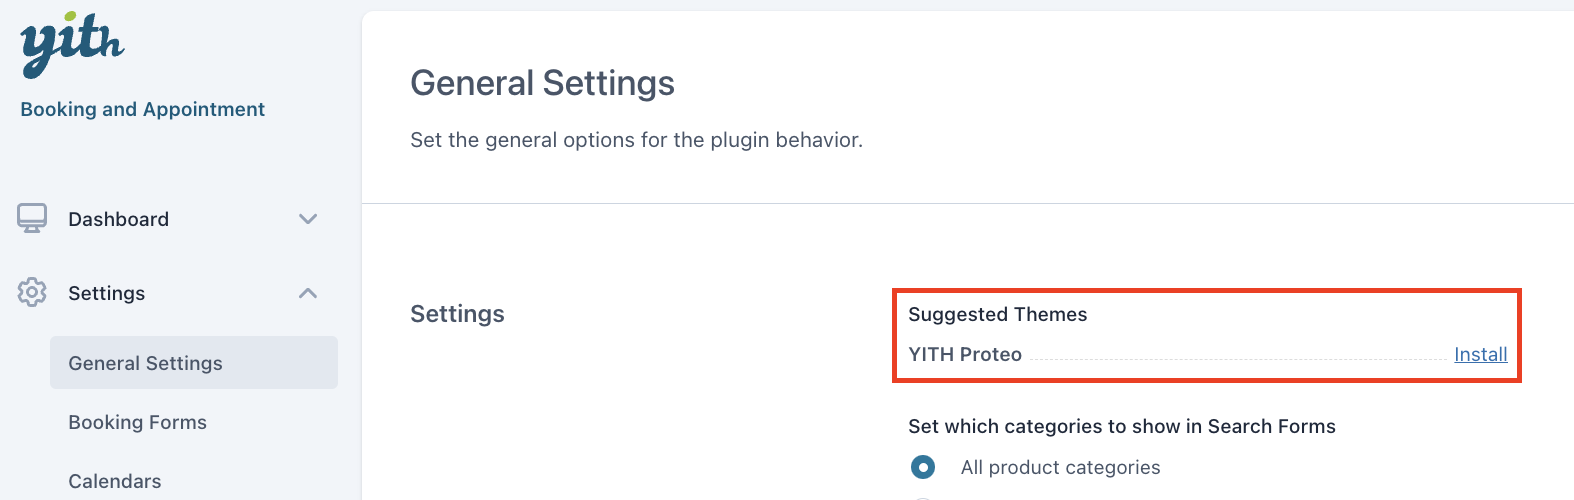
From “YITH > Booking > Dashboard > “All bookings” you can see all bookings made on your store. When no bookings have been placed yet, a message is shown.

Dashboard with all bookings

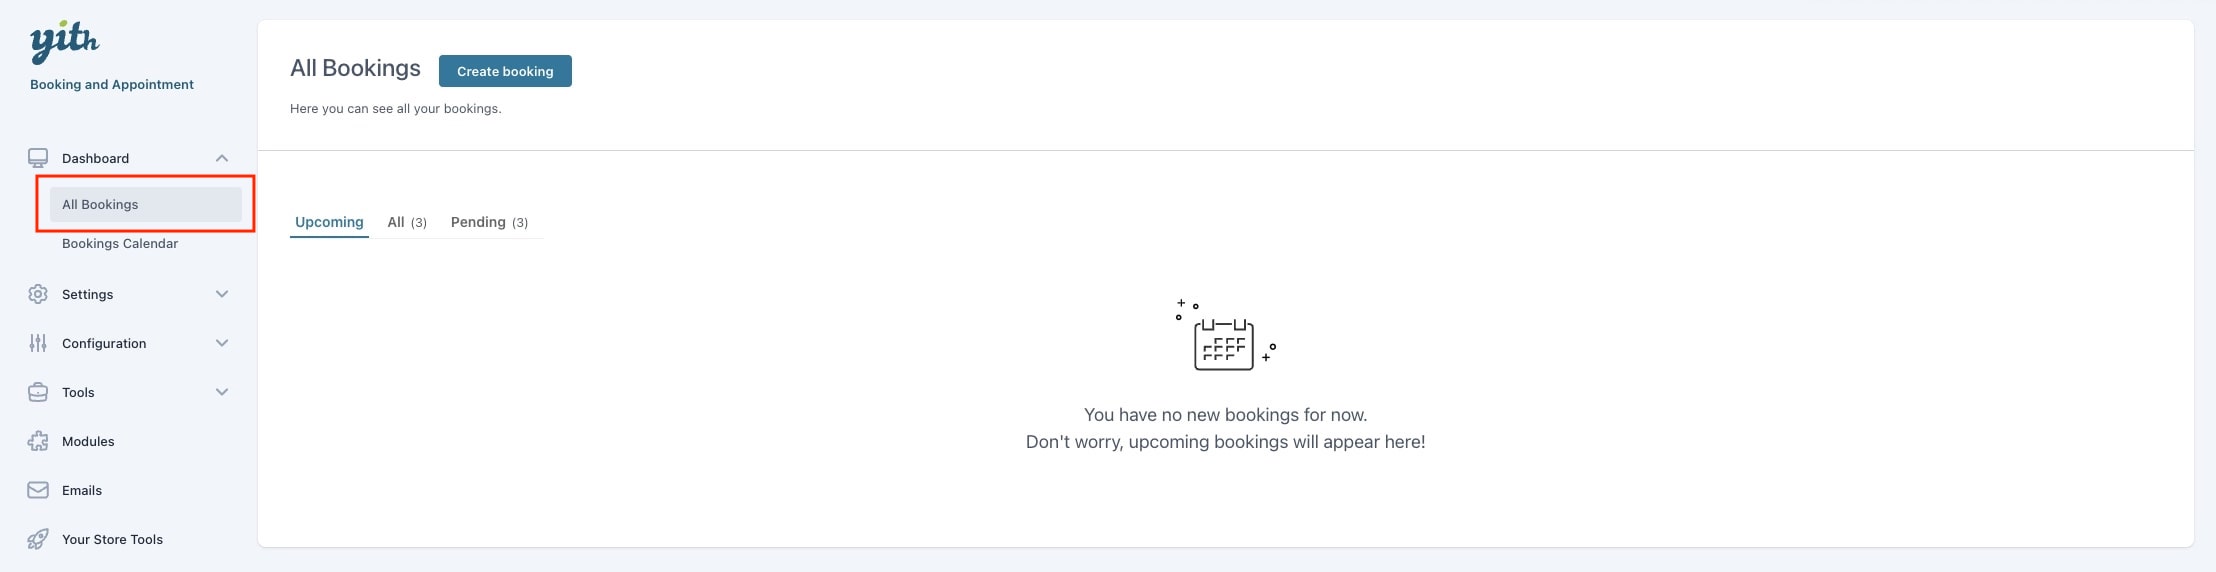
The dashboard of all bookings enables you to filter and search the booking list and use columns you can sort. (By default, it is sorted by ‘date from’).

All bookings table

Within the ‘all bookings’ tab, you can find various sub-tabs depending on the booking status. The default lists of views are ‘Upcoming’ and ‘All’. (Other tabs are automatically populated based on the statuses of your bookings).

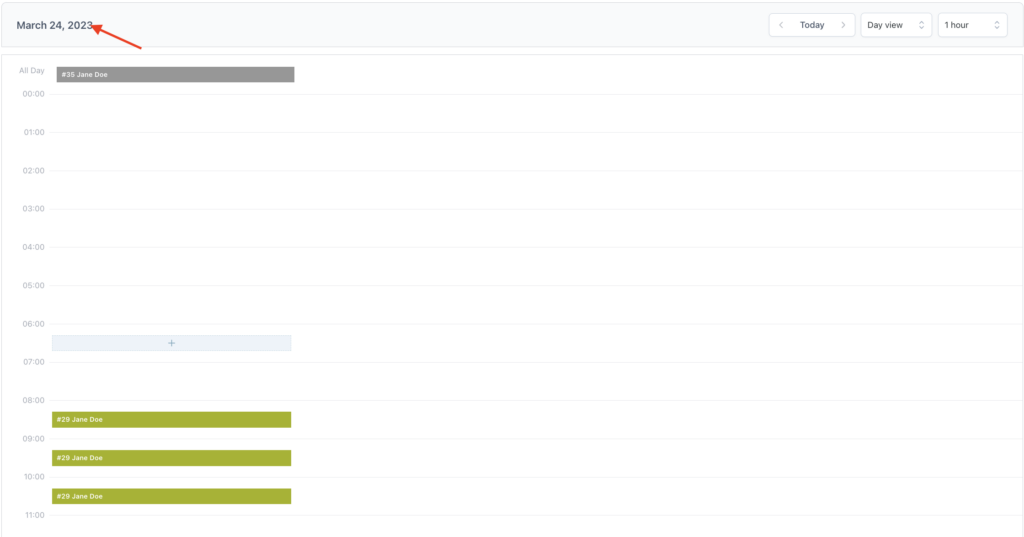
The “Upcoming” view shows all current and future bookings (with visibility in the first column on when it starts).

The amount column refers to the order price, only if there is an order. (Only if you would edit the order item price manually, this price can differ from the booking price).

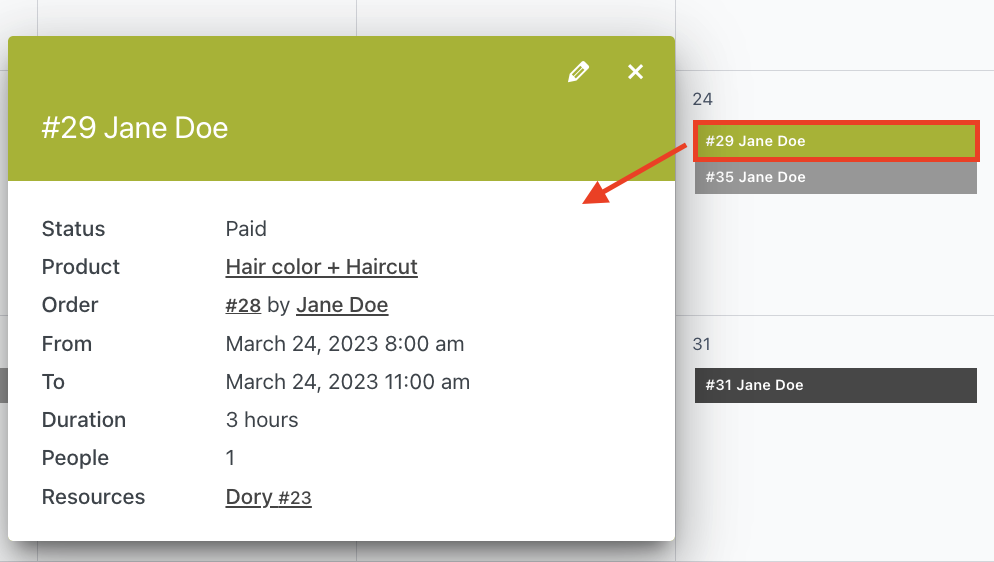
Booking status and icons

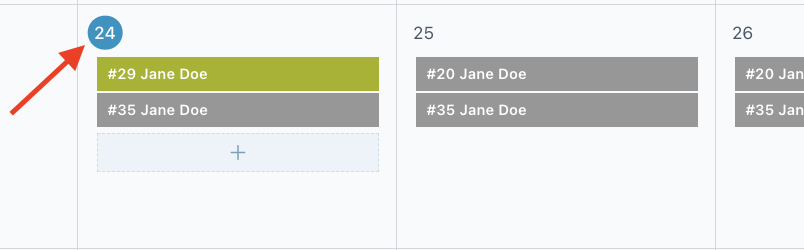
Each booking that is placed will be directly visible, you can distinguish the status of the booking not only by name but also by color.

When hovering over some statuses, you will see the “Action icons” which you can use to directly change the booking status.

The status transitions allowed through “action icons” are:
– Unpaid to Paid ( money icon )
– Paid to Completed ( black check icon )
– Pending to Confirmed ( blue check icon )
– Pending to Rejected ( red X icon )

Actions example

Calendar

From YITH > Booking > Dashboard > “Calendar” you can see a calendar overview with all placed bookings.

Booking calendar

You can filter by:

  • Product
  • Resource (requires the Resource module to be enabled)
  • Date and year
  • Month or day: You use the ‘Daily view‘ for hourly and/or per-minute bookings; you use the “Monthly view” for daily bookings.

Using the arrows beside the ‘month/day’ header, you can switch easily to the previous/next month or day.

You can also search for any terms available in the booking details.

monthly view
Booking calendar - monthly view
daily view
Booking calendar - day view

Each booking that is placed will be visible directly in the calendar, the color of the booking indicates the status of the booking.

Moreover, you can both check the single booking details by clicking on the specific booking…

and all the bookings for that specific day by clicking on the day.

Click on day
Bookings for specific day
Booking status
Booking status colors

If you want to change the name of the shown booking (show only name, only product, etc.), you can! Please check the specific settings on this page here.

Availability left

If you want to know how many seats, rooms, beds, etc. are left for a certain booking product, that is possible! You can simply filter the product you want to see, select monthly view or daily view, select date, and hit “filter”. 

Monthly view
Availability left - monthly view
daily view
Availability left - day view

The calendar view only shows the selected product and its availability in the header of the specific day or time.

Note: This filter can only be applied to booking products that have the “Max bookings per unit” option greater than one.

Calendar by resource

From this view, you can also filter bookings by the selected resources and see a calendar of the specific resource.

This is very useful, for example, if your resources are staff members and you want them to see an updated calendar of their day.

Filter bookings by resource

Create new booking

From the calendar, you also create new bookings by clicking on the “+” icon that shows on mouse hover.

Booking creation from the calendar

From the popup, you can select the following data:

  • User: link the booking to an existing user, or a guest user
  • Bookable product: search the bookable product
  • Assign order: decide whether to link the booking to an order or not or if you want to create a new order

If you are creating a booking for a product configured with hourly duration, the form will show all the related fields as in the example below.

Create hourly booking

As an admin, you can also create the booking for past and future dates. This can be useful, for example, if you have accepted an in-person booking on March 14 for a room in your hotel and decide to register it the day after, March 15.

Edit booking page

From the ‘All bookings’ list, you can click on the booking ID number to enter the edit booking page.

Open booking details

You have oversight of the booking details and the possibility to edit them. You can change the booking date and duration:

Edit booking date

Note: the admin should double-check the availability before changing the date because the calendar used on this page does not indicate the availability.

You can also edit the number of people and the booking services:

Edit people and services

Add notes

Another useful option is to add notes to the booking. These can either be private notes (only visible to the admin) or notes shared with the customer.

Add booking notes

To distinguish them, you can see them in different colors, light grey for private notes, and light yellow for notes to customer.

When choosing the “Note to customer” option, the customer will also be informed via email, with this note.

Booking PDF

From the sidebar, you have the option to download the customer PDF and the admin PDF. The admin PDF also includes the user information.

Customer pdf

customer pdf

When you (or the customer) would click on the product “Sydney Hostel” in this case, the user will be redirected to the frontend product page. When you click on the “order number” you will be redirected to the My Account > My orders page.

booking pdf for admin

As you can see, the same information is for the customer PDF + the user info.

When the admin clicks on the “Sydney Hostel” in this PDF, you will be redirected to the product edit page in the backend, the same goes for the “order number” you will be redirected to the order edit page in the backend.

General settings

From YITH > Settings > “General settings” you can decide which theme you want to use in combination with the booking plugin. We suggest using our YITH Proteo theme, but you are free to use your own theme.

Suggested themes

You only have to activate it by clicking on the link ‘activate’, and you are ready to go. The plugin will show a ‘check mark’ once the theme has been activated.

booking proteo integration

From Appearance > “Proteo Theme” you can find the 3 ‘Booking’ skins you can activate and use. These skins are ONLY available if you’ve purchased and activated the YITH WooCommerce Booking and Appointments plugin.

For more information on how to set up your Proteo theme, check out the documentation here.

Now we go back to the ‘General settings’ page, as from here you can also set some other general settings:

General settings
  • Set which categories to show in search forms:
    • All product categories: Useful if you do not sell non-booking products.
      • Choose specific product categories: Useful if you also sell non-booking products. Eg. you do not want to show the clothing category in the booking search form.
        If this option is not available in your installation, make sure you have enabled the related module from YITH > Booking > Modules.
  • Reject a “Pending confirmation” booking after a specific time: Decide if you want to reject a booking automatically and set the number of days. The booking with pending confirmation will be rejected automatically when reaching the number of days you have previously configured.
  • Set paid booking to “Completed”: Decide if you want to set a booking to ‘completed’ automatically and set the number of days. The paid booking will be set to completed automatically, as soon as the End Date has been exceeded by the specified number of days.

Please note: it doesn’t take into account hours/minutes since the check is executed daily.

Google Map API KEYS

To set the location for your products, the plugin uses Google Maps services.

First of all, you have to generate and copy your “Google Maps API Key”.
To access Google, go to https://developers.google.com/maps/documentation/javascript/get-api-key, and click on “Get a key”.

Google Maps API KEy authentication

After selecting the project, in the next step, you will obtain the key required by the plugin.

Google Map API KEY

Now, make sure you have enabled the Google Maps module from YITH > Add-ons > Modules.

Now, you will be able to see the Google Maps API Key fields in YITH > Booking > Settings > General settings > “Google Maps API Key”: copy and paste the key there.

Google Maps

Now open your product settings (Booking Options > Settings > Google Maps), type in the name of the location you wish to select and you are done.

You can set 2 different API Keys for:

  1. Google Maps API Key
  2. Google Maps Geocode API Key
Google Maps API keys

To set them correctly, you should create 2 different API Keys in Google Console:

1. The Google Maps API Key can be restricted through HTTP referrers.

api key settings google

2. The Google Maps Geocode API Key can be restricted through IP addresses.

api key settings google

How to enable Geocode and Places libraries in your Project

To have everything work correctly, you need to enable Geocode and Places libraries in your Google project.

Geocode library

To enable the Geocode API library, please follow this procedure:

Geocode-library
  • Now search for Geocode API and enable it.
geocode-library2
Geocode-library3

Places library

To enable the Places API library, just follow the same procedure described above.

How to display the map

By entering the shortcode [booking_map] within the Booking product page, the Google map linked to the product location will be automatically displayed.

Map

The shortcode attributes are:

  • width: map width
  • height: map height
  • zoom: map zoom level
  • type: map type, choosing from:
    • roadmap: displays the default road map view. This is the default map type.
    • satellite: displays Google Earth satellite images
    • hybrid: displays a mixture of normal and satellite views
    • terrain: displays a physical map based on terrain information.

Usage example:

 [booking_map width='300px' height='300px' zoom='100' type='satellite']

Booking form position

From YITH > Booking > Settings > “Booking forms” you can manage the booking form position on the single product page.

Booking form options
  • Show booking form in booking product page to: Decide to show the form to all users or only to logged users. If you decide to show it only to logged users, guest users will not be able to place a booking.
  • Booking form position:
    • Default
    • Before summary
    • After title
    • Before description
    • After description
    • After summary
    • Use widget
    • None (use shortcode)

We especially want to highlight the “use widget” and the “none” options.

None – use shortcode

Selecting the “None” option, allows you to use the “[booking_form]” shortcode to place the booking form anywhere you want. You can use it without any parameters on the product page.

If you want to use it on other pages, you’ll need to use a parameter (product ID), eg: “[booking_form id=123]”.

example shortcode

Use widget

Selecting the use widget” option, the special “Booking product form” widget becomes available. You can find this widget in Appearance > Widgets.

Bookable product form - widget

This widget needs to be added to the product page sidebar. If you are using the YITH Proteo Theme, you can use any Proteo additional sidebar (sidebar 2, sidebar 3, …), you should set the sidebar to be shown on the product pages.

Note: the widget is only shown on the product page. If your theme does not include a product page sidebar, you are not able to use this widget.

example widget

People in booking form

If you want to show the types in a unique field in the booking form, you can enable the option “People types layout” in the YITH > Booking > Settings > “Booking form” section.

People types layout

  • Show as dropdown: Click on the “people” field in order to see the people types.
  • Show people type fields: People types are shown in the booking form.
    • Columns for people fields: Decide how many columns to show.

show people

How to enable people management for your bookable products? Take a look at this page here.

Calendar options

From YITH > Booking > Settings > “Customizations” you can manage the way you want to show the date picker and calendar in the booking form.

You can select the format of the date and the time picker in the calendar view.

Date picker options
  • Date picker format
  • Time picker format

There is also an option to add a custom format. When you select your preference, you can see the preview below your selection.


Now we can go back to YITH > Booking > Settings > “Booking forms” to manage the style and layout of the calendar shown to the customers.

Date picker layout options
  • Date range picker layout: Decide to show it in a single line or separate lines.
  • Date range picker columns: Decide to show it in a single column or 2 columns.
examples of layout and columns
show calendar options
  • Calendar style: Decide to show the calendar as a dropdown or inline on the page.
calendar inline or dropdown example
  • In calendar load: How many months are loaded in the calendar, we recommend 3. (You will be able to see the complete year, other months are loaded in AJAX to improve performance).

Resources and time selector layout

Resources default layout: choose to show the resources in a dropdown menu or list them all in the booking form. This option can be overridden on each bookable product edit page.

Resources in a dropdown
Resources as a list
Resources as a list

Time selector layout: choose to show all available time slots either in a dropdown menu or by listing them in the booking form.

Time selector in dropdown
Time selector as a list

Calendar options
  • Check min/max duration: Enable so the plugin considers the min and max duration to show available dates in the calendar.
  • Update non-available dates on loading (AJAX): Only enable if you use plugins to cache product pages.
  • Disable day if no time is available: Enable to hide days in the calendar if no time is available.
Block dates for pending bookings
  • Block dates for pending bookings: Enable to block dates after receiving bookings with a confirmation request. In this way, it won’t be possible for other users to book the same dates as bookings with pending status. To unblock the dates, set the pending bookings to Rejected.

Services options

From YITH > Booking > Settings > “Booking forms”  you can manage the visibility of the services and their details.

Please, note that these options are only visible if you have enabled the Services module from YITH > Booking > Modules.

Services settings in booking form
  • Info to show before “Book” button: (Example)
    • Prices for services
    • Descriptions for services
    • Included services
    • Totals
  • Service info layout: (Example)
    • Show in tooltip
    • Show inline
  • In case of errors in the booking form: (Example)
    • Disable the “book” button and show messages when updating the form
    • Show error messages after clicking on the “book” button
Example with all services selected
frontend booking form example


Example of services layout inline and tooltip
show services info inline or tooltip


Example In case of errors in the booking form
error in booking form