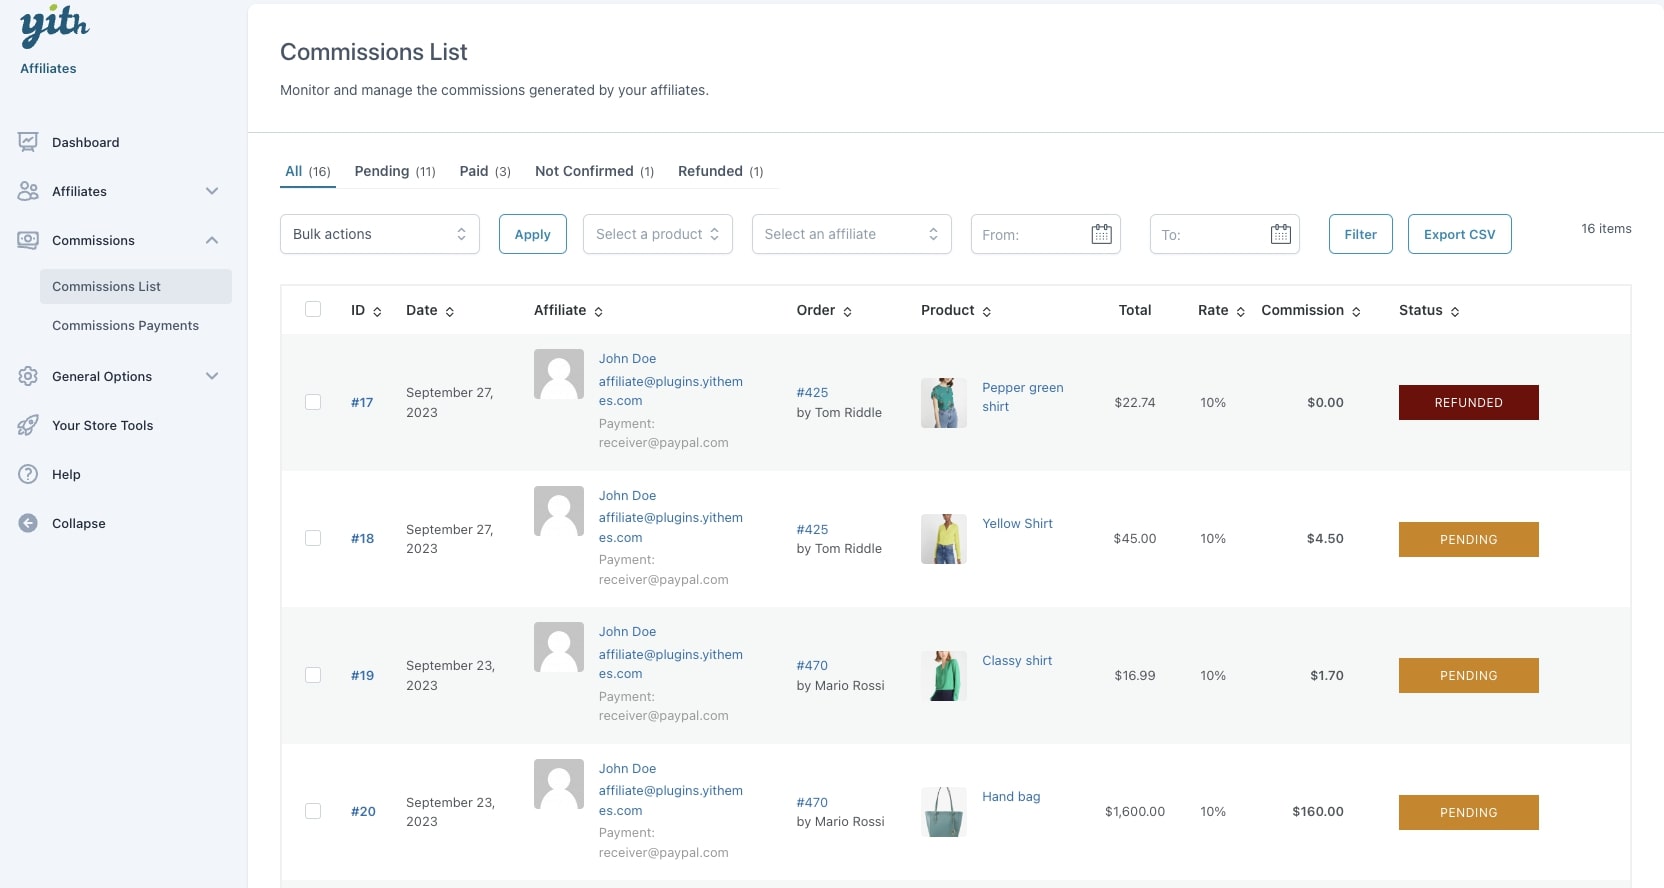
From the Commissions List page, you can see a list of all the commissions generated in your shop.
The plugin will generate one commission for each item line in the order, so, for example, if you purchase 3 different products in the same order, the plugin will generate 3 commissions. If you purchase 3 items of the same product in one order, instead, the plugin will generate only 1 commission item.
You can see a table with the following information (each column title can act as a sorting filter):
Commission ID
Date
Affiliate
Order ID and customer
Product
Item total
Rate
Commission
Status
Additionally, you can also show the following columns and enable them from the “Screen options”.
Refunds (per item total)
Discounts (per item total)
Category
Payment ID, if any. This will link to the payment details.
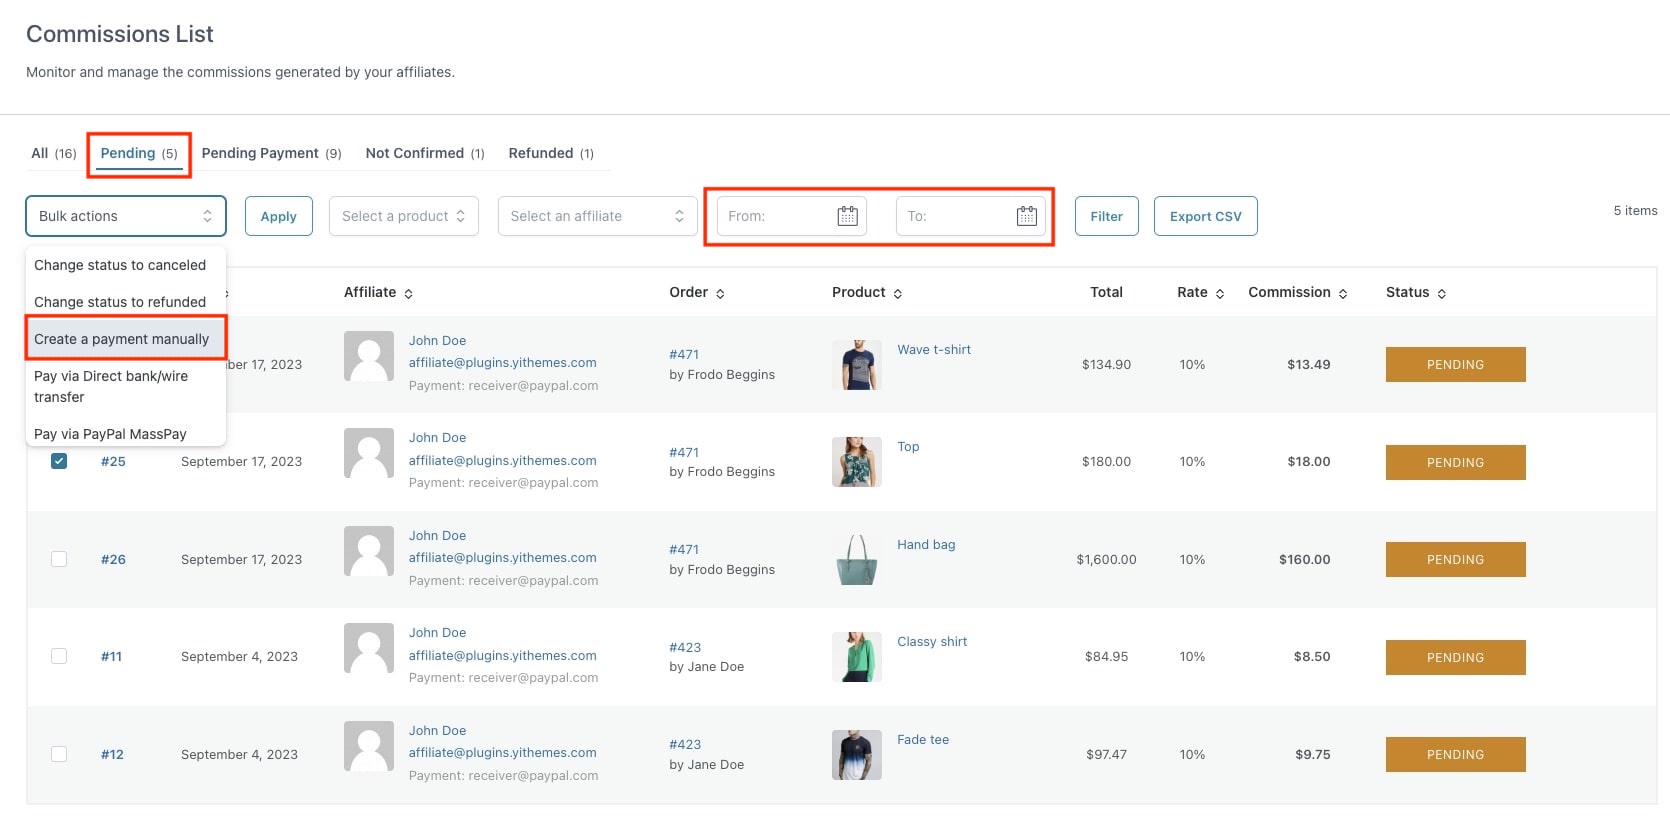
Filters and bulk actions
Based on the commission status, you can filter the view of the commissions using the filters on top and filter for example only by Pending or Paid commissions.
Yet, you can further filter these views using the additional filters by:
product
affiliate user
date
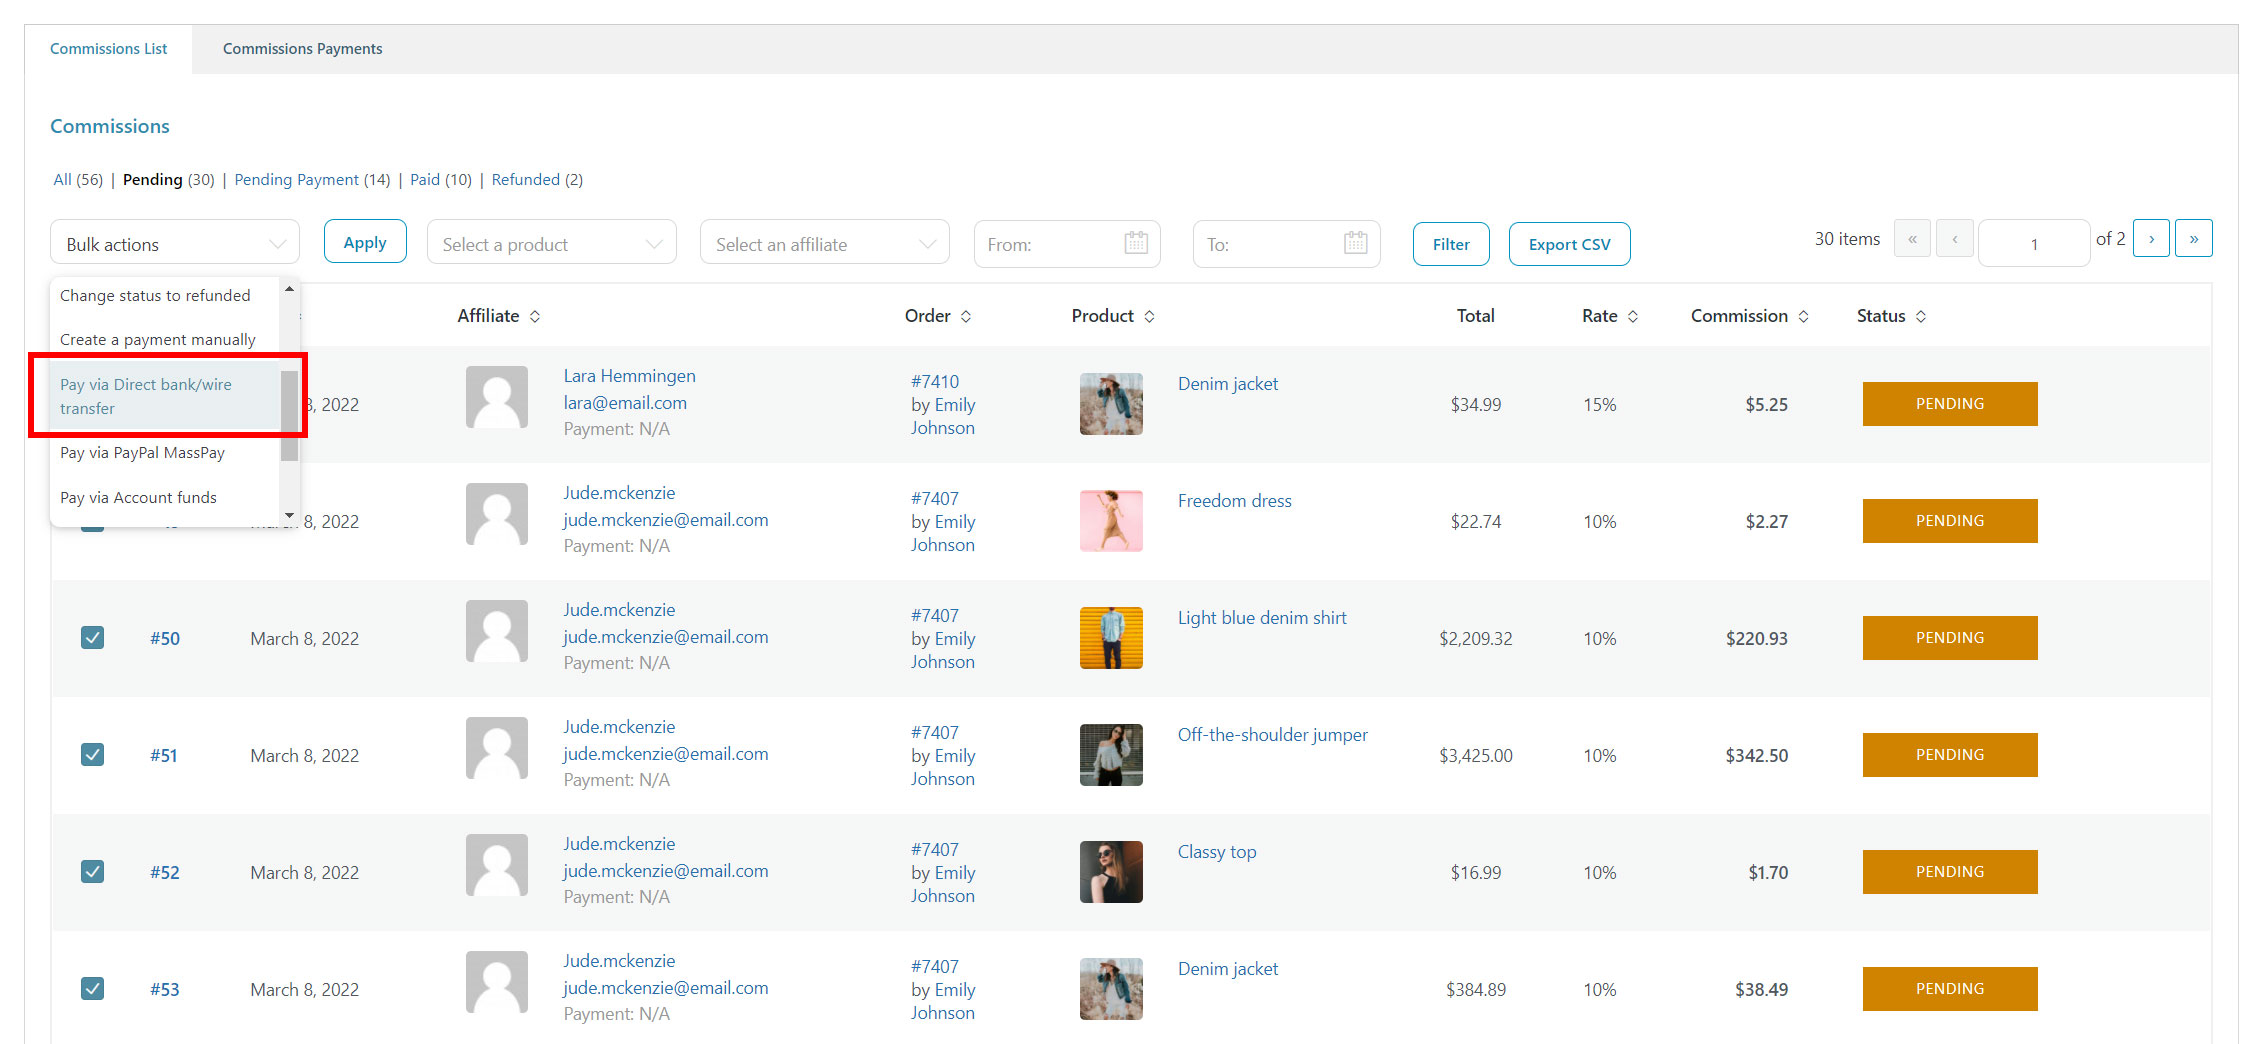
You can also bulk edit them and apply the following actions:
change status to “pending”
change status to “not confirmed”
change status to “cancelled”
change status to “refunded”
create a payment manually
pay via Direct bank/wire transfer
pay via Direct Mass pay
move to trash
As you can see, you can both change the commission status, trash them or create a payment record. For more details about how to generate payments, please, refer to this page.
CSV Export
It is also possible to export the commissions’ list or filtered commissions only into a CSV file.
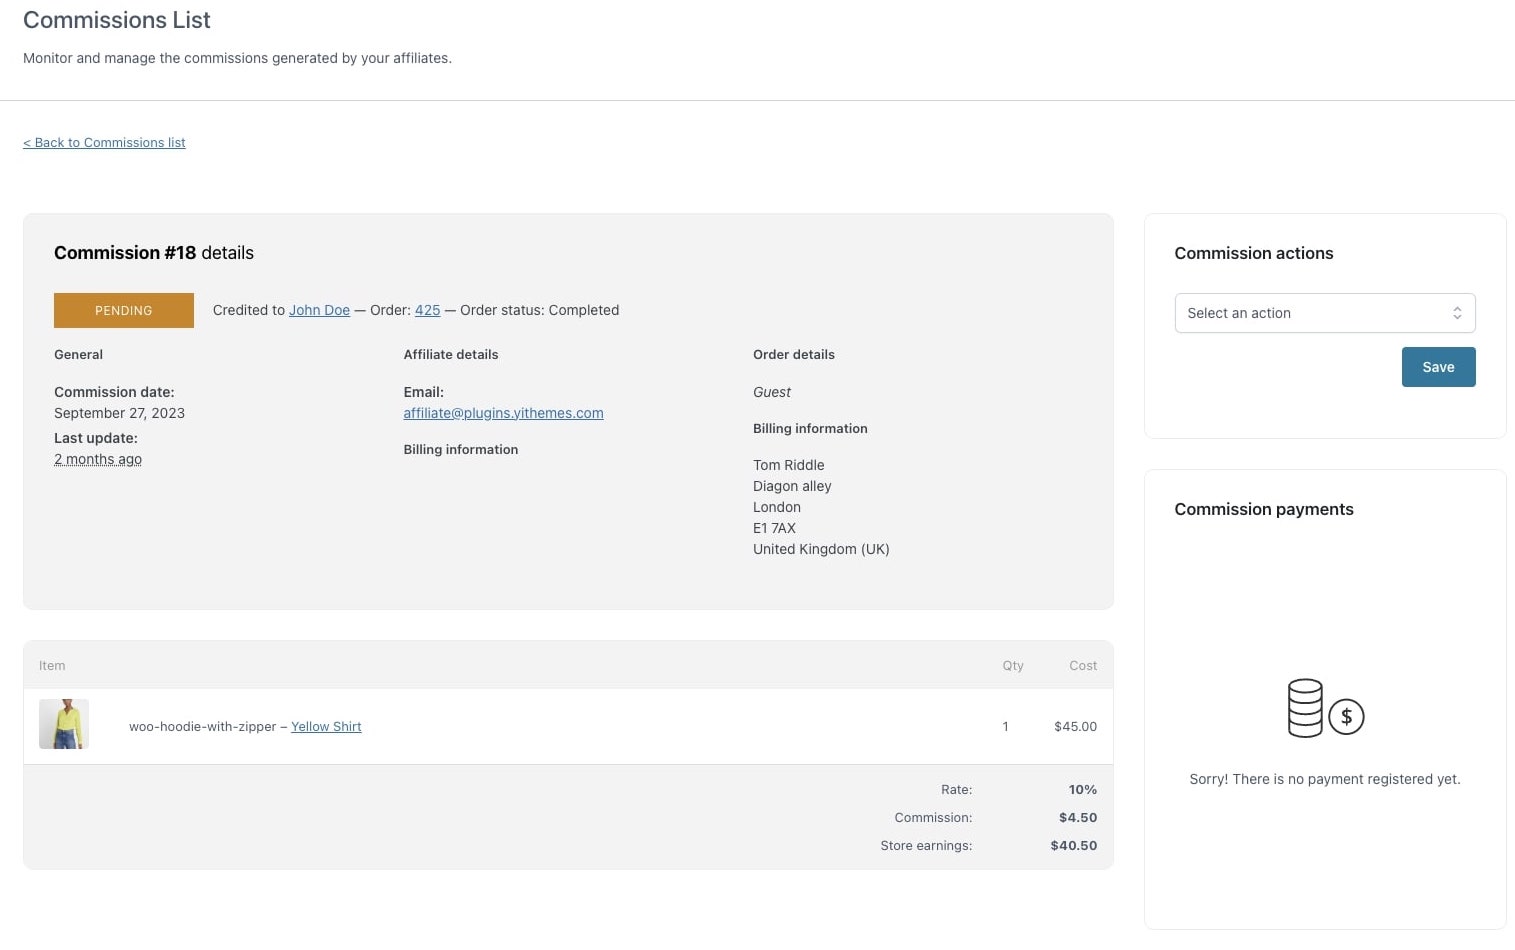
Commission details
Additionally from this page, you can also click on the commission ID and see all the details.
From this screen, you can see the general info about the commission creation, the affiliate’s details and the order details.
You can see the products that generated that commission, the percentage rate, the commission total and the general store earnings for that sale.
You can also apply any of the available actions (that change based on the commission status) and see the linked payment (if created) and a notes section.
For a more details explanation of how the commissions’ statuses work, please, refer to this page.
The payment of the commission can be done either manually or automatically:
if manually, you can create the payment record, issue the payment to the affiliate offline and then change the payment status to Completed and all linked commissions will automatically get the Paid status.
if automatically, based on the settings, the commission status will automatically go to Paid as soon as the payment is completed.
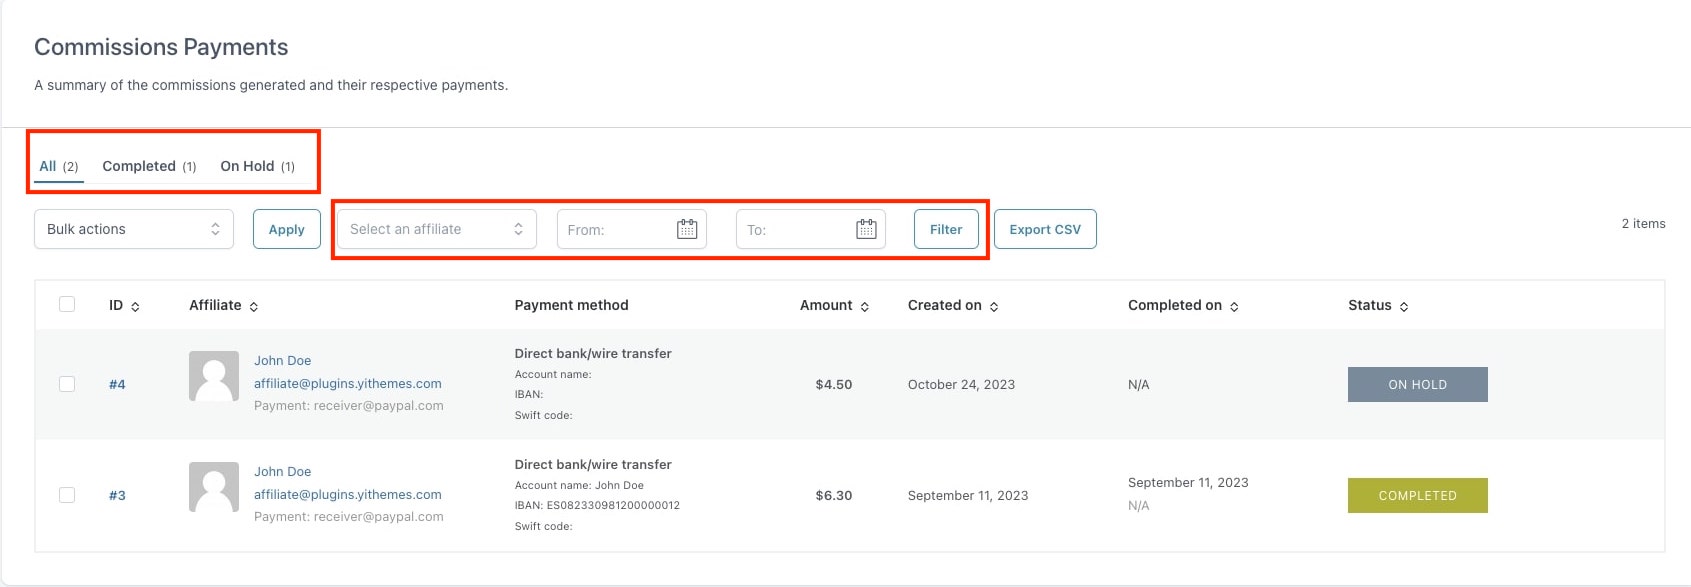
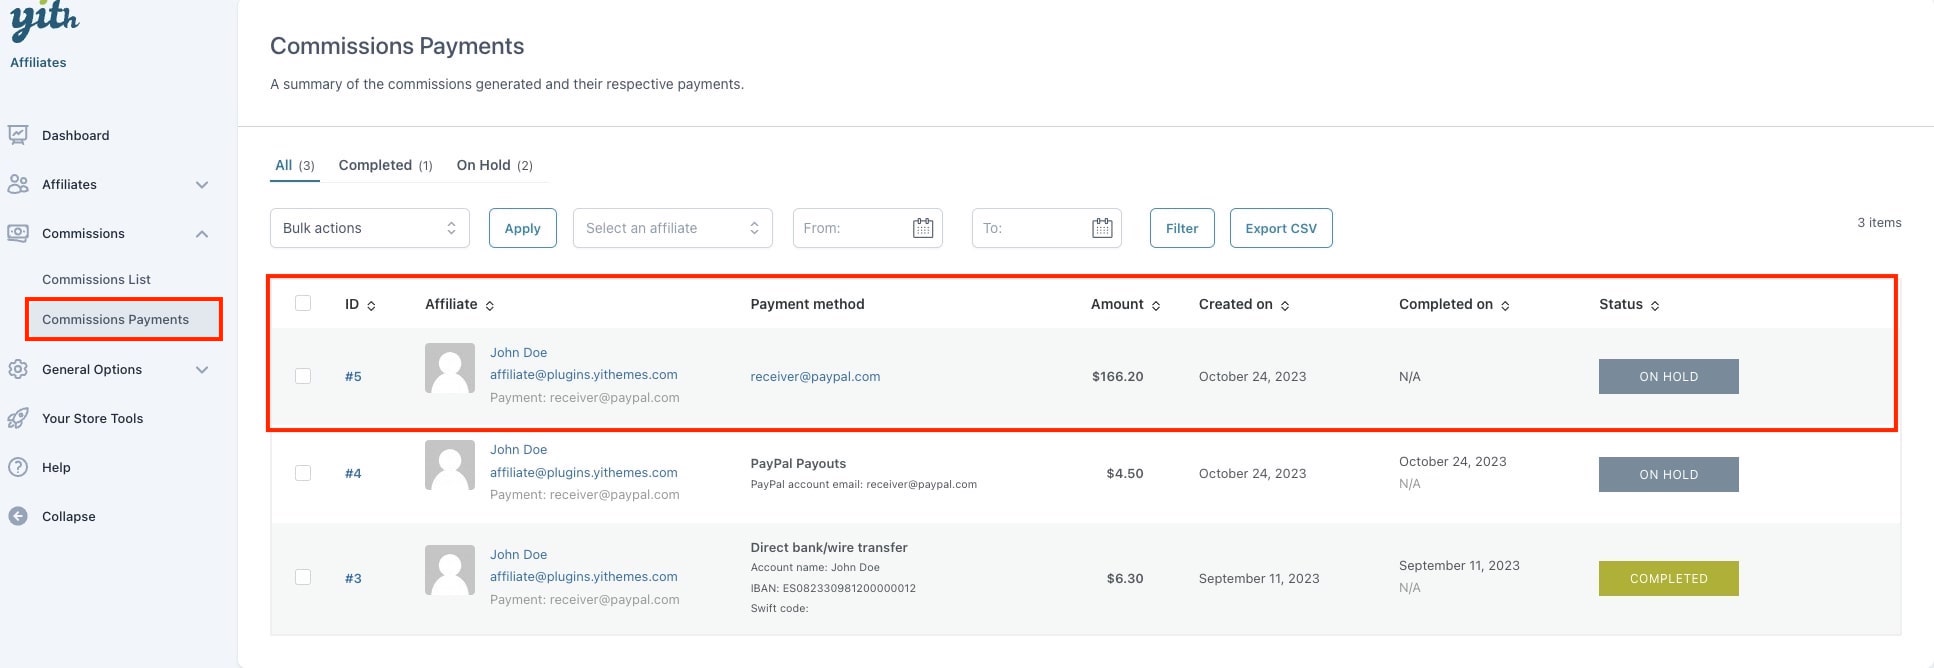
Once the payment is created, you will see on this page all the payment records.
From this screen you can filter the payments by status, affiliate, date.
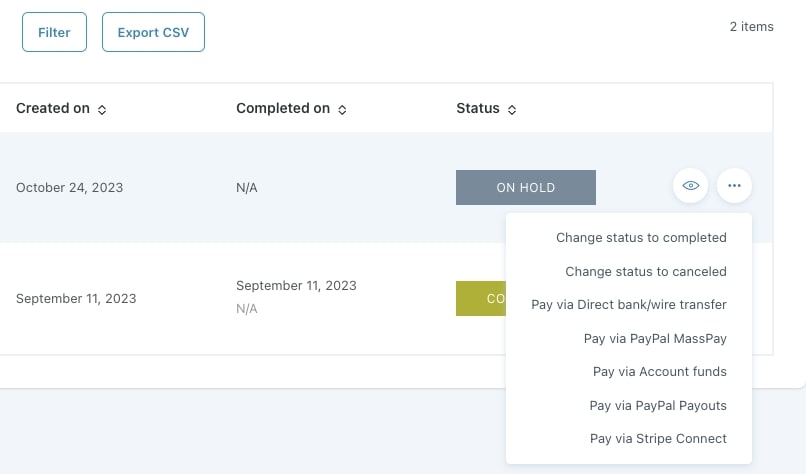
You can bulk edit them and choose any of the following actions:
Change status to “Completed”
Change status to “On hold”
Change status to “Cancelled”
Delete
Pay via PayPal MassPay (only if PayPal MassPay service has been enabled in your PayPal account, refer to this page for more details)
Pay via Account Funds (only if YITH Account Funds is installed and enabled, refer to this page for more details)
Pay via PayPal Payouts (only if YITH PayPal Payouts is installed and enabled, refer to this page for more details)
Pay via Stripe Connect (only if YITH Stripe Connect is installed and enabled, refer to this page for more details)
The same options will also be available in the commission actions and additionally you will find also Pay via Direct bank/wire transfer (refer to this page for more details).
Finally, you can also export all of them or a selection based on the filters into a CSV file.
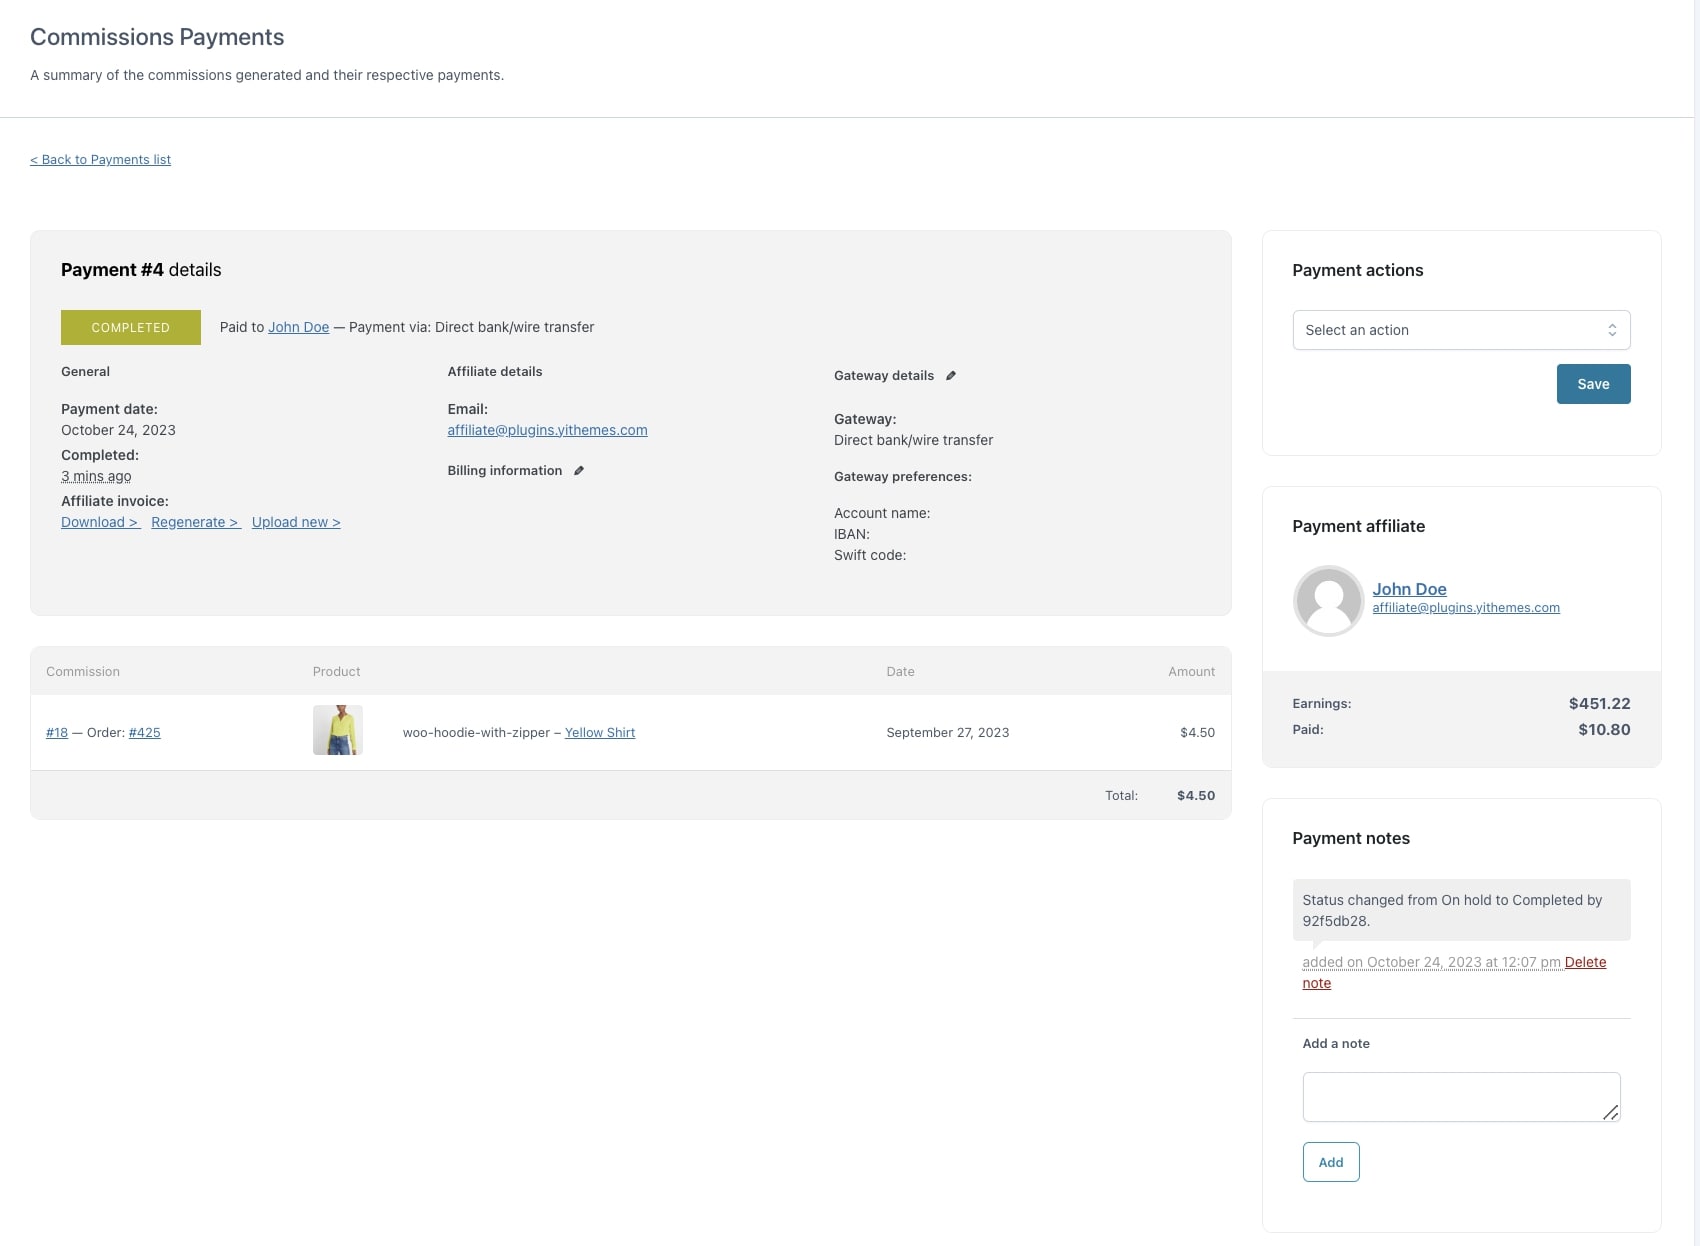
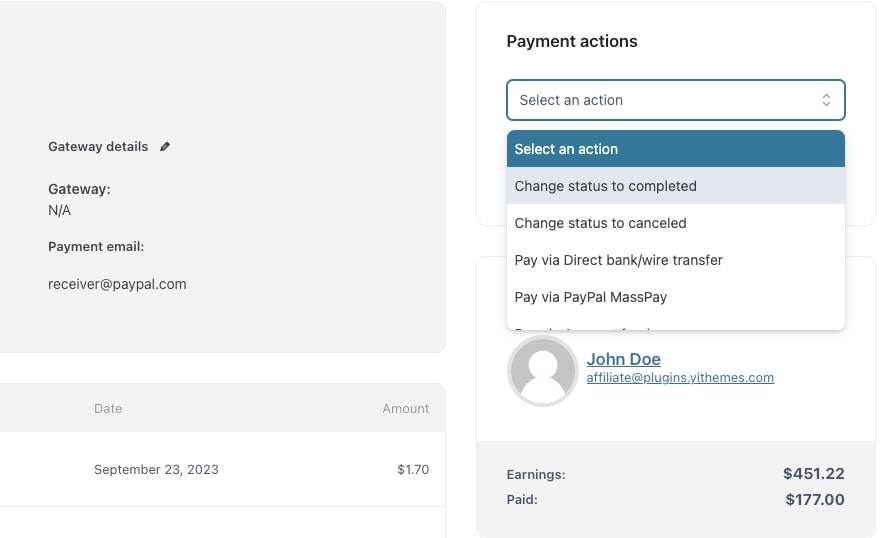
To open the payment details, just click on its ID and you will be able to see a detailed section with the General info, the Affiliate details, the Gateway details, the commissions included in this payment, the payment available actions, a payment recap of the affiliate and the payment notes.
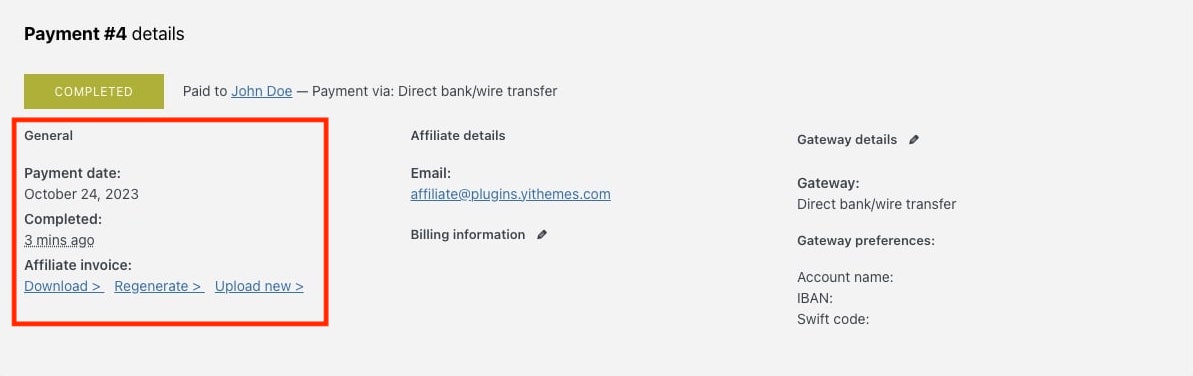
General
From the General section, you can see the payment creation date, the date it has been completed and a section where you can download the invoice (either generated automatically or uploaded by the customer), upload a new one or regenerate the existing one (for example after updating the billing details). For more details about the invoice settings, please, refer to this page.
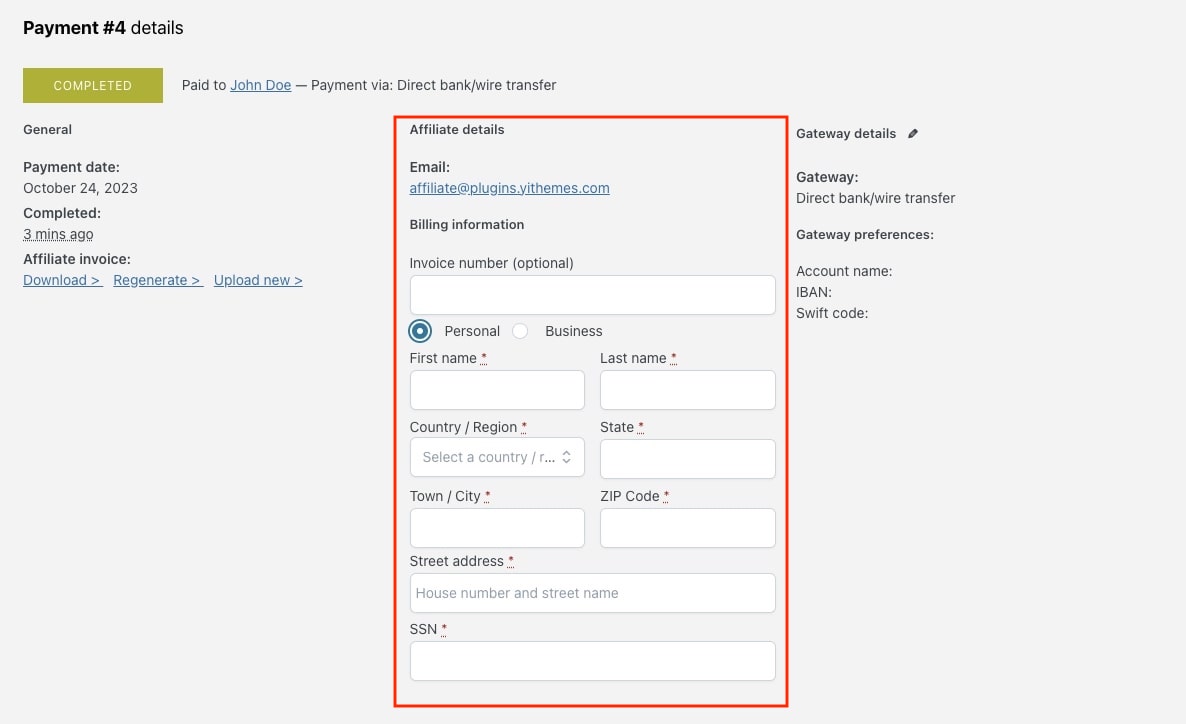
Affiliate details
Here you can find and update the affiliate email address and billing information. All changes made here will be reflected in the affiliate’s profile and will be used for this and all future payments.
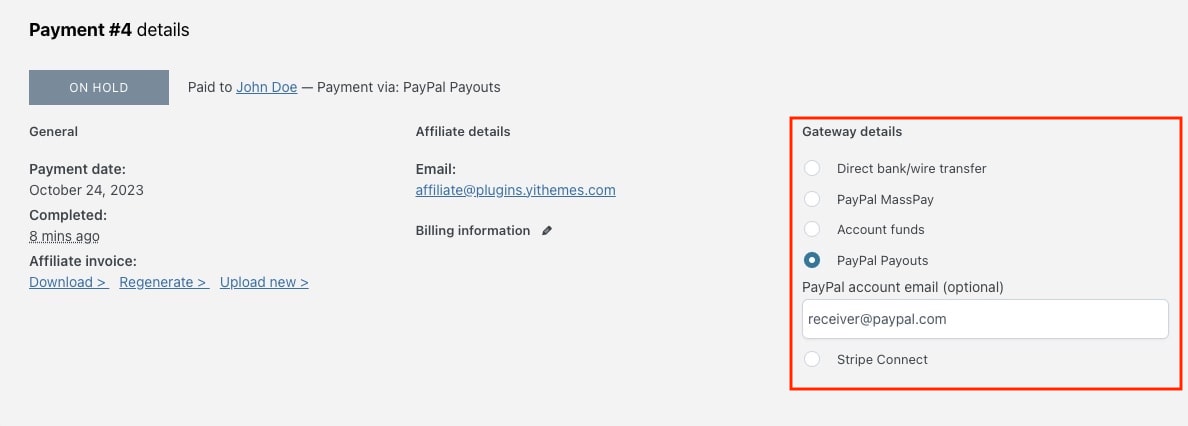
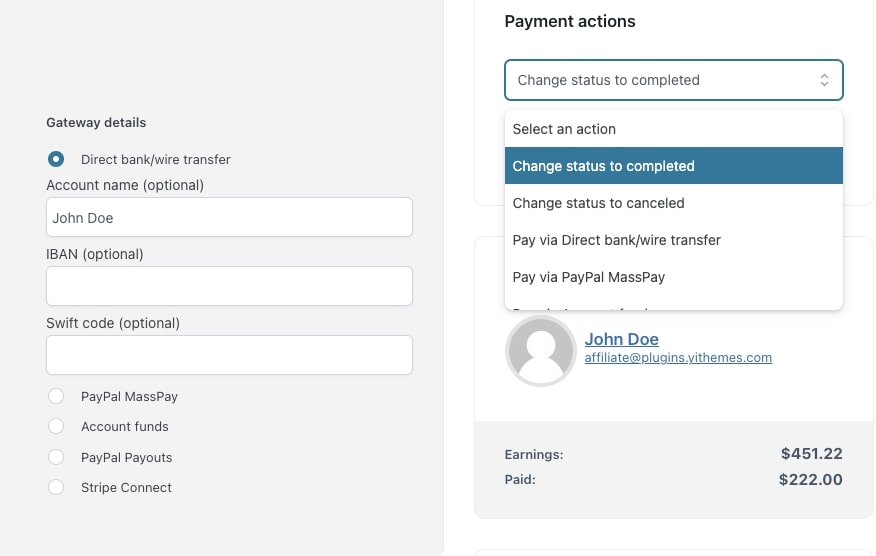
Gateway details
From this section, the admin can set the preferred payment gateway for this payment and update the payment details if necessary. Any changes made to this section will be reflected in all the other payments that have not been paid yet.
Your affiliates will be able to add their payment details from the Settings tab in their Affiliate dashboard.
If more than one payment gateway is enabled, your customers will be able to fill in all the details, but it will always be the admin who will choose the payment among the available ones when paying for the order.
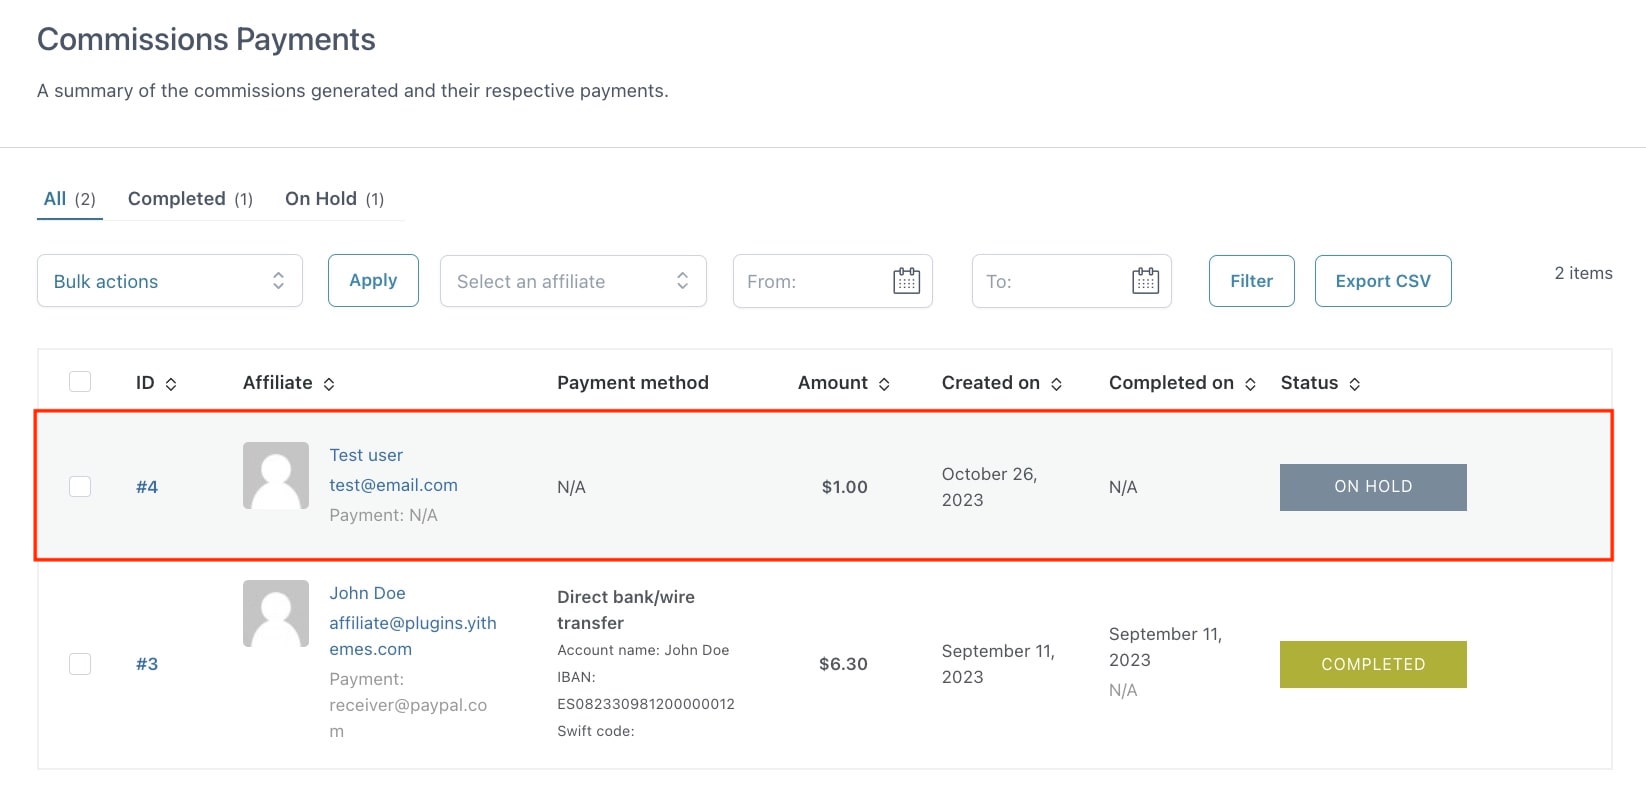
If you want to create payments manually, you can do the following.
From the commissions list page, you can filter and select the commissions by status, affiliate, product, date and from the bulk actions select “Create a payment manually“.
The plugin will automatically group the commissions of each affiliate user (so calculate the total amount to be paid) and create one payment record for each affiliate.
The manual payment record will be automatically set to the On hold status.
Example: you want to manually generate a payment record for all the pending commissions older than 30 days.
You can first click on the “Pending” view, then, filter the commissions by date, select them all and finally create a payment from the bulk actions.
This will create one payment record for each affiliate in the Commissions Payments table (in this case, one for Susanne and one for Elisabetta) with the on-hold status.
Now you can pay your commissions using any offline payment gateway you prefer, for example in cash or with a non-supported gateway, and once the payment is done, you can manually change the payment status to “Completed” either from the payment details or from the payment actions in the payments list.
This action will also change the status of the related commissions to “Paid“. For more details about the commission status, please, refer to this page.
Also, even if the payment record is created manually, you can also process the payment from this page by using any of the integrated gateways: the payment will be automatically set to completed.
Payments via Bank transfer are currently very similar to manual payments, but if you enable them, your users will be able to enter their payment details (so the Account name, IBAN and Swift code) so you can quickly find them in the payment details when you will process the payment.
The payment, however, occurs manually, so you will have to create a bank transfer from your bank, the plugin will not do that on your behalf.
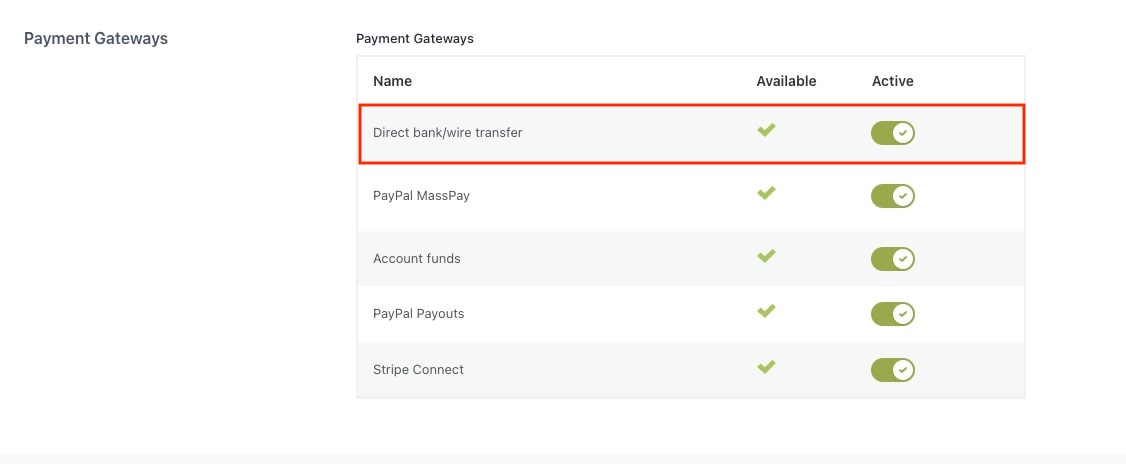
To enable this gateway, go to General options > Commissions & Payments > Payment gateways and make sure the gateway is enabled (it is enabled by default when you first activate the plugin).
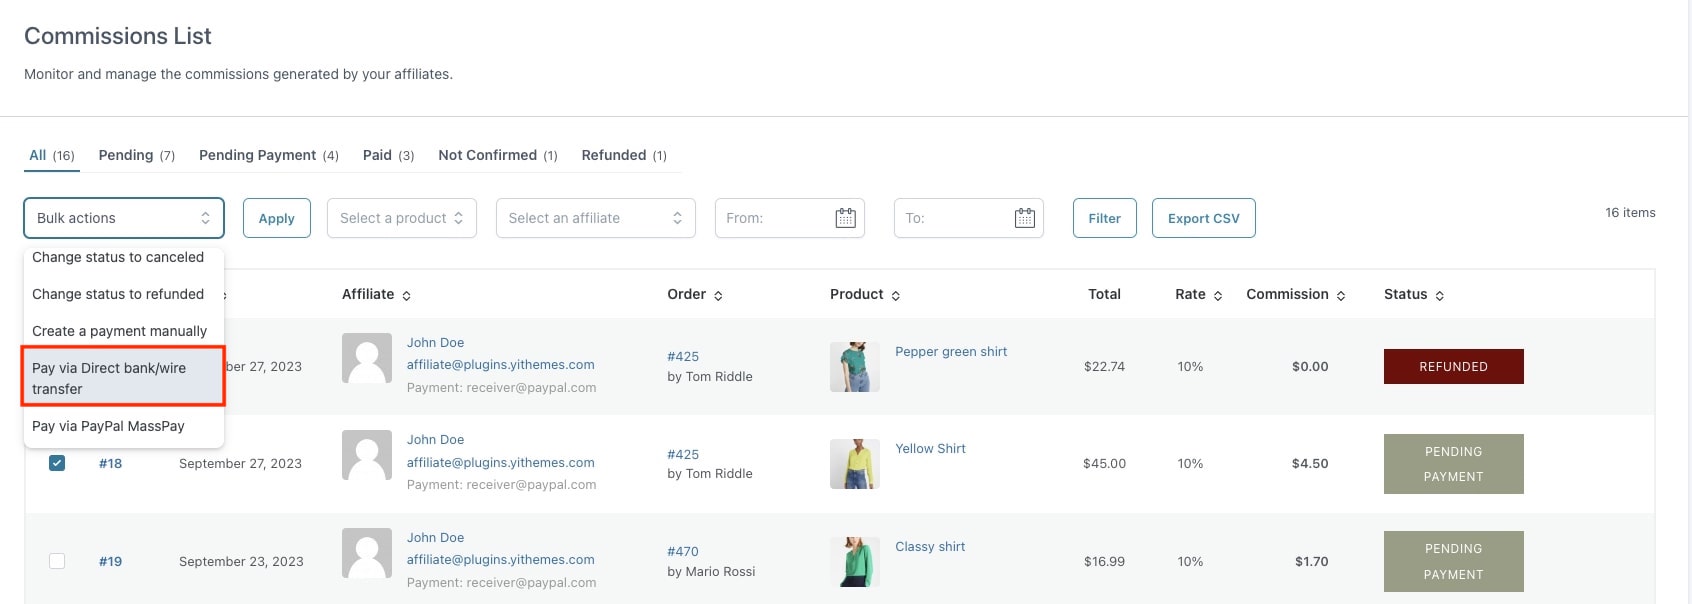
Then, go to the Commissions list page, filter them based on your needs and select the commissions you want to pay.
Then, click on Bulk actions dropdown and select “Pay via Direct bank/Wire transfer“.
This will create one payment record for each affiliate with the “on hold” status.
If the payment details have not been set for the affiliate, you will be able to add them from the Gateway details in the Payment details, as you can see below. Please, note, this option is available only if you’re using the premium version.
You can now issue the payment (manually) from your bank account and once it is done, you can manually change the payment status to “Change status to completed” from the payment actions.
This will also update all the related commissions’ status and set it to “Paid“. For more details about the commission status, please, refer to this page.
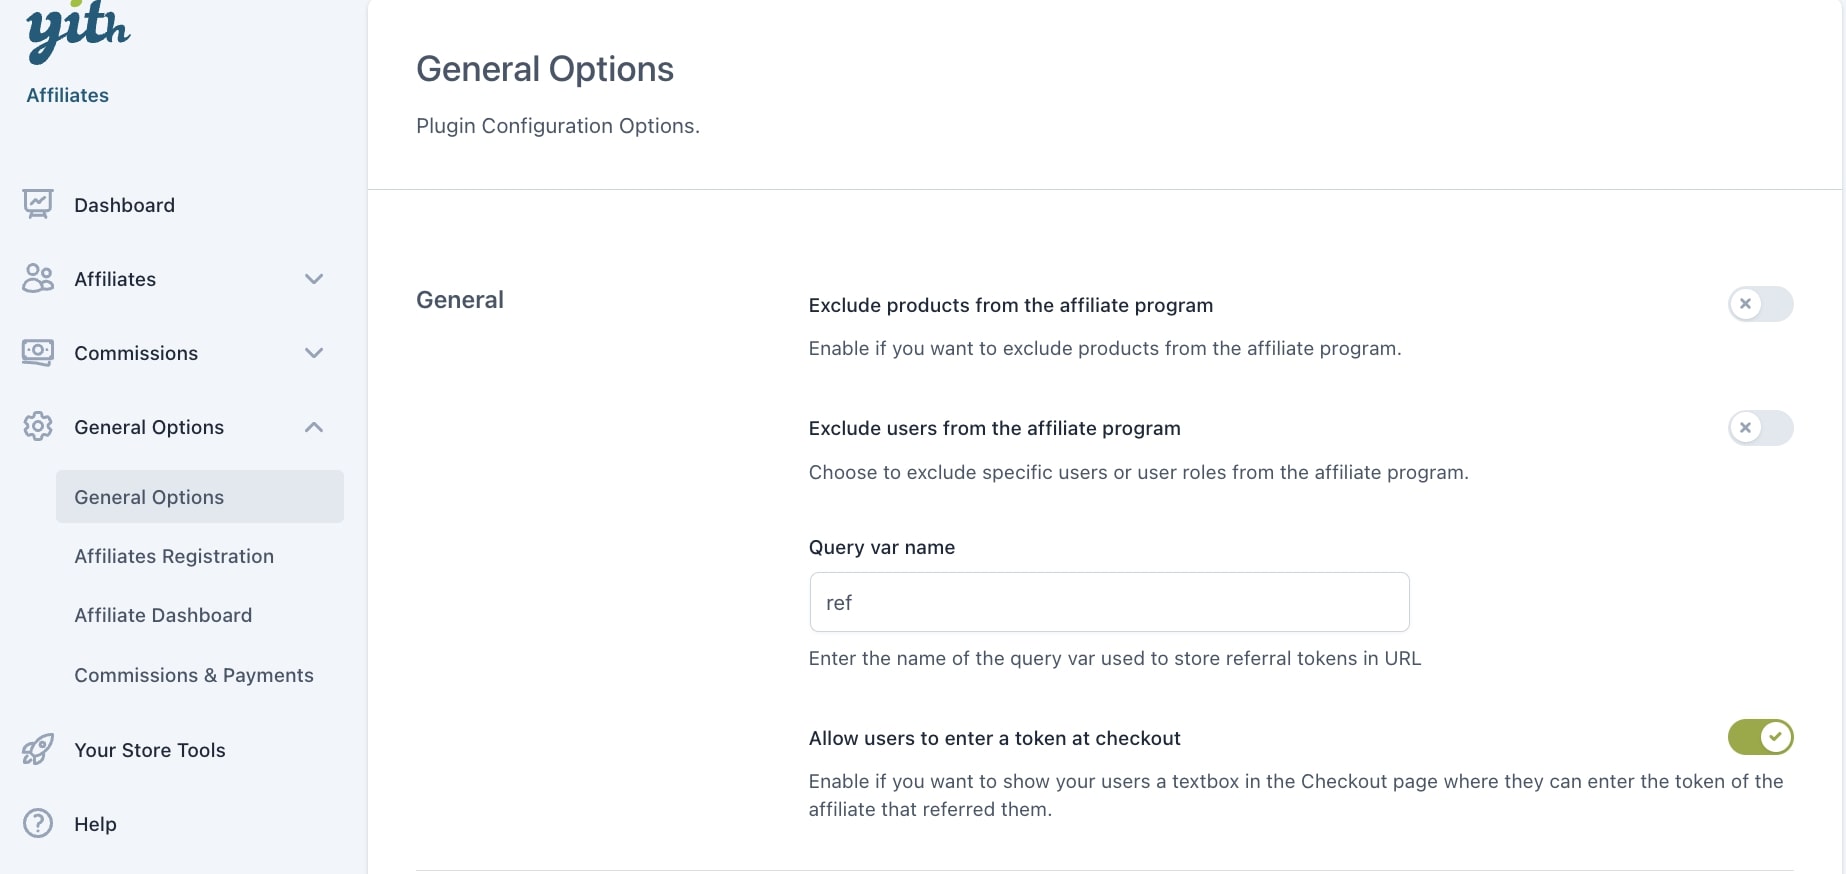
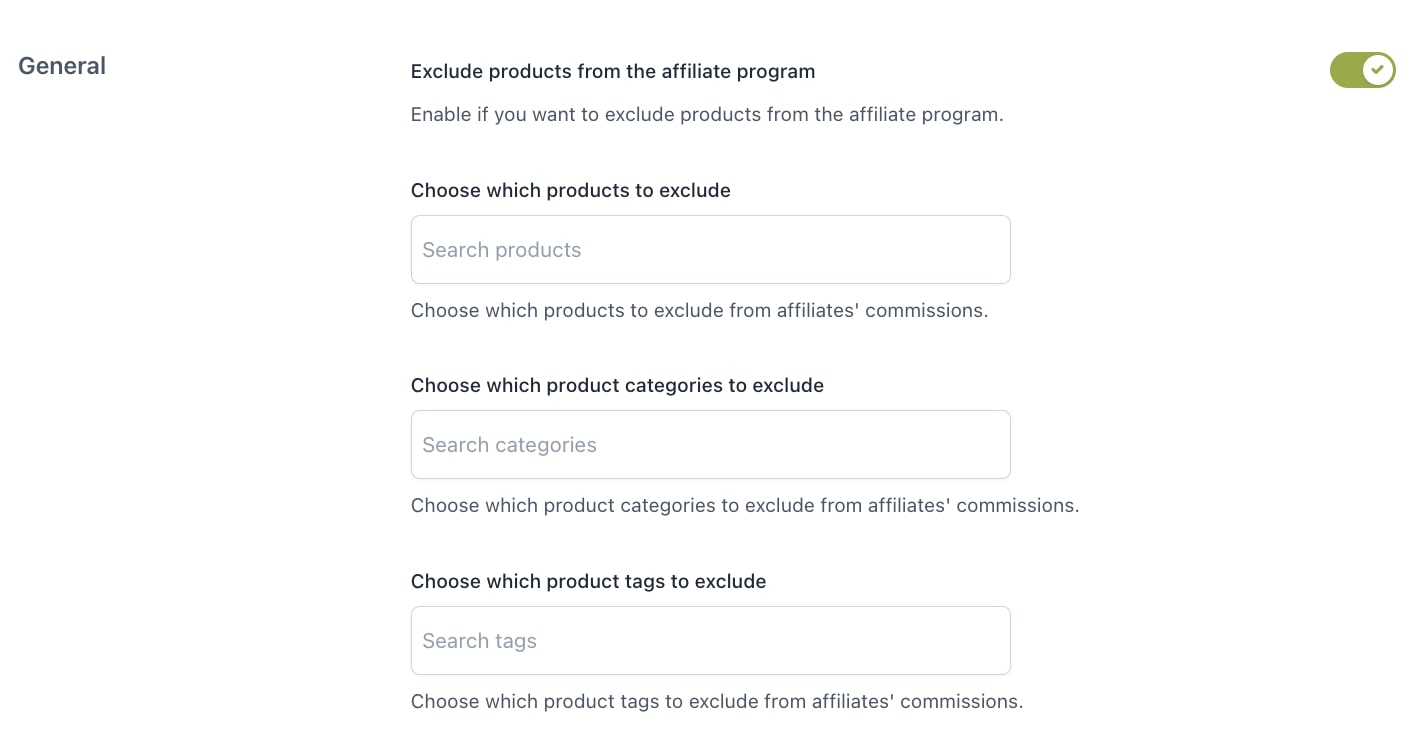
Exclude products from affiliates’ commissions: enable if you want to exclude products from the affiliate program and make sure no commissions are generated. You will be able to further select specific products, categories or tags in the options below.
Exclude users from the affiliate program: enable to exclude specific users or user roles from the affiliate programme and make sure no commissions are generated for them.
Query var name: enter the name of the query var used to store the referral tokens in the URL. Default to “ref”. A typical referral URL is http://sitename/?ref=2, where “ref” is the var name: you can change it to any text you like, and it will be changed in all your affiliates’ referral URLs.
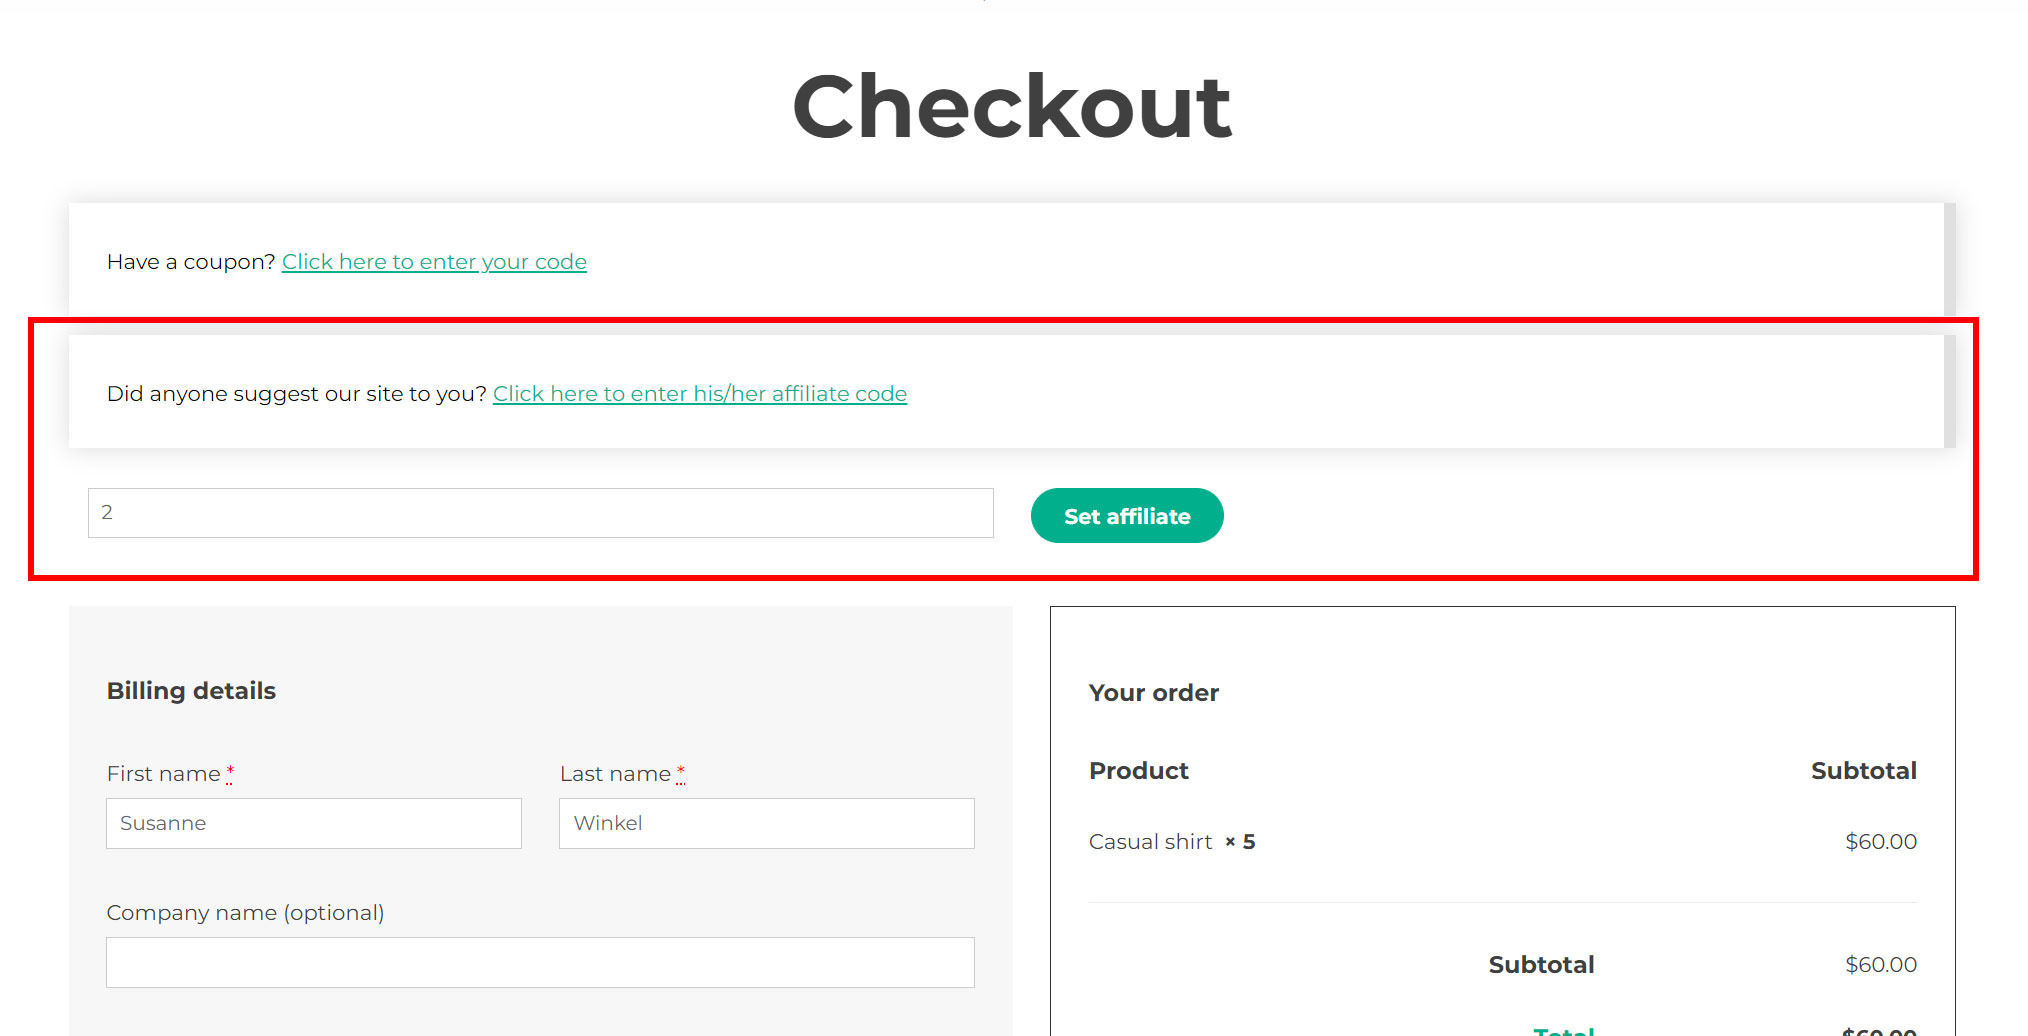
Allow users to enter a token at checkout: enable if you want to show to your users a textbox on the Checkout page where they can enter the token of the affiliate that referred them.
If you are using WooCommerce checkout block, you might need to edit the template in order to show the Set referrer block.
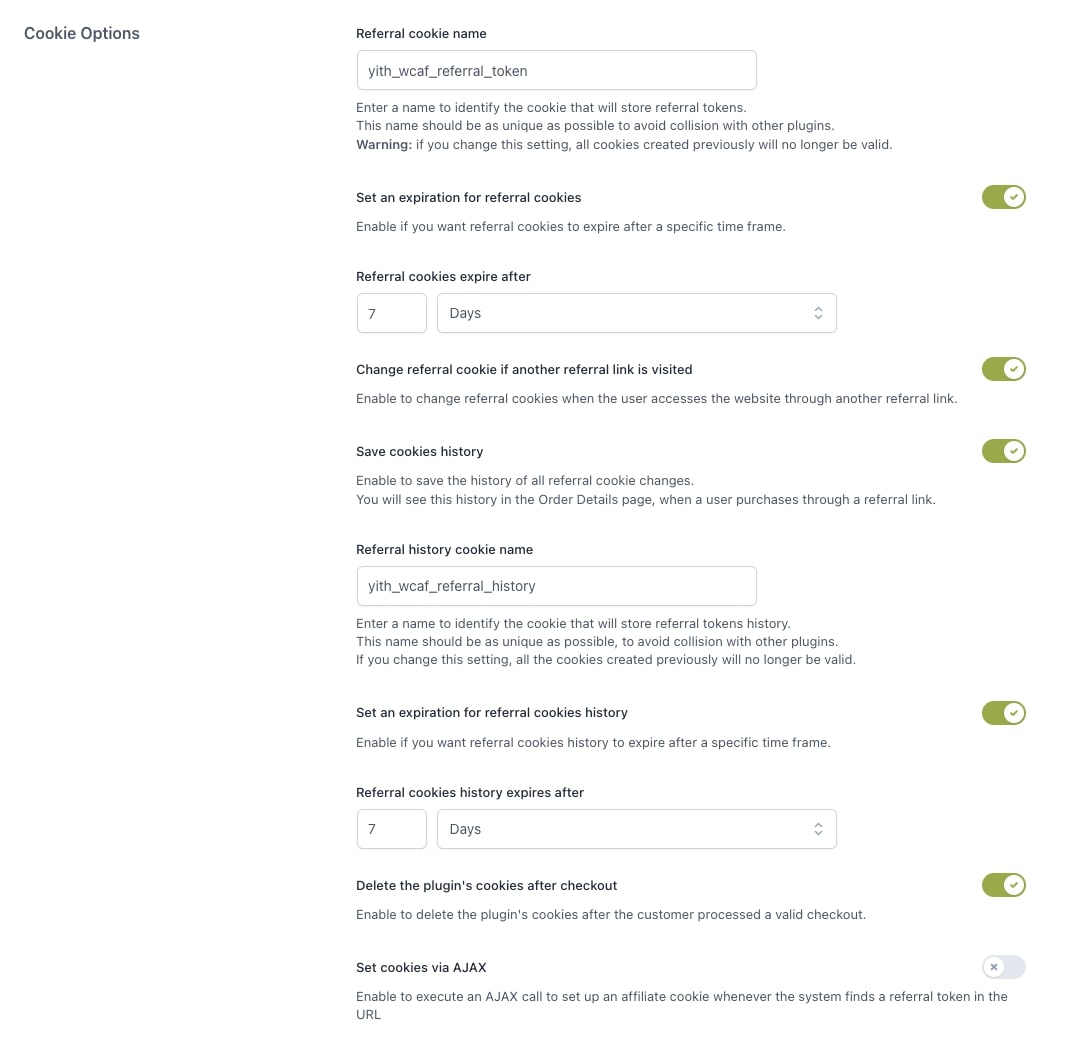
Referral cookie name: enter a name to identify the cookie that will store the referral tokens. This name should be as unique as possible to avoid collision with other plugins. If you change this setting, all cookies created previously will no longer be valid. Default value is yith_wcaf_referral_token.
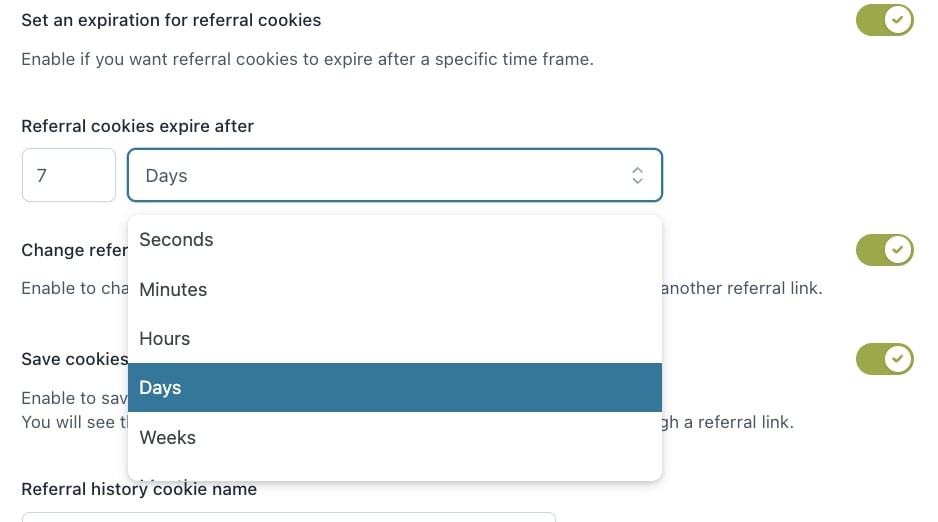
Set an expiration for referral cookies: enable if you want referral cookies to expire after a specific time frame. If the customer completes the purchase after the expiration date, no commissions will be assigned to the affiliate.
Change referral cookie if another referral link is visited: enable to change cookies when the user accesses the website through another referral link. So, if a customer visits your site through the referral link of affiliate A and then through the referral link of affiliate B, affiliate B will get the commission for that order.
Save cookies history: enable to save the history of all referral cookies changes. You will see this history in the Order details page, when a user purchases through a referral link.
Referral cookie history name: enter a name to identify the cookie that will store referral tokens history. This name should be as unique as possible, to avoid collision with other plugins. If you change this setting, all the cookies created previously will no longer be valid.
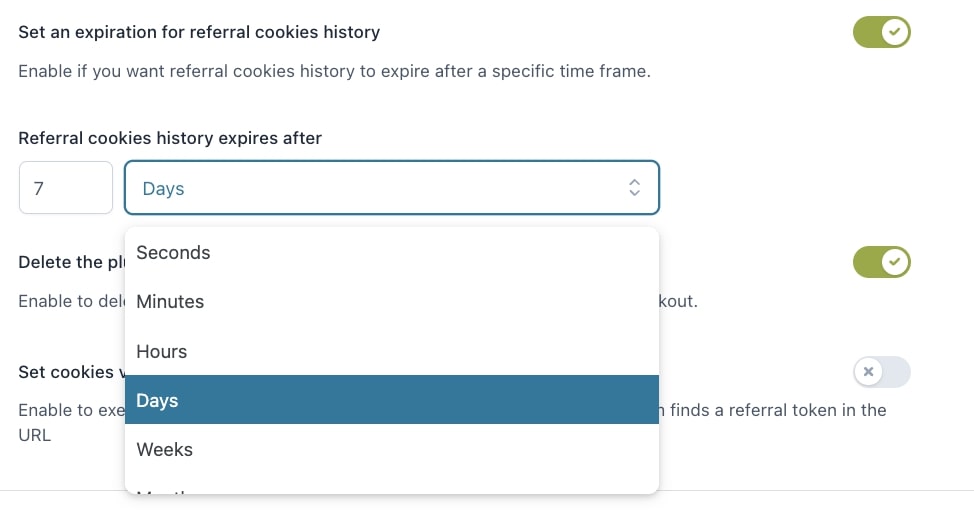
Set an expiration for referral cookies history: enable if you want referral cookies history to expire after a specific time frame.
Delete the plugin’s cookies after checkout: enable to delete the plugin’s cookies after the customer processed a valid checkout. This will make sure that no other commissions will be assigned to the same affiliate unless the customer visits a referral link once again.
Set cookies via AJAX: enable to execute an AJAX call to set up affiliates cookies whenever the system finds a referral query string in the URL.
Coupon options
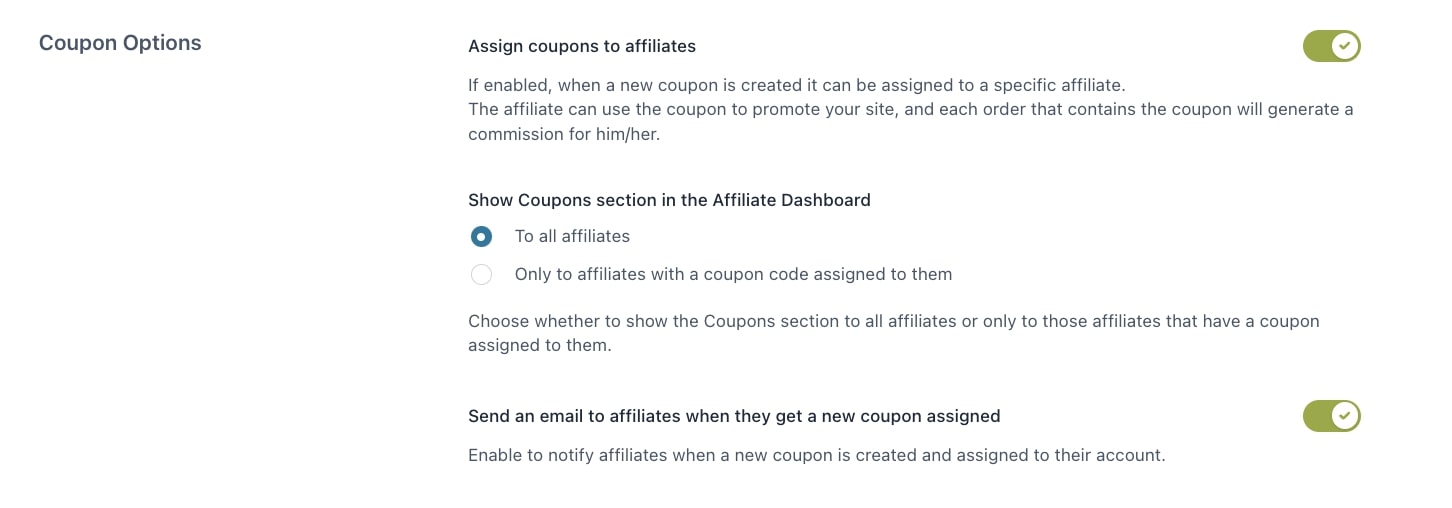
Assign coupons to affiliates: if enabled, when a new coupon is created, it can be assigned to a specific affiliate. The affiliate can use the coupon to promote your site and each order that contains the coupon will generate a commission for him/her.
The coupon codes have to be created by the admin from Marketing > Coupons and assigned to the affiliate from the coupon settings.
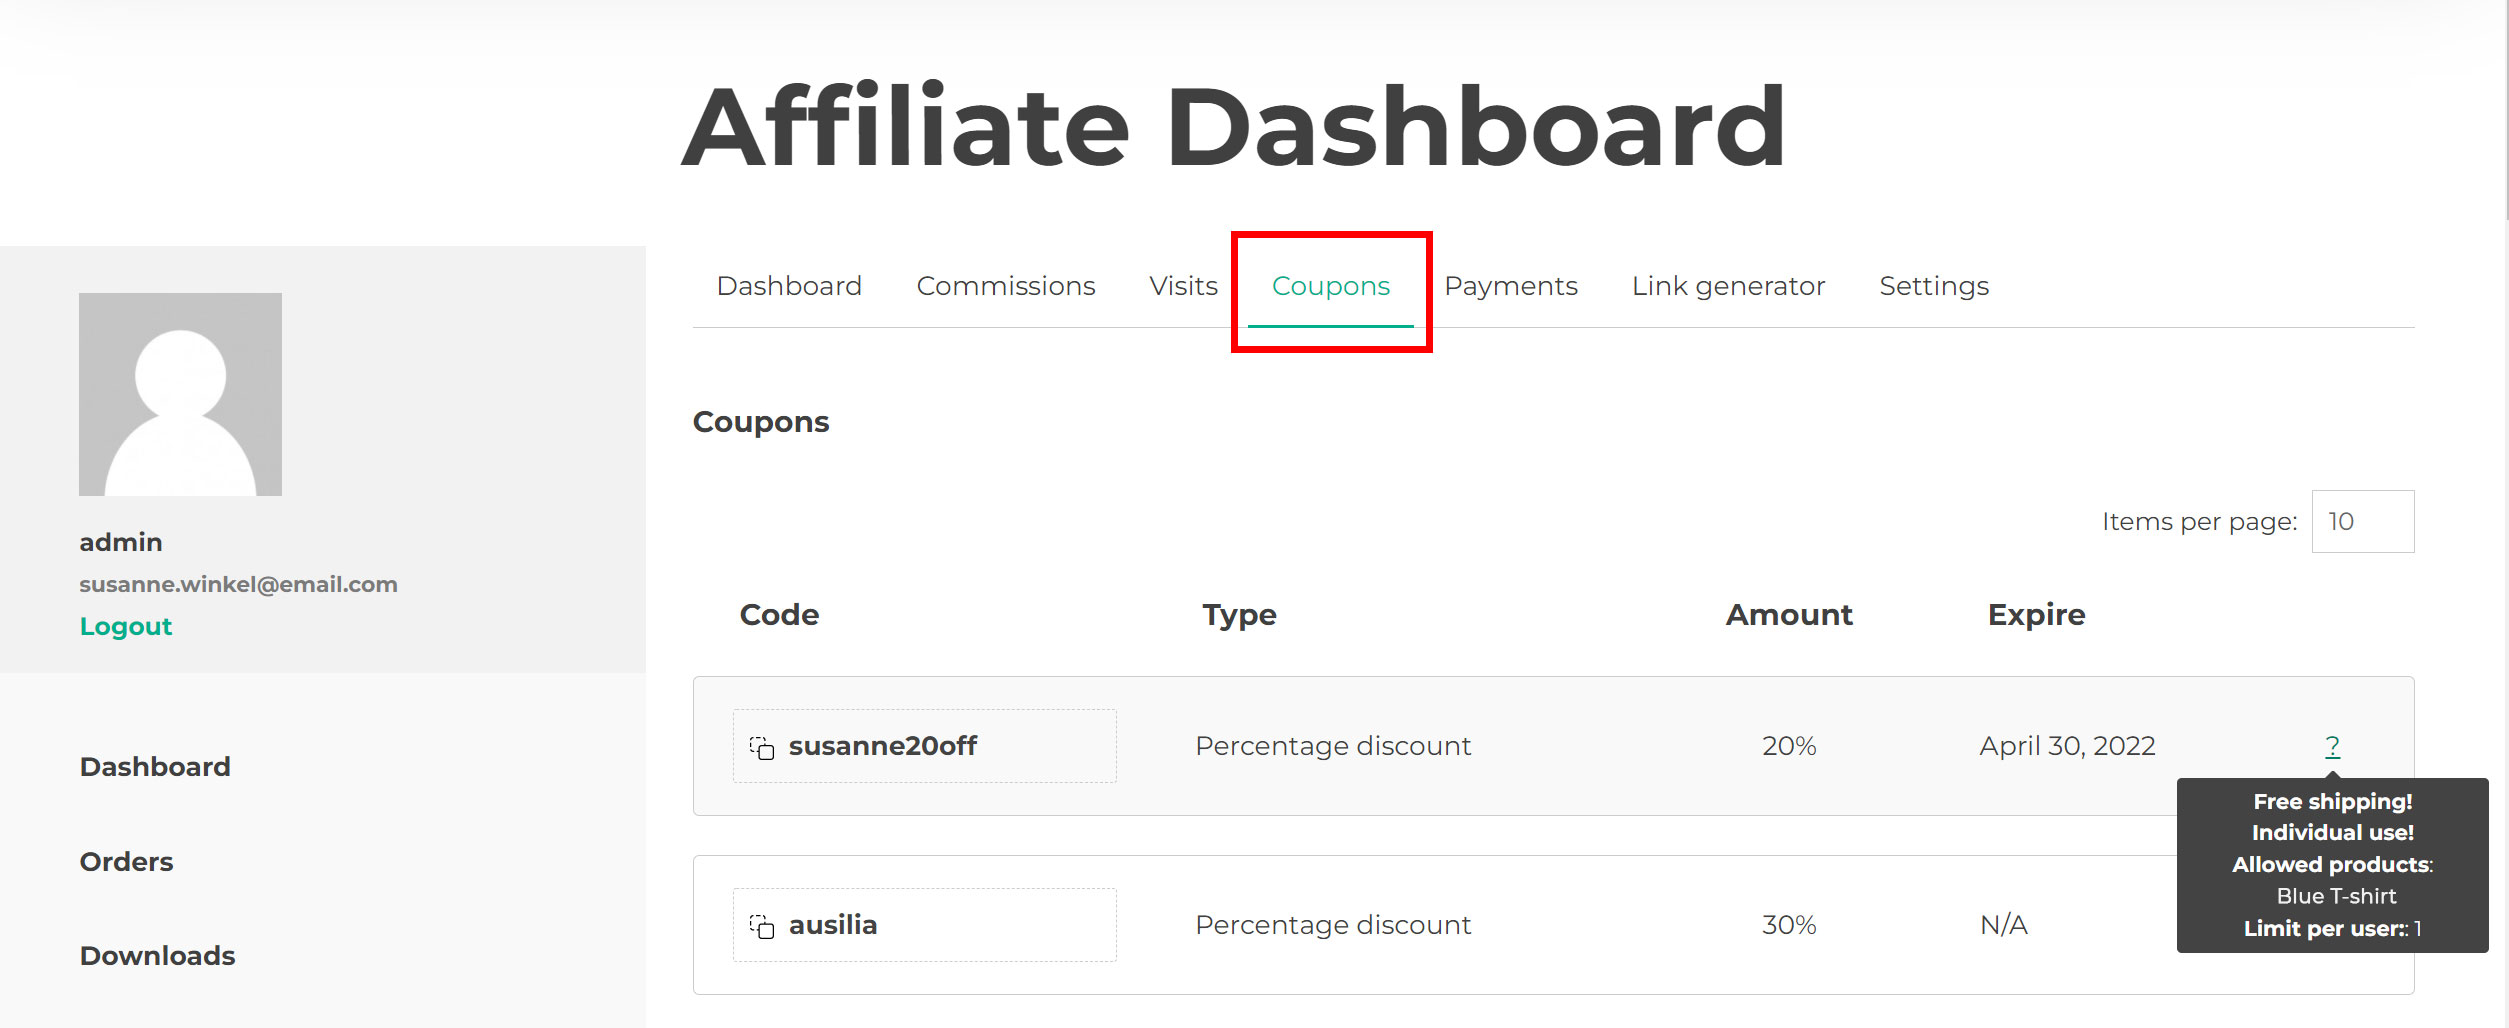
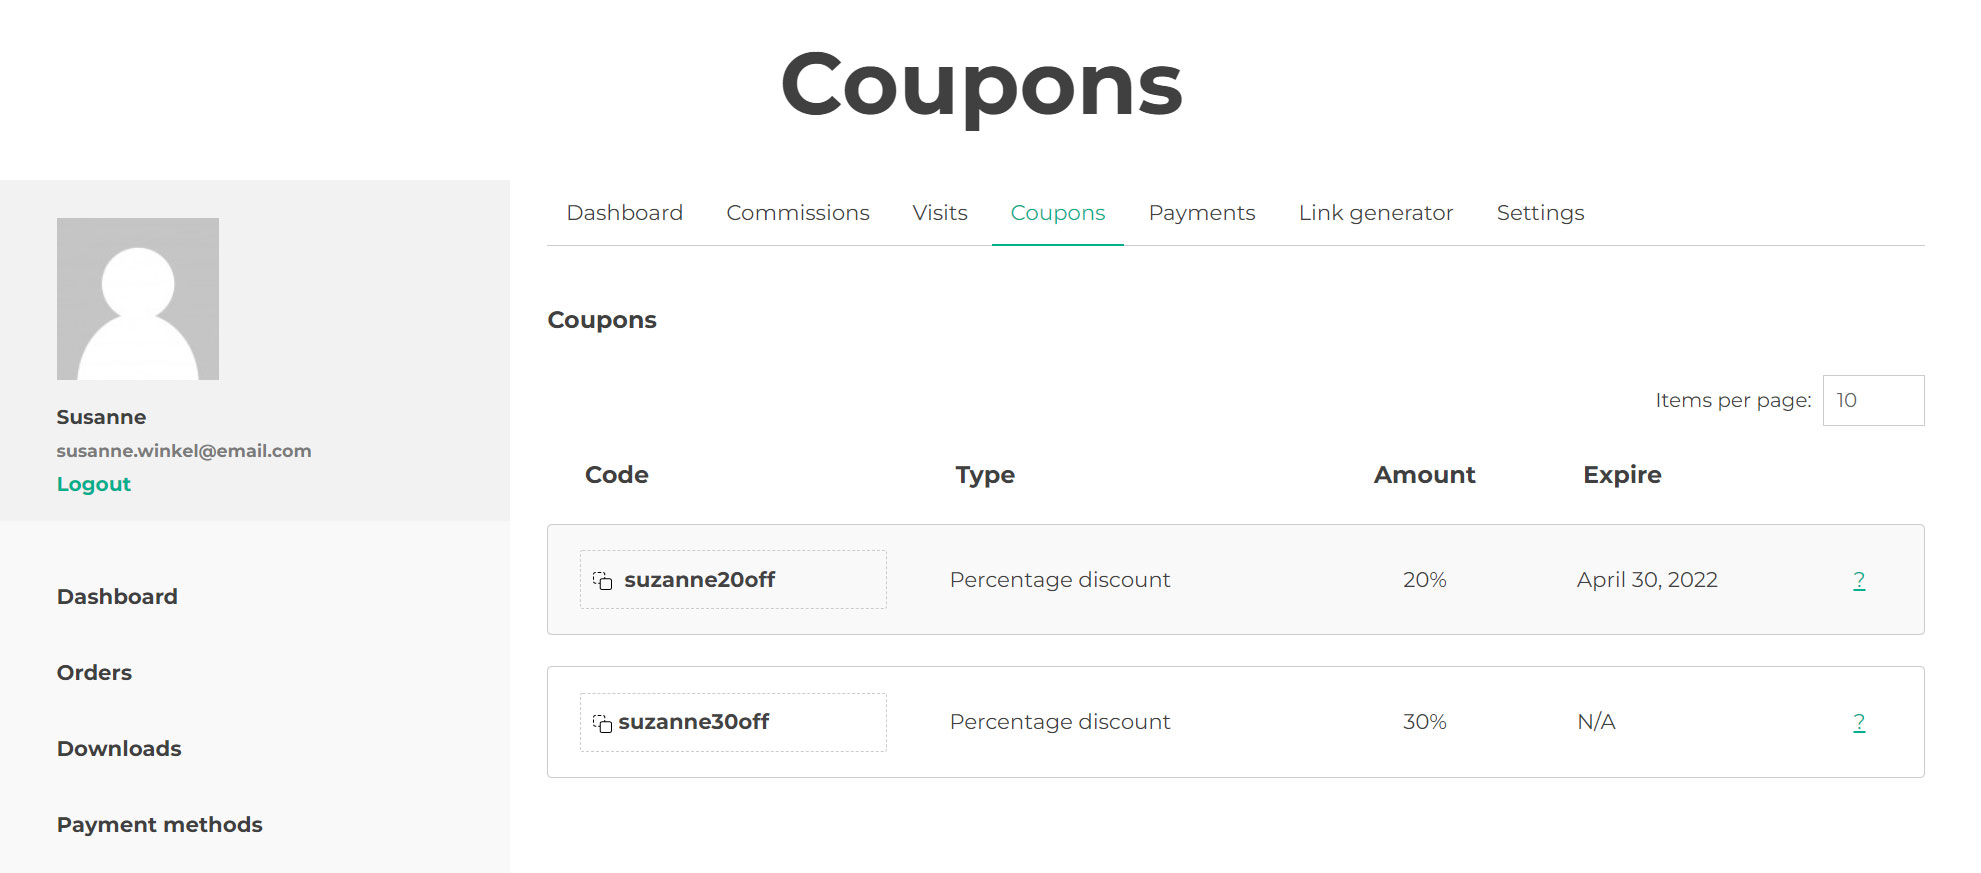
Show Coupons section in the Affiliate Dashboard: choose whether to show the Coupons section to all affiliates or only to those who have been assigned a coupon code. From this section, affiliates can view all the coupon details: coupon code, type and amount of the discount, expiration date, and other information added to the tooltip as shown in the image below.
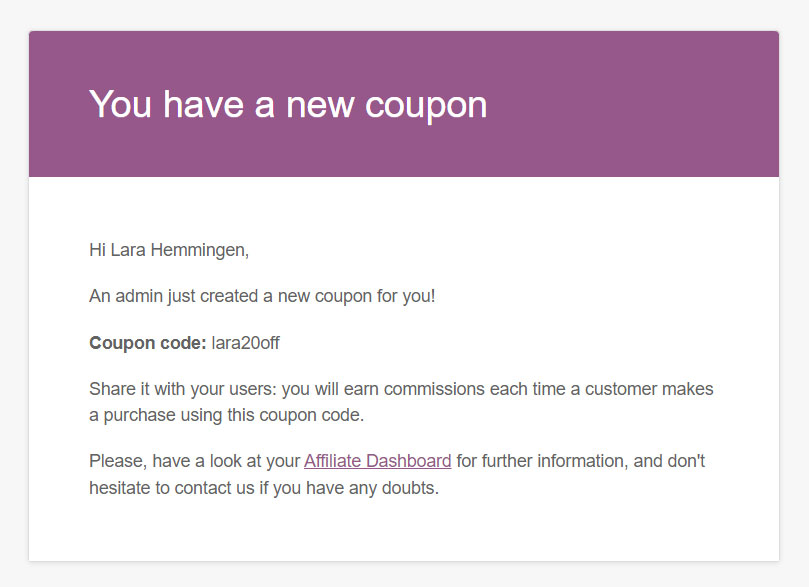
Send an email to affiliates when they get a new coupon assigned: enable to notify affiliates when a new coupon is created and assigned to their account. You can edit the email content from WooCommerce > Settings > Emails and select the email notification called YITH WooCommerce Affiliates – New affiliate’s coupon.
You can add almost any option you can define for a coupon to the body of the email that is sent to the affiliate. There are a lot of parameters you can use.
The placeholder is normally built with the word coupon and the property name according to this pattern: {coupon_HERE_GOES_PROPERTY_NAME}.
Here is a list of the most useful properties:
amount
date_created
date_modified
date_expires
discount_type
description
individual_use
product_ids
excluded_product_ids
usage_limit
usage_limit_per_user
limit_usage_to_x_items
free_shipping
product_categories
excluded_product_categories
exclude_sale_items
minimum_amount
maximum_amount
email_restrictions
So, for example, if you want to add the expiration date of the coupon in the email, you must use the placeholder {coupon_date_expires} where date_expires is the property name. This will print the coupon expiration date in the email.
For more properties, you can refer to the official documentation provided by WooCommerce on this page.
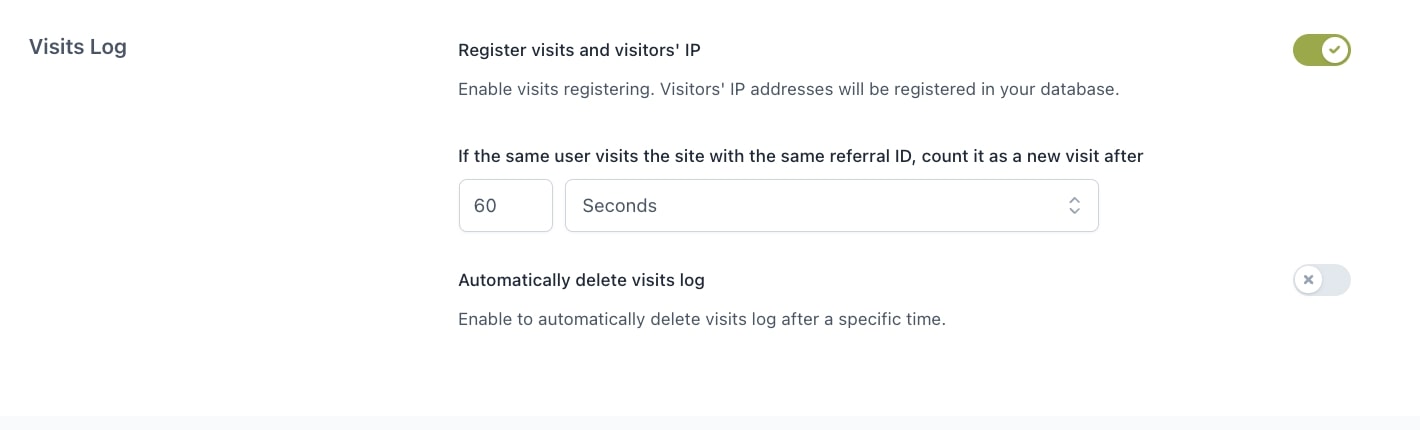
Visits logs
Register visits and visitors’ IP: enable visits registering. Visitors’ IP addresses will be registered in your database.
If the same user visits the site with the same referral ID, count it as a new visit after: enter a time here in seconds, minutes, hours, days, weeks or months.
Automatically delete visits log: enable to automatically delete visits log after a specific time. You can set this time in seconds, minutes, hours, days, weeks, or months.
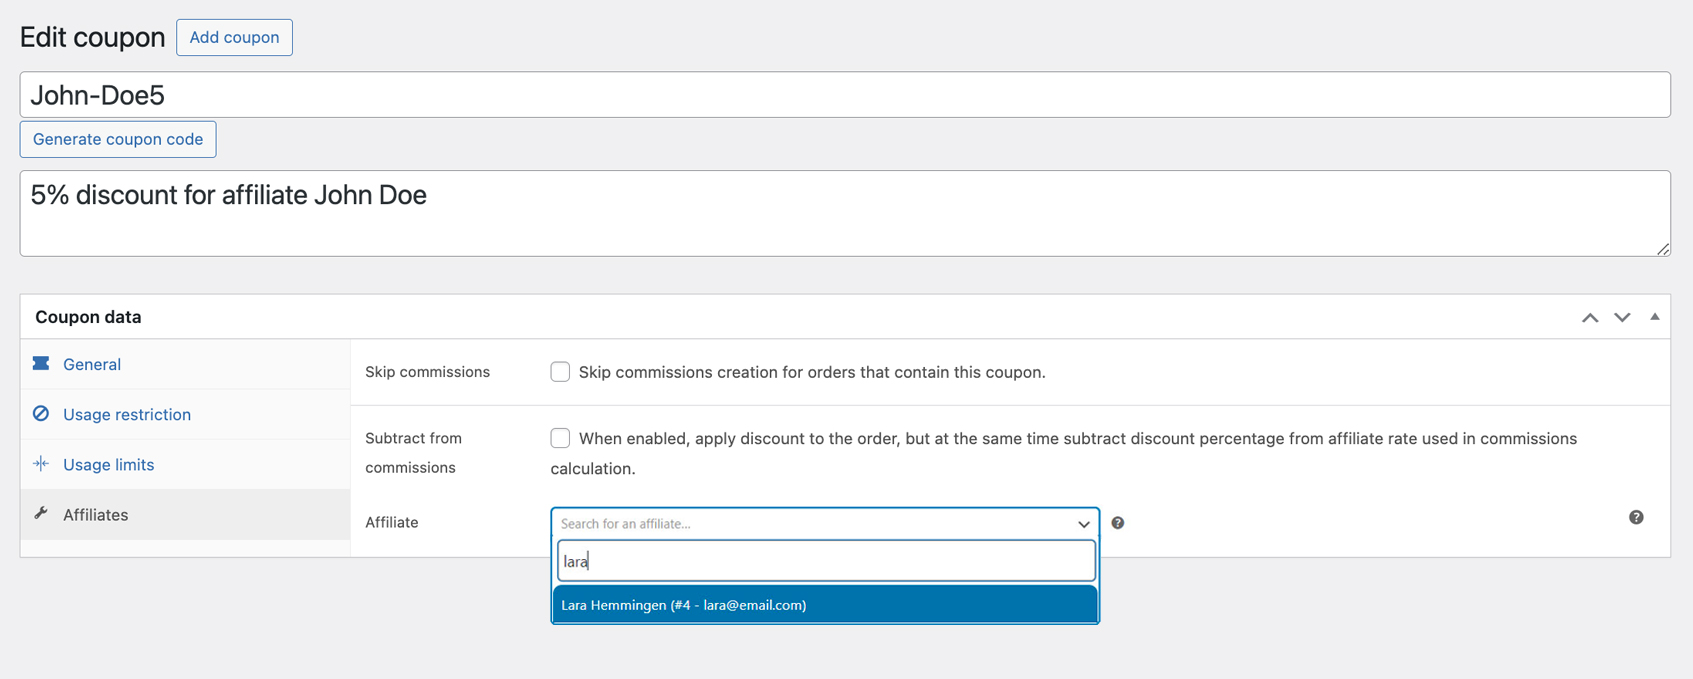
If you enable the Assign coupons to affiliates option from the General settings > Coupons options, you will be able to find a new Affiliates tab to select the affiliate for whom this coupon will generate commissions. This is very useful so both your affiliate can get a commission and the customer a discount. All other the standard coupon settings are available.
Please, note: you can assign multiple coupons to the same affiliate but not the same coupon to multiple affiliates.
Additionally, from the coupon settings you will be able to restrict the coupon application with the following two options:
Skip commission creation for orders that contain this coupon.
When enabled, apply discount to the order, but at the same time subtract discount percentage from affiliate rate used in commissions calculation. This is only available for percentage rate coupon code. E.g. if the coupon is 10% and your affiliate rate is 30%, an affiliate will get 20% commission on the order where this coupon is used.
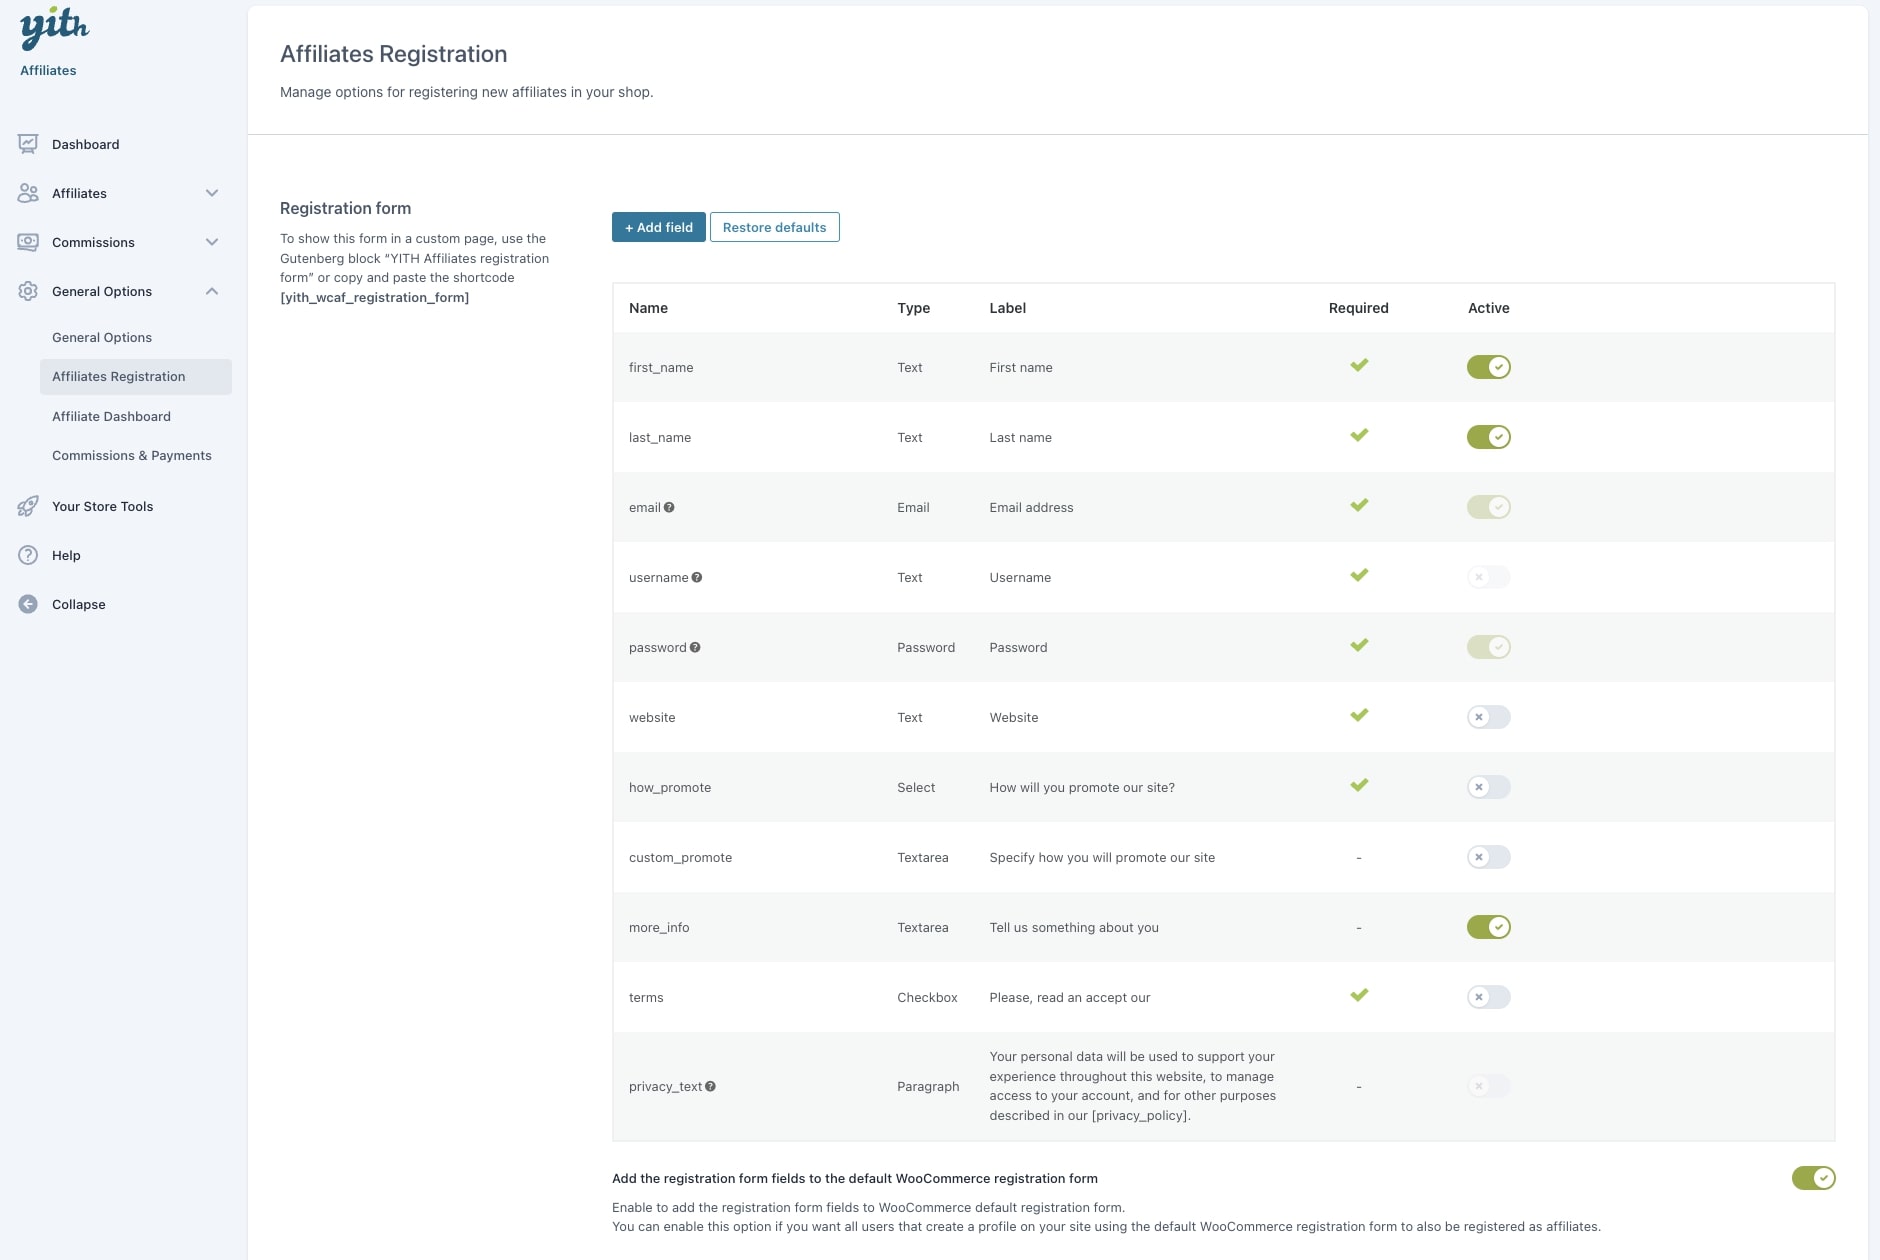
From the General options > Affiliates Registration tab, you will be able to configure the fields of the affiliate registration form and its options. Let’s see how you can customize it.
Registration form
In the first section, you will find the Registration form fields. There are some default fields and you can add as many as you wish, enable and disable them, duplicate them, set them as required.
How to add a new field
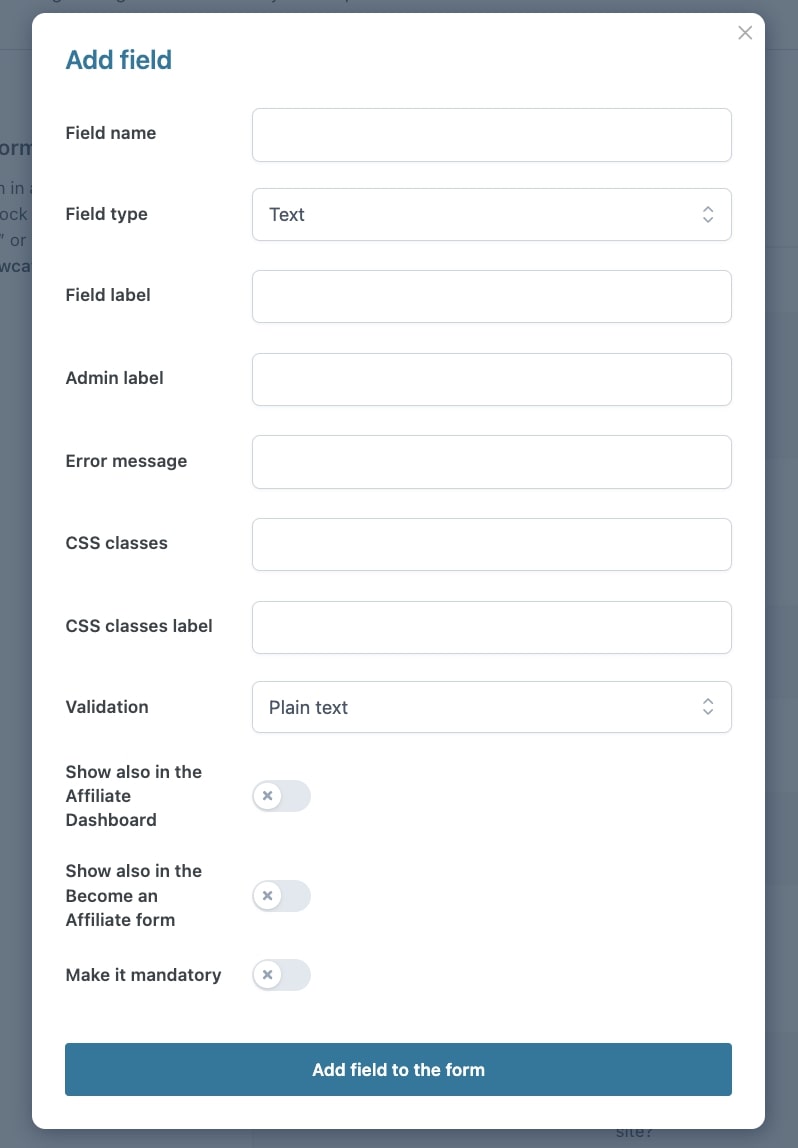
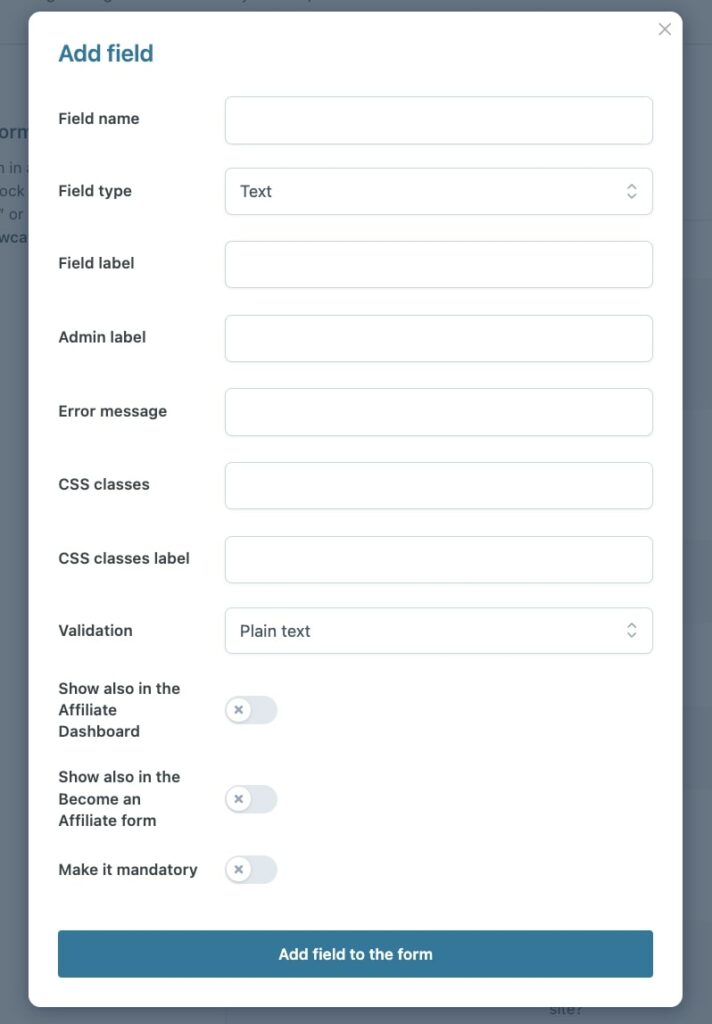
Just click on the + Add field button on top of the table to create a new field.
You will find the following options to configure the field.
Field name: this is the field name that should not contain any spaces
Field type: you can choose among many supported types:
Text
Email
Password
Phone
Textarea
Radio button
Checkbox
Multi checkbox
Select
Country
State
Date
Field label: this is the title of the field visible on the frontend
Admin label: this is the title of the field visible on the backend
Error message: enter here an error message to display in case the value entered by the customer here does not match the expected format or is left empty for a mandatory field
CSS classes: add the CSS classes that you want to associate to this field
CSS classes label: add the CSS class that you want to associate to the label of this field
Validation: the text entered by the user will be validated according to your needs, you can choose among:
plain text
email
phone
URL
Options this option is only available for Radio buttons and Select types and allows you to create the available options from which the customer can choose.
Show also in the Affiliate Dashboard: enable this if you want to show this field also in the Affiliate Dashboard after the affiliate’s account approval. This can be useful for fields that the affiliate user can update at a later stage.
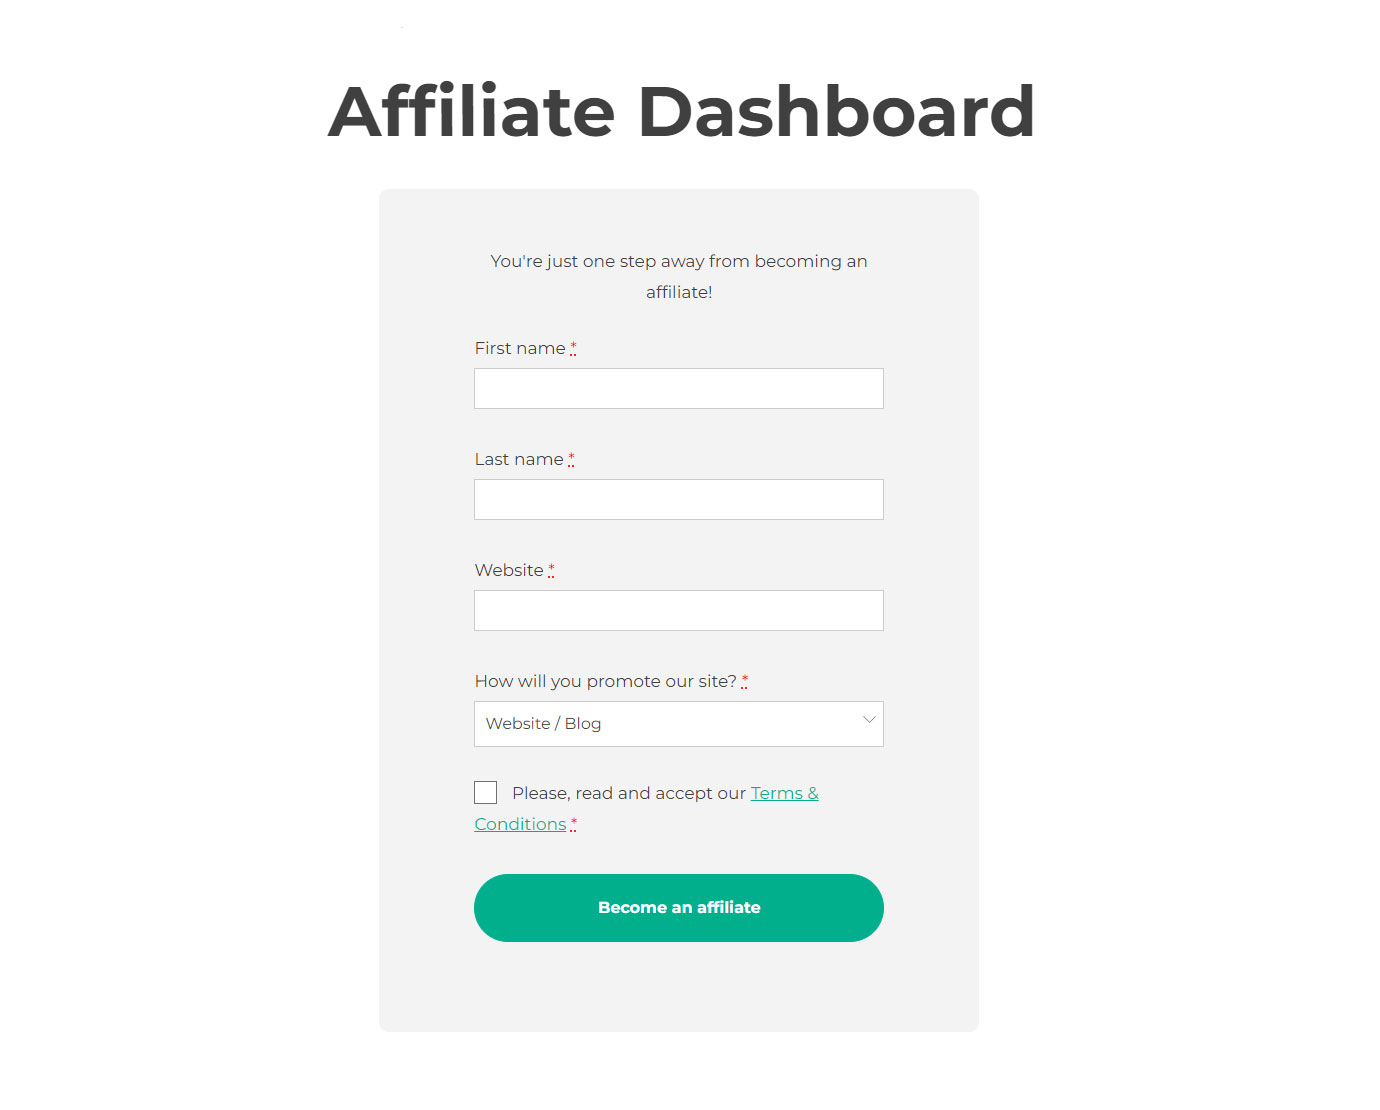
Show also in the Become an Affiliate form: this option allows you to show the field in the form that is shown to registered and logged-in users who want to submit an affiliate application. The Affiliate registration form allows anyone to register as a user and as an affiliate, whereas the Become an Affiliate form is displayed to logged-in users when they visit the Affiliate Dashboard and will include only the affiliate-related forms.
Make it mandatory: enable this option to make the field mandatory.
Below the fields, you will find an important option:
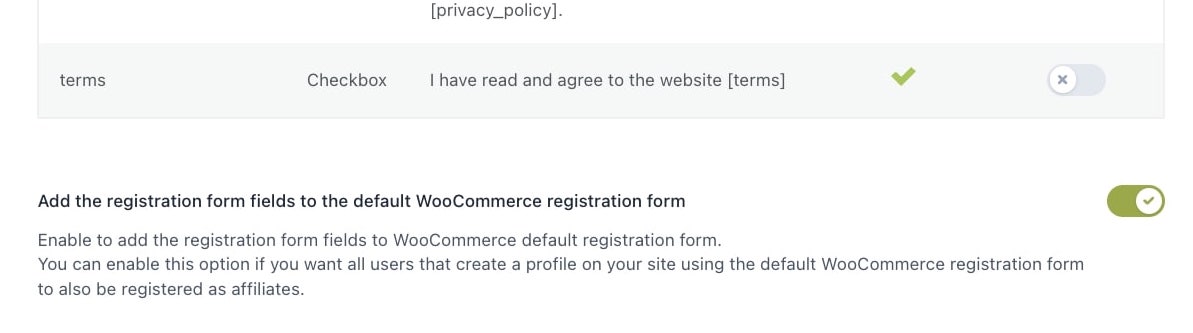
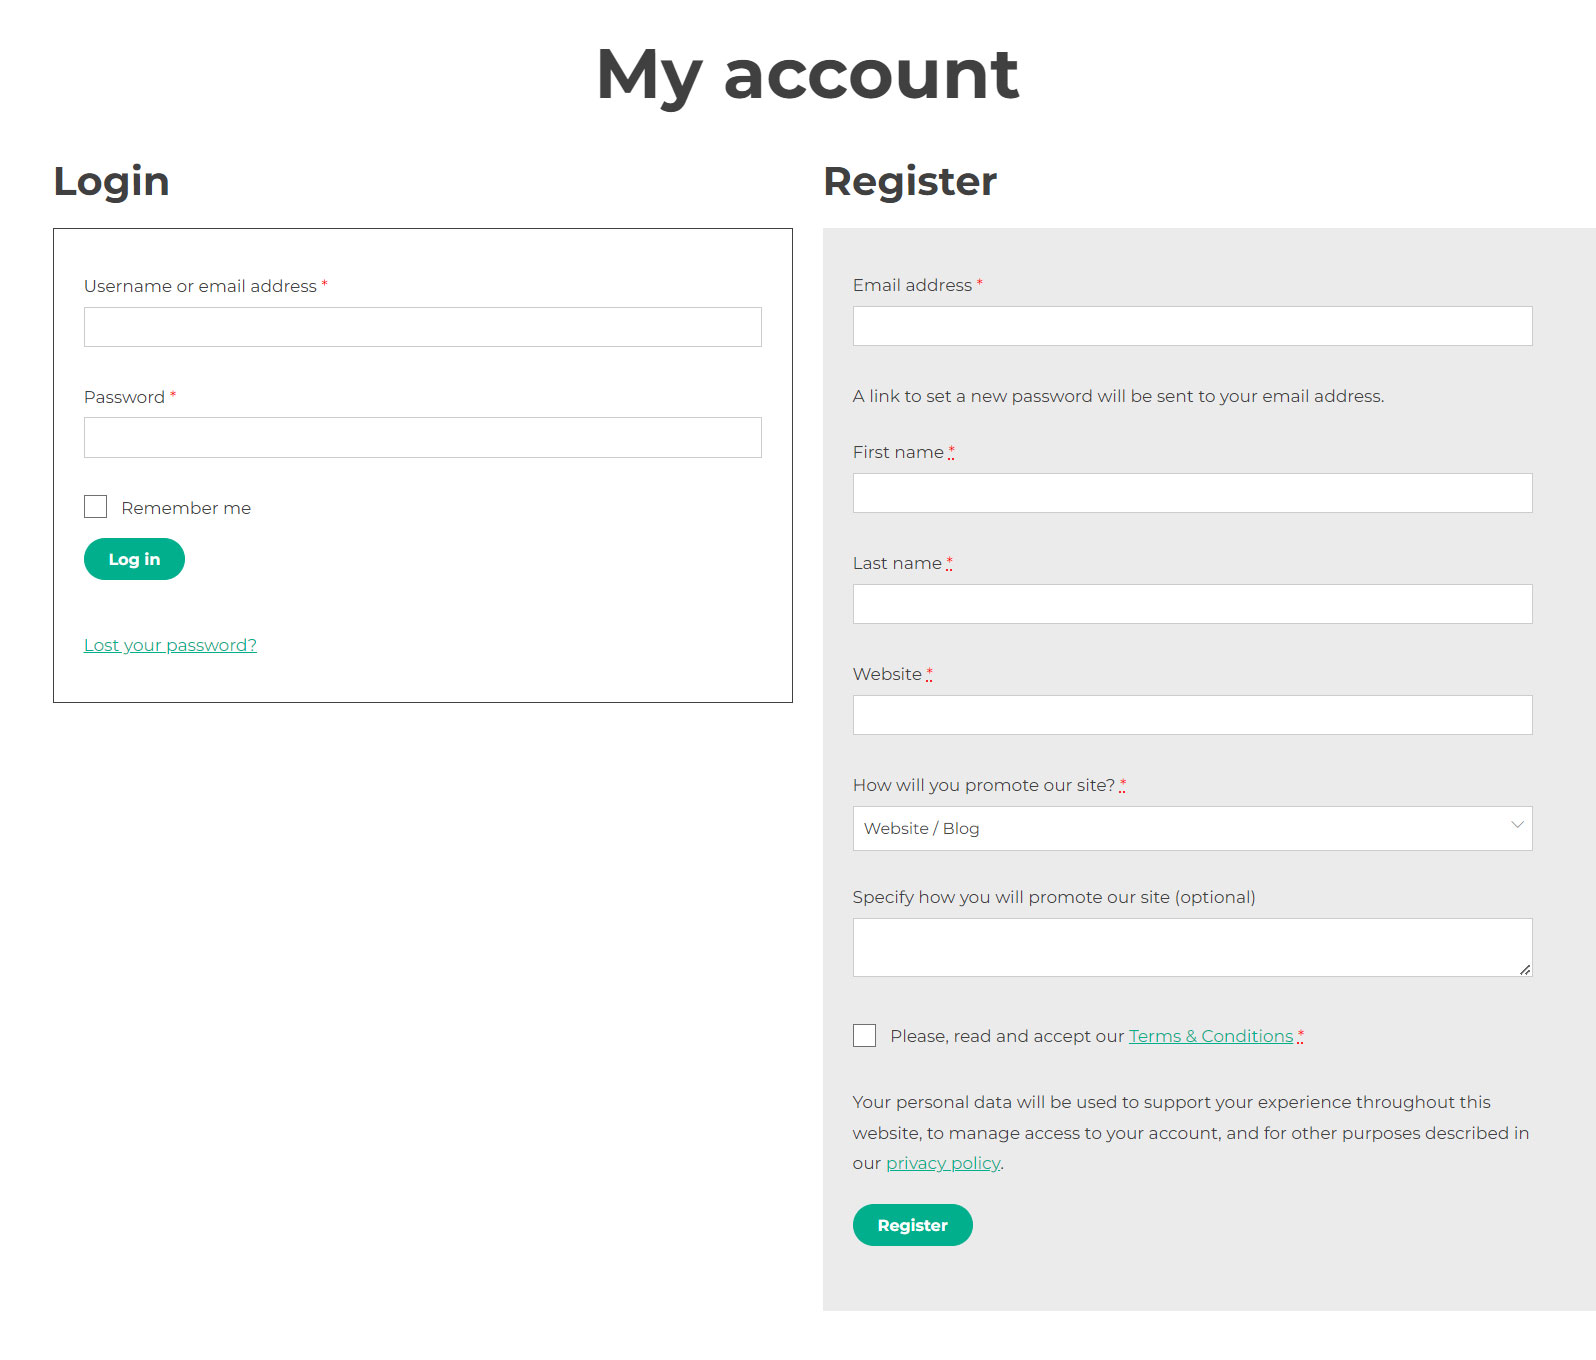
Add the registration form fields to the default WooCommerce registration form: enable this option to add the affiliates registration form fields in the WooCommerce default registration form. In this way, all users who register to your site will also automatically submit an application as affiliates at the same time.
Note: if this option is enabled, you will never be able to see the Become an affiliate form, because all new users are automatically applying as affiliates during the registration. The only exception would be in case the user registered before the option was enabled.
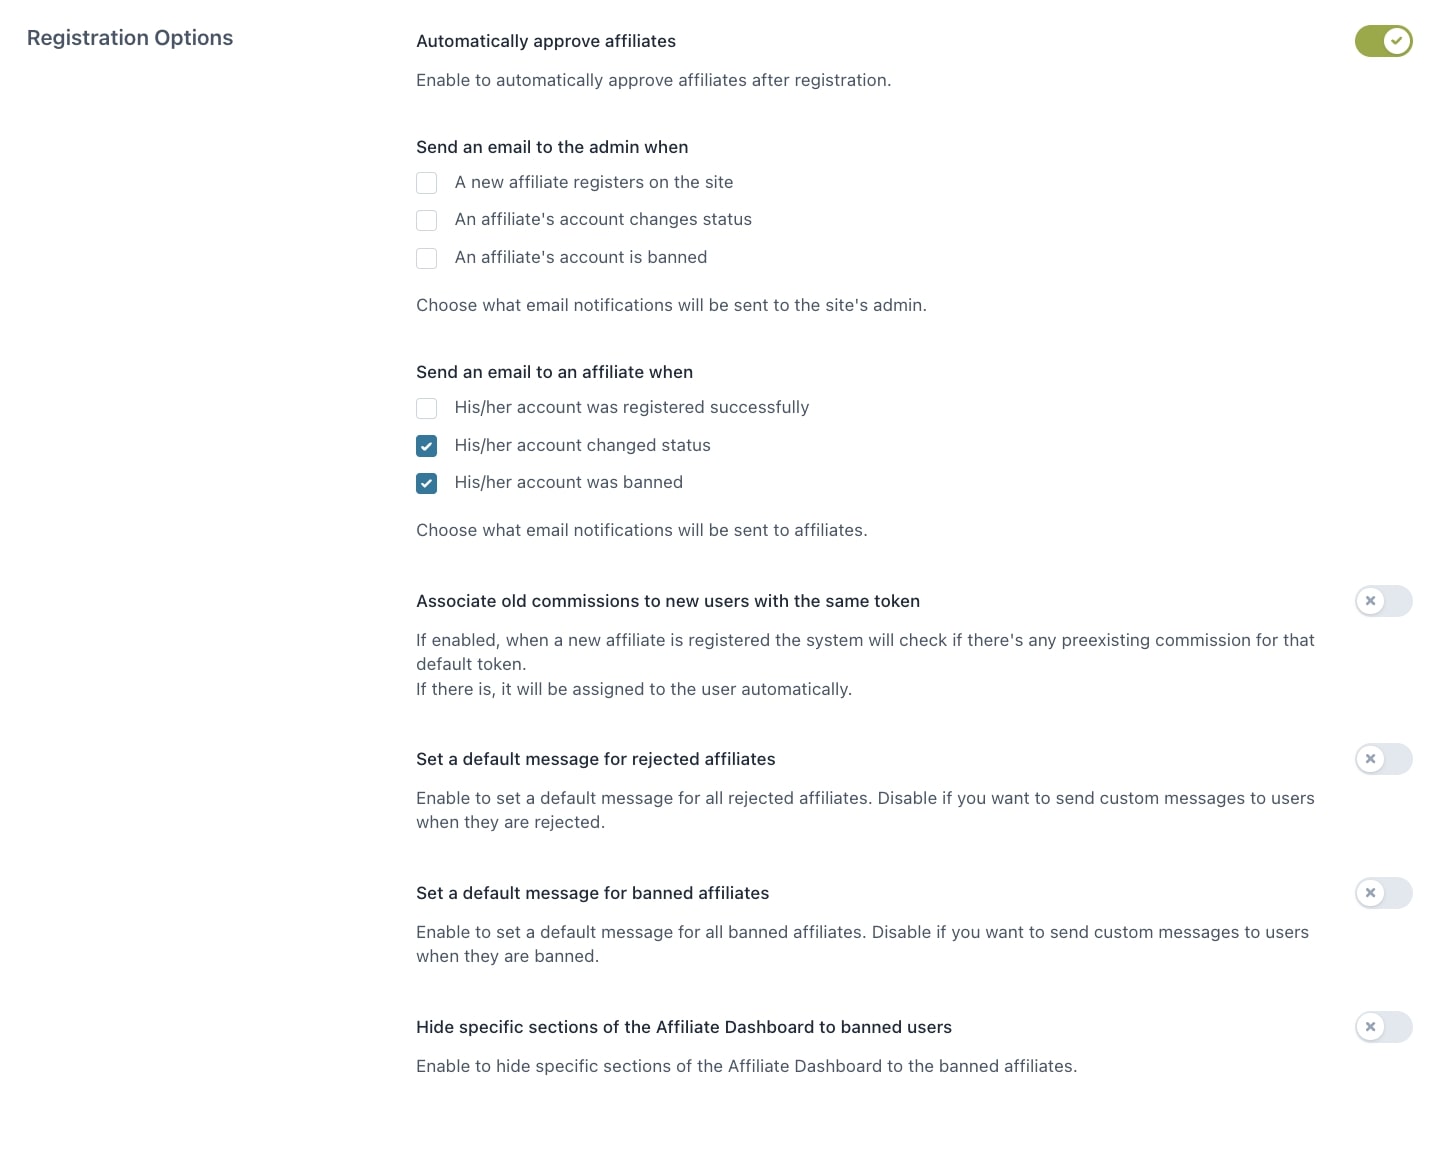
Registration options
Automatically approve affiliates: enable to automatically approve affiliates after their registration.
Send an email to the admin when:
a new affiliate registers on the site
an affiliate’s account changes status
an affiliate’s account is banned
Send an email to an affiliate when:
his/her account was registered successfully
his/her account changed status
his/her account was banned
You can edit these email notifications from WooCommerce > Settings > Emails.
Associate old commissions to new users with the same token: if enabled, when a new affiliate is registered, the system will check if there’s any preexisting commission for that default token. If there is any, it will be assigned to the user automatically.
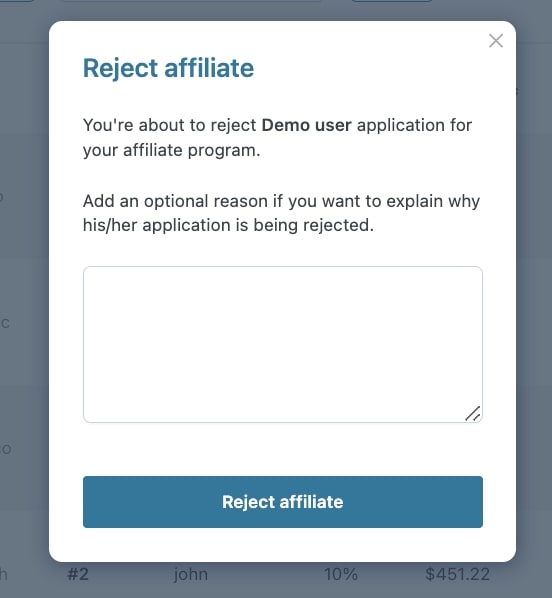
Set a default message for rejected affiliates: enable to set a default message for all rejected affiliates. Disable if you want to send custom messages to users when they are rejected.
Set a default message for banned affiliates: enable to set a default message for all banned affiliates. Disable if you want to send custom messages to users when they are banned.
You will be able to set a custom reject or ban message in the affiliate’s profile or from the popup when you reject the affiliate from the actions menu:
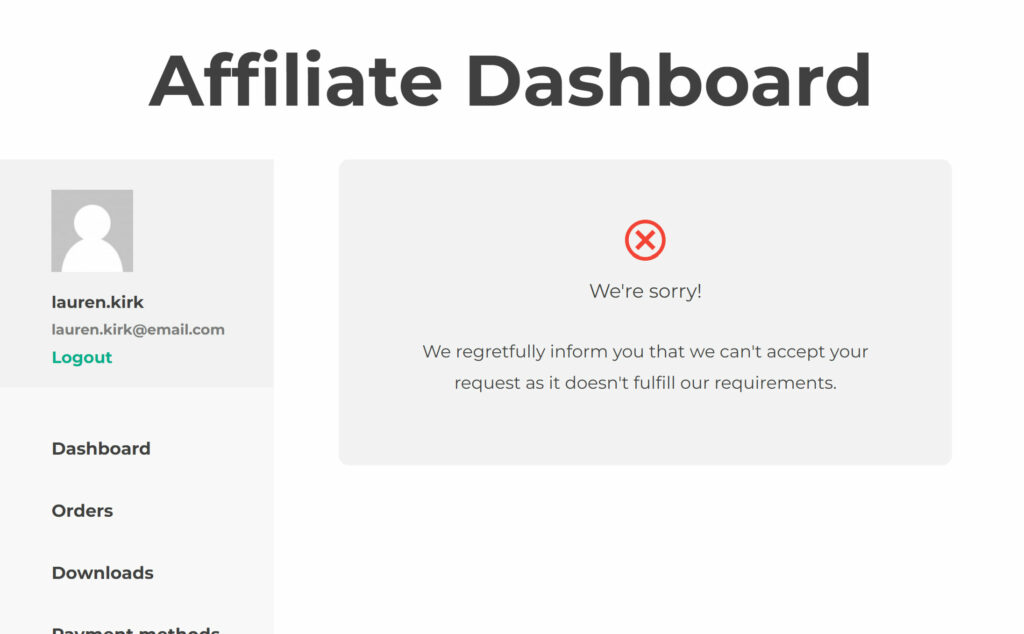
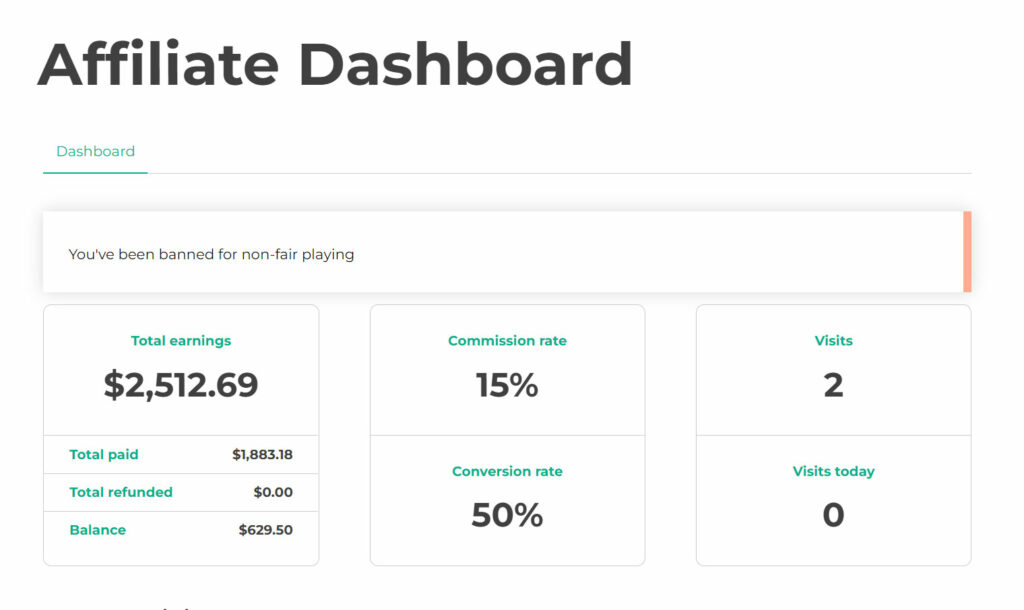
Hide specific sections of the Affiliate Dashboard to banned users: choose to hide one or more sections of the Affiliate Dashboard from banned users. Available sections are:
Dashboard
Commissions
Visits
Coupons
Payments
Link generator
Settings
Affiliate Dashboard of a banned user where only the Dashboard tab has been enabled. All other sections have been hidden.
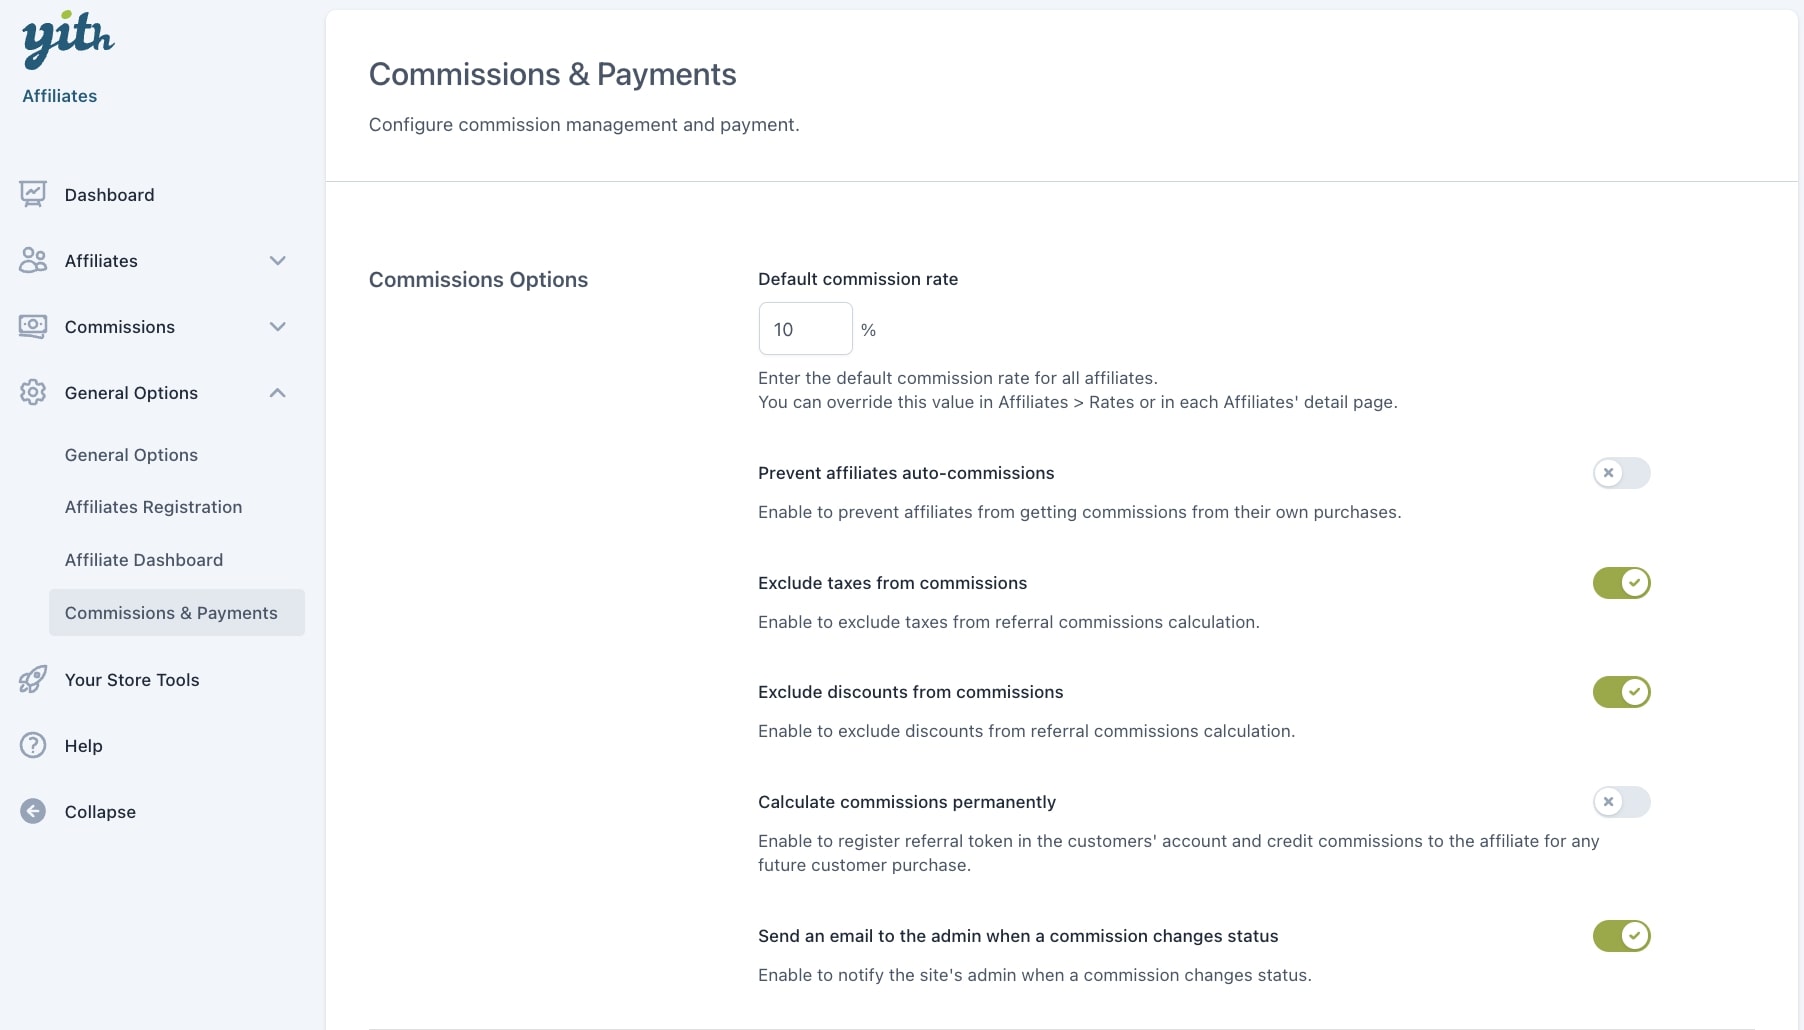
Prevent affiliates auto-commissions: enable to prevent affiliates from getting commissions from their own purchases.
Exclude taxes from commissions: enable to exclude taxes from referral commissions calculation. E.g. if a product costs €100 and there’s €20 tax added (for a total of €120), the affiliate commissions will be calculated on €100.
Exclude discounts from commissions: enable to exclude discounts from referral commissions calculation. E.g. if a product costs €100 and a €20 discount is applied, the affiliate commissions will be calculated on €80.
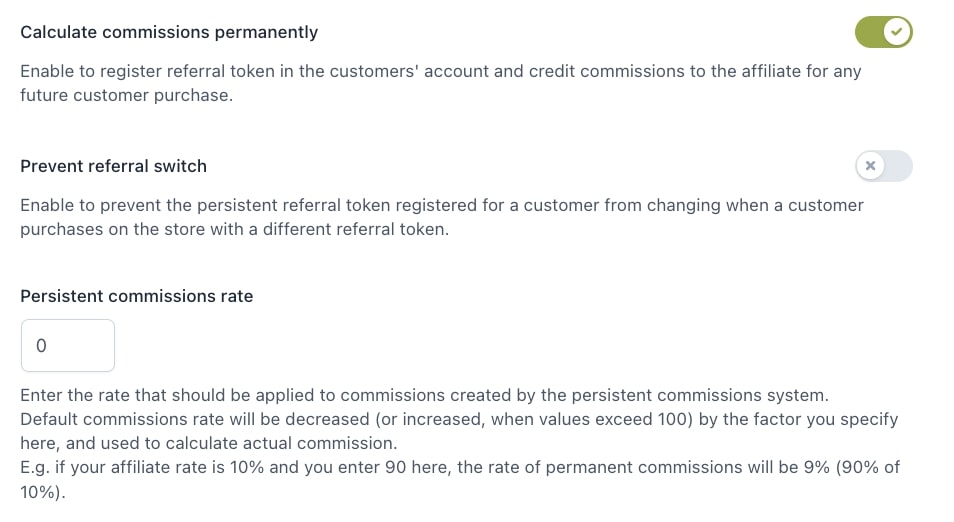
Calculate commissions permanently: enable to register referral token in the customer’s account and credit commissions to the affiliate for any future customer purchase. If enabled, this option will let you adjust more settings.
Prevent referral switch: enable to prevent the preexistent refer token registered for a customer from changing when a customer purchases on the store with a different referral token.
Persistent commissions rate: enter the rate that should be applied to commissions created by the persistent commissions system. Default commissions rate will be decreased (or increased, when values exceed 100) by the factor you specify here, and used to calculate actual commission. E.g. if your affiliate rate is 10% and you enter 90 here, the rate of permanent commissions will be 9% (90% of 10%).
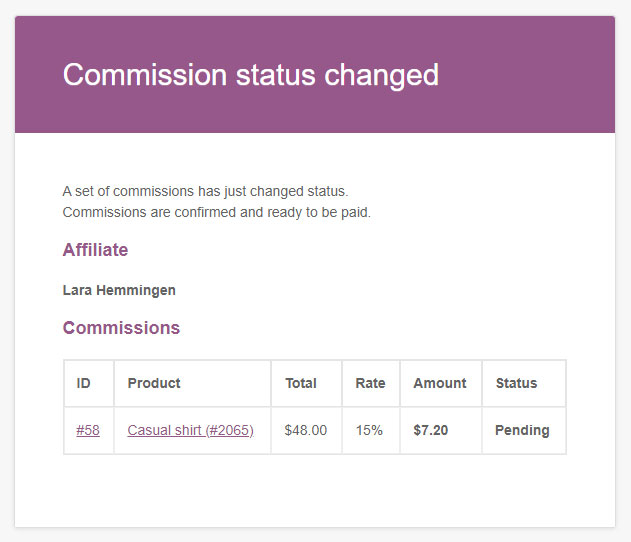
Send an email to the admin when a commission changes status: enable to notify the site’s admin when a commission changes status. You can customize this email from WooCommerce > Settings > Emails.
Payment options
Payment type: this is the first option of the Payment options section and allows you to choose between multiple options for the payment of the commissions. Let’s check them all one by one below:
This is the simplest option that will require the admin to manually create the payments using any of the enabled gateways.
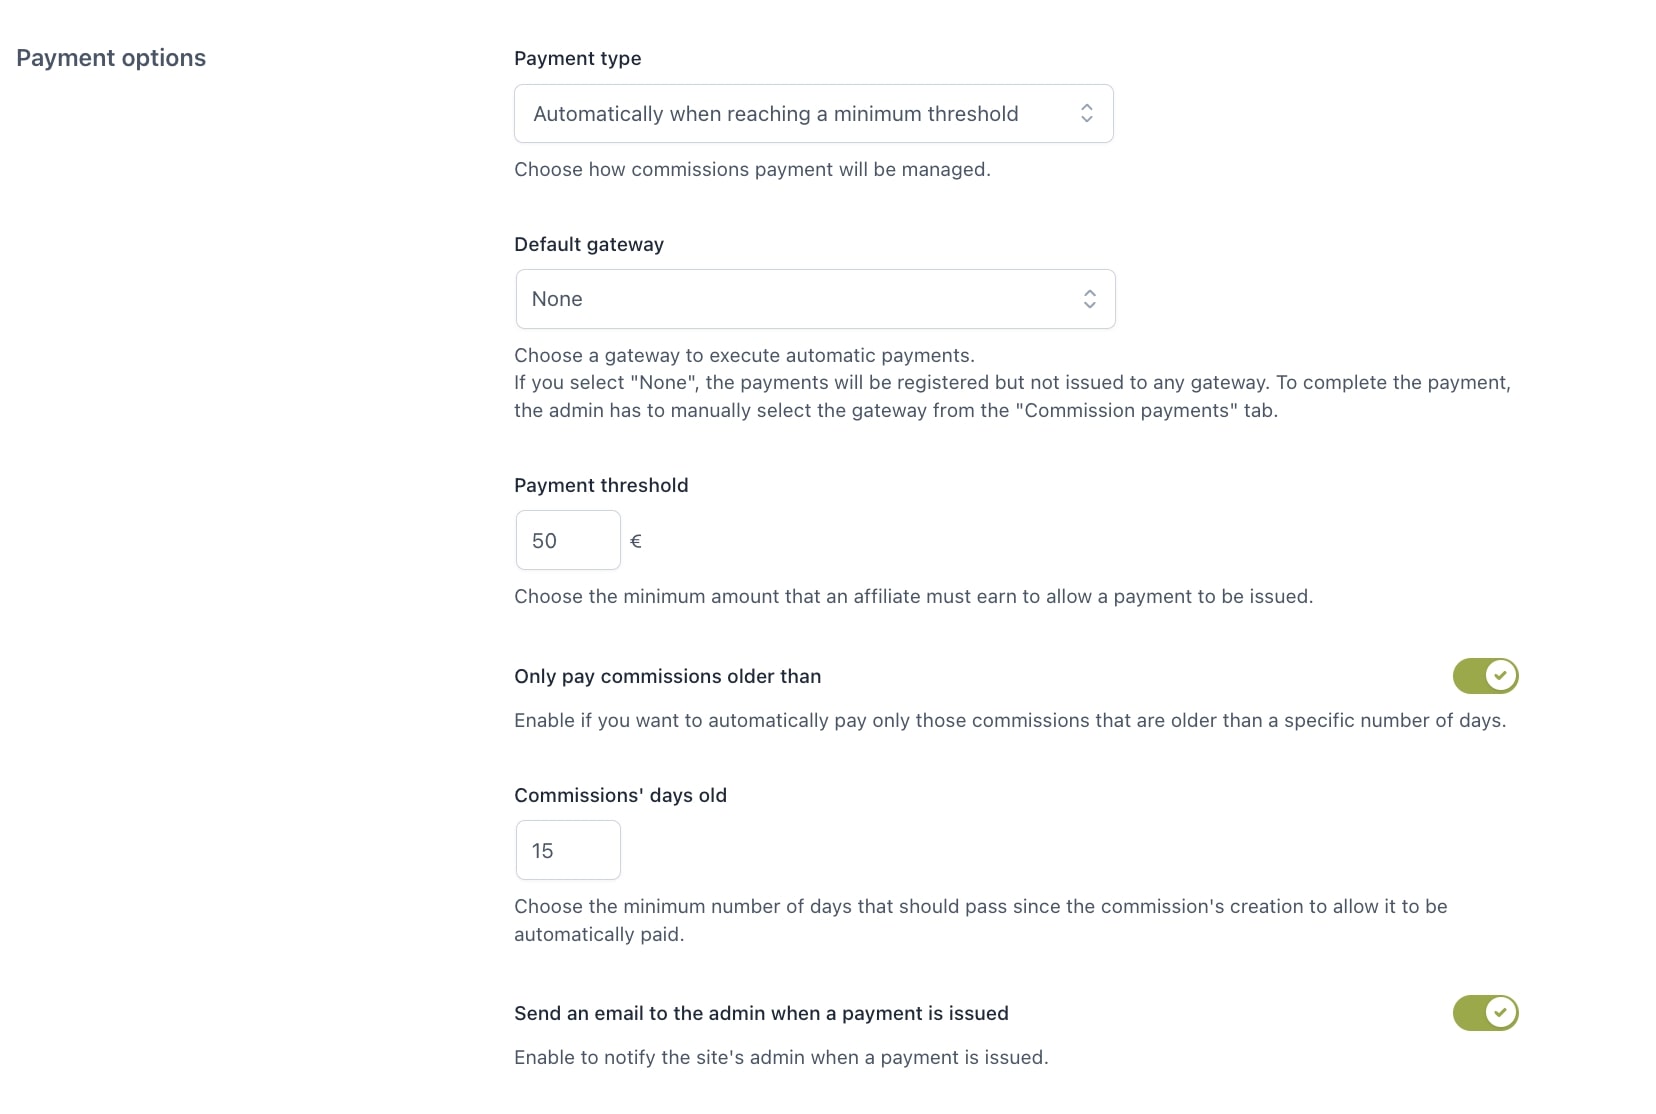
2. Automatically when reaching a minimum threshold
When selecting this option, a payment will automatically be created for affiliates who reach the minimum threshold that you can set up in the next option (it will show all the gateways enabled in the Payment gateways section below). The system will generate one separate payment for each affiliate of the total active balance of that user.
Please, note: the payments will be created based on those conditions by a daily cron.
For example, if you set a minimum threshold of €50, once a day a cron will check all affiliates’ balances and will create a payment record only for those affiliates who have reached the minimum €50 in confirmed commissions.
Then, you can decide whether enabling a default gateway for these payments or not in the option below. If you select “None”, the payment records will be created with the on hold status, so the admin can manually choose the payment gateway from the Payments tab.
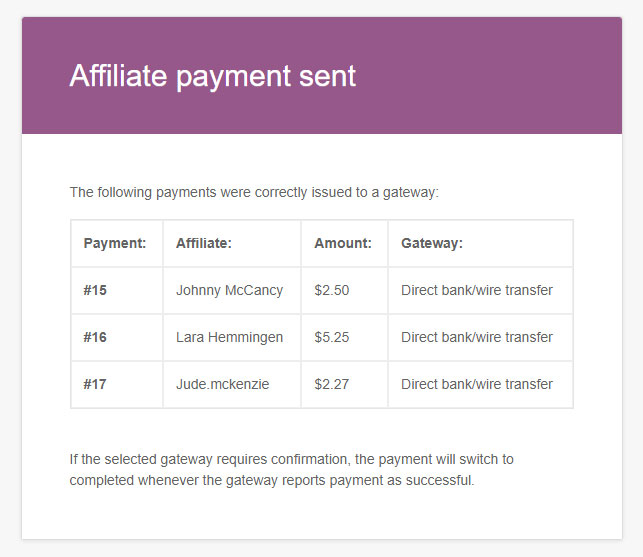
If you select one of the automatic gateways (like YITH Stripe Connect, YITH PayPal Payouts or YITH Account Funds), the payments will be automatically processed and so instantly set to “Completed” automatically by the gateway. For more details about these automatic gateways, please refer to their details page in the Integrations section.
Only pay commissions older than: you can also choose to calculate the commissions threshold from confirmed commissions older than a certain number of days. This option is particularly useful if you offer a no-question refund policy and want to pay the commissions only after the terms of the refund are passed (and so make sure you do not pay commissions for orders that can actually be refunded).
When this option is enabled, your affiliates will see two different amounts for their balance:
Current balance: this is the sum of all confirmed commissions, regardless of the commission date.
Available balance: this is the balance that can actually be paid, after a certain number of days since it is confirmed. E.g. You set this option to 30 days and the affiliate has a total balance of 430$ generated more than 30 days ago. Yet, today, he/she earns 70$ more. The current balance will show 500$, but the available (payable) balance is still 430$, because the 70$ commissions have been confirmed only today and will account in the available balance only in 30 days from today.
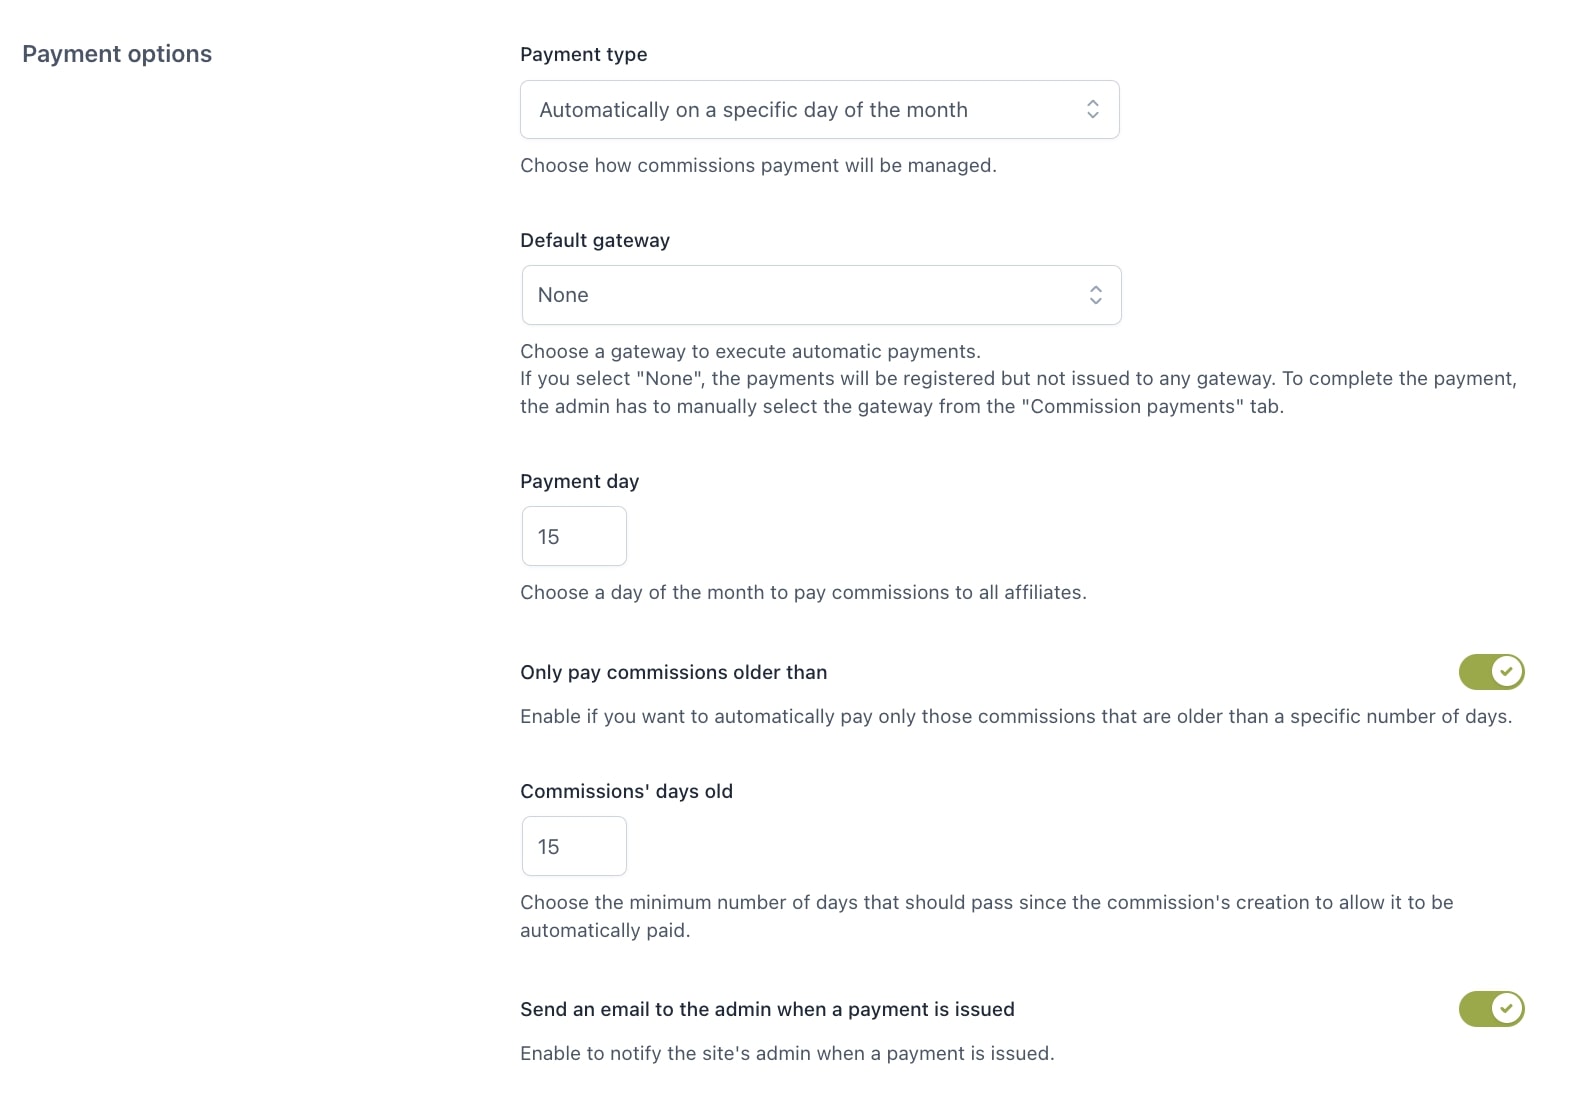
3. Automatically on a specific day of the month
This option allows you to generate the payment records automatically on a specific day of the month, for example, every 1st day of the month. As for the previous option, you can also select a default gateway and based on it, the payments will be automatically processed or set to on hold status and create the payment only for commissions older than X days.
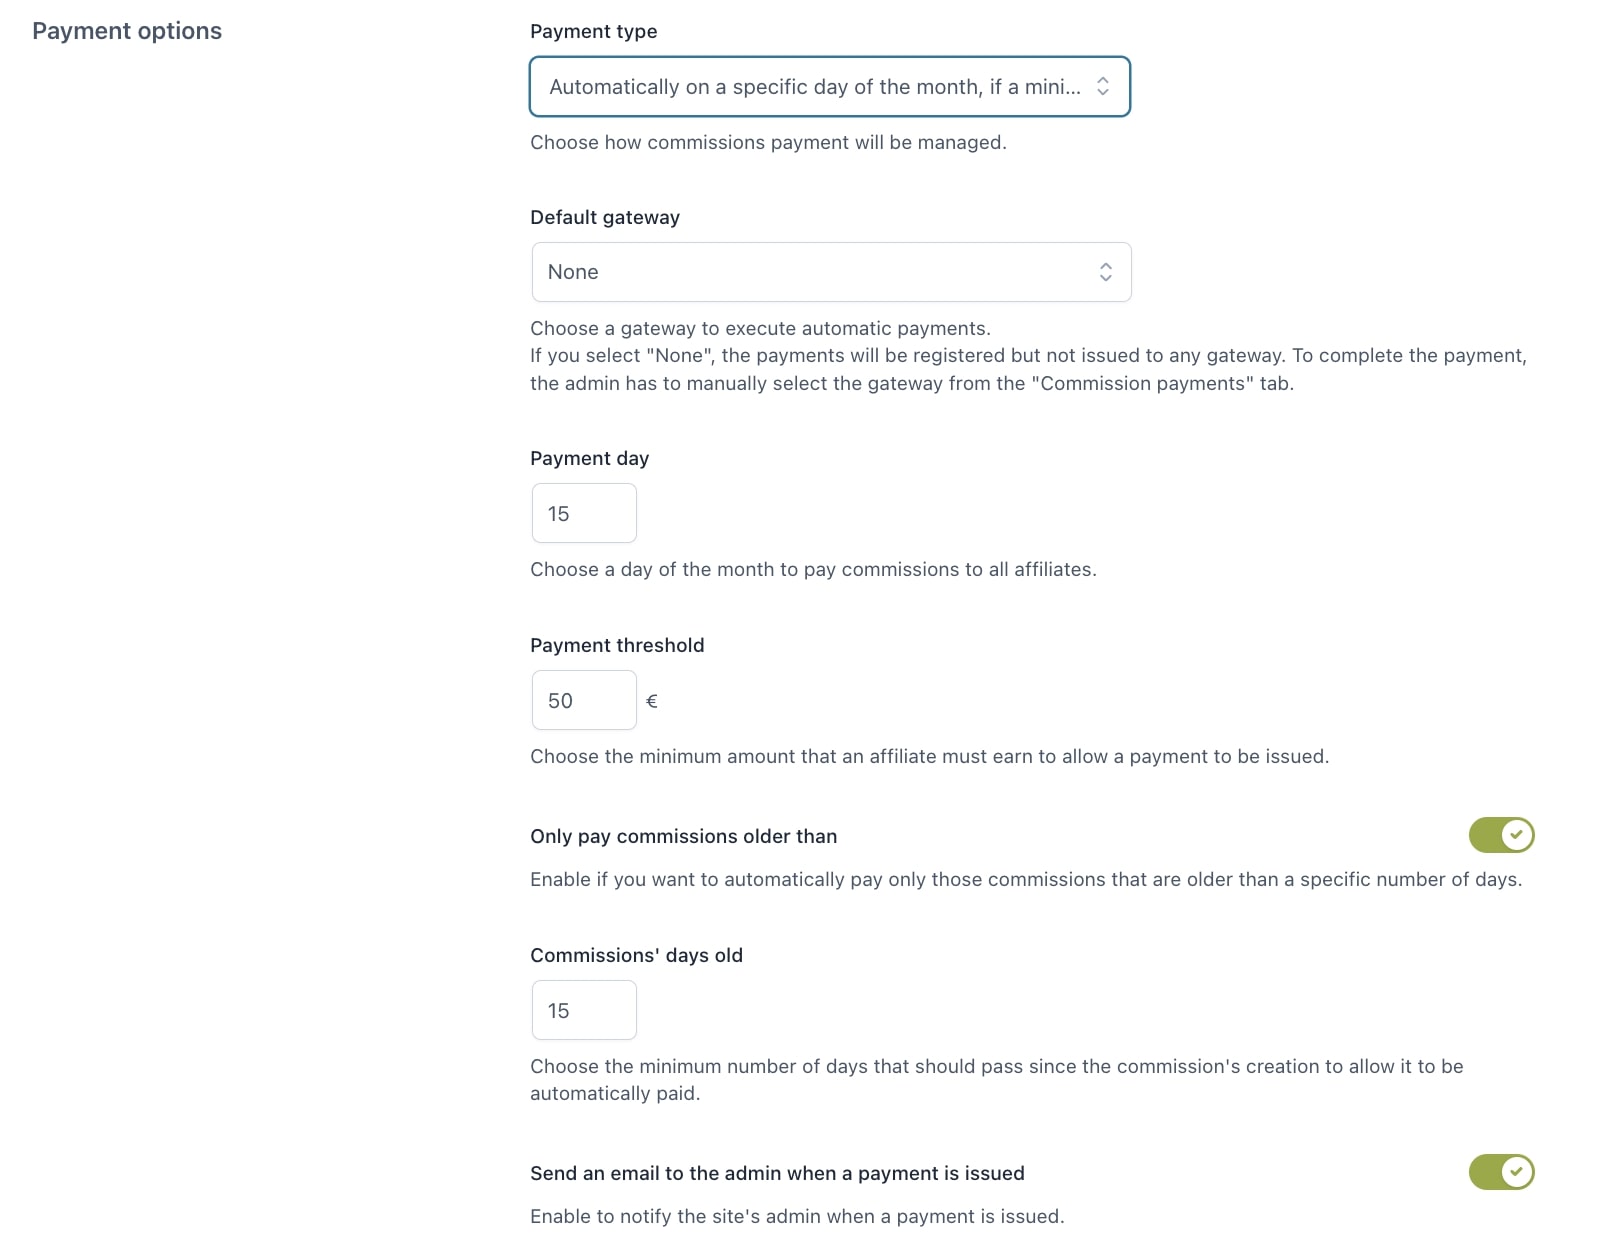
4. Automatically on a specific day of the month, if a minimum threshold is reached
This option combines both conditions, so the plugin will check the affiliates’ balance on the day you set, e.g. at least €50 on 1st every month, and will create payment records for each affiliate whose active balance reaches the minimum set threshold.
As for the previous options, you can also select a default gateway and based on it, the payments will be automatically processed or set to on hold status and create the payment only for commissions older than X days.
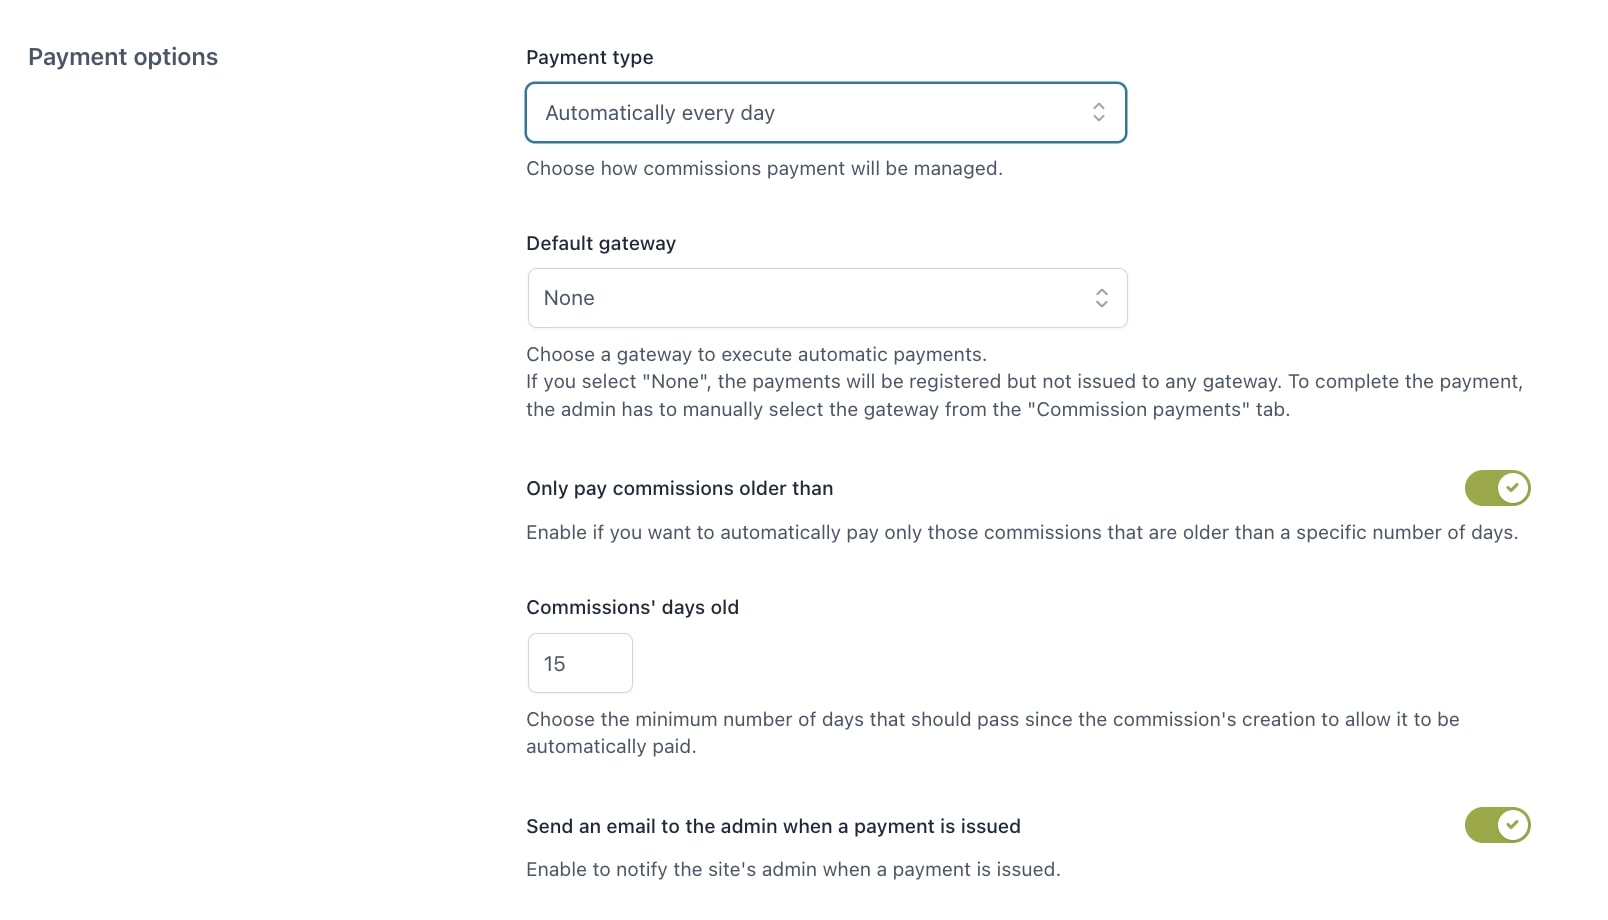
5. Automatically every day
This option will automatically create payments every day for each affiliate, regardless of their total active balance, so it could also create payments of a couple of dollars or cents. Be careful when using this if you are charged fees for every payment issued.
As for the previous options, you can also select a default gateway and based on it, the payments will be automatically processed or set to on hold status and create the payment only for commissions older than X days.
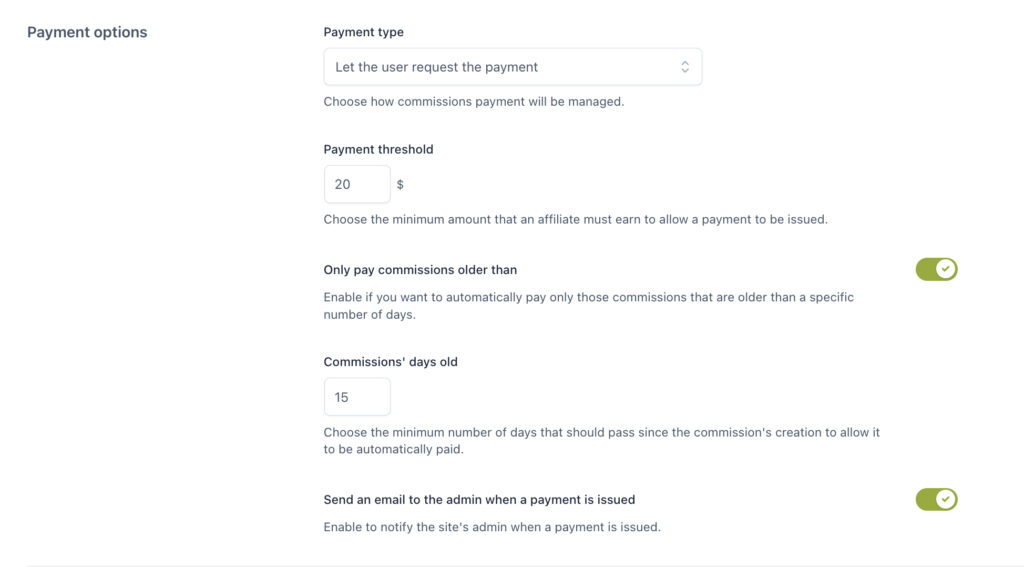
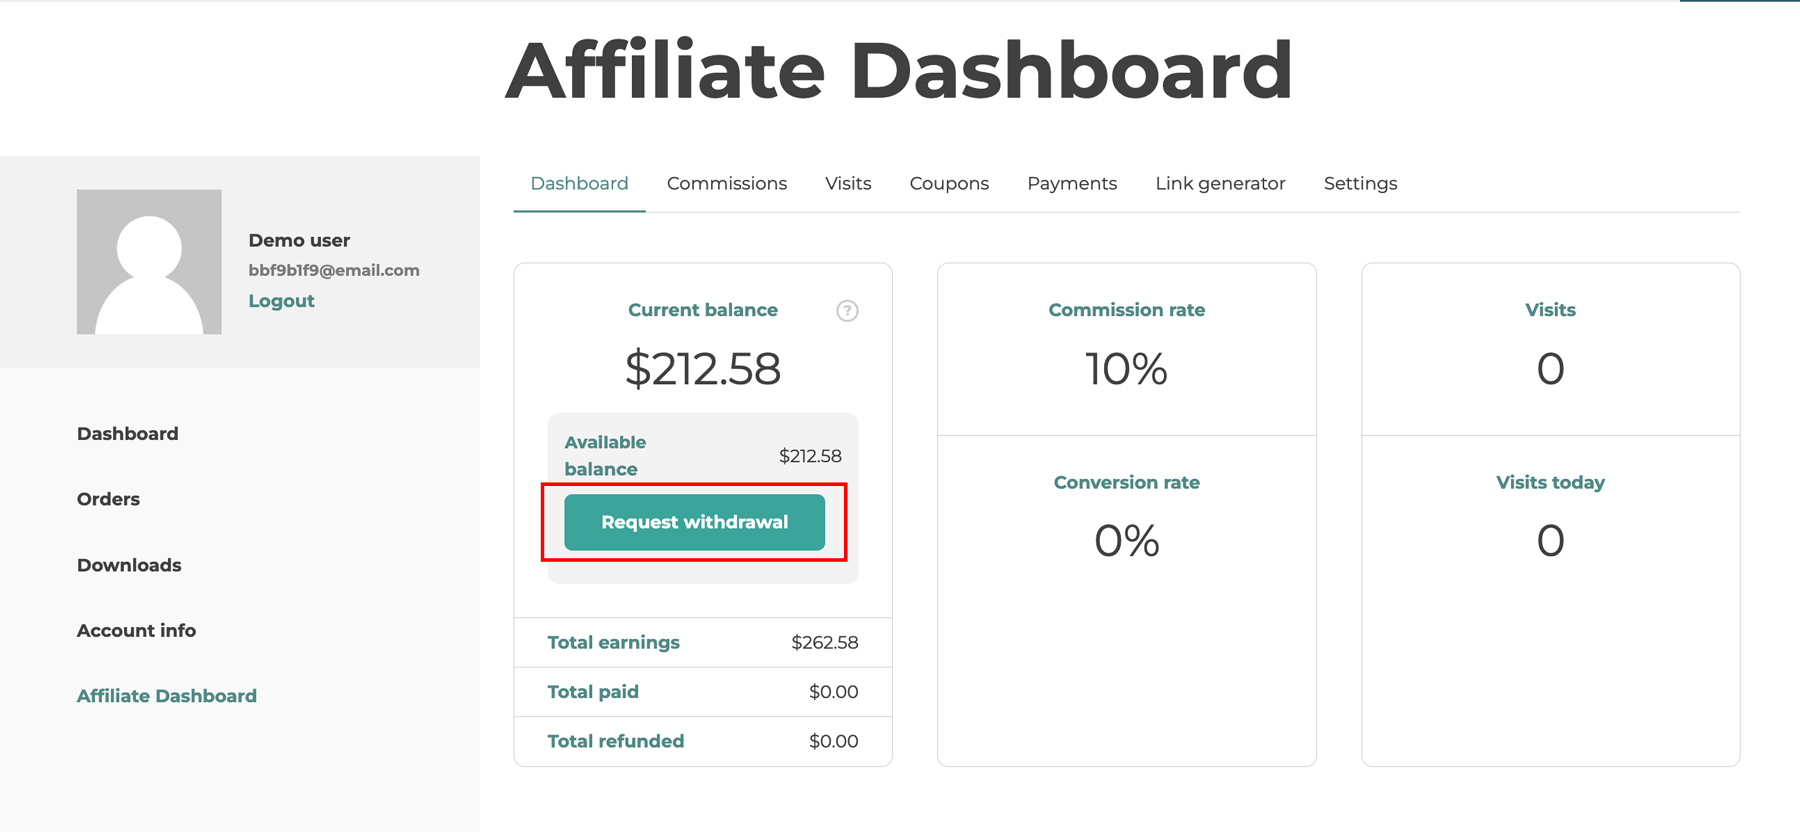
6. Let the user request the payment
When selecting this option, the user will be able to request the payment from the Dashboard.
Also in this case, you can set a minimum payment threshold and you can also enable the option that requires the invoice.
A Request withdral button will appear if:
the minimum threshold is reached and
there are no other pending payments.
Additionally, as for the previous options, you can also make sure that the payment is created only for commissions older than X days.
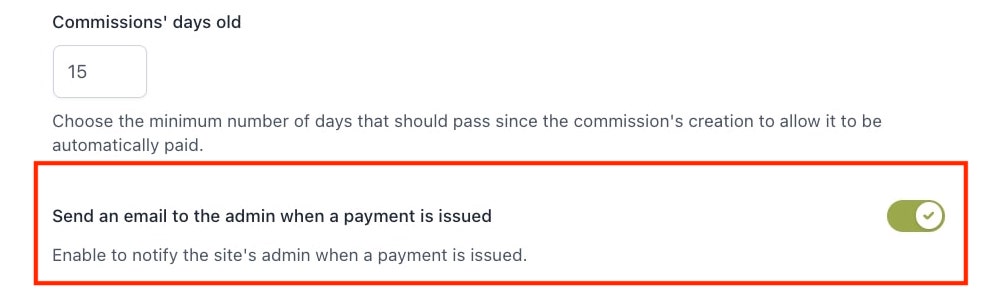
Send an email to the admin when a payment is issued:
Enable this email notification to notify the admin when a payment is issued. You can edit this email from WooCommerce > Settings > Emails.
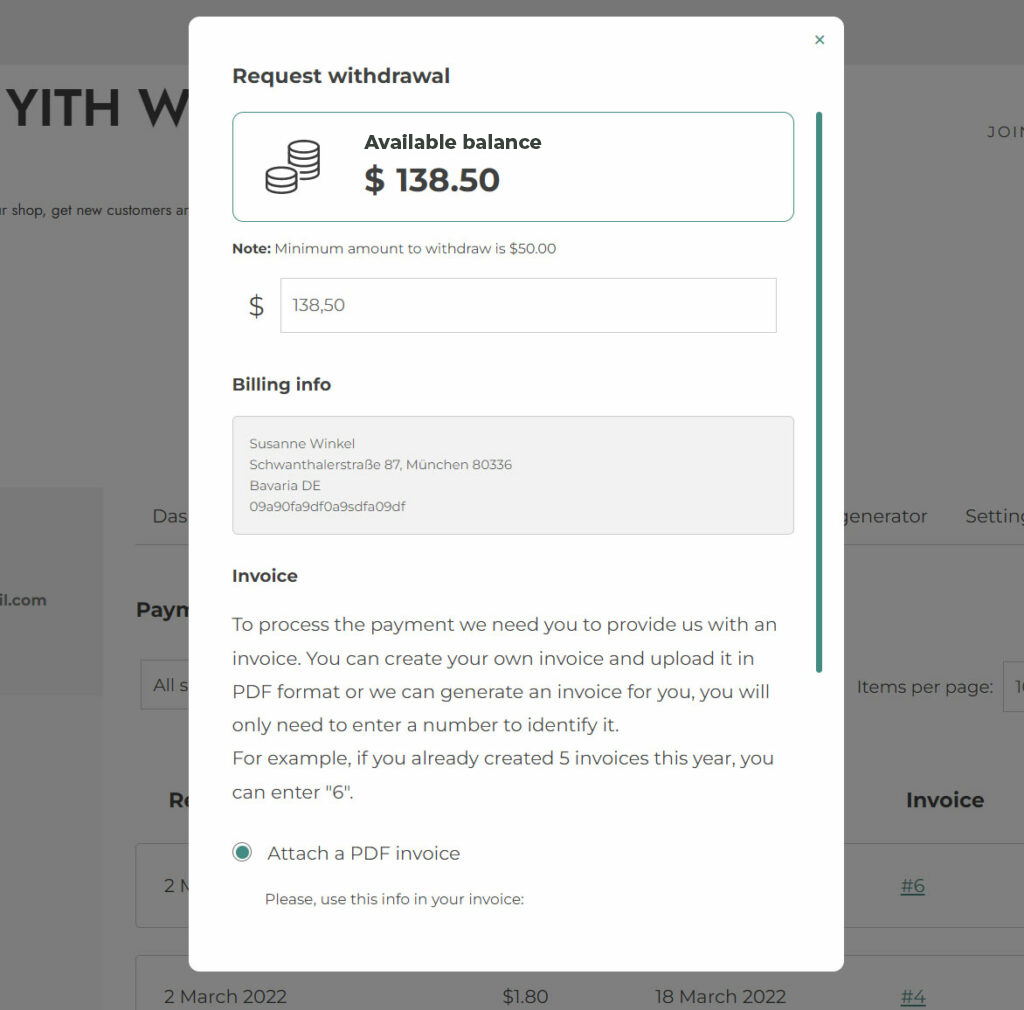
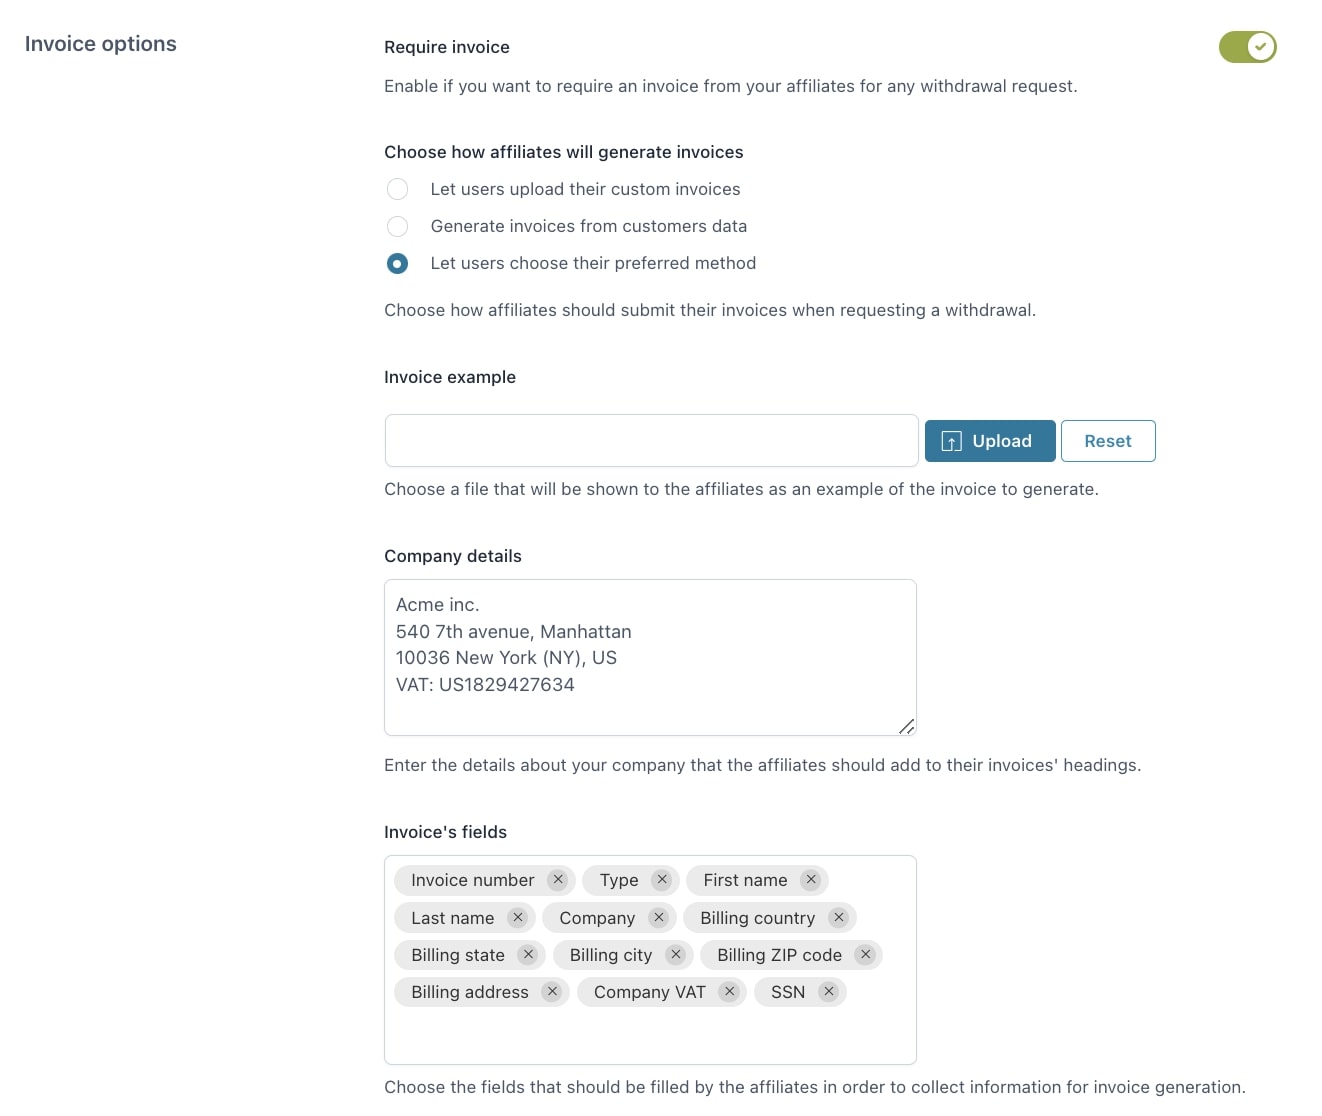
Invoice options
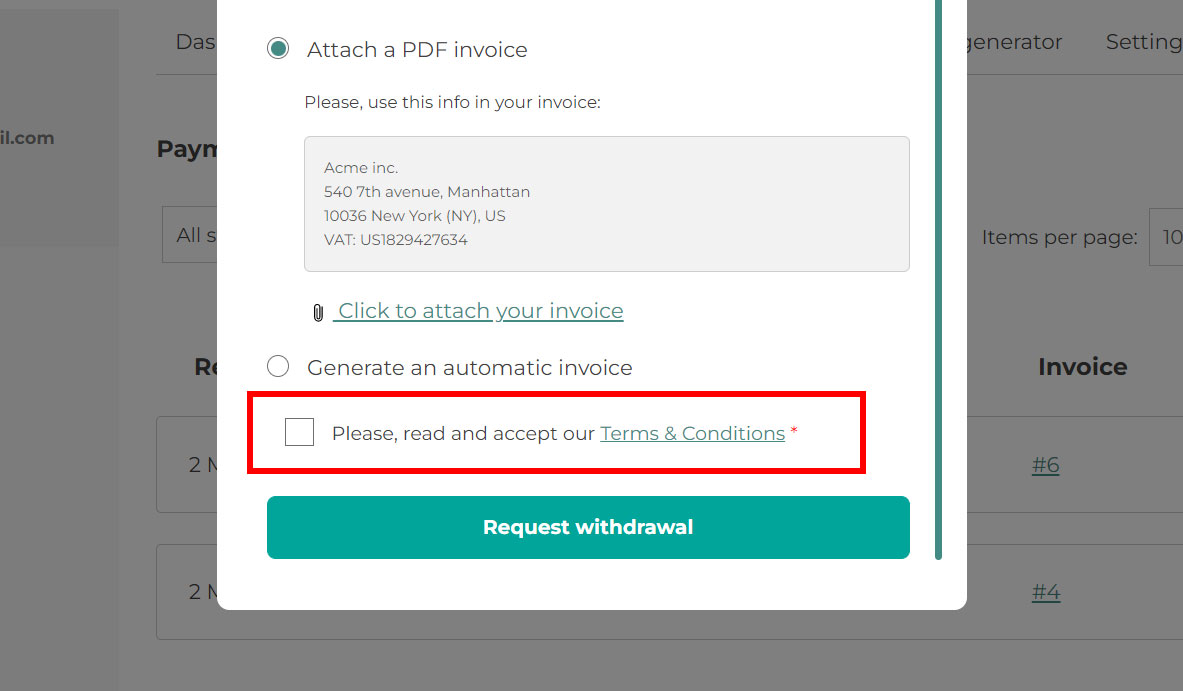
If you enable the Require invoice option, the payments requested cannot be submitted until an invoice document is uploaded by the affiliate or an automatic invoice is generated from the affiliate’s billing details.
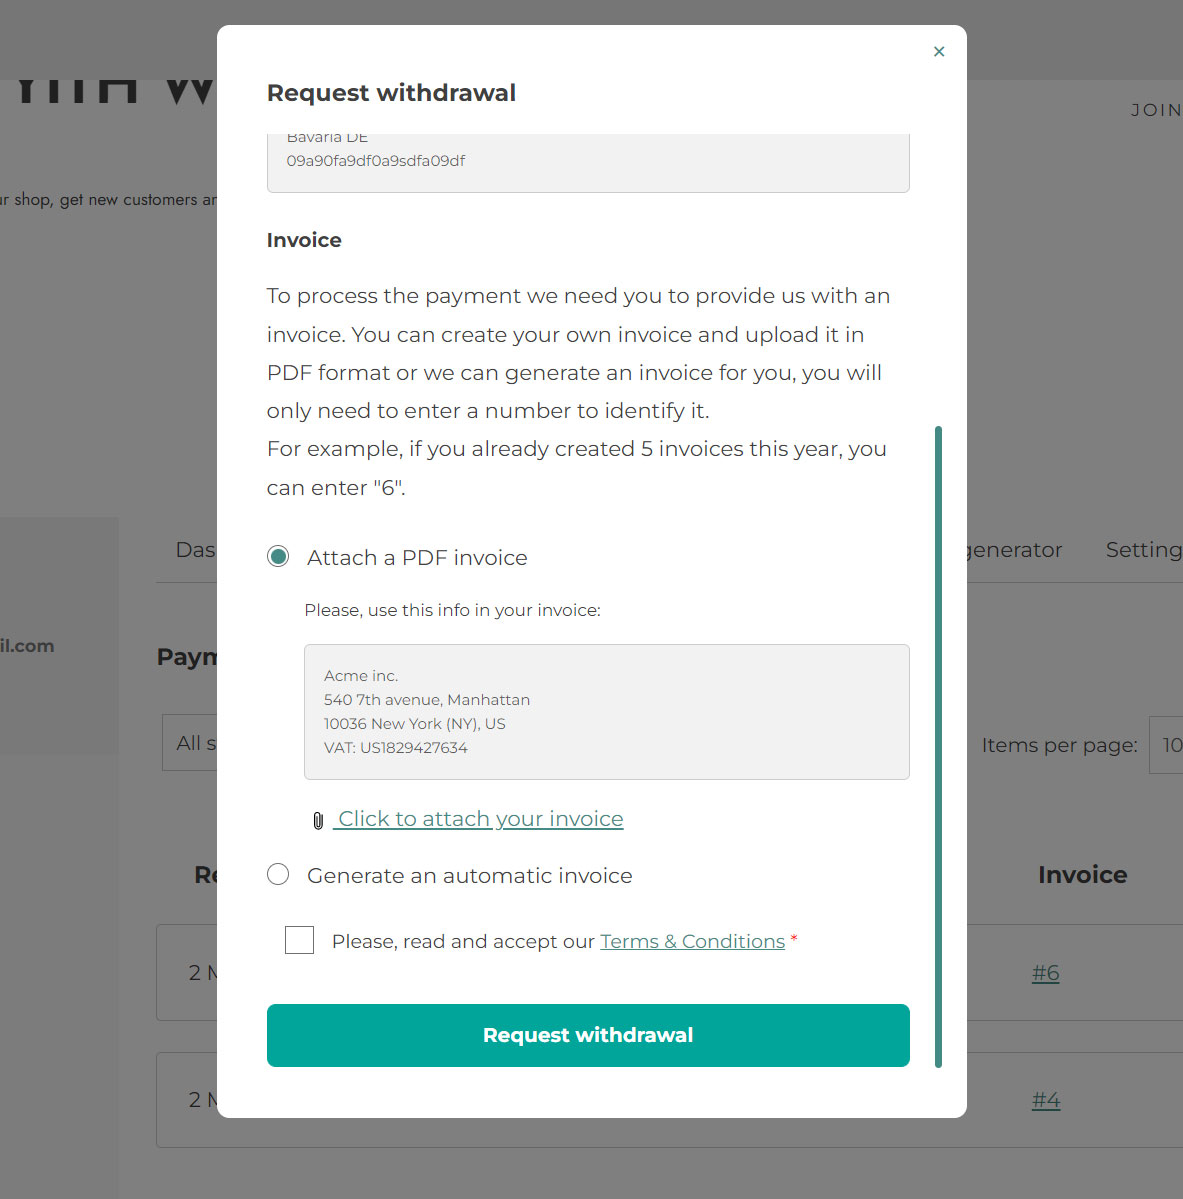
The button will open a popup to fill out the request, where they can see the current active balance, enter the amount of the payment, update the billing info, upload or generate the invoice and accept the Terms & Conditions.
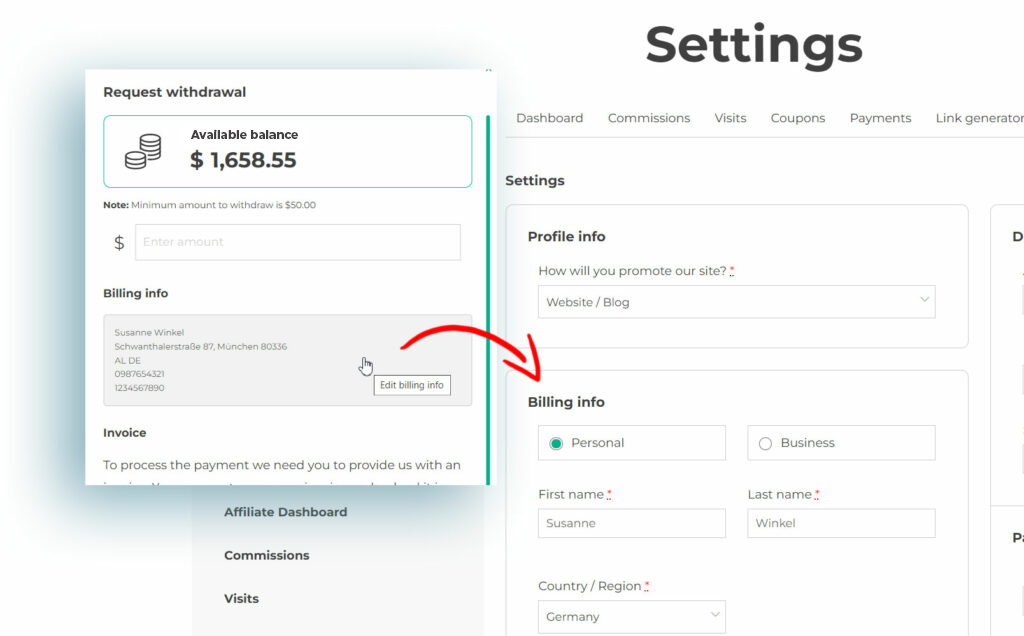
If the billing info are not complete, they will be able to click on the box and will be taken to the Affiliate Dashboard > Settings tab to complete all the required fields.
Let’s go on with more options for the invoice:
Choose how affiliates will generate invoices: choose how affiliates should submit their invoices when requesting a payment.
Let users upload their custom invoices
Generate invoices from customers data
Let users choose their preferred method
Invoice example: upload here a file that can be displayed to the affiliate as a sample invoice.
Company details: enter your company details here, the ones that your affiliates should add to their invoice. These details will be displayed if they choose to upload their own invoice file.
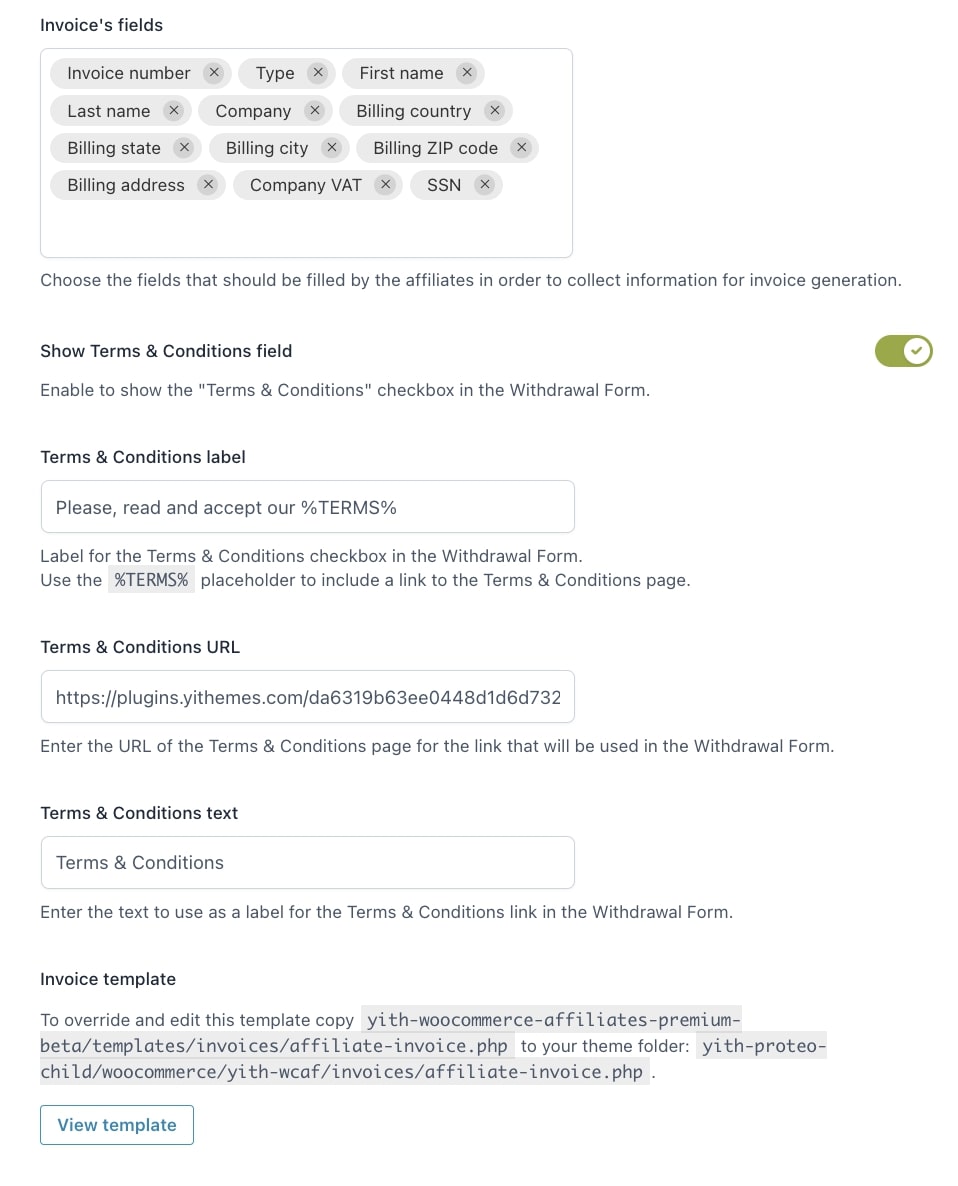
Invoice’s fields: choose the fields that should be filled by the affiliates in order to collect information for the automatic invoice generation. Available options: Type, first name, last name, company, billing country, billing state, billing city, billing ZIP code, billing address, company VAT, SSN.
Show Terms & Conditions field: enable to show the Terms & Conditions checkbox in the withdrawal form.
Terms & Conditions label: label for the Terms & Conditions checkbox in the withdrawal form. Use the %TERMS% placeholder to include a link to the Terms & Conditions page.
Terms & Conditions URL: enter the URL of the Terms & Conditions page for the link that will be used in the withdrawal form.
Terms & Conditions text: enter the text to use as a label for the Terms & Conditions link in the withdrawal form.
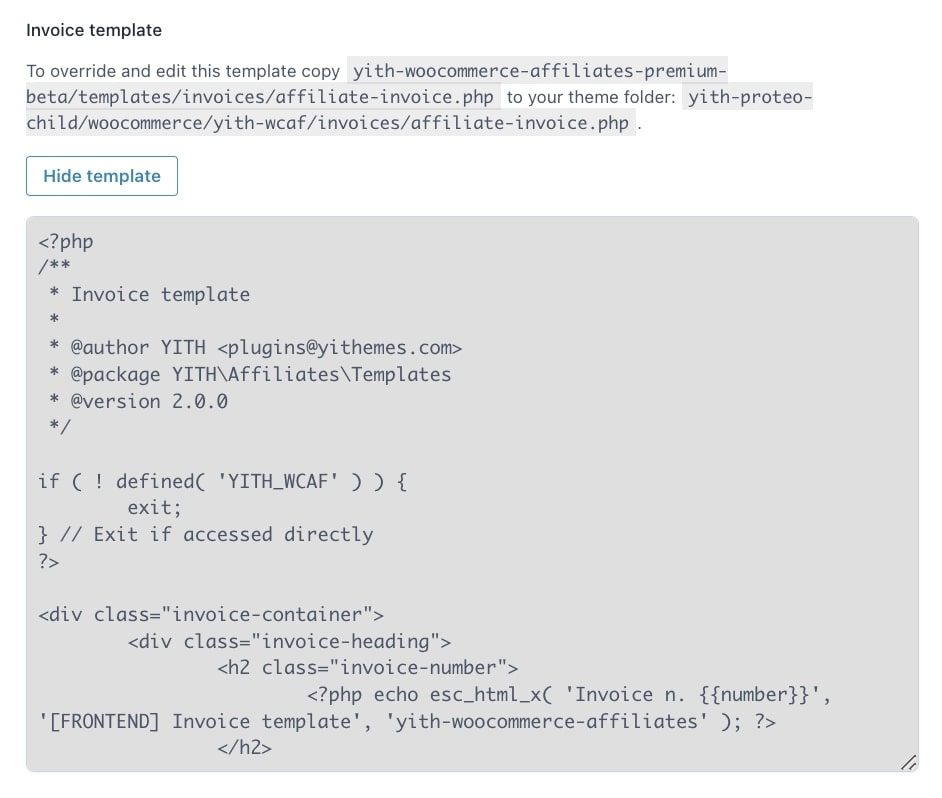
Invoice template: to override and edit the template of the affiliate invoices automatically generated by the system you can copy the yith-woocommerce-affiliates.premium/templates/invoices/affiliate-invoice.php to your theme folder, for example, yith-proteo-child/woocommerce/yith-wcaf/invoices/affiliate-invoice.php.
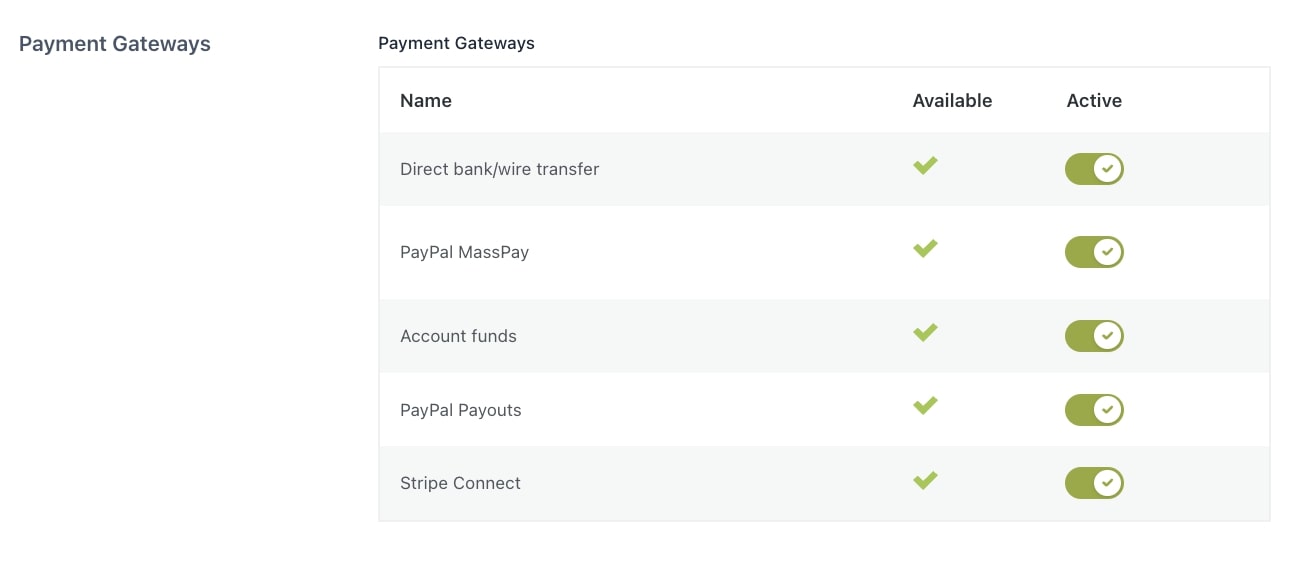
Payment gateways
In this section, you can see all the supported gateways and enable or disable them. By default the plugin supports:
Direct bank/wire transfer: for more details about how payments via direct bank/wire transfer work, please, visit this page.
PayPal MassPay: this is a deprecated service offered to some PayPal accounts, for more details, please, check this page.
Additional supported gateways are:
Account funds: this requires that you also install and enable the plugin YITH WooCommerce Account Funds. For more details, please, visit this page.
PayPal Payouts: this requires that you also install and enable the plugin YITH PayPal Payouts for WooCommerce. For more details, please, visit this page.
Stripe Connect: this requires that you also install and enable the plugin YITH Stripe Connect for WooCommerce. For more details, please, visit this page.
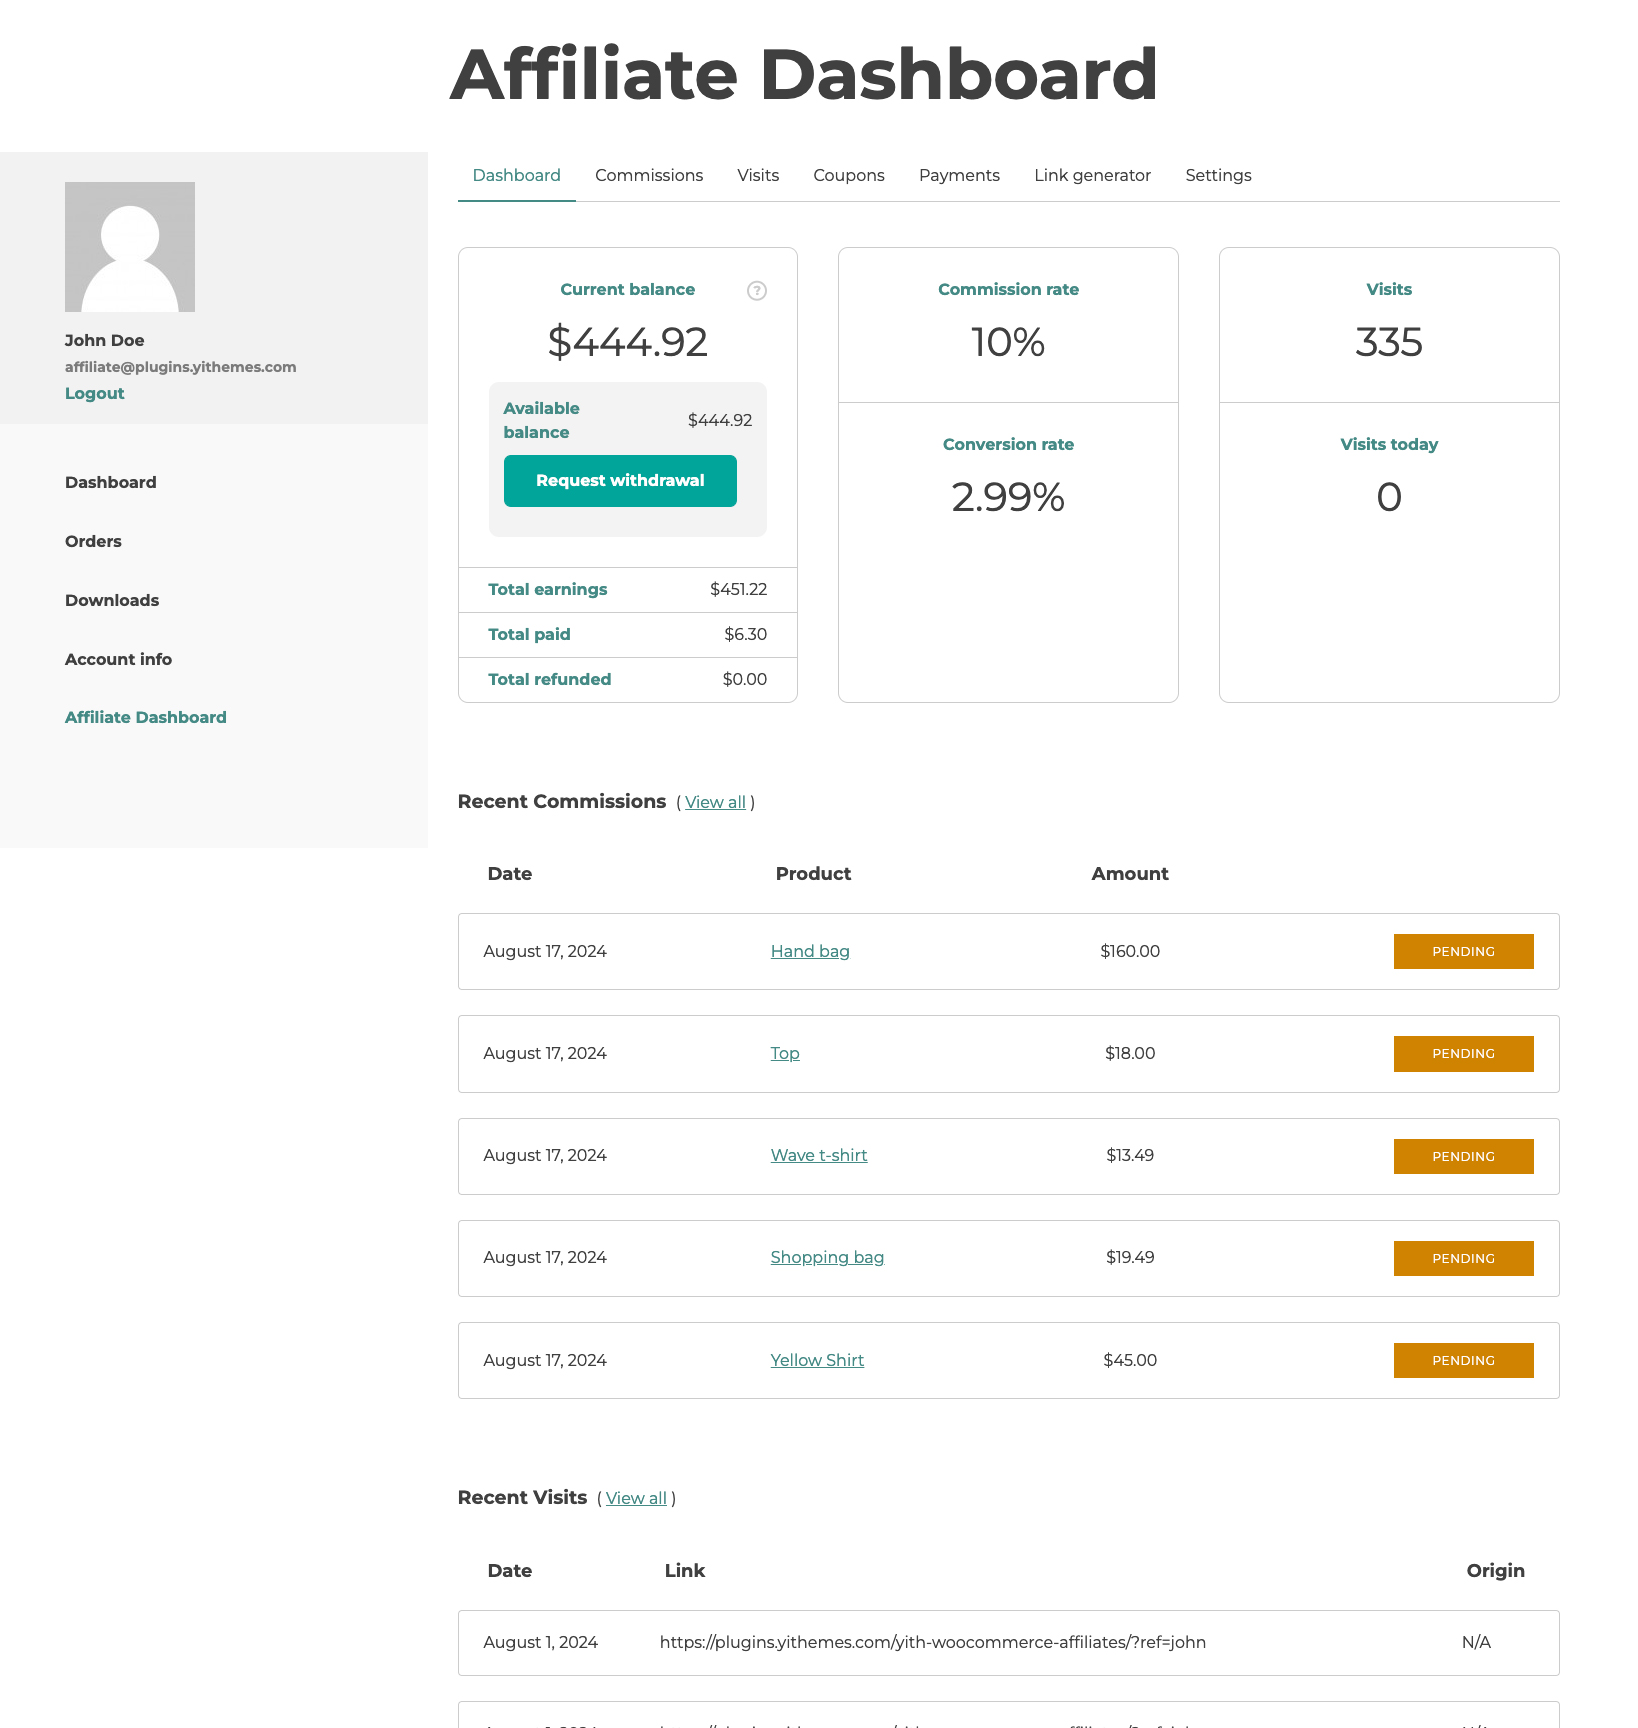
On this page we will cover everything related to the Affiliate Dashboard, the tool at your affiliates’ disposal where they can find everything related to their affiliate profile, traffic and commissions generated and payments.
The dashboard will be visible only to approved affiliates and partially to banned affiliates (see how to hide specific sections to banned users in the Registration options).
The affiliate dashboard is made of different sections:
the above mentioned “Let users request a payment” option has been enabled;
the affiliate’s available balance is equal or greater than the minimum amount for withdrawal;
there is no other pending or on hold payment for that user.
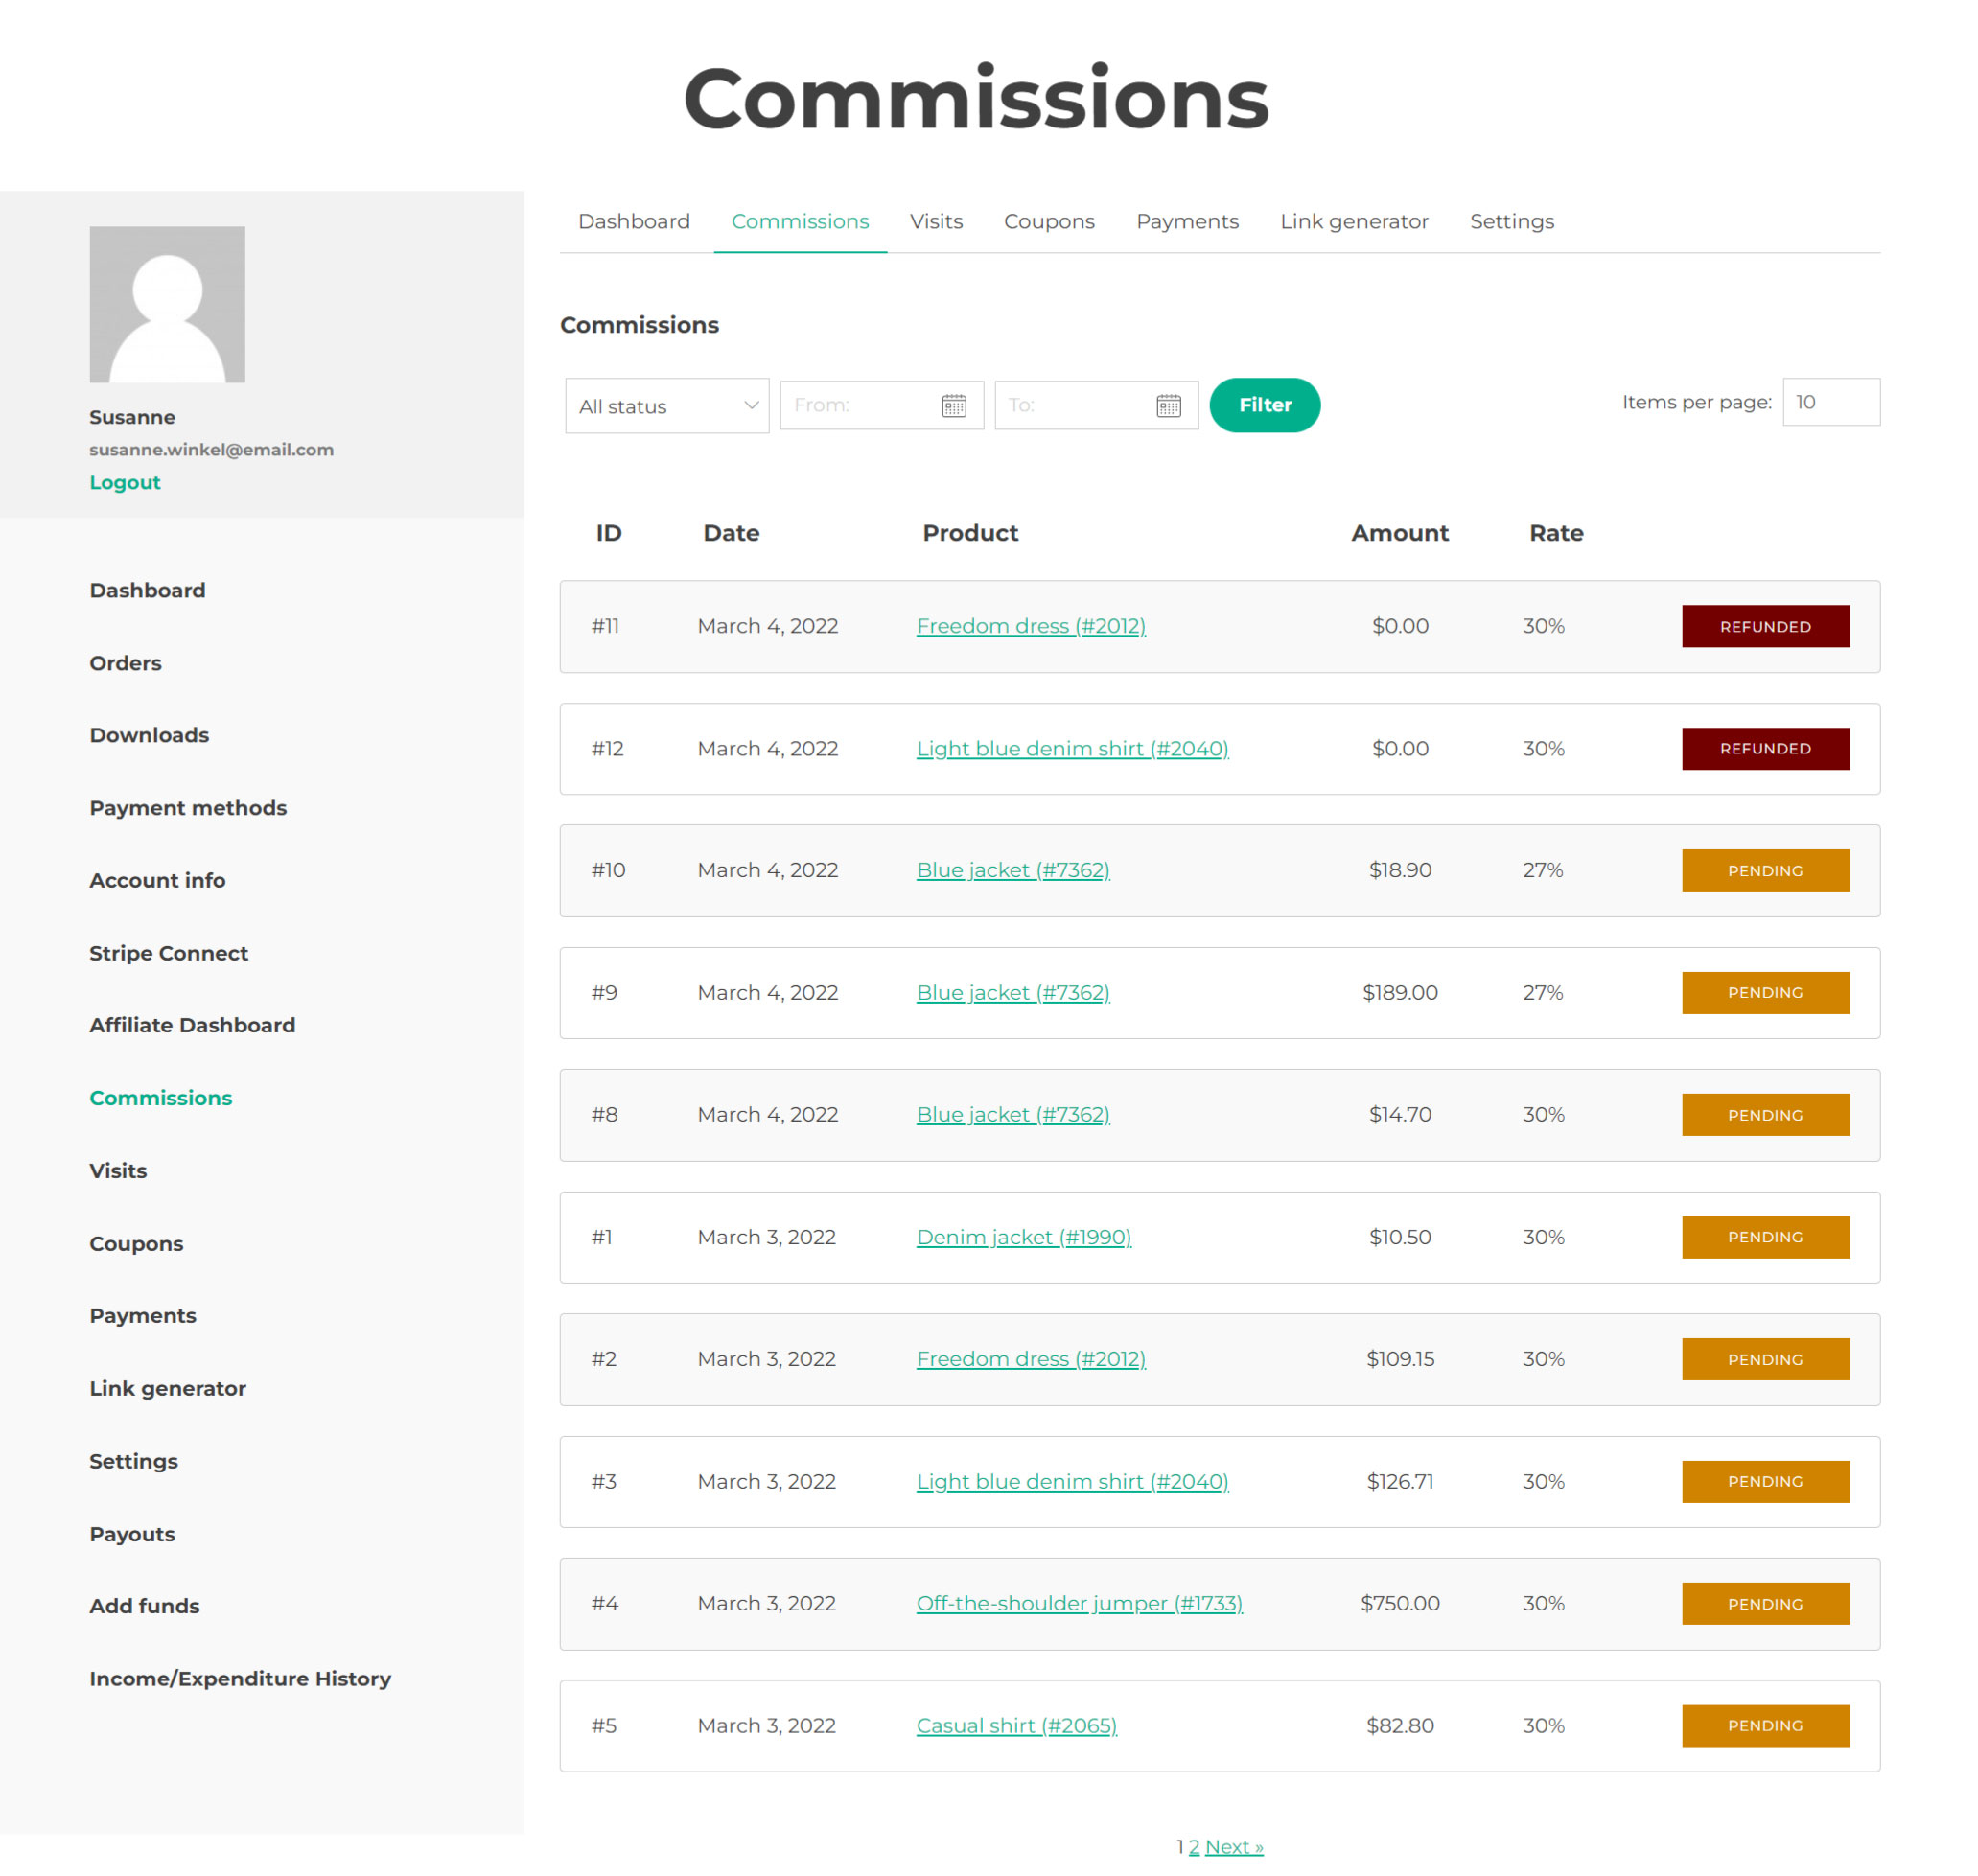
Commissions
In this tab, you will see all the commissions generated with their ID, date, product and related order ID (the plugin will generate one commission for each product), amount, commission rate and commission status. For more details about the commission status, please, refer to this page.
You can also filter the commissions by status and date, and sort them by any of the titles in the column.
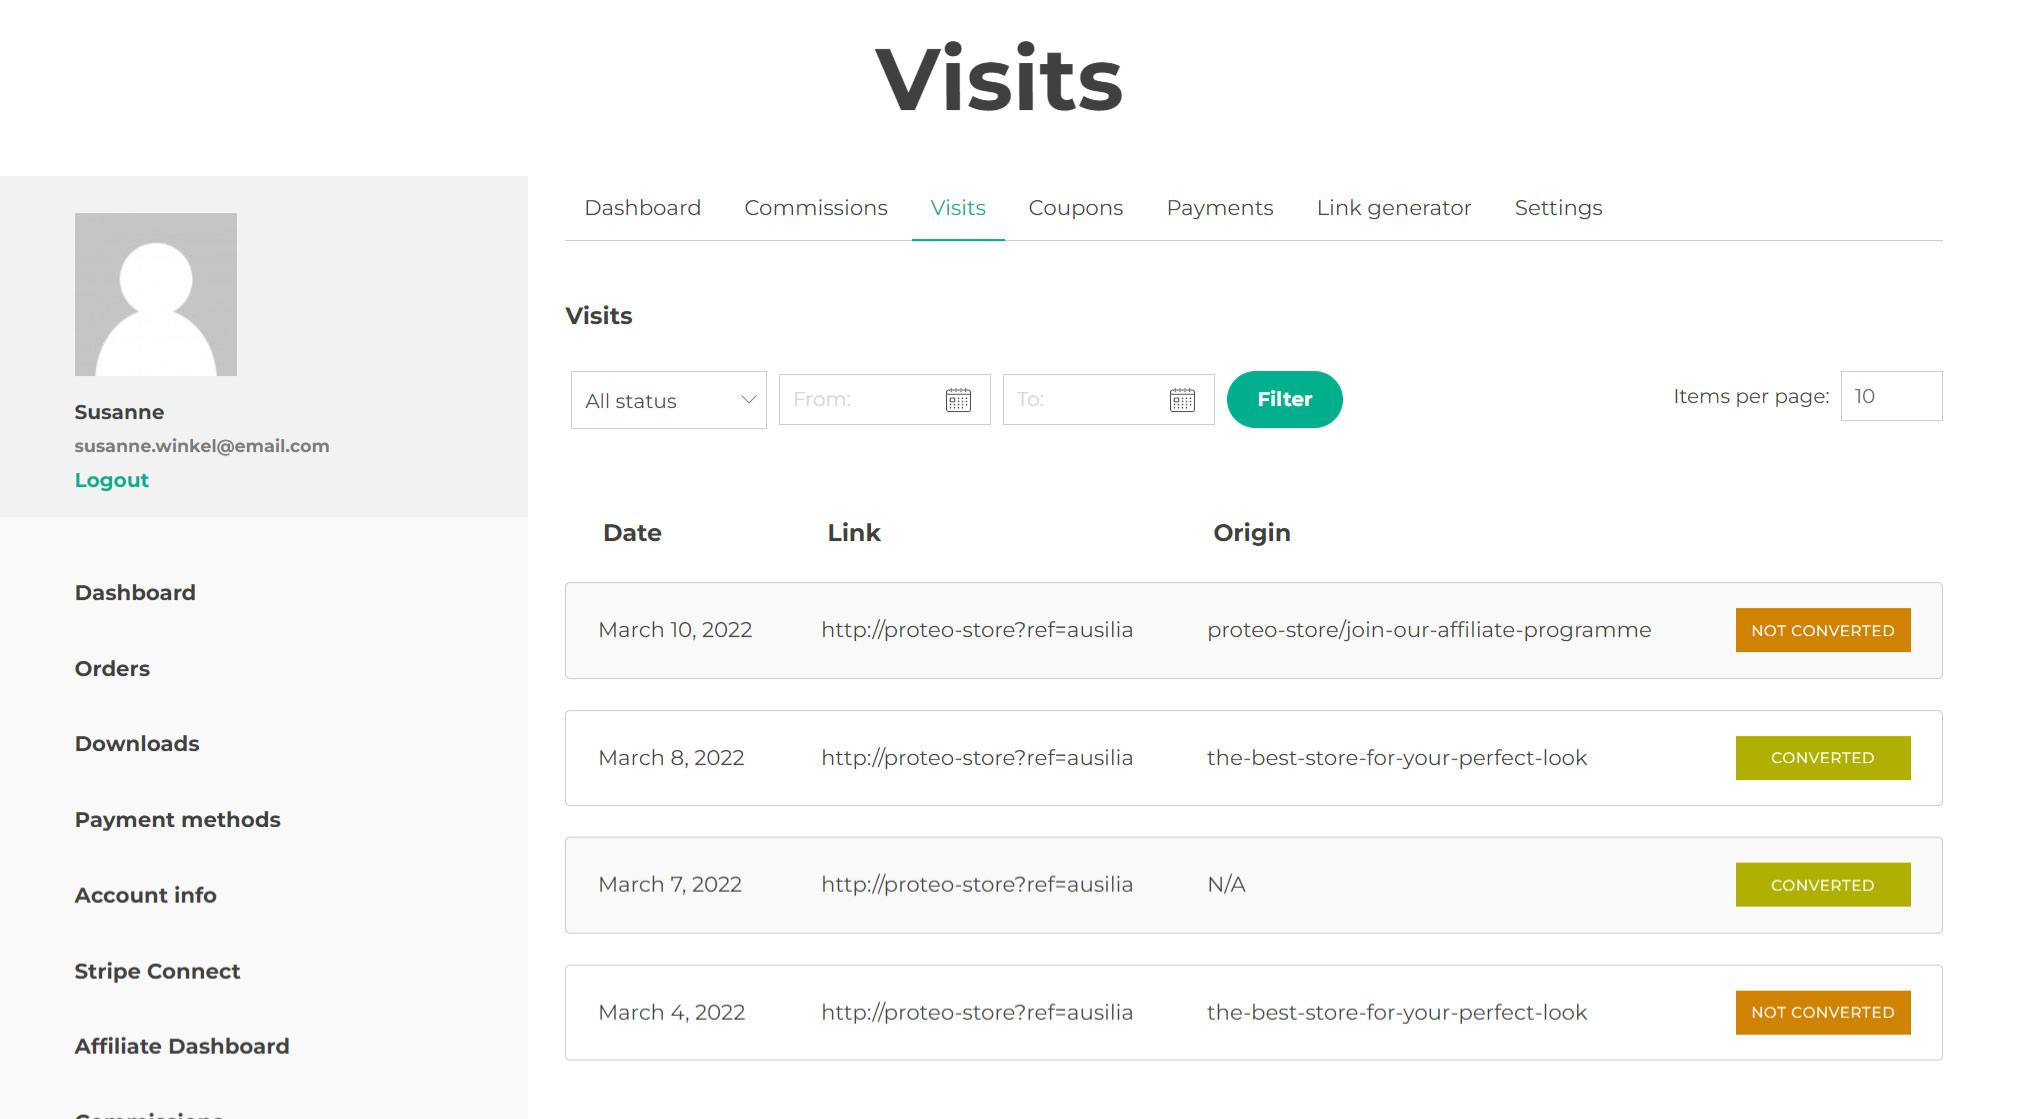
Visits
From this tab you can see all the visits, date, the referral Link that has been used, the Origin – the page where the link has been embedded – and the status (that can either be converted or not converted).
Coupons
This tab can be enabled by default for all users or make sure that it only appears if the affiliate has at least one coupon code enabled for his/her account. To change this option go to General Options > Coupon options.
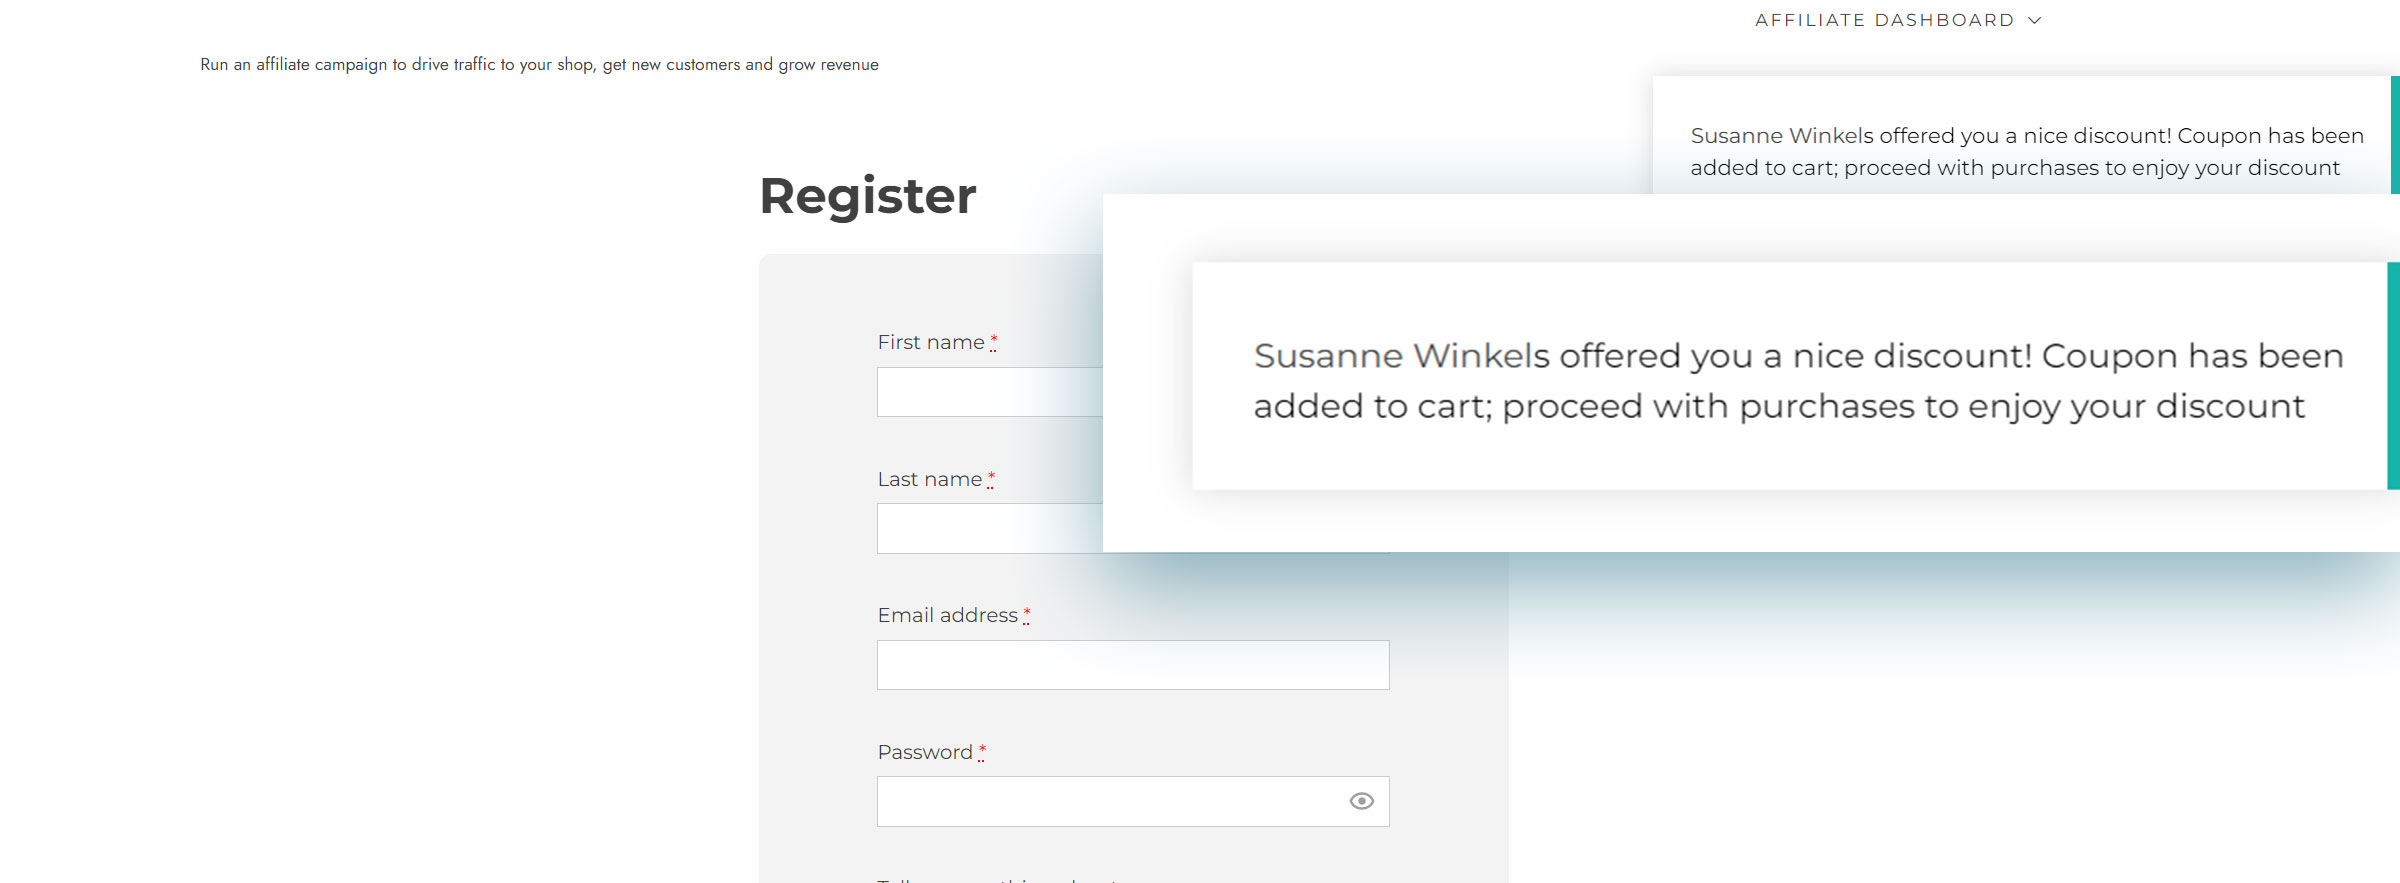
By clicking on the coupon code, your affiliates can copy a link ready to be shared on their social networks, on their blog or any other tool where they choose to promote your store.
When a user visits that link, it will take the user to your site and will automatically apply the coupon code in cart.
The coupon code will grant a discount to the user and a commission to the affiliate for any order where the code is used.
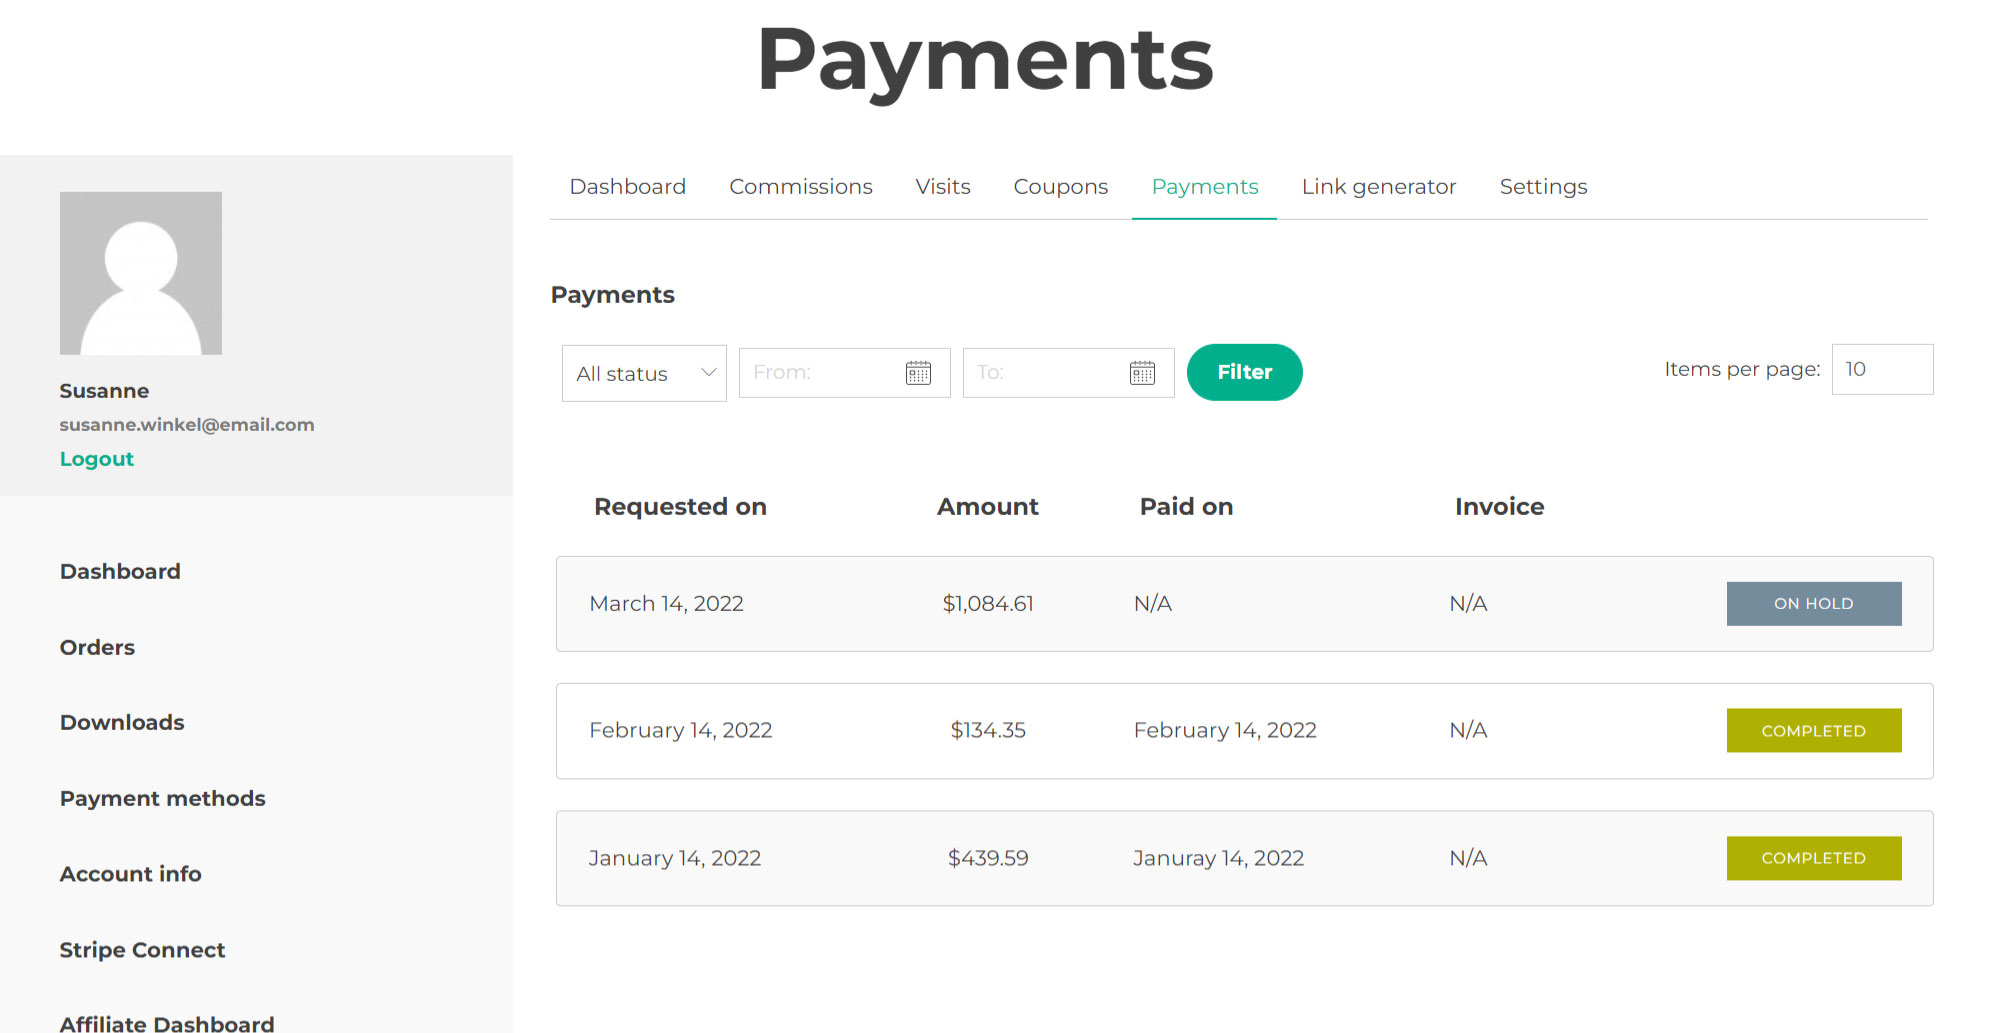
Payments
From this tab, your affiliate will see all their payment records, the date, the amount, the invoice (if available) and the status.
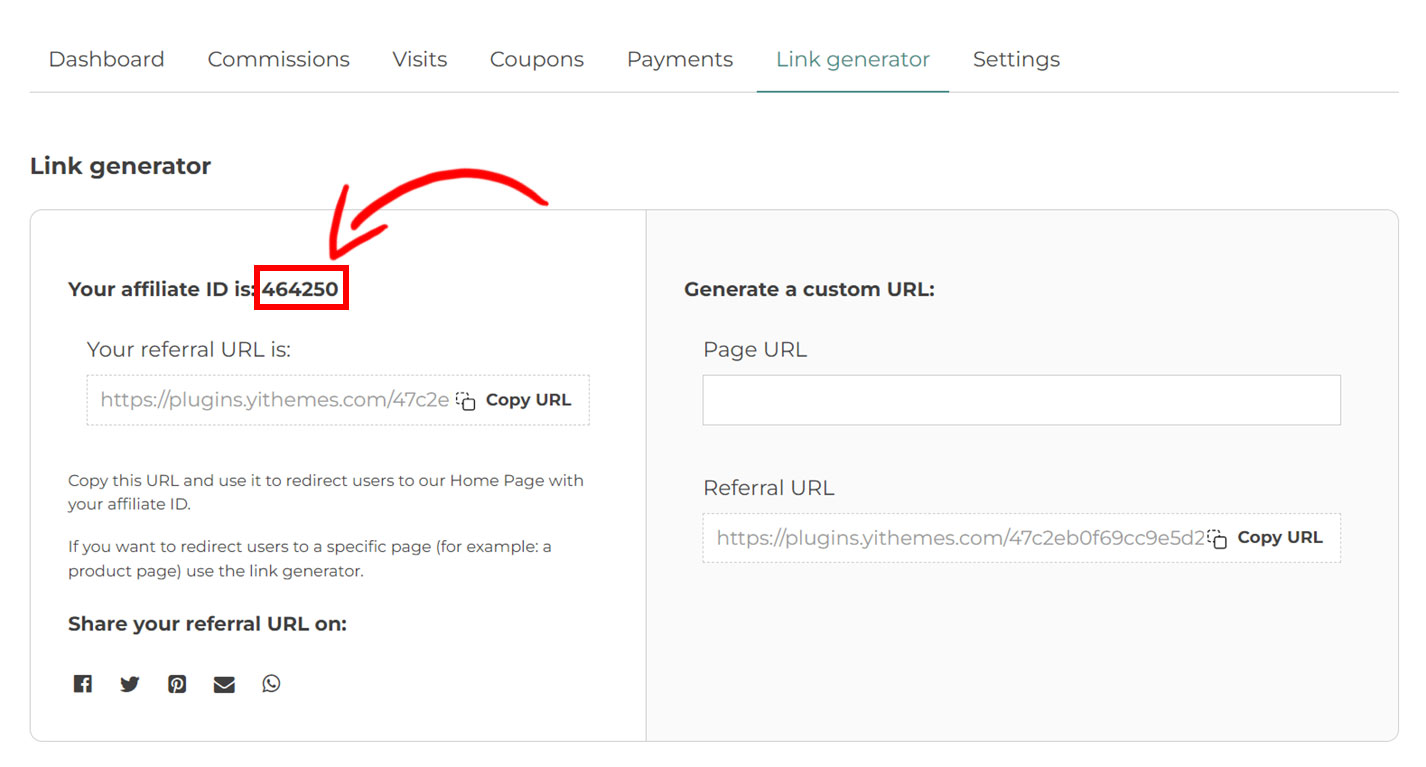
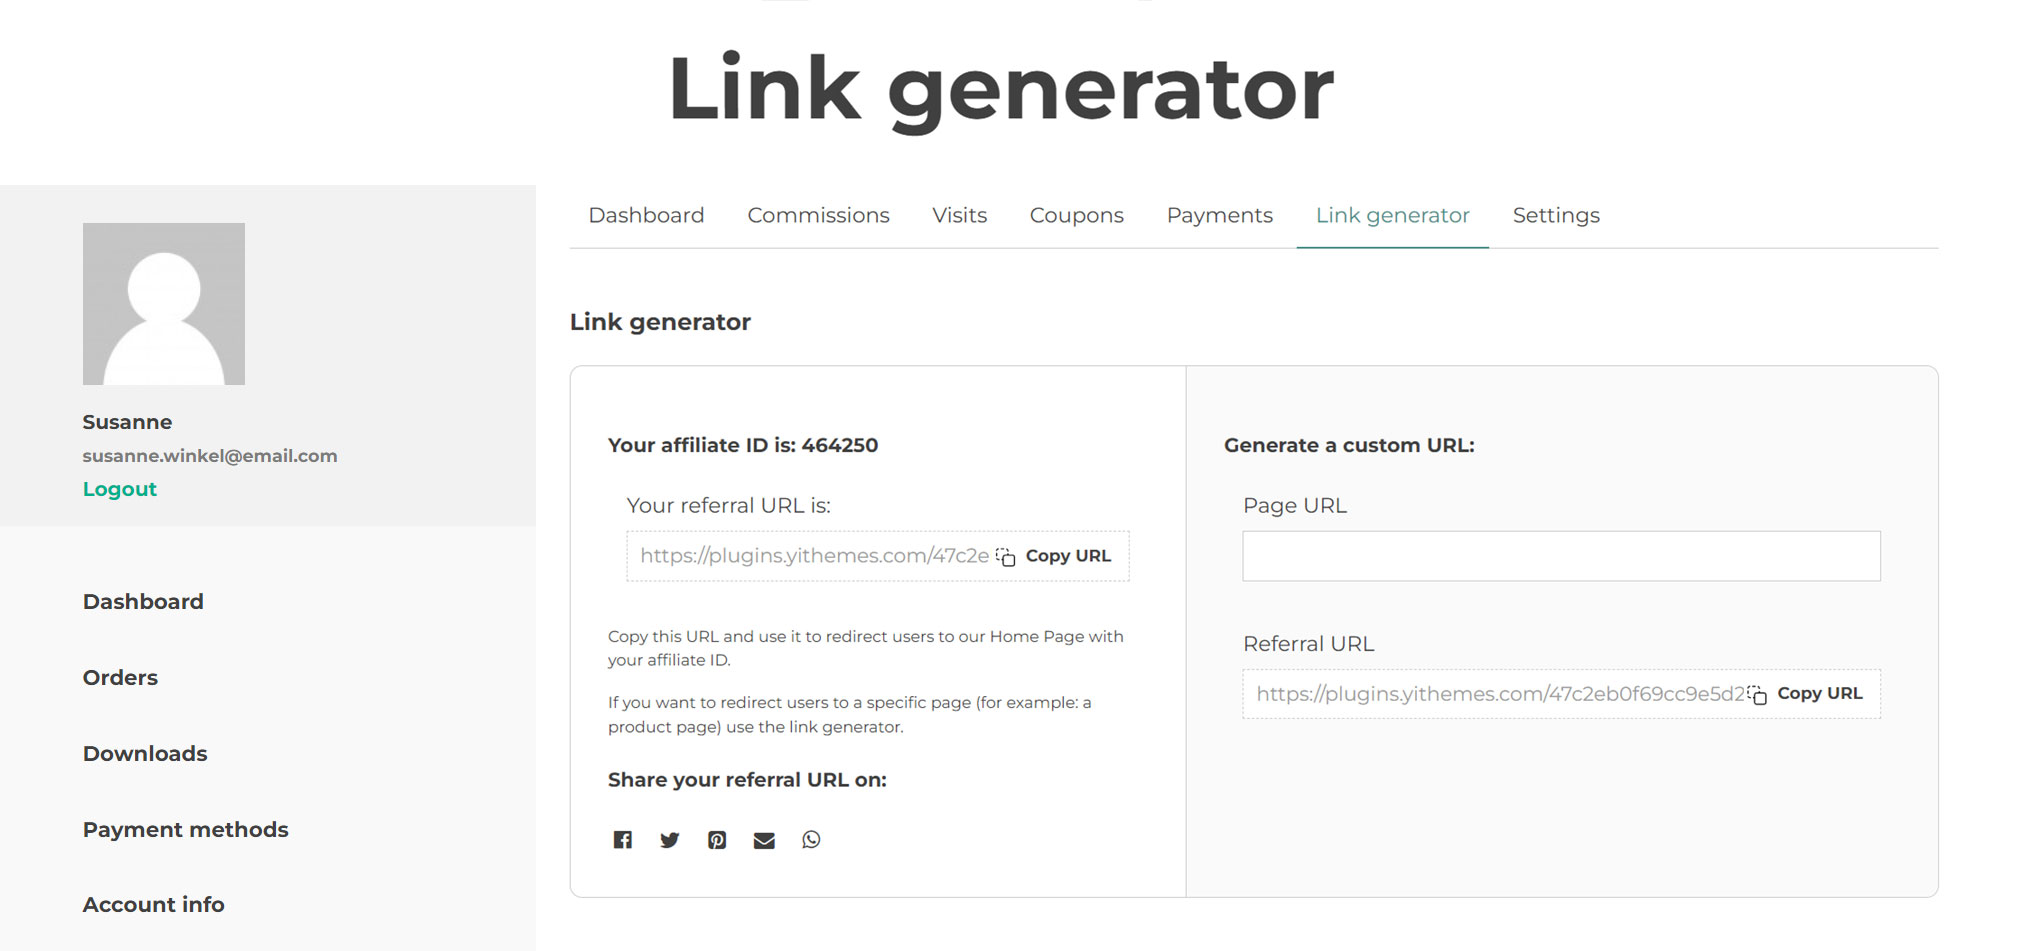
Link generator
This is where the affiliates can find their affiliate ID or token, their referral link and where they can also generate direct links with their referral ID to specific pages of your site.
Not only is it possible to copy the link and embed it on any page they wish, but it is also possible to enable the social sharing icons, so they can share the link in just a few clicks. To learn more about how to enable the social sharing options, please, visit this page.
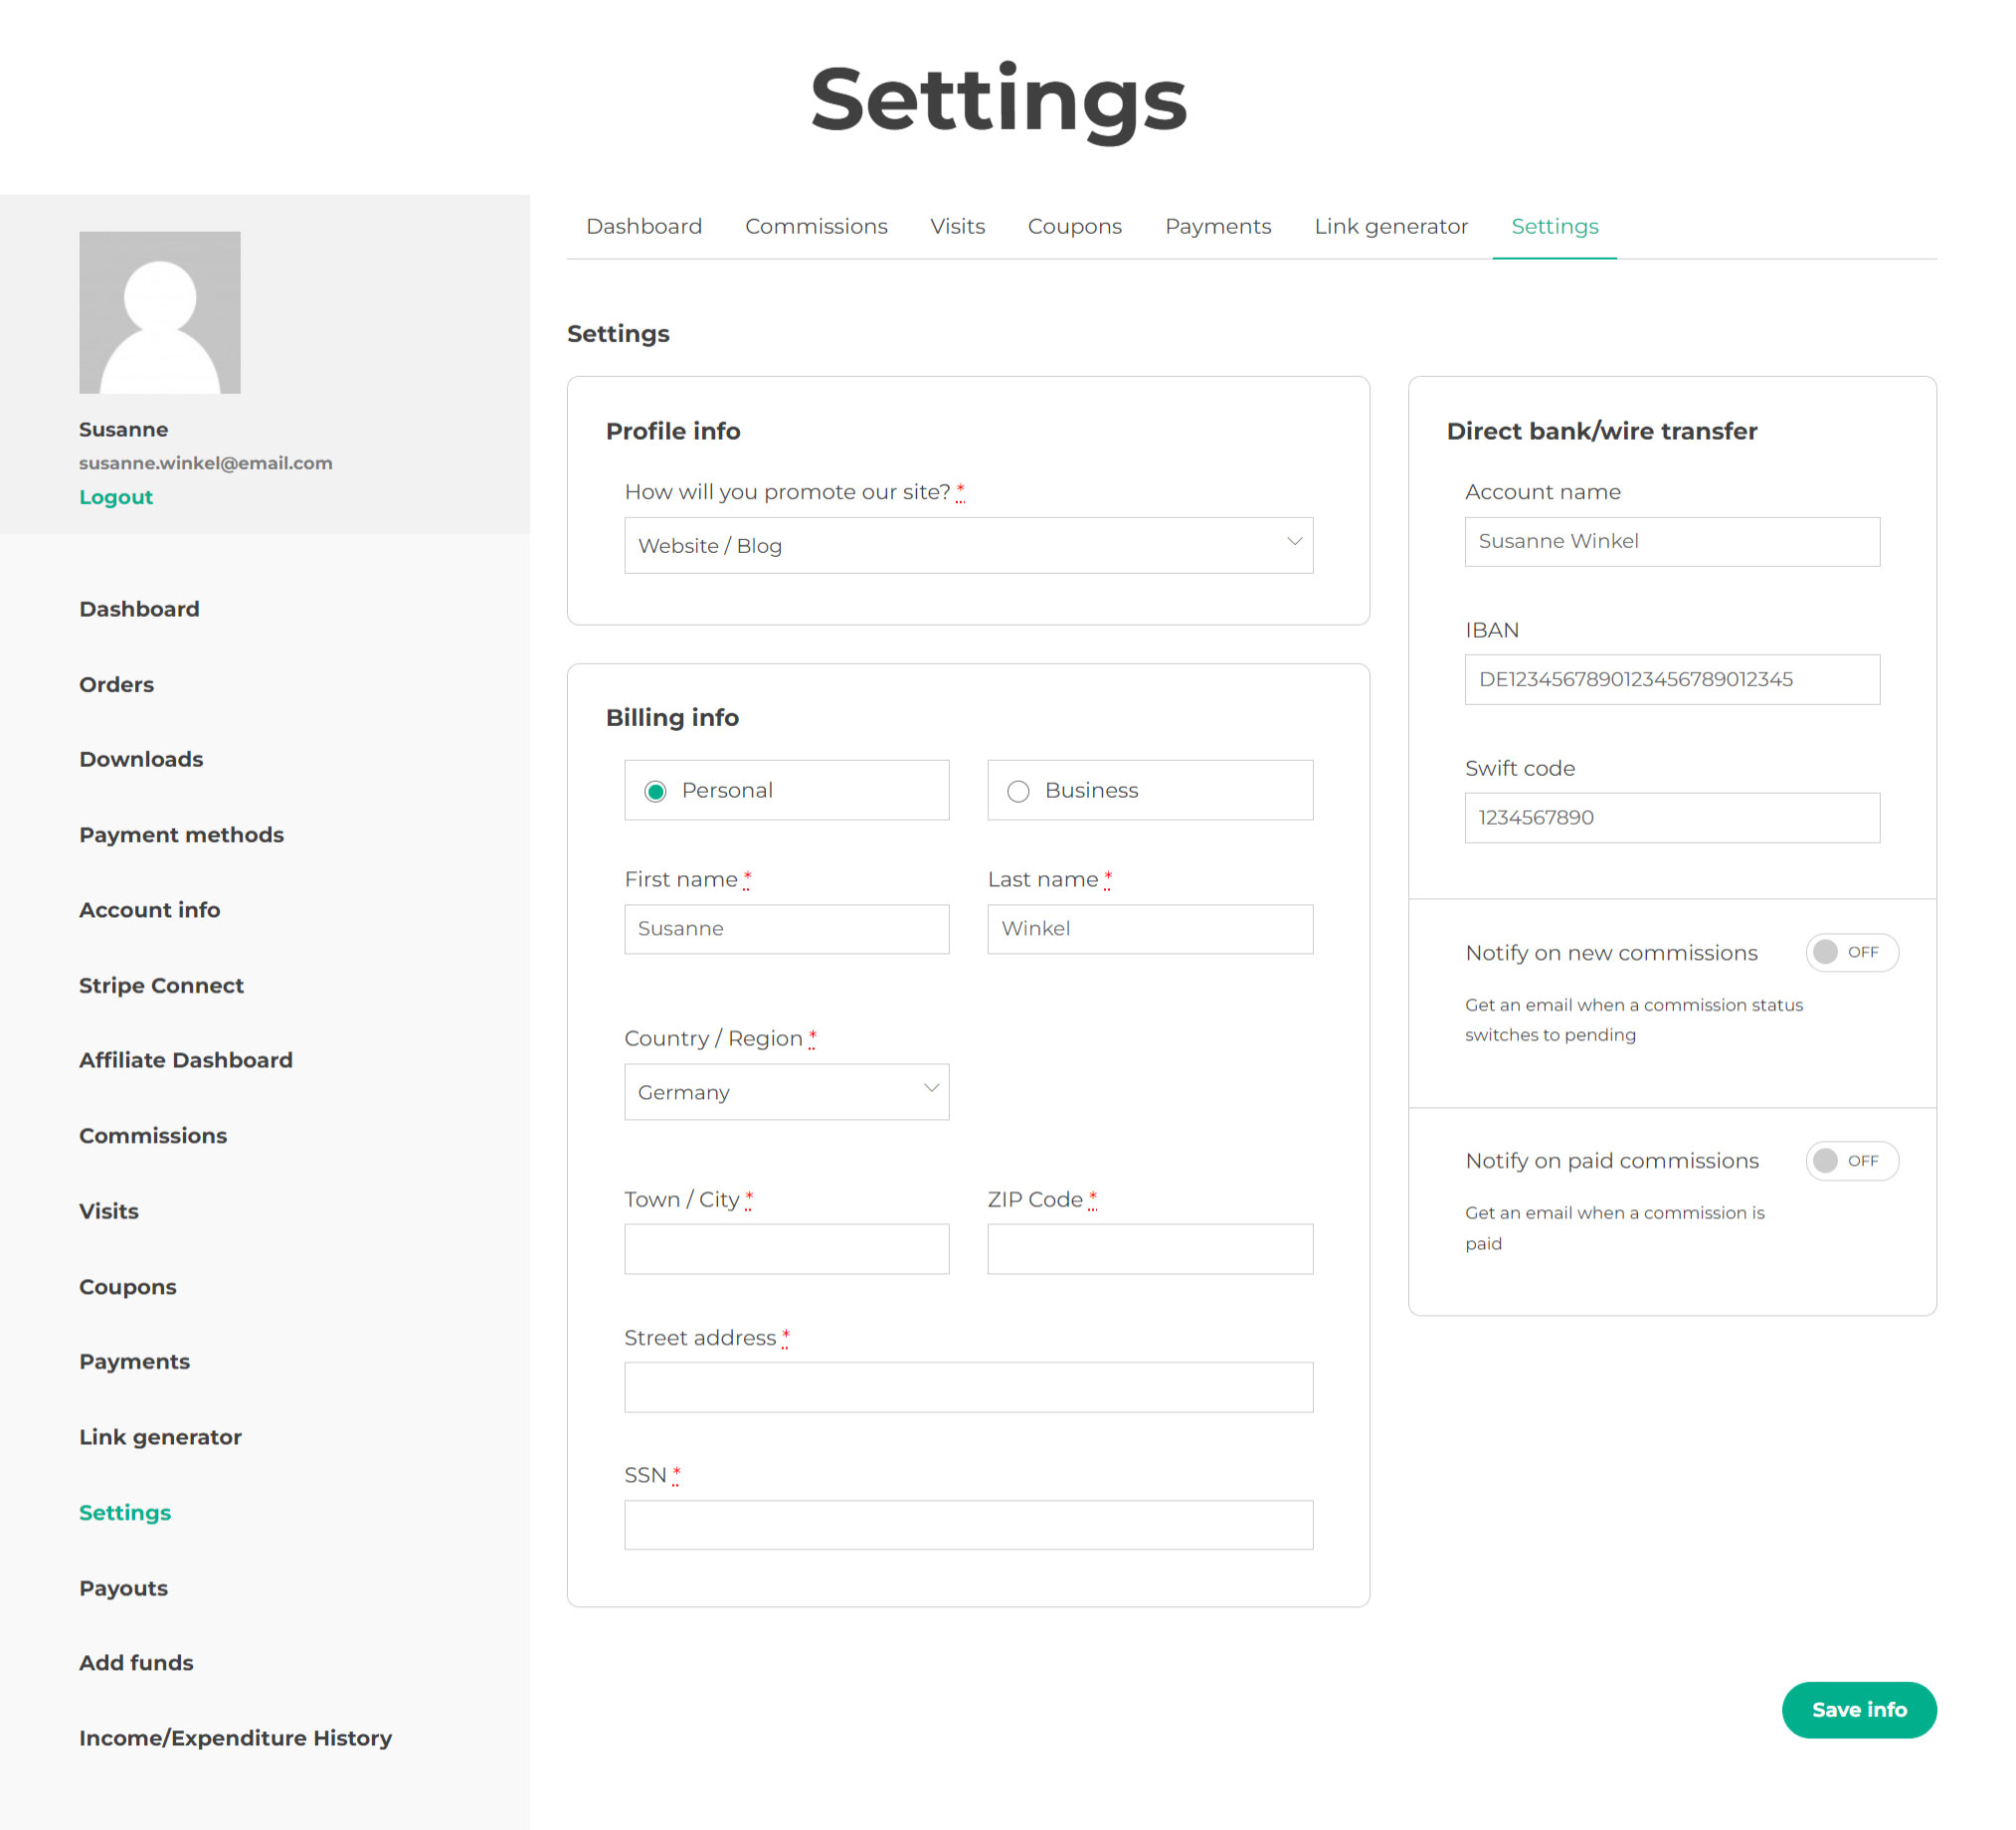
Settings
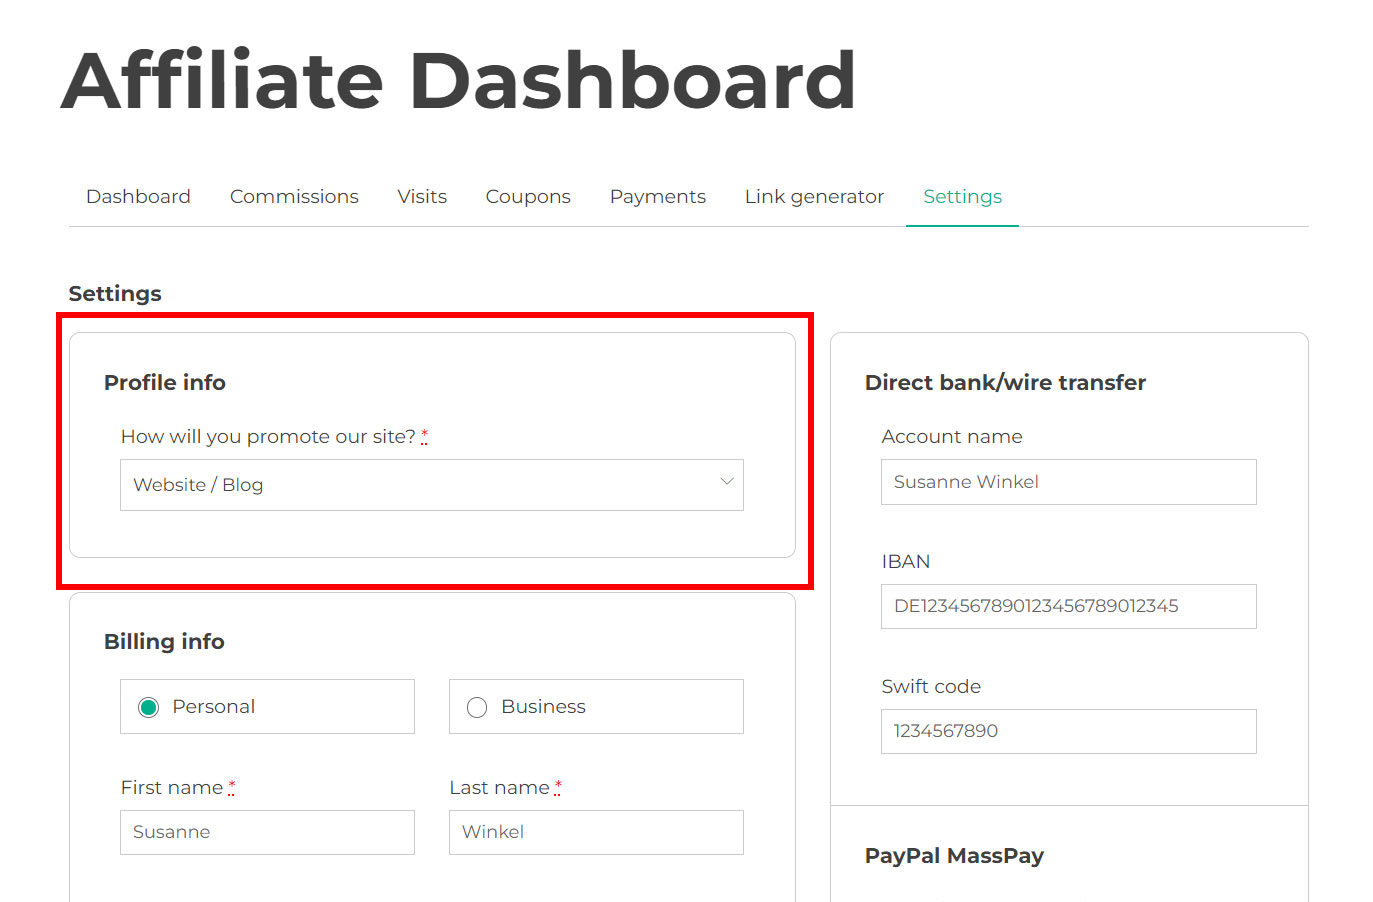
From this tab, your affiliates will be able to adjust their profile settings.
In the first section “Profile info” they will find the affiliate registration fields that you’ve enabled to show also in the Affiliate dashboard. For more details, about how to display affiliate registration specific fields here, please, check this page.
Then, the billing info: these will be used for the automatic generation of the invoice when a new payment of commissions earnings is submitted and if the invoice is set as required. For more details about how to request an invoice and the automatic generation, please, see this page (Let users request a payment).
In the box on the right, the affiliates will be able to enter their payment details for each enabled gateway. For more details about the available payment gateways, please, visit this page.
Finally, from the same box, the affiliates can enable or disable two notification emails:
Notify on new commissions: if enabled, they will receive an email whenever a new commission is generated in an order made through a referral link.
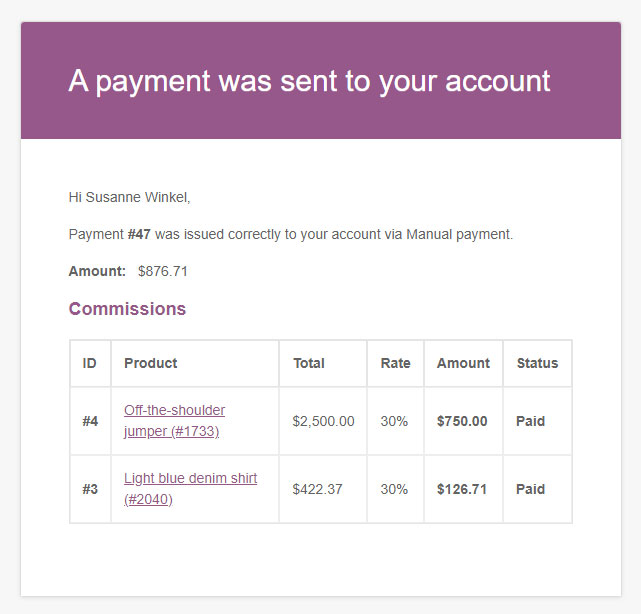
Notify on paid commissions: if enabled, they will receive an email whenever a payment of their commissions is issued.
You can edit this email notification template from WooCommerce > Settings > Emails.