View Product Page

Affiliates list and details

Affiliates list

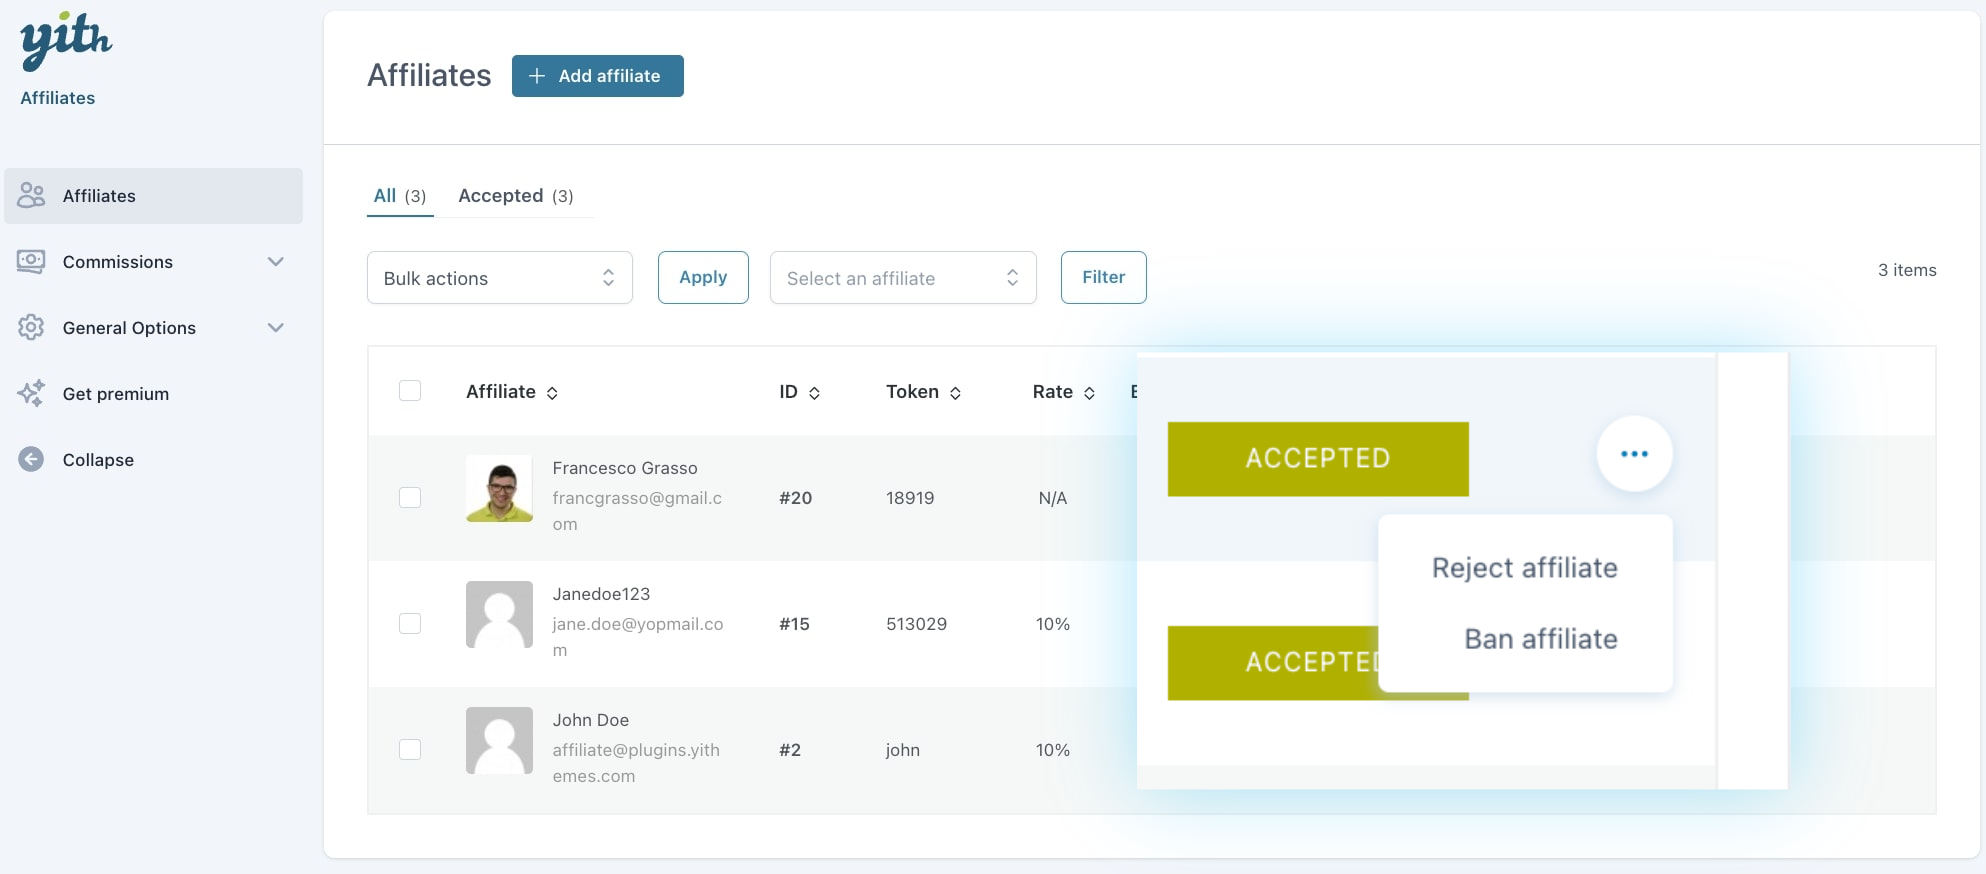
Go to YITH > Affiliates > Affiliates to find the list of all your registered affiliate users.
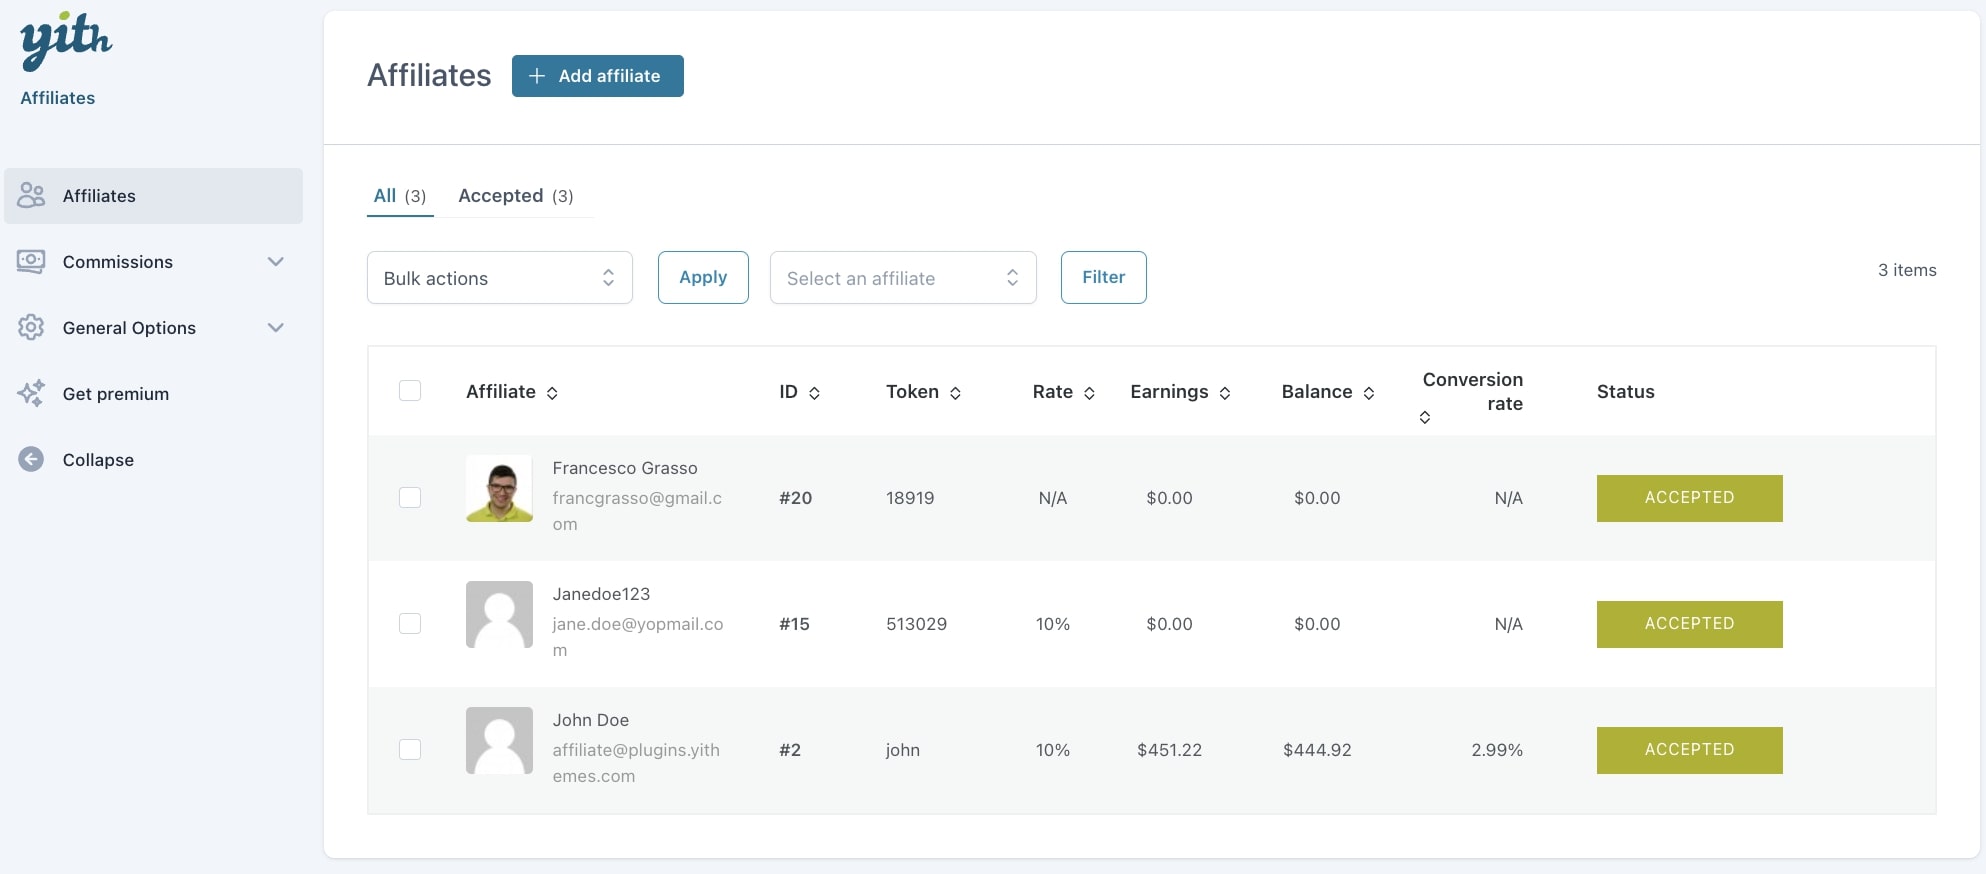

From this screen, you can filter by name, email addres or token ID (minimum 3 characters) to find one specific affiliate.

Additionally, you will also be able to change the affiliate status either from the bulk actions or from the actions available for single affiliates:

  • Delete affiliate
  • Change status to approved
  • Change status to rejected
  • Ban affiliate
  • Unban affiliate


When you change the affiliate status to rejected or banned from the affiliate’s actions, you will be able to set a custom message for this specific affiliate from a dedicated popup and explain why the affiliate’s profile is being rejected or banned.
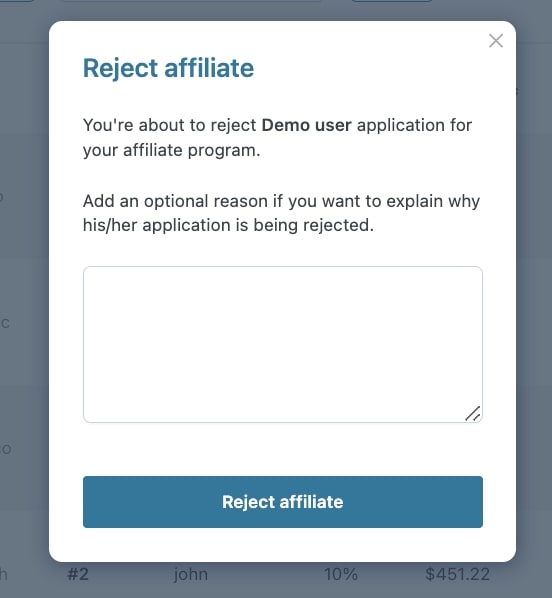

This message can also be set and updated in the user’s profile (see below → Affiliate details).

Create a new affiliate

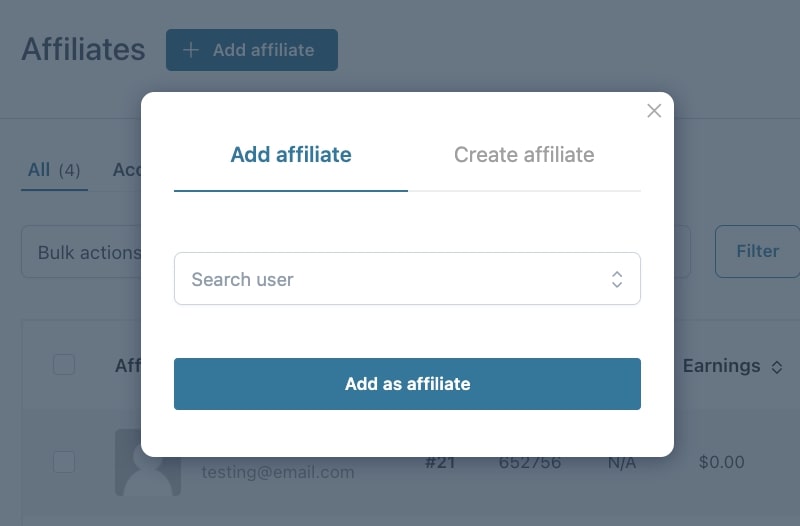
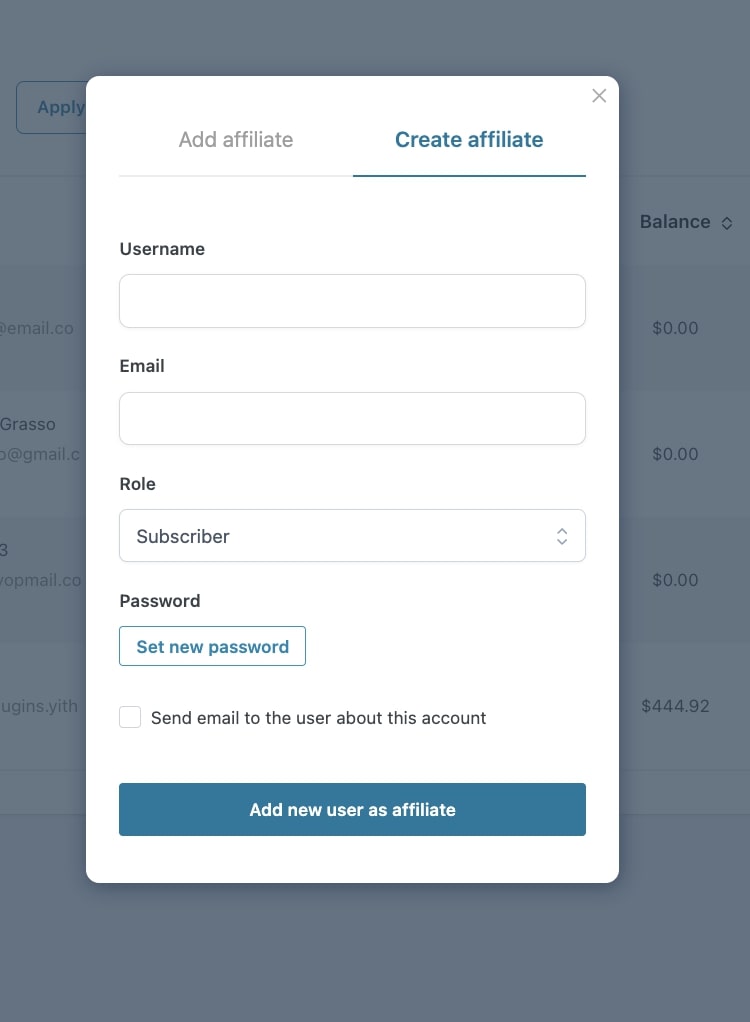
By clicking on the + Add affiliate button, you can create a new affiliate. You will have two options, either select an existing user or create a new user and enable it as affiliate without leaving the page.
Affiliate details

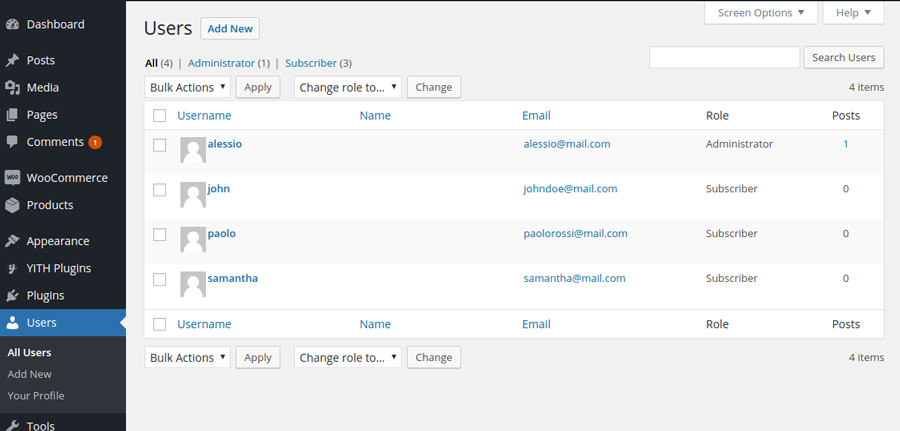
To have access and edit the affiliate information, open the user profile from the Users page.
Users


Scroll down until you find the Affiliates details section.
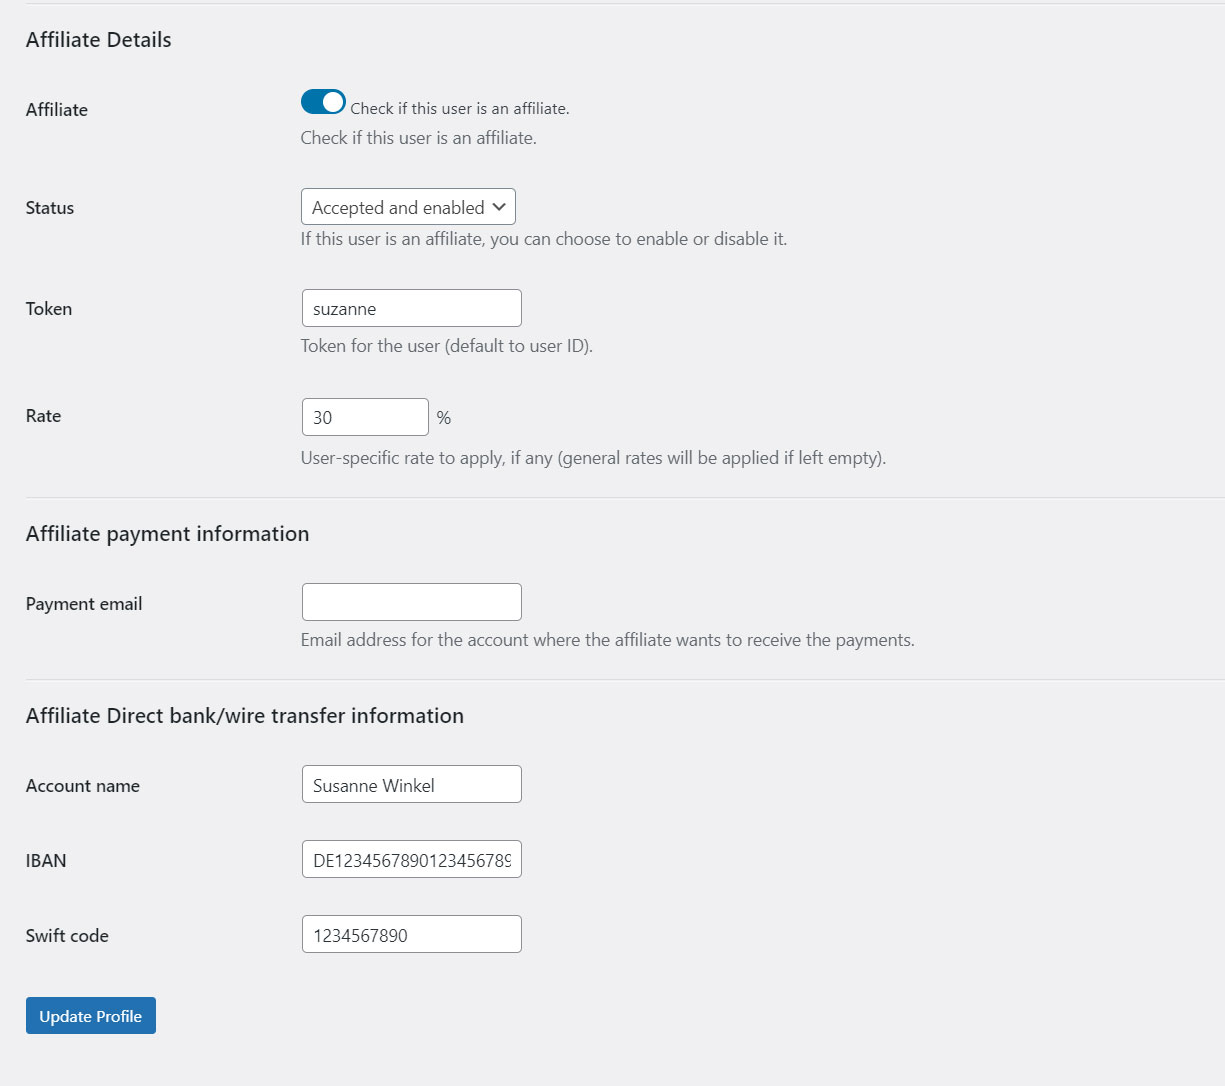

Here you can:

  • add/remove the user from the list of affiliates
  • edit the affiliate’s status (New request, Accepted, Rejected, Banned)
  • when you change the affiliate status to rejected or banned, you will be able to set a custom message.
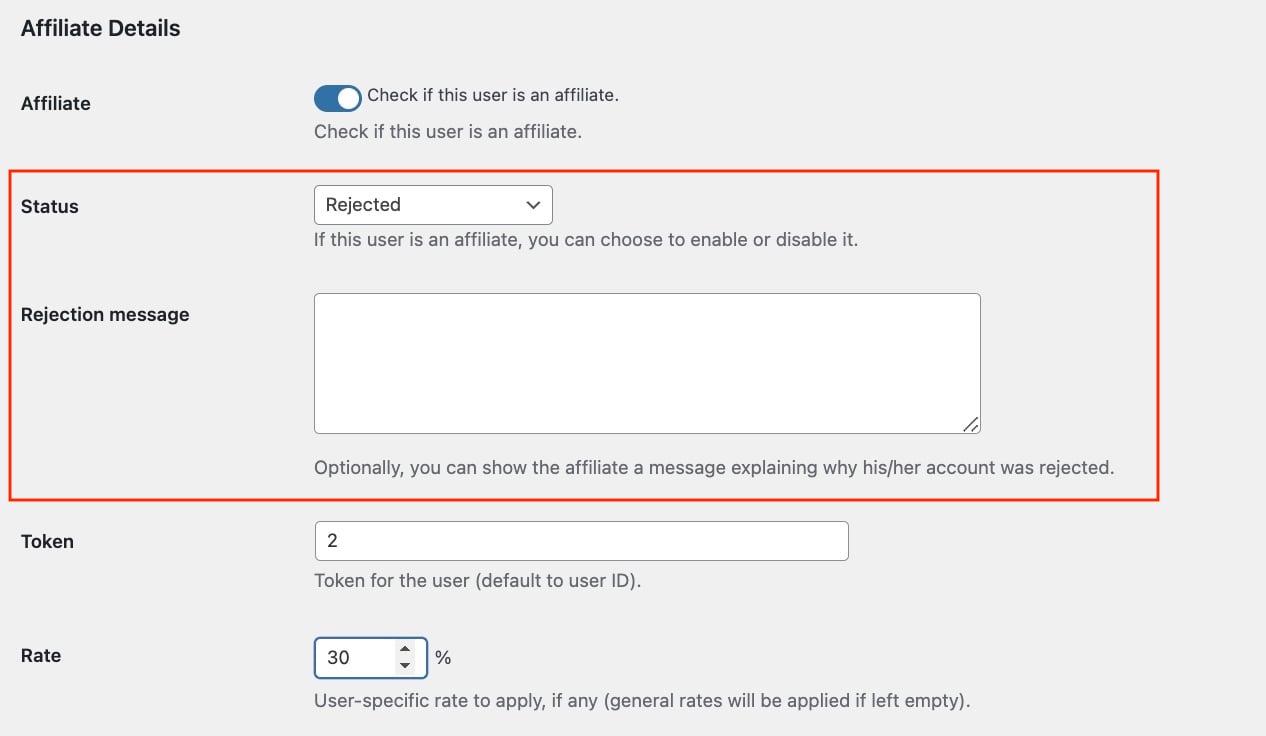
  • edit the affiliation token associated to the user (by default, it matches with the user ID), but it can be changed to a meaningful text for example.
  • edit the affiliate’s rate: this value overrides the general settings
  • Affiliate payment email: here you can add an email address, as a reference info for your manual payments.
  • Affiliate Direct bank/wire transfer info: this is where you can find or edit the details added by the customer in the Affiliate dashboard > Settings if the Bank transfer payment method is enabled (from the general options).

Commissions List

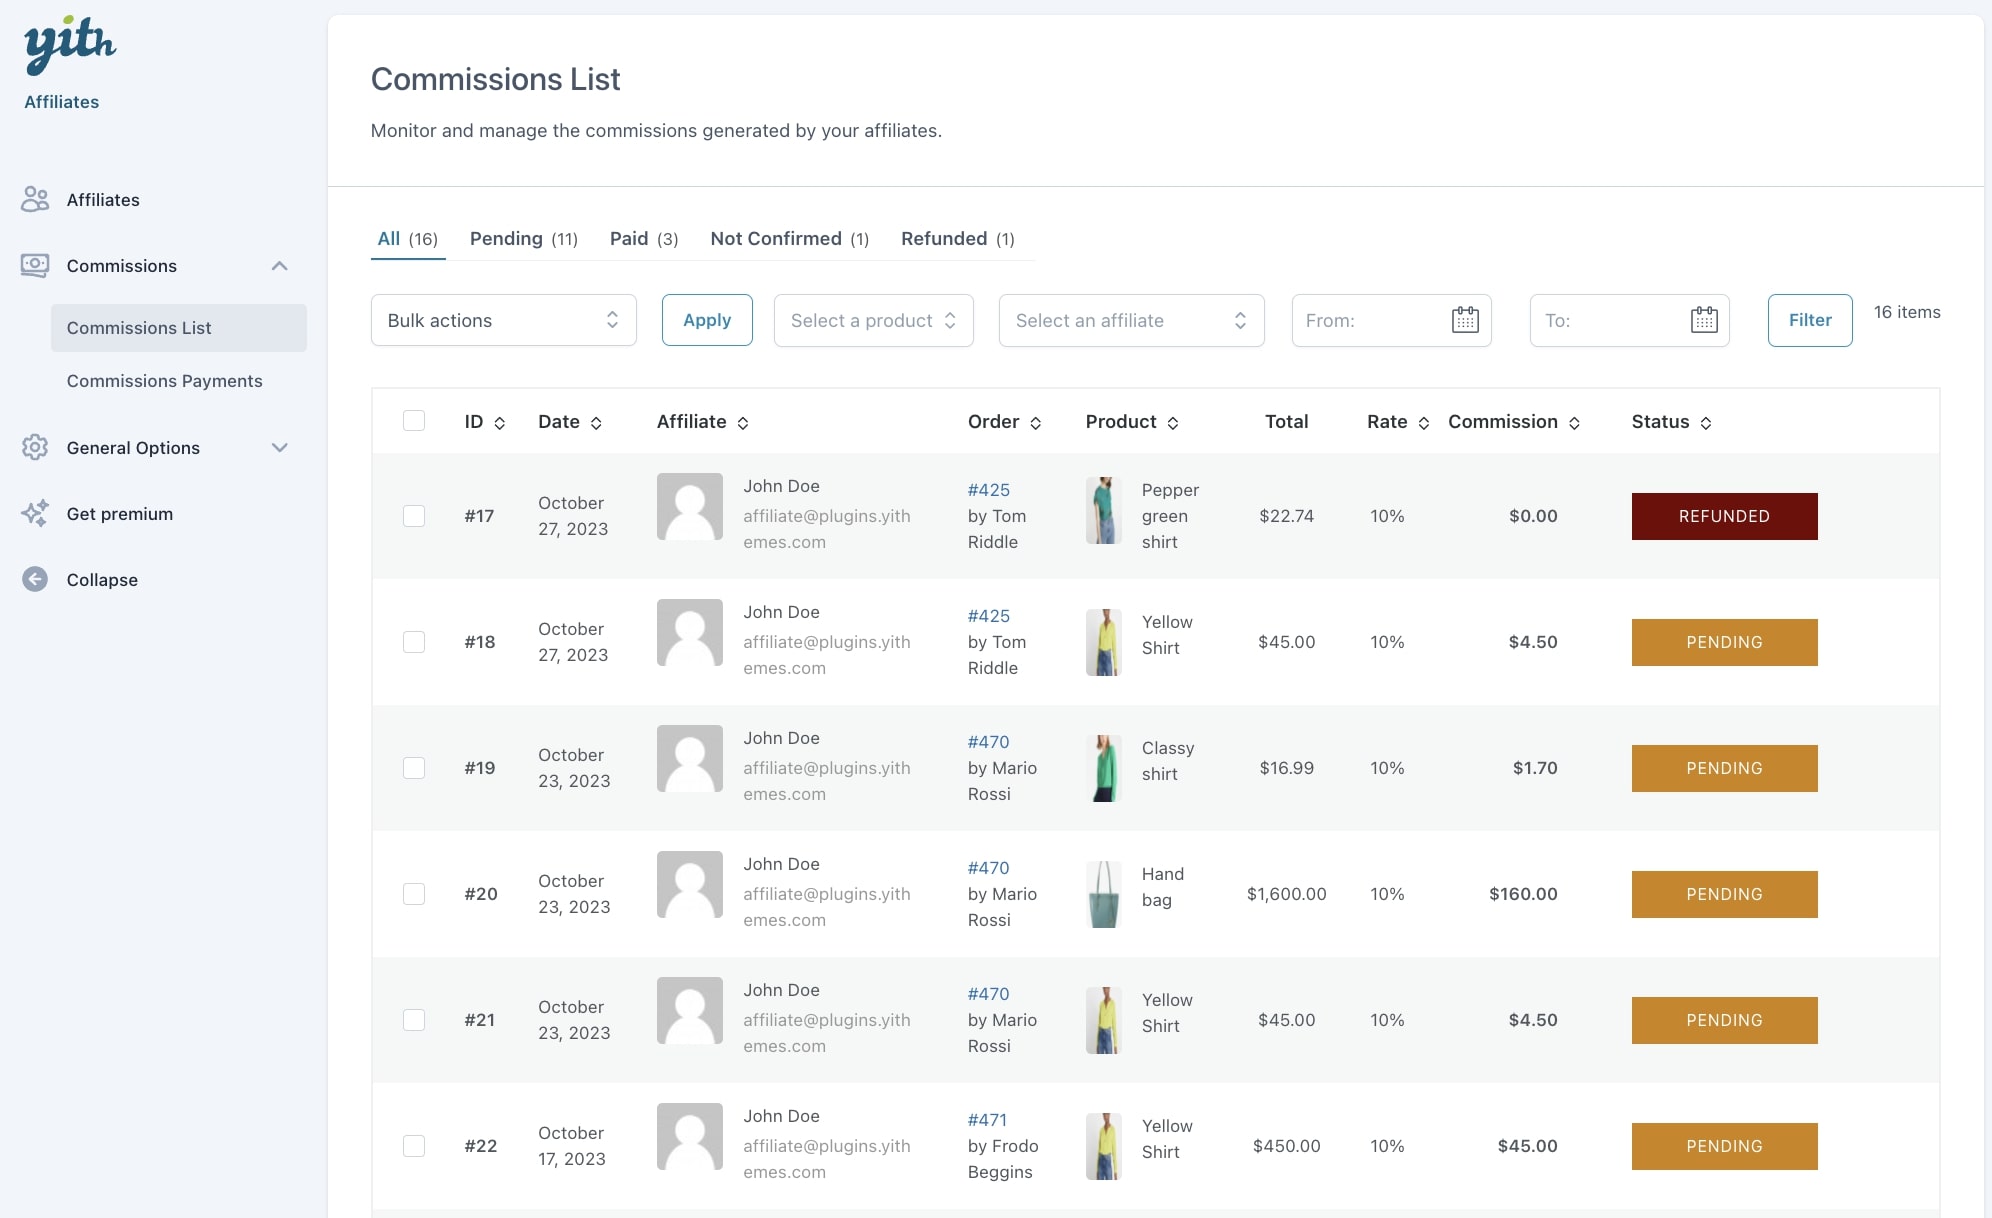
From the Commissions page, you can see a list with all the commissions generated in your shop.

The plugin will generate one commission for each item line in the order, so, for example, if you purchase 3 different products in the same order, the plugin will generate 3 commissions. If you purchase 3 items of the same product in the one order, instead, the plugin will generate only 1 commissione item.


You can see a table with the following information (each column title can act as a sorting filter):

  • Commission ID
  • Date
  • Affiliate
  • Order ID and customer
  • Product
  • Total
  • Rate
  • Commission
  • Status

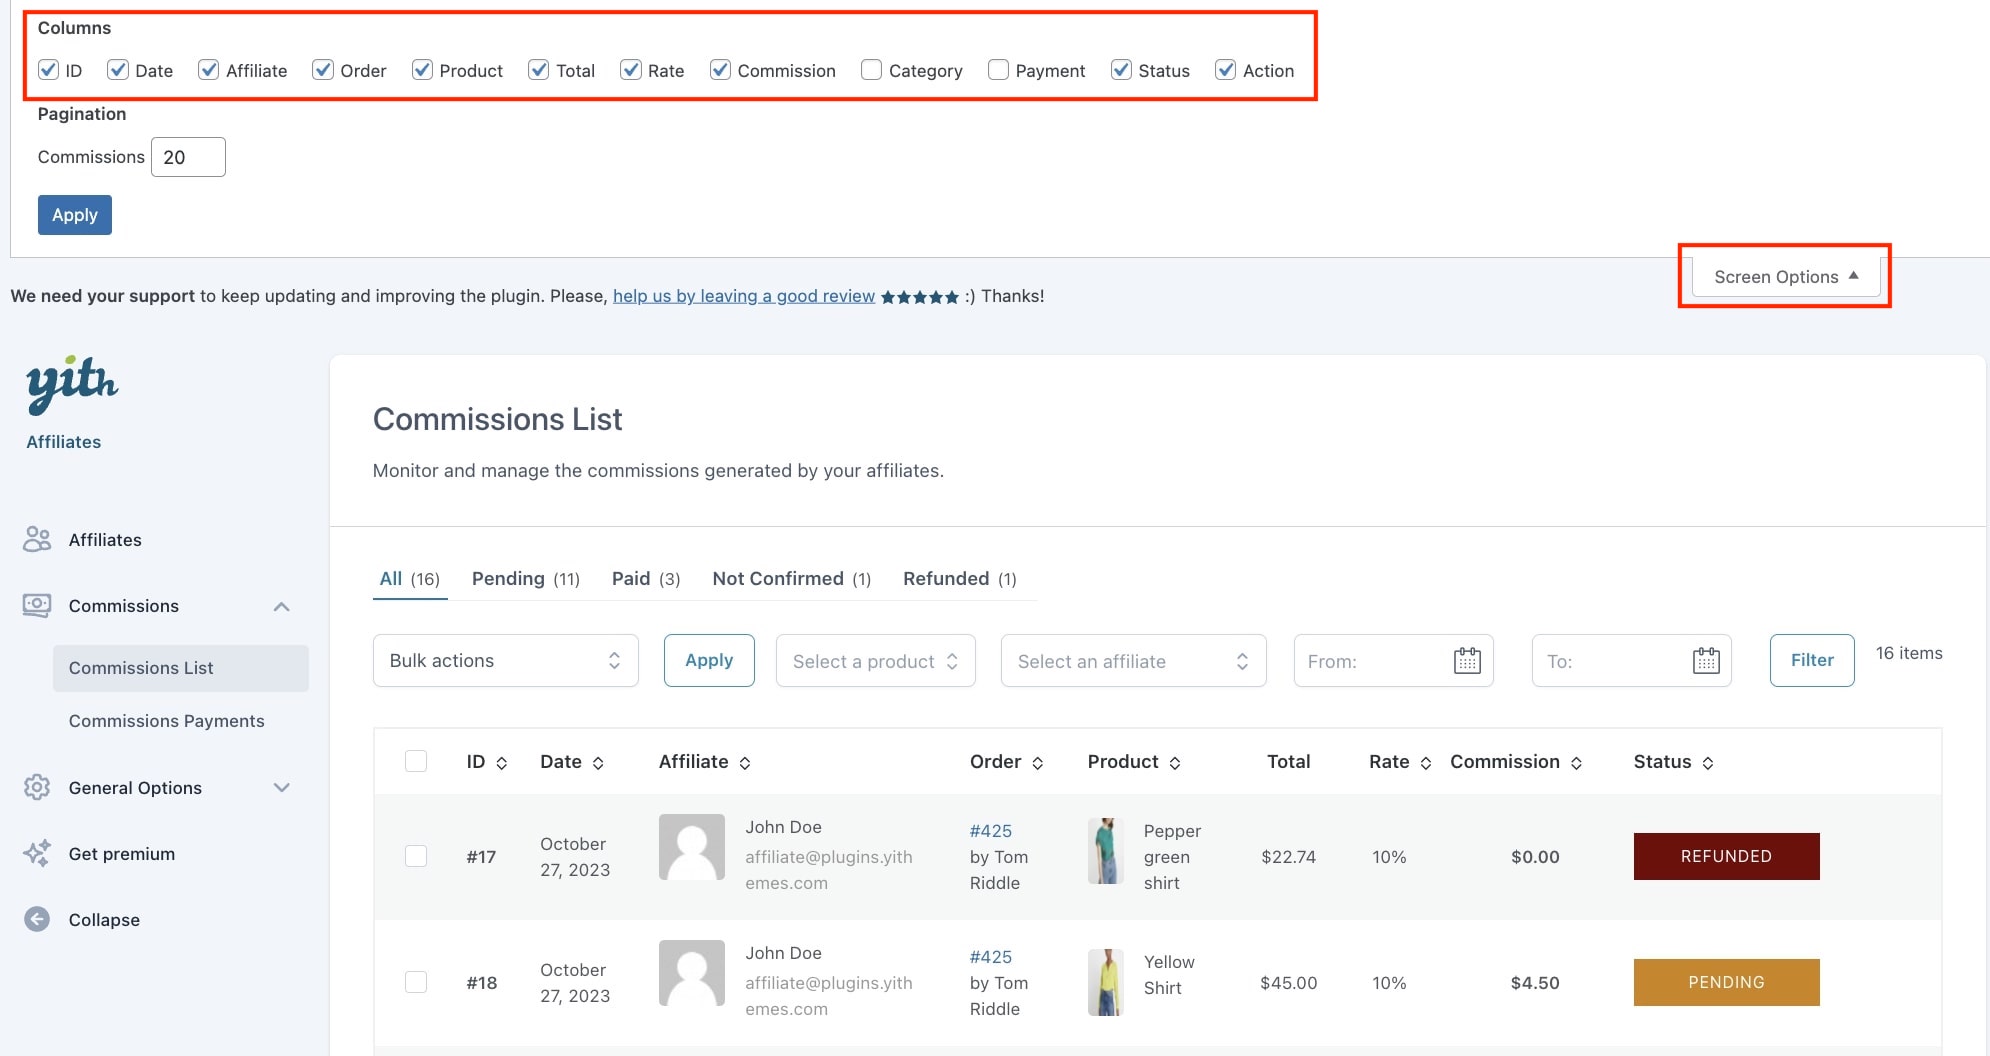
Additionally, you can also show the following columns and enable them from the “Screen options”.

  • Category
  • Payment ID: this will show the number of the related payment, if created.

Filters and bulk actions

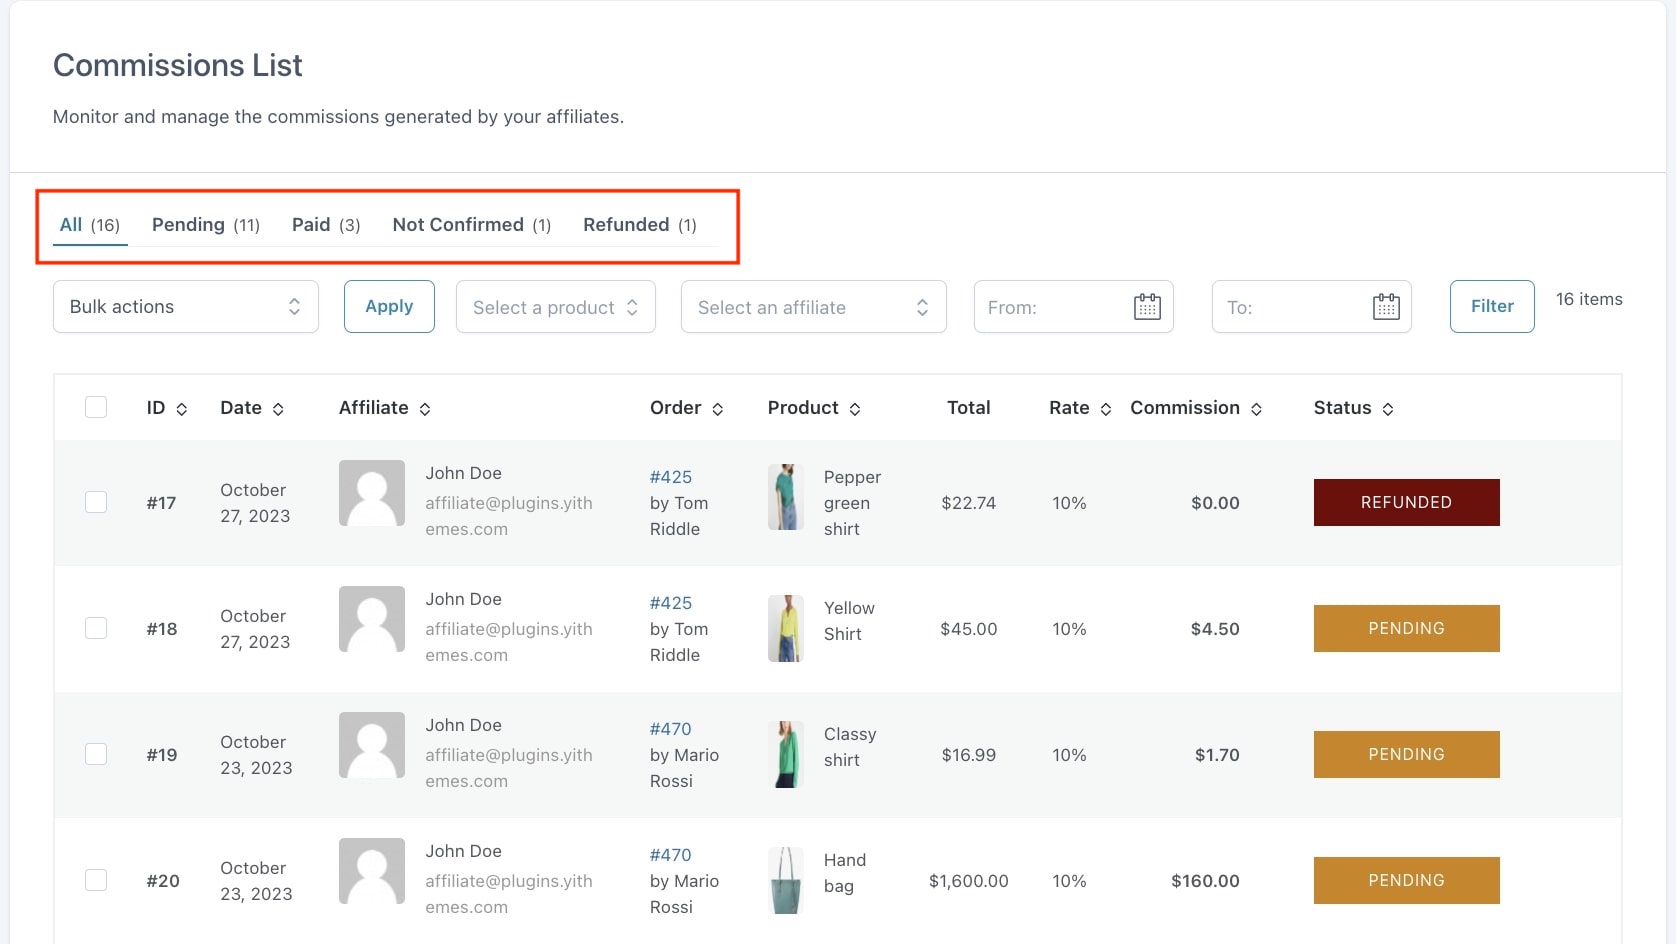
Based on the commission status, you can filter the view of the commissions using the filters on top and filter for example only by Pending or Paid commissions.


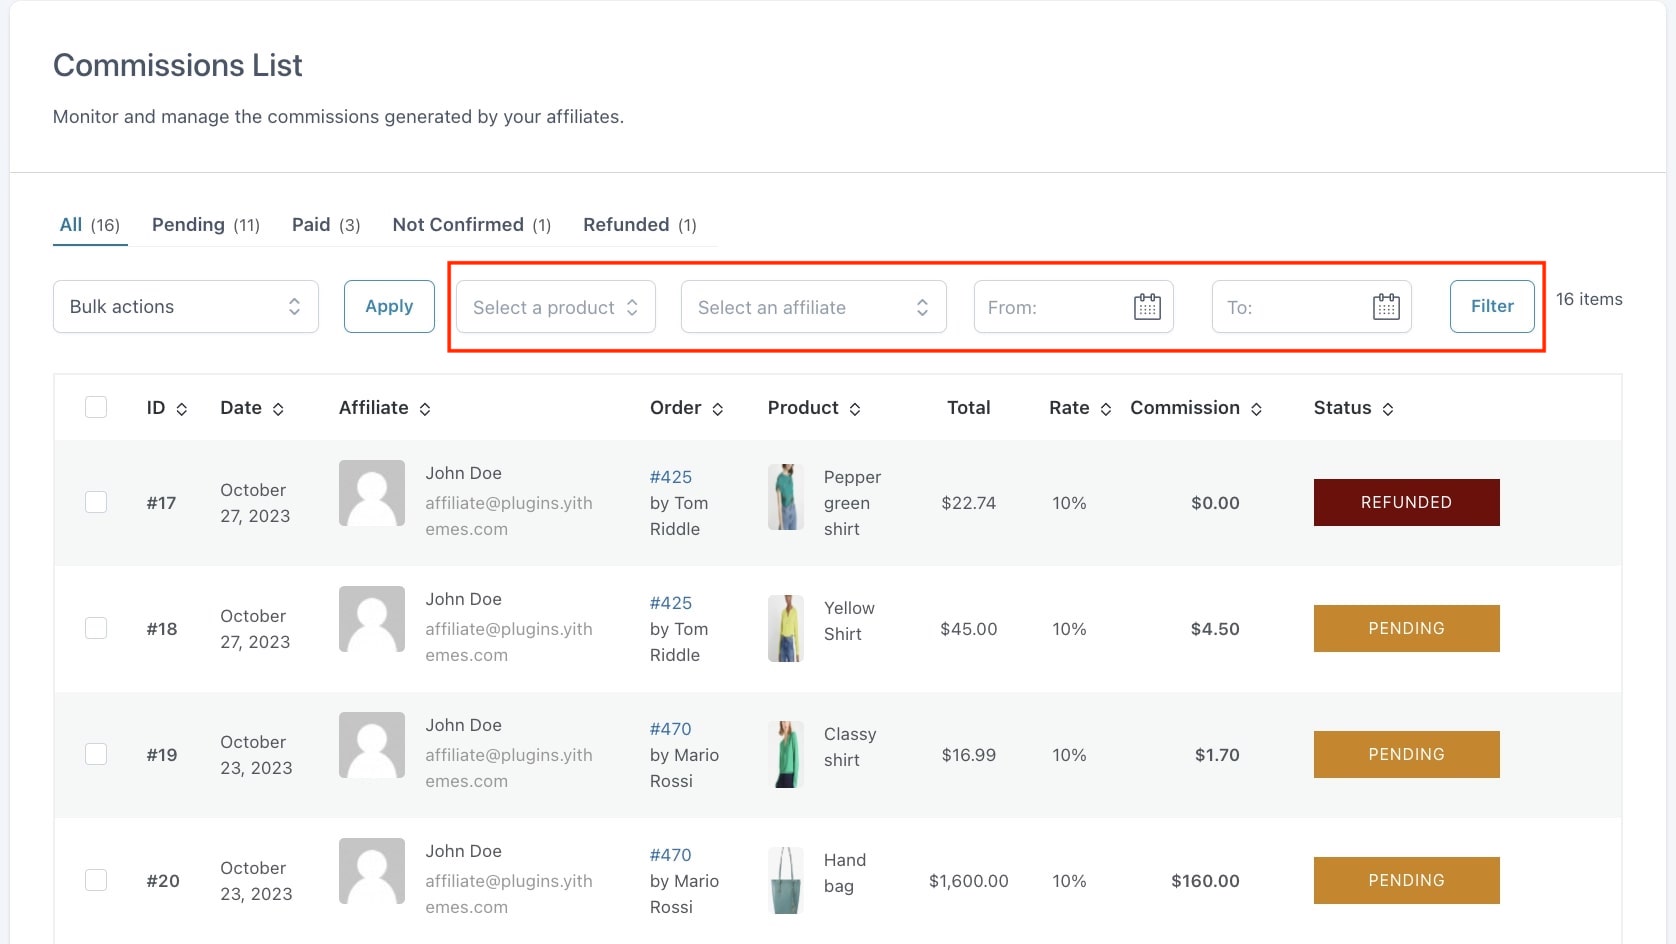
Yet, you can further filter these views using the additional filters by:

  • product
  • affiliate user
  • date


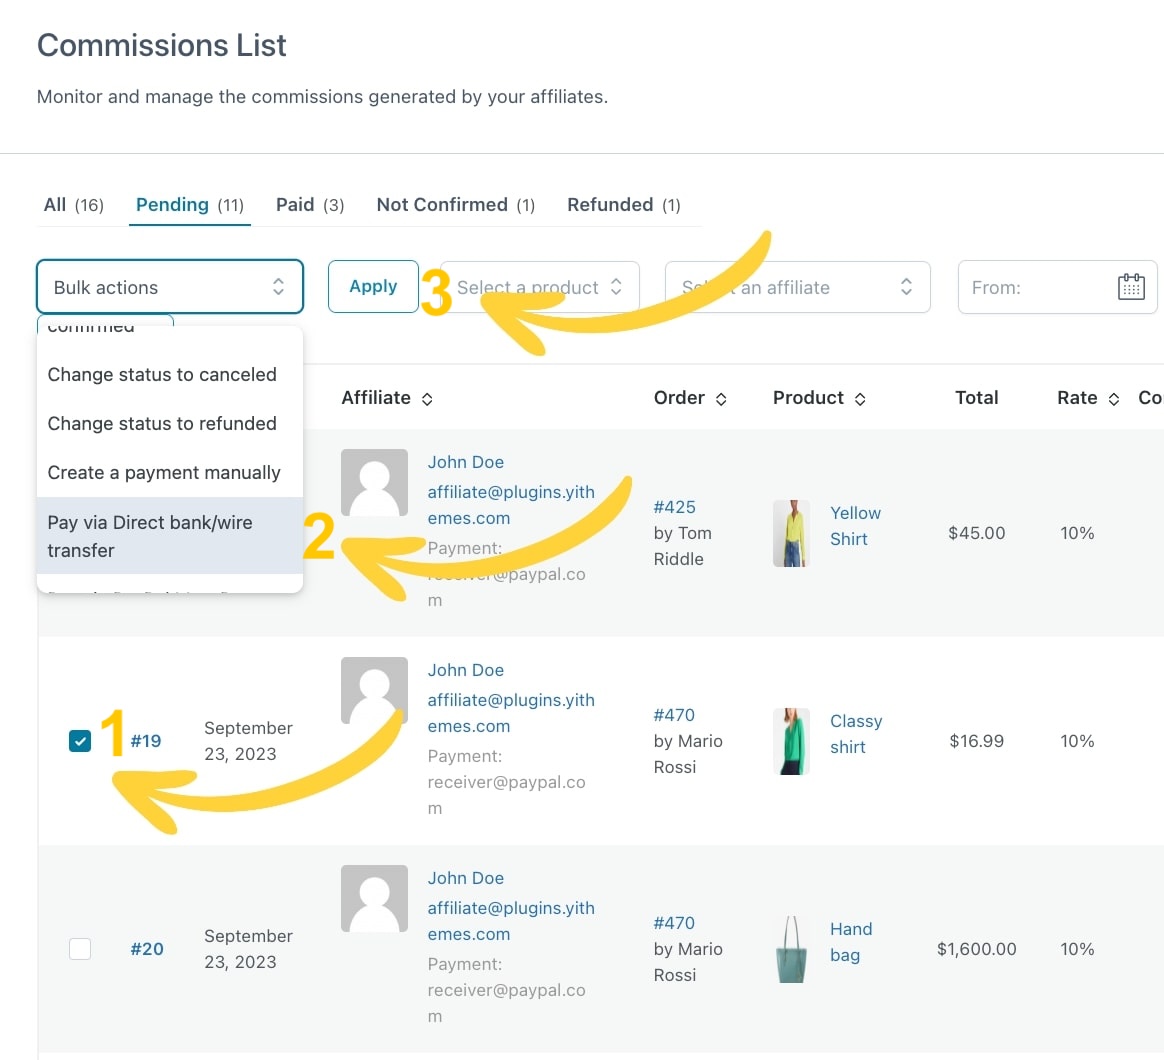
You can also bulk edit them and apply the following actions:

  • change status to “pending”
  • change status to “not confirmed”
  • change status to “cancelled”
  • change status to “refunded”
  • create a payment manually
  • pay via Direct bank/wire transfer
  • move to trash

As you can see, you can both change the commission status, trash them or create a payment record.

Create a payment record

To create a payment record, one of the two of the options shown above in bulk actions must be used (Create a payment manually or Pay via Direct bank/wire transfer) after selecting the respective commission to which the record needs to be created.


Once you have selected the commission and the payment option just click Apply to see the commission listed in ”Commissions Payment” tab to process the payment. For more details go to this page.

Commissions payments

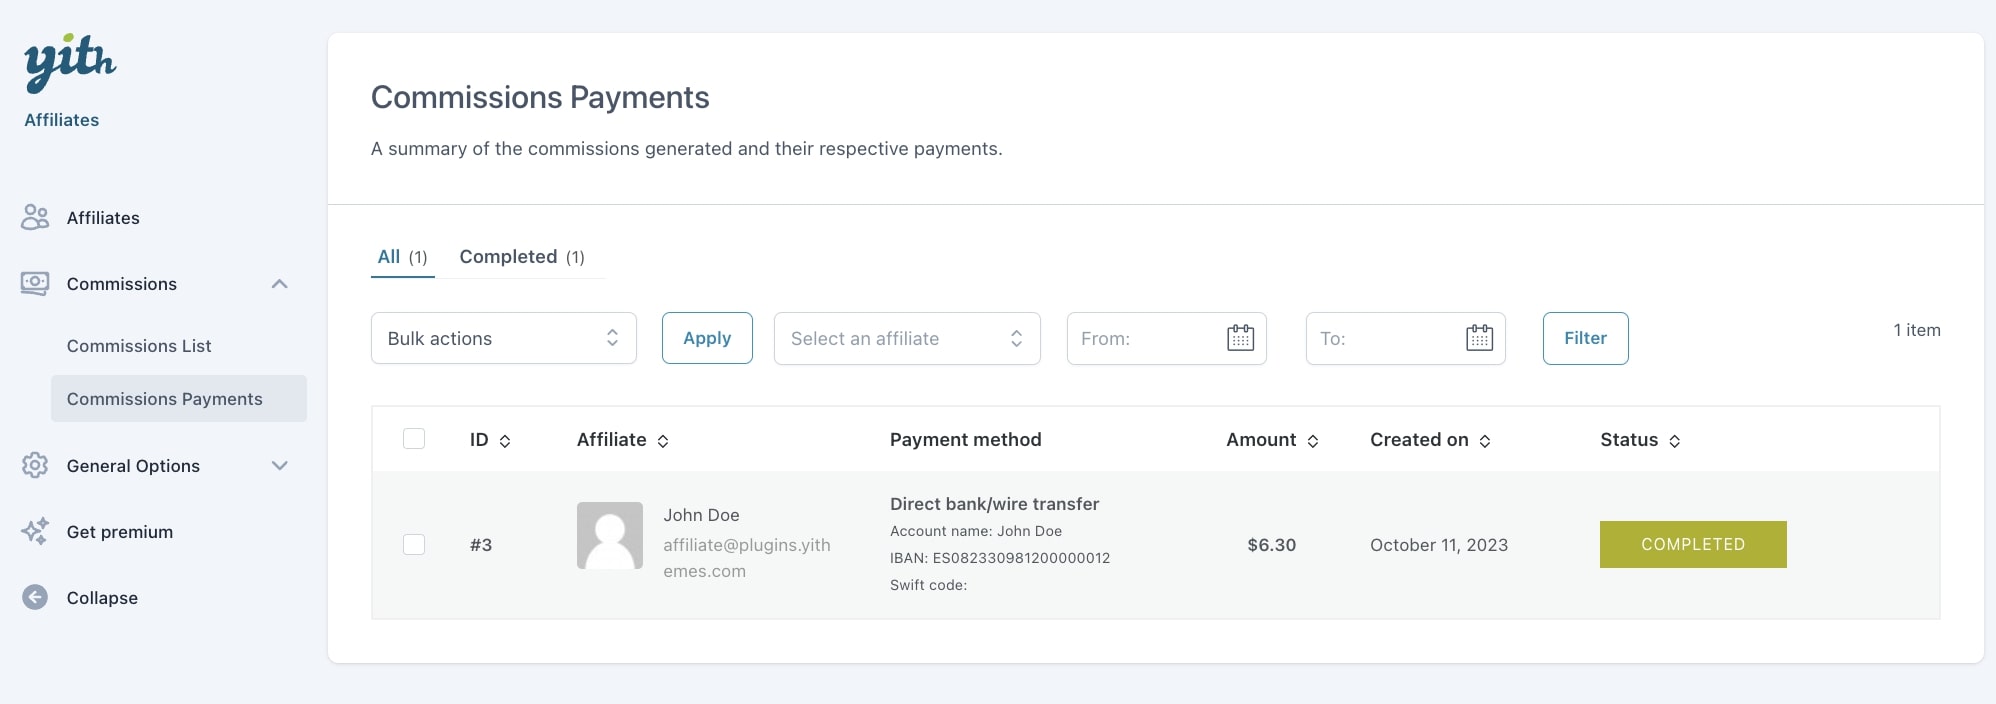
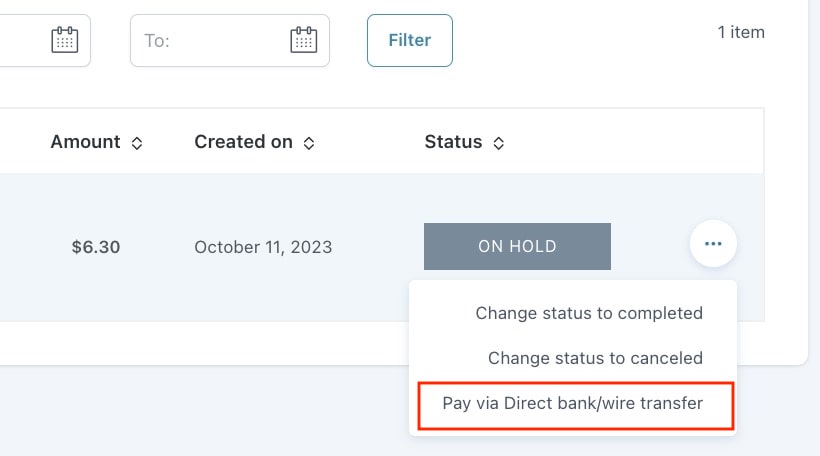
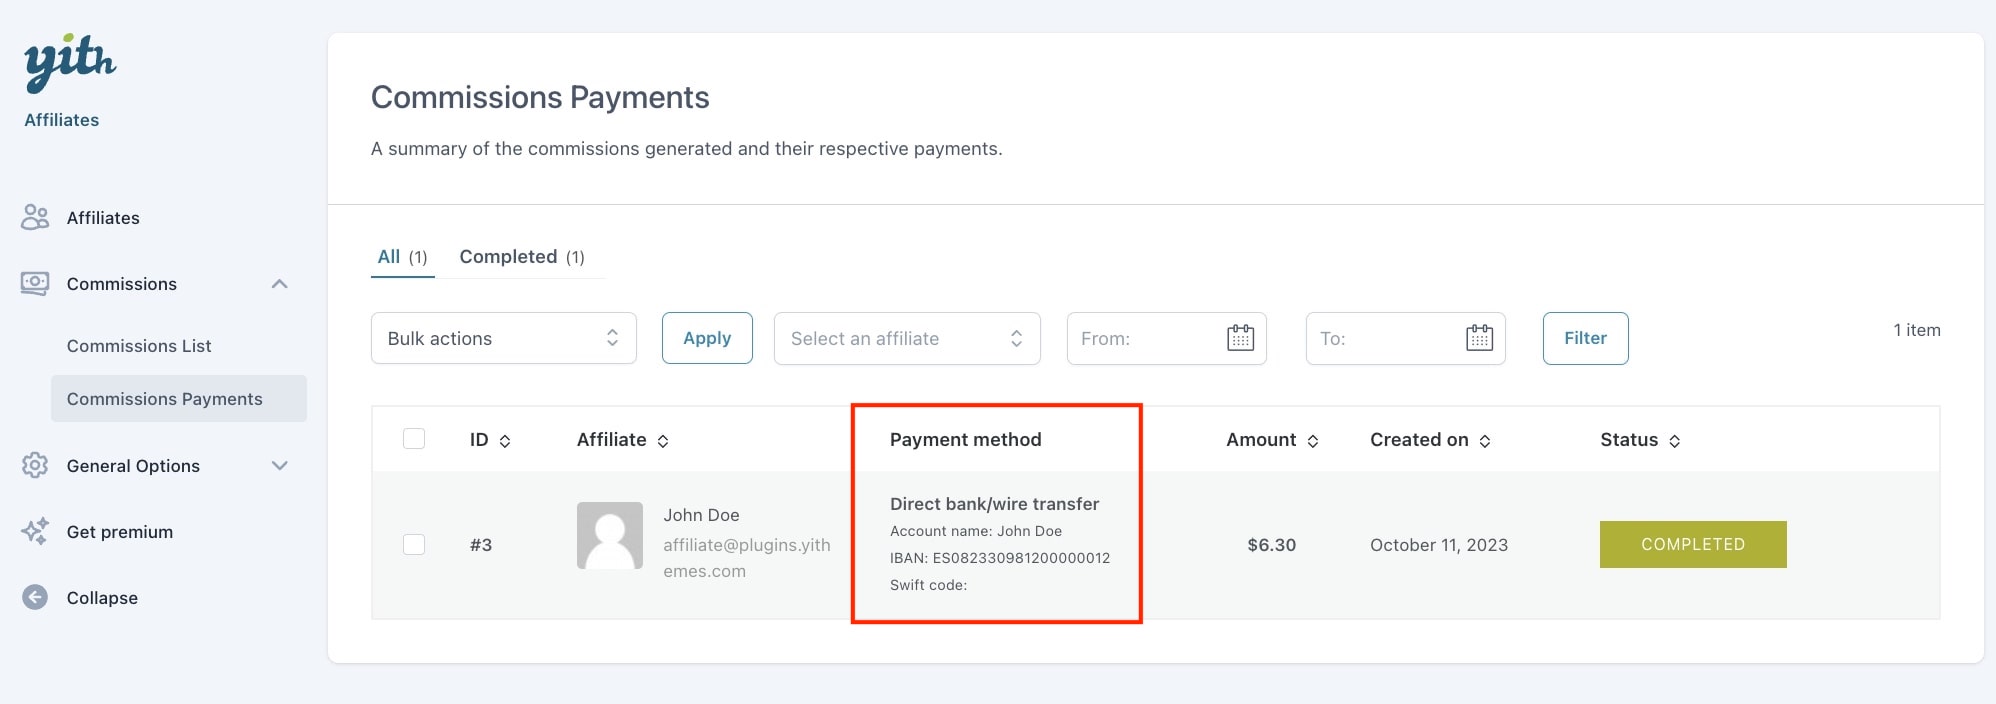
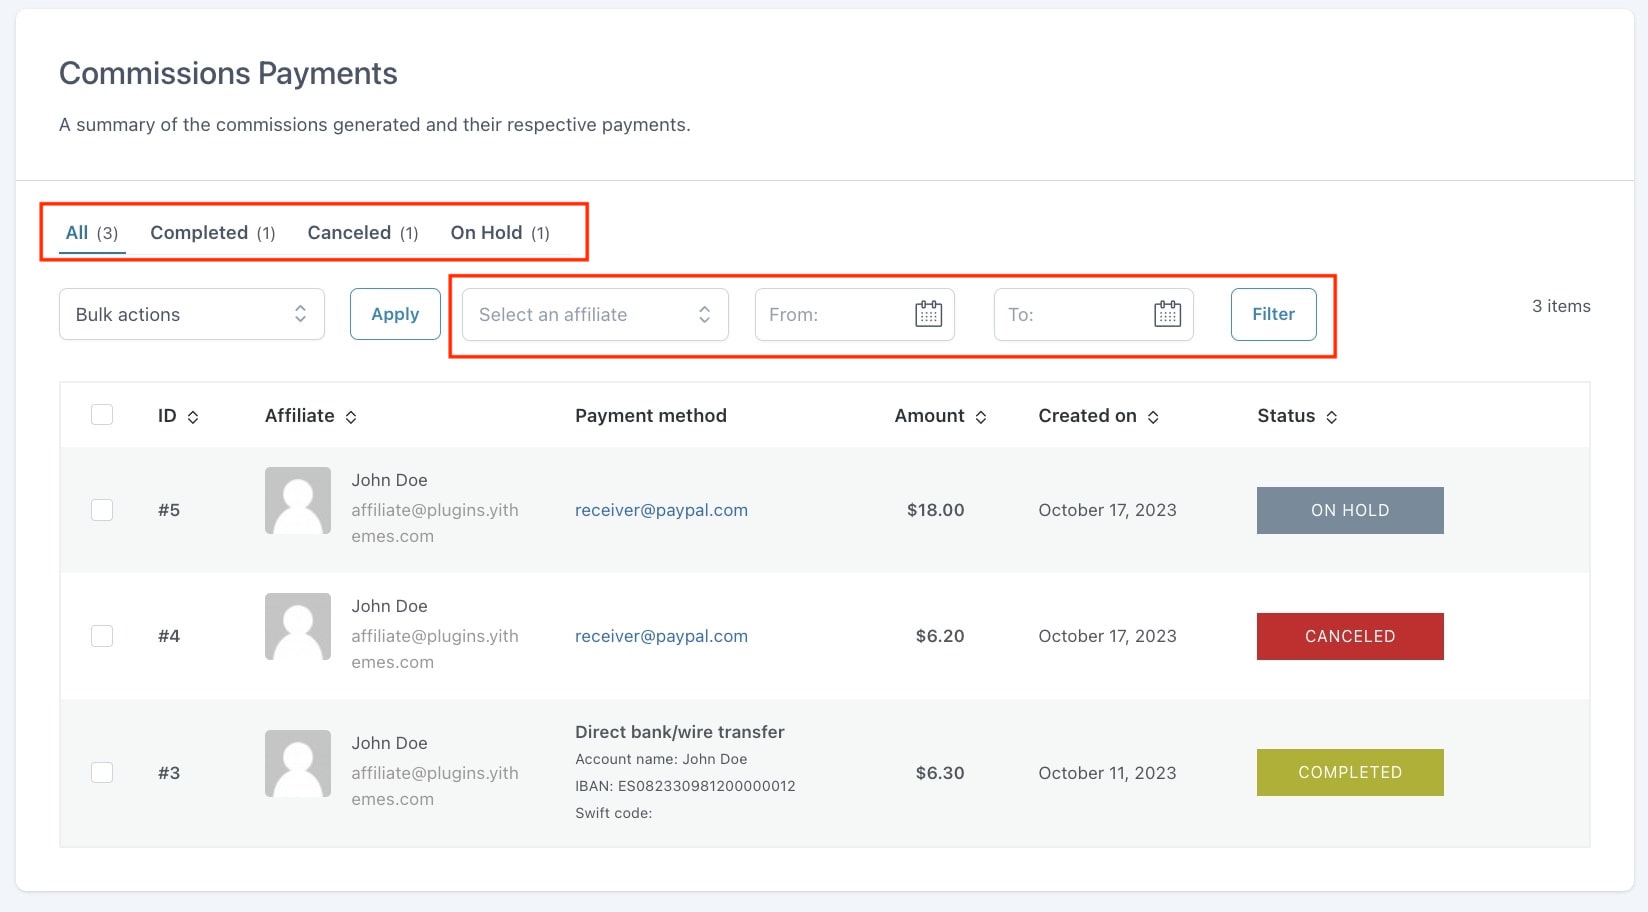
To generate a new payment record for your affiliates, you can go to the Commissions tab> Commissions Payments and from the bulk actions generate a payment record by choosing either Pay manually or Pay via bank/wire transfer.

Once the payment is created, you will see on this page all the payment records created with the on hold status so the payment can be processed and completed.


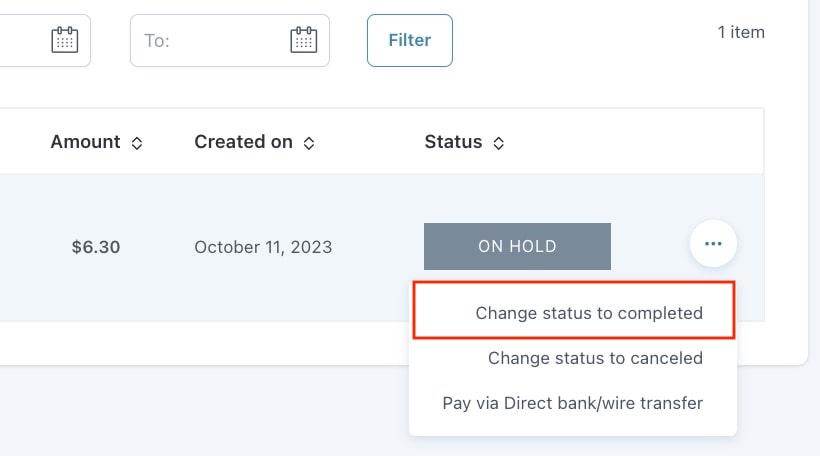
Once the payment record is created, you can issue the payment to the affiliate offline and change the payment status to Completed: all linked commissions will automatically get the Paid status.

Pay Manually

If the option ‘‘Create a payment manually’‘ has been selected when creating the payment, that means you will pay the affiliate using any offline method you prefer, for example in cash or with a non-supported gateway.


Once the payment is done, you can manually change the payment status to “Completed” from the payment actions in the payments list.

Pay via bank/wire transfer

Payments via Bank transfer are currently very similar to manual payments, but if you enable them, your users will be able to enter their payment details (Account name, IBAN and Swift code) that you can find it from the user profile.

The payment, however, occurs manually, so you will have to create a bank transfer from your bank, the plugin will not do that on your behalf.

To enable this gateway, go to General options > Commissions & Payments > Payment gateways and make sure the gateway is enabled.


This option is enabled by default when you first activate the plugin.


If you select Pay with bank transfer from the payment actions, you will be able to see the payment details in the the Payment method column.


Once the payment has been processed remember to change the commission status to completed.

Filters

From this screen you can also filter the payments by status, affiliate and date.


You can bulk edit them and choose any of the following actions:

  • Change status to “Completed”
  • Change status to “On hold”
  • Change status to “Cancelled”
  • Delete

Commission status

The commission status is strictly linked to the order status.

When the order is submitted, the commissions are generated with the Not confirmed status. Then, when the order is paid and completed, the commission automatically gets the Pending status, which means that the commission is ready to be paid.

Here is a more detailed list with all the statuses that a commission can get and which order status can trigger it:

  • pending: if the order status goes to completed or processing
  • pending-payment: this status is not triggered by any order, it can only be triggered by automatic or manual payment and will be like this until the payment is confirmed by the gateway or set to completed by the admin manually.
  • paid: this is the status that the commission takes when the associated payment is set to completed status.
  • not-confirmed: this is the commission status when the order status goes to pending or on-hold.
  • cancelled: if the order status goes to cancelled or failed.
  • refunded: if the order status goes to refunded.

Please, note: when the commission is on pending payment or paid status, it can only be changed to Trashed. No other status change is allowed to prevent a commission is erroneously paid twice.

The commission can be paid only when it’s on Pending status.

Example: a commission standard life cycle

This is the default life cycle of a commission, and the statuses it takes on:

  • order created > commission not confirmed
  • order completed > commission pending
  • commission payment created > commission pending payment
  • commission payment completed > commission paid

The admin can anyway manually change the commission status regardless of the order status, so for example, a pending commission can be changed to not confirmed even if the order is completed.

For more details about how to create commissions payments, please, refer to the following page:

Commissions payments for the free version
Commissions payments for the premium version

General options

In the General Options tab we will find two different sections:

General


Query var name: enter the name of the query var used to store the referral tokens in the URL. Default to “ref”.
A typical referral URL is http://sitename/?ref=2, where “ref” is the var name: you can change it to any text you like, and it will be changed in all your affiliates’ referral URLs.

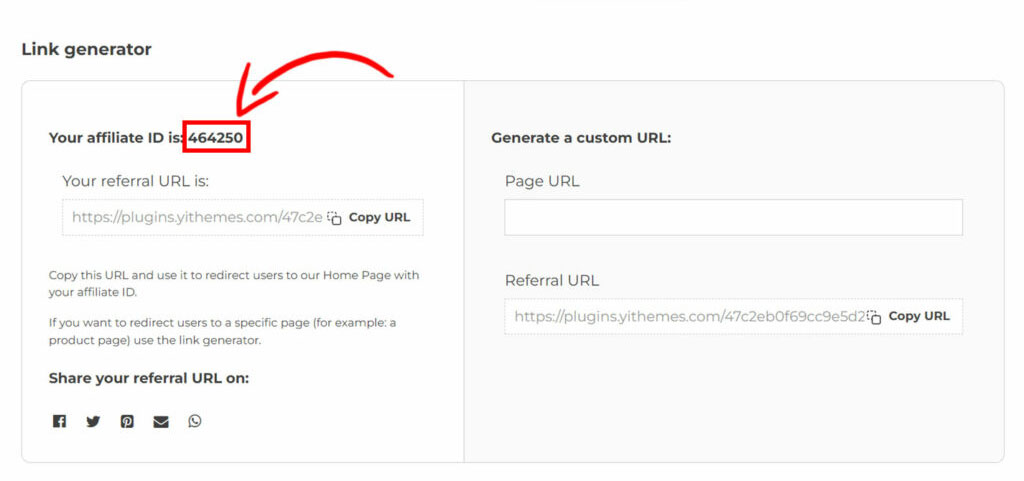
The affiliate can find this token in the Affiliate Dashboard > Link generator tab:

Cookie options

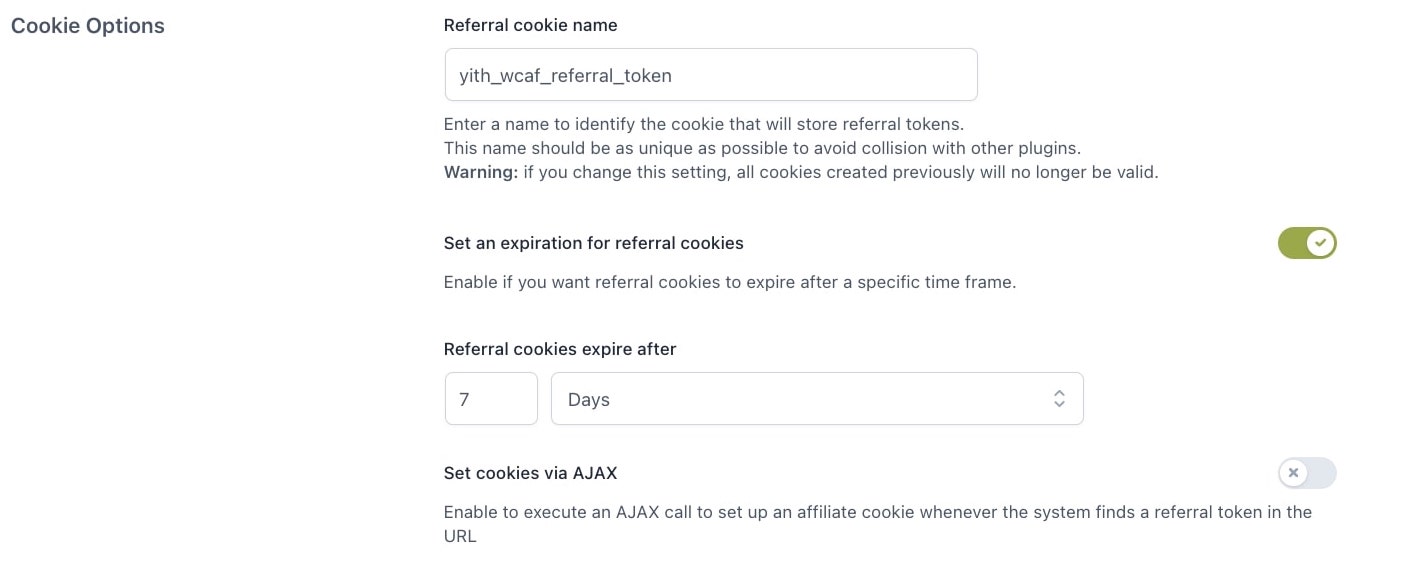
Referral cookie name: enter a name to identify the cookie that will store the referral tokens. This name should be as unique as possible to avoid collision with other plugins. If you change this setting, all cookies created previously will no longer be valid. Default value is yith_wcaf_referral_token.

Set cookies via AJAX: enable to execute an AJAX call to set up affiliates’ cookies whenever the system finds a referral query string in the URL.

Affiliate registration – options

From the General options > Affilites Registration tab, you will be able to enable/disable the affiliate registration form and its options.

Registration form

The affiliate registration form includes the standard WooCommerce registration fields (username, email and password) that cannot be changed, and the additional affiliate fields:

  • First name
  • Last name
  • Privacy text
  • Terms


Below the fields, you will find an important option:


Add the registration form fields to the default WooCommerce registration form: enable this option to add the affiliates registration form fields in the WooCommerce default registration form. In this way, all users who register to your site will also automatically submit an application as affiliates at the same time.

Note: if this option is enabled, you will never be able to see the Become an affiliate form, because all new users are automatically applying as affiliates during the registration. The only exception would be in case the user registered before the option was enabled.

Registration options

Just below, you will find the following option:

Associate old commissions to new users with the same token: if enabled, when a new affiliate is registered, the system will check if there’s any preexisting commission for that default token. If there is any, it will be assigned to the user automatically.

Affiliate Dashboard – options

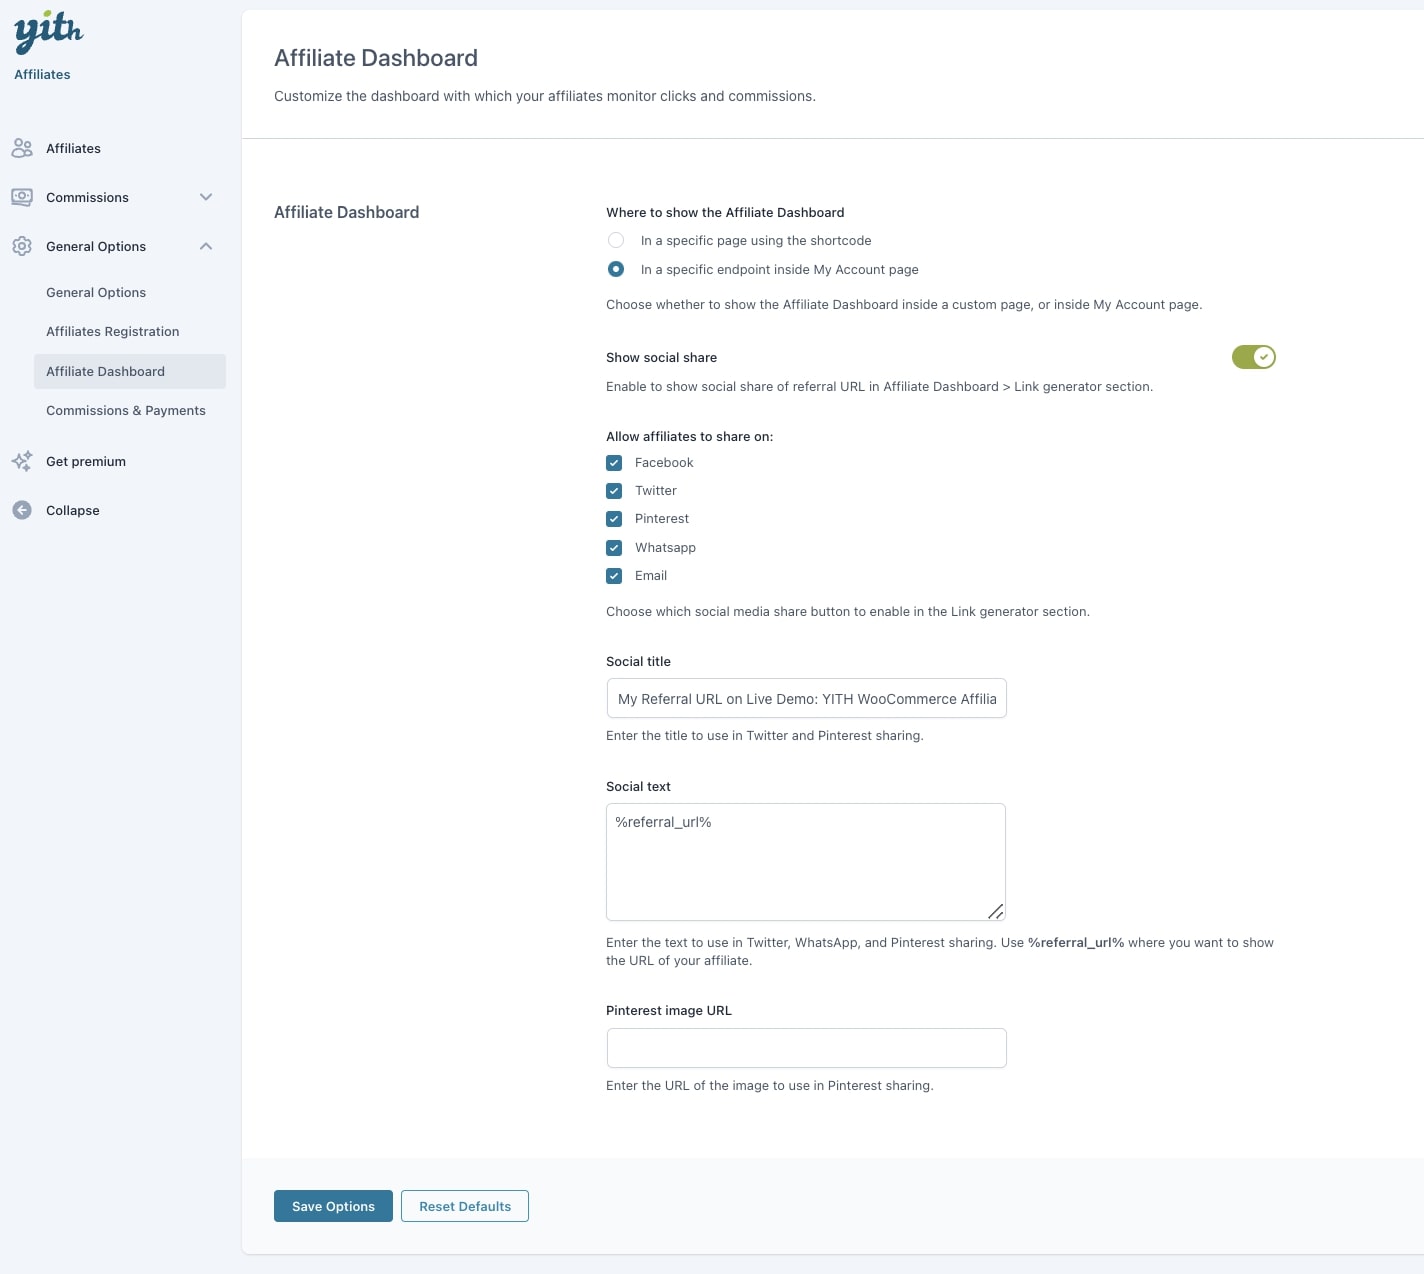
From this tab in the General options > Affiliate Dashboard, we can configure all the options related to the Affiliate Dashboard, which is the dashboard that will be displayed to the affiliates on the frontend.


Where to show the Affiliate Dashboard:

  • In a specific page using the shortcode: if you select this option, you will be able to select the page and what to show to guest users in the options below

Choose the Affiliate Dashboard page: use this shortcode [yith_wcaf_affiliate_dashboard] in the page you want to use as the dashboard.

To guest users in the Affiliate Dashboard show:

  • The affiliate registration form only
  • The affiliate registration form + the login form

These settings can also be changed through the shortcode attribute. For more details please see this page.

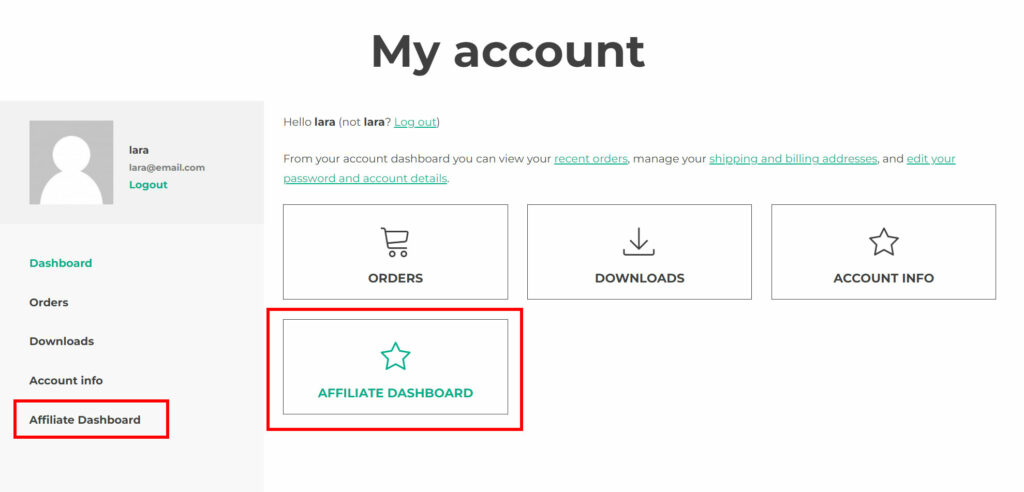
  • In a specific endpoint inside My Account page: select this option if you want to show the dashboard automatically in My account page


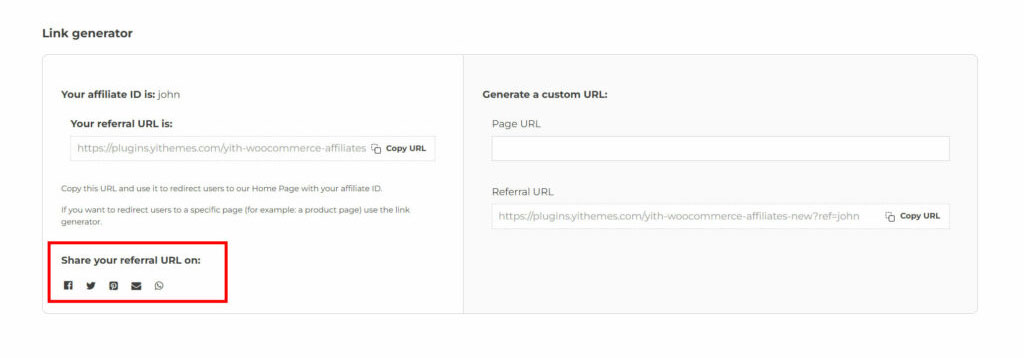
Show social share: enable to show social share buttons of referral URLs in Affiliate Dashboard > Link generator section.

Allow affiliates to share on: enable the social sharing options that you want to offer on your site. Their icons will be displayed in the Link generator section:

  • Facebook
  • Twitter
  • Pinterest
  • Whatsapp
  • Email

Social title: enter the title to use in Twitter and Pinterest sharing.

Social text: enter the text to use in Twitter, WhatsApp and Pinterest sharing. Use %referral_url% where you want to show the URL of your affiliate.

Pinterest image URL: enter the URL of the image to use in Pinterest sharing.

Commissions & Payments – options

From this page in the General options > Commissions & Payments you will be able to set up the following sections:

Commission options


Default commission rate: enter the default commission rate for all your store affiliates.

Prevent affiliates auto-commissions: enable to prevent affiliates from getting commissions from their own purchases.

Exclude taxes from commissions: enable to exclude taxes from referral commissions calculation. E.g. if a product costs €100 and there’s €20 tax added (for a total of €120), the affiliate commissions will be calculated on €100.

Exclude discounts from commissions: enable to exclude discounts from referral commissions calculation. E.g. if a product costs €100 and a €20 discount is applied, the affiliate commissions will be calculated on €80.

Payment gateways


In this section, you can enable the only payment method supported in the free version, the Direct bank/wire transfer.

For more details about how payments via direct bank/wire transfer work, please, visit this page.

Affiliate dashboard

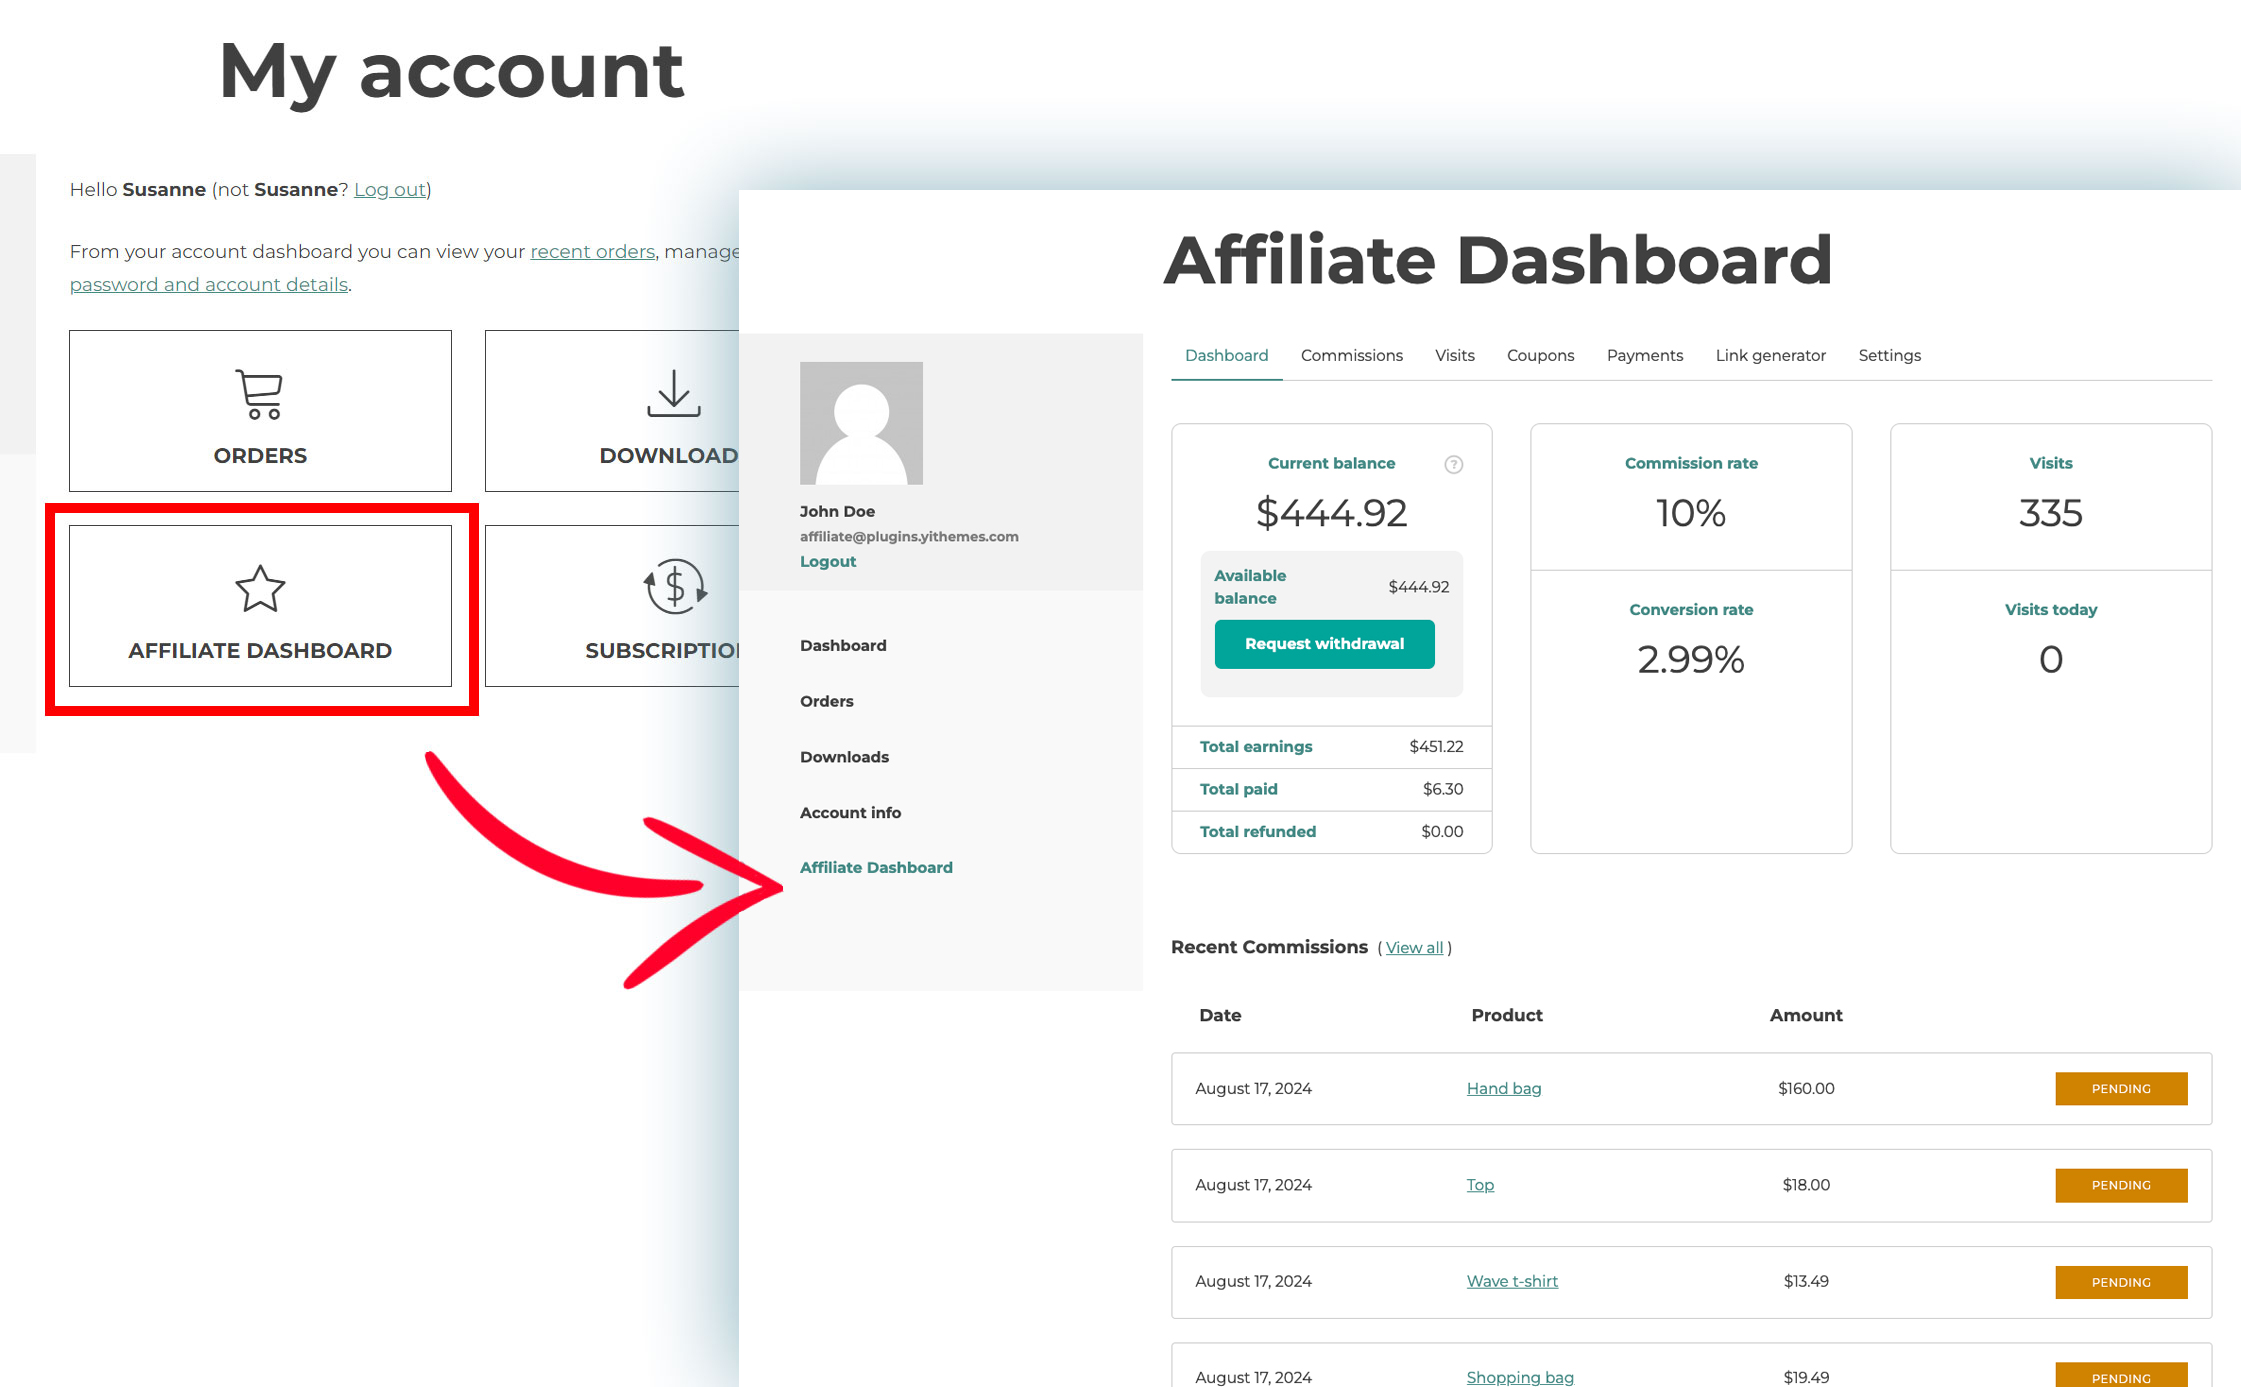
On this page, we will cover everything related to the Affiliate Dashboard, the tool at your affiliates’ disposal where they can find everything related to their affiliate profile, traffic and commissions generated and payments.

The dashboard will be visible only to approved affiliates and is made of different sections:

Dashboard

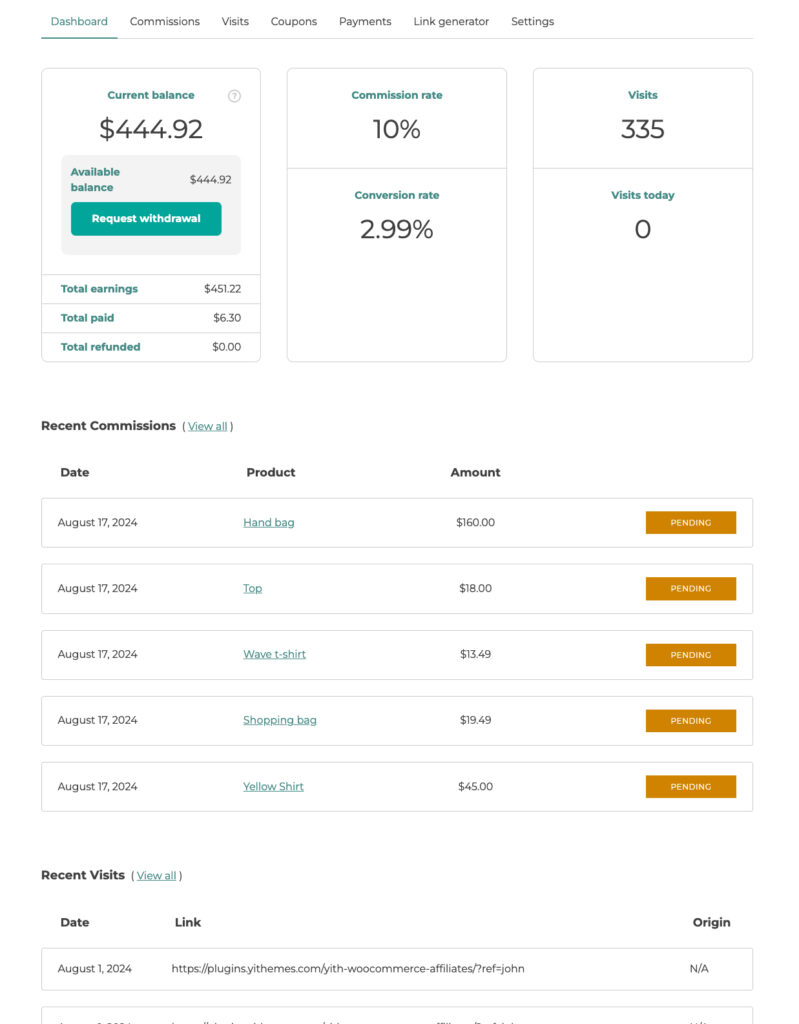
The dashboard section is the home screen with a recap of all the data of their profile, with:

  • Total earnings, paid, refunded and active balance;
  • Commissions rate, conversion rate and the latest commissions;
  • Visits, visits today and the latest visits.

Commissions

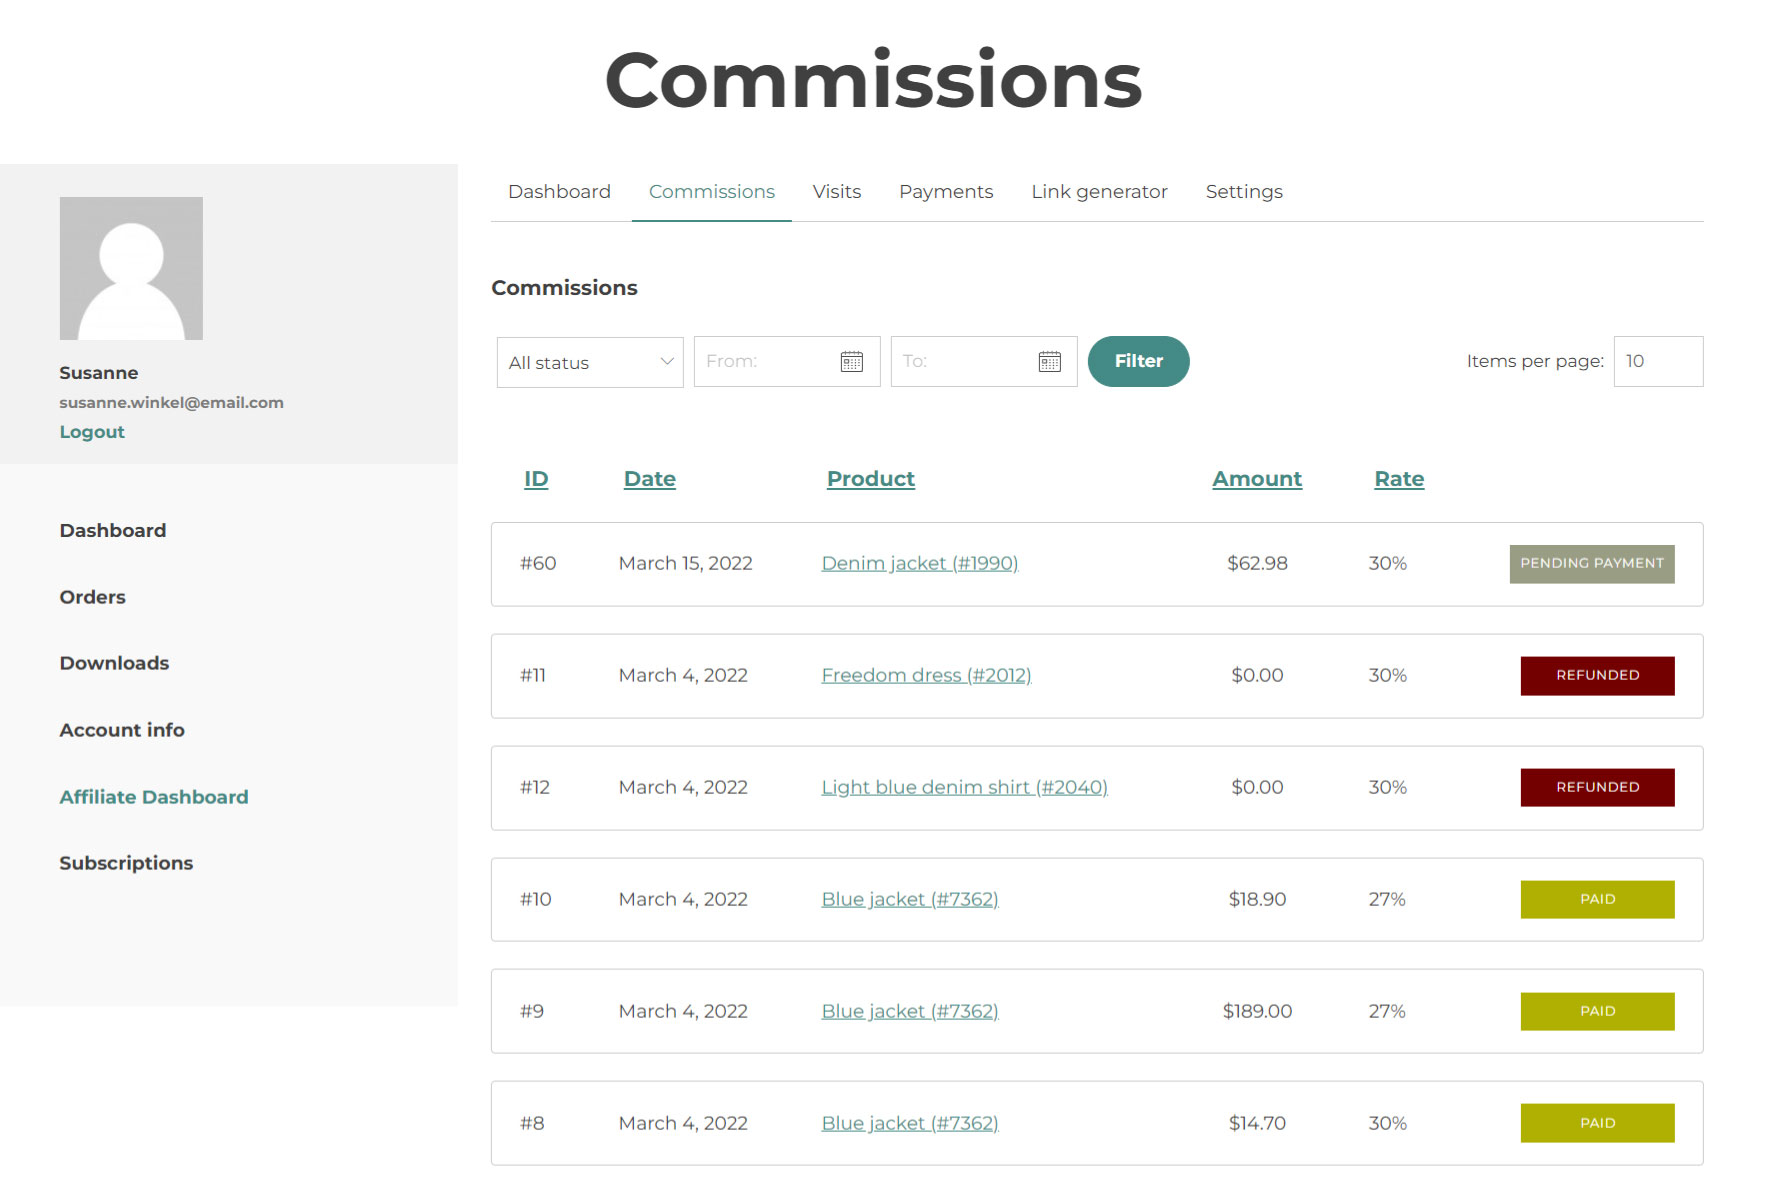
In this tab, you will see all the commissions generated with their ID, date, product and related order ID (the plugin will generate one commission for each product), amount, commission rate and commission status. For more details about the commission status, please, refer to this page.

You can also filter the commissions by status and date, and sort them by any of the titles in the column.

Commissions

Visits

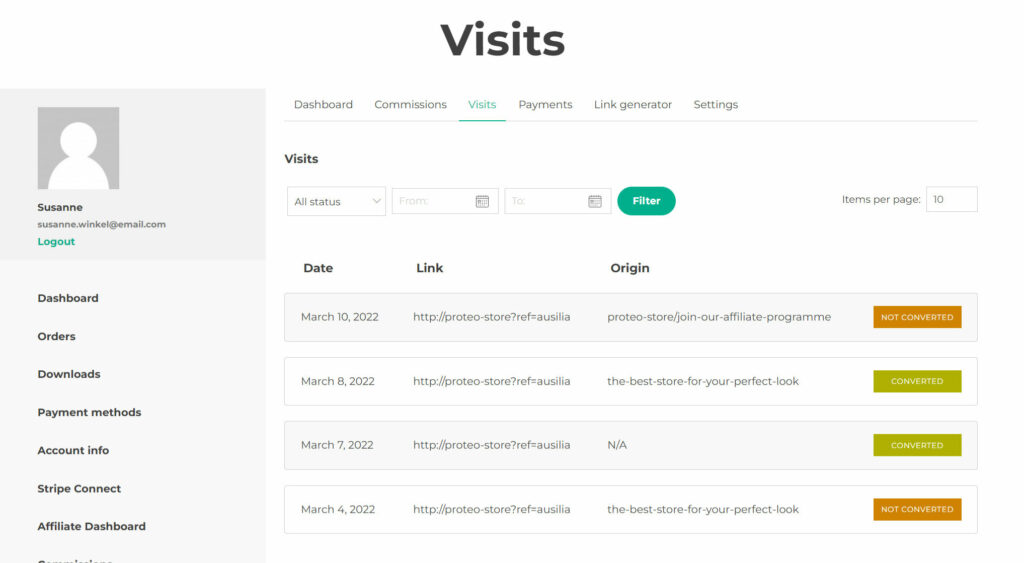
From this tab, you can see all the visits, date, the referral Link that has been used, the Origin – the page where the link has been embedded – and the status (that can either be converted or not converted).
Payments

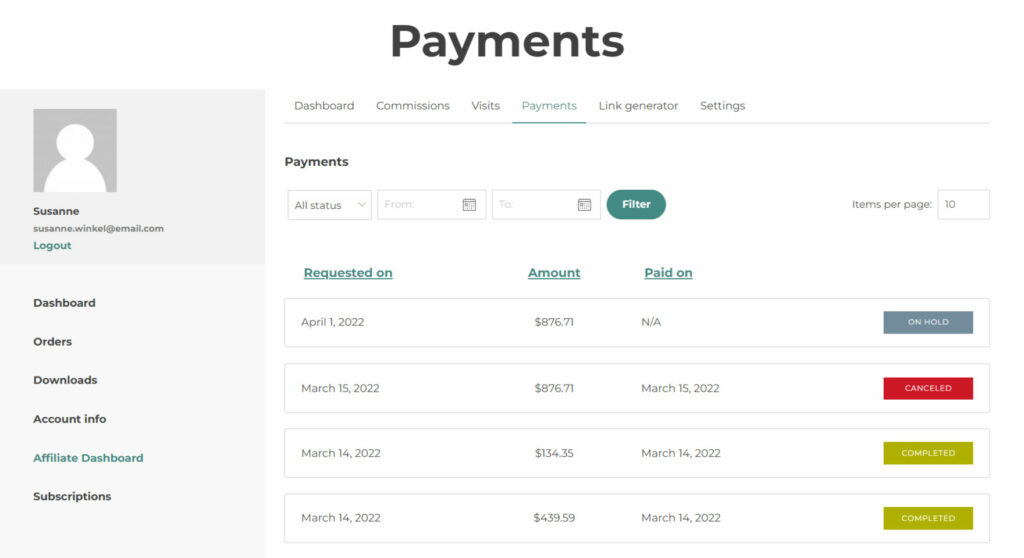
From this tab, your affiliate will see all their payment records, the date, the amount, the invoice (if available) and the status.
The user cannot request a payment, so, payments have to be done by the admin manually. For more details about how to create a payment record, please, refer to this page.

This is where the affiliates can find their affiliate ID or token, their referral link and where they can also generate direct links with their referral ID to specific pages of your site.

Not only is it possible to copy the link and embed it on any page they wish, but it is also possible to enable the social sharing icons, so they can share the link in just a few clicks. To learn more about how to enable social sharing options, please, visit this page.

Link generator

Settings

From this tab, your affiliates will be able to add their payment details.

Settings

The admin will be able to find this info in the User’s profile, as you can see here.

Join the Affiliate programme

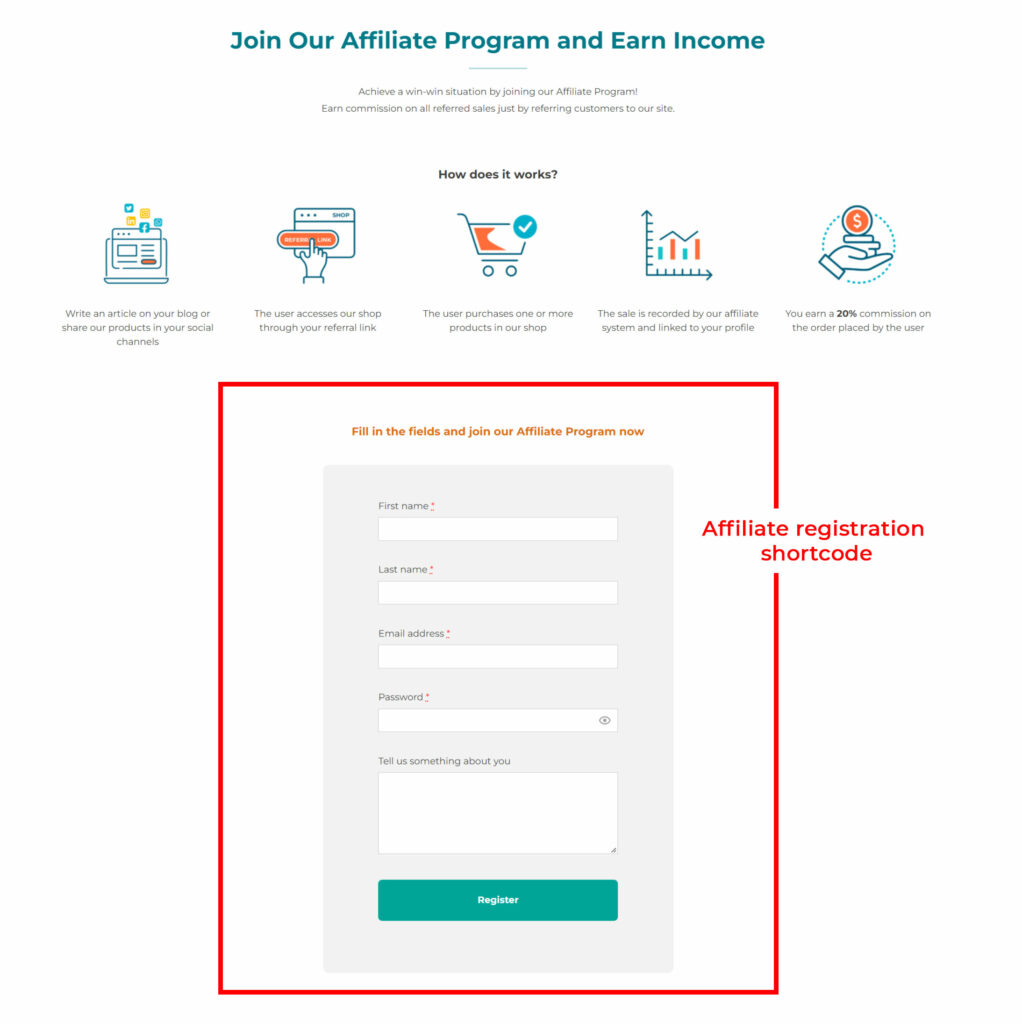
Your users will be able to join the affiliate programme from any page where the affiliate registration shortcode is displayed or from the Affiliate dashboard if they are not registered as affiliates yet.

In case you use the affiliate registration shortcode, they will see a button that redirects them to the Affiliate dashboard once their accounts are approved.
→ Registration shortcode – premium version
Registration shortcode – free version

In case they land on the Affiliate dashboard page, they will see a dynamic content that will differ based on their profile.
Affiliate dashboard – premium version
Affiliate dashboard – free version

Let’s see some use cases.

1. guest user who wants to join

Based on how the admin decided to set up the affiliation programme, you have two options:

  1. Direct any user to a promotional page where the affiliate registration is printed
Registration shortcode on a custom page
  1. direct users to the Affiliate dashboard page


In both cases, the guest user will see the Affiliate registration form with the fields configured in the Registration settings and, optionally the login option.
Registration settings premium version
Registration settings free version

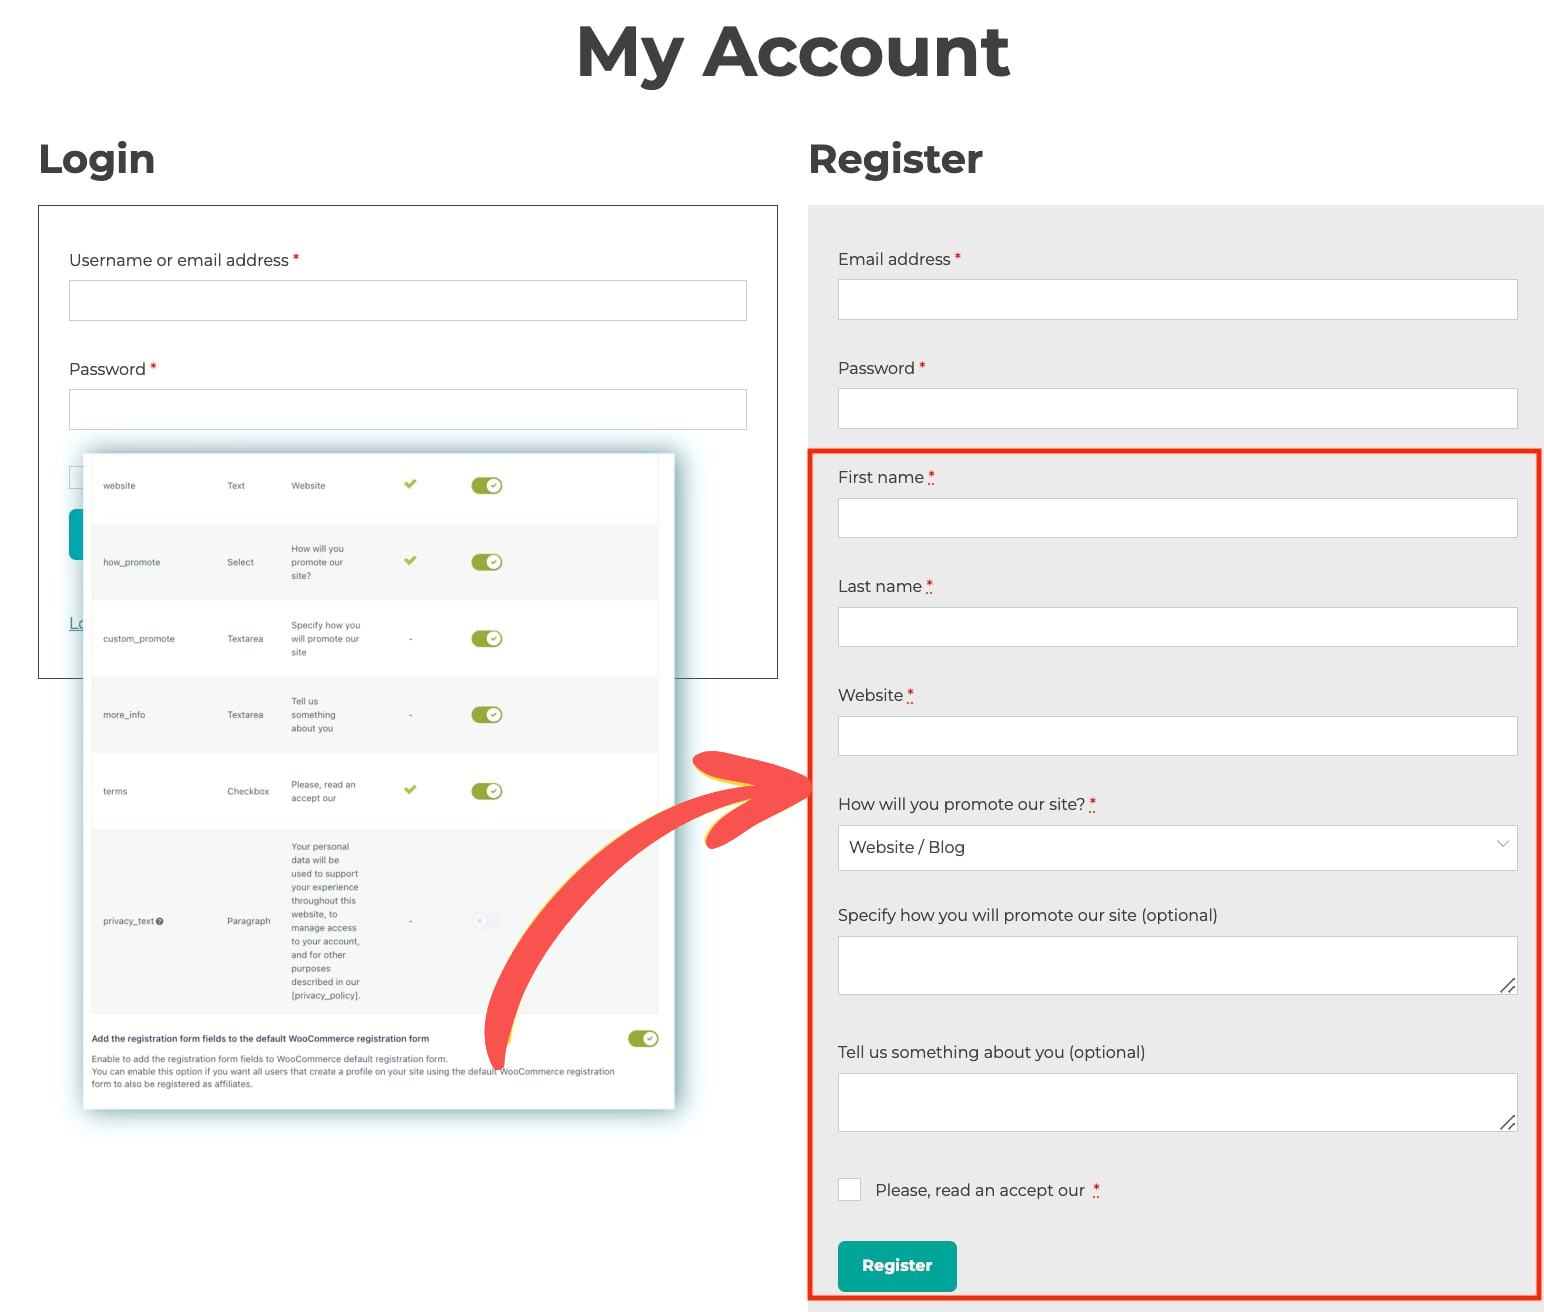
The admin can additionally choose to embed the affiliate registration options in the default WooCommerce registration form: in that case, whenever a new user registers, he/she will also apply for the affiliate programme.

To do that, you just have to enable the option displayed below. If this option is enabled, instead, whenever a person registers as a user will also send an application for the Affiliate Programme.

2. logged in user who wants to join

In case the user has already registered an account on your site and has logged in, both the affiliate registration shortcode [yith_wcaf_registration_form] and the Affiliate dashboard will show the Become an affiliate form, which will include only the affiliation related fields.

With the premium version, you can customize this form with custom fields, whereas with the free version you can only enable or disable the default fields. For more details, please, see the following pages:
Registration settings premium version
Registration settings free version

3. application sent

When the user submits his/her application request, there are two available options, based on the admin’s settings:

  1. users will see a message that informs them that their application will be reviewed. They will receive an email confirmation based on whether the application is approved or rejected.
  2. affiliate applications will be automatically approved and the affiliate will immediately see a button that redirects to the Affiliate dashboard. For this setting, just make sure you enable the “Automatically approve affiliates” option in the Registration options.
    Note: this automatic approval option is only available when using the premium version.
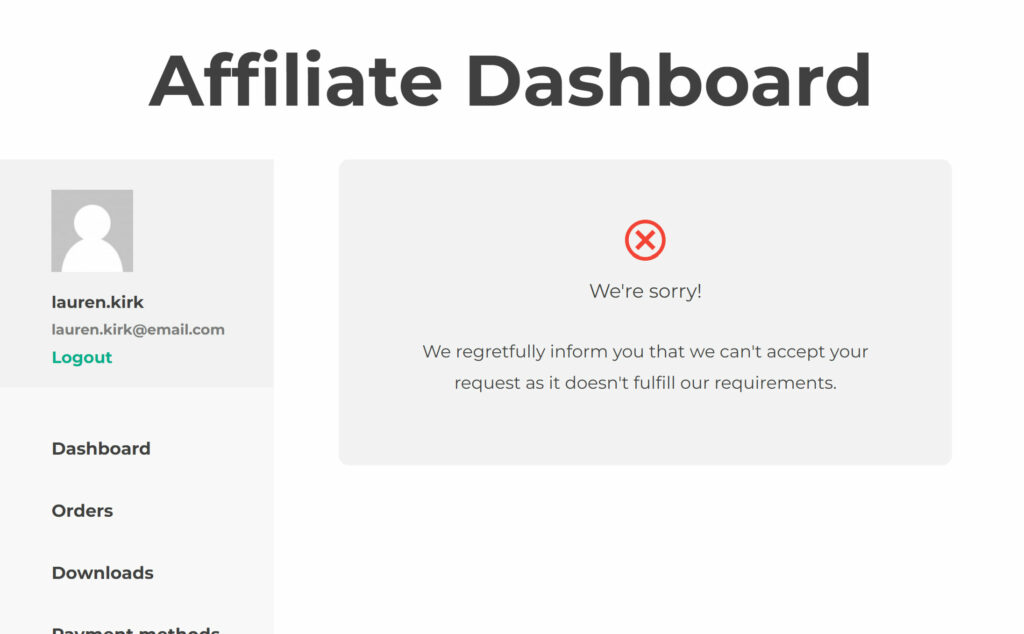
4. Affiliate rejected

In this case the affiliate will see a custom message that can either be set up globally for all rejected affiliates in the Registration settings or for each affiliate from the affiliate’s profile or the popup that shows when changing the affiliate’s status from the affiliates page.

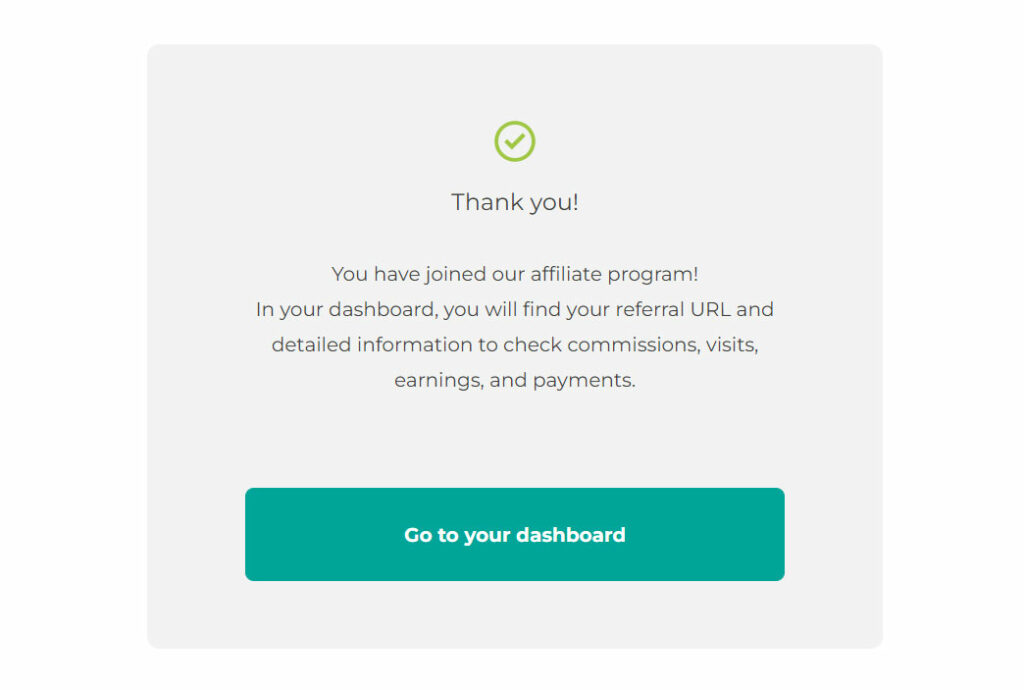
5. Affiliate approved

If the affiliate request is approved and the user has applied through a custom page with the registration shortcode, this will be turned into a greeting message and a button that takes to the Affiliate Dashboard.

If the application has been sent through the Affiliate dashboard, it will automatically update and show the full content.

Affiliate dashboard

Let’s see what this looks like and what the user can do from the Affiliate Dashboard.

Affiliate dashboard – premium version
Affiliate dashboard – free version