View Product Page

Affiliates list

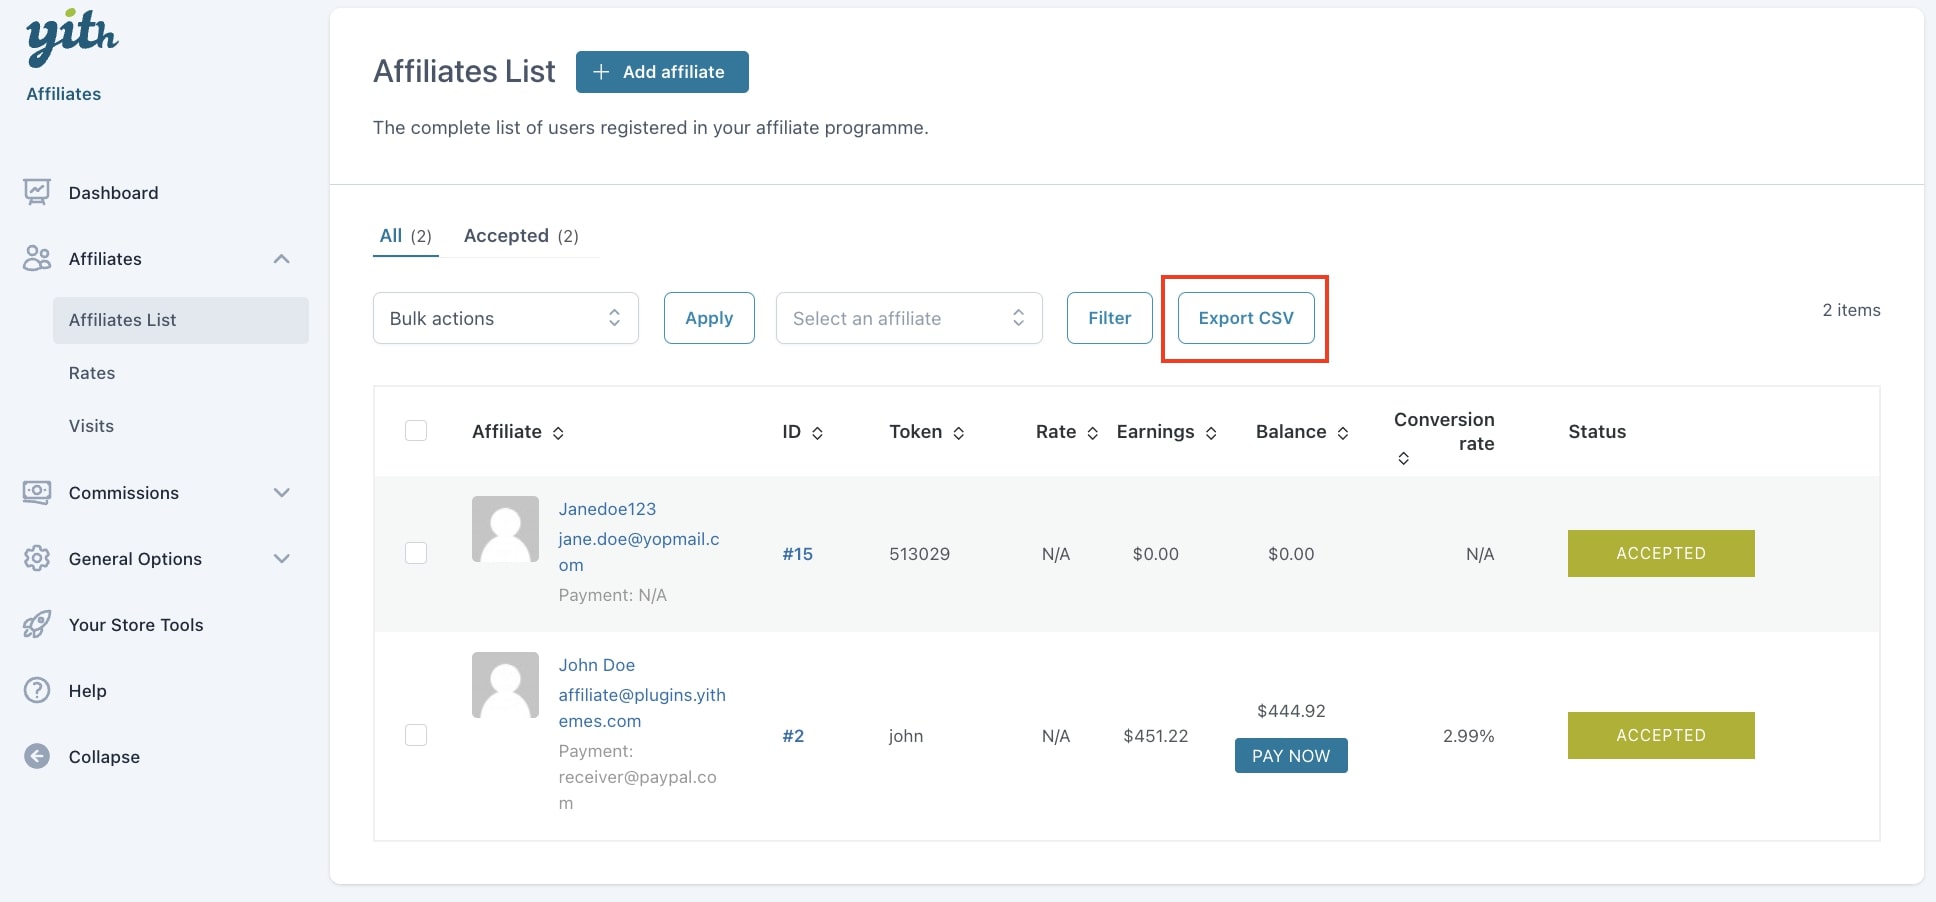
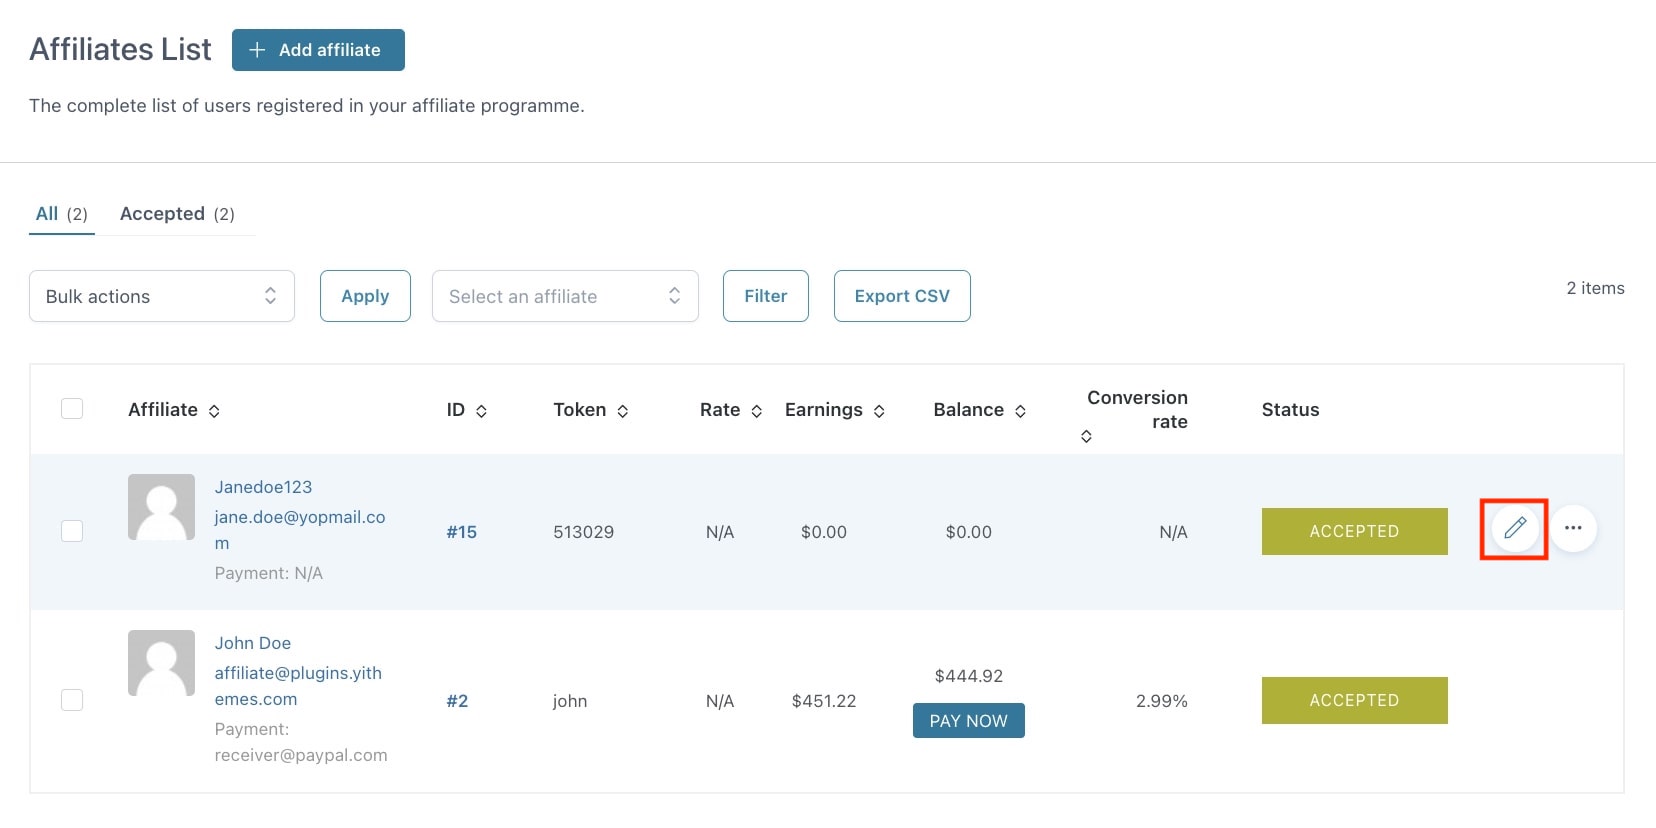
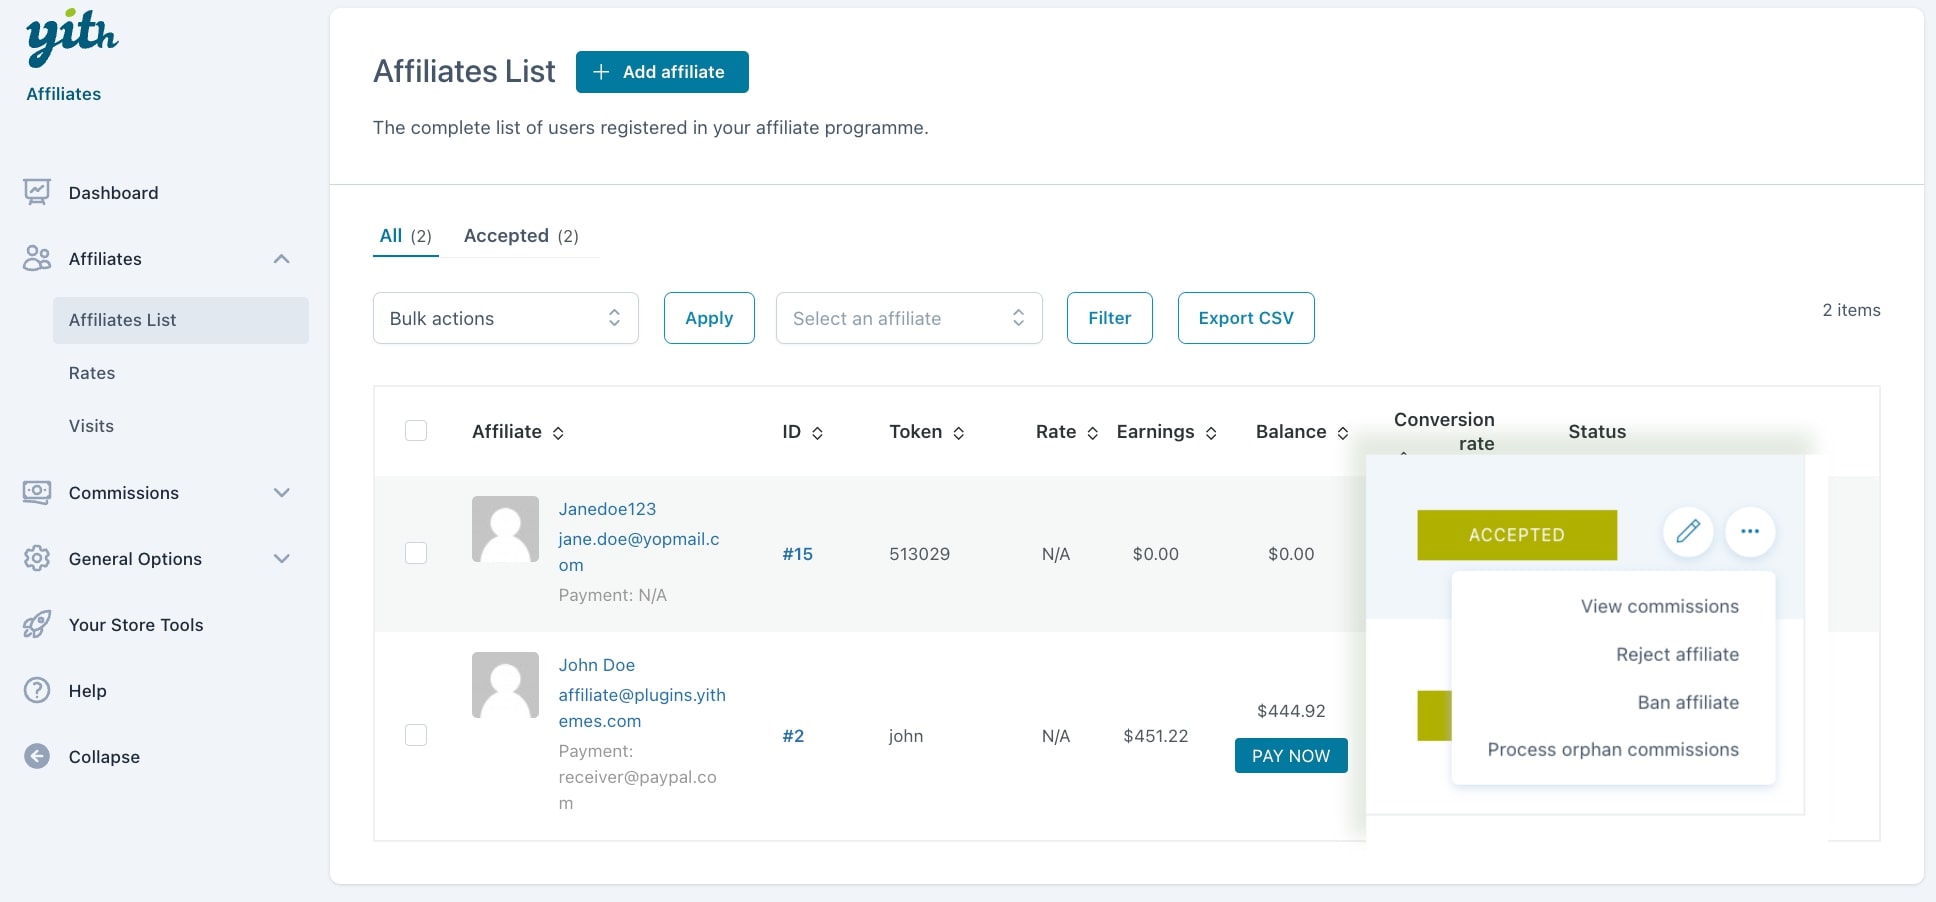
Go to YITH > Affiliates > Affiliates list to check all your registered affiliate users. You will see here everyone who applied as an affiliate and you can also filter this view by affiliate status.

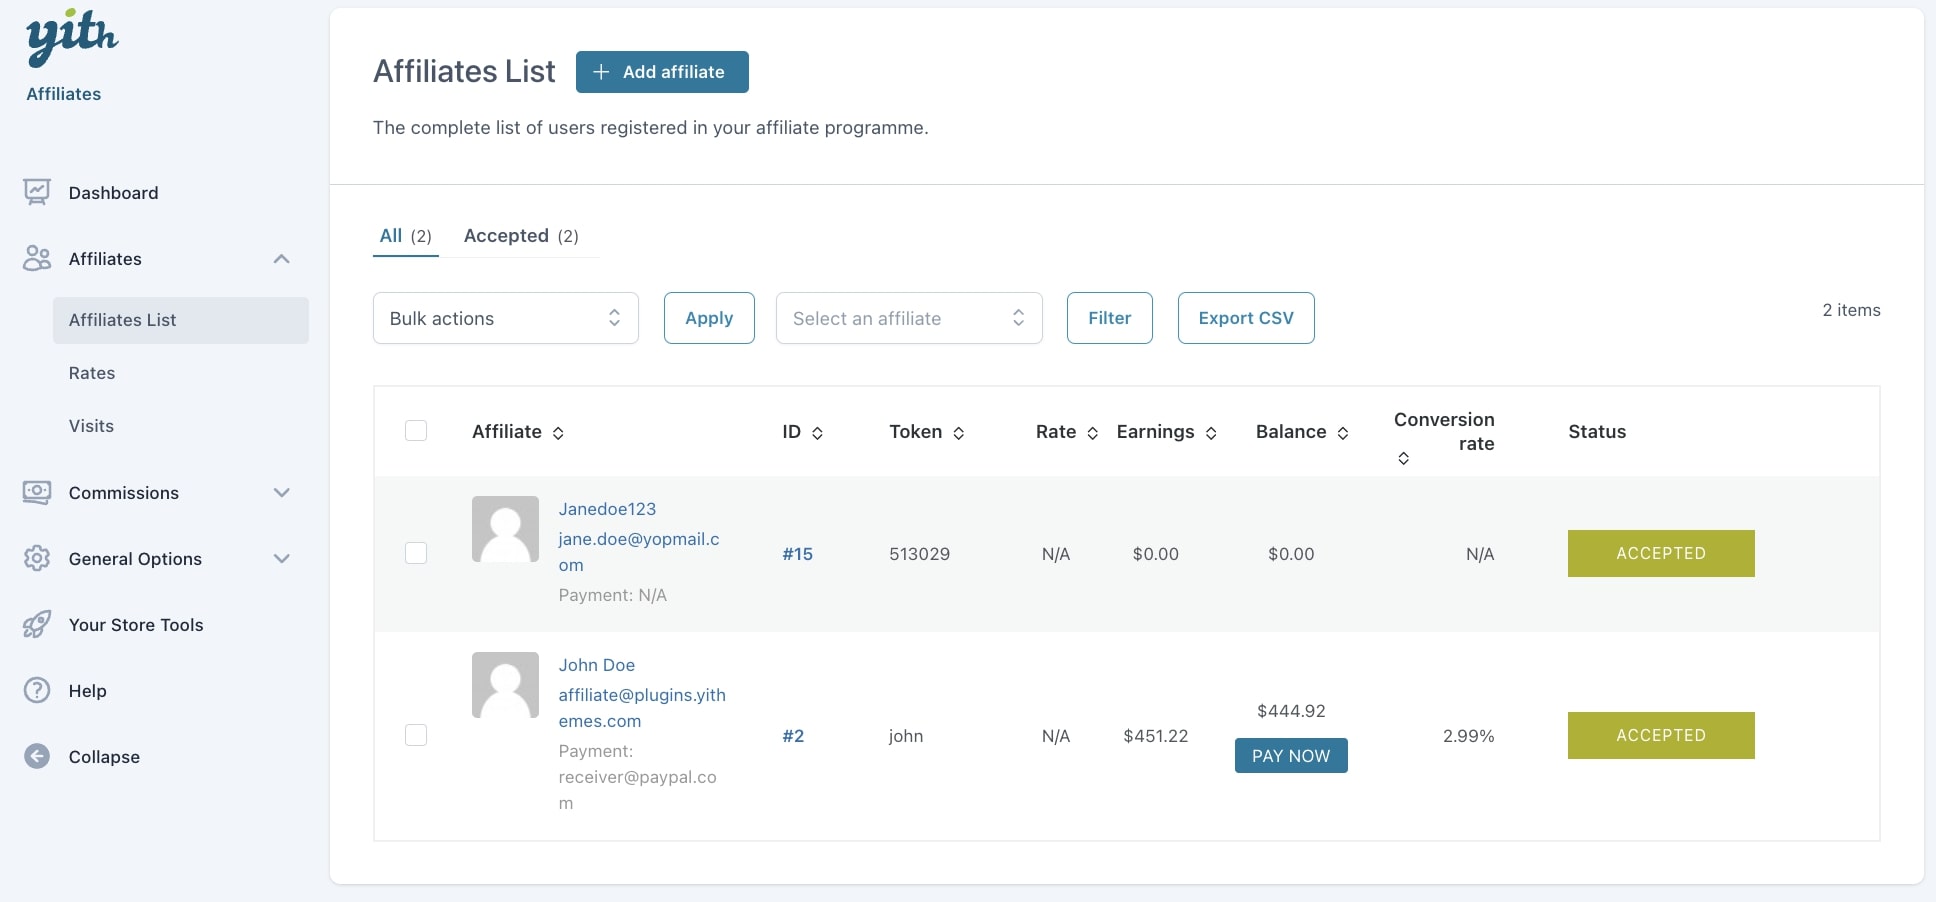
From this screen, you can filter by name, email addres or token ID (minimum 3 characters) to find one specific affiliate.

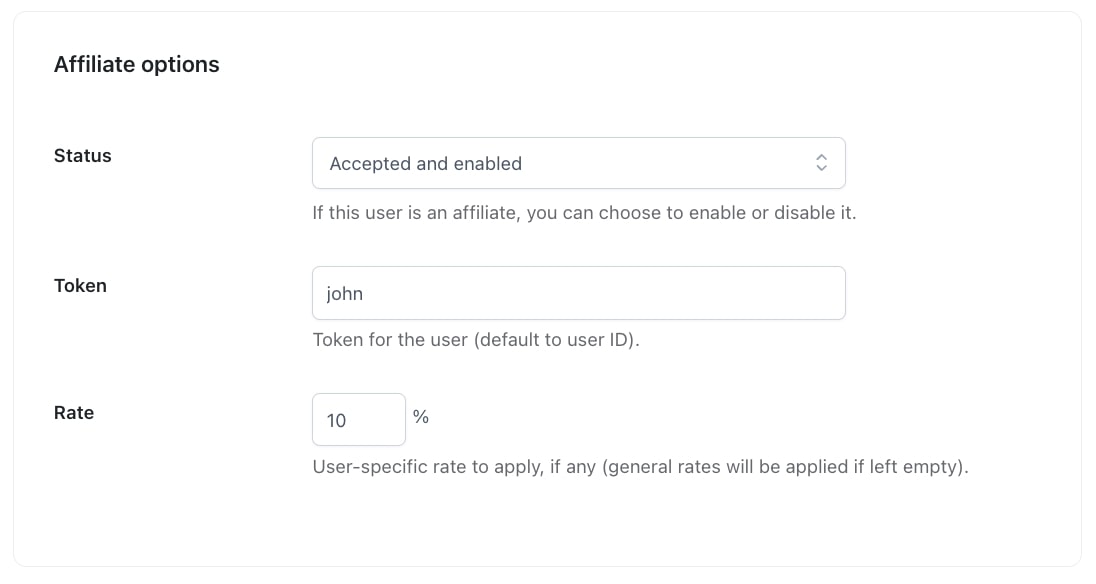
Additionally, you will also be able to change the affiliate status either from the bulk actions or from the actions available for single affiliates:

  • Delete affiliate
  • Change status to approved
  • Change status to rejected
  • Ban affiliate
  • Unban affiliate


When you change the affiliate status to rejected or banned from the affiliate’s actions, you will be able to set a custom message for this specific affiliate from a dedicated popup and explain why the affiliate’s profile is being rejected or banned.
Please, note, this option is only available if you do not set any general message from the Registration options.


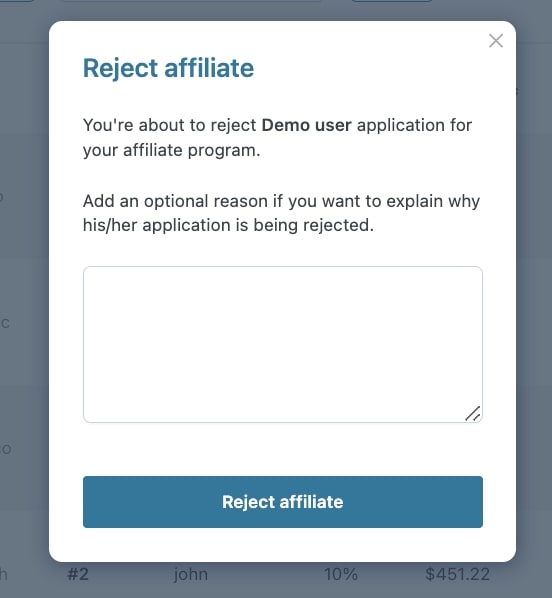
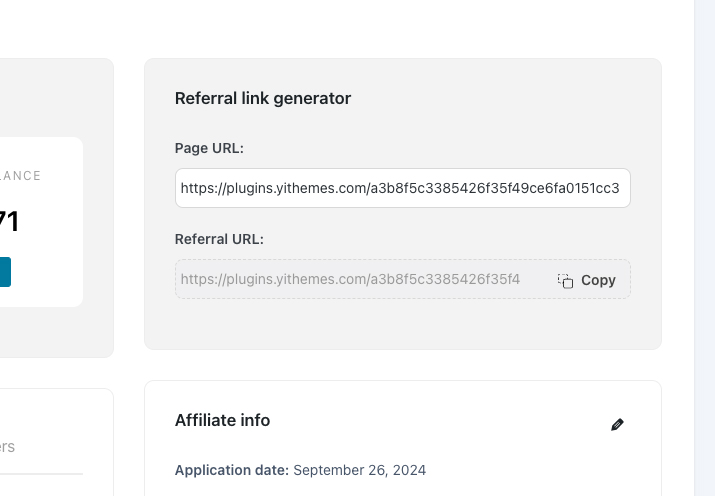
This message can also be set and updated in the Affiliate’s profile.

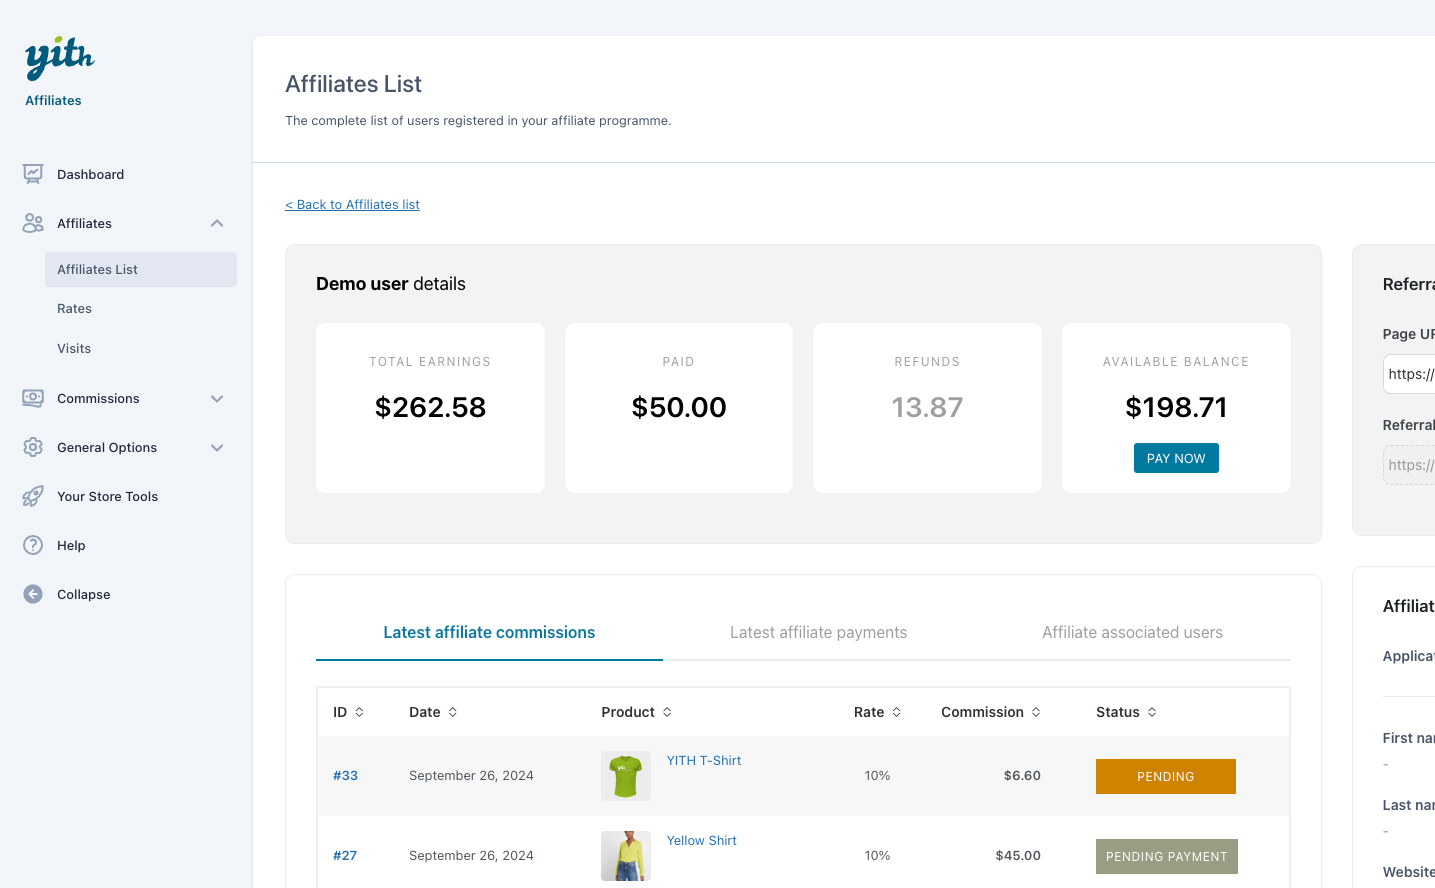
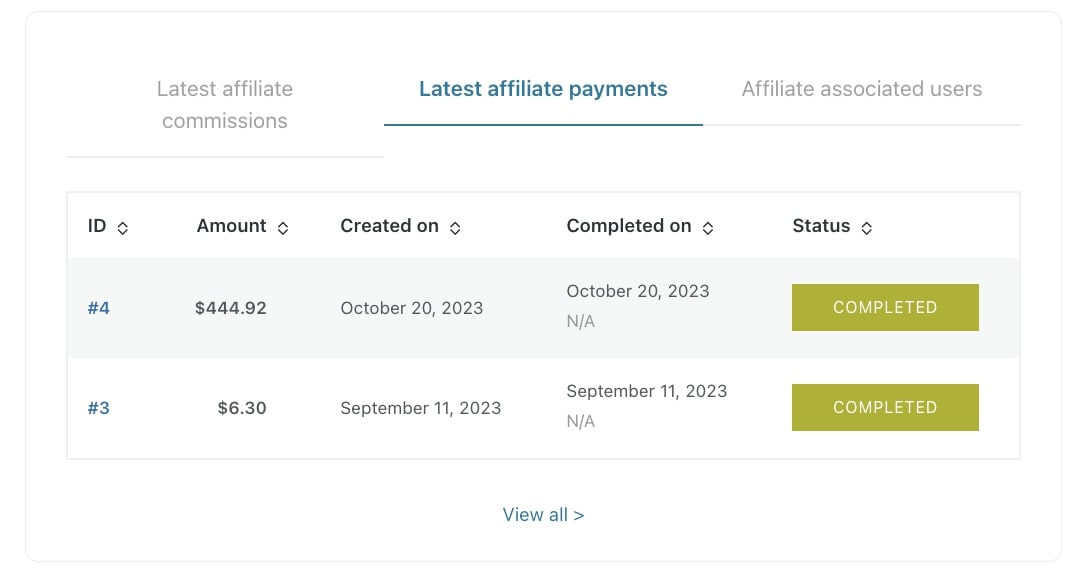
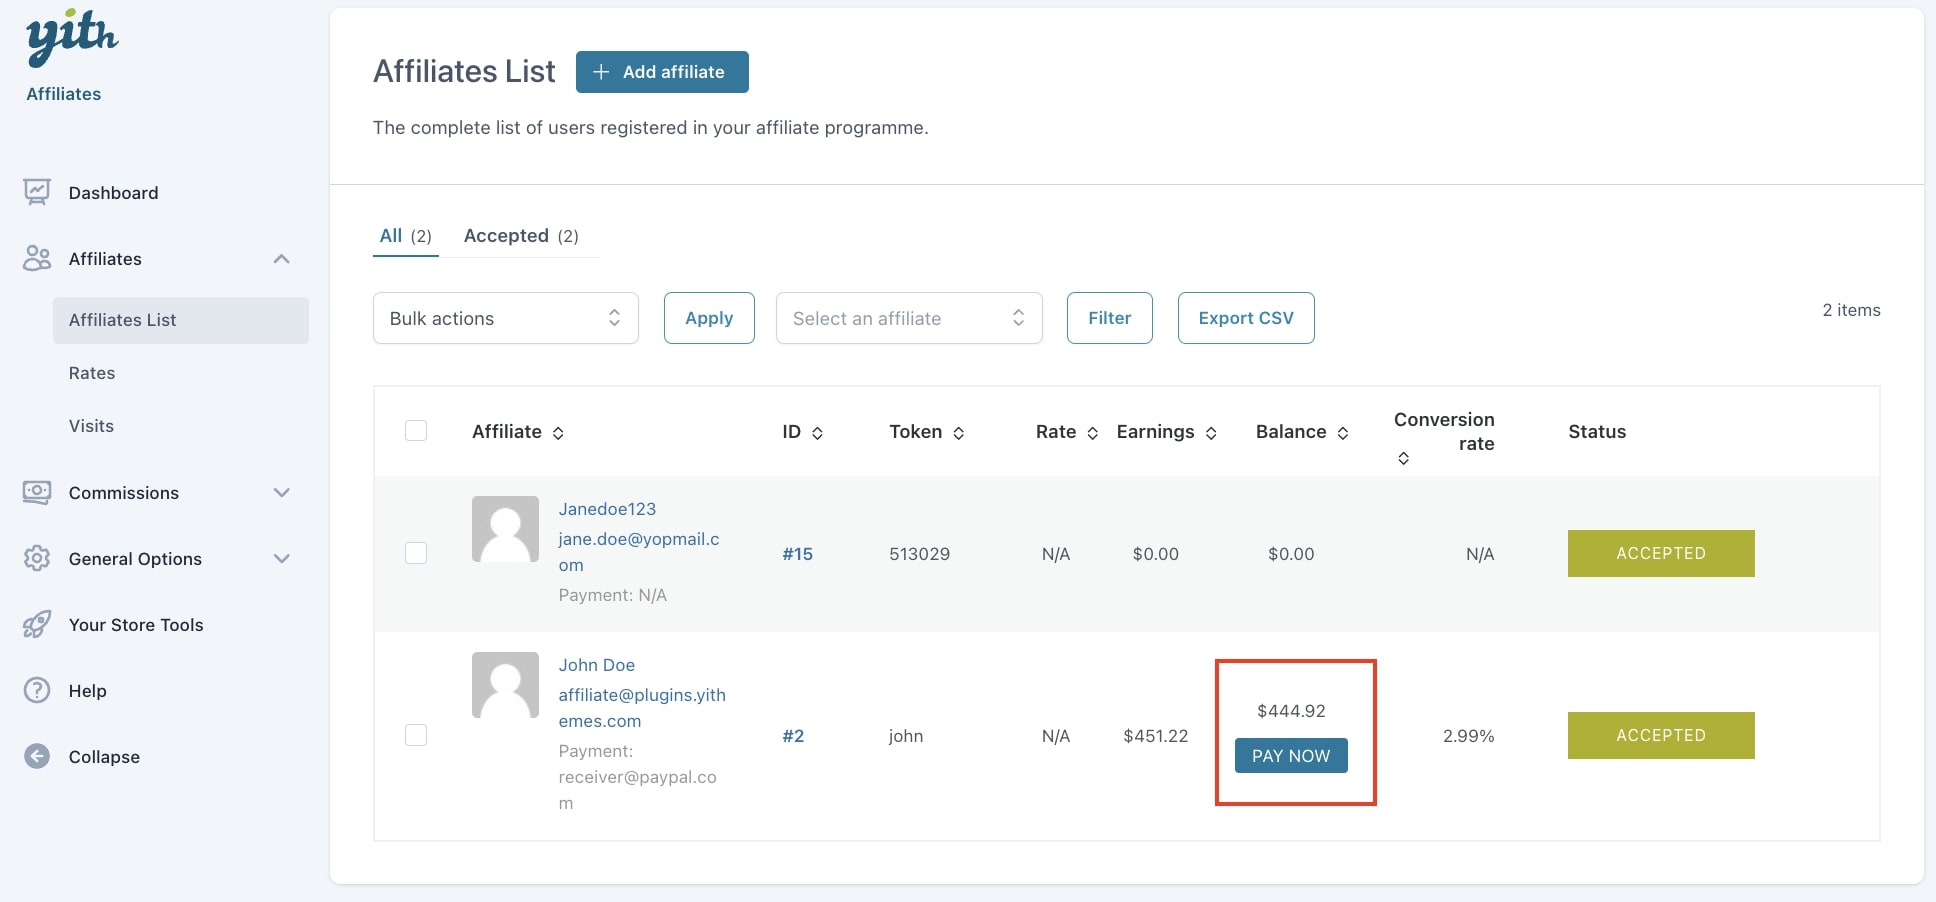
Finally, you can also quickly create a payment record from this screen for the whole balance by clicking on the Pay now button. This payment will be available in the Commissions Payments tab.

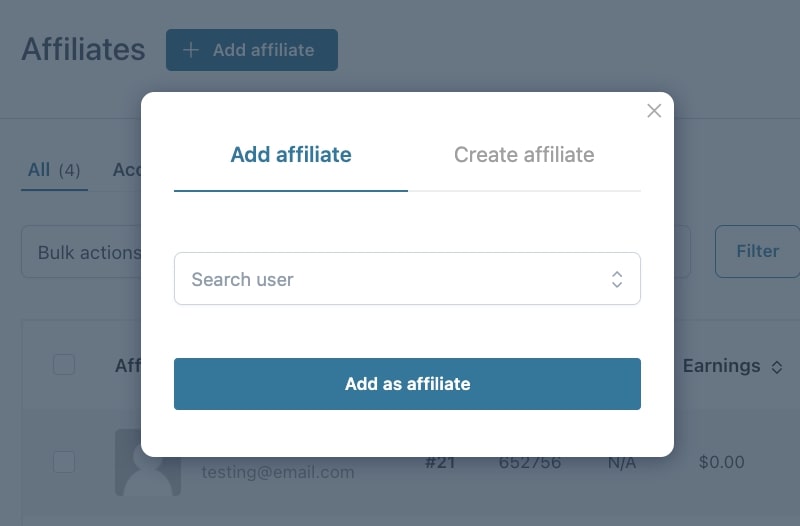
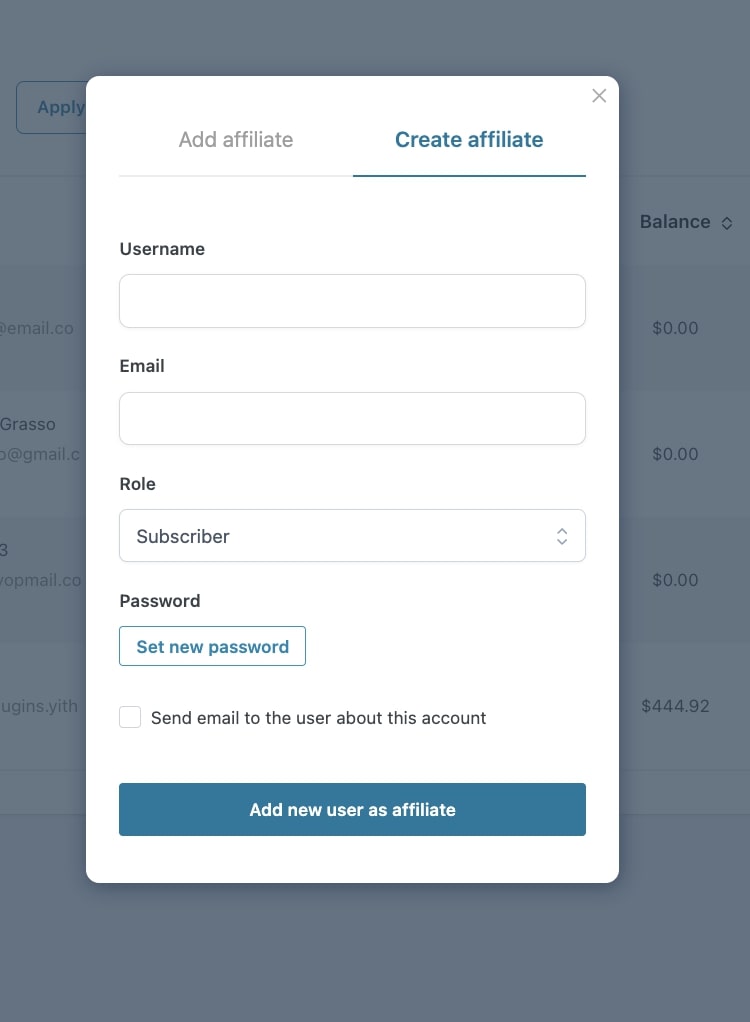
Create a new affiliate

By clicking on the + Add affiliate button, you can create a new affiliate. You will have two options, either select an existing user or create a new user and enable it as an affiliate without leaving the page.

CSV Export

From this page, you can also export a CSV file with all your affiliates or the filtered ones, for example, if you filter by Accepted affiliates only or by one specific affiliate.

Affiliate’s profile

If you want to see and update the details of an affiliate’s profile, go to the Affiliates list page and click on the pencil icon in the affiliate row.

From this page, you will be able to see a comprehensive summary of your affiliate’s activity.

Affiliate’s details


Here you can see:

  • total earnings: this is the total earnings of the affiliate and it includes both paid commissions and the active balance (not paid commissions)
  • total paid: this is the total of commissions paid so far
  • refunds: this is the total of refunded commissions, that is commissions generated from orders that have been refunded (please, note, paid and pending payment commissions cannot be refunded).
  • active balance: this is the total earnings that are still to be paid. You can quickly create a payment record from this page by clicking on the “Pay now” button.

Referral link generator


This is a compact version of the link generator that the affiliate sees on the affiliate dashboard on the frontend. The admin can generate the affiliate referral link in just one click.

Latest commissions, payments, associated users

In this section, you will find three tabs:

1. the latest 5 commissions generated by the affiliate and their current status


2. the latest 5 payment records and their status


3. the associated users: these are the users whose purchases will always generate commissions for this affiliate. These users are associated if the permanent commissions option is enabled. For more details, please, refer to this page.

Affiliate options


From this section, you can change the status of your affiliate between:

  • New request: this is when the affiliate submits an application, so, no options are available yet, no commissions are generated and so on.
  • Accepted and enabled: the affiliate will be able to see the dashboard and fully take advantage of the affiliate program
  • Rejected: this is the status of an affiliate whose application has been rejected. No way to use the affiliate program.
  • Banned: this is the status of an affiliate who is no longer allowed to use the affiliate program and will not be able to submit an application again. Some of the sections of the affiliate dashboard can be hidden from Affiliate registration > Registration options.

Also, you can see and update the affiliate token, which is by default the user ID. It supports also alphanumeric characters, so, for example, you can replace this ID with meaningful text, like a name. This is the affiliate ID that the user will see in the Affiliate Dashboard > Link Generator tab.


Finally, you can also update the affiliate rate and override the general rate. Leave it empty, if you want to use the default rate. If you want to update the affiliate rate, we highly recommend creating a rule from the Affiliates > Rates page, so you can combine more rules and easily understand how they are prioritized.

Affiliate info

Here you can edit the affiliate’s info that includes both the information added through the affiliate registration form and the payment info for each available gateway activated. This info can also be edited by the affiliate from the Settings tab in the Affiliate dashboard on the frontend and in the affiliate’s info in the payment details.

Rates

From this page, you can create some rules that will override the general affiliate rate (that you set up in the Commissions & Payments options tab), and so create very specific rates based on the selected product, role or user.


Thanks to the rules, you will be able to create custom percentage rates based on specific conditions:

  • User: you can set custom rates for one or more affiliate users
  • Product: you can set custom rates for one or more products, variations included
  • Product category: you can set custom rates for one or more product categories
  • User role: you can set custom rates for one or more user roles
  • User/product: you can set custom rules for a combination of product and affiliate user, so for example, apply a 50% rate only for affiliate “Susanne” when somebody buys “Luxury watch” product through her affiliate link. Product variations are supported too.

Priority

As you can see, the rules are of different types and based on this, the priority of the rules will be set. The rule priority order is the following (sorted from highest to lowest priority):

  1. User/product variation
  2. User/product
  3. Product variation
  4. Product
  5. Product category
  6. User
  7. User role

Example: a product rule will always have priority over a category rule, but a product rule set on a variation will have priority over a rule on the parent product.

Please, note:
excluded products and affiliates (from the General options tab): these will never be considered in the priority rule calculation and will win over any other rule.
Also note that you can override the affiliate’s rate from the affiliate’s profile, but this will not create a visible rule on this page. Make sure you keep that in mind when setting your affiliate’s rates both from the affiliate profile and from this page. All other product rules will win also on affiliate rates set in the affiliate’s profile.

Manual order among rules of the same type.

You can also set a custom priority value in the rule settings or leave it empty and automatically sort it by dragging and dropping from the rules list, which will update this number.
Yet, please, be aware that with this value you can only define the priority among the rules of the same type.

Example. You have the following rules:

  • priority 1 – 15% on Luxury watch (product rule)
  • priority 2 – 30% on Luxury watch for affiliate Susanne (user/product rule)

If someone purchases the Luxury watch through affiliate Susanne’s referral link, Susanne will get a 30% commission, regardless of any priority value that you set, because it’s two different rule types and user/product rules have always higher priority than product rules. Other affiliates will get a 15% instead.


Yet, if you have:

  • priority 1 – 15% on Luxury watch (product rule)
  • priority 2 – 30% on Luxury watch and Silver earrings (product rule)

In this case, it’s two rules of the same type, so if the Luxury watch is purchased, a 15% will apply because it has a higher priority value set (1).

Visits

On this page, you find the list of all visits made through an affiliate link. You find here:

  • the date
  • the referrer (the name and email of the affiliate to whom the visit is associated)
  • the order ID and user who submitted the order (if any)
  • the followed URL: this is the referral URL to the website
  • the origin URL: this is the origin URL where the referral URL was embedded, for example, it can be a blog post where the affiliate promotes your site and has added his/her referral link;
  • conversion time
  • if the visit was converted into a sale or not.


You can filter the visits by the affiliate user and per date.

Also, from this page you can also bulk delete the visits from the Bulk actions.

The affiliate user will be able to see a similar table with all the visits generated by him/her on the Affiliate dashboard on the frontend.