View Product Page

General settings

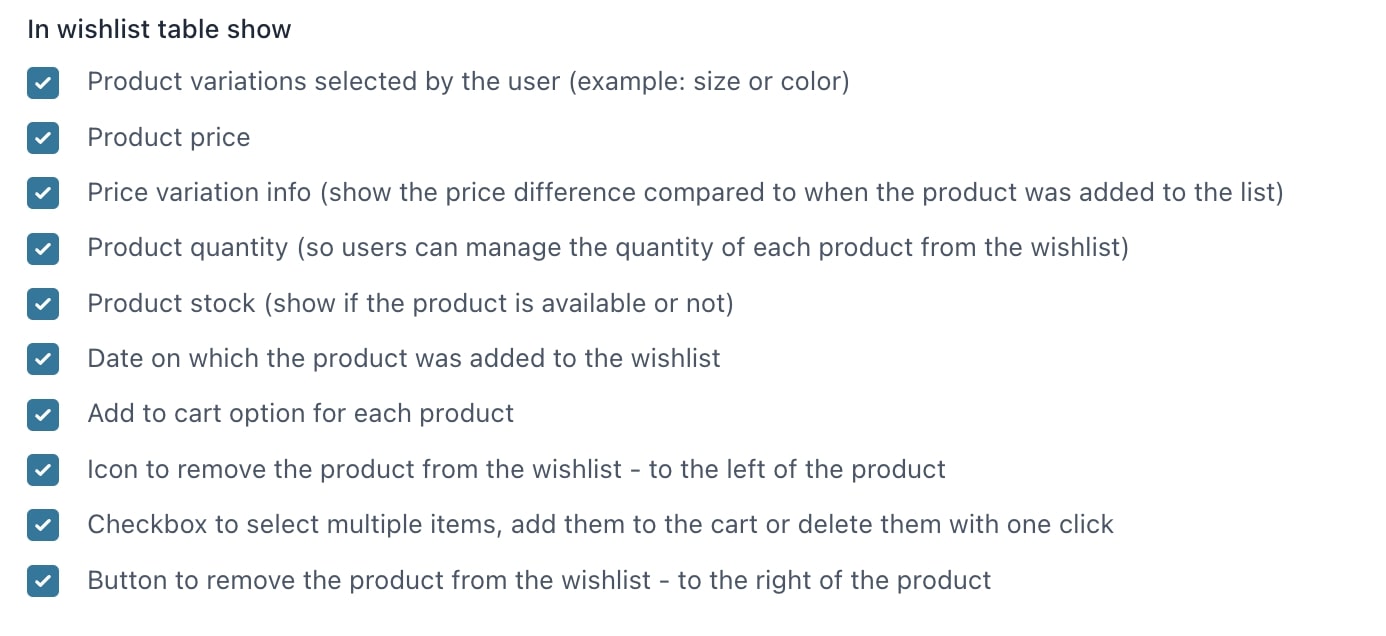
From the General tab within Settings you can configure the general options of the plugin, which include the Multi-wishlist settings too.

General settings
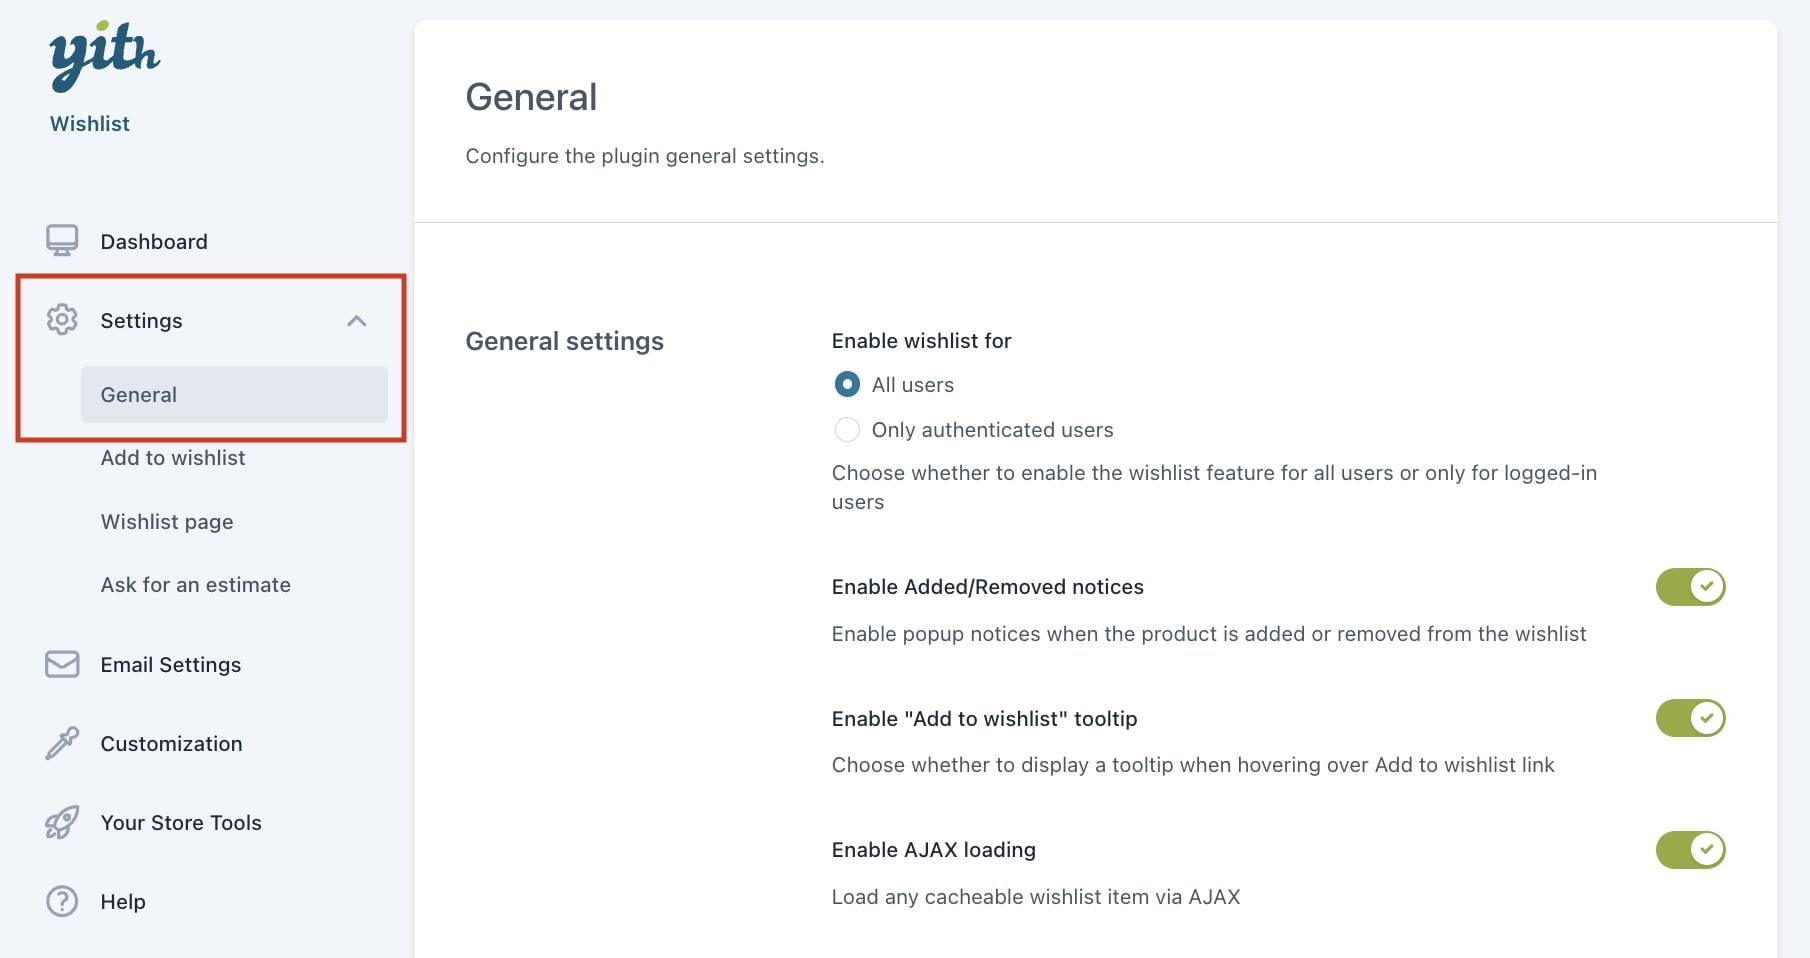
  • Enable wishlist for: choose to enable the plugin features for all users or only for registered ones. If you enable it only for authenticated users. As soon as they try to add a product to the wishlist or display the Wishlist page, they will be redirected to the “My Account” page and a message will be shown that invites them to register.

You can edit the login message for unauthenticated users from Customization > Labels > Multi-wishlist (click on this page to read more about it).

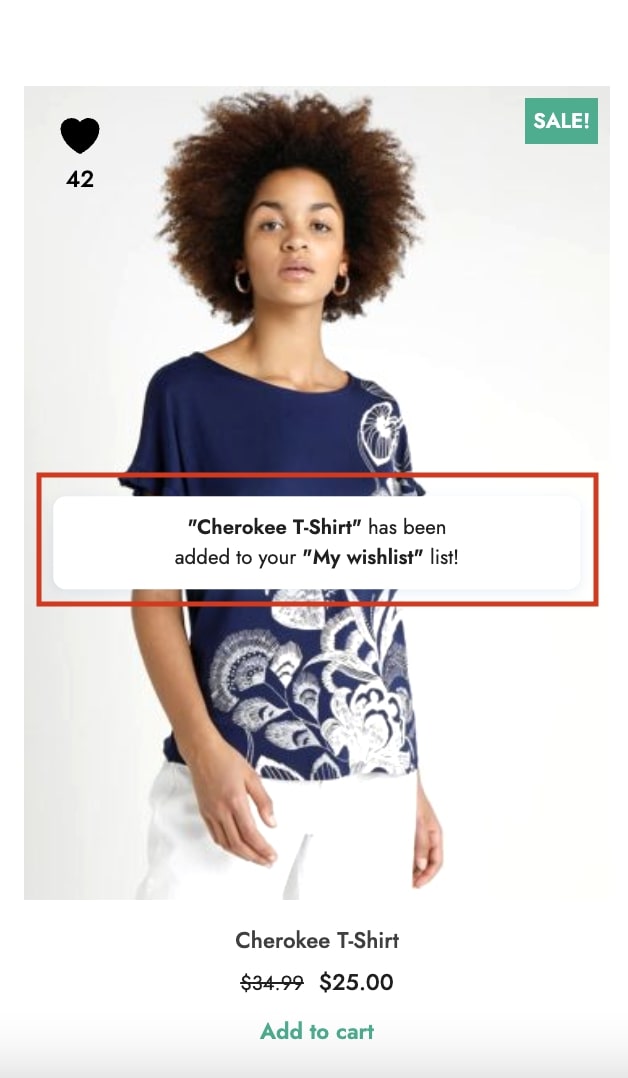
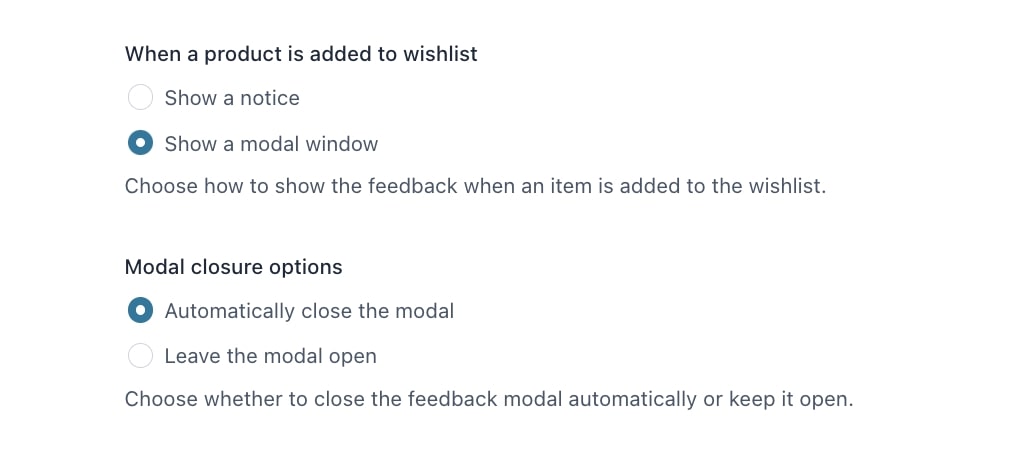
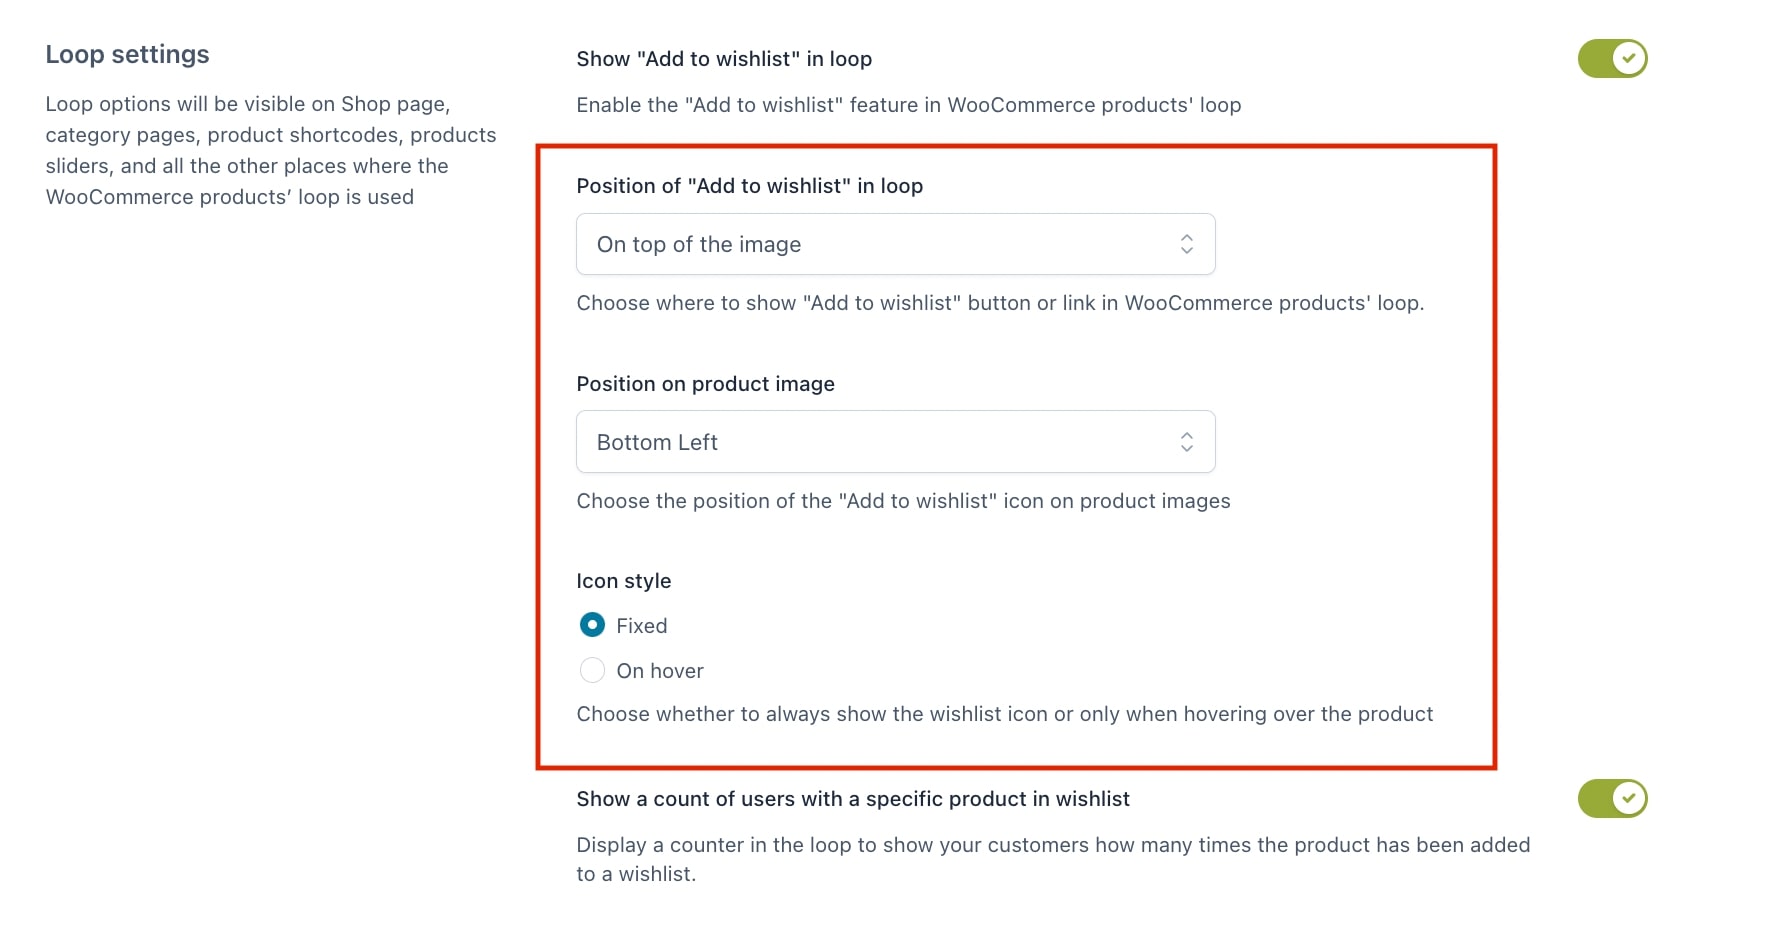
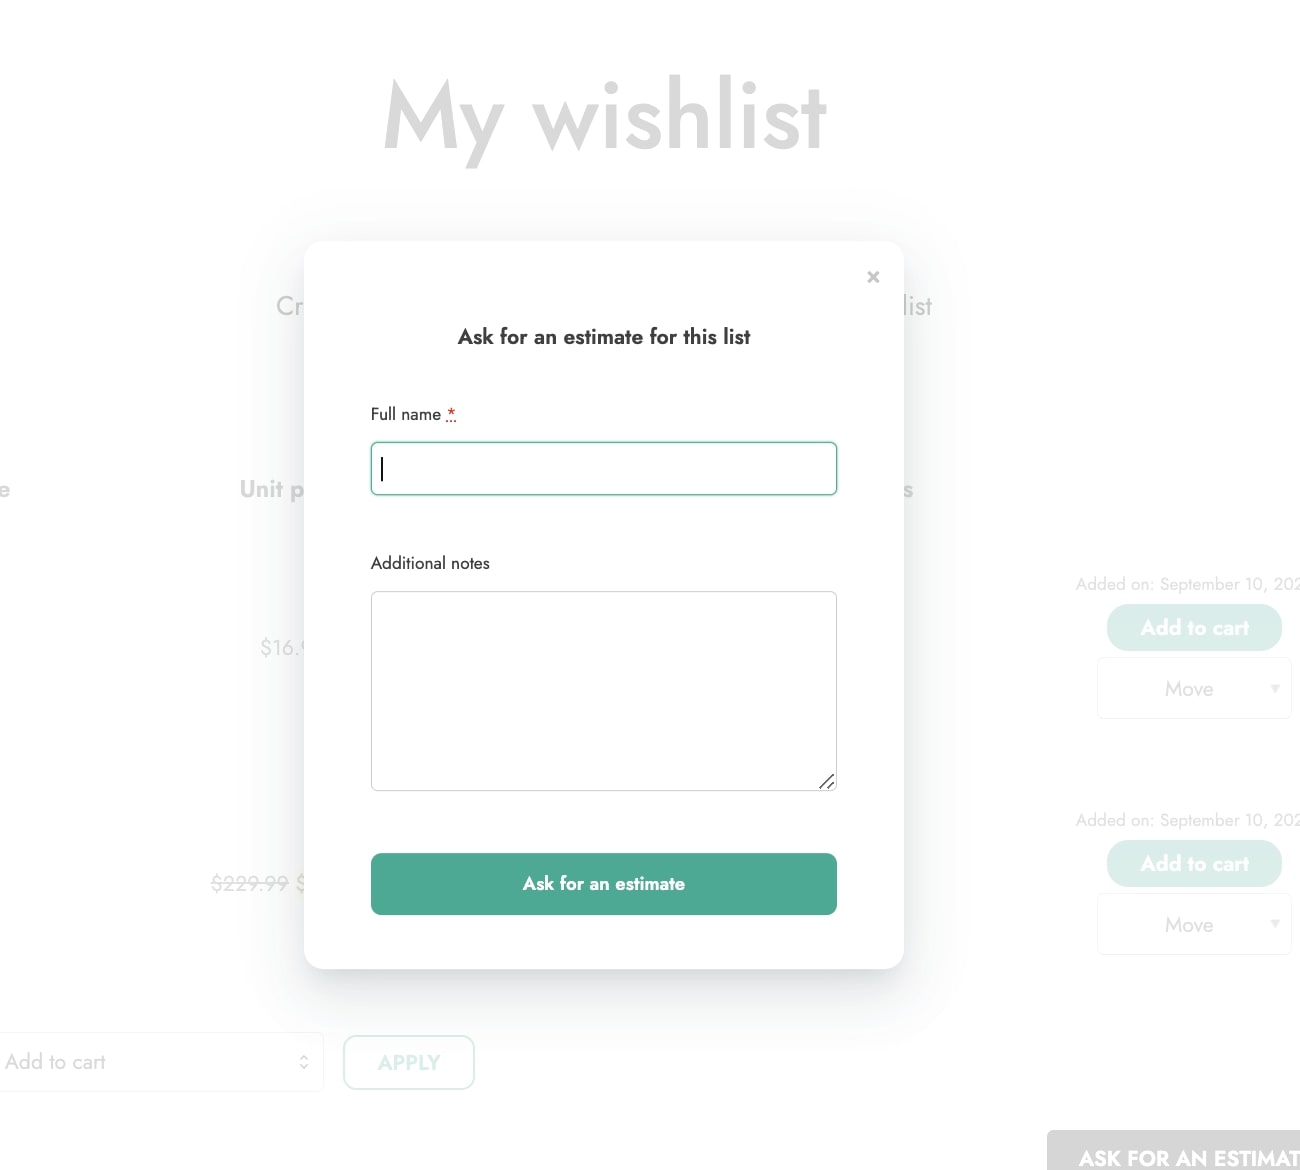
  • Enable Added/Removed notices: when activated, popup notices will show when a product has been added or removed from the wishlist.
Removed item from wishlist popup
Removed item popup example
  • Enable “Add to wishlist” tooltip: this allows showing a tooltip when hovering over Add to wishlist link. You can refer to the Customization settings in this page to check how to edit the text and colors for this option.
Tooltip example
Tooltip example
  • Enable AJAX loading: when activated, all wishlist elements will load via ajax, so as to avoid any issues caused by caching systems.

Multi-wishlist settings

Multi-wishlist settings

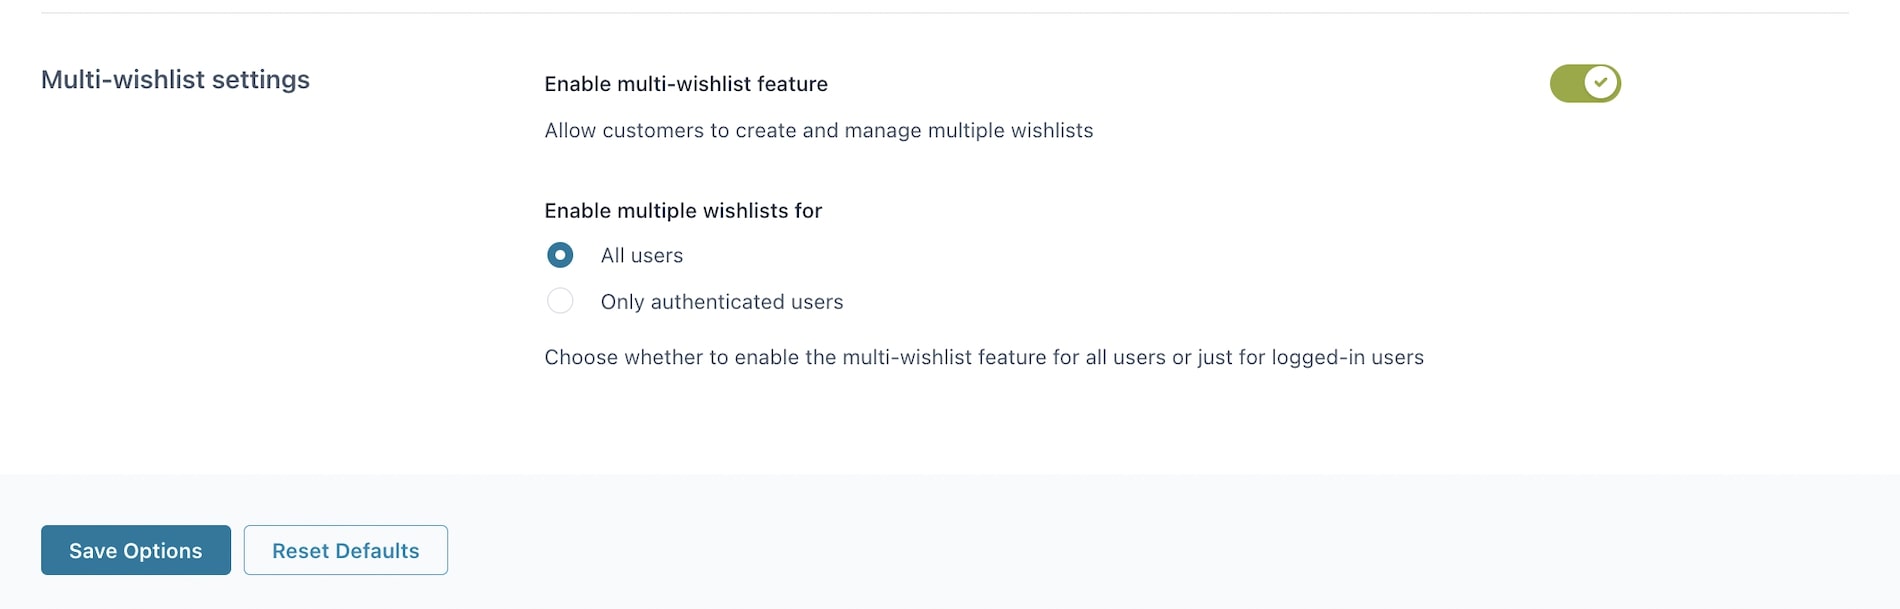
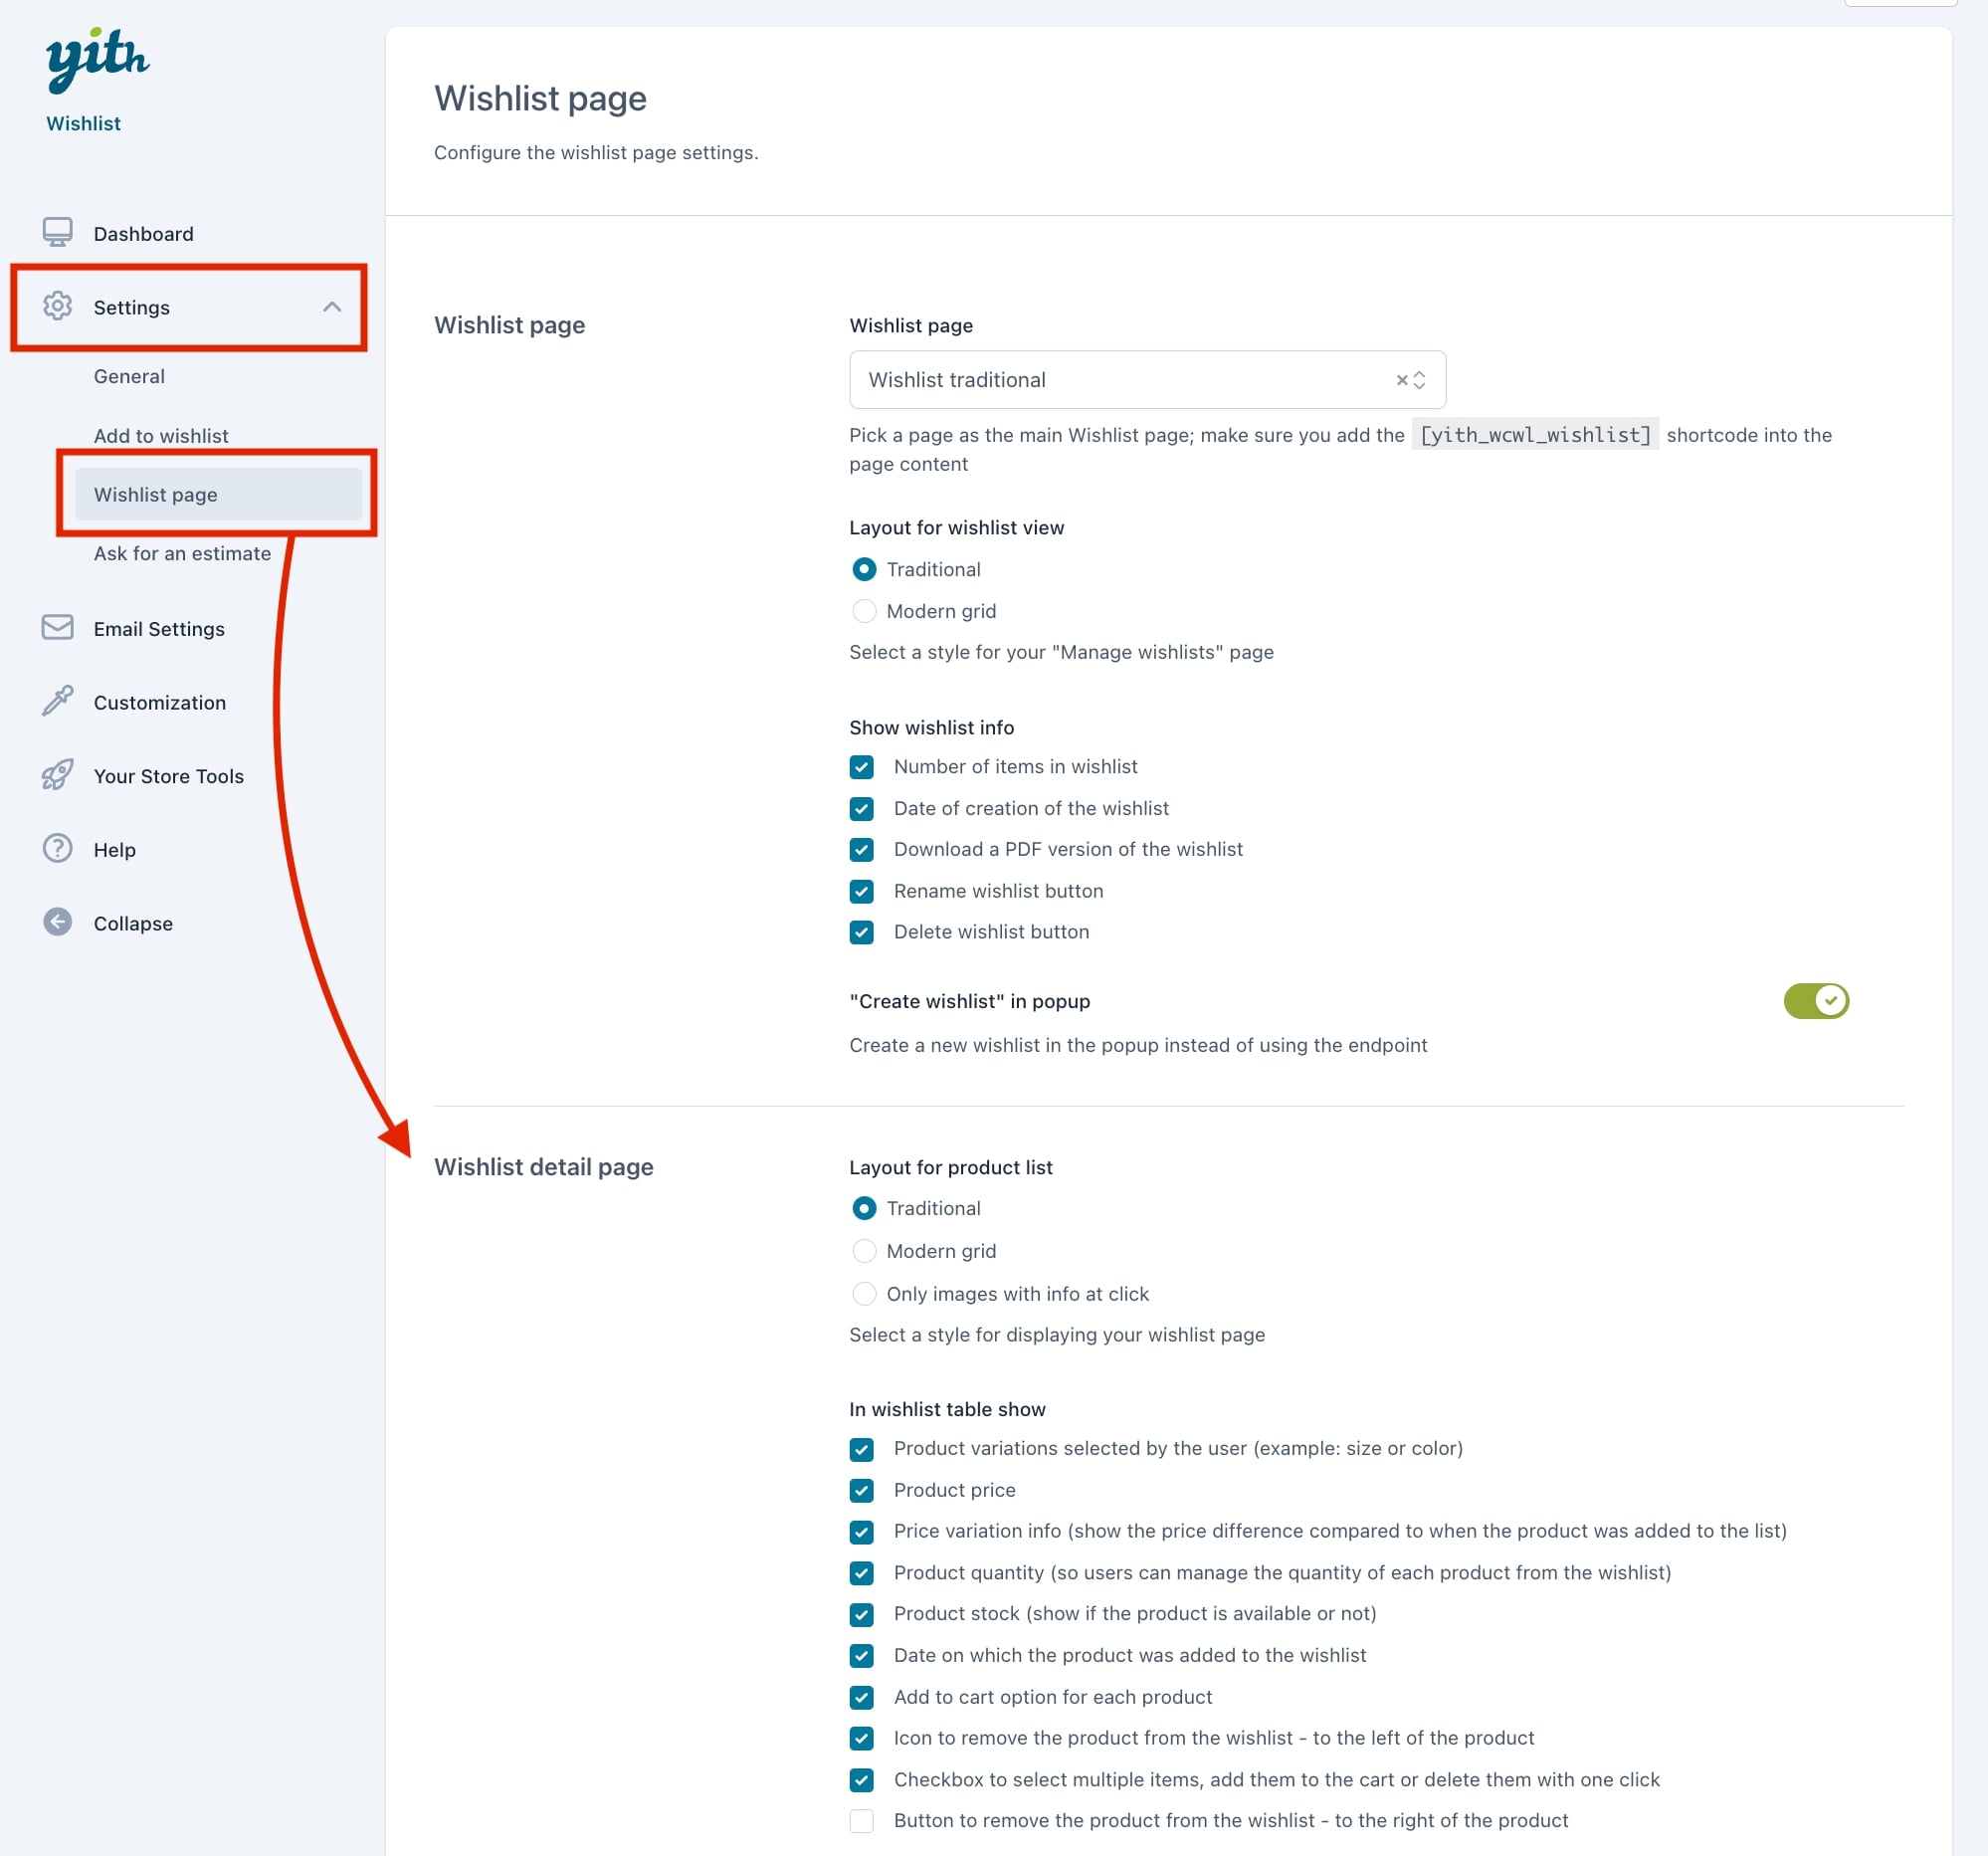
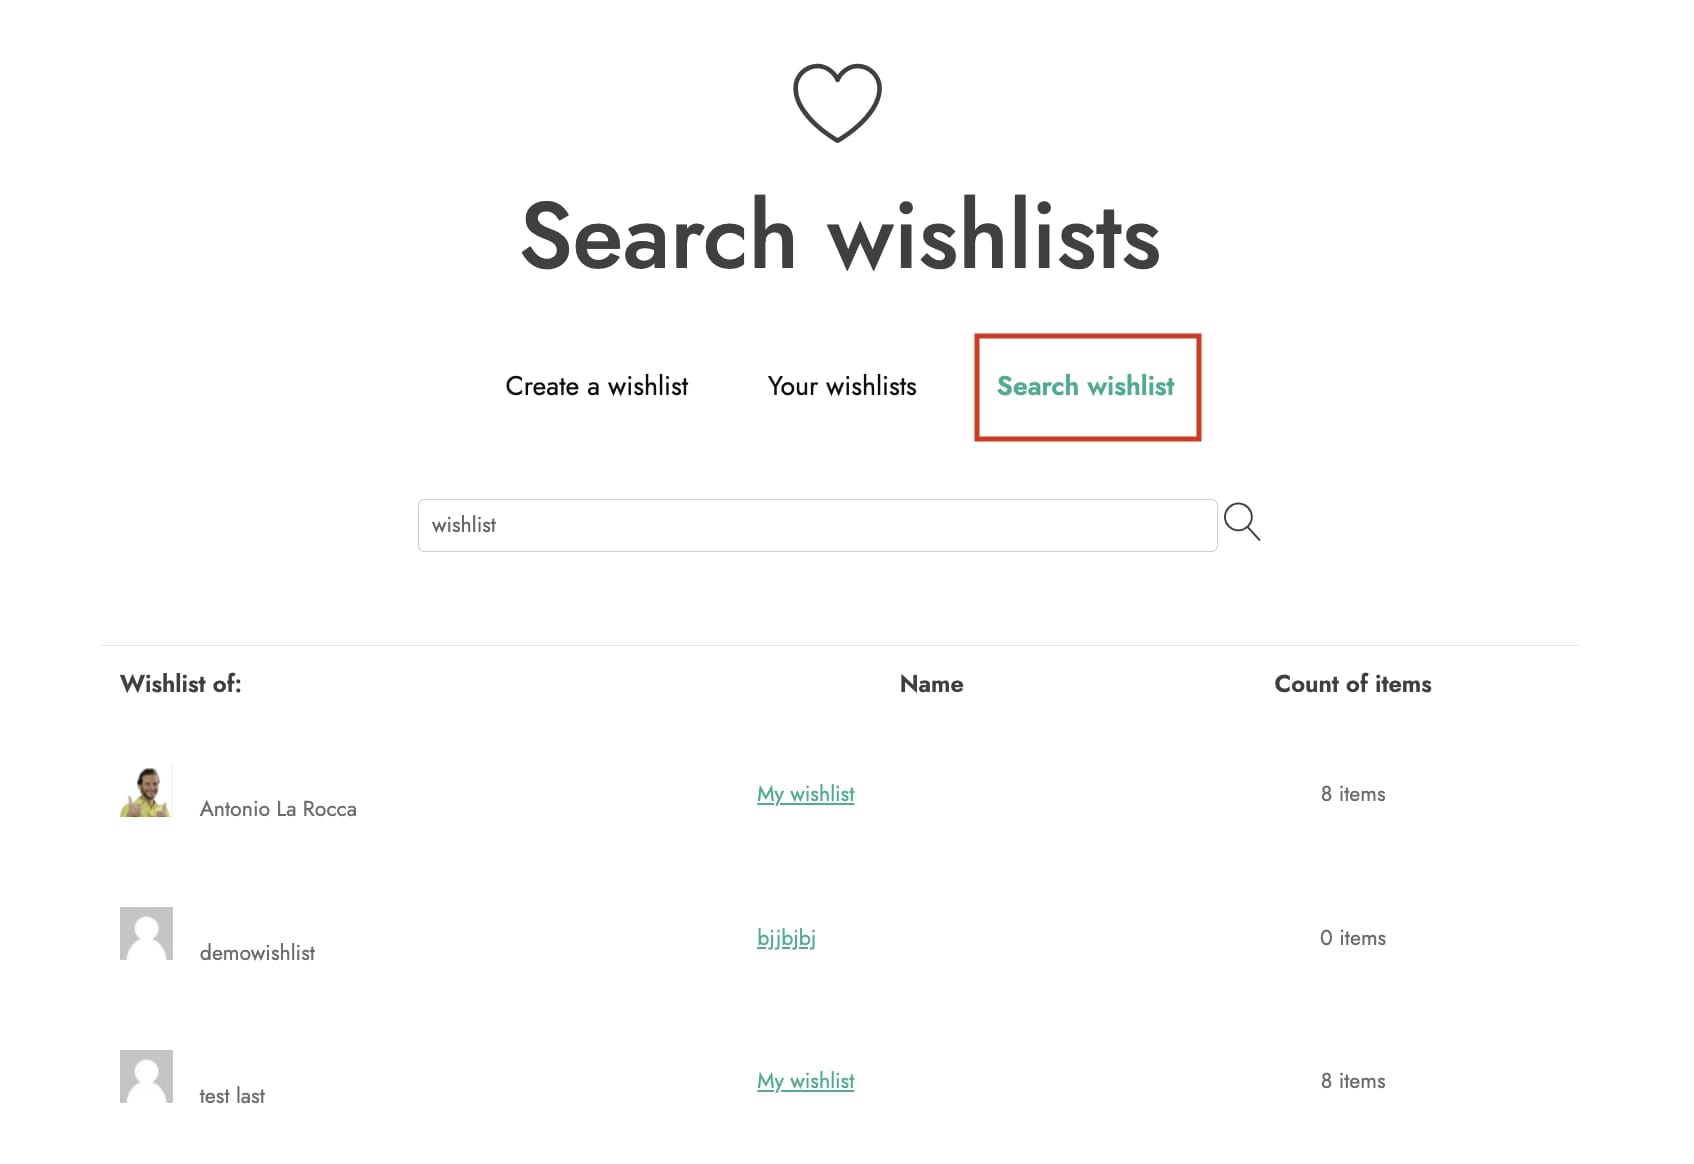
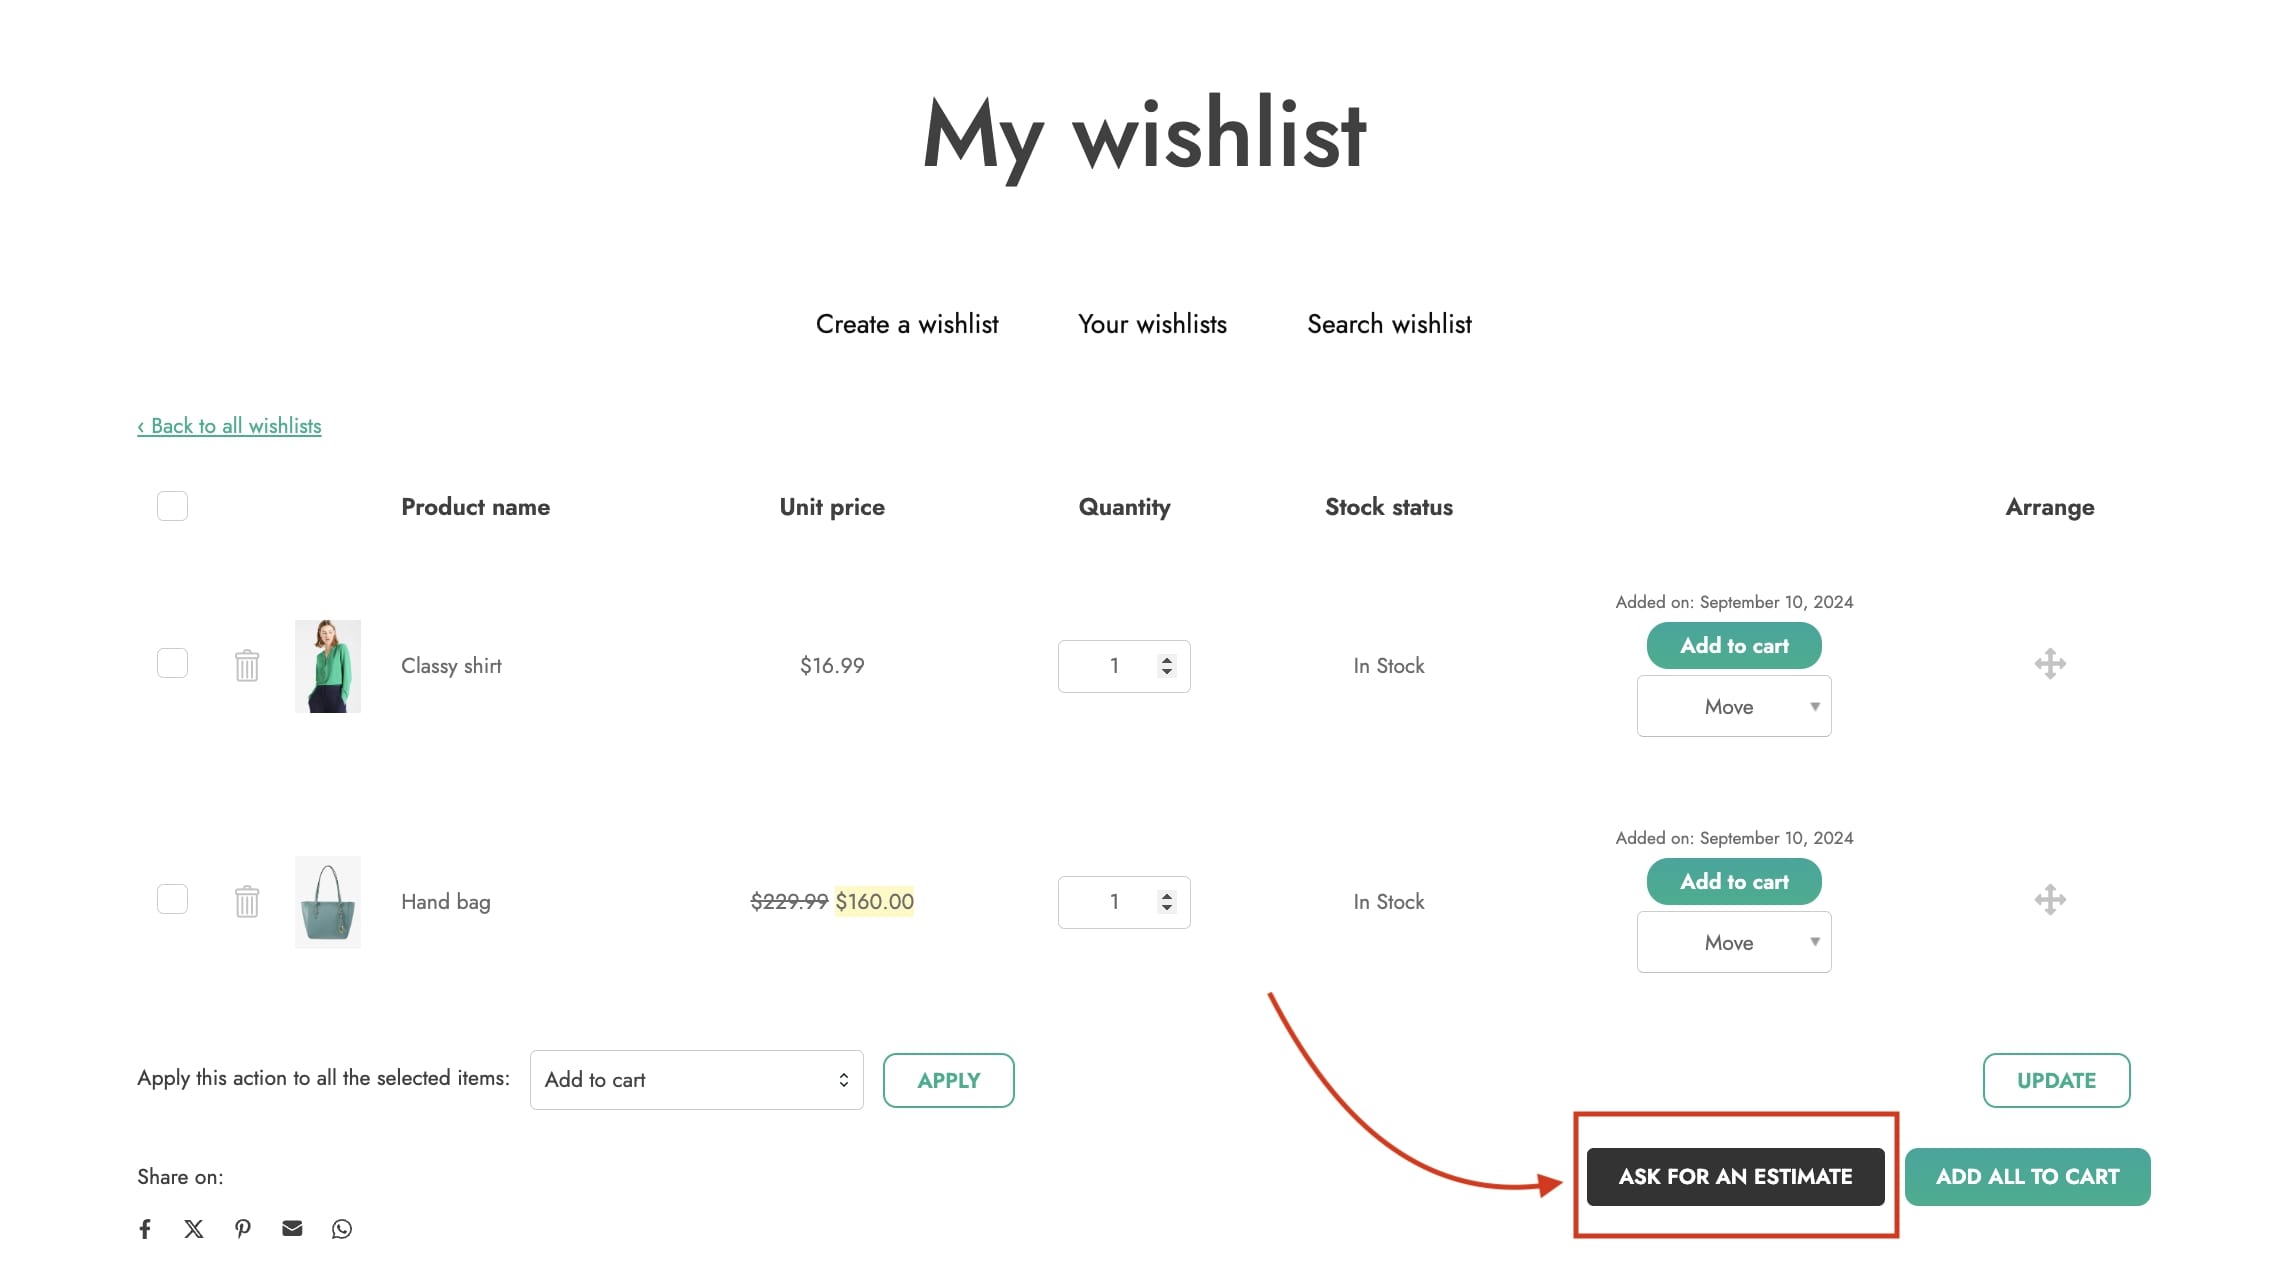
Enable the Multi-wishlist feature if you would like to allows users to create different wishlist so they can better organize their products. Once activated, you choose to enable multiple wishlist for all users or only authenticated users.

If you have previously selected in General settings the Enable wishlist for > Only authenticated users, the same will apply to the multi-wishlist feature and the option Enable multiple wishlists for will be automatically disabled.

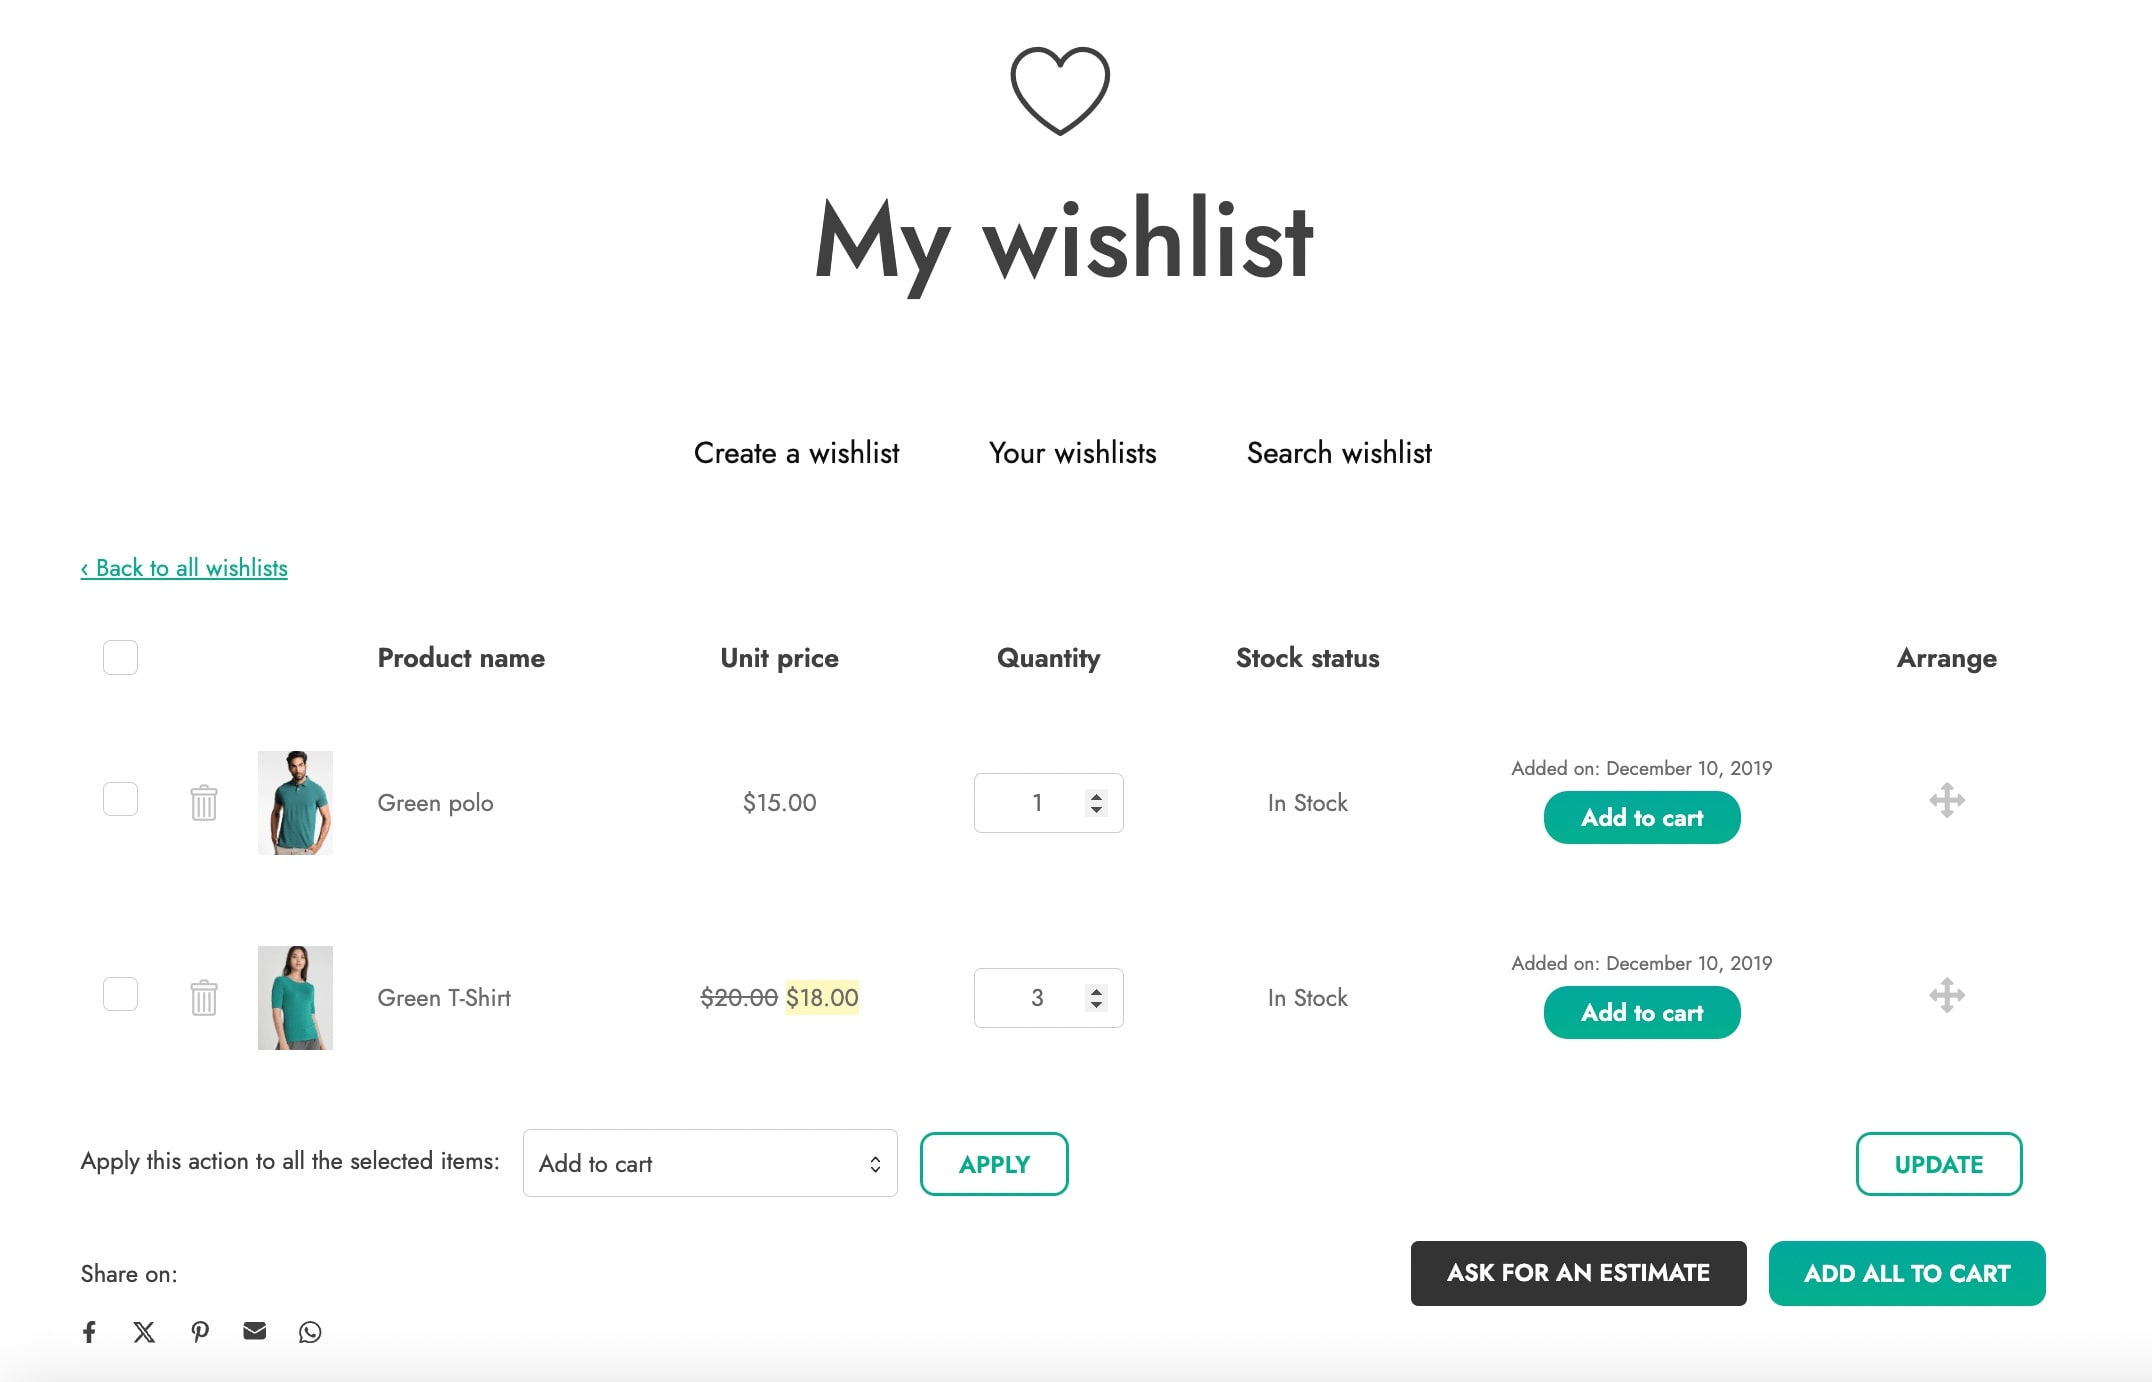
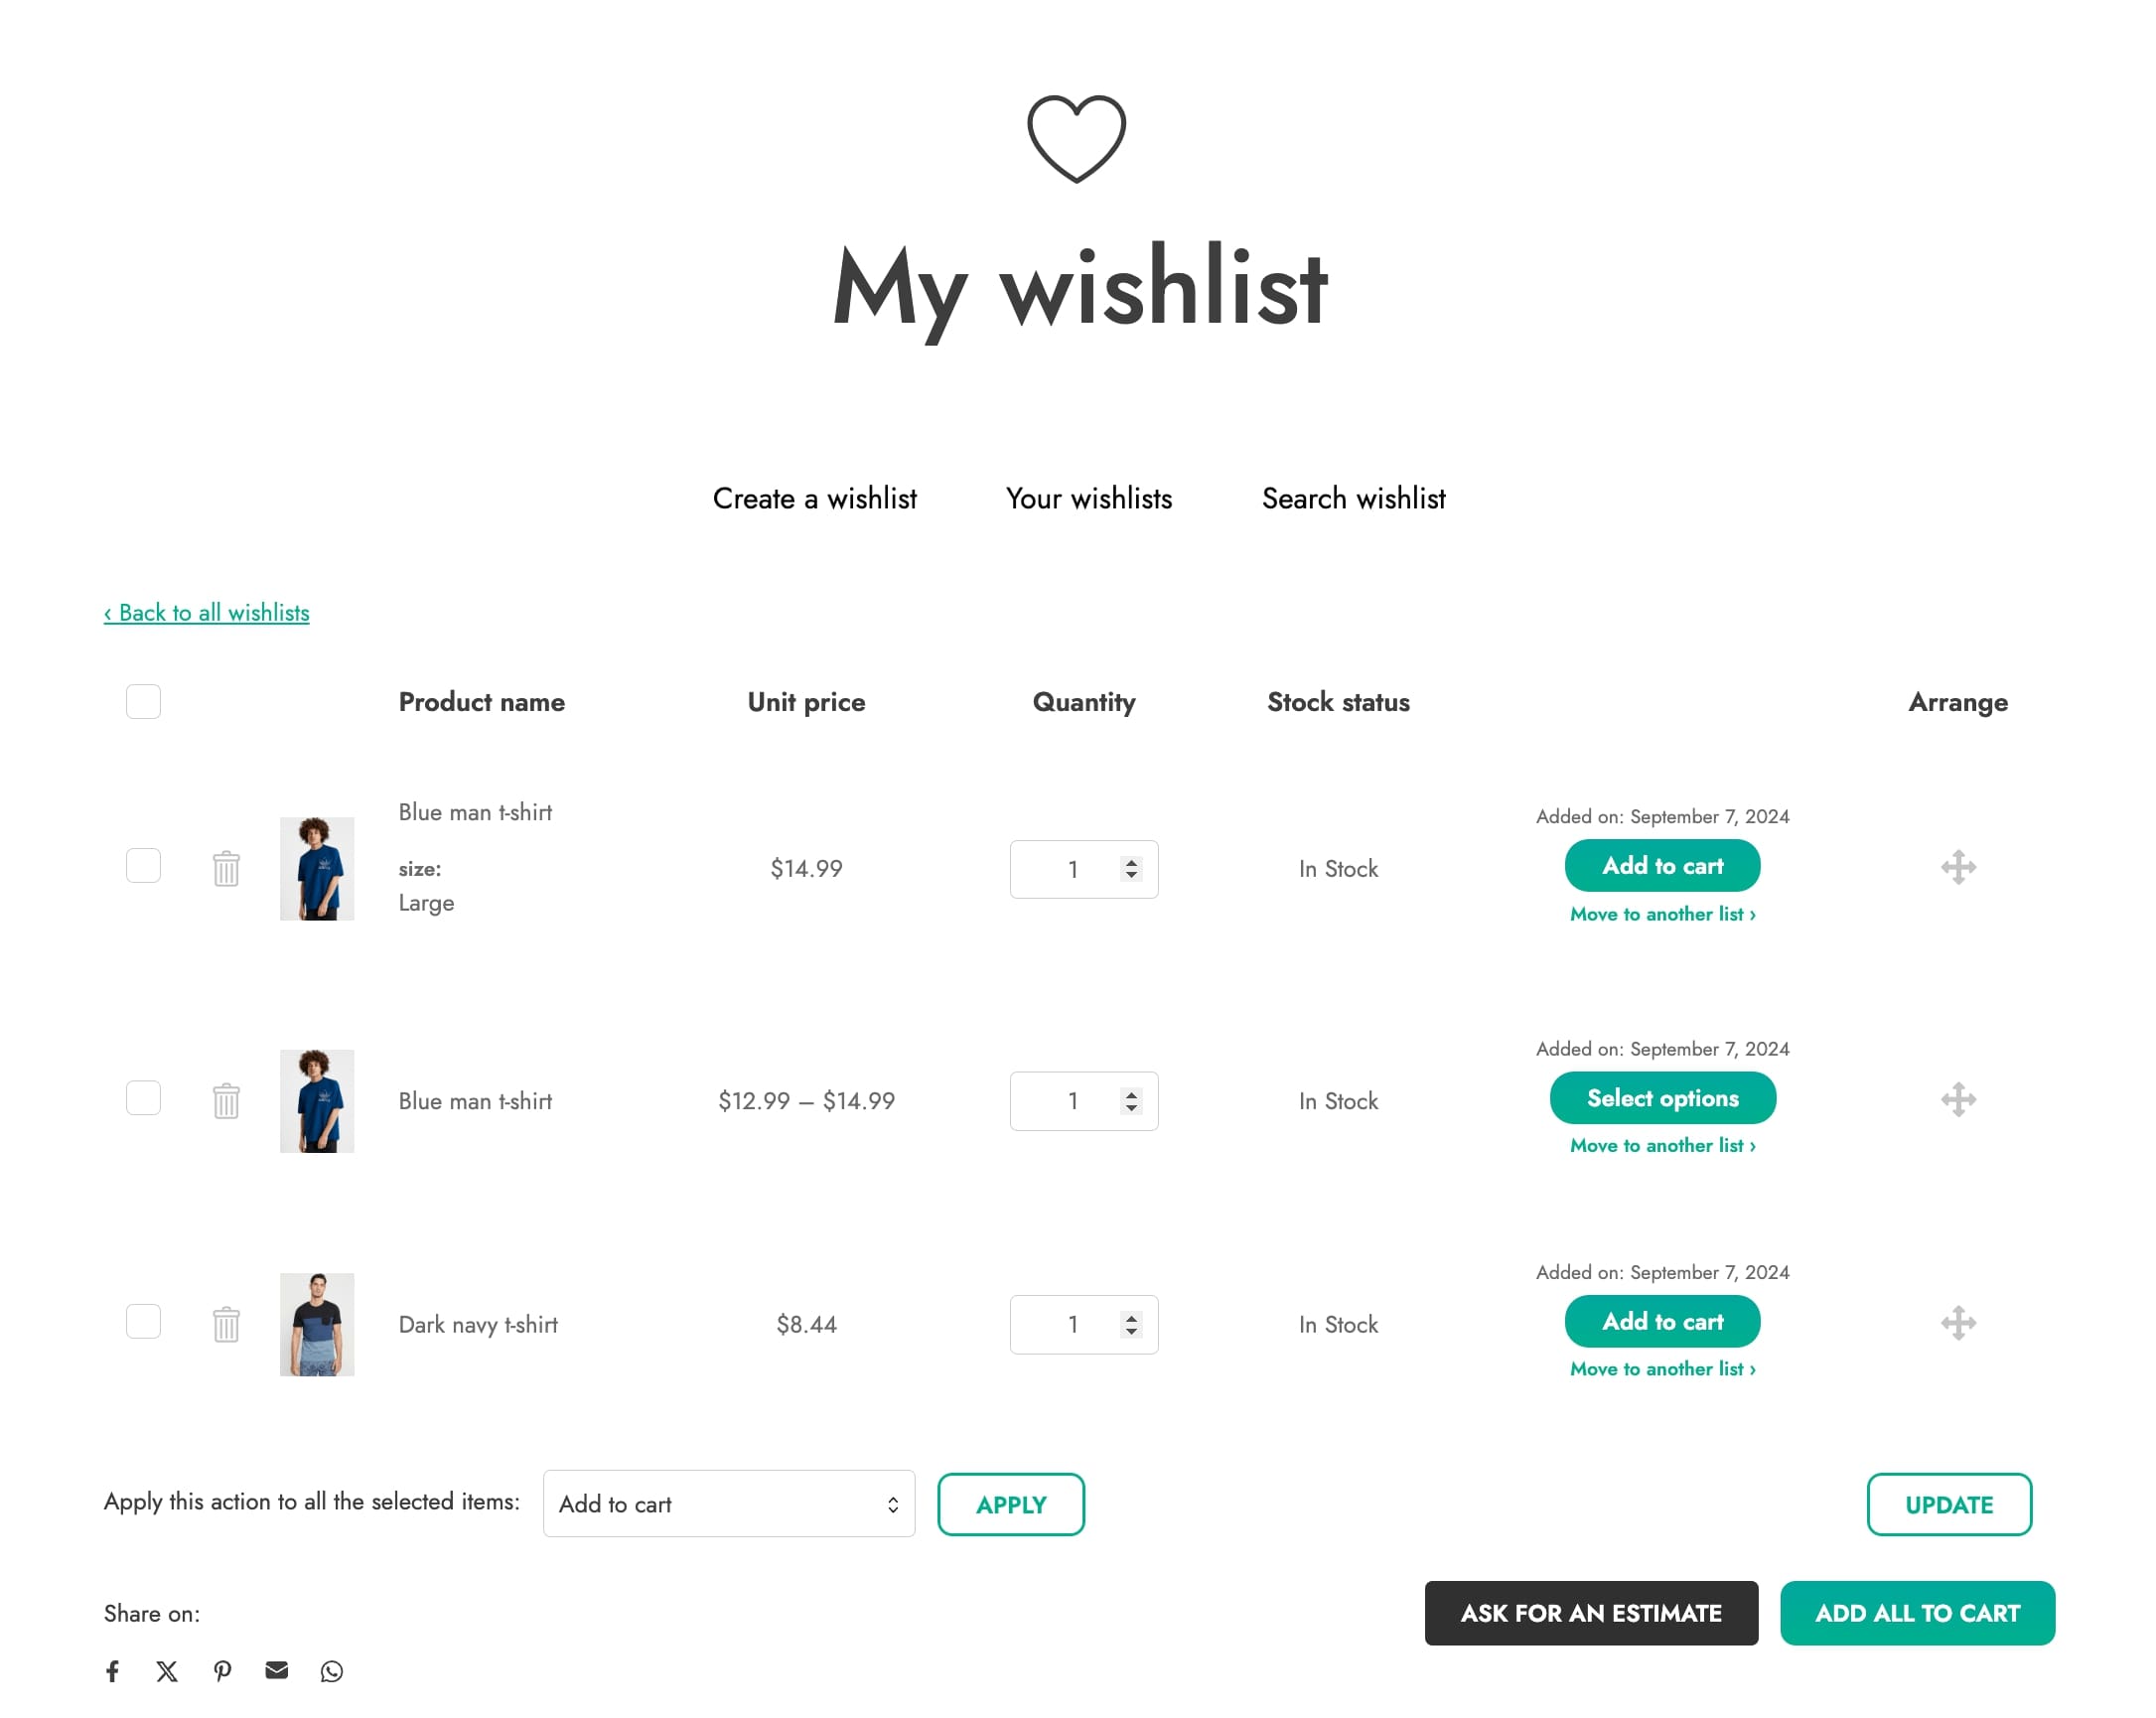
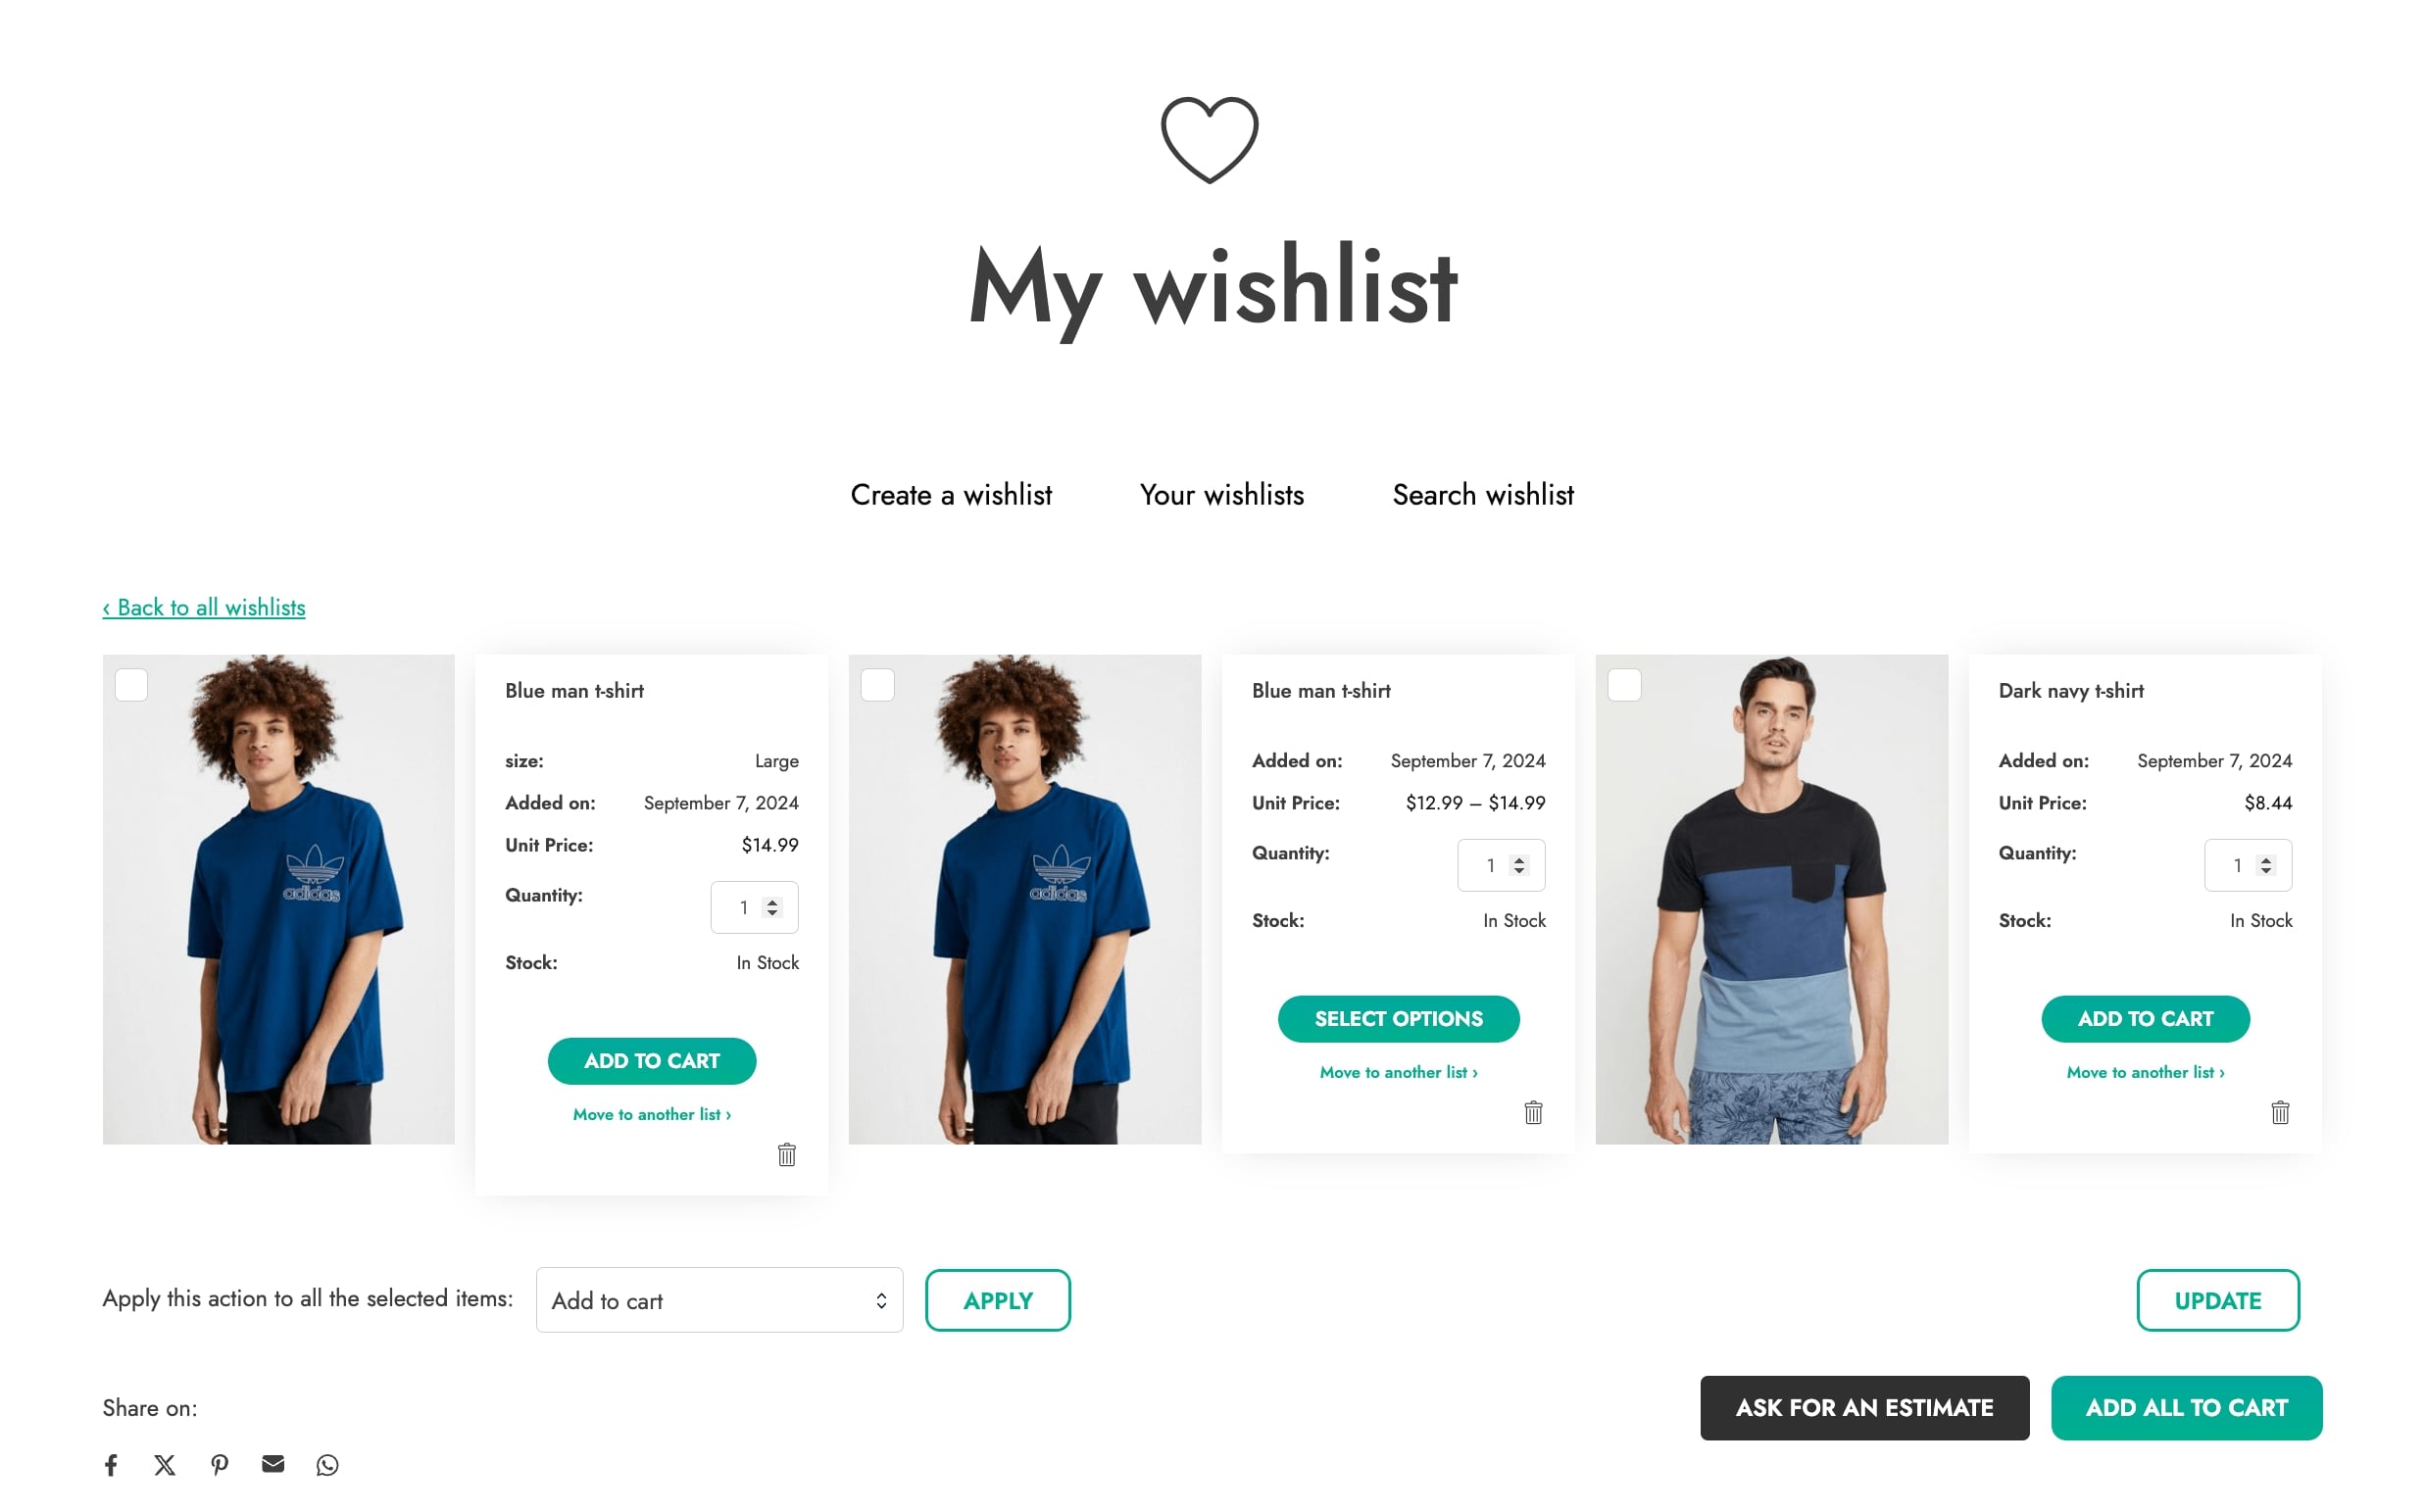
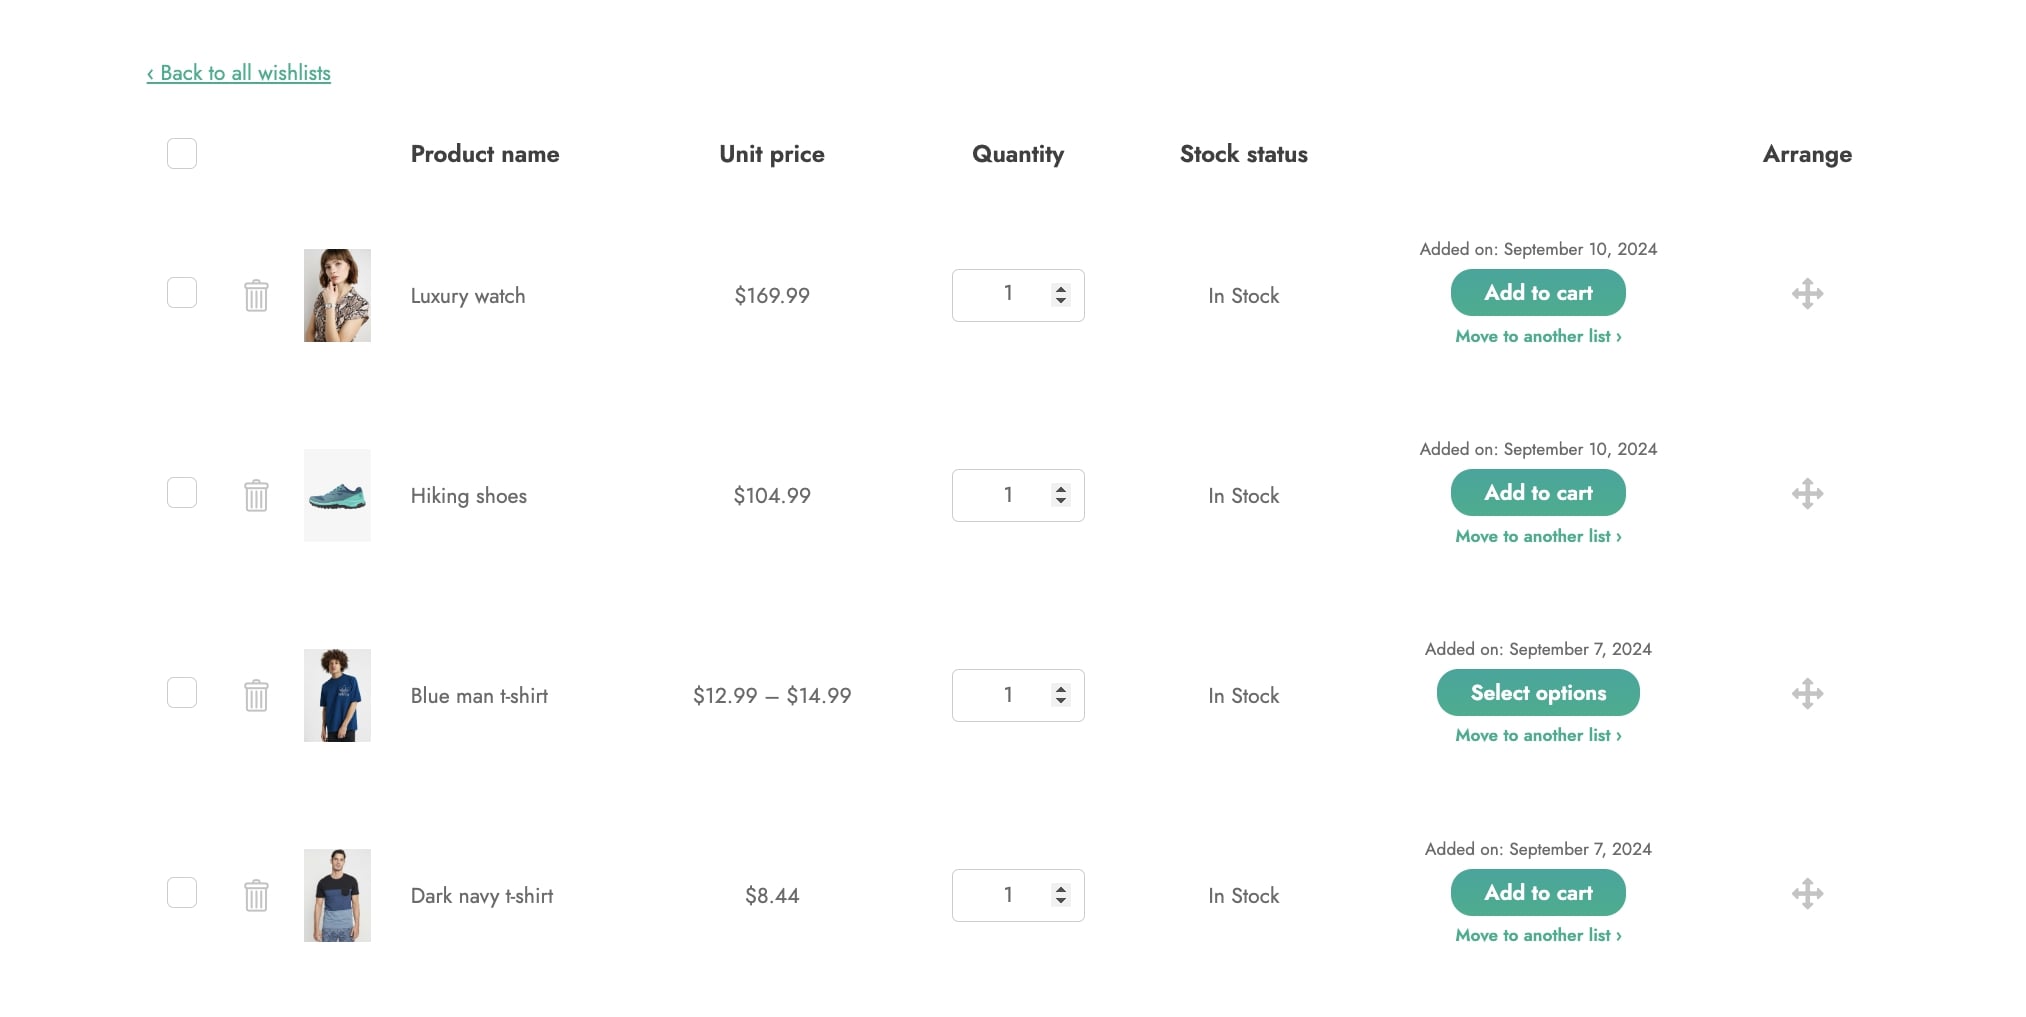
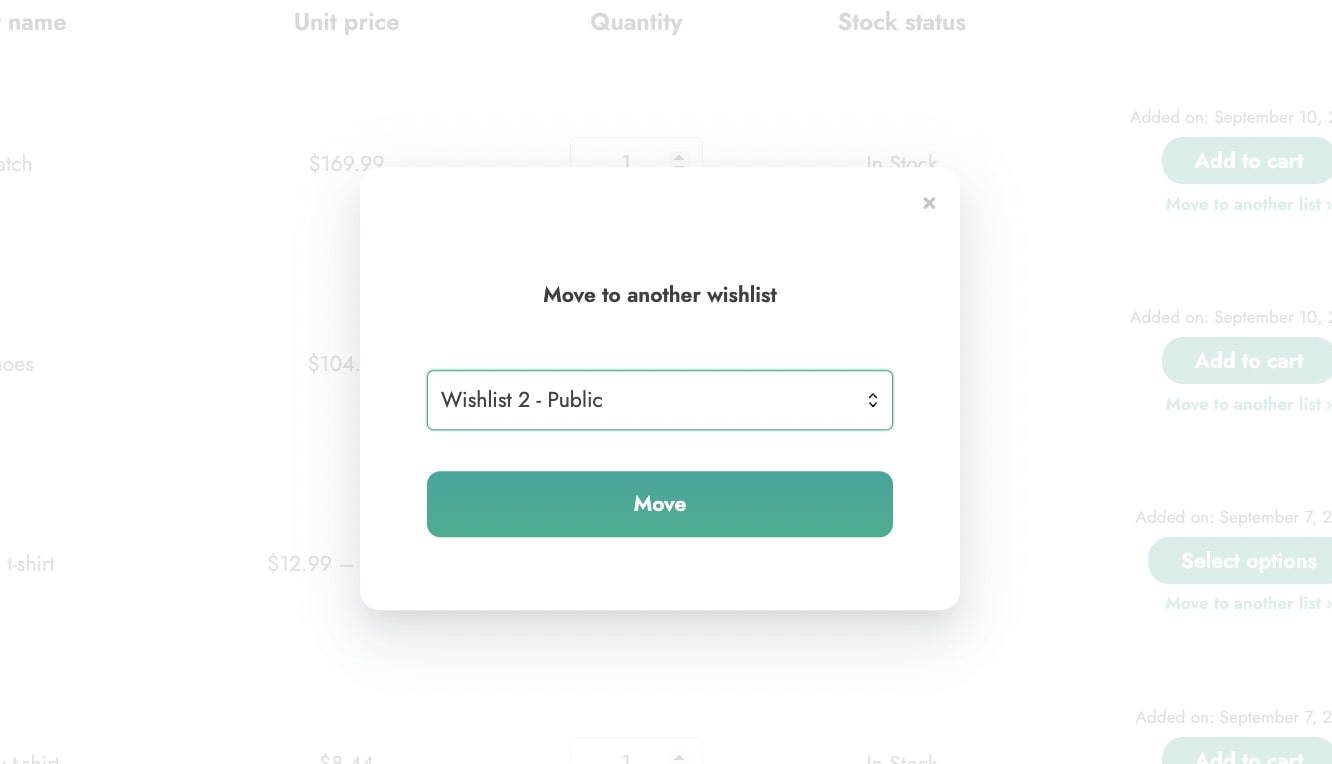
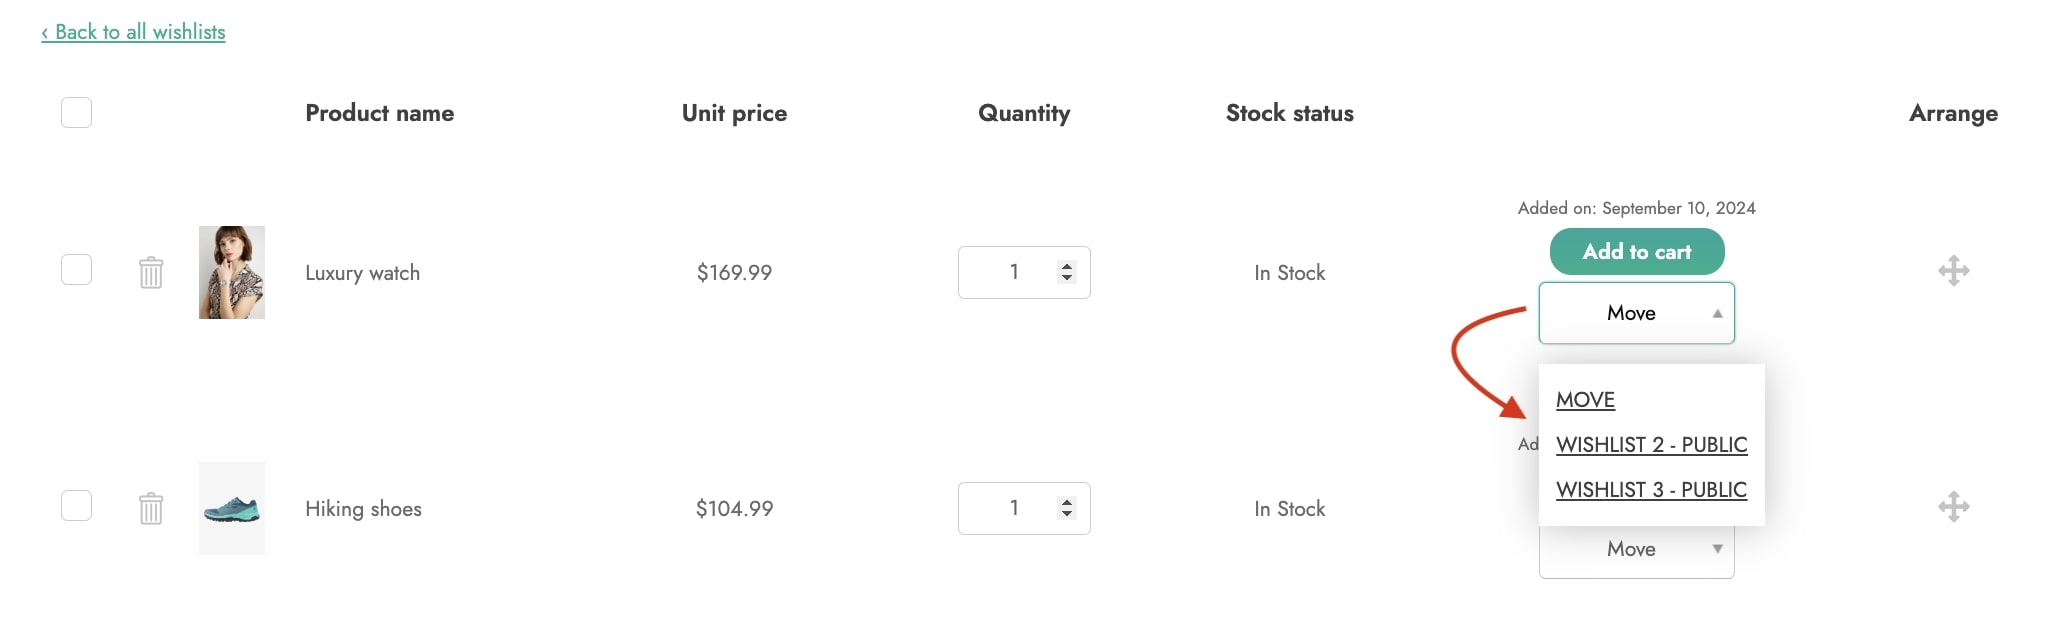
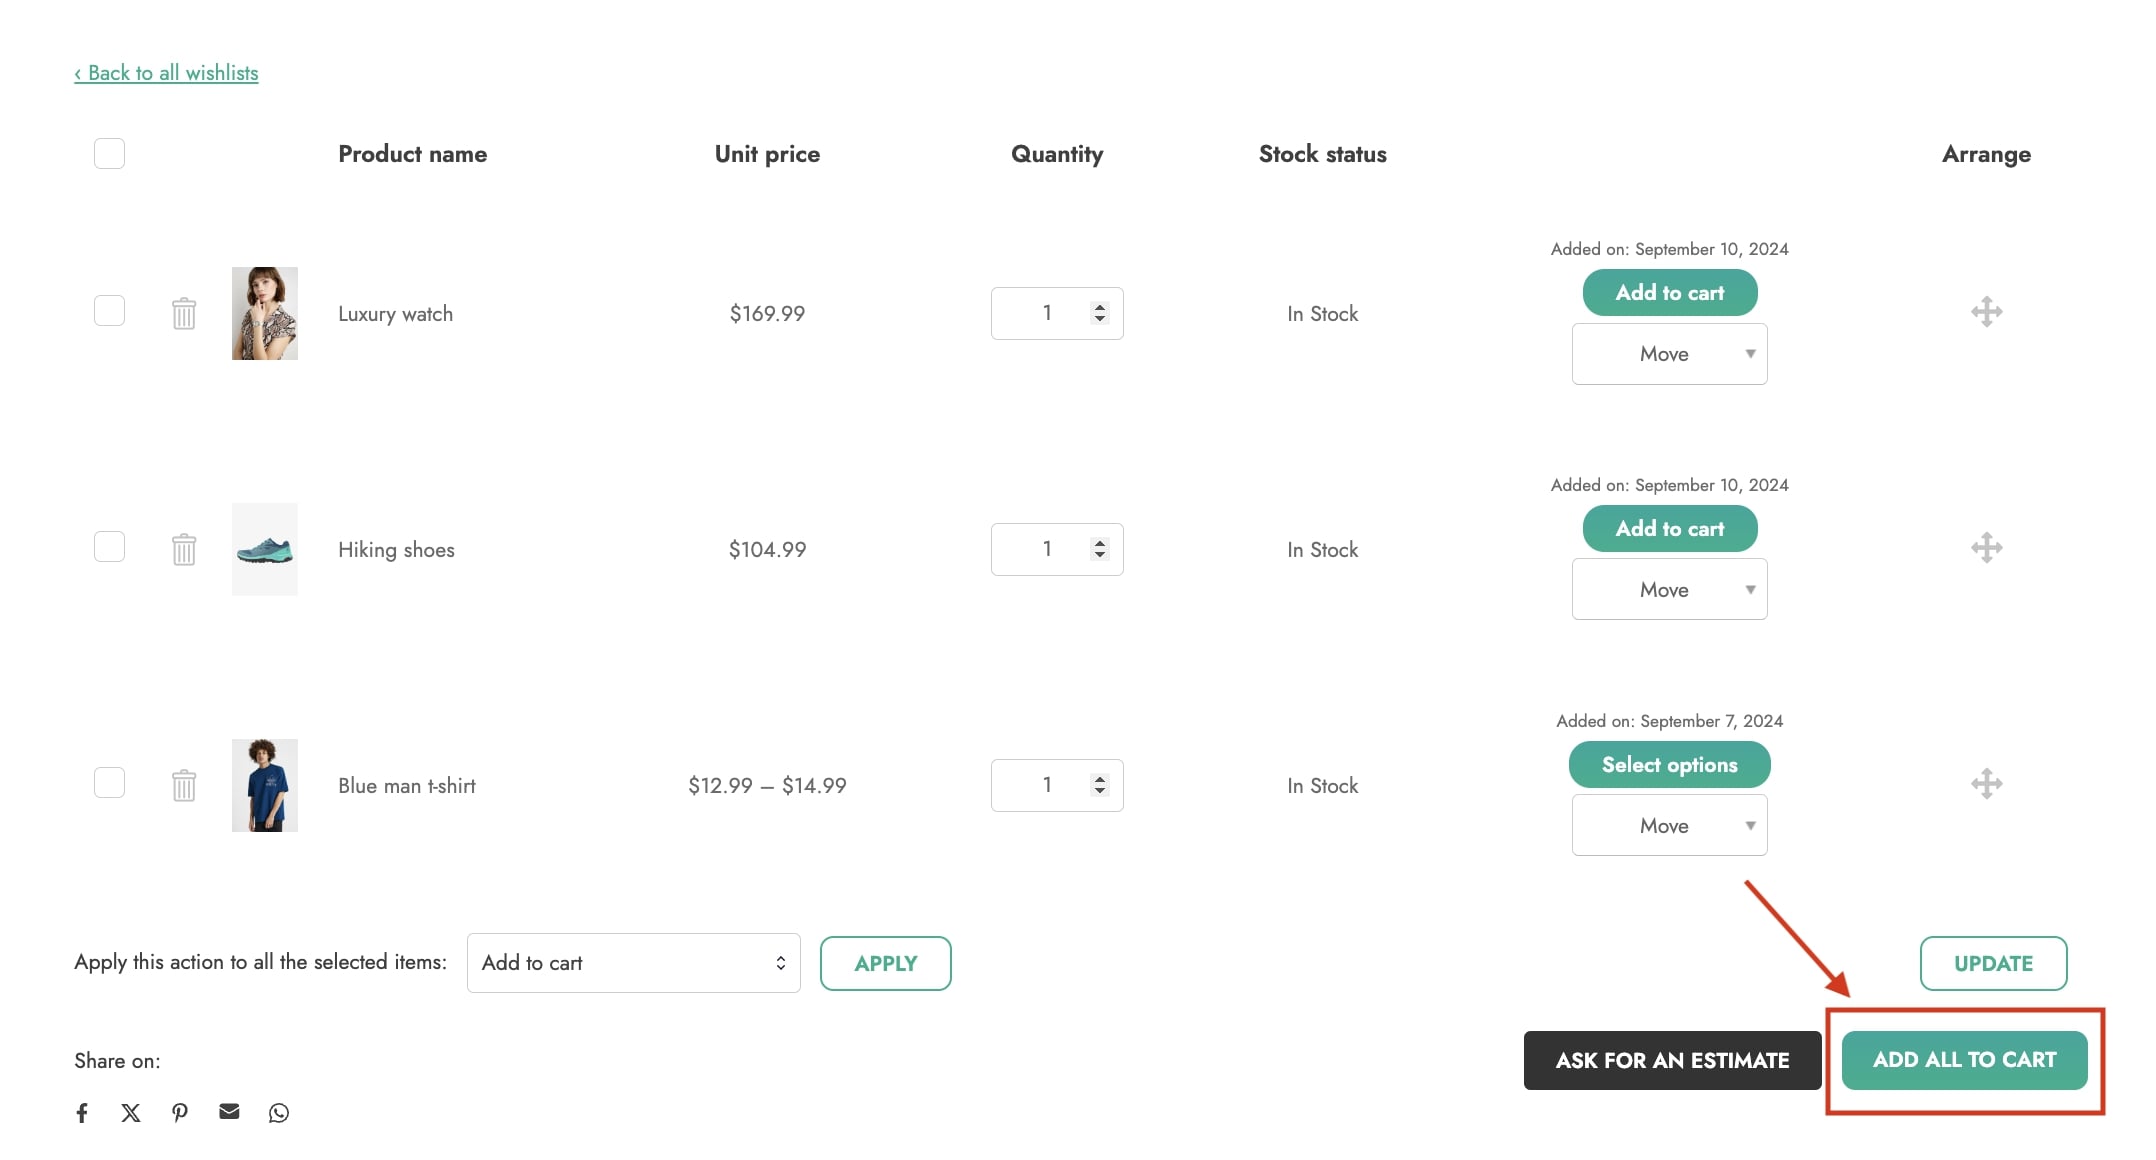
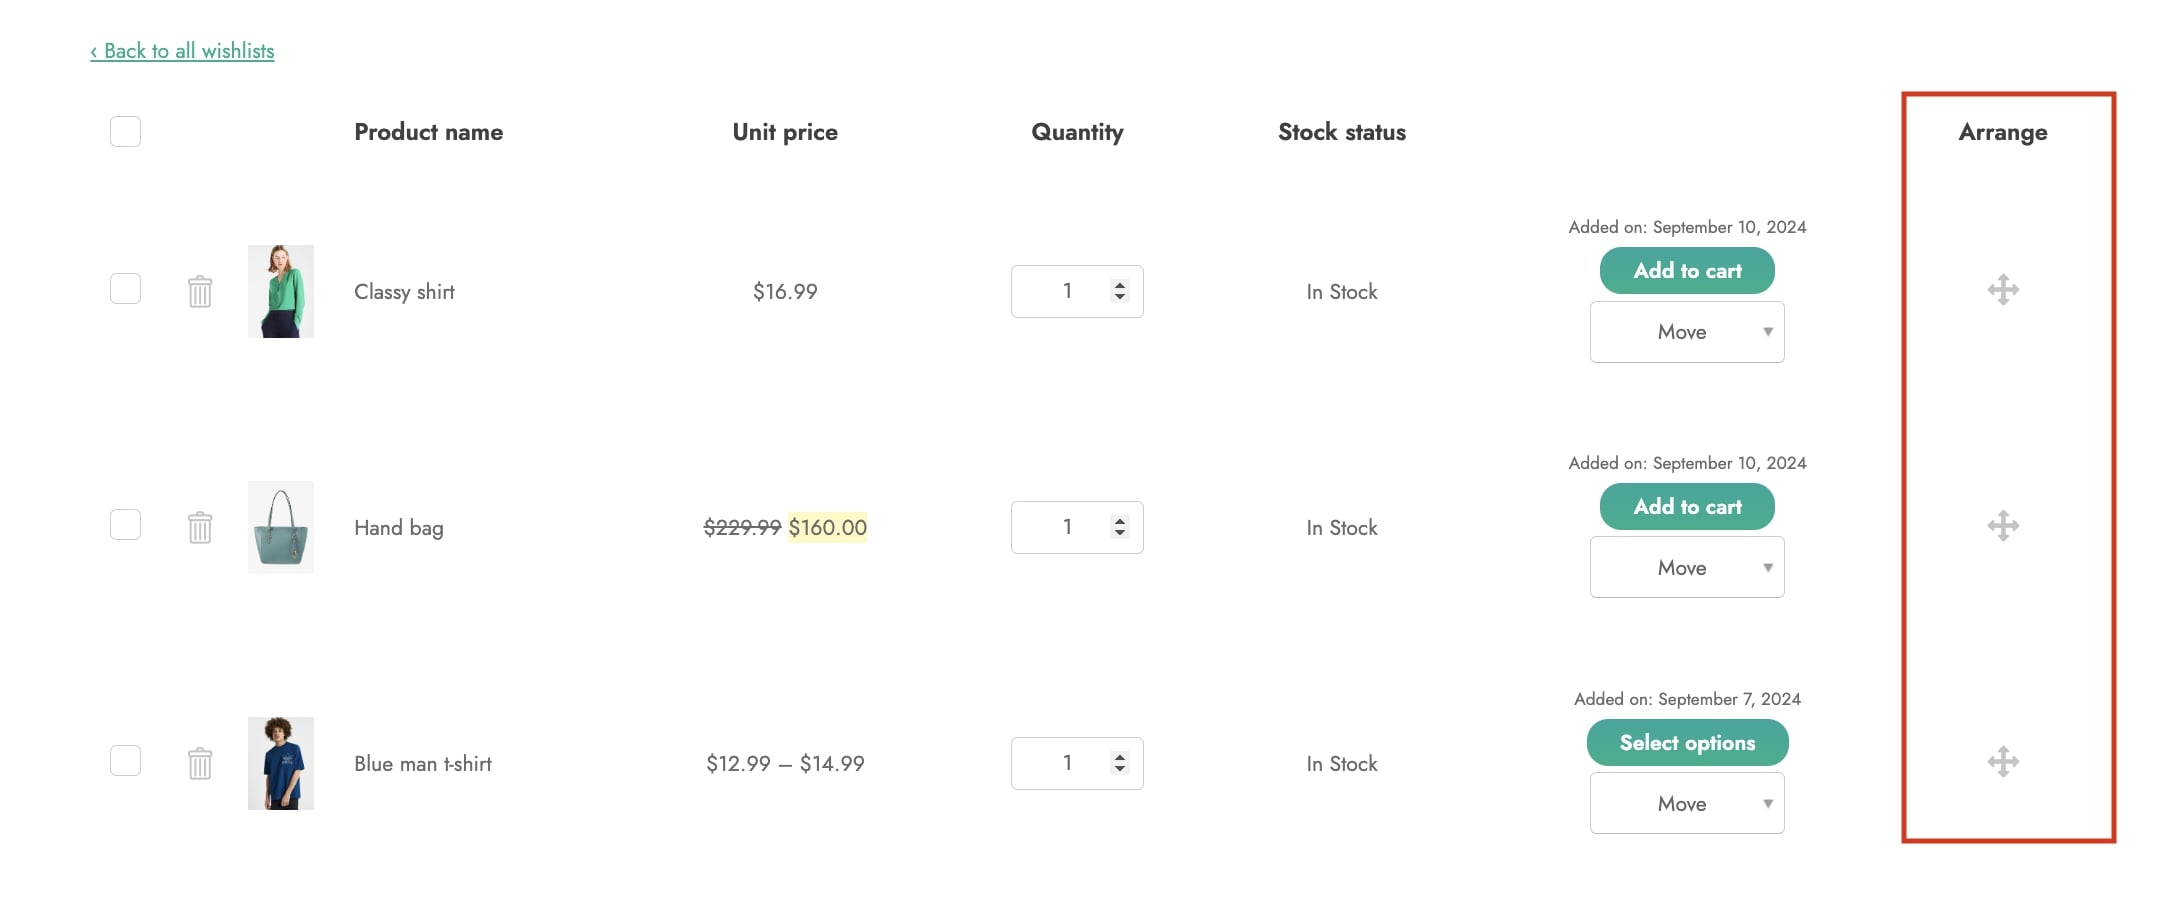
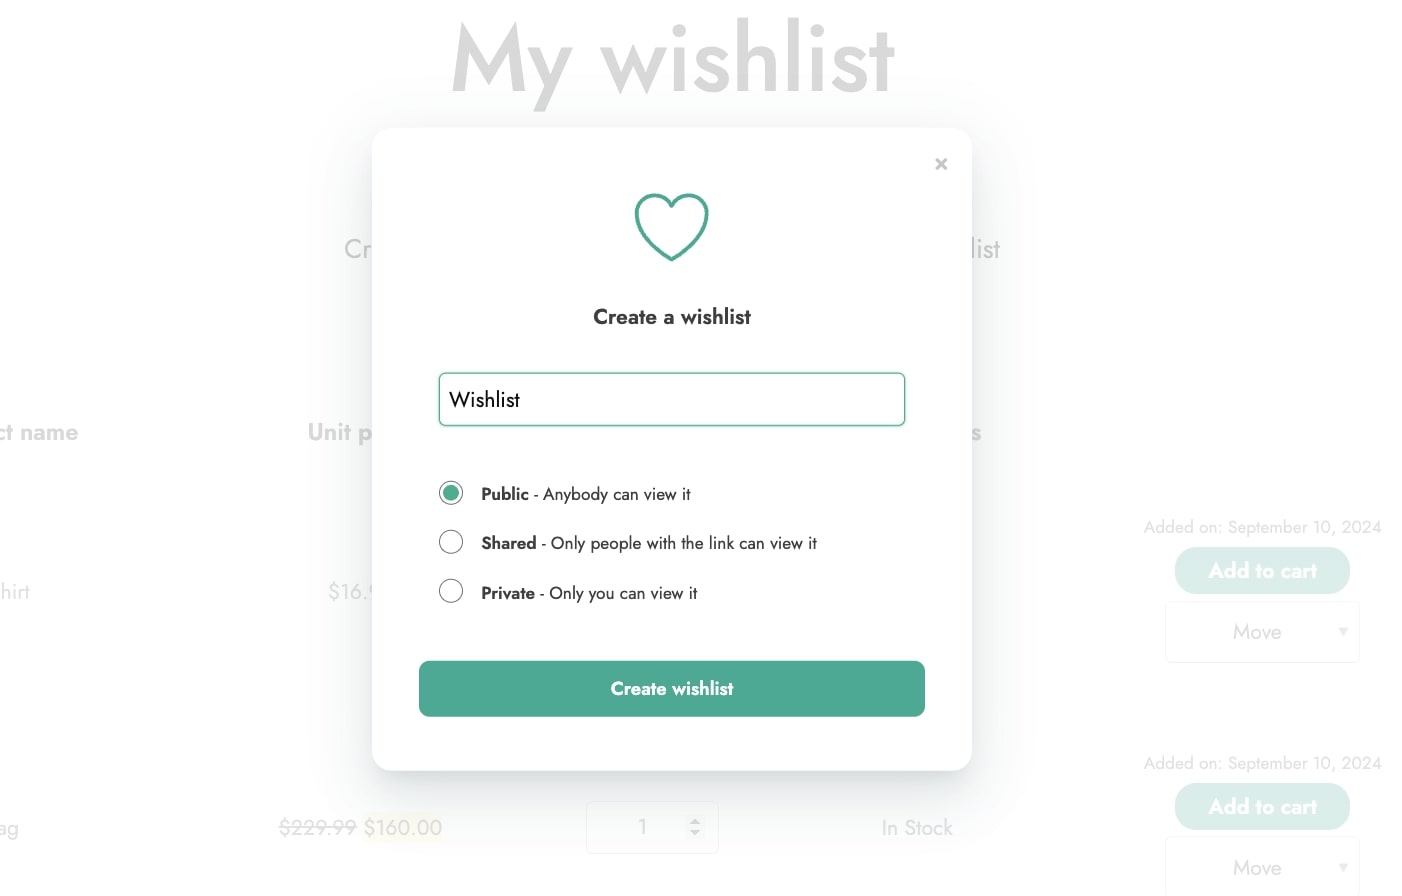
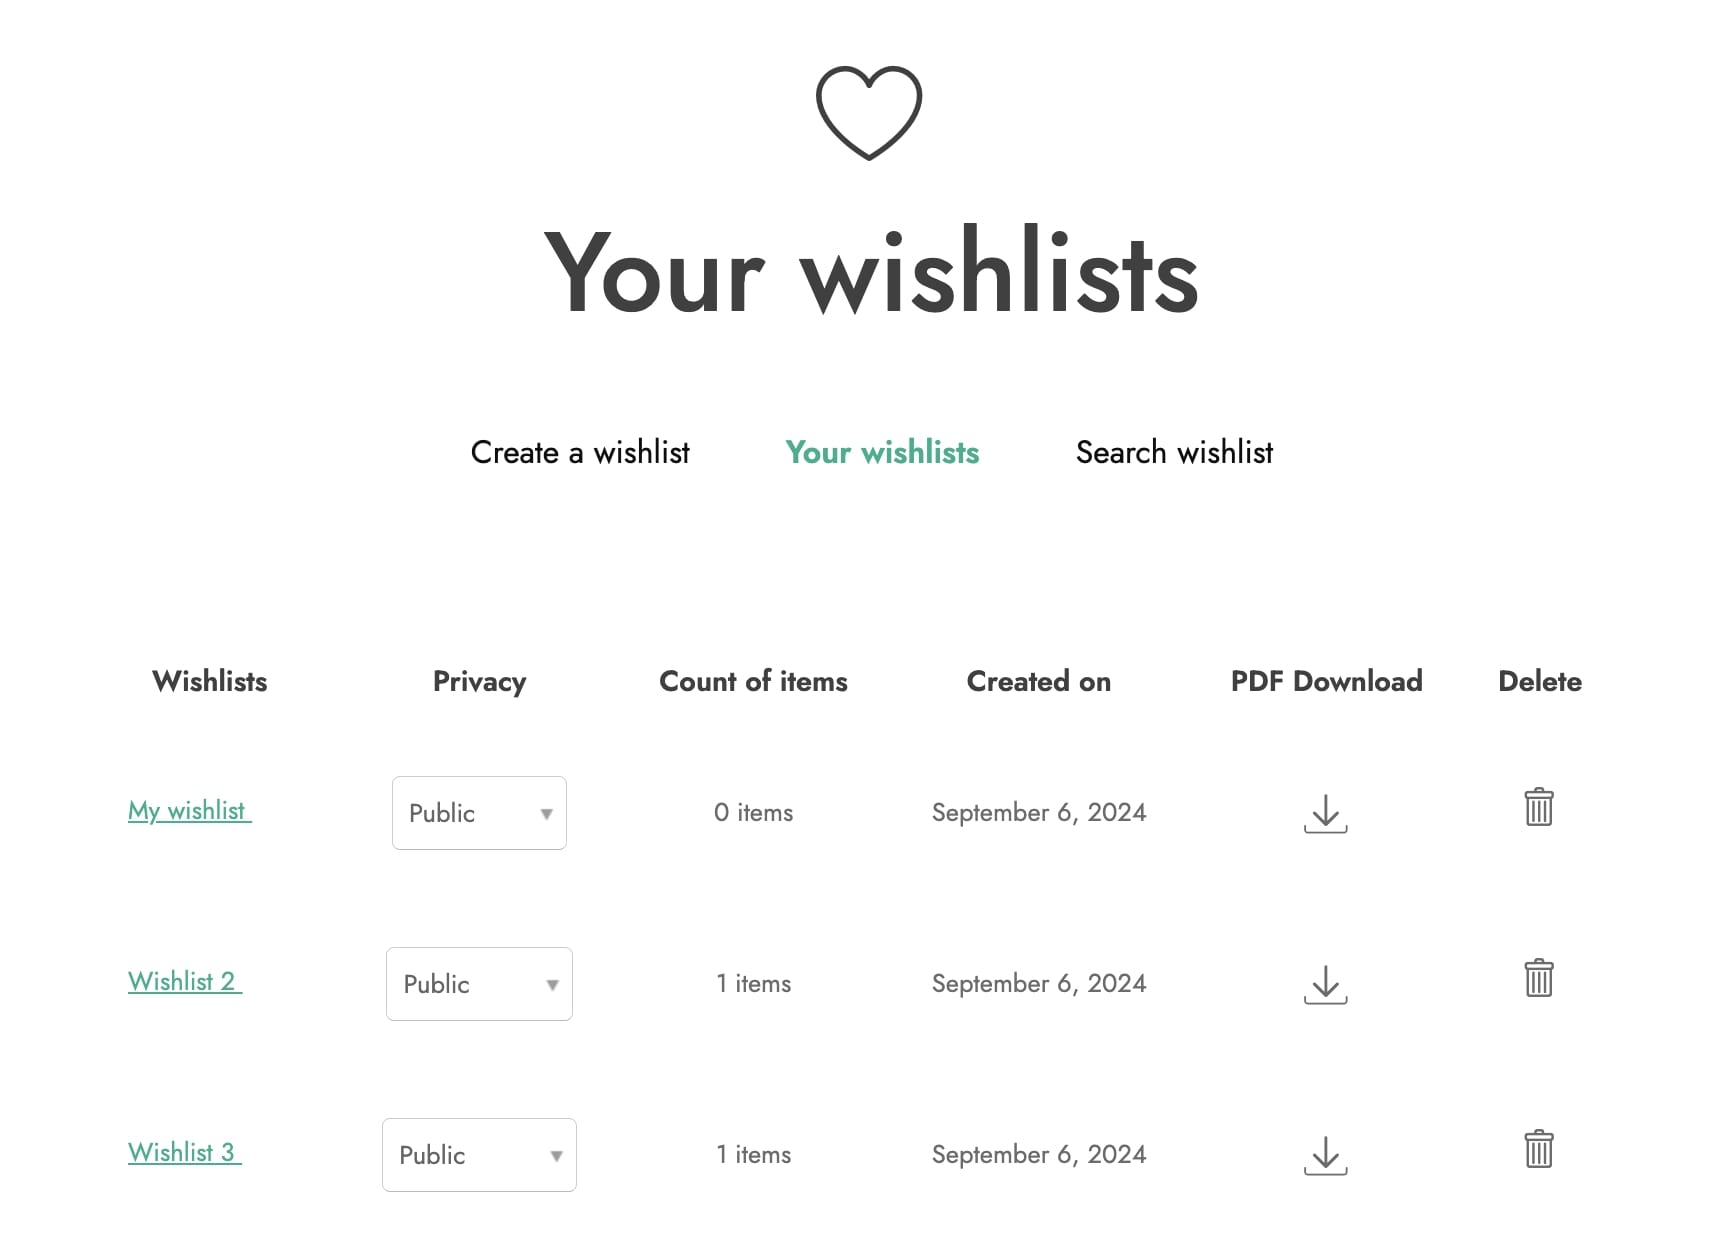
Every time users add a new product to the wishlist, they will be able to select one of those already available or to create a new one.

Choose wishlist
Multiple wishlists example

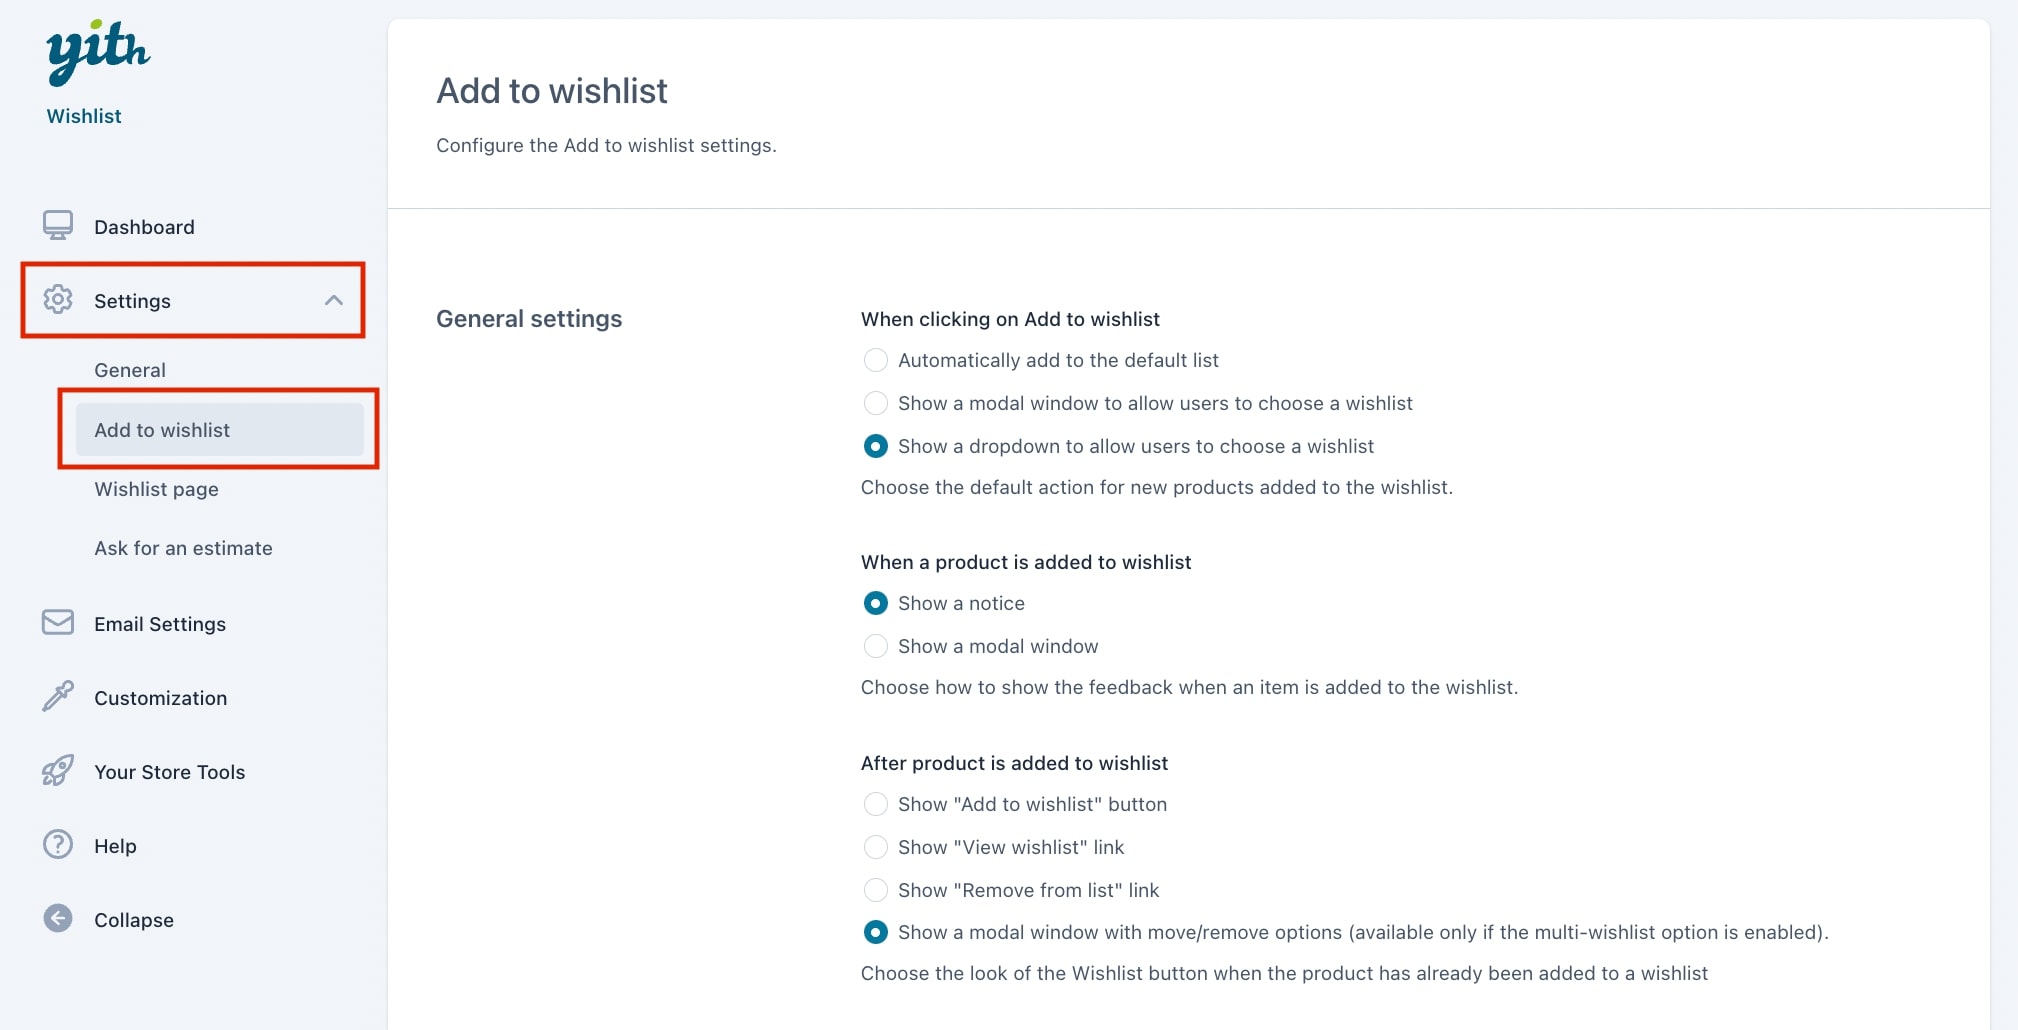
Please note: this depends on the settings configured in Add to wishlist options, specifically on the option When clicking on Add to wishlist that, if set to “Automatically add to the default list”, it won’t give users the possibility to choose.

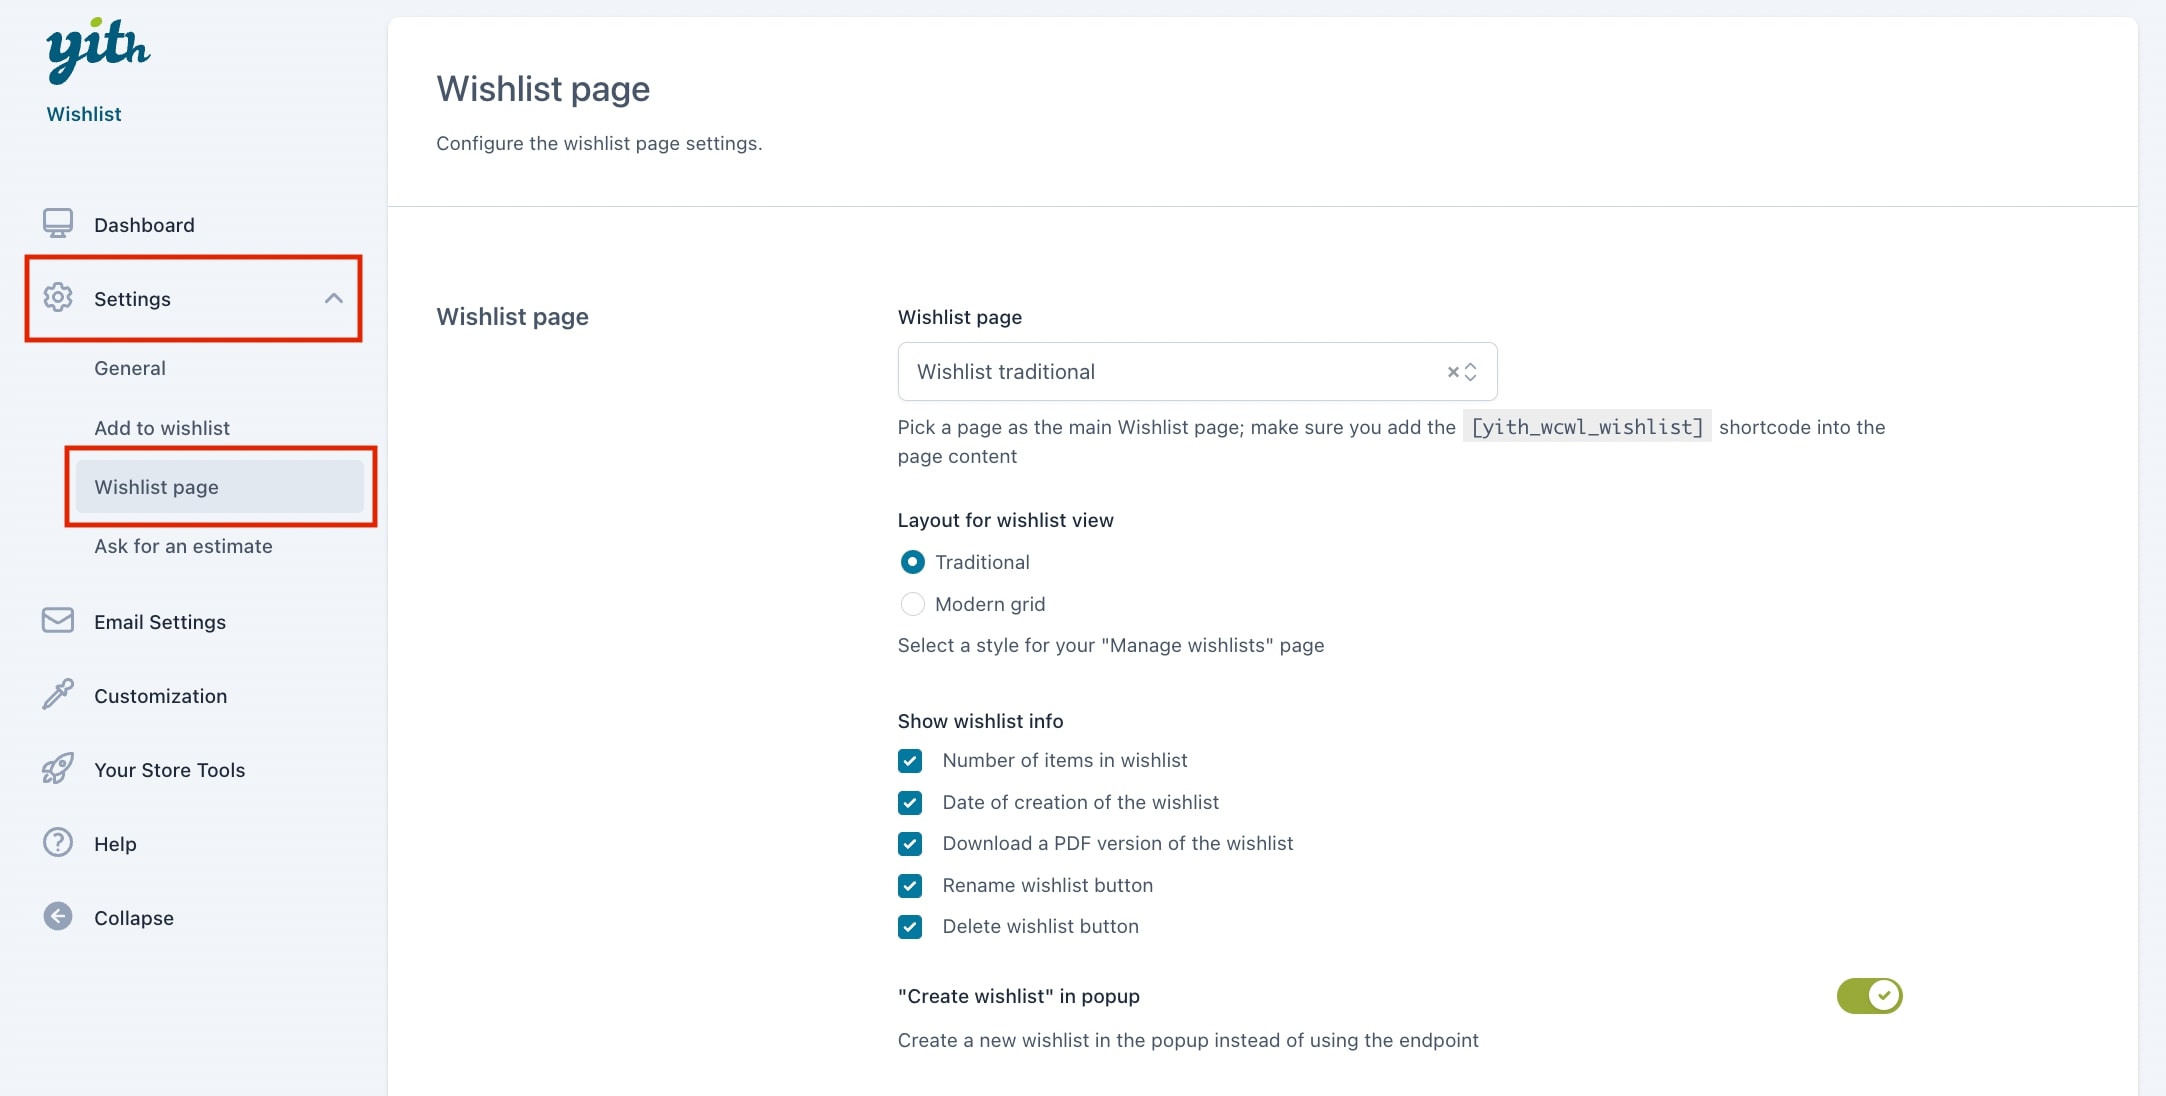
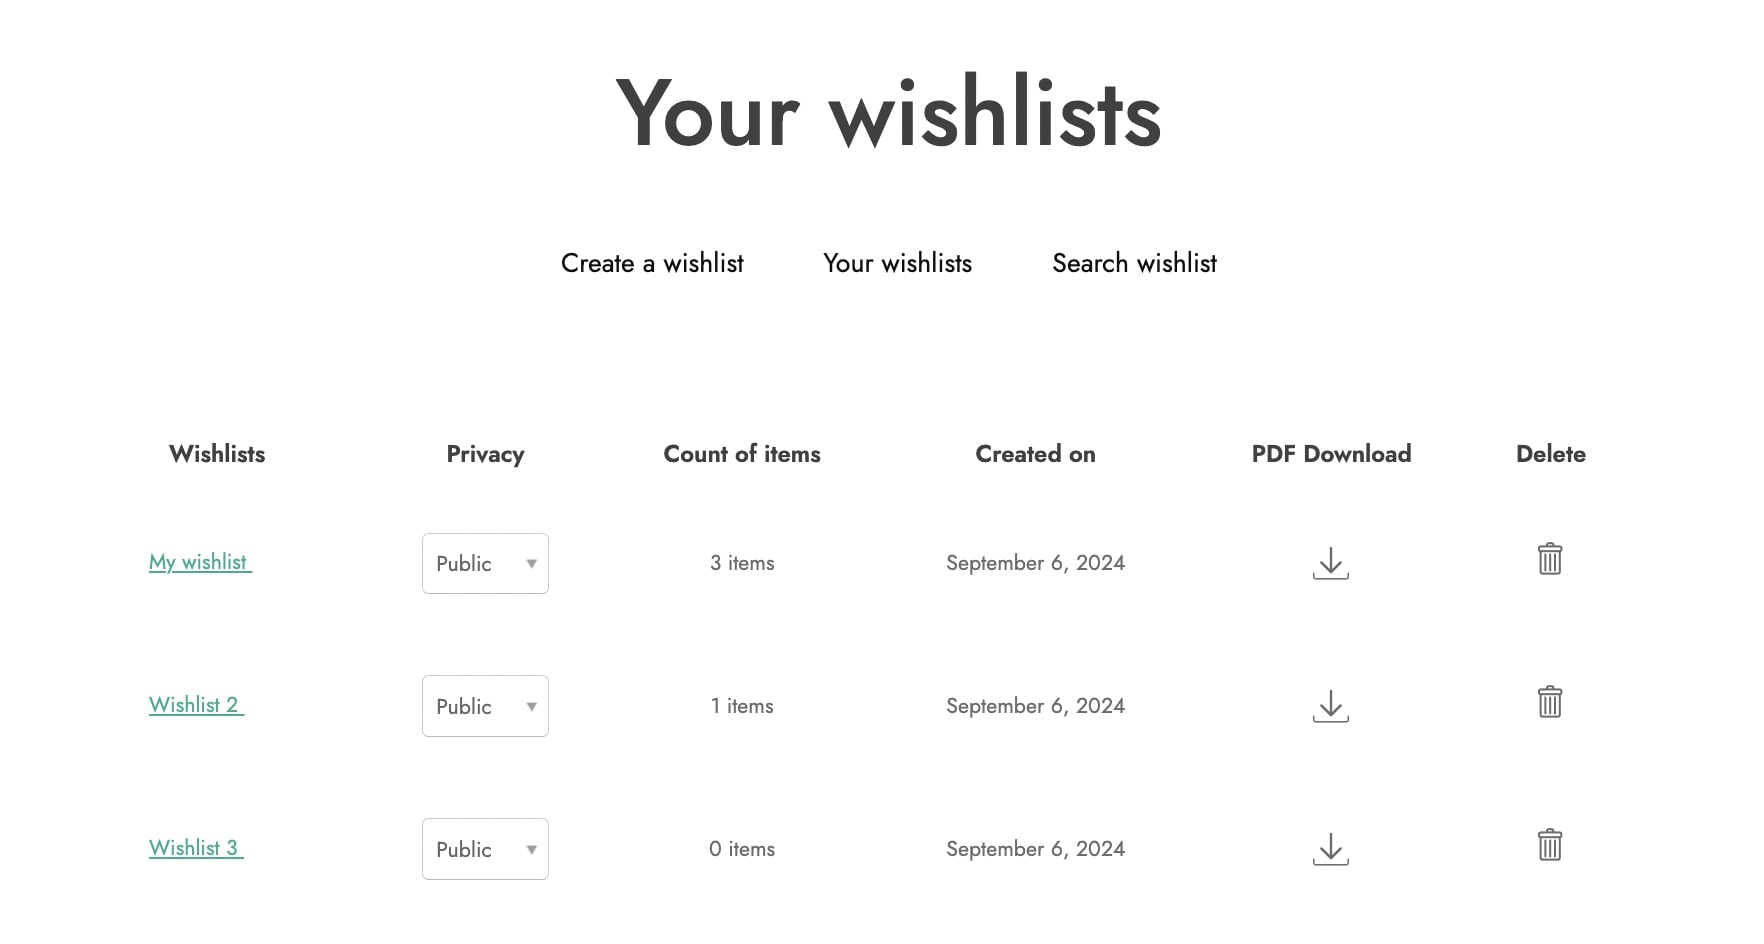
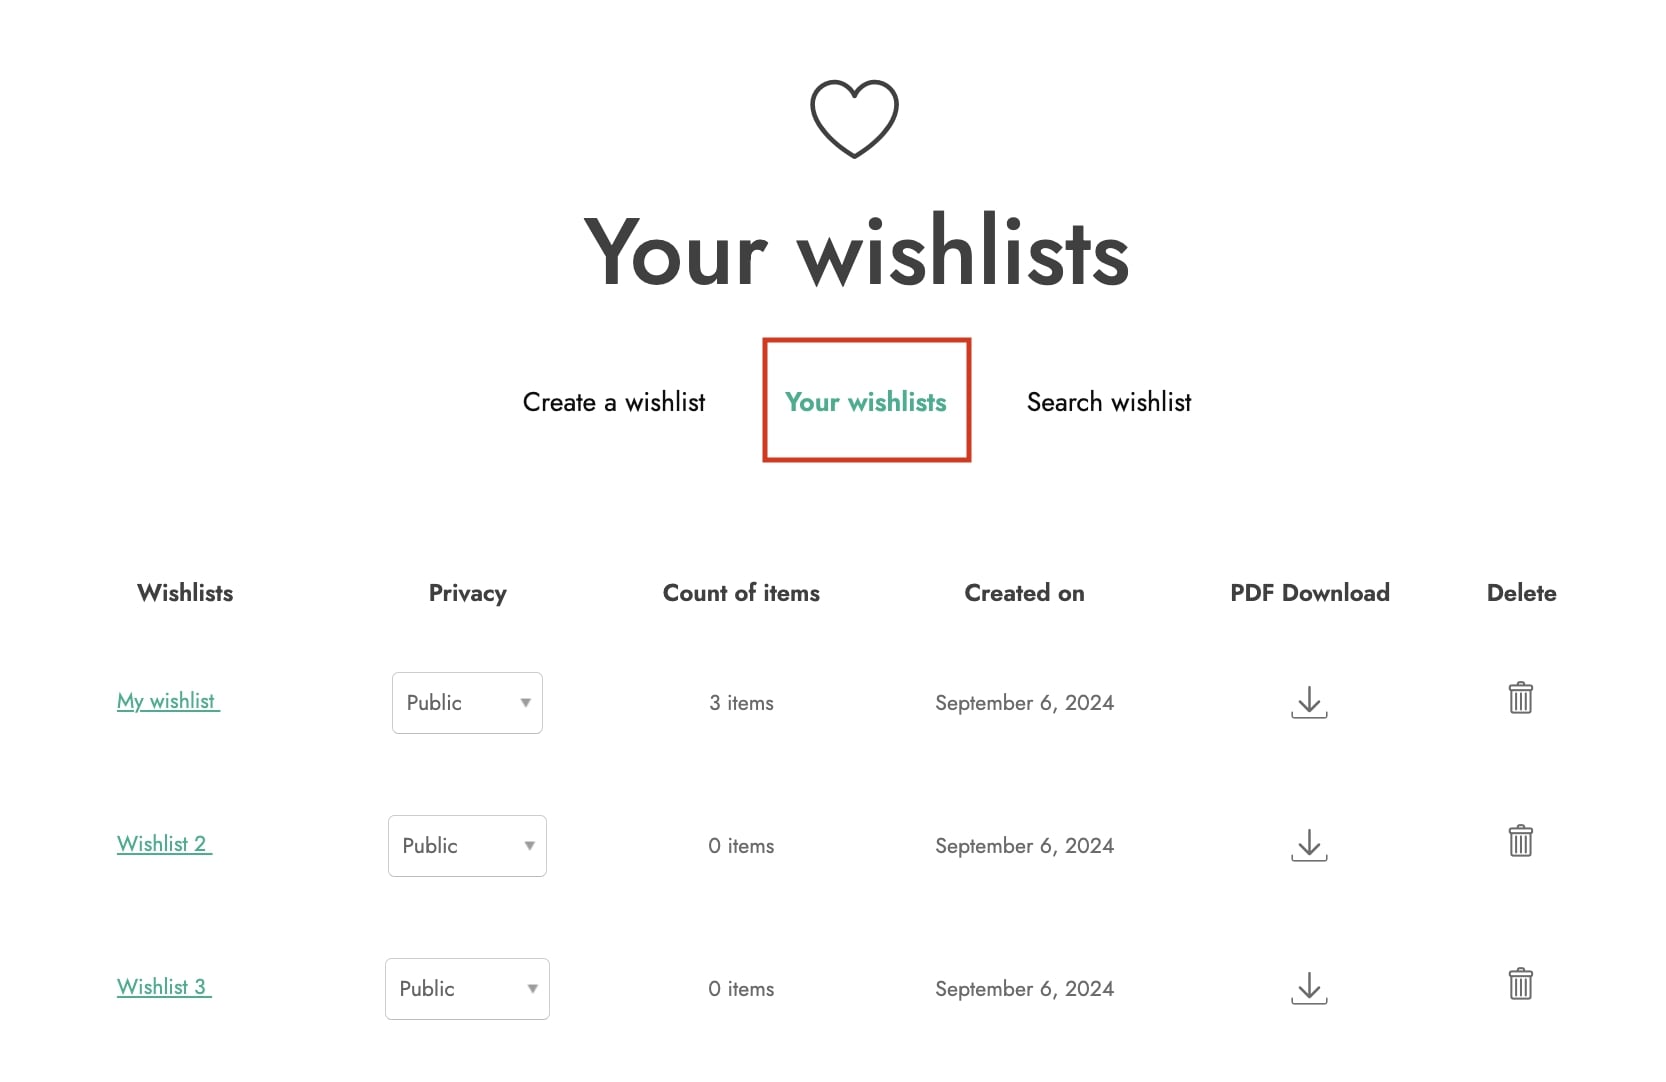
Users can access their wishlists by clicking on Your wishlists link on the Wishlist page:

List of multiple wishlists

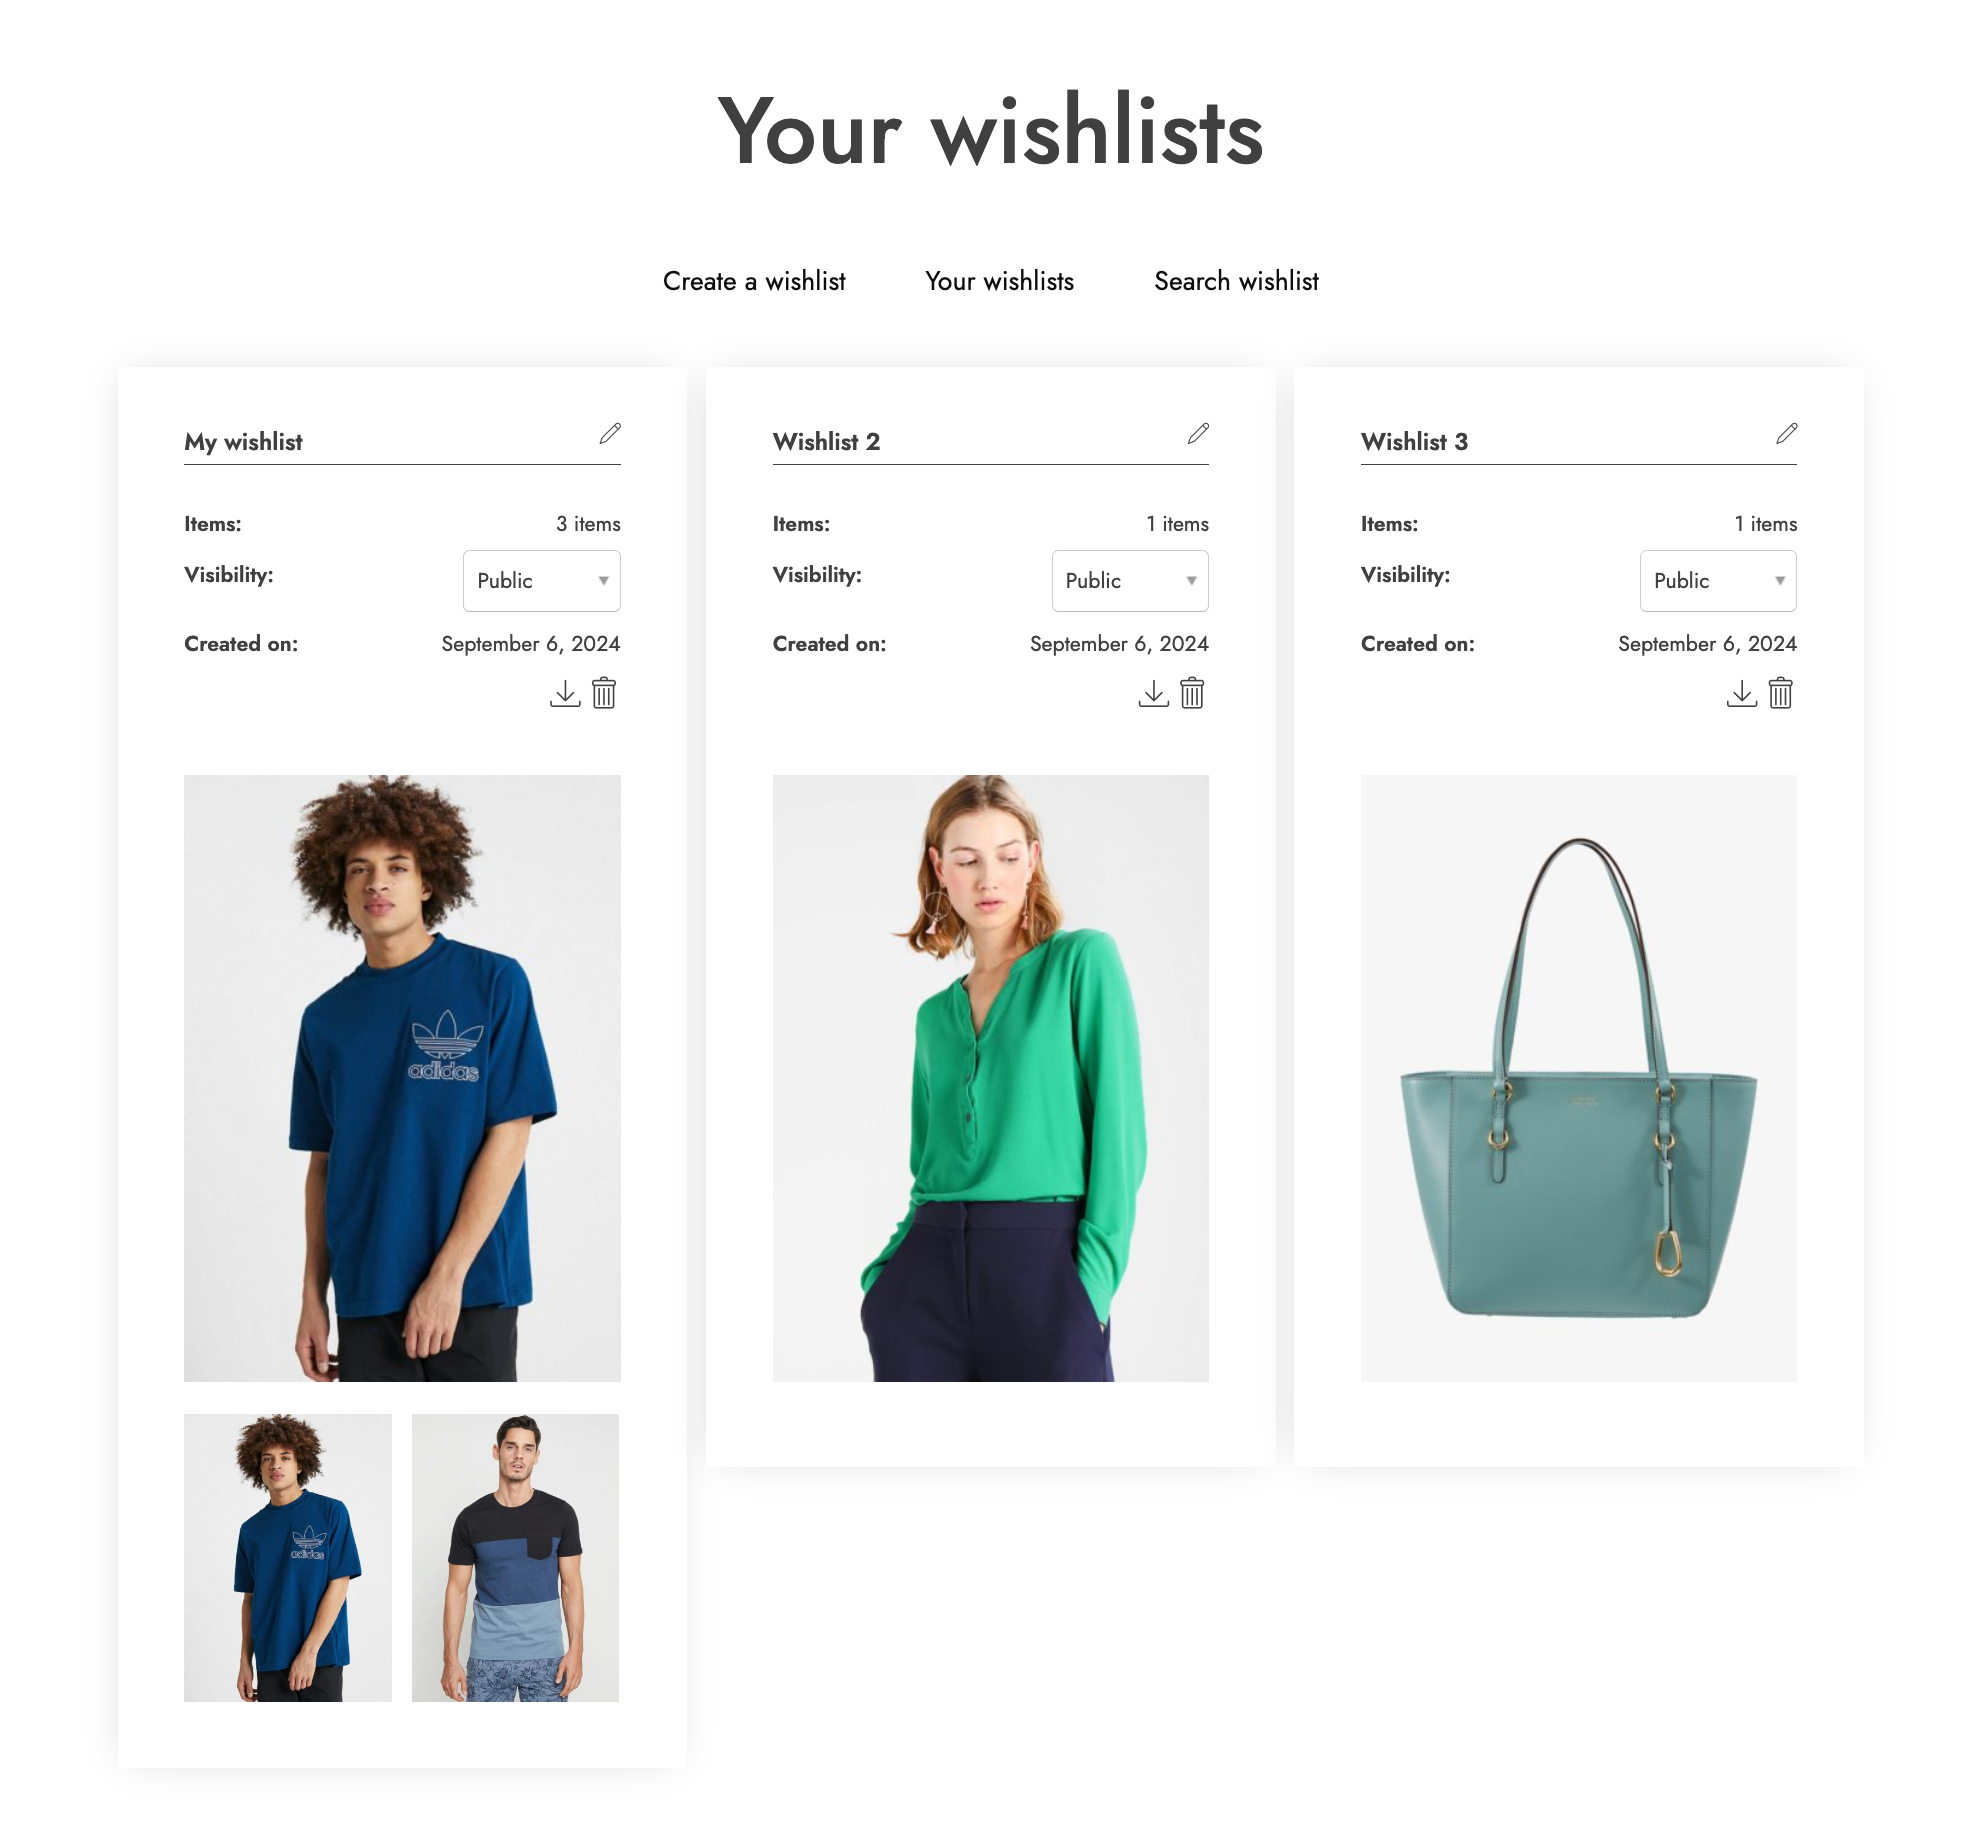
or through the widget (if added to the sidebar):

Widget link example


General settings

All the options to configure the “Add to wishlist” button actions can be found in the Settings > Add to wishlist tab. In the General settings section you can configure the general actions that are triggered when a user clicks the “Add to Wishlist” button.

Add to wishlist - general settings

The option When clicking on Add to wishlist has three different options. Choose the action that will be the default one from:

  • Automatically add to the default list: the product will be added to the default wishlist without any possibility to choose a different wishlist
  • Show a modal window to allow users to choose a wishlist: this will give users the possibility to select the wishlist where they want to add the product from a popup
  • Show a dropdown to allow users to choose a wishlist: this will give users the possibility to select the wishlist where they want to add the product from a dropdown.

The option When product is added to wishlist allows choosing the modal window behavior. Choose the action that will be the default one from:

  • Show a notice: select this option if you want to show a notification after a product is added to the wishlist.
Notice after adding a product to the wishlist
Product added to wishlist notice
  • Show a modal window: select this option if you would like to show a modal window when a product is added to the wishlist.
Add to wishlist modal
Product added to wishlist modal window

If you select this option, you will be able to choose the modal window behavior through the Modal closure options. You can decide whether to automatically close the modal or leave it open.

Modal closure options

The option After product is added to wishlist allows choosing the look of the wishlist button when the product has already been added to a wishlist. Choose the action that will be the default one from:

  • Show “Add to wishlist” button: this will show the button Add to wishlist, so your customers will be able to add the plugin to multiple wishlists if they want to
  • Show “View wishlist” link: this will show the link to view the wishlist
  • Show “Remove from list” link: this will show the link to remove the product from the wishlist
  • Show a modal window to move or remove items (available only with multi-wishlist option enabled): this allows showing a modal window to remove the product or move it to another wishlist.
Move wishlist modal window
Move to another wishlist modal window

Loop & Product page settings

You will find the options to configure the position and display of the “Add to wishlist” button specifically on the WooCommerce’s loop and Product page in the Settings > Add to wishlist tab.

Loop settings

From the Loop settings section you enable to show the “Add to wishlist” button on your shop page, category pages, product shortcodes, product sliders, and all the other places where the WooCommerce products’ loop is used. Then, you can set the position, icon style and counter options:

Loop options
  • Show “Add to wishlist” in loop: enable it to show the Add to wishlist button to WooCommerce products loop.
  • Position of “Add to wishlist” in loop: choose the position of the Add to wishlist button in WooCommerce products loop. You can choose On top of the image, before “add to cart” button, after “add to cart” button or use a shortcode.

If you select the position on top of the image, you can also configure the following options:

Top of the image position options
  • Position on product image: select in which part inside the product image you wish to show the “Add to wishlist” icon. You can choose top left, top right, bottom left or bottom right.
  • Icon style: choose whether to show the wishlist icon permanently inside the product image or only when the user hovers the mouse over the product.
  • Show a count of users with a specific product in wishlist: enable if you want to show users a counter that displays how many times the product has been added to the wishlist.

Product page settings

You can configure the ‘Add to wishlist’ button position and counter options in the Product page settings:

  • Position of the add to wishlist on product page: choose in which part of the product page to show the “Add to wishlist” button or link. You can choose from after “add to cart” button, after thumbnails, after summary or use a shortcode.
  • Show a count of users with a specific product in wishlist: enable if you want to show users a counter that displays how many times the product has been added to the wishlist.
Wishlist counter example

Wishlist page

From the Settings > Wishlist page tab you will be able to configure the settings related with the Wishlist page and the Wishlist detail page.

Wishlist page settings

In this post, we’ll review the Wishlist page section, where you can configure options related to the page displaying all wishlists created by the user.

Please, note: multiple wishlists can be created only if the Multi-wishlist feature is enabled from the plugin general settings, as explained here. If disabled, the wishlist page and wishlist detail page settings will apply to the default wishlist.

  • Wishlist page: pick which page will be the main Wishlist page. For correct functioning, after enabling the plugin, a default “Wishlist” page is generated on WordPress: it includes the “[yith_wcwl_wishlist]” shortcode that provides the insertion of the table of all products added to the wishlist.
View wishlist page example

With this option you can show the wishlist on any page of your site, different from the one selected by default.

Please note: the page you choose to use as a Wishlist page must necessarily include the “[yith_wcwl_wishlist]” shortcode. In case you have issues to display the wishlist page, regenerate the permalinks.

  • Layout for wishlist view: select the style option to display the page to manage your wishlists. You can choose between Traditional or Modern:
Your wishlists traditional style
Traditional style
Your wishlists modern style
Modern grid style
  • Show wishlist info: allows you to select the data to show on the wishlists. The options are:
  • number of items in wishlist
  • date of creation of the wishlist
  • download PDF version of the wishlist
  • rename wishlist button
  • delete wishlist button
  • Create wishlist in popup: you can let your users create a new wishlist directly in the popup rather than using the endpoint.
Create wishlist from the popup example

Now we can move to the next step, which is to configure the Wishlist detail page.

Wishlist detail page

From the Wishlist detail page settings available in Wishlist page tab, you can configure the information and actions available in the page of a specific wishlist. Here are the options you can set:

Wishlist detail page

Choose the style of the product list

From the Wishlist detail page settings available in Wishlist page options, you can choose the style of the product list of the wishlists created by the users.

Product list layout options
Traditional content
Traditional layout
Modern content
Modern layout
Images content
Only images with info at click

Choose wishlist table info

The plugin makes available a list of options to let you decide what you want to show in the wishlist table. These options are:

  • Product variations selected by the user (example: size or color)
  • Product price
  • Price variation info (show the price difference compared to when the product was added to the list)
  • product quantity (so users can manage the quantity of each product from the wishlist)
  • Product stock (show if the product is available or not)
  • Date on which the product was added to the wishlist
  • Add to cart option for each product
  • Icon to remove the product from the wishlist – to the left of the product
  • Checkbox to select multiple items, add them to the cart or delete them with one click
  • Button to remove the product from the wishlist – to the right of the product

Based on the options enabled, users will be able to check the information in the wishlist table:

Wishlist table info

How to move products from a wishlist to another

For those users who have created more than one wishlist, you can allow them to move products from one to another by enabling the option Show Move to another wishlist.

Move wishlist options

Now you can choose the style to show this option from a popup or a dropdown.

Move wishlist popup
Popup style
Move wishlist dropdown
Dropdown style

Add to cart options from the wishlist

The site admin can choose what happens after the user adds a product to the cart from the wishlist.

Redirect and remove cart options

The options are:

  • Redirect to cart: redirect to cart page if Add to cart button is clicked in the wishlist page
  • Remove if added to the cart: remove the product from the wishlist if it has been added to the cart

To offer users the possibility to add all the products of their wishlist to the cart, you must enable the option Enable “Add all to cart”.

Add all to cart option
Add all products in the wishlist to cart

How to arrange products in the wishlist

By enabling the option Enable drag and drop, you will give users the possibility to easily arrange the order of the products they have added to their wishlist through a drag-and-drop action.

Drag and drop wishlist products
Drag and drop option to arrange products

Actions on wishlist page

There are three wishlist actions: creation, management, and search. You can manage these by enabling the option Show link to pages.

Wishlist actions option
Actions on wishlists
  • Create a new wishlist: To create a new wishlist, you have to insert the name and select the status, to choose from “public”, “private” and “shared”.
Create a new wishlist

Please, note: This option is available only if the multi-wishlist feature is enabled. If not, users cannot create a new wishlist and all items will be saved in the default wishlist. You can enable the multi-wishlist as explained in this page.

  • Manage wishlists: to edit one of the created wishlists click on “Your wishlists” field. From the page you will be redirected to, you could edit the status of the wishlist or remove it.
Manage your wishlists
  • Search wishlist: the search wishlist function allows obtaining a complete list of all the wishlists, with “public” status, related to the user’s name or to the specified email address.
Search wishlist

Share wishlist

Users can only share the wishlist for the socials you selected in the Wishlist detail page options:

Share wishlist on social media option
Share wishlist on social media example

To configure the social media title, text and icons, you can refer to the Customization tab from this page.

Ask for an estimate

By enabling the Ask for an estimate button, users will be able to ask the administrator for the final price of the products added to the Wishlist. The administrator receives an email with a link to the concerned wishlist asking for an estimate.

Ask for an estimate

To give users the possibility to add some notes to the request to be sent, enable the Show additional notes popup option.

The plugin automatically shows the email field to unregistered users. Other fields can be added through the button Add new field. We will analyze later how to set these fields.

The popup will show after users click on Ask for an estimate on the wishlist page.

Ask for an estimate button

According to the fields configured, the popup will look like this

Ask for an estimate popup

How to set additional fields

Let’s analyze the options available in the settings of the additional fields that will show in the popup.

  • Label for the field: insert the name of the field you want to show
  • Required field: enable if you want the field to be required. Leave it disabled to show it as optional
  • Placeholder for the field: enter the placeholder to show in the field
  • Field description: type here the description of the field
  • Position of the field in the form: choose from three different positions: first (this will show the field as first), last (this will show the field as last when two or more available), wide (this will show the field in the whole row).
  • Type of field: choose the type of field from TextEmail, Phone, URL, Number, Date, Textarea, Radio, Checkbox, and Select.

If choosing Select and Radio, a new entry (Enter options for the field) will appear to let you enter the options to be shown in the dropdown.

Select field

Here is an example of how the Select field looks like in the frontend:

Select field example

You can see how to manage and customize the “ask for an estimate” email options in the Email settings.