We will explain step-by-step how to create a basic, standard auction.
Step 1. Create an auction product and set price
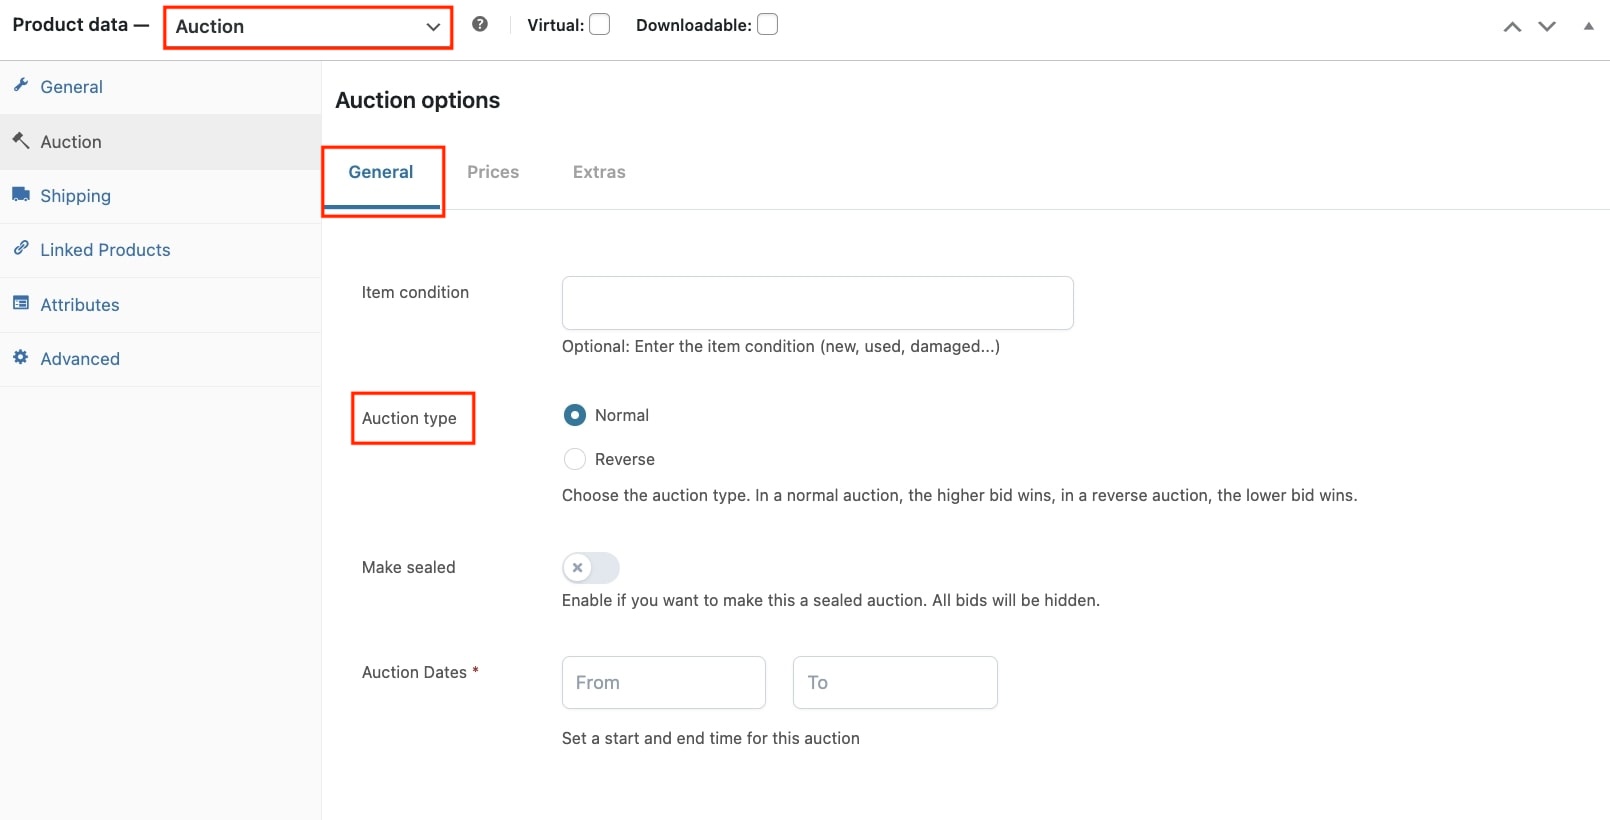
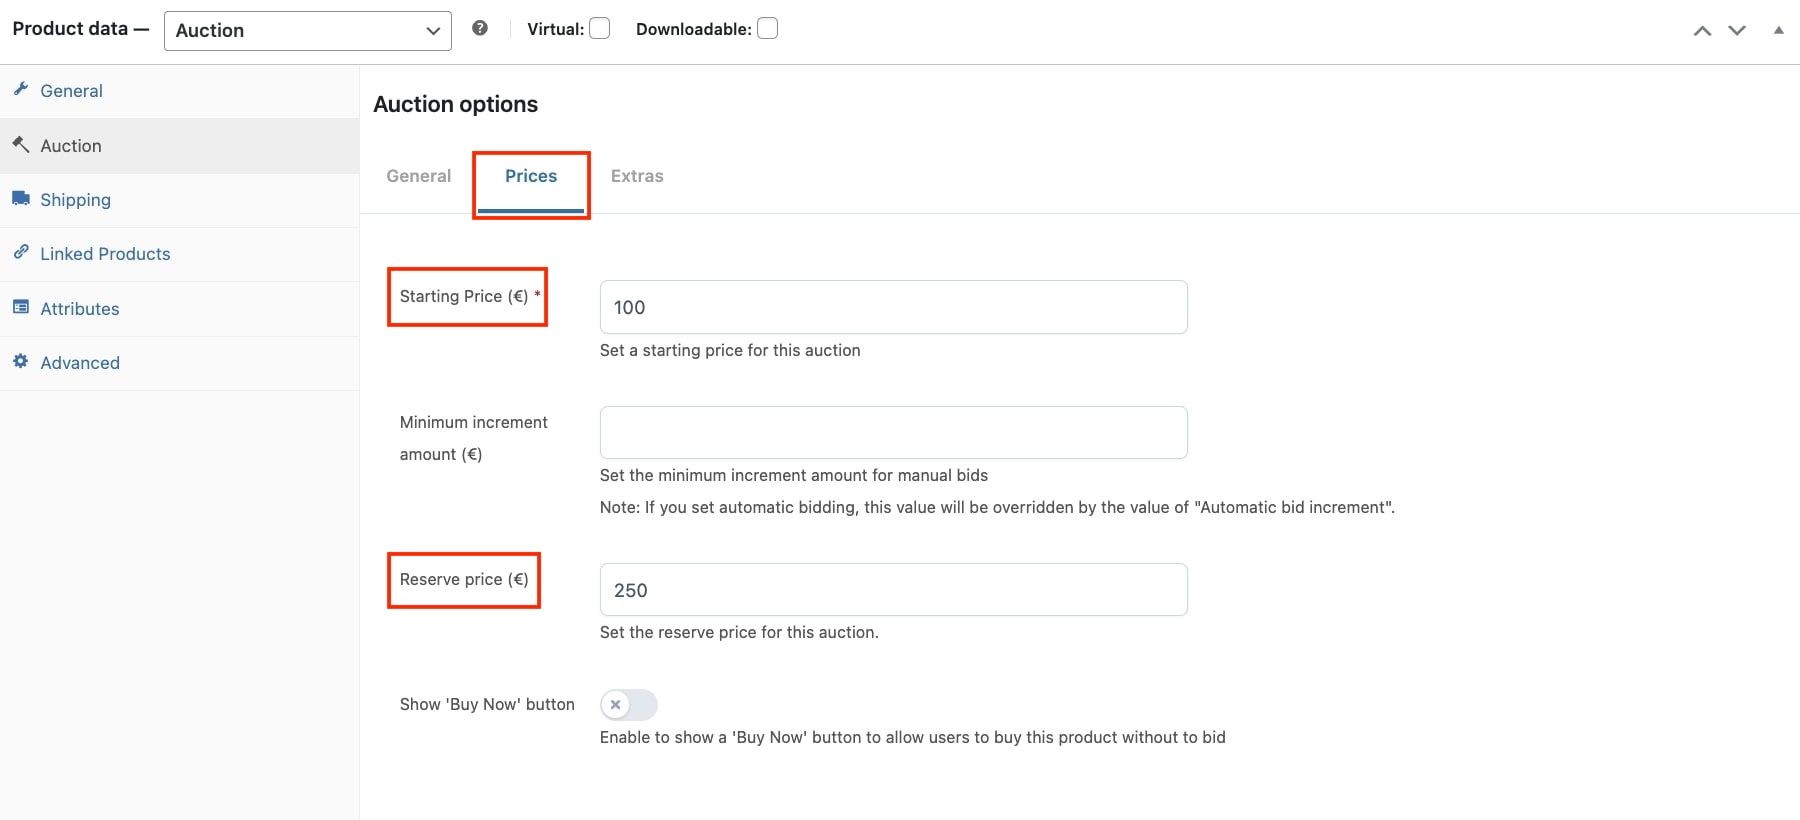
We select ‘Auction’ from the dropdown and select the auction type: ‘Normal’. We go to the ”Prices” tab and set the mandatory starting price to 100, so the bidding will start from there.
Step 2. Set the start- and end date
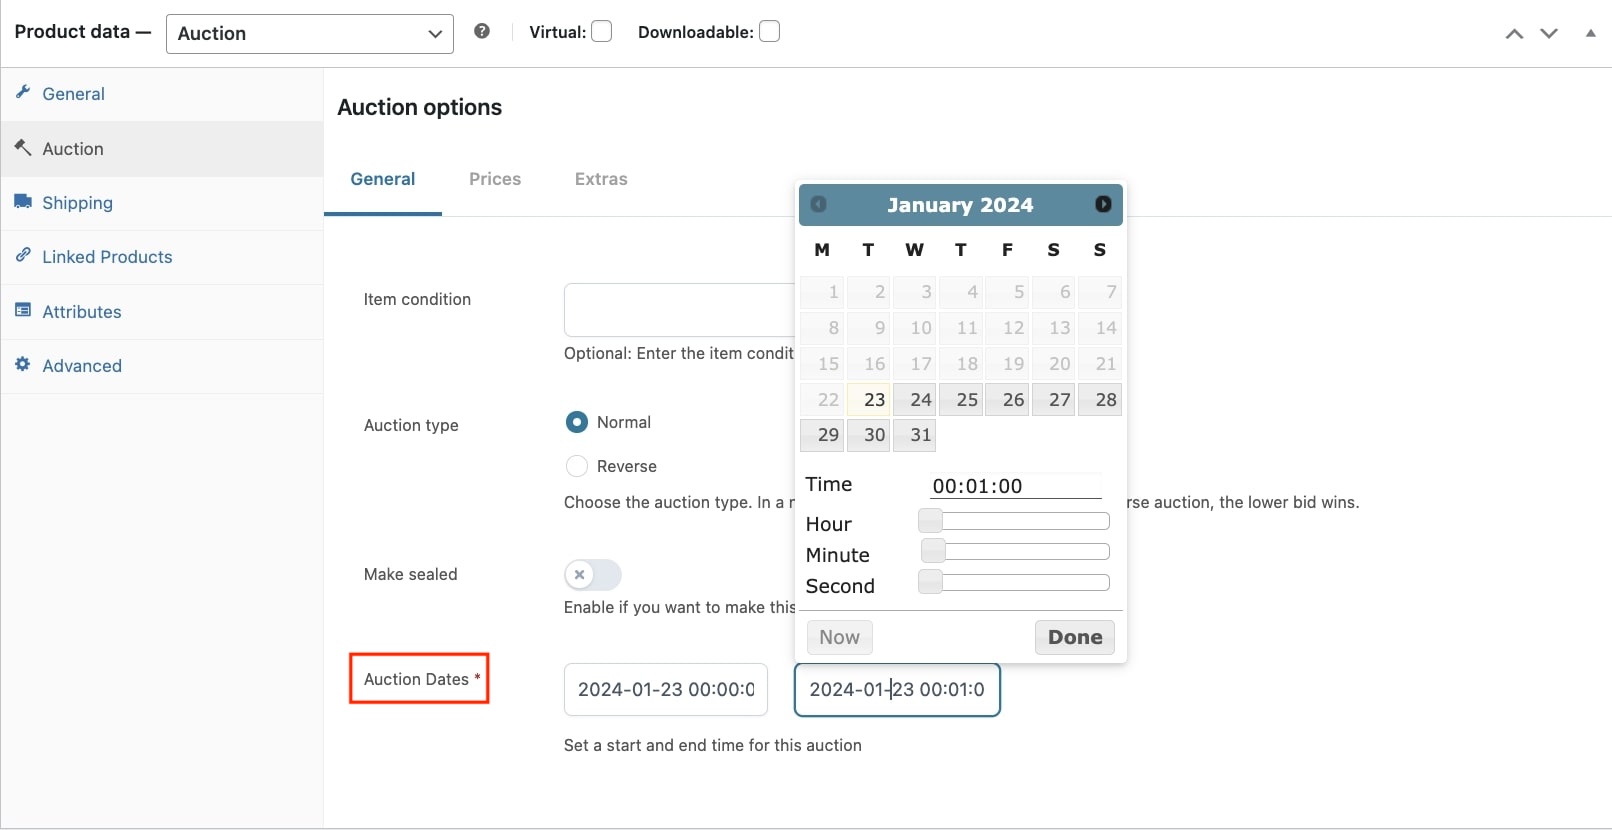
We go back to ”General” tab, and we select the start date (we could use the ‘now’ button to select today’s time and date) > Done. We click on the end date field, and give in the end date and time. Now go to the top to save the settings.
Step 3. Check the end result
On the shop page we see the minimum amount we gave in, the countdown and the end date.
We will explain step-by-step how to create a basic, standard auction with a fee. What does this ‘fee’ mean exactly? It means that a user will have to pay a xx amount in order to be able to start bidding.
Step 1. Create an auction product and set price
We select ‘Auction’ from the dropdown and select the auction type: ‘Normal’. We go to the ”Prices” tab and set the mandatory starting price to 100, so the bidding will start from there.
Step 2. Set the start- and end date
We go back to ”General” tab, and we select the start date (we could use the ‘now’ button to select today’s time and date) > Done. We click on the end date field, and give in the end date and time.
Step 3. Set auction fee for this product
Go to ‘advanced options’ tab so we can override the general options, like the fee (if set/not set). We enable the ‘override’ option and we enable the ‘fee before bid’ option and finally give in the amount, Now go to the top to save the settings.
We will explain step-by-step how to create a basic, standard auction with an option to purchase the product directly, without bidding.
Step 1. Create an auction product and set price
We select the auction type: ”Normal” and go to the ‘‘Prices” tab to set the mandatory starting price to 10.000, so the bidding will start from there and also enable the ‘Buy now’ option, and set the price to 15.000.
Step 2. Set the start- and end date
We go back to ”General” tab, and we select the start date (we could use the ‘now’ button to select today’s time and date) > Done. We click on the end date field, and give in the end date and time.
Step 3. Check the end result
On the shop page we see the minimum amount we gave in, the countdown and the end date. Besides that, we also see the ‘buy now’ button and the price.
After someone purchases the product through the ‘buy now‘ option, it will show a message with the reason why the auction suddenly closed.
We will explain step-by-step how to create a basic, standard auction, with a reserved price. This means that users can place bids as usual, but they will have to reach at least the reserved price, in order to be able to purchase the product. If users do not reach the reserved price, the auction will close without a winner. For options about what to do if a reserved price is not reached, check this page here.
Step 1. Create an auction product and set price
We select the auction type: ”Normal” and go to the ‘‘Prices” tab to set the mandatory starting price to 100, so the bidding will start from there Now we set the reserve price, the minimum price that has to be reached in order to sell the product.
Step 2. Set the start- and end date
We go back to ”General” tab, and we select the start date (we could use the ‘now’ button to select today’s time and date) > Done. We click on the end date field, and give in the end date and time.
Step 3. Check the end result
On the shop page we see the minimum amount we gave in, the countdown and the end date. Below the ‘bid’ field, we are informed that the product has a ‘reserve price’.
After placing a bid, that apparently is high enough, we see the message has changed, and the reserve price has been exceeded.
What is a reverse auction? You might ask. A reversed auction is, as the name says, reversed. Instead of inserting a minimum amount, you now put in a maximum amount, and the users can keep bidding to lower the product price.
Step 1. Create an auction product and set price
We start by selecting the ‘Reverse’ auction type option. After that we go to ”Prices” tab and set the starting price, which should be the maximum price. As the users can keep bidding to lower the price.
Step 2. Set the start- and end date
We go back to ”General” tab, and we select the start date (we could use the ‘now’ button to select today’s time and date) > Done. We click on the end date field, and give in the end date and time.
Step 3. Check the end result
On the shop page we see a message, informing the user that the auction is reversed. Furthermore we see the minimum amount we gave in, the countdown and the end date.
After placing a bid, just like a normal auction, the current bid price has changed. However, since it is a ‘reversed auction’ the price is lower instead of higher.
We will explain step-by-step how to create a sealed auction. This means that all bids and messages in this auction will be hidden for the users. The admin however, will see all bids in the backend.
Step 1. Create an auction product and set price
We select ‘Auction’ from the dropdown and select the auction type: ‘Normal’. Now we enable the ‘sealed auction’ option, so the bids will be hidden for the users. Go to the ”Prices” tab and we give in the mandatory starting price (100), so the bidding will start from there.
Step 2. Set the start- and end date
We go back to ”General” tab, and we select the start date (we could use the ‘now’ button to select today’s time and date) > Done. We click on the end date field, and give in the end date and time. Now go to the top to save the settings.
Step 3. Check the end result
On the shop page we see a message, informing the user that the auction is sealed, and all bids are hidden. Furthermore we see the minimum amount we gave in, the countdown and the end date.
What is automatic bidding exactly? Well, you simply enter the highest price you’re willing to pay for an item, and we’ll do the rest.
Once you set up automatic bidding, you can stay ahead of the competition for an item without needing to be on the site to bid yourself.
To set up automatic bidding on an auction product, the user will enter the maximum amount he likes to pay for that item and places a bid. The plugin will bid in increments on behalf of the user, to keep him in the lead but only up to the limit they gave in.
The plugin also sends an email to the user, if someone outbids their max amount, so they can decide to increase the maximum limit again.
How to set up bid increments with the plugin?
When another user places a bid, the plugin will place a slightly higher bid on behalf of the user. The amount the bid increases by is known as a bid increment.
Step 1. Choose the bid type within the product editing page
We can choose either the ‘simple’ increment or the ‘advanced’ increment. With the simple increment we only have to add 1 amount (10€), that will be used regardless of the current bid.
In this example we will choose the advanced option however.
Step 2. Setting the advanced increment rules
Generally, bid increments are smaller when the bid price is low and larger in higher price brackets, so we will follow this example.
Current price
Bid increment
0,01 to 4,99
+0,10
5,00 to 24,99
+0,50
25,00 to 99,99
+1,00
100 and up
+2,50
Step 3. How does the automatic bid up work?
Suppose we set a 10€ automatic bid up for the product and the auction base price is 50€ like we have set in step 1.
Jane places a bid of 100€. It is the first bid and we have set an automatic bid up value, the system will record the bid in the amount of the product baseprice rather than the 100€ the Jane put in.
Now another user, Carlos, places a bid of 60€.
The system records the new bid and checks the available conditions to apply an automatic bid up for those users who previously made a bid for the auction.
In our example, we have a recorded bid of 50€ made by Jane. Actually the user initially bade 100€, therefore the system can automatically apply a new bid for her.
The new ‘automatic’ bid will be 70€. This value is given by the 10€ automatic bid up applied to the highest recorded bid (60€).
Step 1. Choose the auction product you want to place a bid on.
I decide to go for the painting of € 250.
Step 2. Check possible requirements or needs.
Great, I can see the product does not have a reserve price, and there is no ‘buy now’ option. So I can bid without the concern that someone will purchase it before the auction ends. Furthermore I can see that I am the first one to place a bid.
Step 3. Bidding popup
I put in an amount of 300€ and click on ‘bid’. A popup appears reminding me of the fact that I am making a commitment, and is asking me if I want to continue. Yes, I do.
Step 4. Seeing the result of your bid
I see the price has gone up to my bid of 300€ and I see myself in the ‘Bids’ tab. Yes, still the only one, and with only 3 minutes on the clock, I am hopeful that I will win.
Step 5. Winning the auction
I won, perfect! I now quickly click on the ‘pay now’ button, since they only give me 3 days to pay.
Step 6. Payment
I decide not to add any other products, I am happy with this one alone. I continue by clicking on ‘place order’
Step 7. Check my account page
In the My Account page I can see my bid, the current bid and the fact that the auction is closed.