As soon as you open the plugin panel, you will see a dashboard with the main information about your vendors’ sales.
Specifically you can see:
Number of commissions
Total commissions amount
Pending commissions amount
Paid commissions amount
Refunded commissions amount
Total net earnings from vendors
Total earnings from vendors
Orders
This info can be filtered by date or date range, but you can also choose whether to show the info from all vendors, one specific vendor or compare two or more vendors, as in the screenshot below:
Finally, in the two boxes below the charts, you will find a list with the top products and the top vendors:
Definition of terms Commission: it refers to the partial amount that admin pays to sellers/vendors on each product sold.
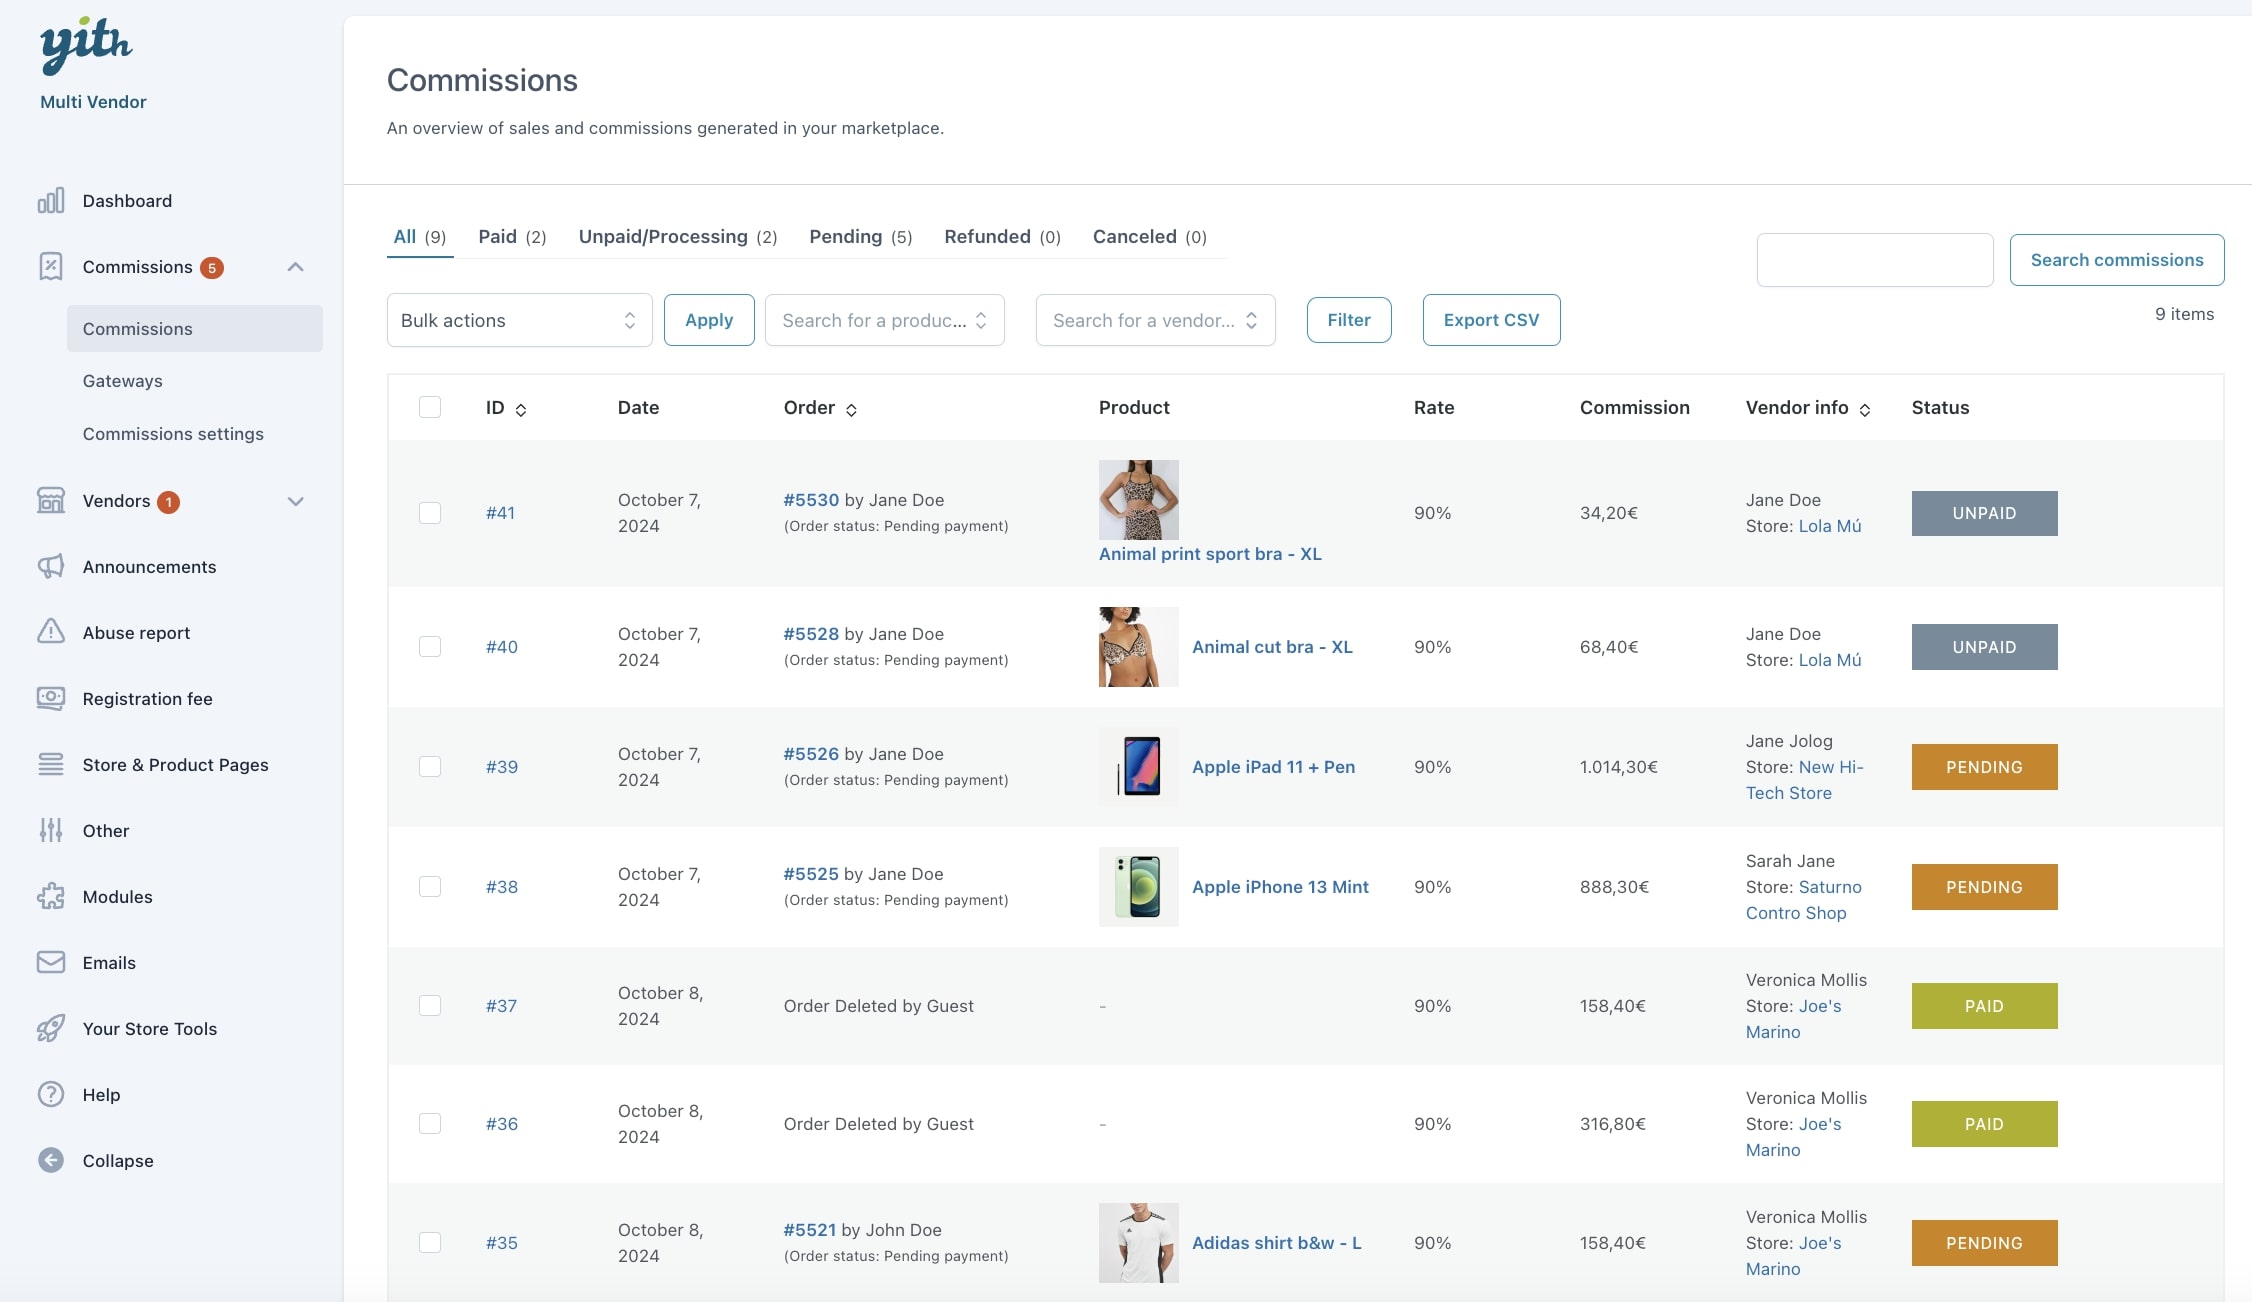
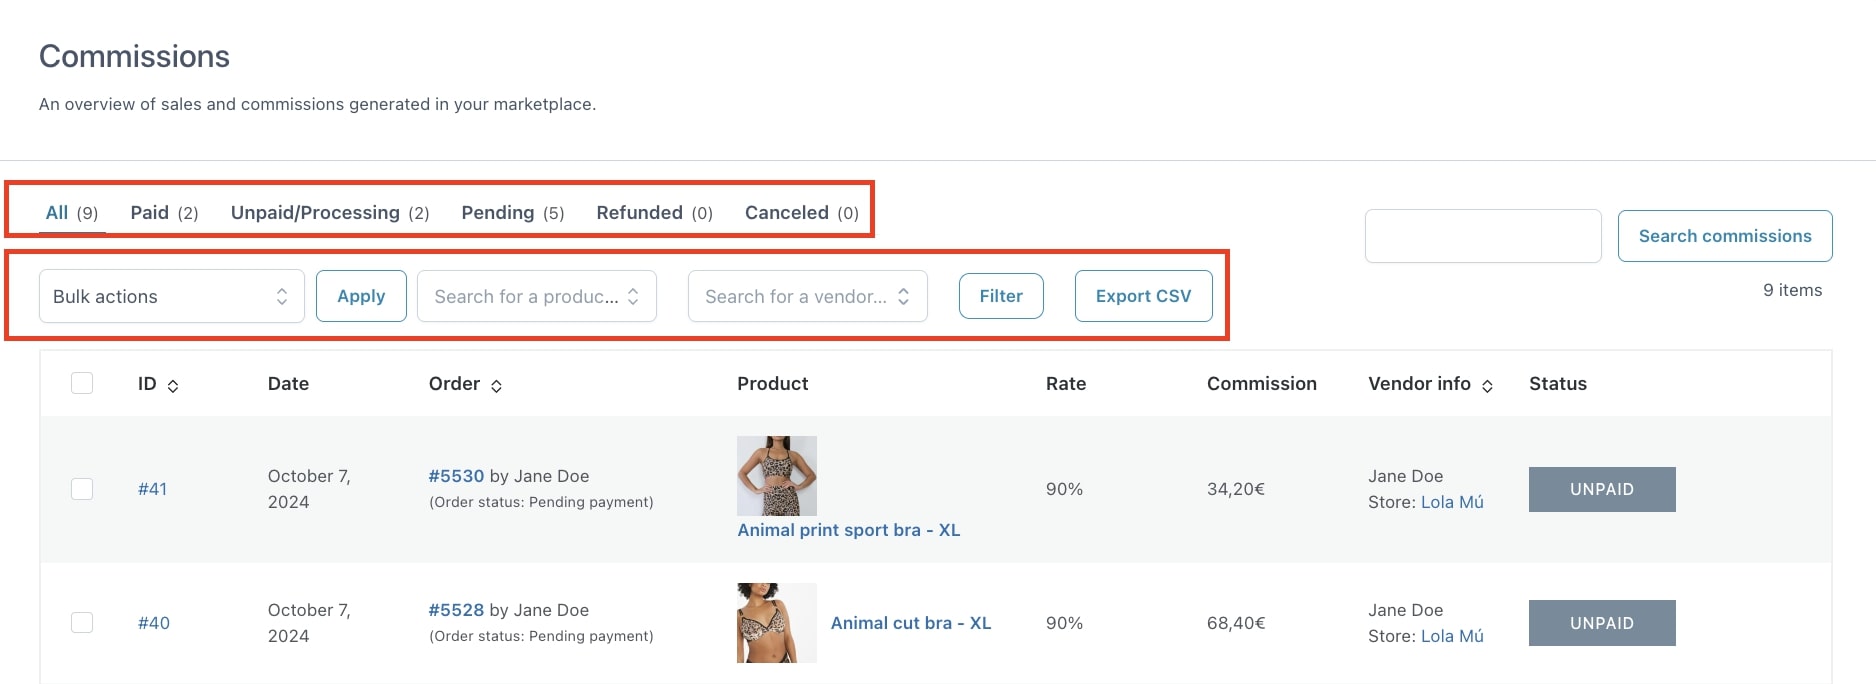
From the Commissions menu, you can see a list with all your vendors’ commissions.
From this view, you can search commissions by ID or by the linked order ID. You can also filter them by status using the filters above, and further filter this view by date, product or vendor.
Additionally you can also export a CSV file of the current view, so export either all commissions or only the displayed ones if any filter has been applied.
Finally you can also bulk edit multiple commissions from the bulk actions menu:
On this page you will see the following info for each commission:
ID: commission ID, available also in order detail page.
Date: date when the commission has been generated.
Order: linked order and user.
Product: product associated to the commission.
Rate: commission rate on the order. You can set the vendor’s commission rate from the → Commission settings and override it from the vendor’s details or from the product page, as explained here.
Commissions: this is the total amount of the commission.
Vendor info: here you find the associated vendor and a link to their store.
Status: commission status. For more details about the commission status, please, refer to this page.
Actions: in the last column, you find the available actions on the commission. You can either view the commission details in a popup (see below for more info) or apply specific actions based on the commission status.
Pro tip: to pay your vendors’ commissions manually, you can quickly find their payment info by clicking on their store name in the Vendor info column. This will redirect you to that specific vendor; by accessing the profile, you can also find the payment info.
If enabled, in the actions, you will also see the various options to pay with the integrated gateways, like YITH Stripe Connect, YITH PayPal Payouts or YITH Account Funds.
To enable these gateways, please, make sure you install the related plugin and enable it from the gateways section. Refer to this page for more details.
Commission detail in a modal window
When you click on the eye icon in the last column of this page, you will be able to open the commission details in a modal window.
Here you can change the commission status from a drop down menu, see all the commission details, refunds included, and a notes section where all actions on the commissions are recorded.
For more details about the payment of your vendors’ commissions, please, refer to this page.
The commission status is directly linked to the order status that generated the commission, regardless of the payment method used. In the following table, you can see how the commission status changes based on the order status.
Order status
Commission status
on-hold
pending
processing
unpaid/pending
pending
pending
cancelled
cancelled
failed
cancelled
refunded
refunded
completed
unpaid
So, if we opt for the manual payment of commissions, commissions can be paid when they get the status unpaid.
If we have activated any of the automatic payment gateways, when the commissionis ready to be paid (so when the order is set to completed), it will automatically change to
processing (if the gateway needs some processing time, like with PayPal)
and finally to paid, if the payment goes through.
If the payment does not go through for any reason, the commission status will automatically switch back to unpaid.
From this page, you can handle the gateways available for the payment of your vendors’ commissions.
Each of them requires an additional plugin, so, once installed and configured you will be able to enable it as a gateway from this page and activate some specific options for each of them.
For more details about each single gateway, please, refer to this page.
From this page, you will be able to control some options related to the vendors’ commissions. Let’s check them one by one below.
Default commission: set the default commission percentage for your vendors. You can override this value from the vendor’s profile and the product detail.
Commissions page view: select the default view you want to show when you open the Commissions List page. For example, if you want to view all the unpaid commissions instead of seeing them all, just make sure you select your favorite one.
If a coupon was used, calculate the vendor’s commission:
Based on the original product price
Based on the discounted price
Example: a customer purchases a product that costs €100 and uses a 30% coupon code. The vendor’s commission is set to 80% and this option is set to discounted price.
The plugin will first apply the discount (so, €100 – 30% = €70) and then will calculate the 80% vendor’s commission from €70, so €56.
If you set this to be calculated on the original price, the plugin will calculate the vendor’s commission as 80% of €100, so €80 commission, regardless of how much the customer actually paid by using the 30% coupon (€70). Be careful when selecting this option, because this could cause the admin to take a loss.
Taxes receiver: choose how to handle the taxes, whether to credit them to:
the admin,
the vendor or
split taxes between the admin and vendor.
Let’s make an example to clarify how this option work. Suppose we have:
product A that costs €12 (€10 product price + €2 tax);
vendor A who gets 50% commissions on each product sold.
If you select Taxes receiver > Admin, the vendor will get 50% of the product price, that is €5. The remaining 50% and the tax fee goes to the admin, who gets €5 + €2 = €7.
If you select Split taxes between the admin and the vendor, the vendor gets 50% of the product price and 50% of the taxes as well, that is €5 + 1 = €6.
If you select Taxes receiver > Vendor, the vendor will get 50% of the product price, and €2 tax, for a total of €7. The admin will get the remaining 50% of the product price, so, €5.
Pay commissions to vendors automatically when the order status changes: enable this option to automatically pay commissions to vendors when the order status is Completed and/or Processing. This option requires that you’ve enabled at least one of the available gateways for checkout payments from this page, so you will be able to select it in the following option.
Gateway to use: select the gateway to use on checkout.
Yet, this option can be overridden at vendor and product level, so you can make sure that one or more vendors have a different commission rate or that specific products grant a different vendor commission rate.
Custom commission rate by vendor
To override the commission rate for one or more vendors, you can do that from the vendor’s profile.
Go to Vendors list, and click on the pencil icon next to the vendor you want to update.
Go to the Options tab and select Set a different commission percentage for this vendor. Then, add your custom rate here.
This option can be further overridden at product level (see below).
Custom commission rate by product
To make sure, instead, that a specific product grants a specific commission to the vendor assigned to it, you can simply go to the product settings page.
From the Product Data metabox, go to Commissions and add the custom percentage here. Note: the Commissions tab will only be visible if this product has been already associated to one vendor.
These settings will override the general and vendor rate settings. In case if you set a custom rate for both the vendor and a specific product, the product rate will be applied, as more specific.
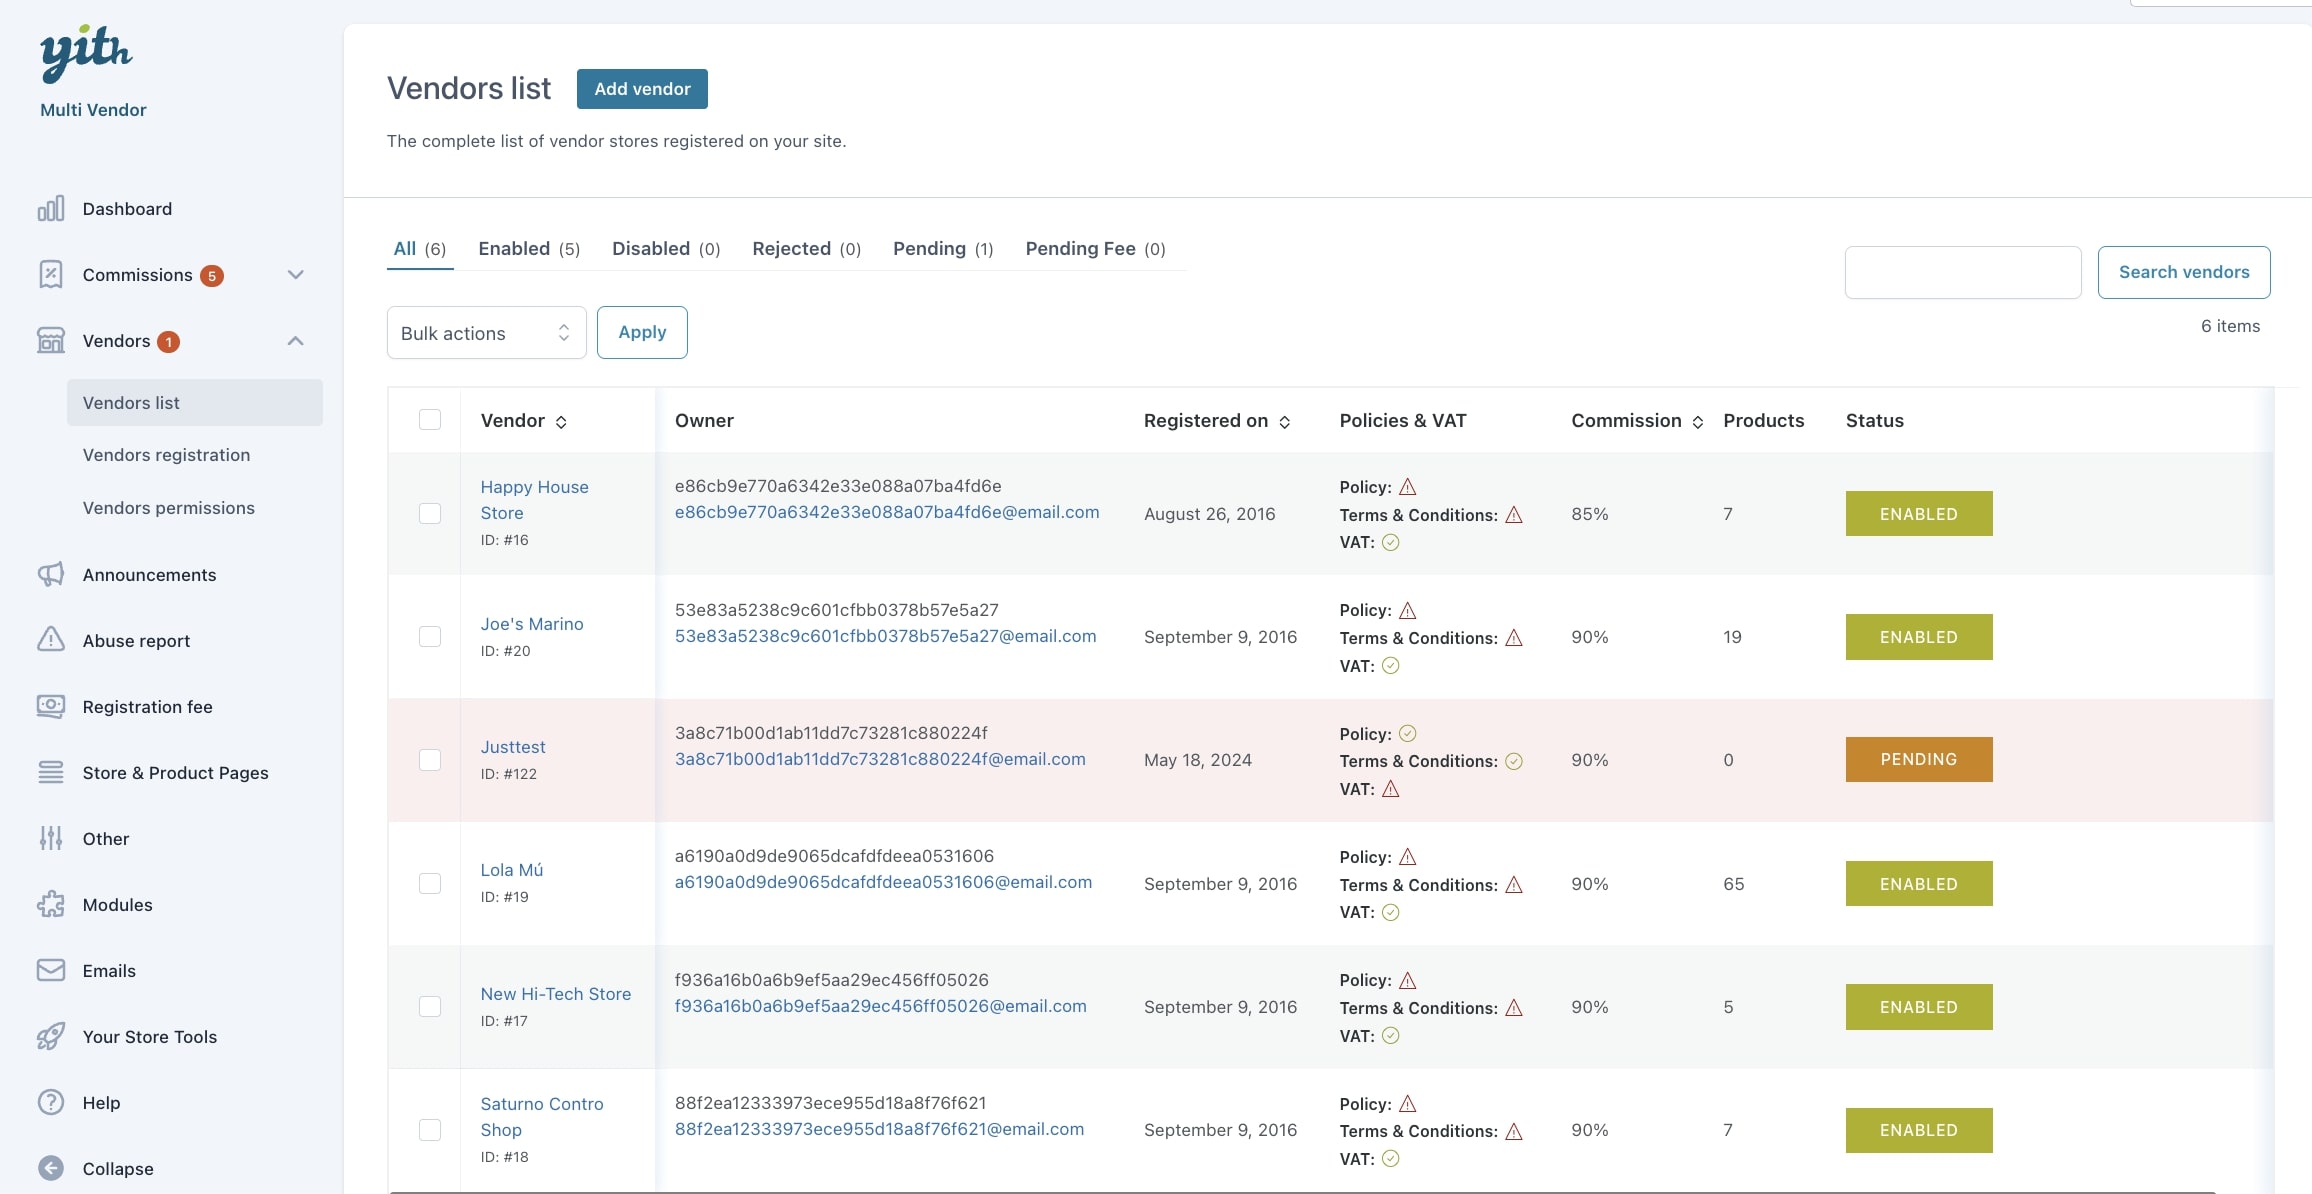
From the Vendors section in the plugin settings, you will find multiple subsections to manage your vendors. The first one is the Vendors list, so a page where you can find all vendors registered and add new ones.
From this page you can also add a new vendor and edit the current ones.
Add a new vendor
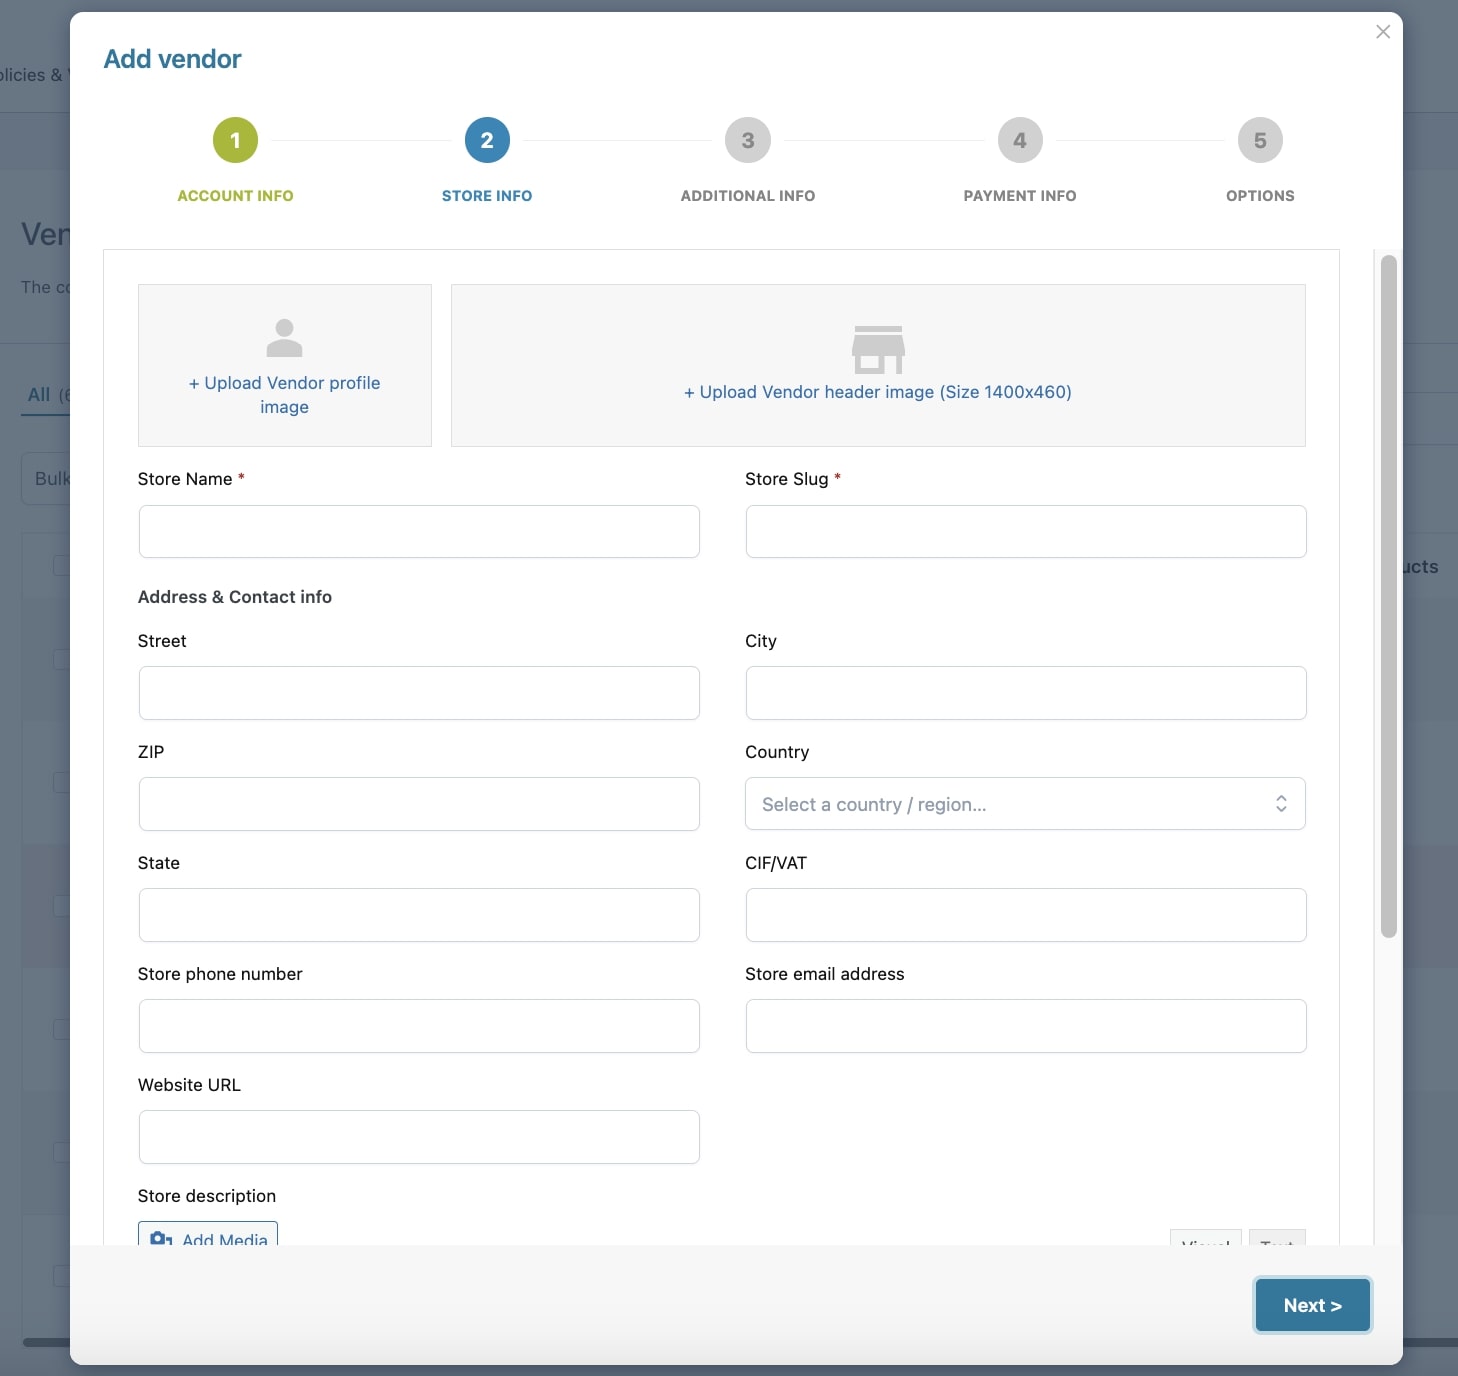
The entire process of creating a vendor will be managed through a wizard in steps. Click on the + Add vendor button.
Step 1 – Account info
From this view, you can choose the user who is responsible for the store. You can either select an existing user or directly create a new user profile from this page.
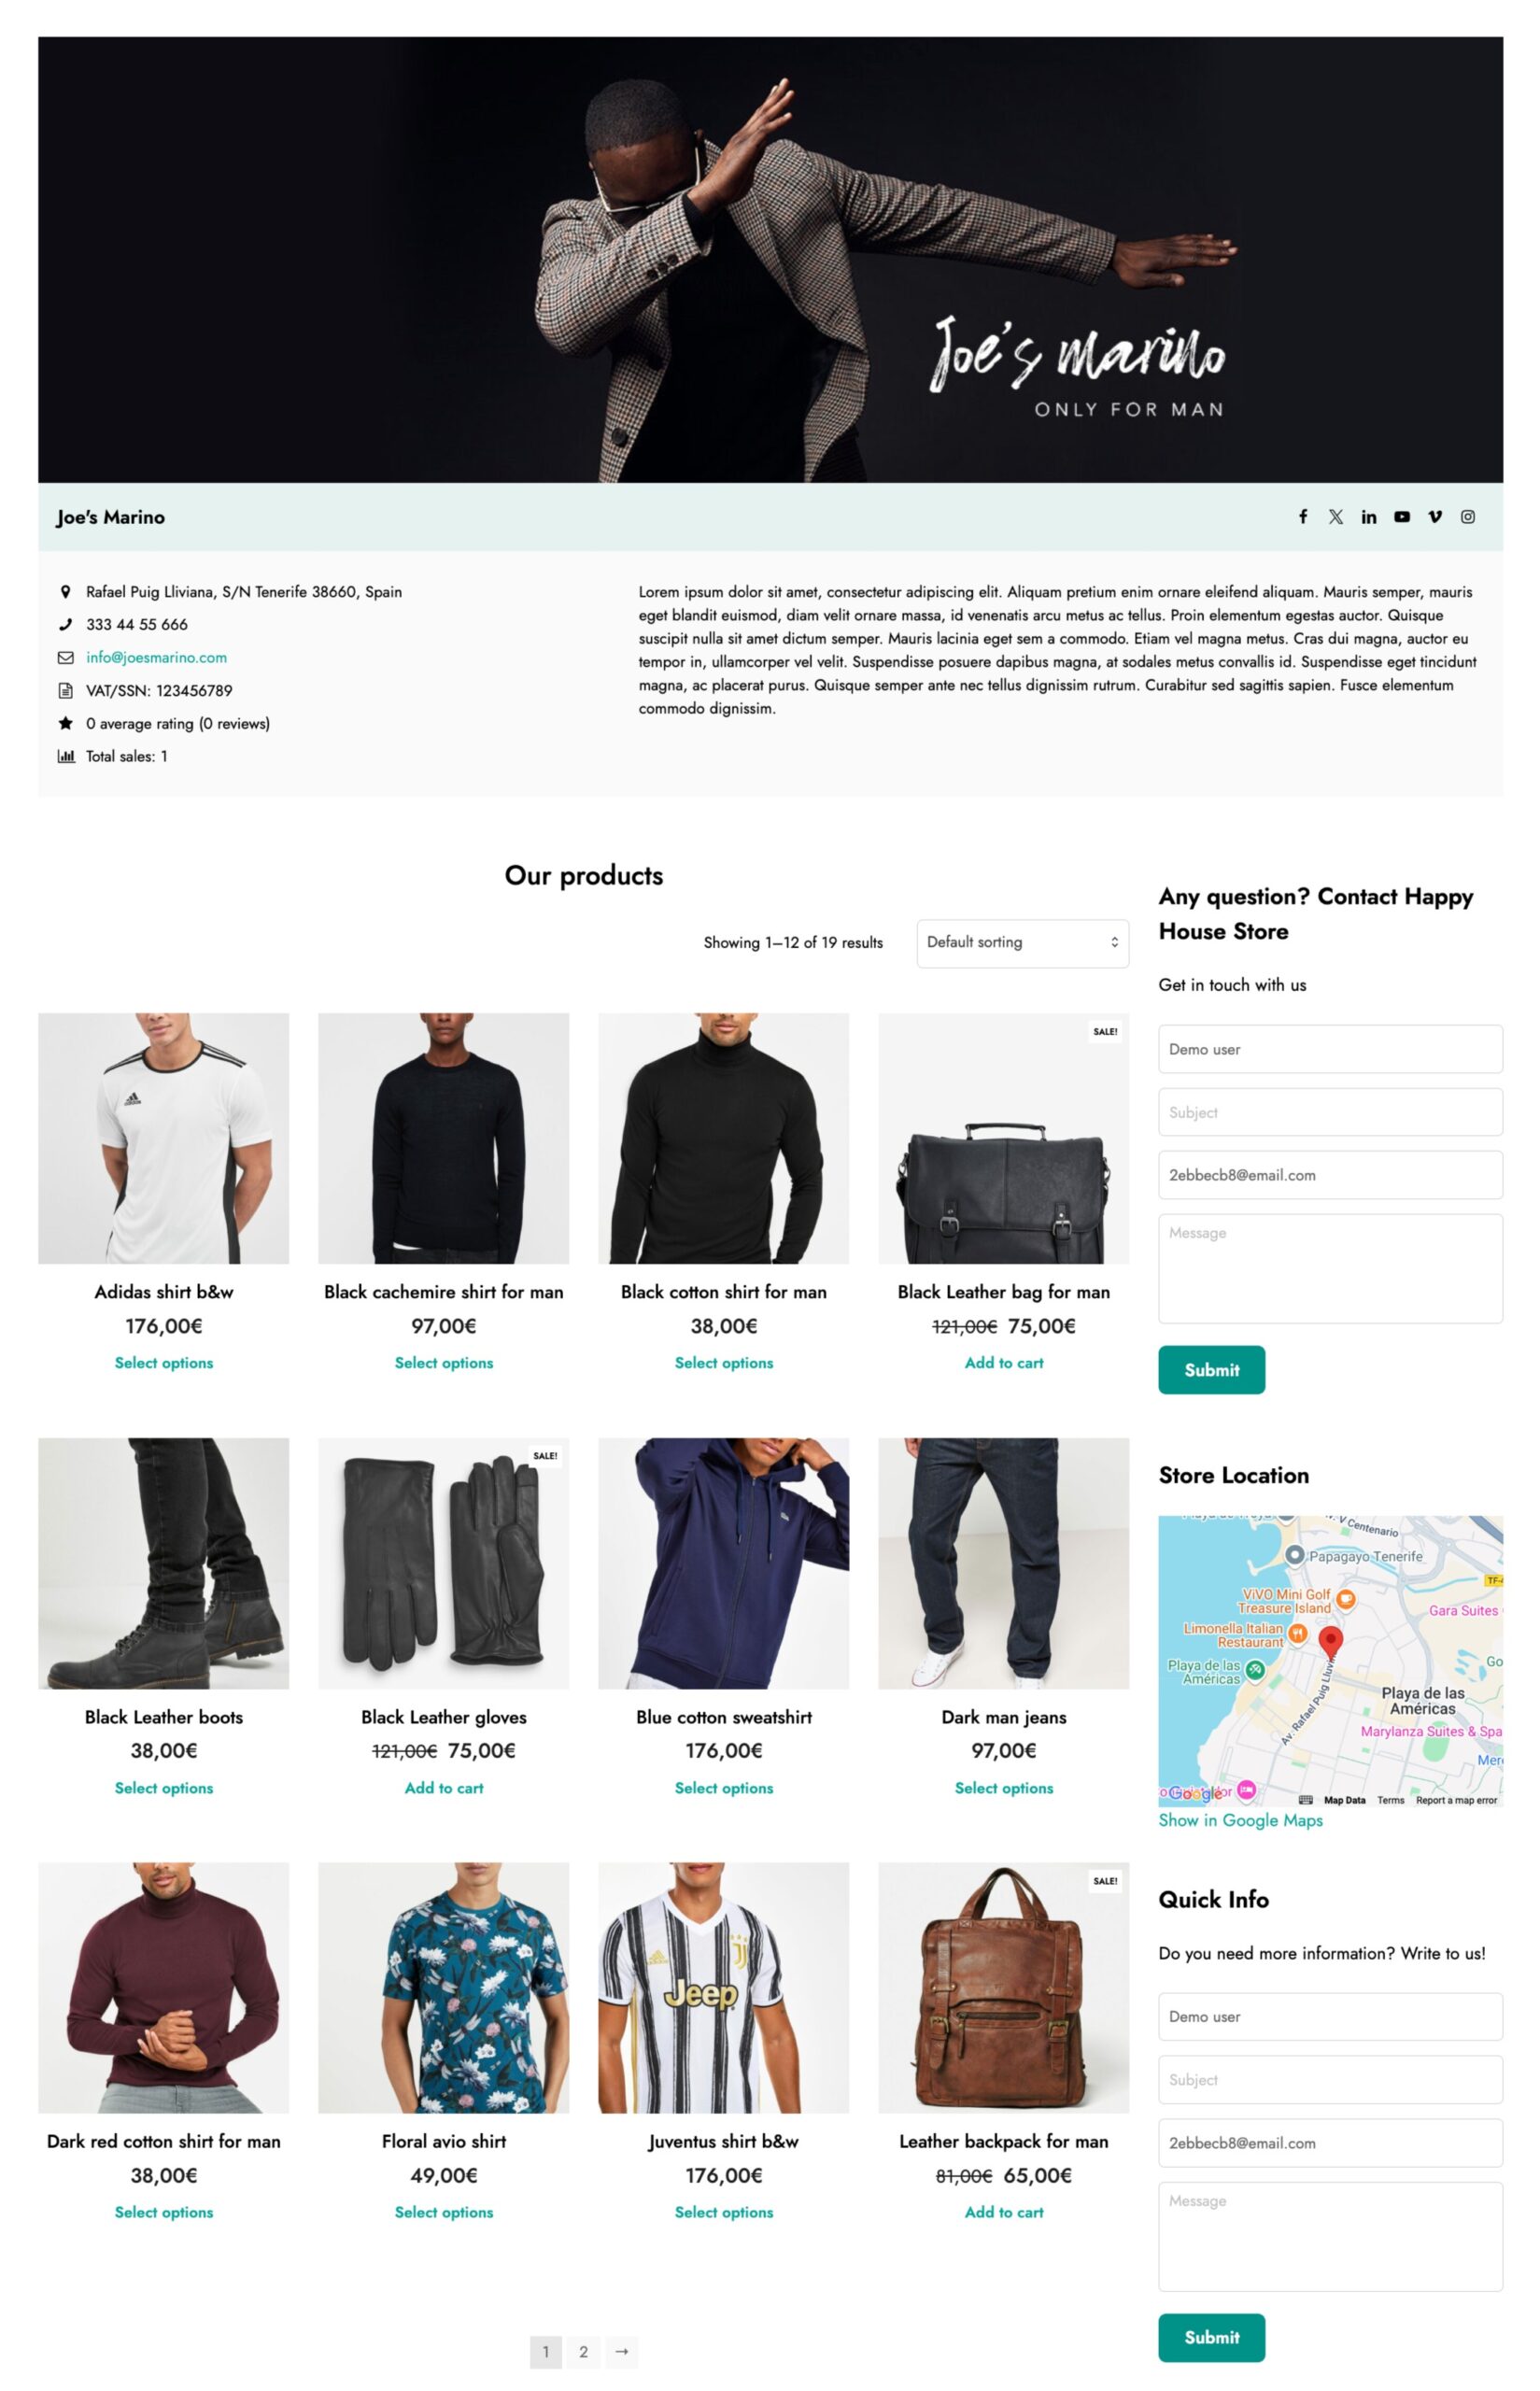
Step 2 – Store info
Here you can add all the vendor store info:
vendor profile image / logo (in the following image, it’s the logo over the header image)
vendor header image
store name
store slug
address and contact info
VAT number
phone number
store email address
store description
company legal notes
This is an example of how a vendor’s store page looks like:
Step 3 – Additional info
Here you can add the vendor’s social info:
Facebook
X
Instagram
YouTube
Vimeo
LinkedIn
Pinterest
Flickr
Behance
Tripadvisor
Step 4 – Payment info
Here you can enter the vendor’s payment info that will be available in the vendor’s details.
Account name
IBAN
SWIFT / BIC
PayPal email
Step 5 – Options
Here you can override some of the general options related to this specific vendor.
Commission base: choose whether to use the default commission rate (that you can set up from the → Commissions settings page) or set a custom one for this vendor. For example, you may want to override the default commission settings that is set to 80% and make sure that this vendor gets a 50%.
Status: select the status for the vendor. Available options are:
Skip admin review: enable this option to allow this vendor to publish new products without the admin’s review. This option overrides the default one set on the → Vendors permissions page.
Allow vendor to set featured products: enable this option to allow this vendor to manage featured products and set some of their products as featured.
Edit a vendor’s account details
Once your vendor is created you can edit some of the details at any time by simply clicking on the pencil icon.
Additionally, you can also see a new Staff tab, where you see all the staff members added by the vendor to their shop. The admin cannot change these settings, but the vendor can do that from the Vendor staff module.
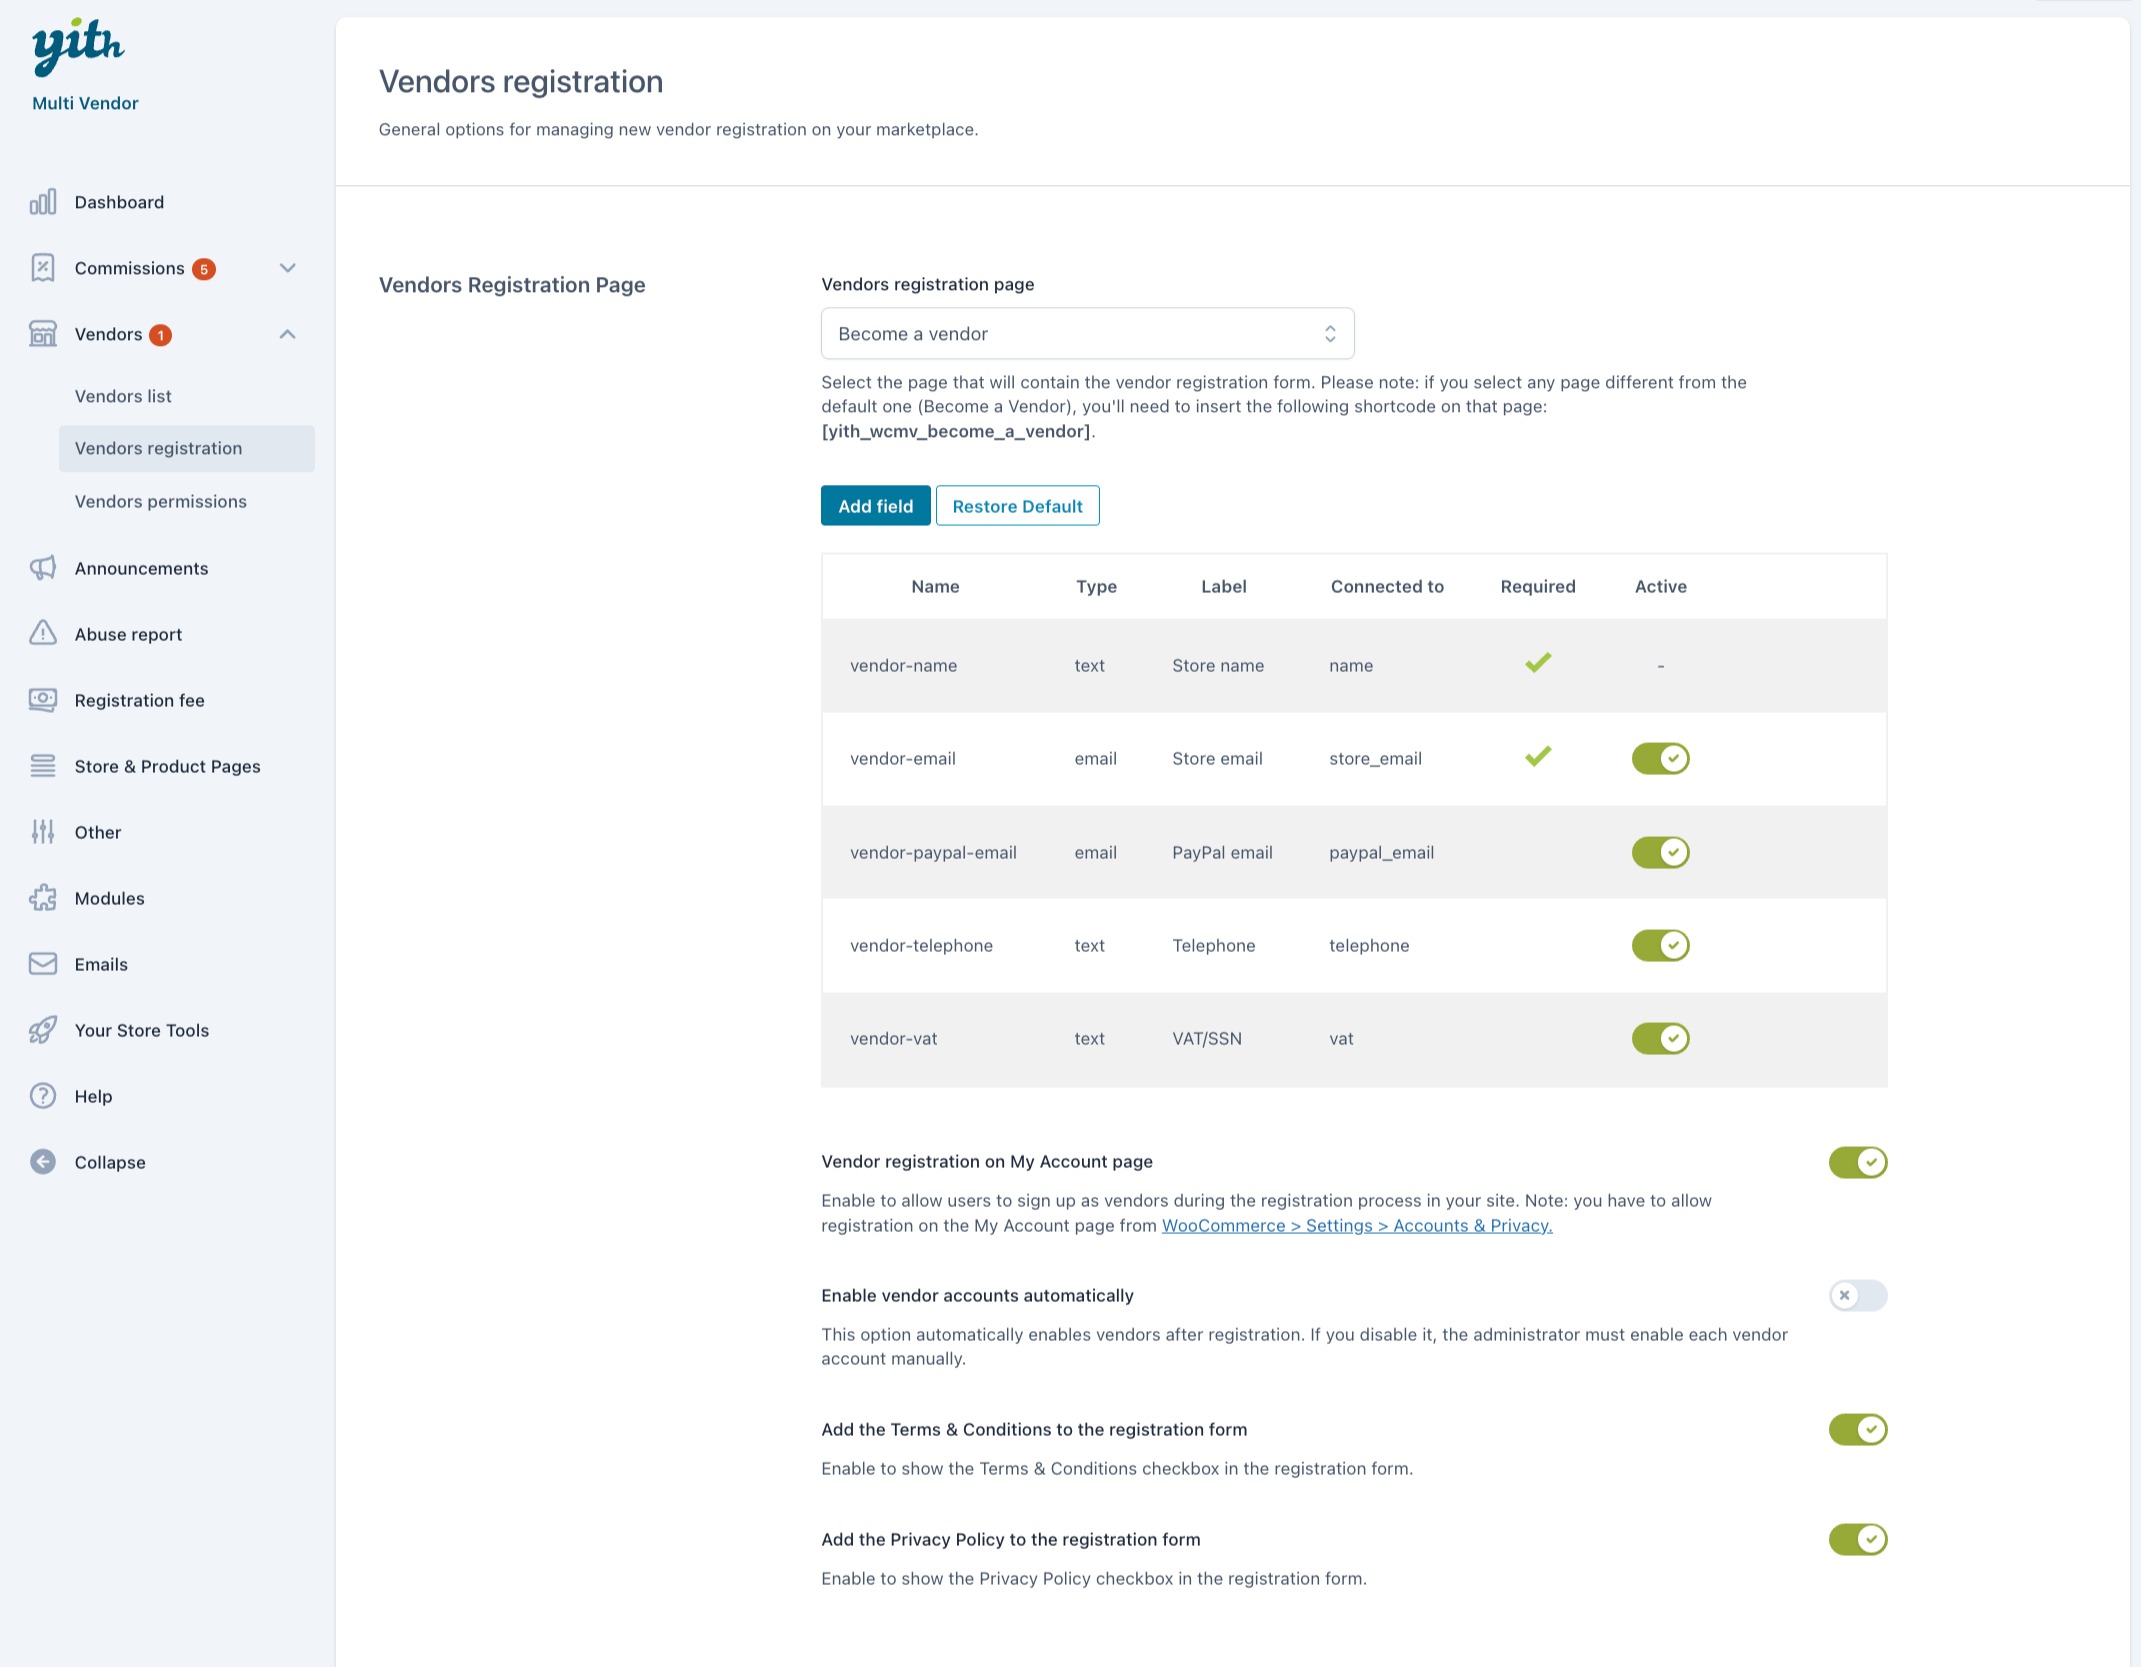
From this section, you will be able to set up the Vendor registration page with all its options.
Vendor registration page: select the page that will contain the vendor registration form. Please note: if you select any page different from the default one [Become a Vendor], you’ll need to insert the following shortcode on that page: [yith_wcmv_become_a_vendor].
Example of a Become a seller page with the registration form
Registration fields
Registration fields: here you can enable/disable the default fields of the registration form, but you can also add new ones.
To add a new field, click on Add field: this will open a modal window, where you can set up all the following options.
Name: this is the name of the field, the one you will see in the registration form list on this page and it’s a mandatory field.
Type:
Text
Email
Phone
Textarea
Radio
Checkbox
Select
Multiselect
Country
State
Label: this is the name of the field as displayed to users on the frontend.
Class: add here one or more CSS classes, separated with commas, to customize this field.
Placeholder: enter here the placeholder text for this field. (available only for Text, Email, Phone, Textarea, Select, Multiselect types).
Connect to: select one of the default fields here if you want to connect this field to one of the default ones visible in the vendor’s profile page.
Options: here you can enter the various select options (this is only visible for Radio, Select and Multiselect types): add the name as displayed on the frontend in the label and set a value.
Position: choose whether the field will appear on the left side (first), right side (last) or will cover the entire width of the form (wide).
Required: choose whether to make this field is a mandatory field.
Let’s see more options related to this page:
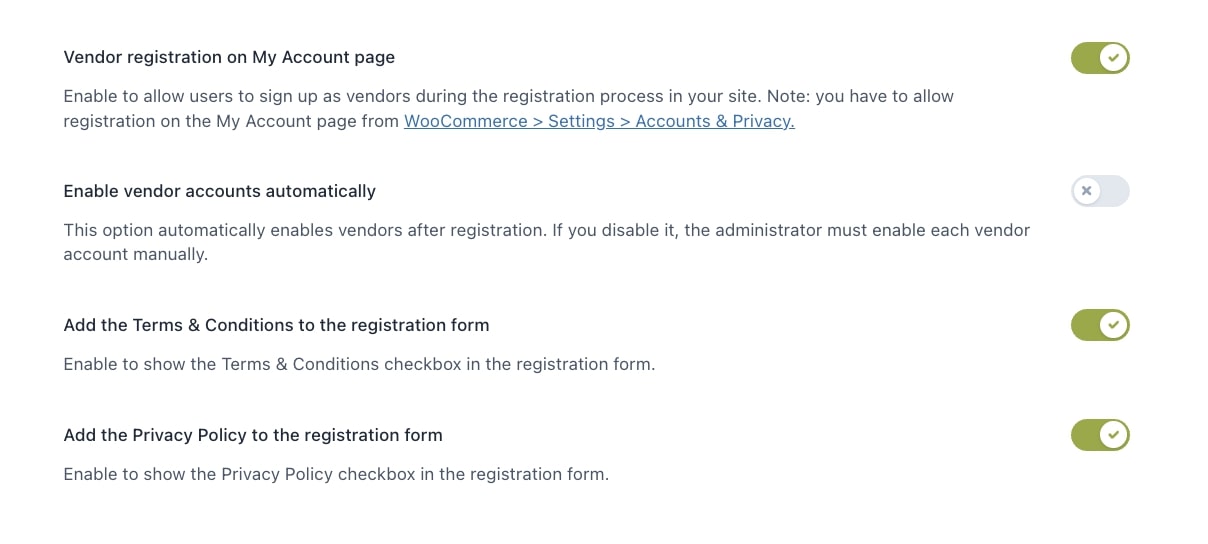
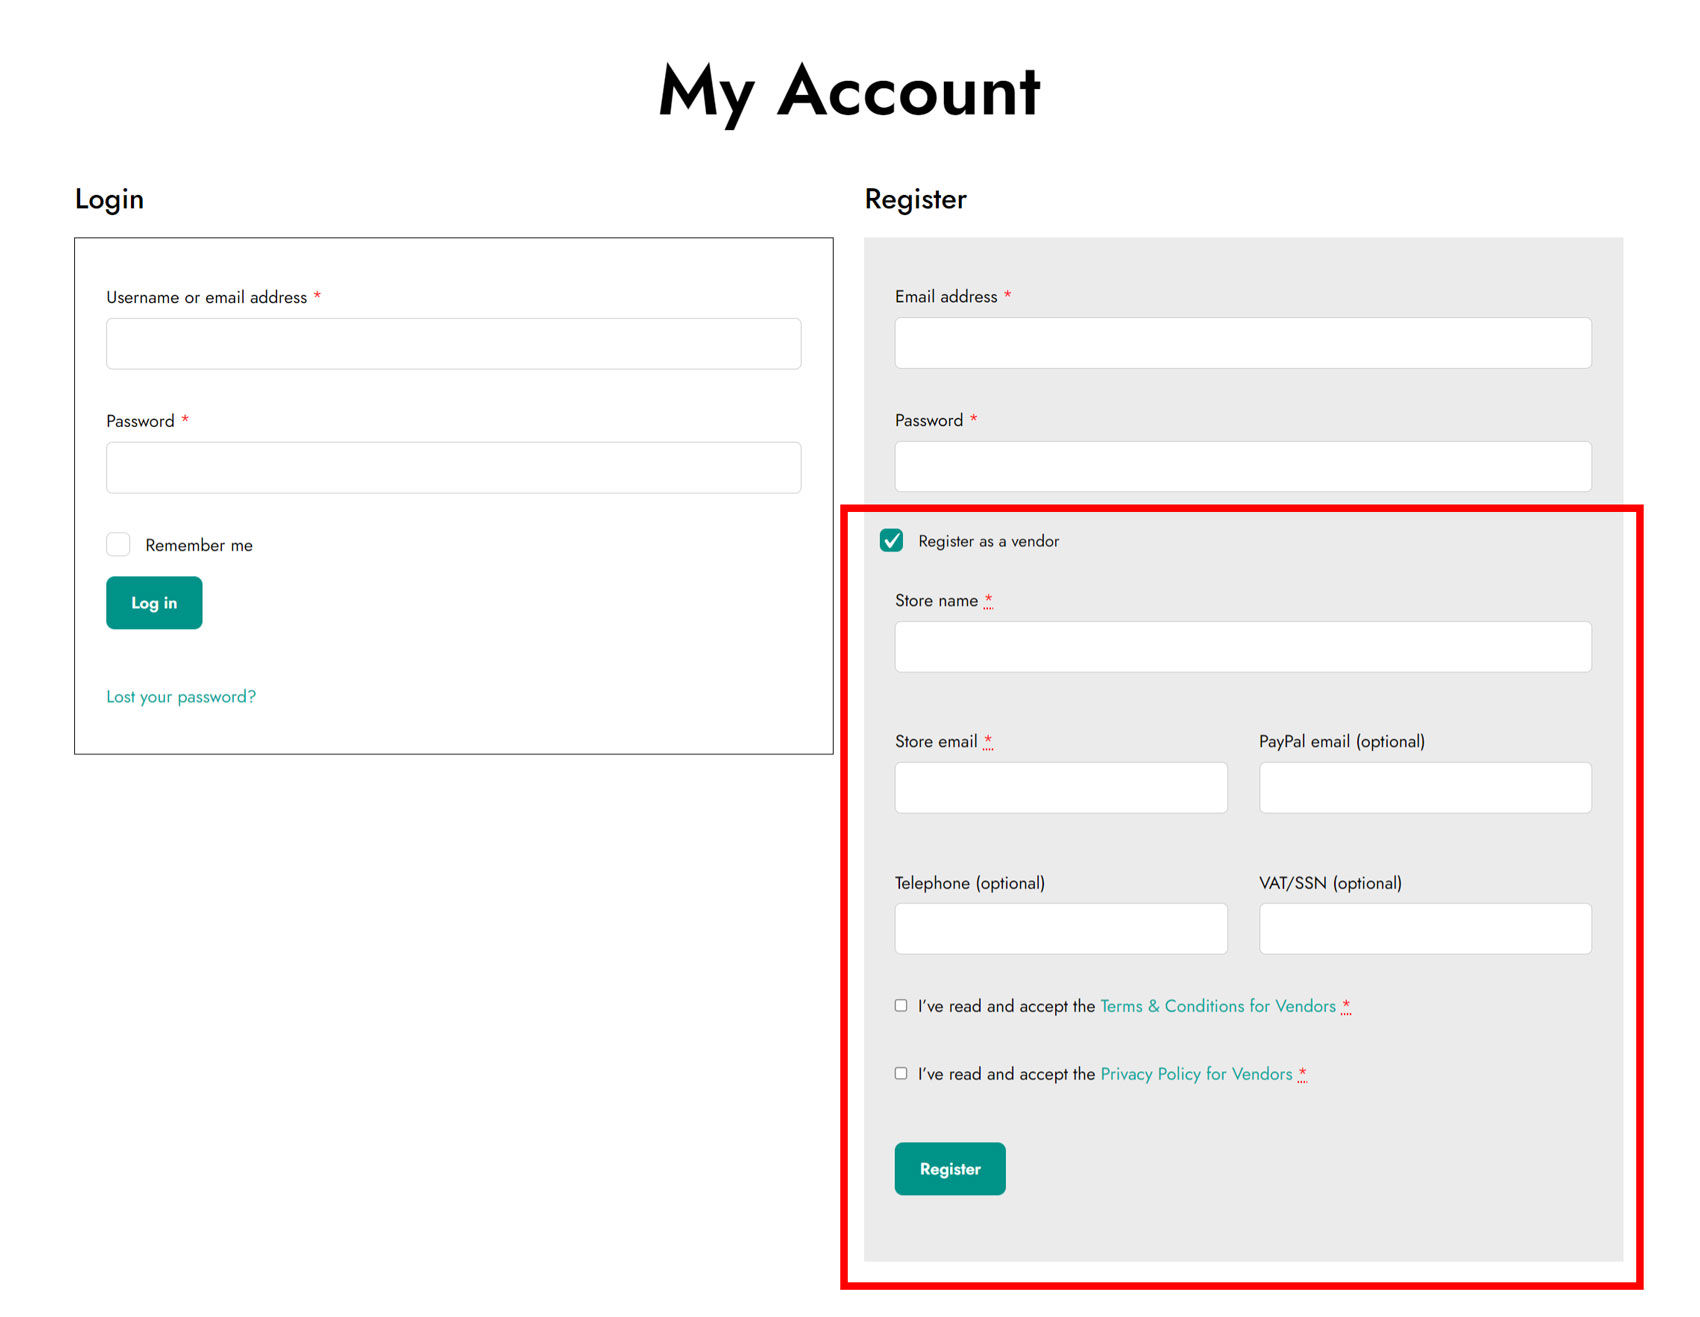
Vendor registration on My Account page: enable to allow users to sign up as vendors during the registration process in your site. Note: you have to allow registration on the My Account page from WooCommerce > Settings > Accounts & Privacy. By clicking on the “Register as a vendor” checkbox, the vendor registration form will be displayed, as in the following screenshot.
Enable vendor accounts automatically: this option automatically enables vendors after registration. If you disable it, the administrator must enable each vendor account manually.
Add the Terms & Conditions to the registration form: enable to show he Terms & Conditions checkboxes in the registration form.
Add the Privacy Policy to the registration form: enable to show the Privacy Policy checkbox in the registration form.
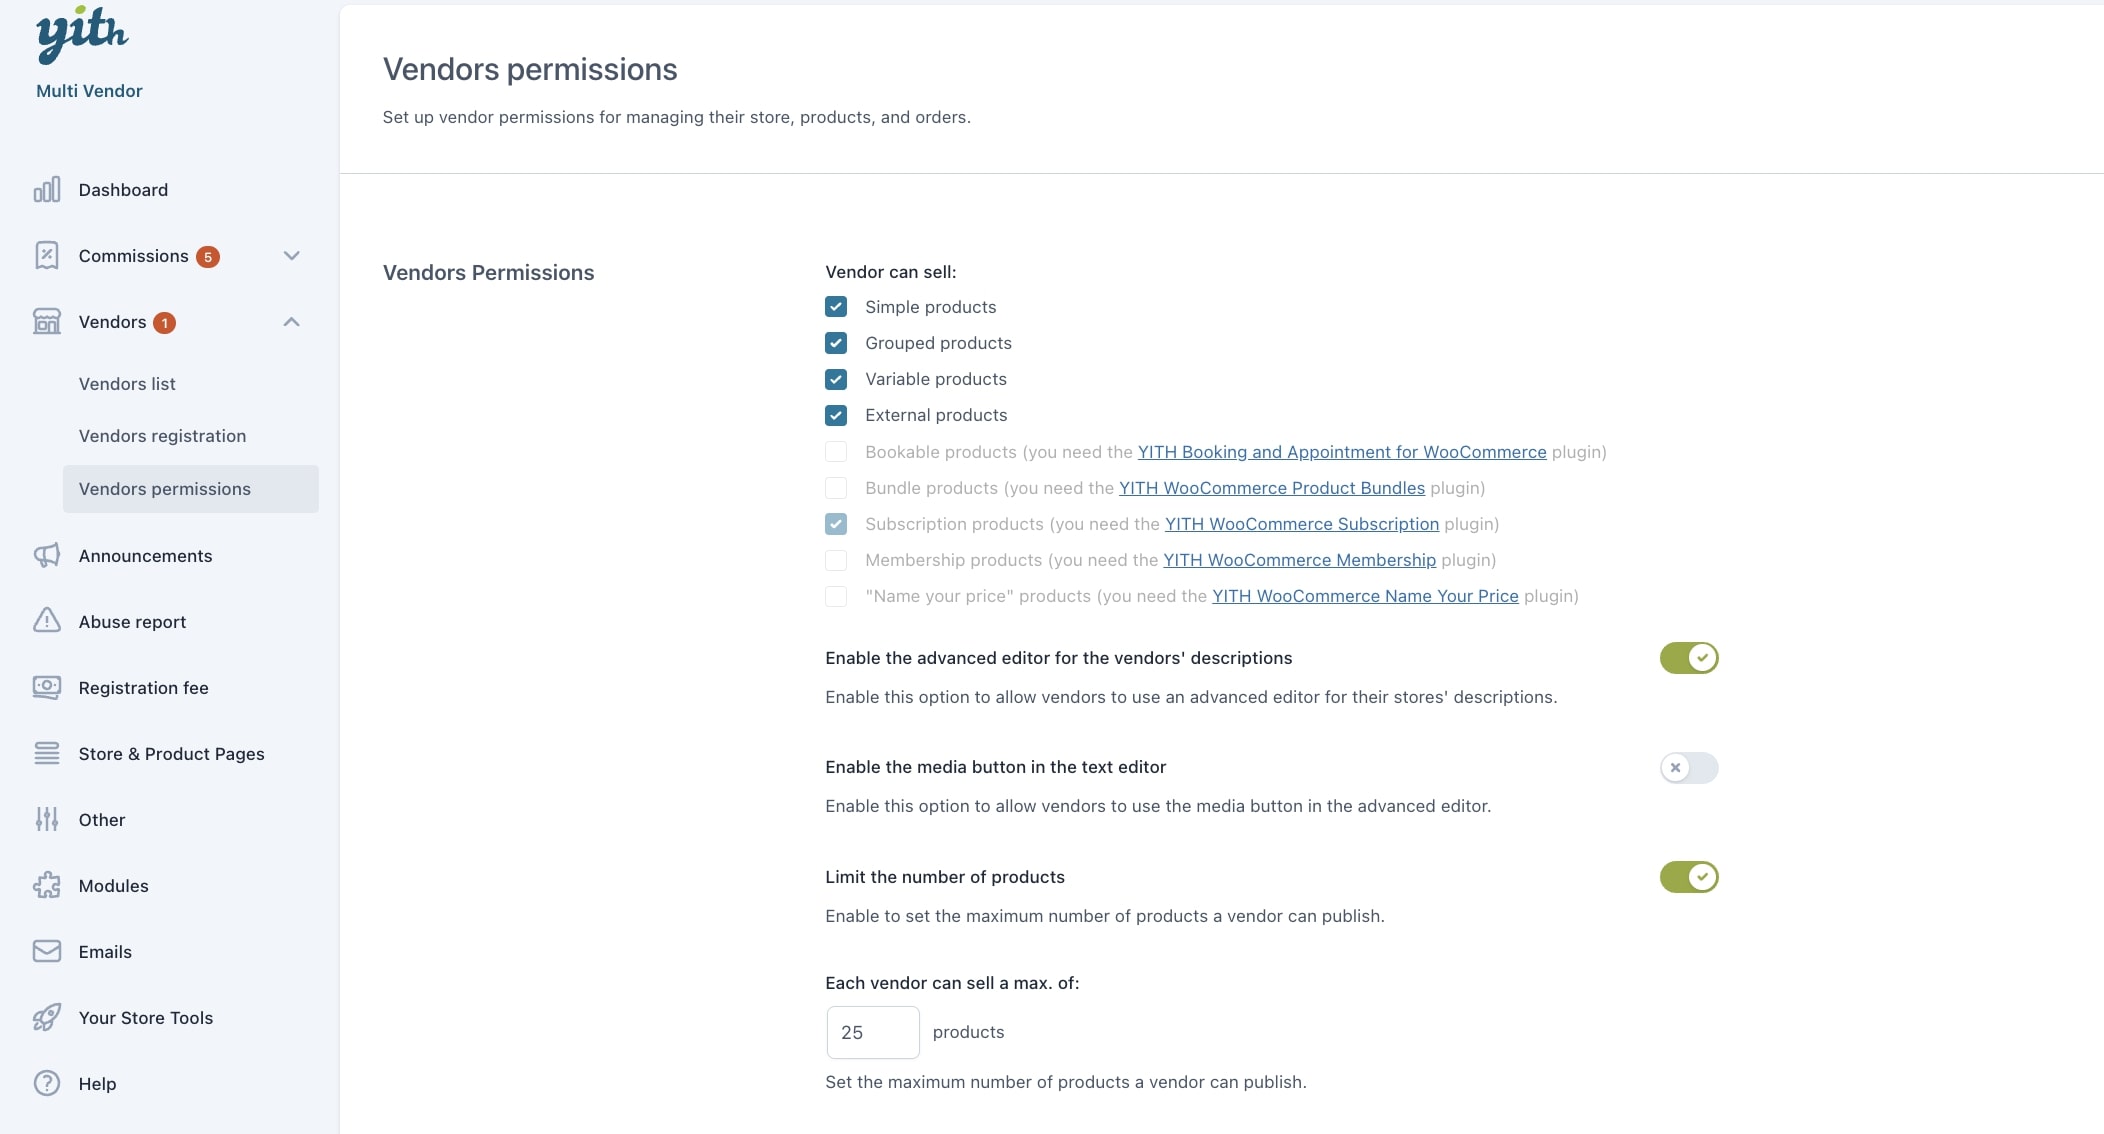
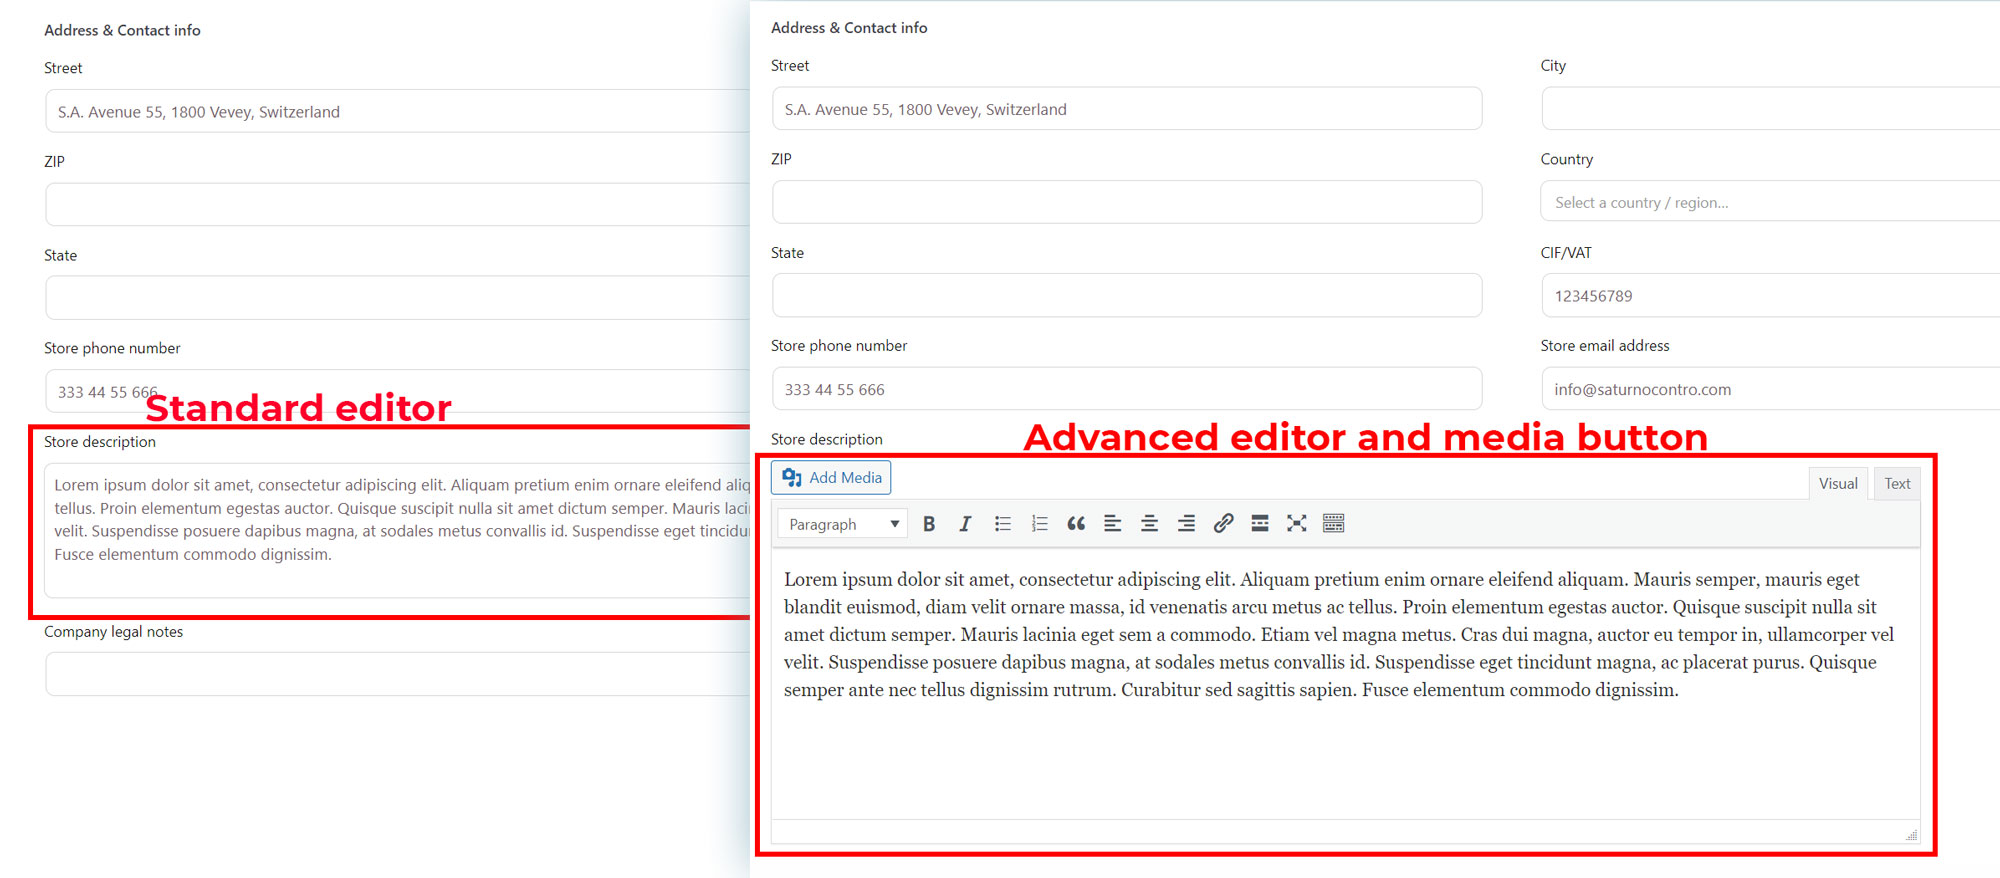
Enable the advanced editor for the vendors’ descriptions: enable this option to allow vendors to use an advanced editor for their stores’ descriptions. Please, check this page for more details about how vendors can edit their store info.
Enable the media button in the text editor: enable this option to allow vendors to use the media button in the advanced editor.
Limit the number of products: enable to set the maximum number of products a vendor can publish. This applies to all vendors. If you want to differentiate and let vendors subscribe to different plans, take a look at the integration with YITH Membership plugin, more details here.
Each vendor can sell a max. ofx products: set here the maximum number of products a vendor can publish.
Admin’s review on vendor products
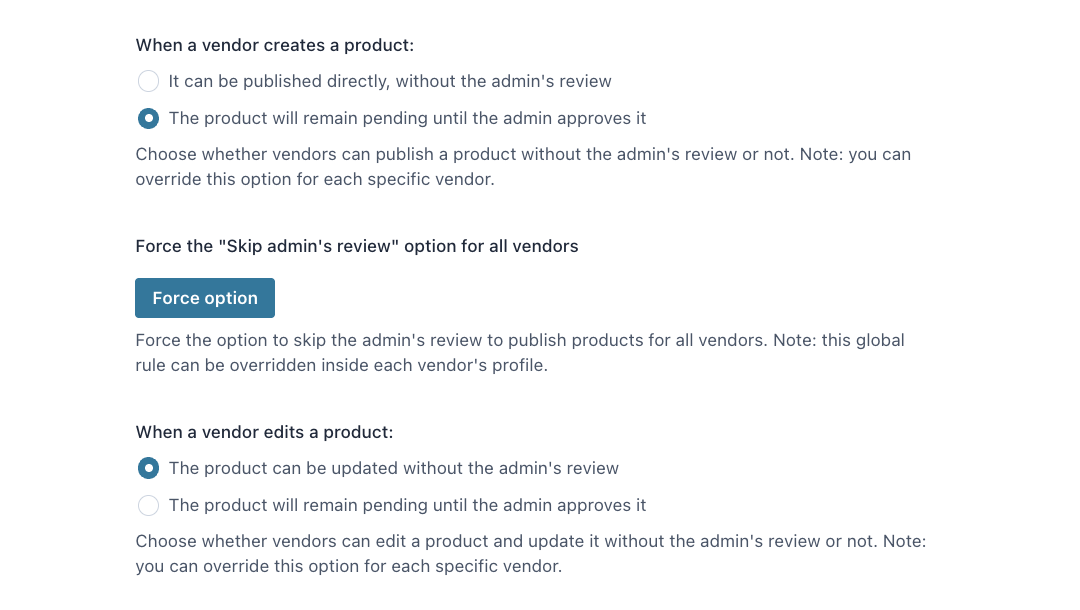
The following two options allow the admin to review what the vendor publishes a new product or edits an existing product and can be managed separately.
When a vendor creates a product:
It can be published directly, without the admin’s review
The product will remain pending until the admin approves it Note: you can override this option for each specific vendor by editing the vendor’s profile as explained here.
Force the “Skip admin’s review” option for all vendors: force the option to skip the admin’s review to publish products for all vendors. Note: the global rule can be overridden inside each vendor’s profile.
When a vendor edits a product:
the product can be updated without the admin’s review
the product will remain pending until the admin approves it Note: you can override this option for each specific vendor by editing the vendor’s profile as explained here.
Store and orders permissions
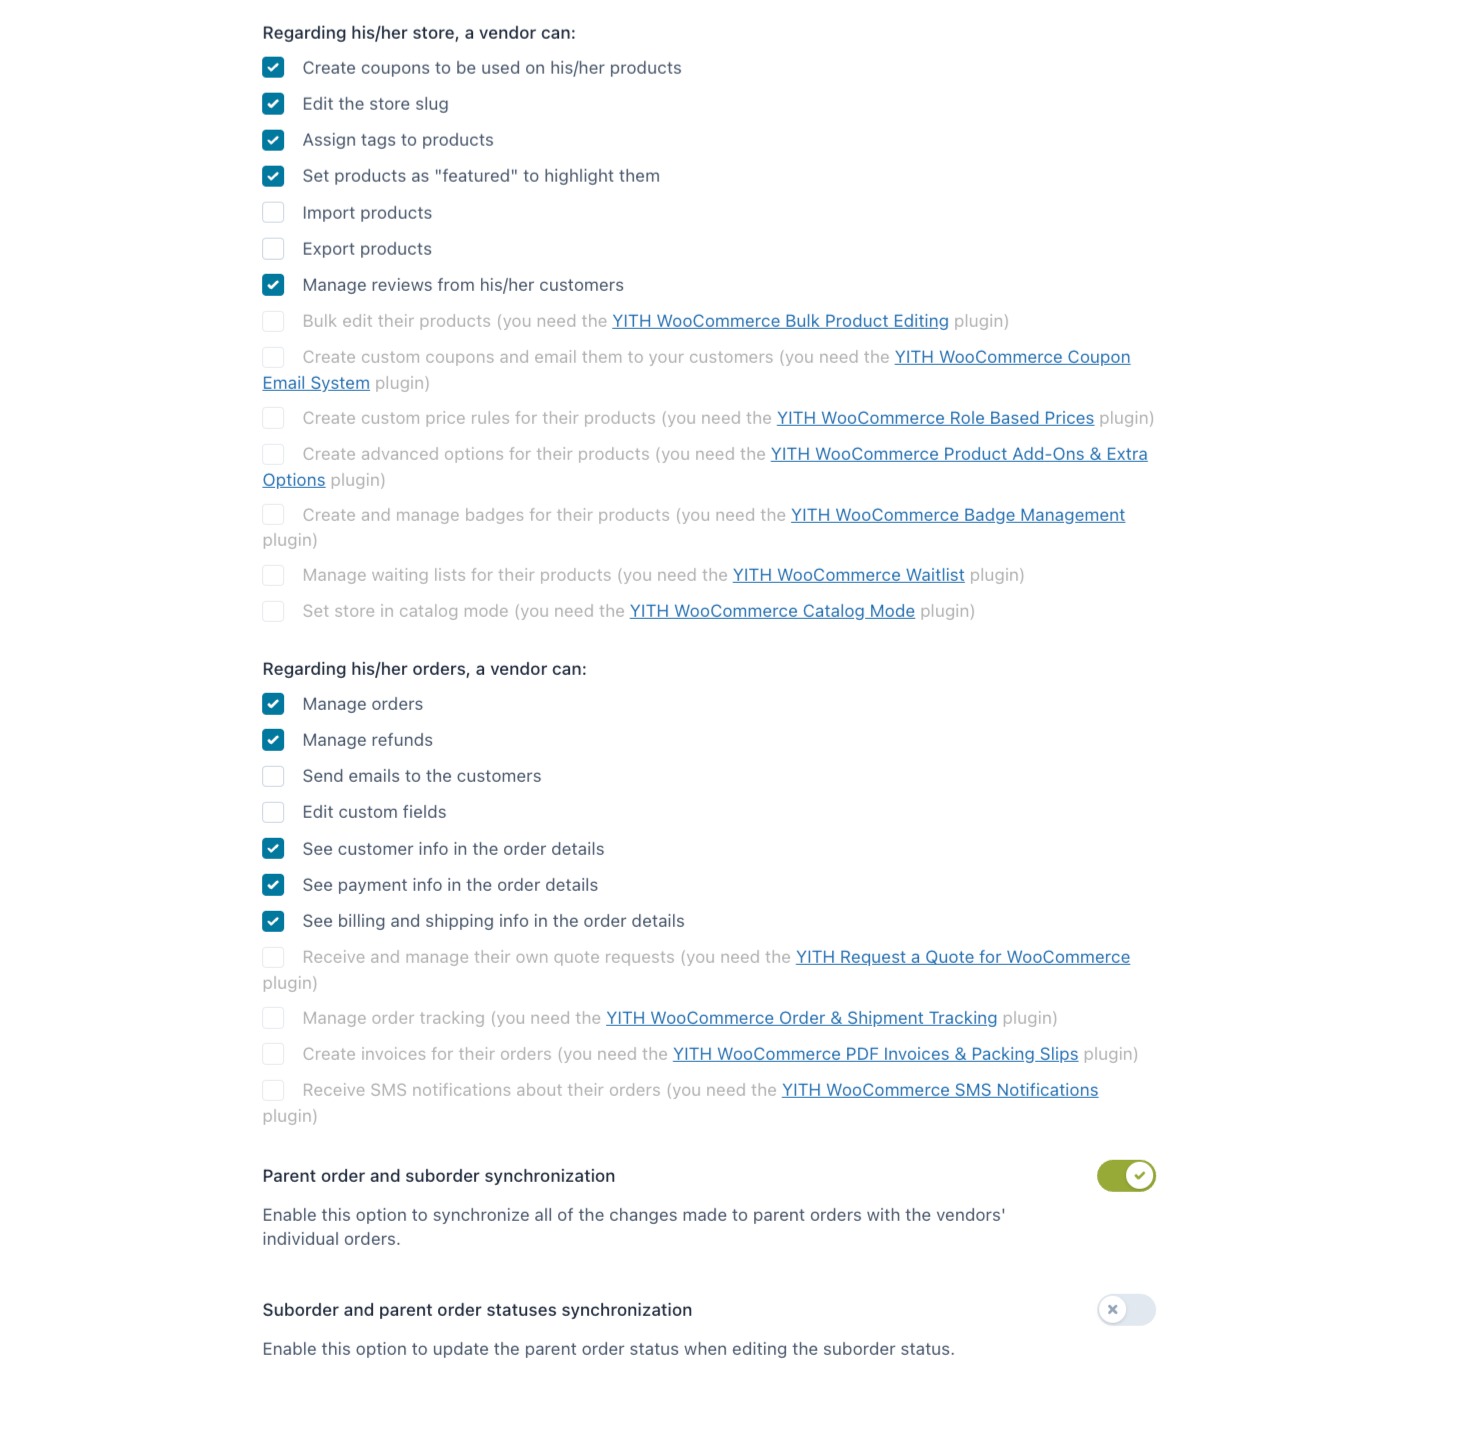
Regarding his/her store, a vendor can:
create coupons to be used on his/her products. For more details, please, refer to this page.
receive SMS notifications about their orders (available only if using YITH SMS Notifications)
Parent order and suborder synchronization: enable this option to synchronize all of the changes made to parent orders with the vendors’ individual orders.
Suborder and parent order statuses synchronization: enable this option to update the parent order status when editing the suborder status.
For more details about the order management and all the above options, please, check this page.
Every vendor will be able to access their dashboard with all details about their sales, commissions, orders and profile.
Once their vendor profile is enabled (please, refer to this page to learn how to do that), they can simply log in with their username or email address and they will be able to access their backend dashboard that looks like this:
As you can see, you will find a limited number of menus on the left side, based on what the admin has enabled:
Media: this is the standard media library, but the vendor will be able to only see his/her media file
Comments: this is where the vendor can see and manage reviews of his/her products. For more details, please, visit this page.
Products: this is where the vendor can find his/her own products. More details here.
Coupons: this is where the vendor can find his/her own coupons. More details here.
Your Shop: this is where the vendor can edit the details of his/her shop, edit logo, description etc. More details here.
Orders: this is where the vendor can find and edit his/her suborders. More details here.
Profile: this is where the vendor can edit his/her default user profile.