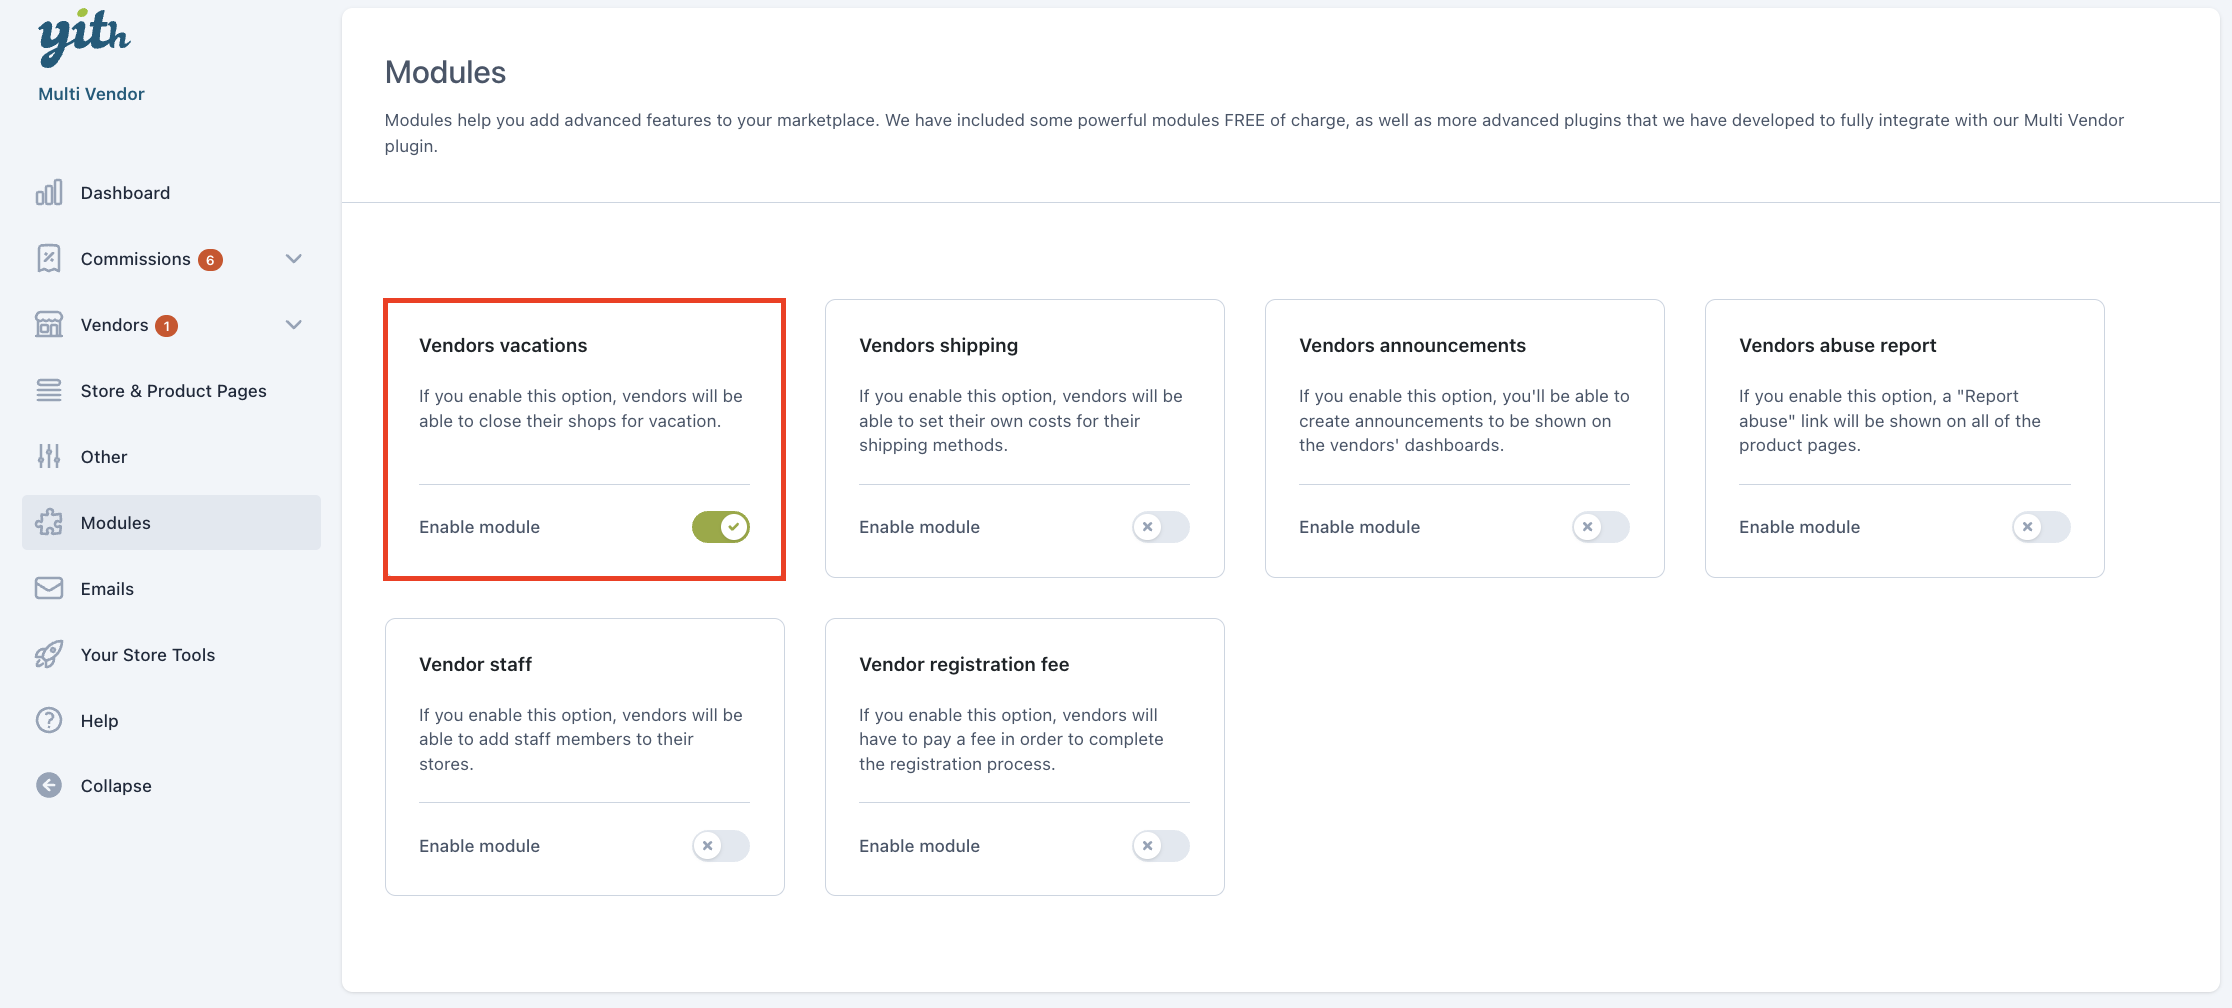
By enabling the Vendor vacation module from the plugin section Modules, your vendors will be able to temporarily close their shop and make sure your customers are informed.
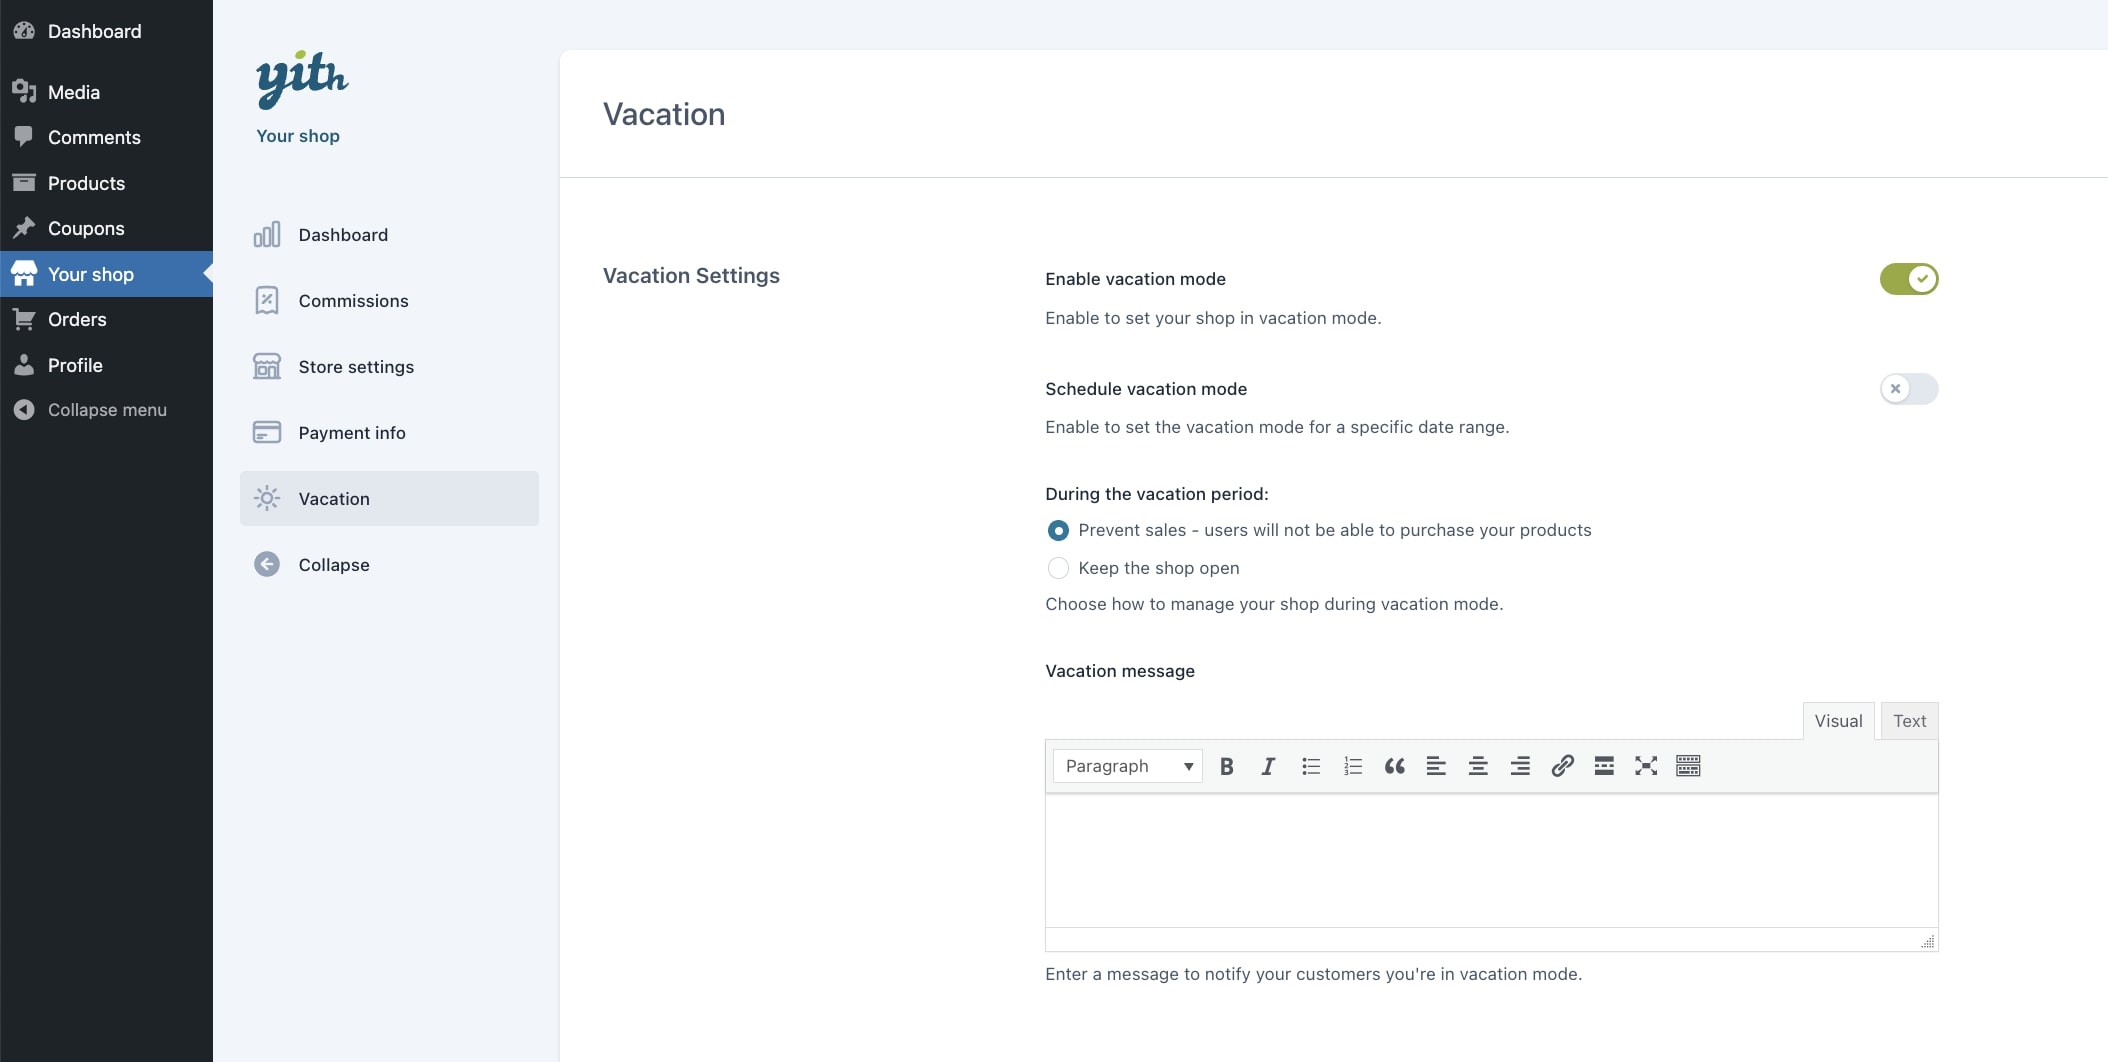
After enabling the module, your vendors will see an additional tab in their dashboard in Your shop > Vacation.
Enable vendor vacation: let the vendor enable or disable their vacation from this option.
Schedule vacationmode: let the vendor enter the start and end date of the vacation, which will be displayed on the frontend and automatically connected to the following option.
During the vacation period: let the vendor choose how to manage the shop during the vacation period from
Prevent sales – users will not be able to purchase products
Keep the shop open – you will keep receiving orders
Vacation message: enter a message to inform your customers that you (vendor) are on vacation and what to expect for this time.
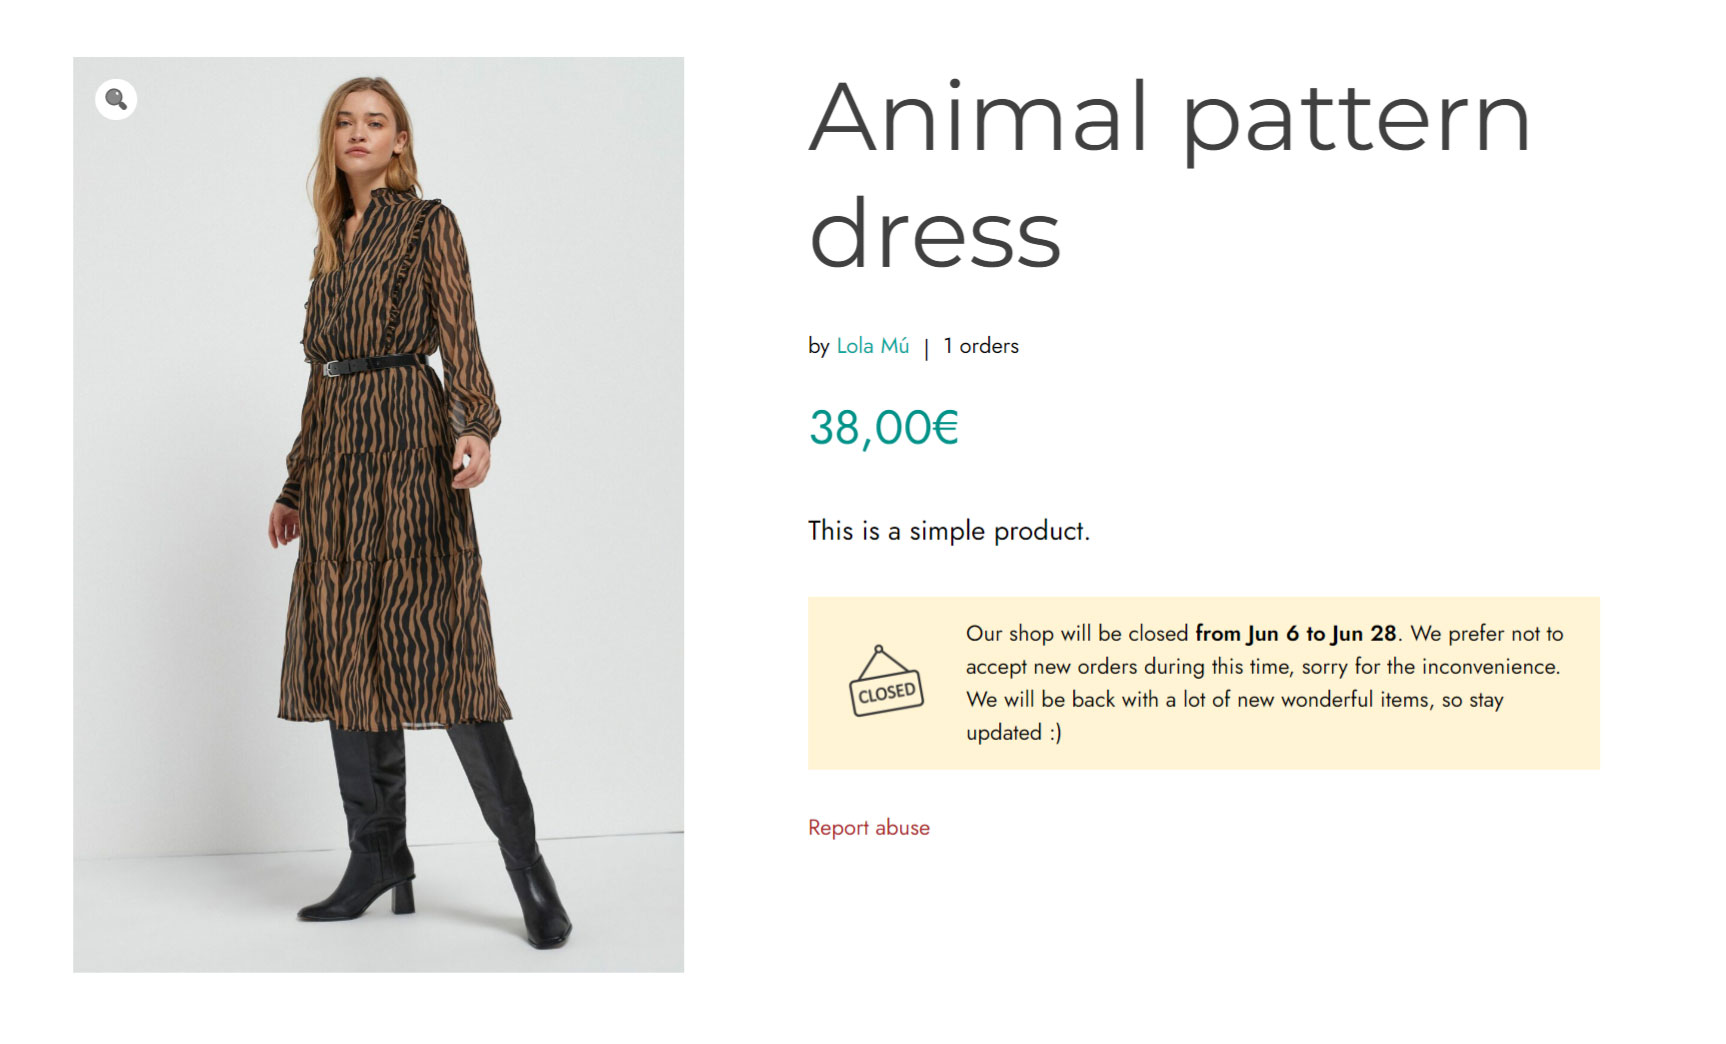
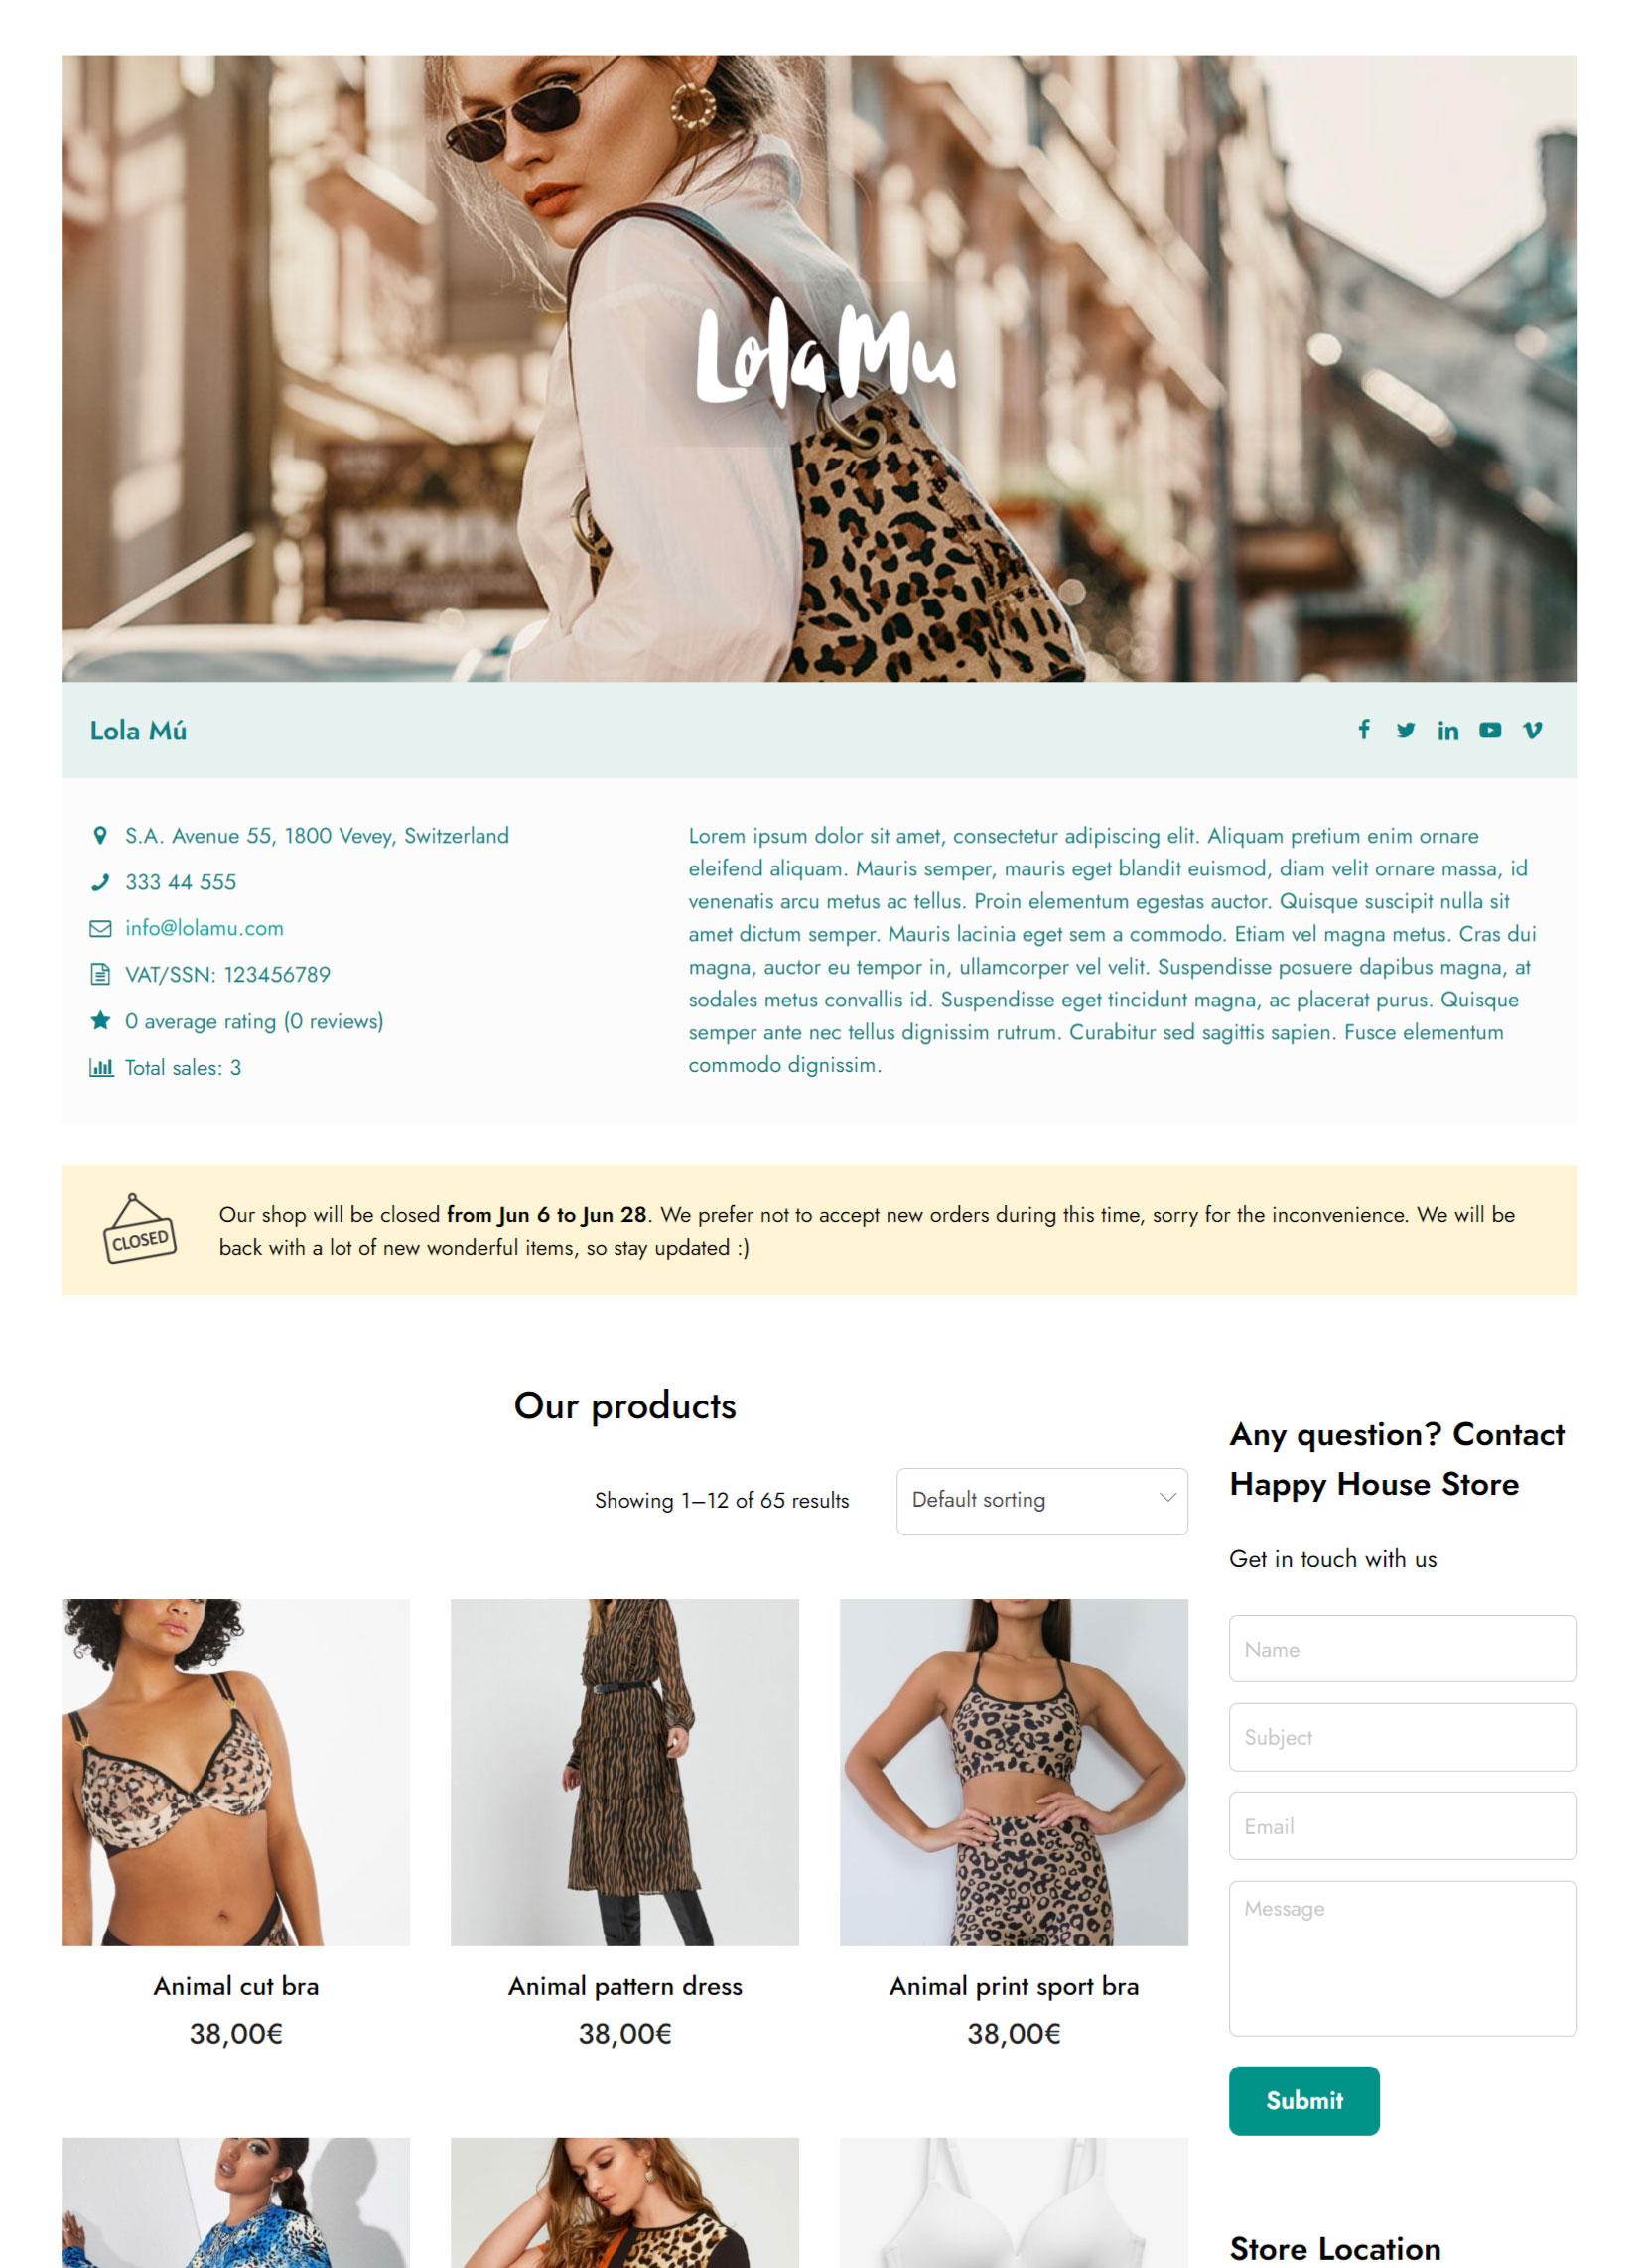
This is how it looks on the frontend on the product page and on the vendor store page.
Product pageVendor store page
If you don’t want to sell products during the vacation and want to keep them hidden, make sure that the option called Hide products of stores in vacation mode in → YITH > Multi Vendor > Store & Product Pages > General is enabled: they will not be visible until the vendor vacation ends. This option is only available to the store administration.
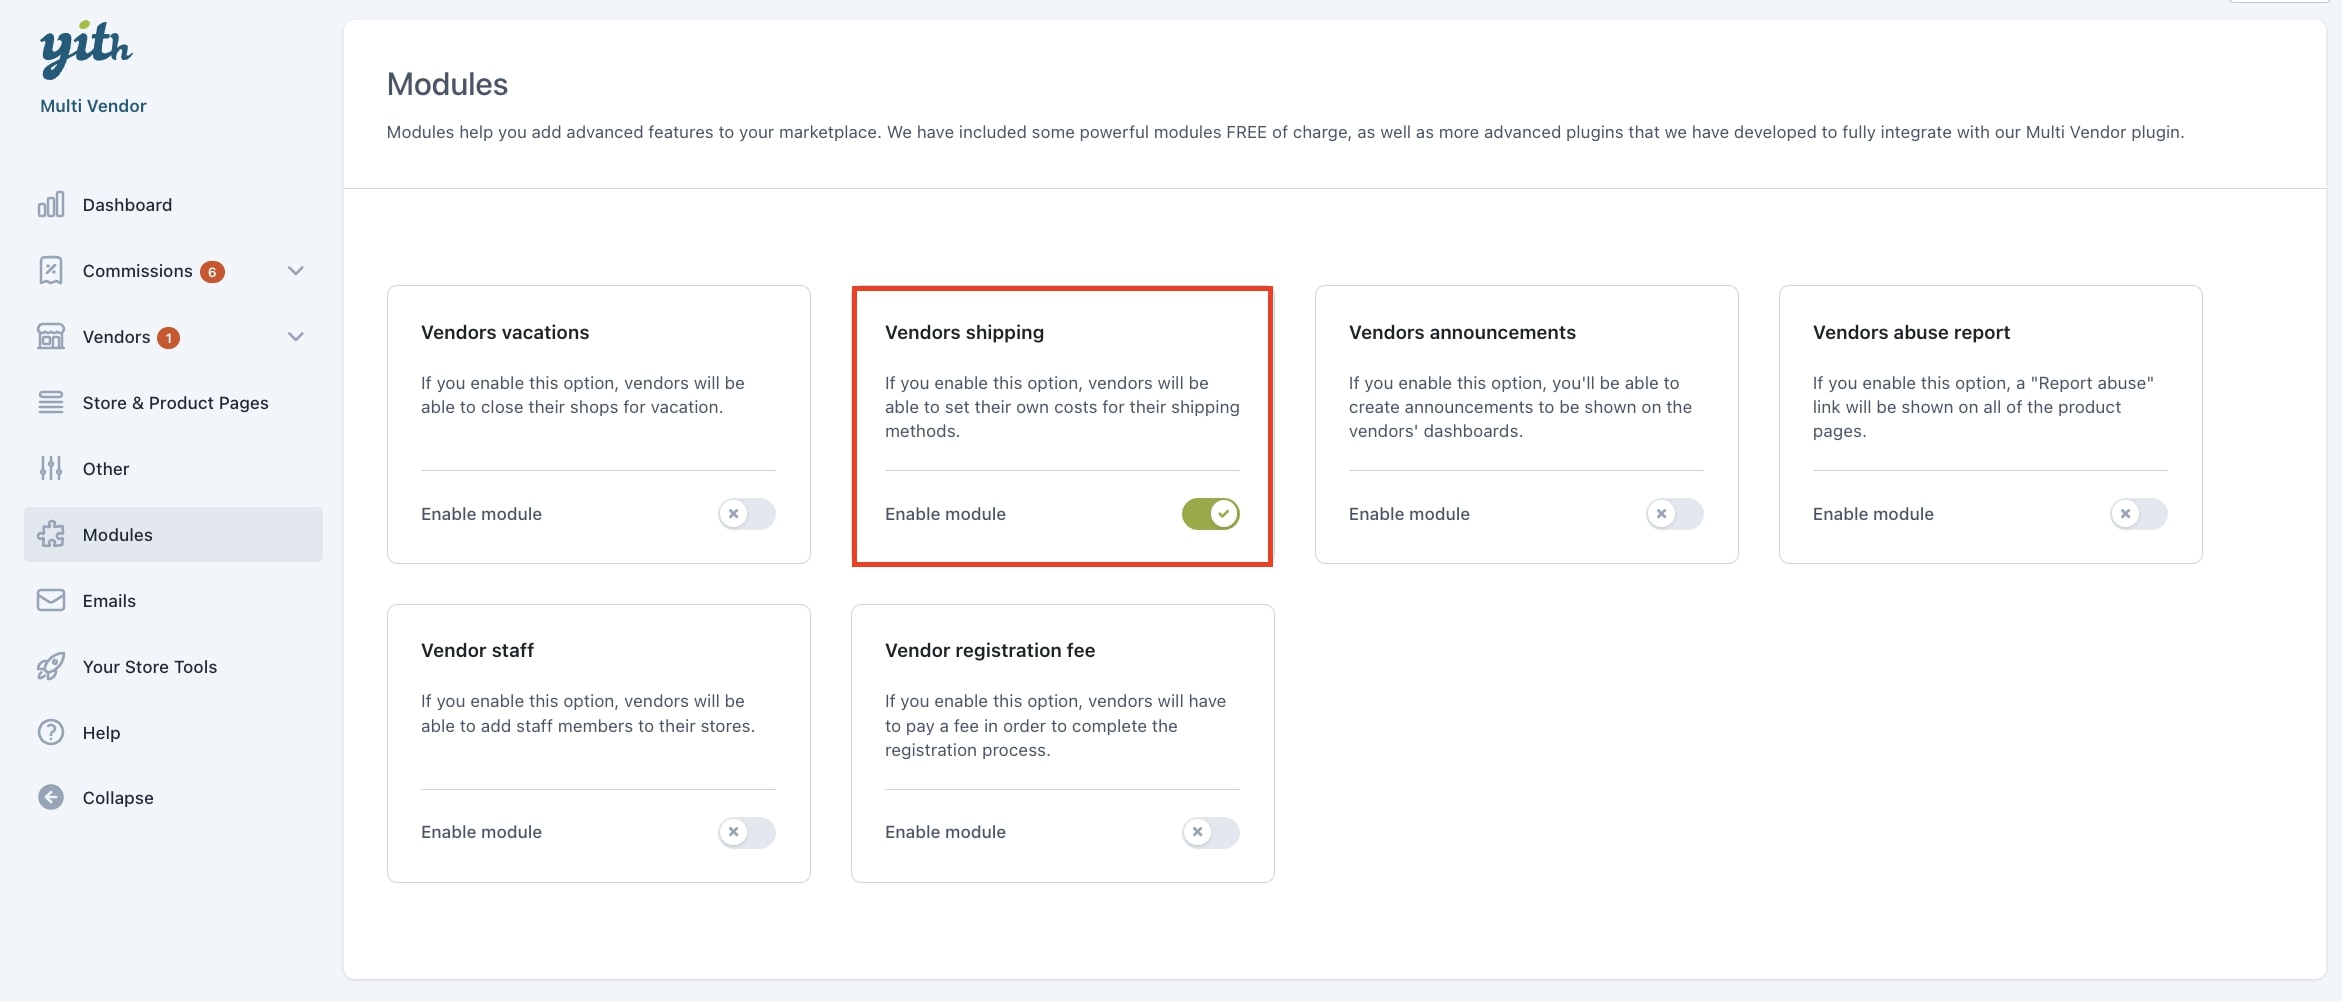
If you want to allow vendors to manage shipping costs for their products, you can take advantage of the Vendors shipping module.
First of all, just make sure you enable it from the Modules section.
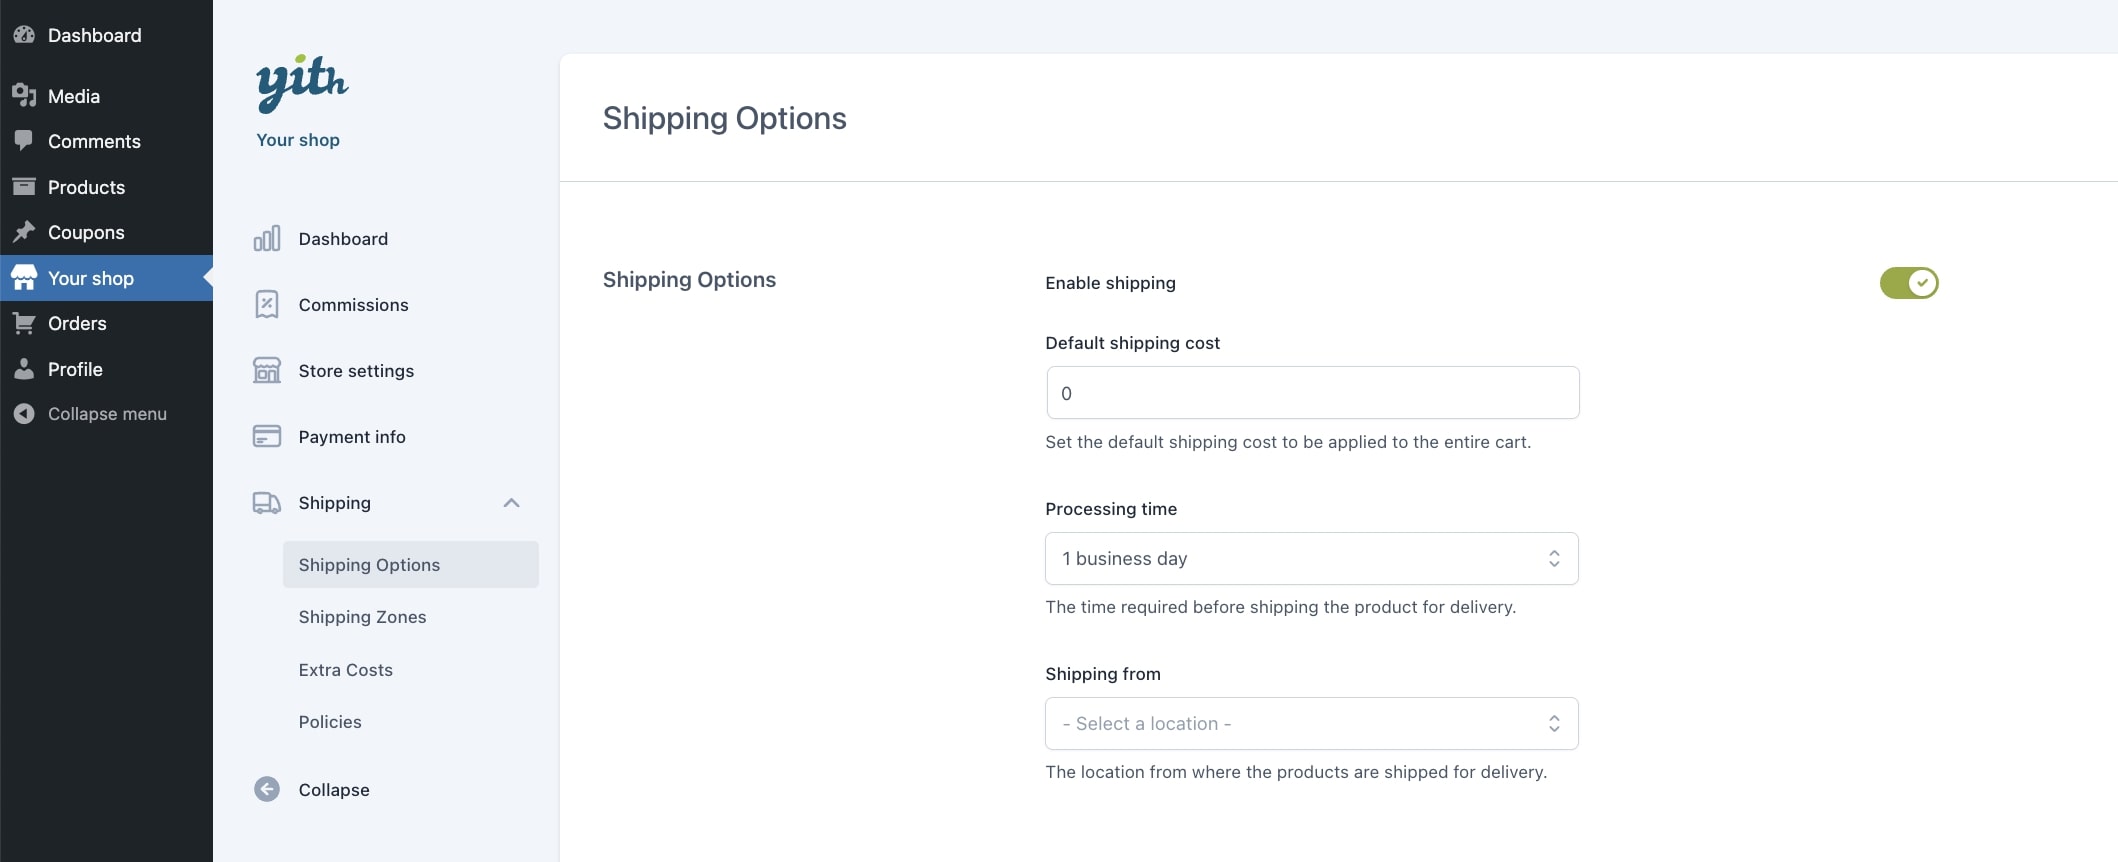
After enabling the module, a new Shipping section will be available in your vendor’s panel, with multiple tabs.
Shipping options
Let’s start with the first tab, the Shipping options:
Enable shipping: enable or disable the module through this option. Use this to temporarily disable the add-on while keeping the settings visible and adjustable.
Default shipping cost: set the default shipping cost to be applied to the entire cart.
Processing time: enter the time required for the shipping of your products.
Shipping from: the vendor can enter the location from where their products will be shipped.
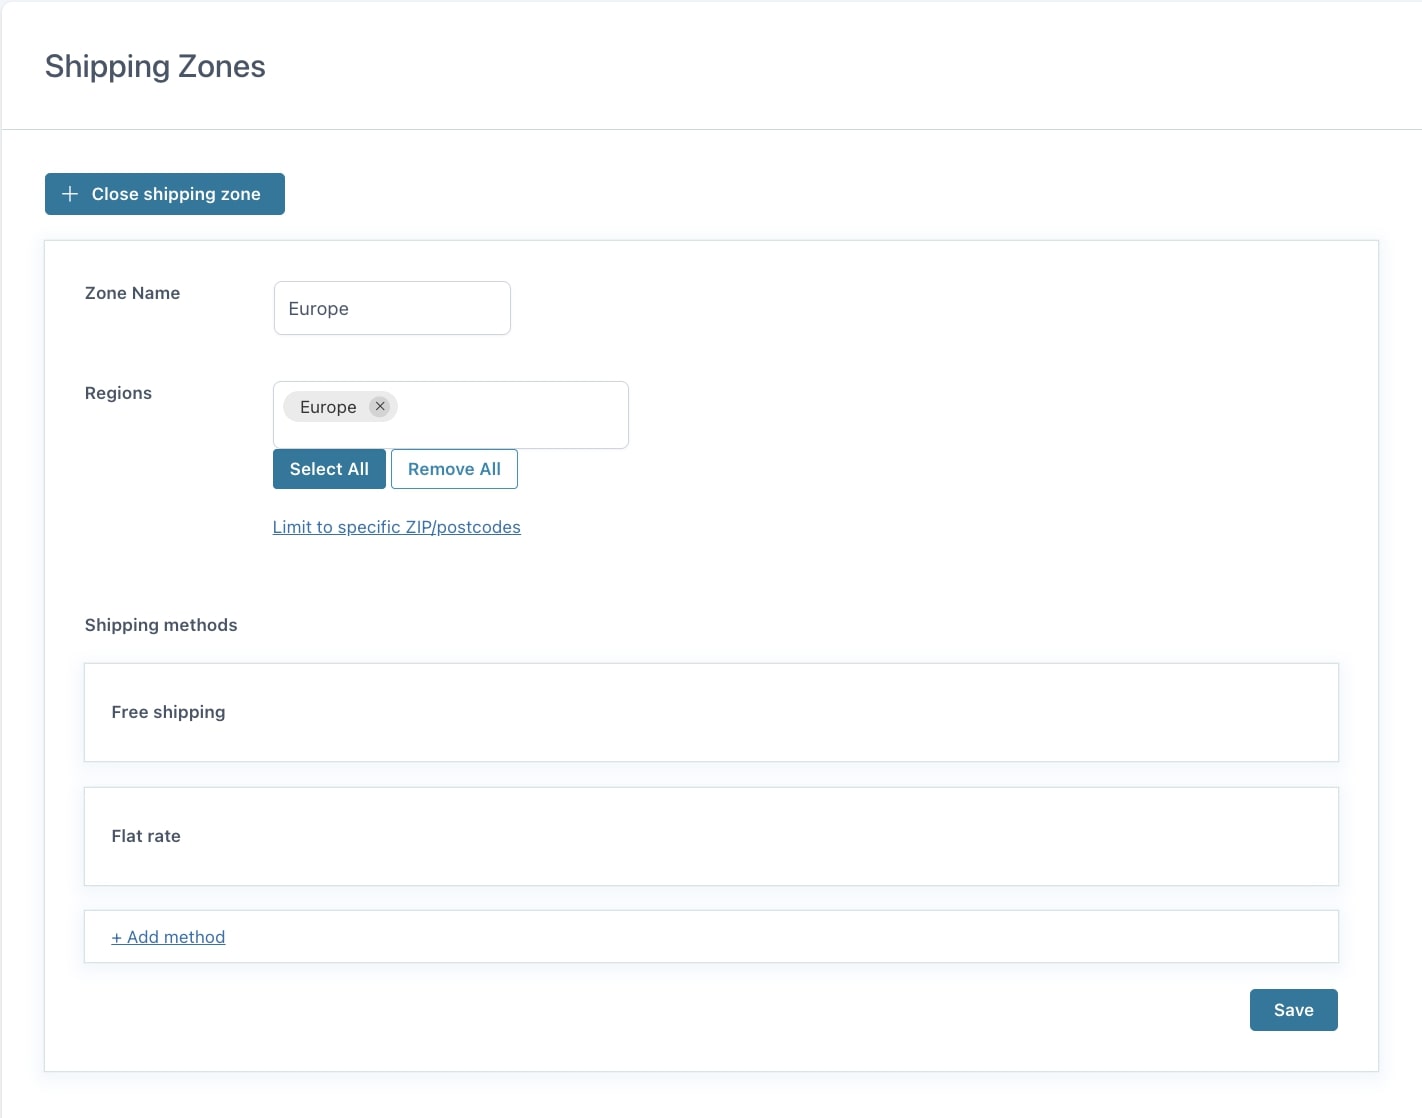
Shipping zones
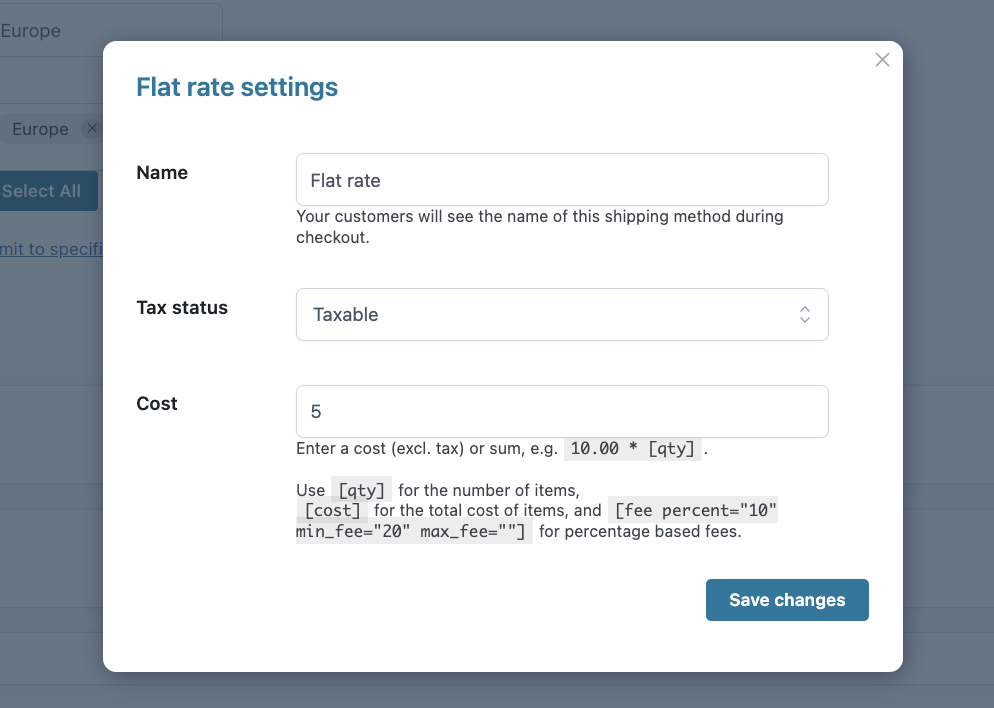
Once configured the options, your vendors can now configure their own shipping zones from the dedicated tab in their dashboard and add one or multiple shipping methods as they would normally do in WooCommerce shipping zones.
These zones and methods will only apply to the products of the current vendor.
Whenever a vendor shipping fee applies to the cart, this will automatically override the general shipping settings.
What happens if there are products by multiple vendors in the same cart?
As every vendor can set their shipping costs, when a cart contains products of different vendors, multiple shipping methods and costs will apply, one for each vendor.
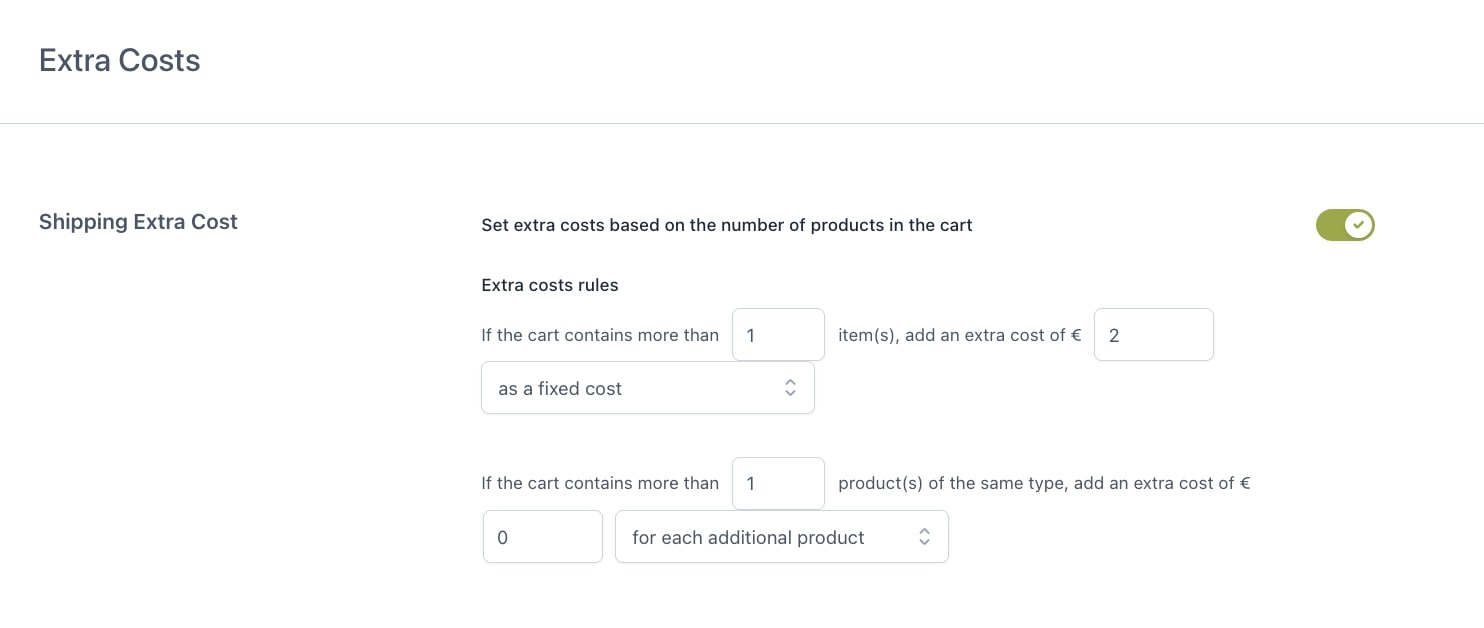
Extra costs
In addition to the standard shipping settings, every vendor can also set extra costs based on the number of products in the cart with the following two conditions:
If the cart contains more than X products, add an extra cost of X for each additional product or as a fixed cost for this vendor.
If the cart contains more than X products of the same type, add an extra cost of X for each additional product or as a fixed cost for this vendor.
Example: according to the rules in the screenshot above, an extra cost of €2 will be charged from the second product of the same vendor in cart and an extra cost of €1 for each additional product of the same type. Let’s say, you add the following products:
Sunglasses x3
Hat x1
It’s 4 products in total, so an extra cost of €6 (€2 x 3) will be added + €2 (€1 for each extra Sunglasses product), so €8 in total.
Policies
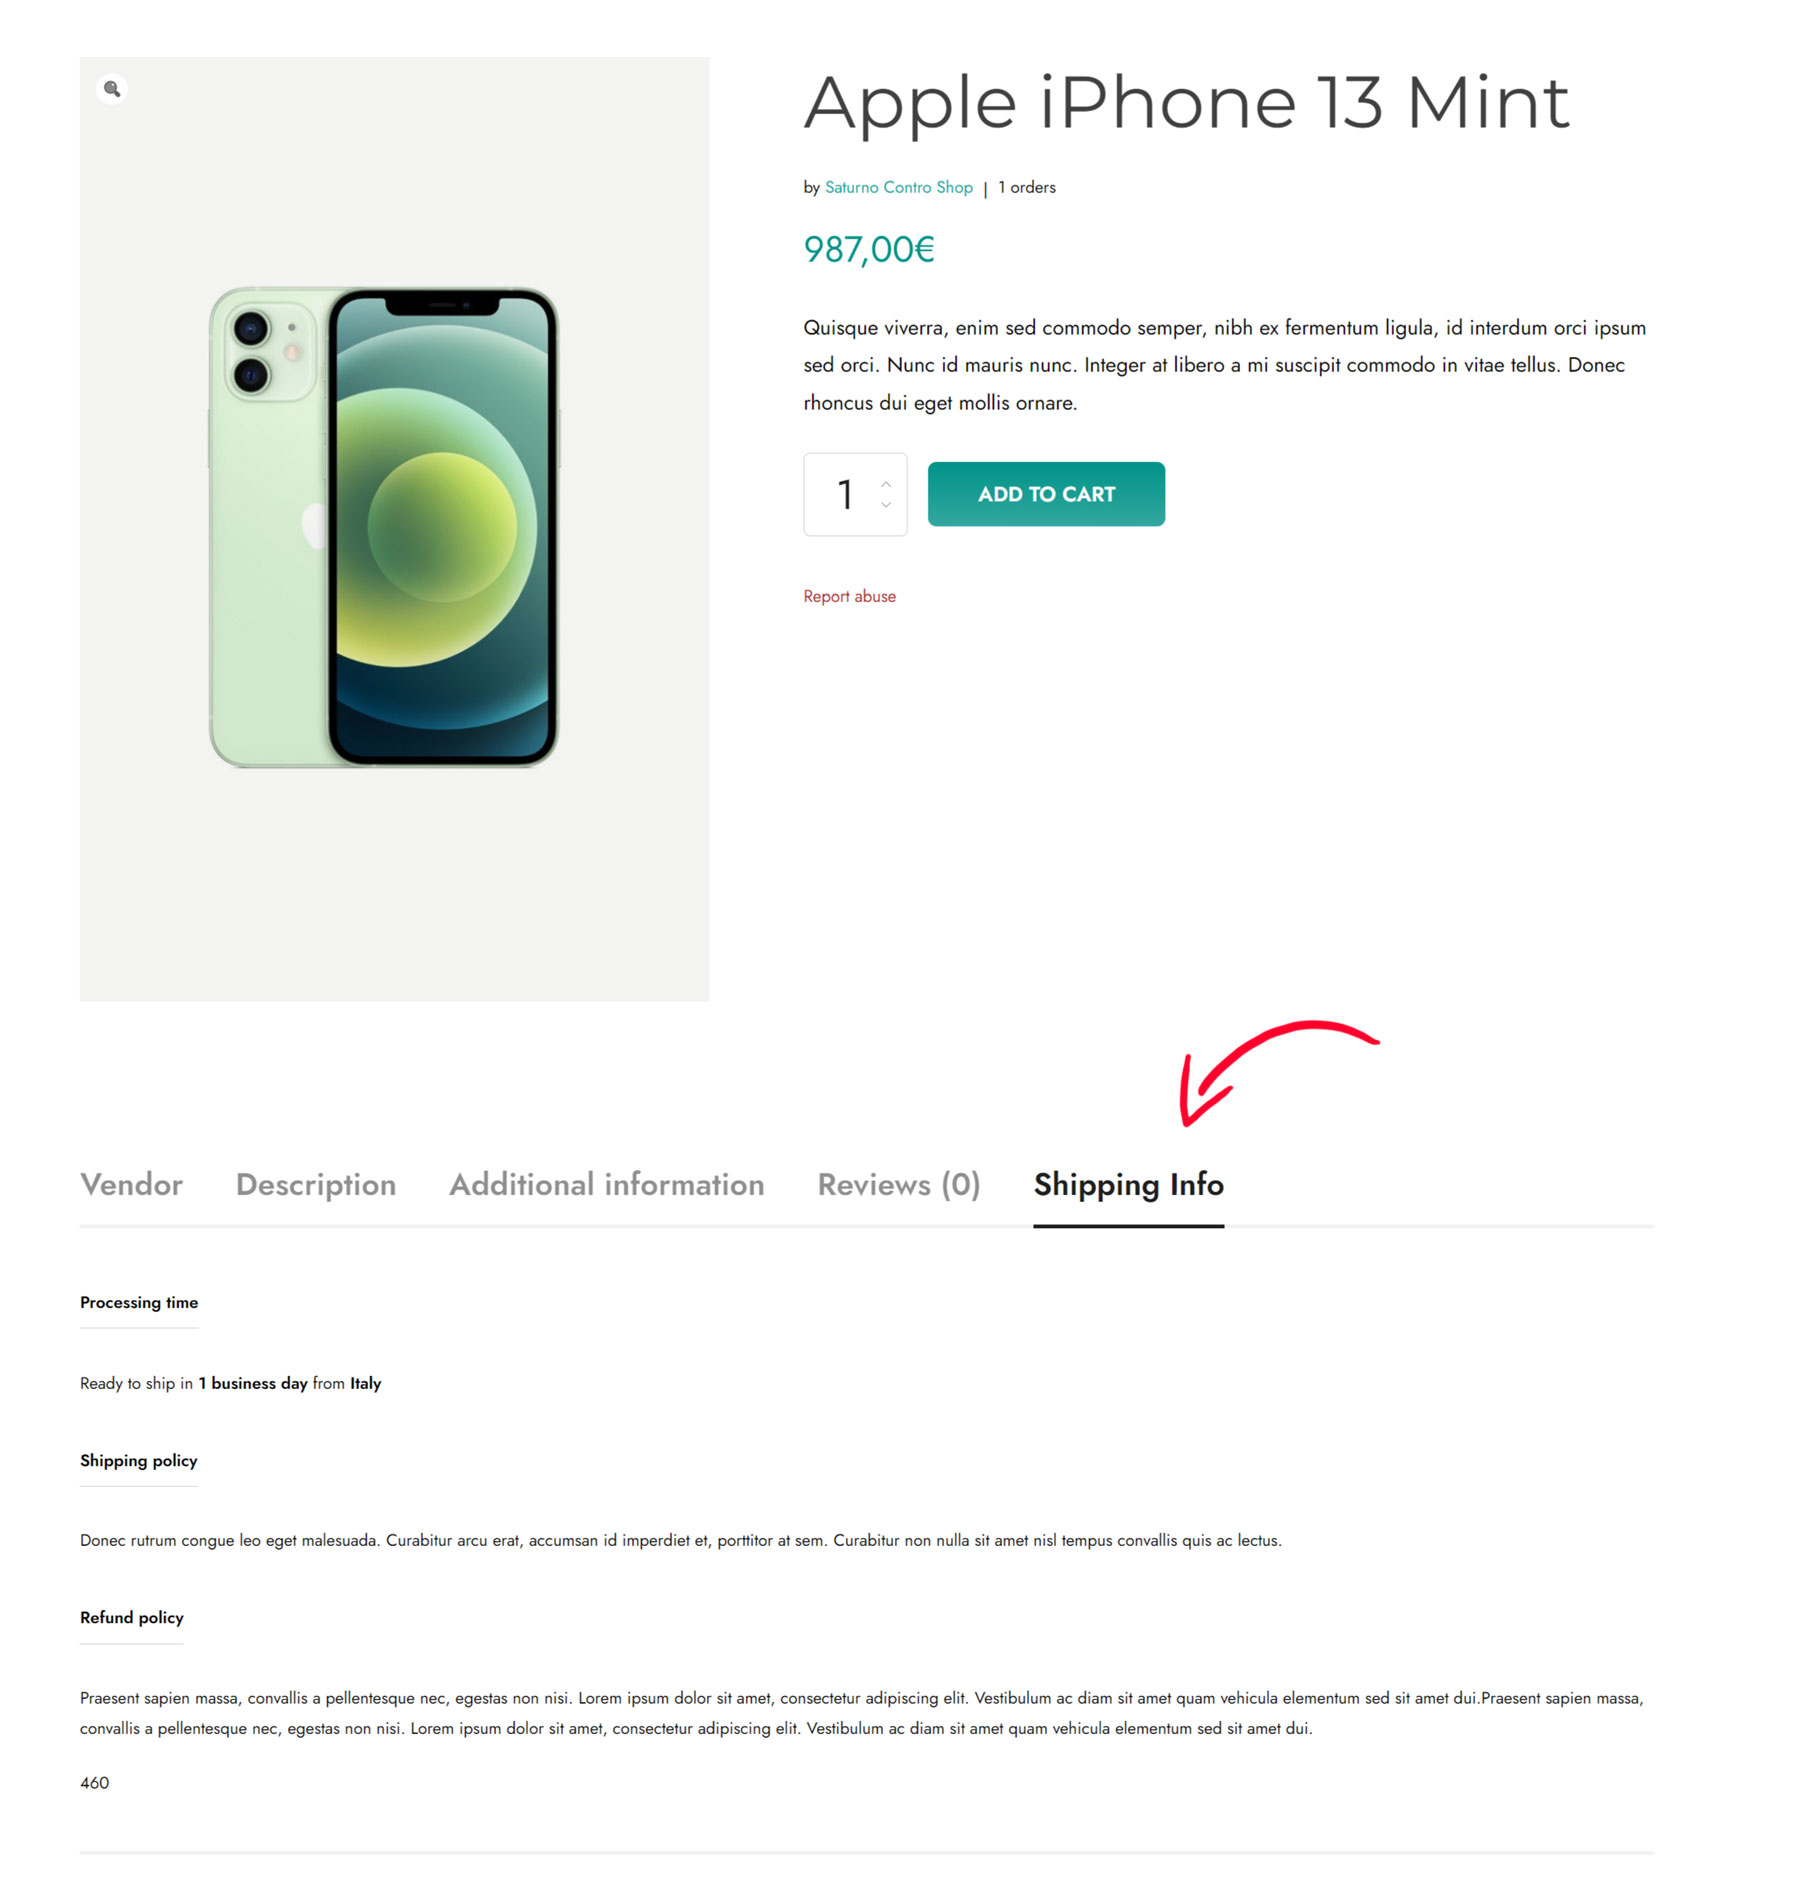
Finally, in this last tab, the vendor can set a Shipping policy and a Shipping refund policy. If set, these will appear in the Shipping tab visible on the product page next to the Vendor’s tab and the standard WooCommerce tabs.
Note: the admin can change the label of the Shipping info tab from the → Product page settings.
This is one of the built-in free modules that you can enable to create custom announcements and show them in your vendors’ dashboard.
You can show the announcements to all vendors or to specific ones, based on specific conditions and, if you want to, for a limited time. Let’s see how to configure a new announcement then.
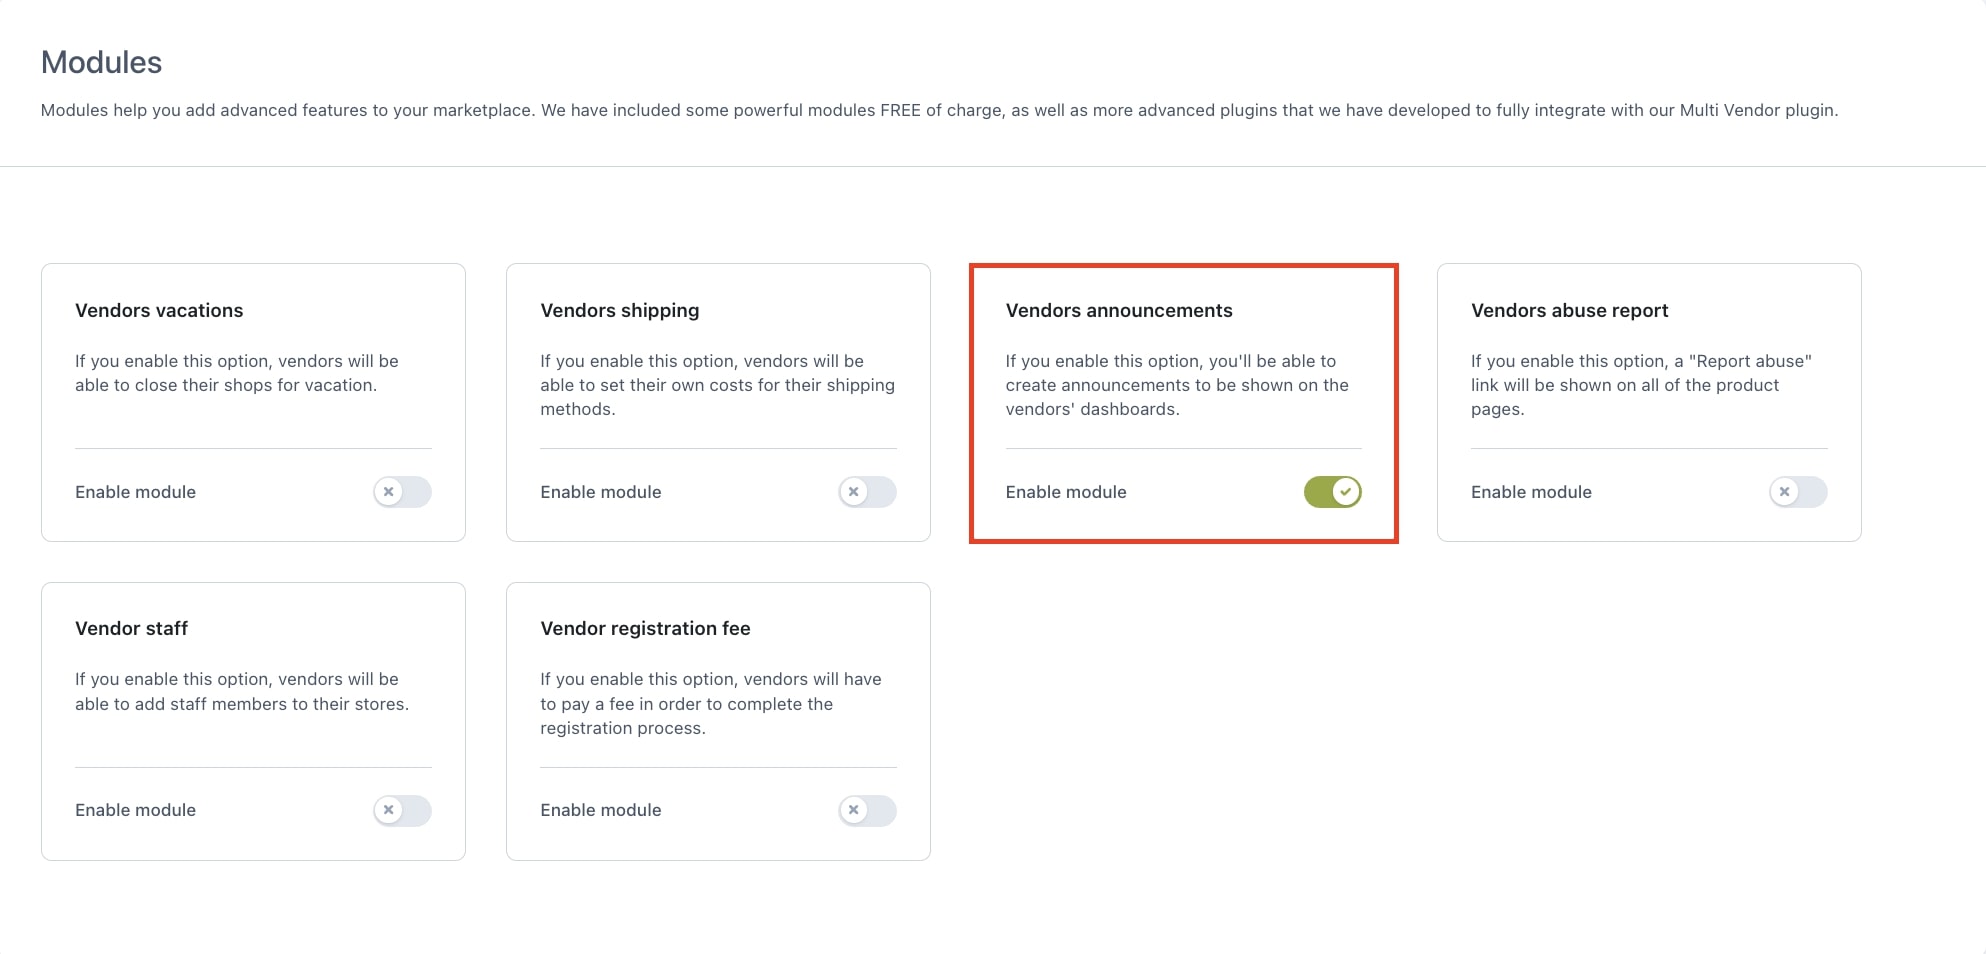
First of all, go to the Modules section and enable Vendors announcements. Once done, you will see a new Announcements tab appear below the Modules menu.
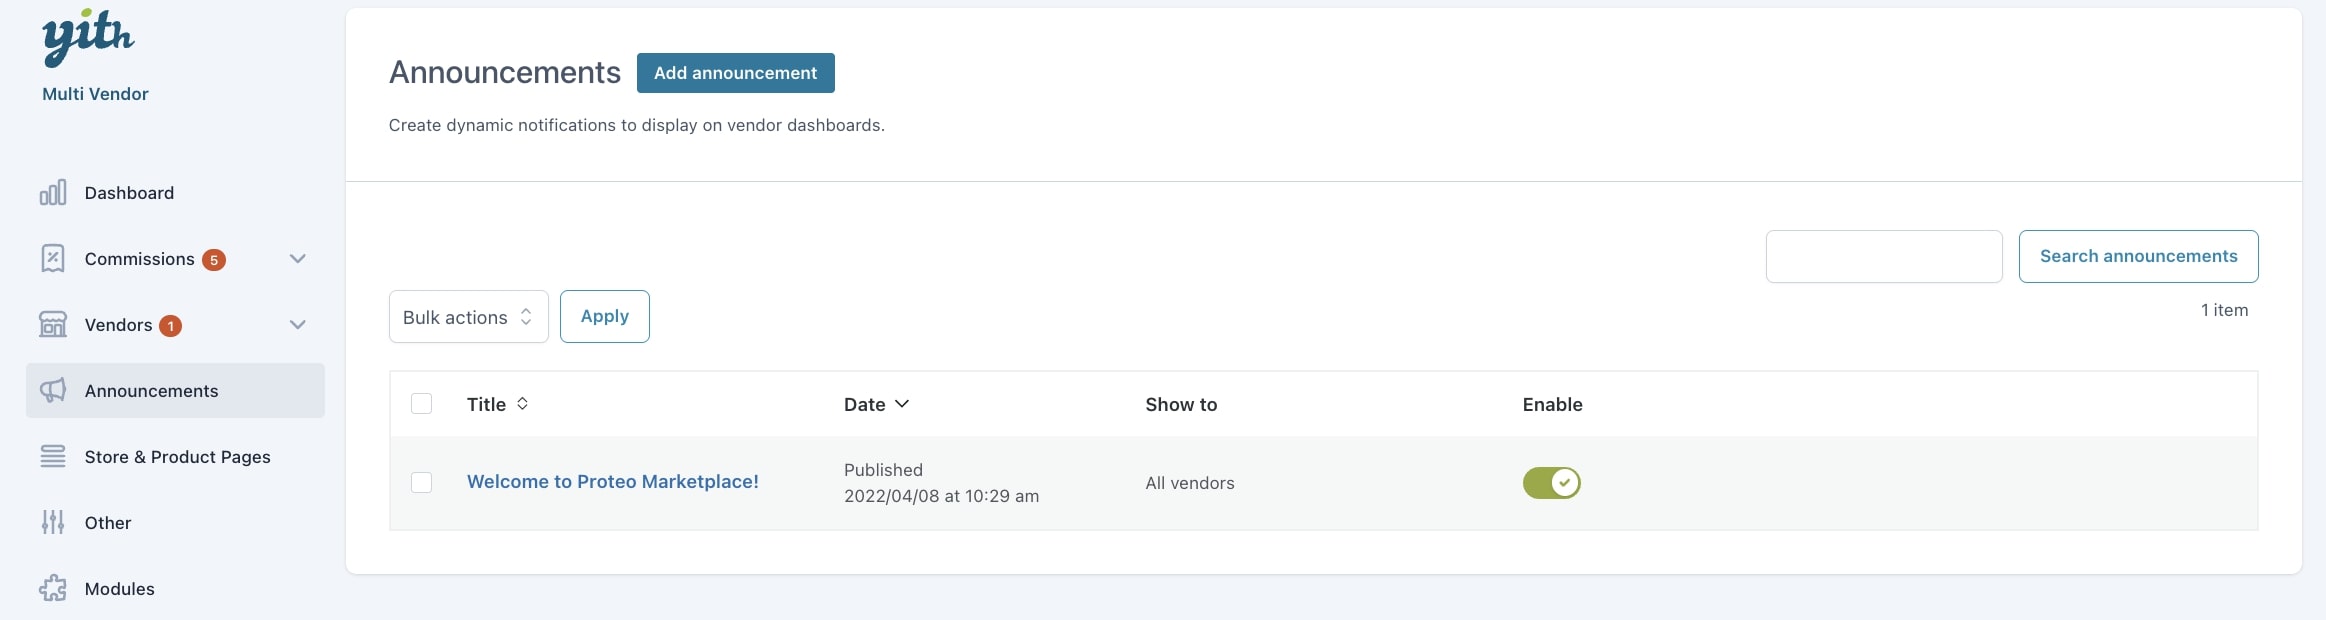
From the Announcements tab, you can see the list of all your announcements.
To create a new one, just click on Add announcement: you will be able to configure your announcement in a modal window. Lets’ see all the options.
Announcement object: enter a text to identify the announcement in the list. This is not visible to vendors.
Content: set up the announcement content; you can use the advanced editor.
Show to: select the vendors that will see this message:
All vendors
Vendors that match specific criteria
Specific vendors
If you select Vendors that match specific criteria, you can choose among the following options and choose to Show to vendors that:
Have not accepted the Privacy Policy
Have not accepted the Terms & Conditions
Have not entered VAT/SSN
Are being reported by users
Achieved a specific number of sales
Achieved a specific amount in sales
Are new to the site
If you select, instead, Specific vendors, you will be able to manually pick the vendors who will see the announcement you’re setting up.
For all kinds of messages, you can then set the following two options.
Schedule announcement: choose whether to publish and remove the announcement manually or schedule it by setting a start and end date.
Vendors can dismiss the notice: enable this option to allow vendors to dismiss the announcement using a close icon.
The Vendors report abuse is one of the free modules that you can enable to give your users the possibility to report any abuse related to the products of your store, especially useful in a marketplace where there is not just one seller.
Make sure you enable it from the Modules tab and after that you will be able to see two new tabs appear: Reported abuse and Report abuse settings.
Reported abuse section
Here you find a list with all the messages sent by your users from the product pages. You can see the reported product, the vendor’s store (if any), the user, the date and finally two actions to see the message and to delete the reported message.
To see the message, click on the eye icon and the message will be displayed in a modal window. You can reply to the user by email by clicking on the Reply button.
Report abuse settings
In this tab you can adjust the settings for the report abuse.
Show “Report abuse” link: choose whether to:
disable the option, no option will show
on all products
only on vendors’ products
“Report abuse” link label: enter the text for the “Report abuse” link.
“Report abuse” link color: customize the default color of the text and on hover.
This link will show on the product page and will look like this.
The user who wants to report an abuse on this product can simply click on that link and leave a message from a modal window:
All messages will appear in the Reported abuses tab and reply by email from there.
This free module allows your vendors to add extra staff members to their store, so they can manage orders and products. First of all, make sure you enable the module from the Modules menu.
Now, your vendors will be able to add members to their store from the new Staff tab available in their dashboard at Your Shop.
They can add first and last name, email and phone number. An email will be sent to the new user with a username and a link to complete the registration:
Once added, the vendor can see all the staff members in the Staff tab and edit permissions for each of them by clicking on the pencil icon:
Manage orders
Create and edit coupons
Manage product reviews
Create and edit products
Manage store settings
View store report
Please, note that all these settings can only be managed by the vendor, the admin cannot control the staff members but only see them from the admin dashboard.
By enabling the Vendor registration fee module from the plugin Modules section, you can ask vendors to pay a fee to complete the registration process.
A new section will then show in the plugin panel. Go to the Registration fee section and configure the following options:
Fee title: enter the title for the fee to show on the Checkout page and order details.
Fee price: define the amount vendors have to pay.
Fee tax status: choose whether the fee is taxable or not.
Fee tax class: if taxable, you can select the tax class by choosing from Standard, Reduced rate, or Zero rate.
Now, when users register as a vendor, they will see a notice related to their application being under review in their vendor dashboard.
As an admin, the new vendor registration will get the Pending status. After approving the registration from the Vendors list, the status will automatically turn into Pending fee.
Status before approvalStatus after approval
The vendors will then see a Pay now button to pay the registration fee and be able to create their shop and sell their products. They will also receive the payment link with the email sent to them when their account is approved. For all the emails sent by the plugin, visit this page.
When clicking on Pay now, they will be redirected to the Checkout page where they can complete the order.
When the order is completed, the vendor status will get the Enabled status. From now, they can start managing their shop.
Vendor accounts automatically enabled
What happens if you want to automatically enable vendors when they register? If you have enabled the option Enable vendor accounts automatically in Vendors registration settings, when users complete the registration form and click on the Register button, they will directly redirected to the checkout page to pay the registration fee.
The new vendor account will get the Pendingfee status. After approving the registration from the Vendors list, the status will automatically turn into Pending fee.
Vendors status will turn into Enabled soon after the registration fee order is completed.
You can check vendors with a pending fee in the Vendors list under the tab Pending fee.