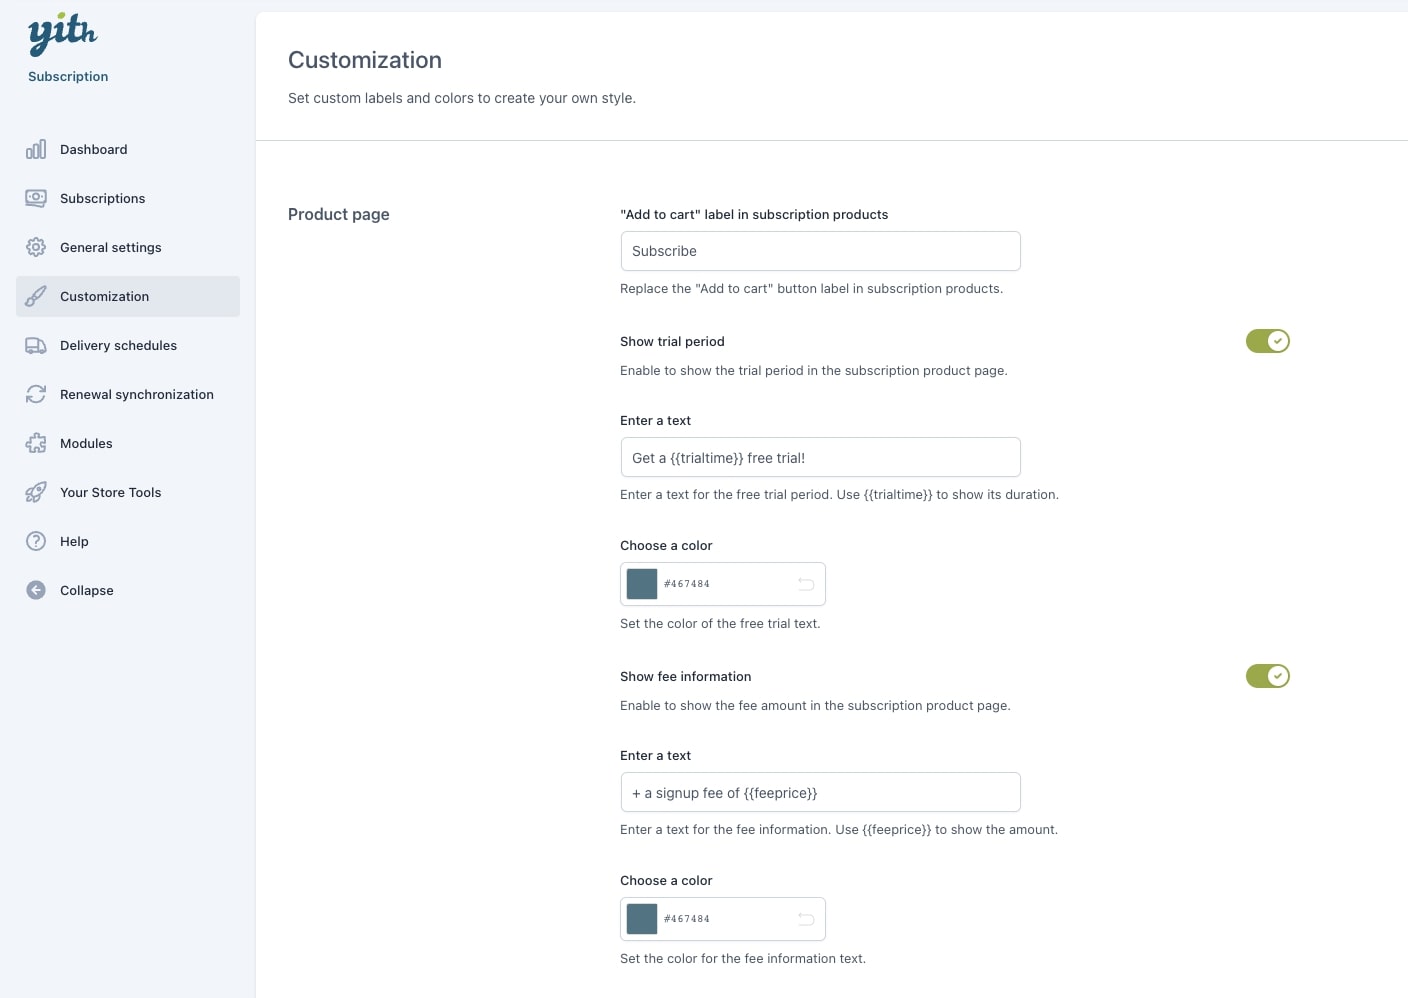
In the section Customization, you can manage the style of subscription product pages, cart and checkout, and My account page by setting custom labels and colors that better fit your needs. You can also set the colors for the different statuses of the subscriptions.
Check the available options of the different sections:
To decide which options and texts the user will see in the My account page, go to YITH > Subscription > Customization.
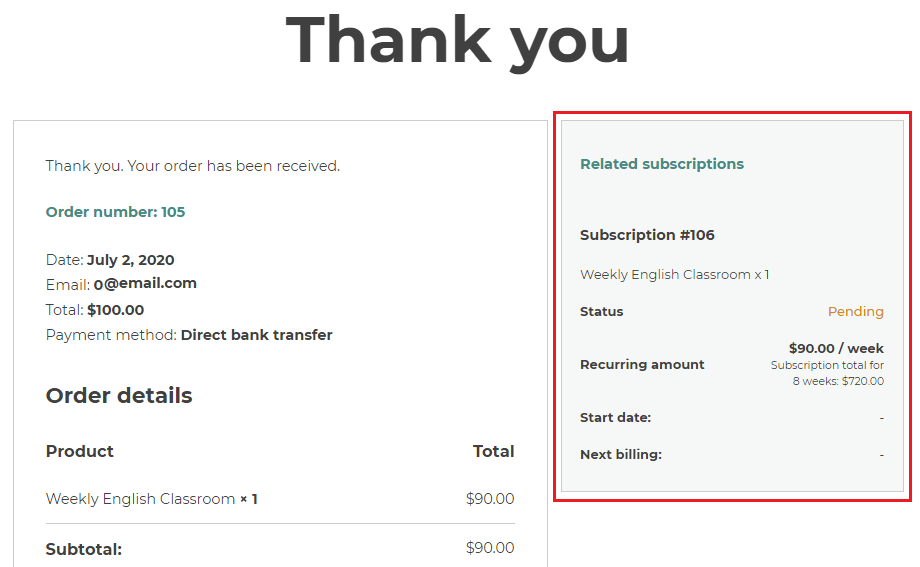
Show the Resubscribe button on My Account > Subscriptions: Decide if you want the give the customer the option to resubscribe to the same subscription.
Maintain the same price of the previous subscription: Enable if you want the customer to pay the same price as before, disable to pay the actual price.
Show the Renew now button on My Account > Orders: Decide if user will be able to force the payment himself, if at least one failed payment attempt is registered (Note: each time the user forces a payment it counts as an attempt).
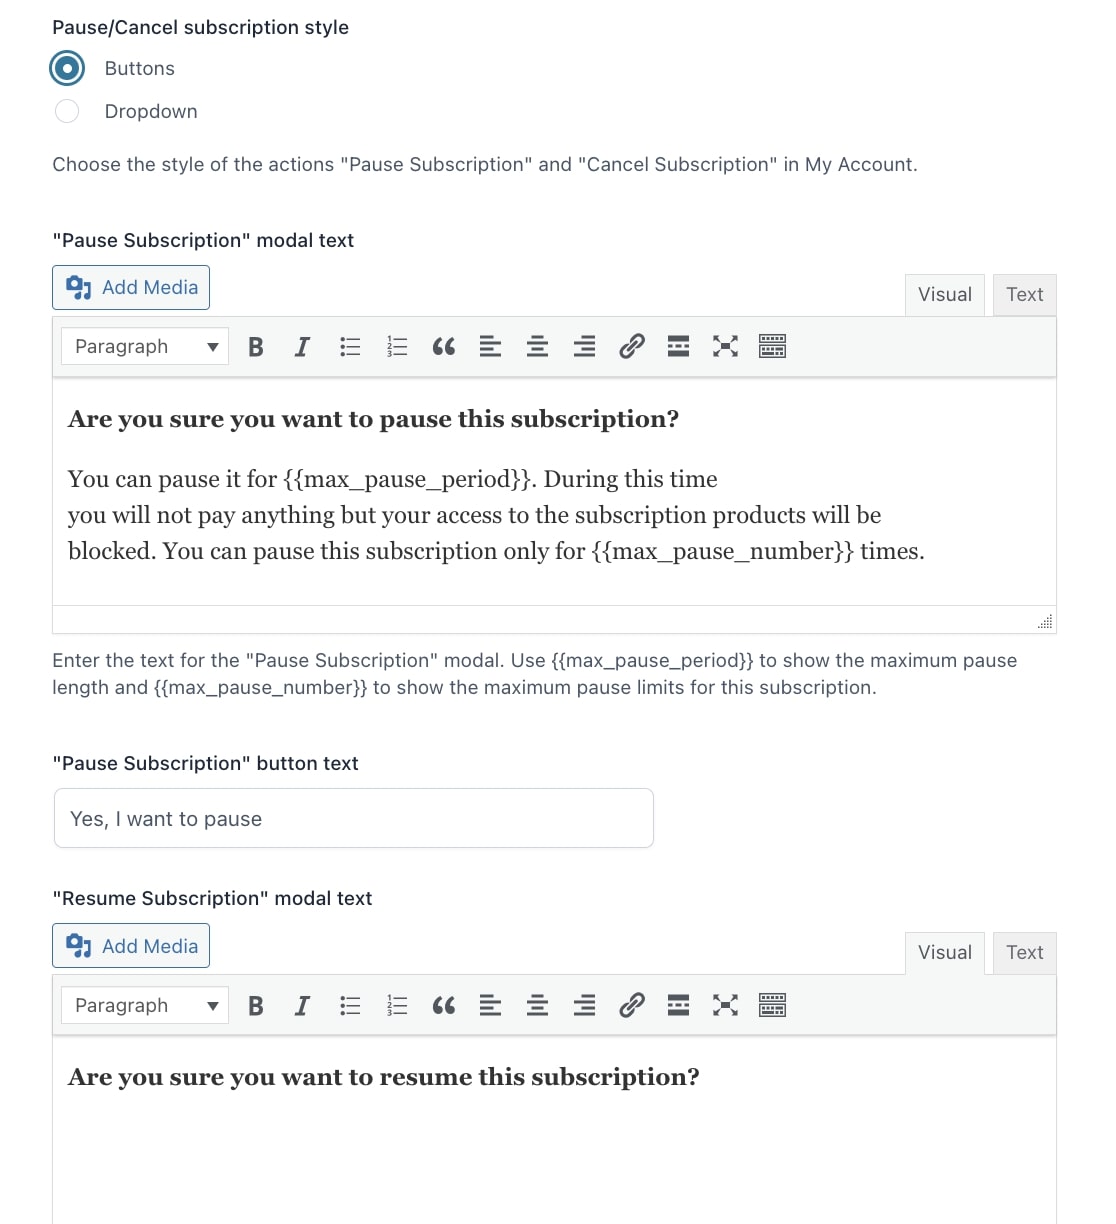
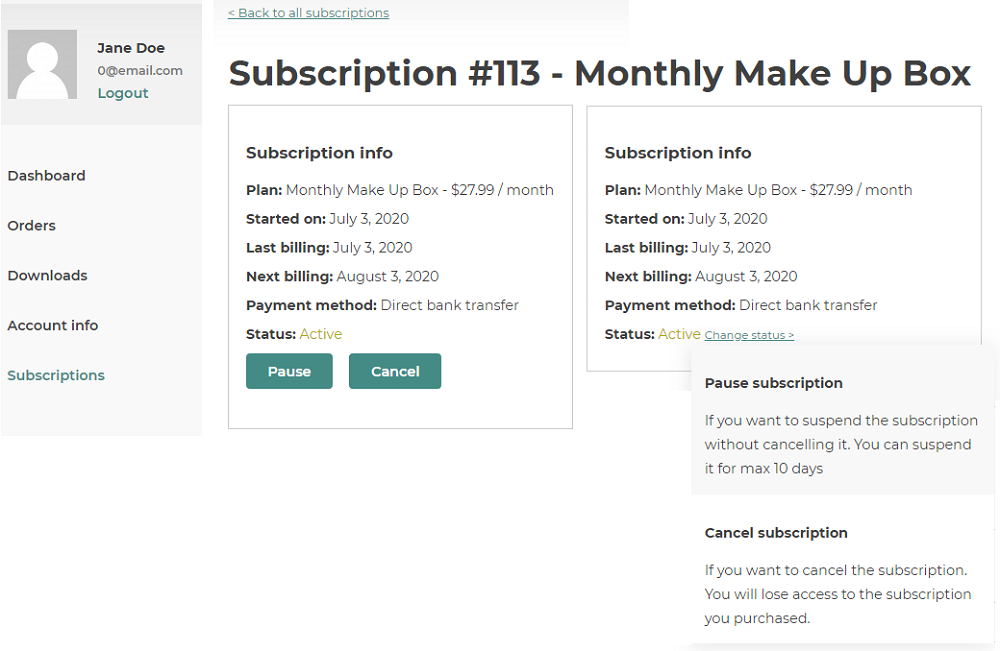
Pause/Cancel subscription style: Choose to either show the options as buttons or in a dropdown.
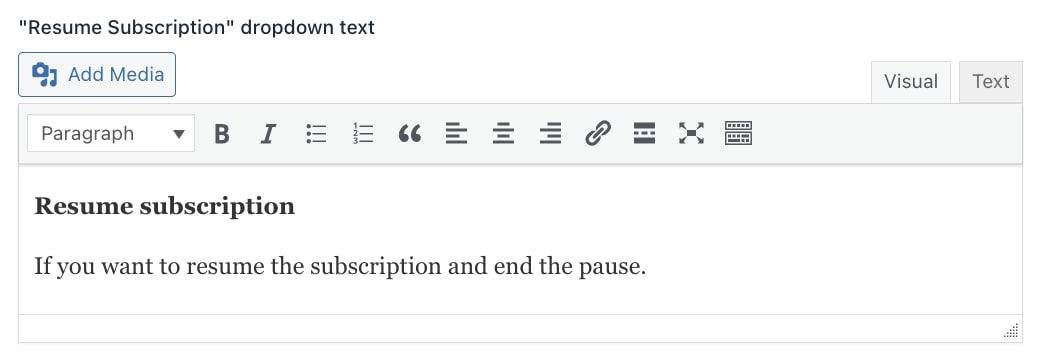
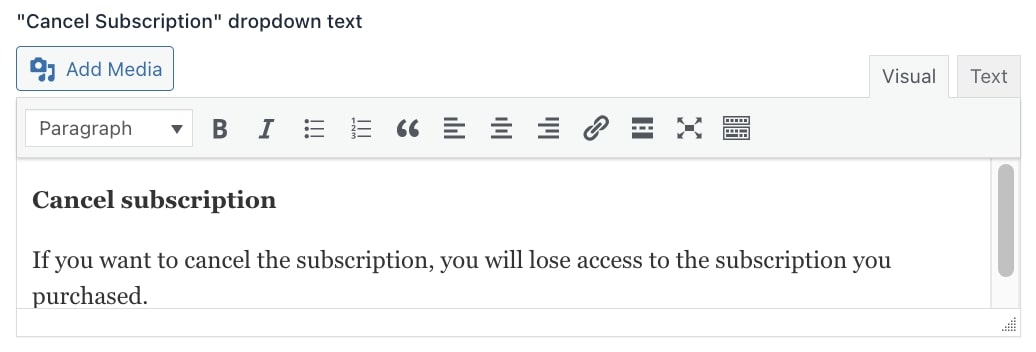
If you choose to show the options in a dropdown, you can edit the texts as shown below.
Pause subscription textResume subscription textCancel subscription text
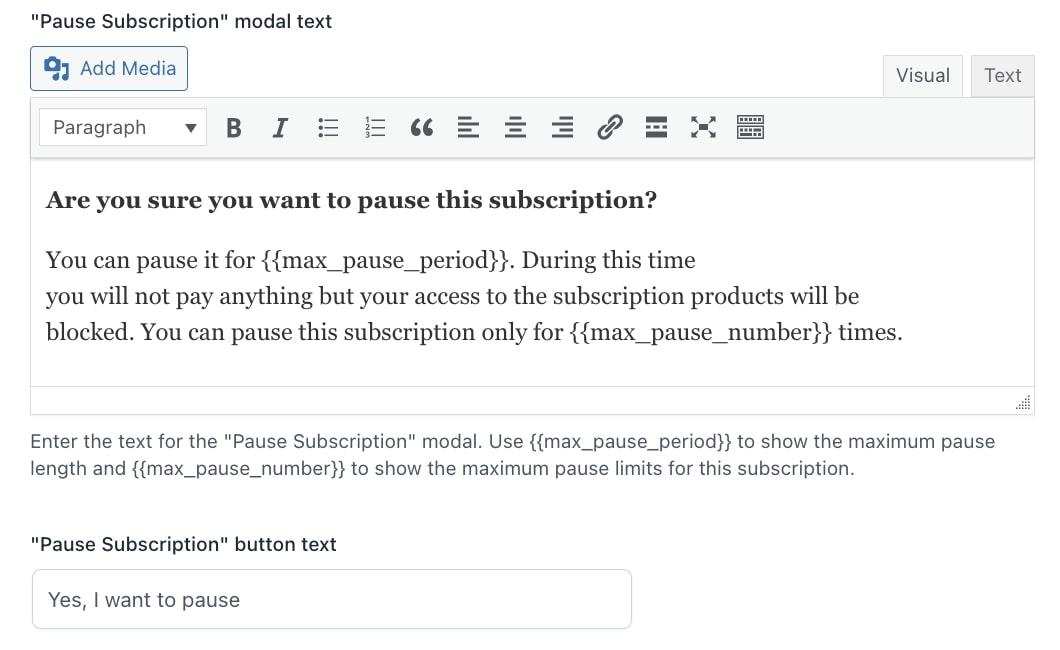
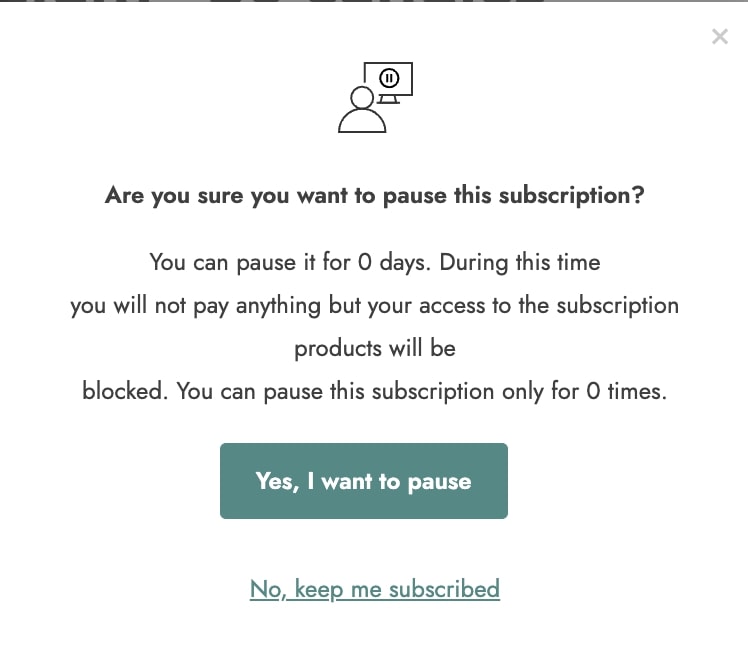
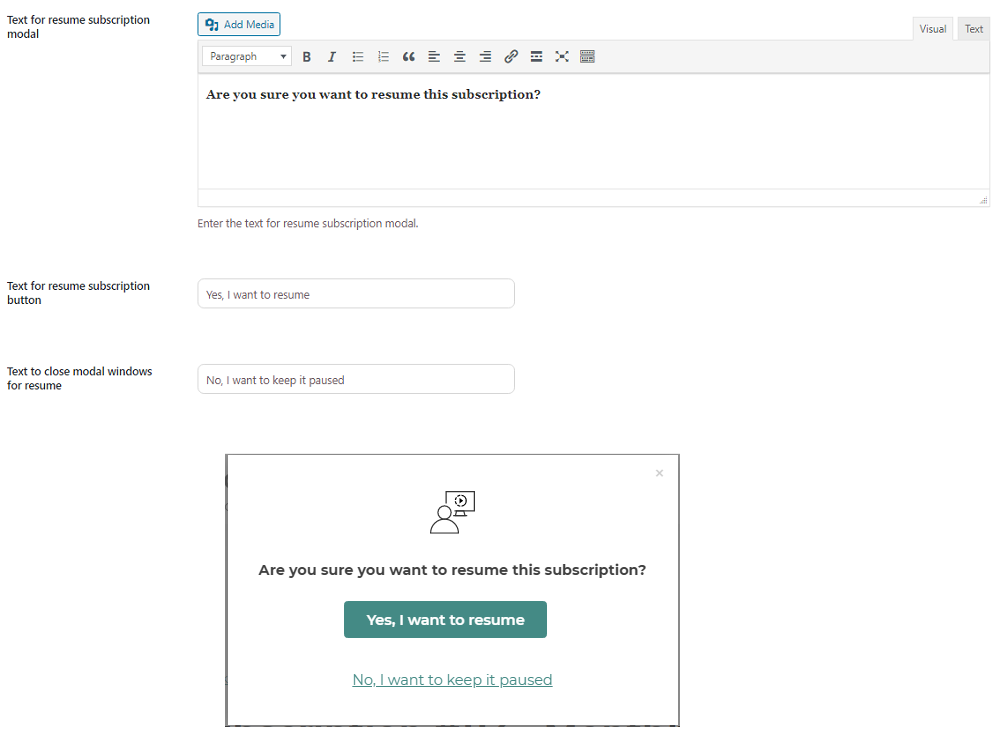
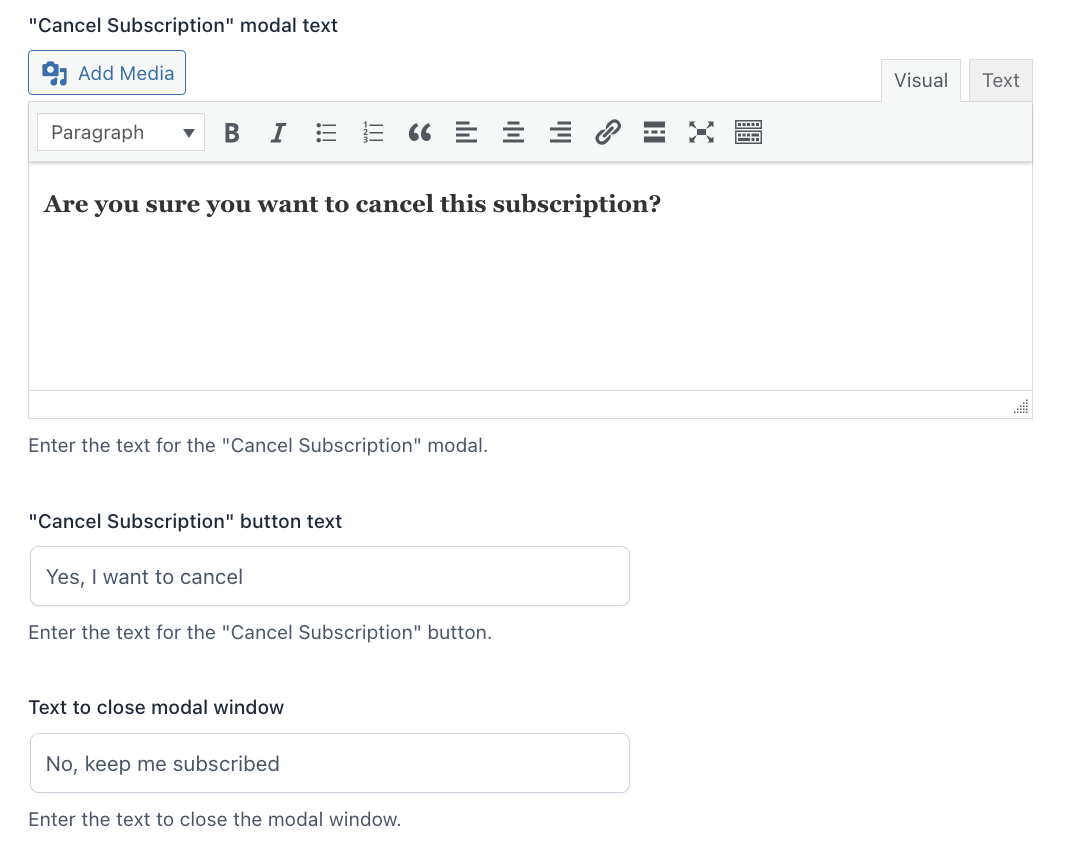
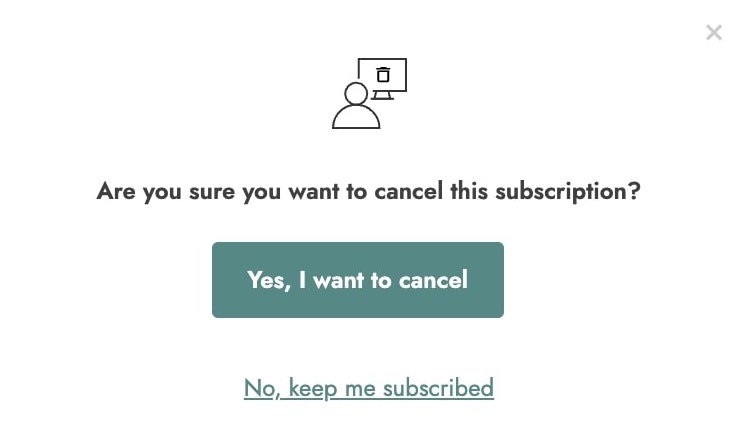
If the customer chooses any of the options from the My account page (pause, resume, cancel) a popup will appear. You are able to customize the text of these popups and the buttons in YITH > Subscription > Customization. In the images below you’ll see an example of the popup and its settings.
Pause subscription
Resume subscription
Cancel subscription
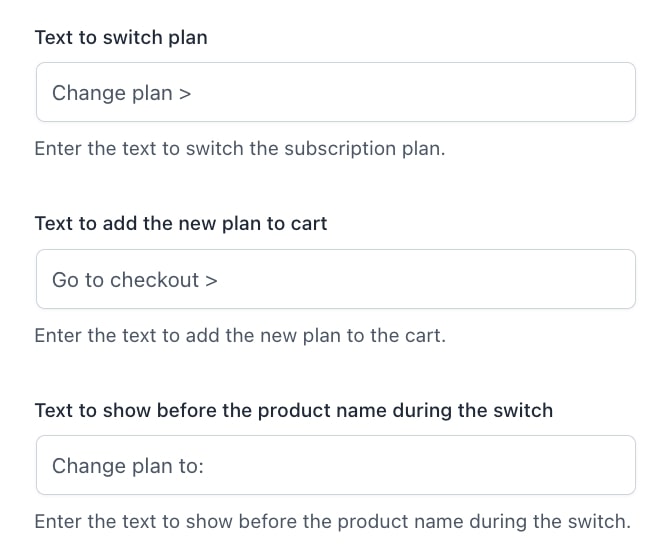
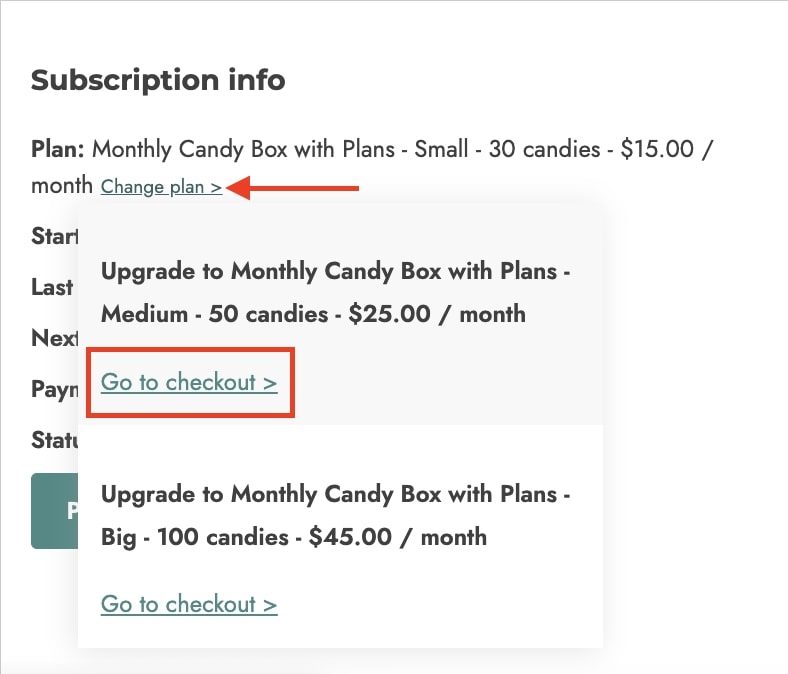
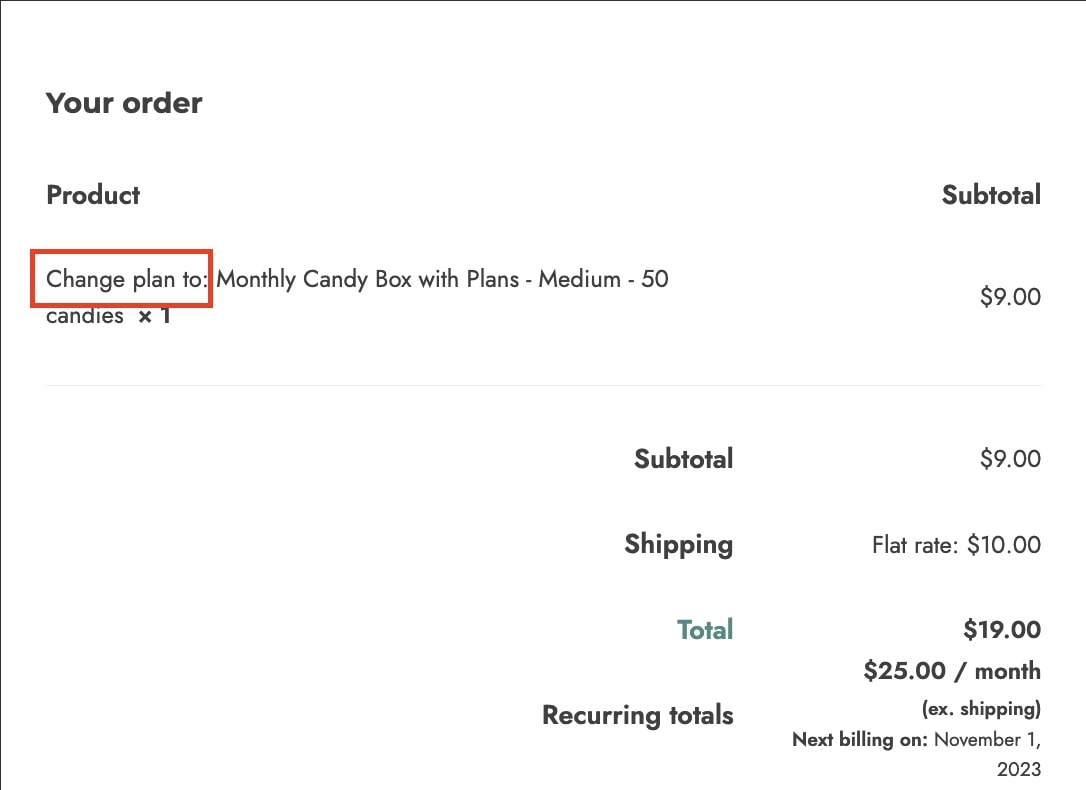
Finally, you can also customize the texts for the subscription plan switch as shown below.
My account page
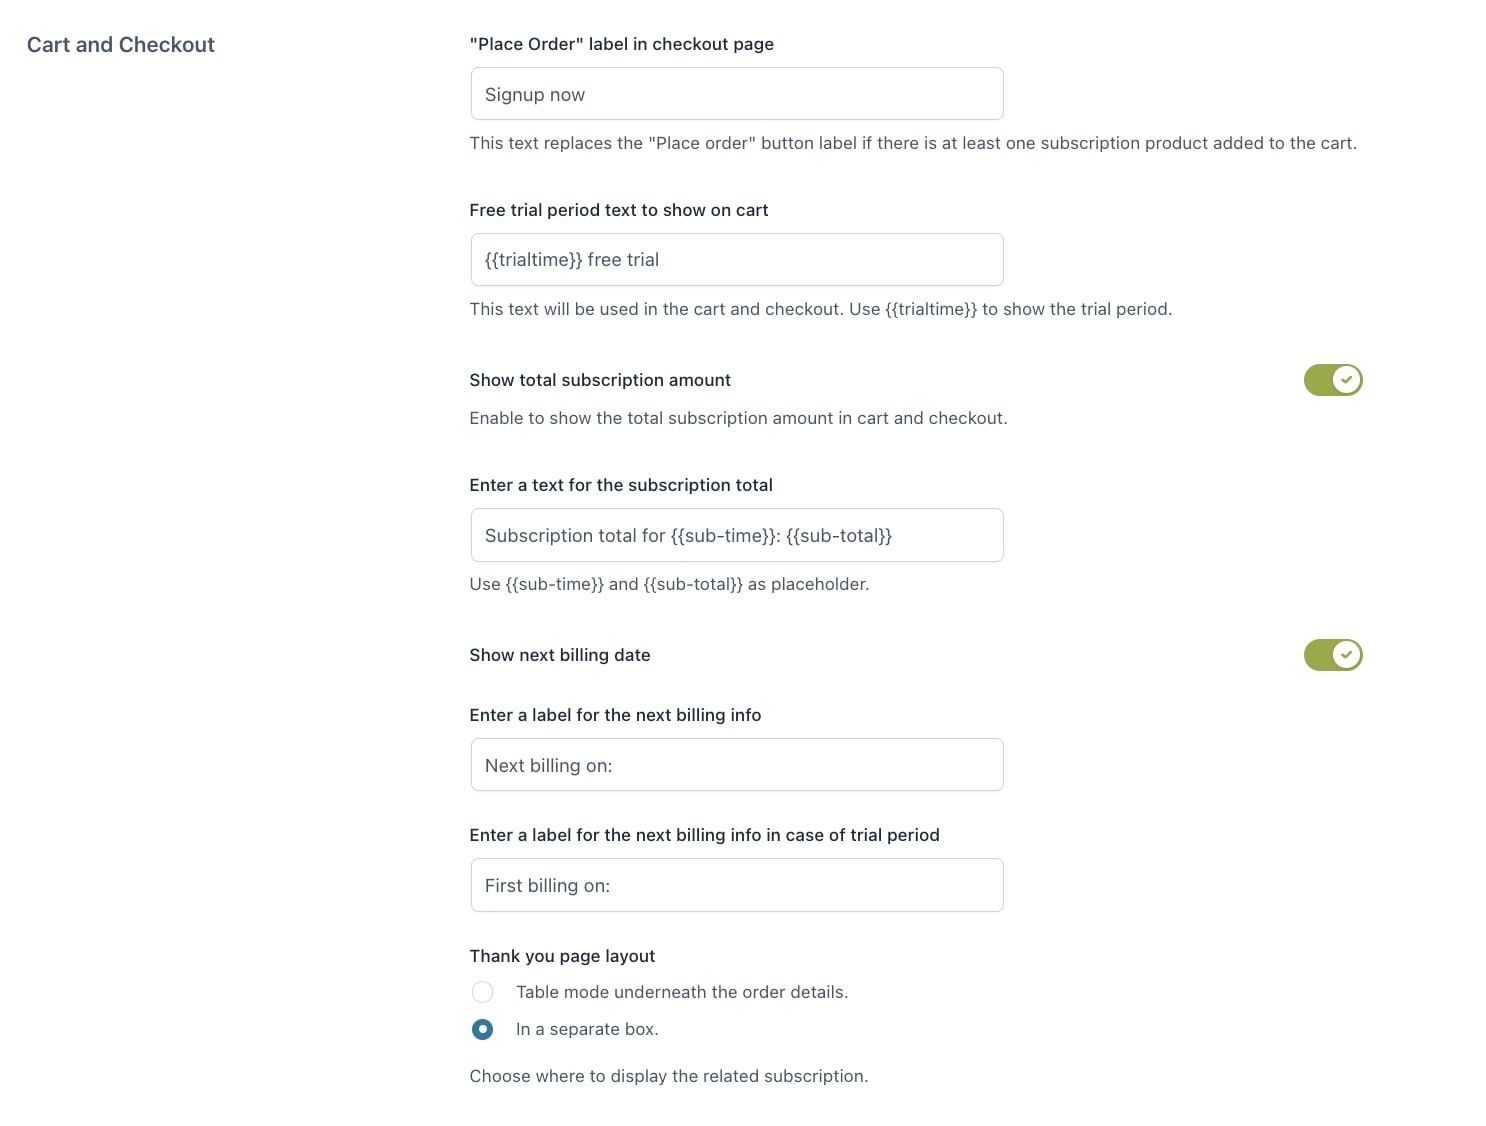
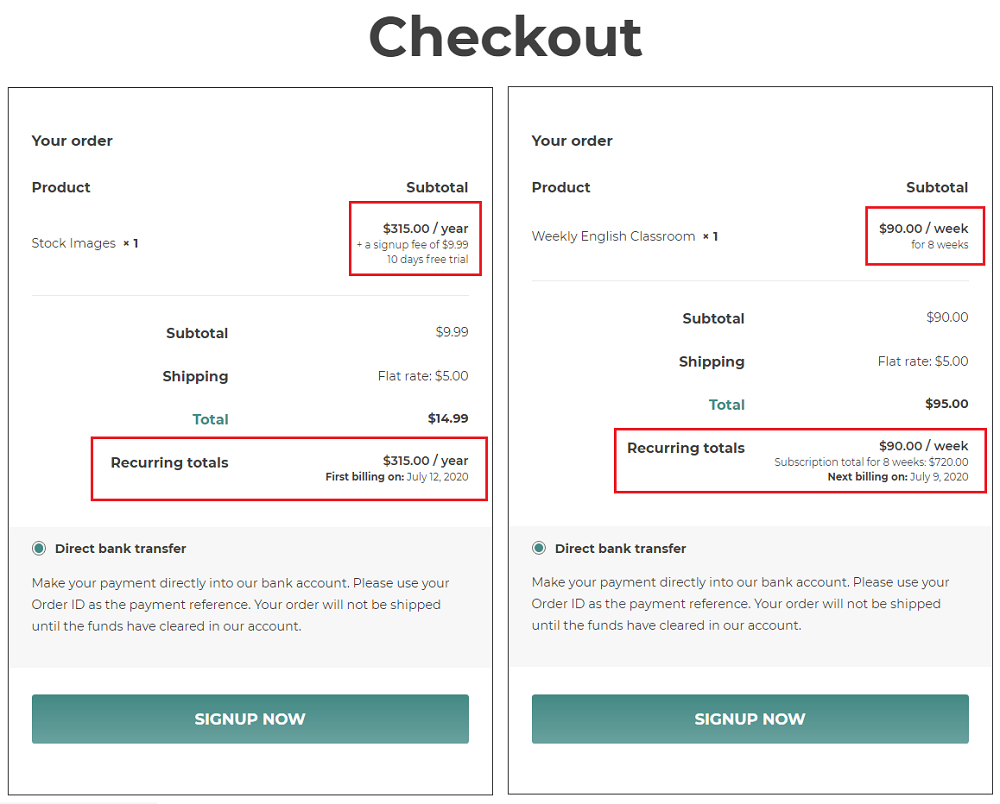
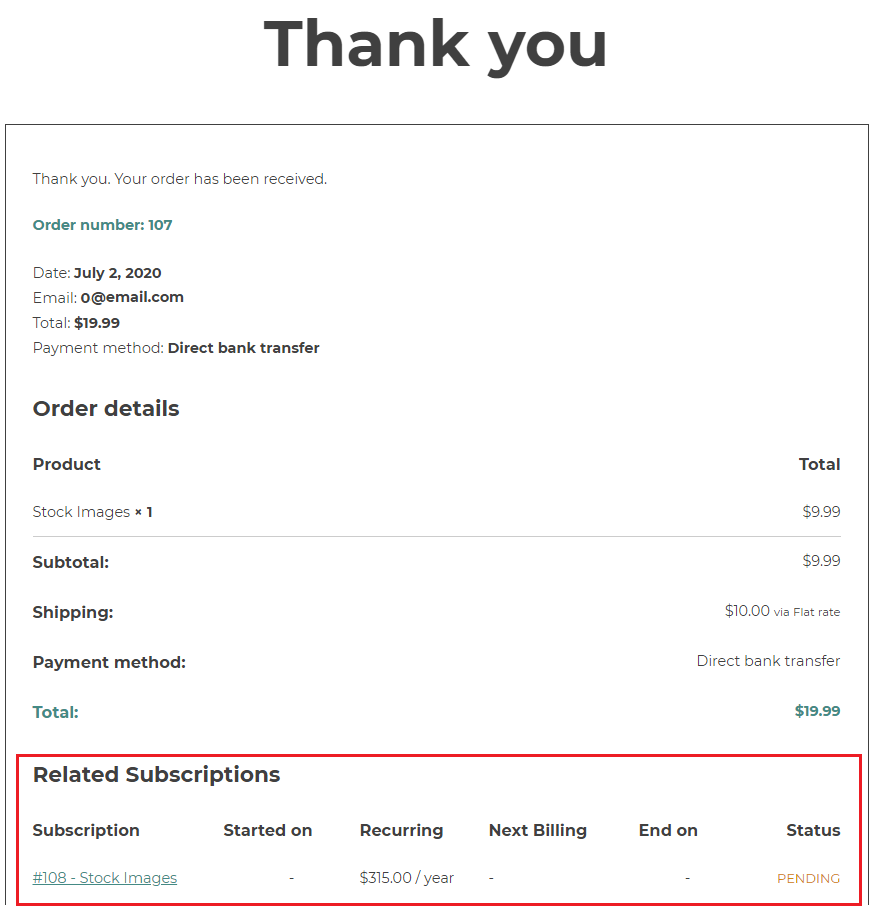
Checkout page
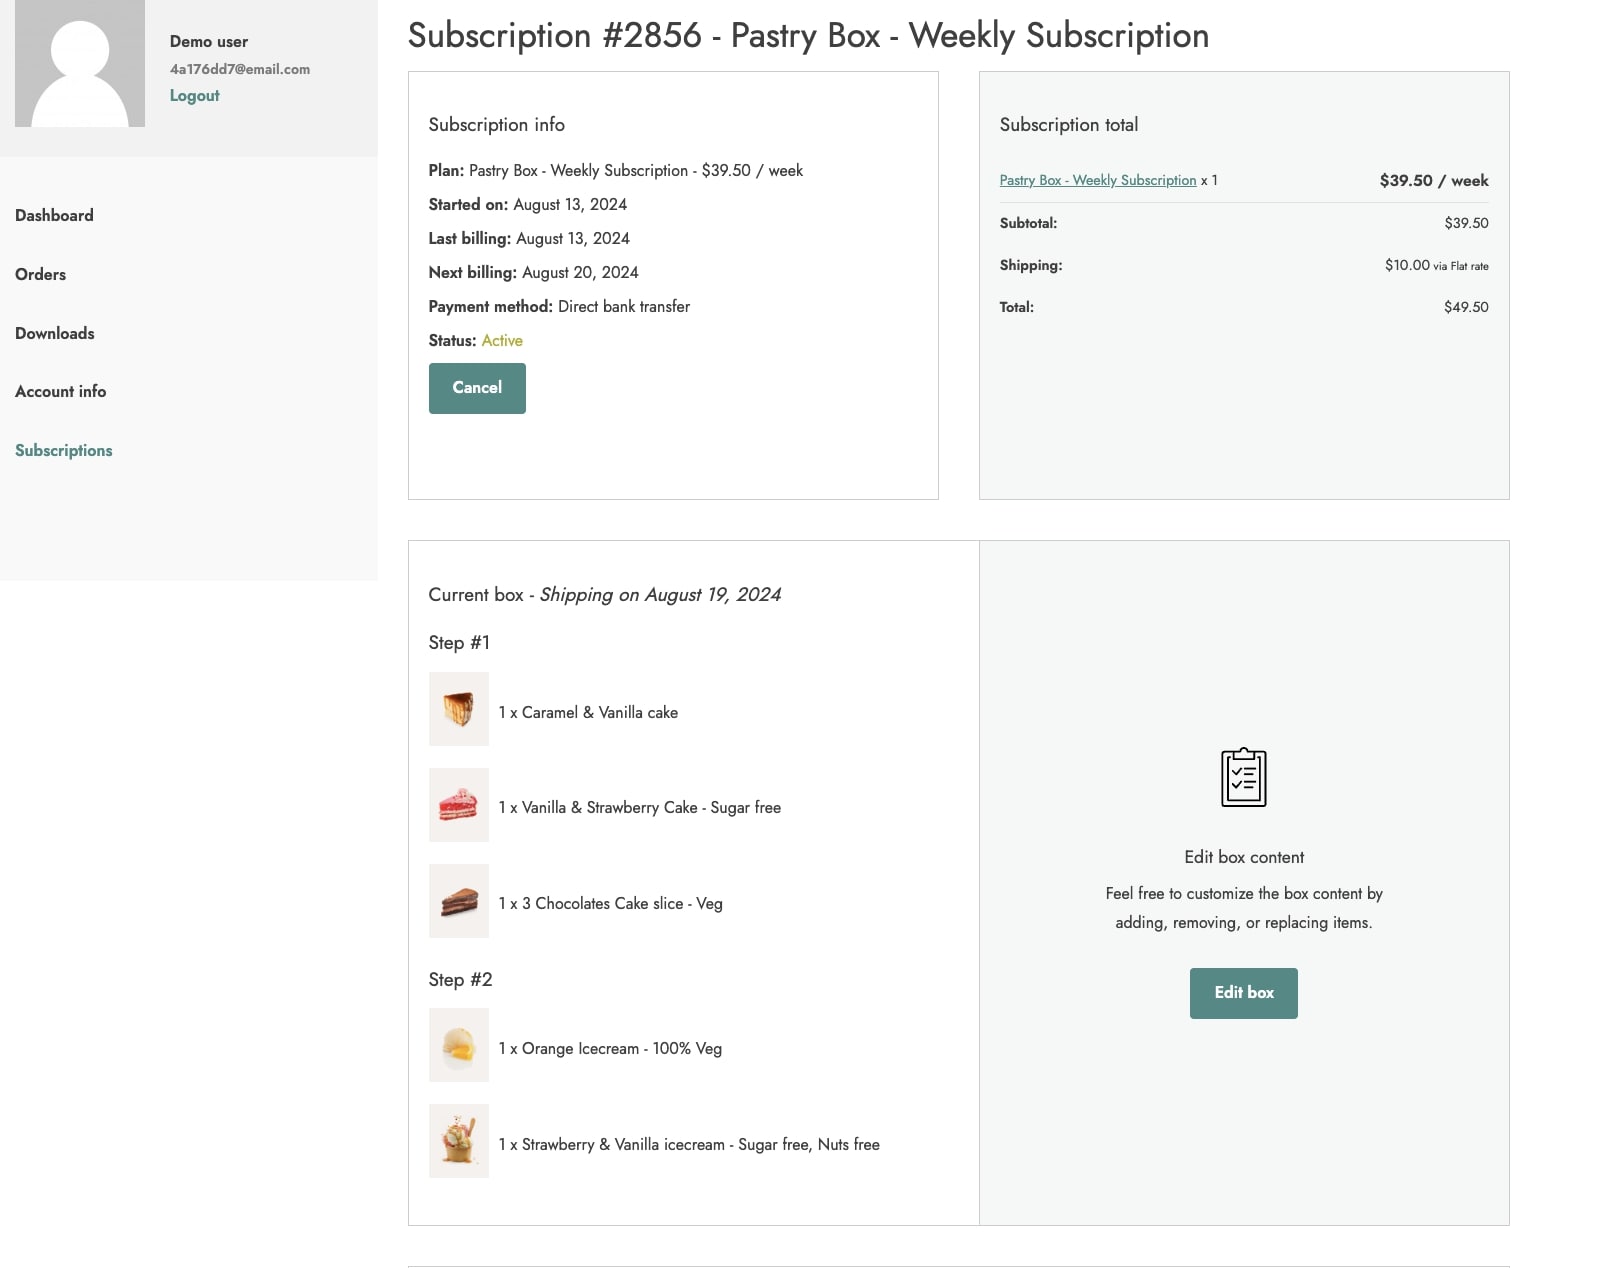
Subscription box
If you have enabled the option ‘‘Subscription box edition” from the plugin General settings > Subscription box, the users will be able to modify the products that are part of the box.
Note: this option also depends on what timeframe has been configured on the Product edit page > Subscription options > Allow box editing up until. Visit this page for more details.
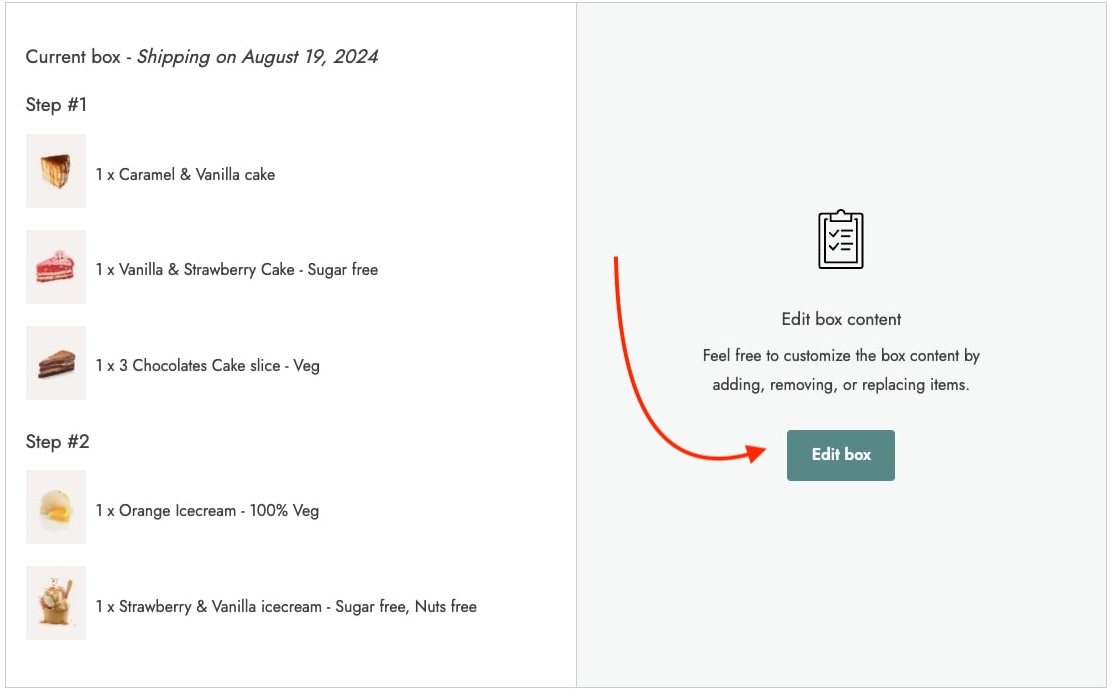
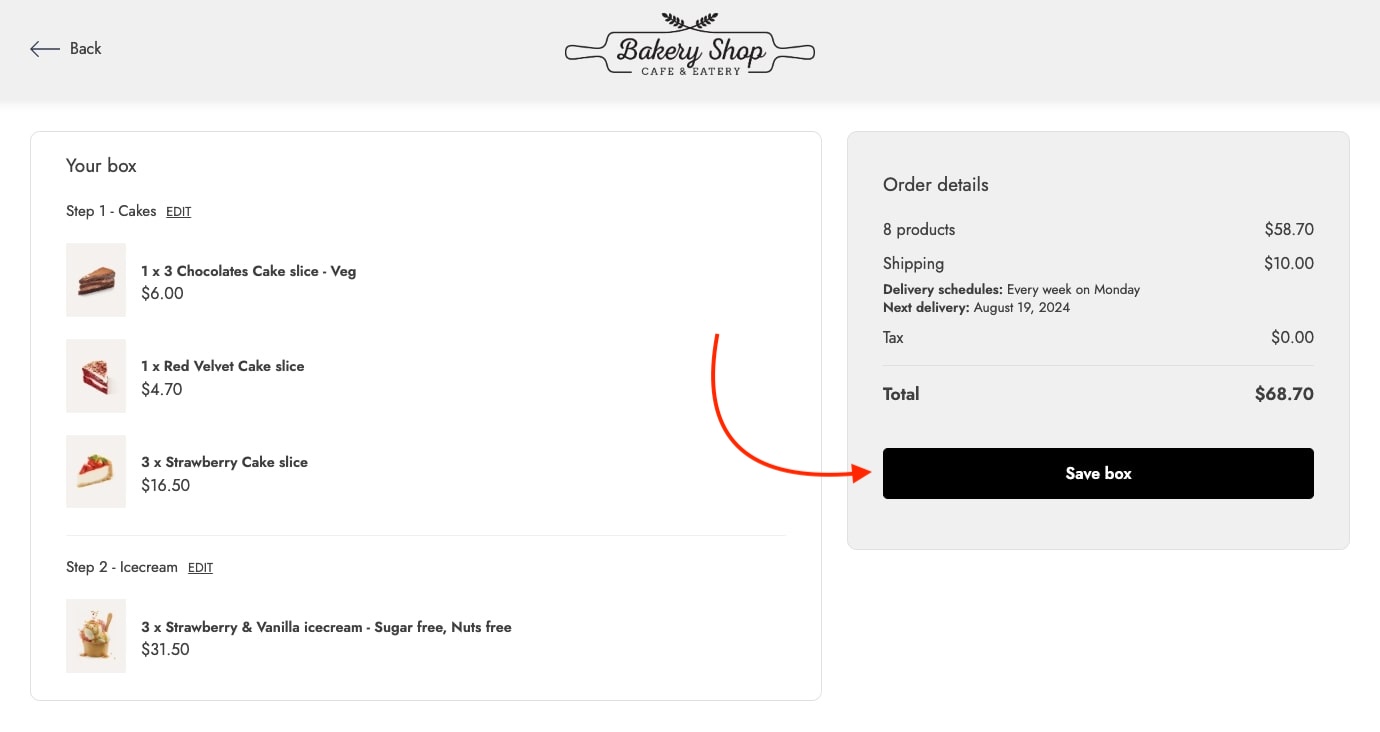
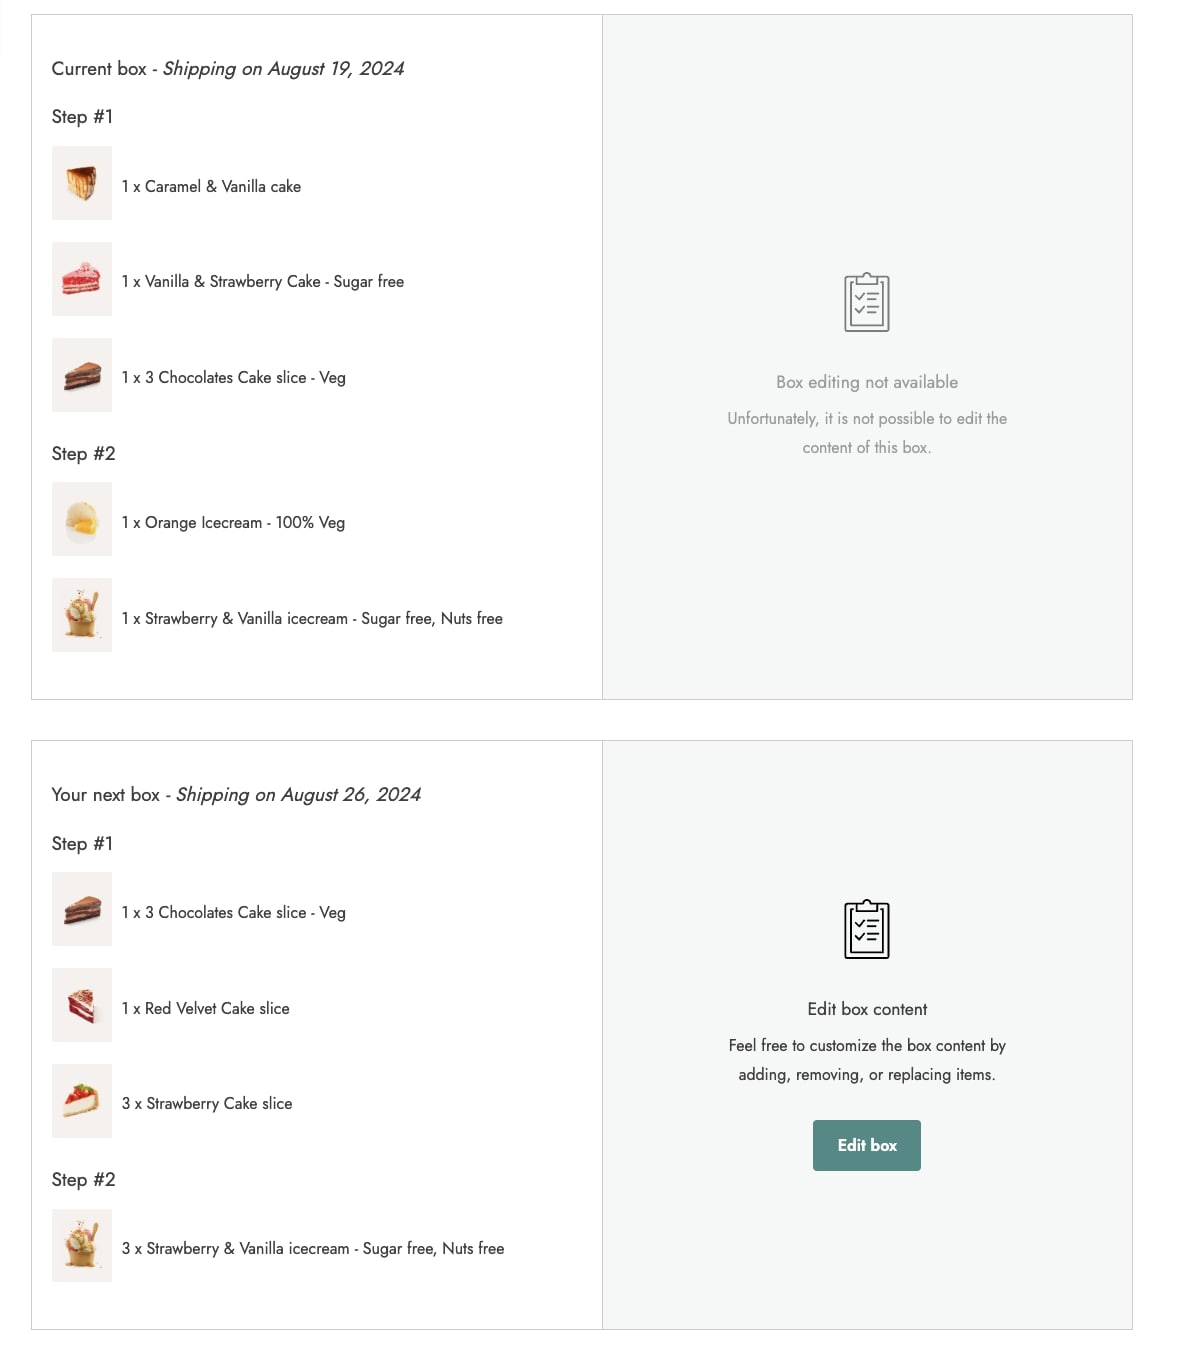
To modify the products in the box the user will need to click ”edit box” button and this will take the user to the product listing page where the products can be changed.
Once the user is done with the new products selection, a cart page will have the box resume and the option to ”save box”.
By making this change a new box will appear on my account page, this will show the products that would be delivered in the next shipment.
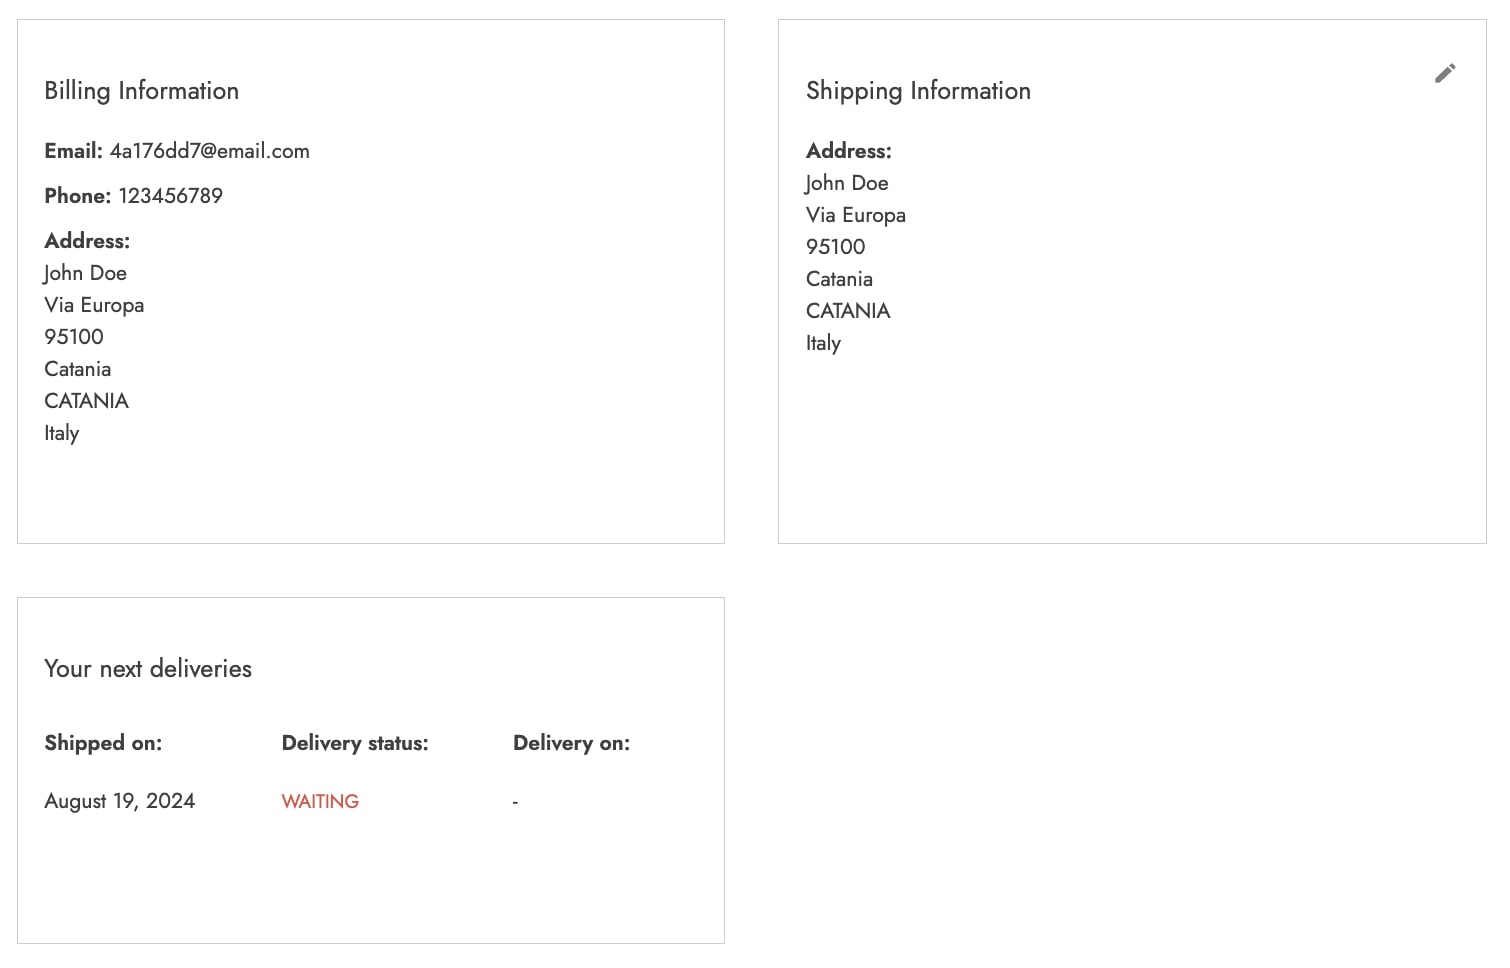
Just below, the page will display the billing/shipping information and details about the delivery dates, refer to this page to know more about the delivery schedules.
Subscription boxes are a type of service in which customers can configure several items into a single purchase and receive them on a regular basis.
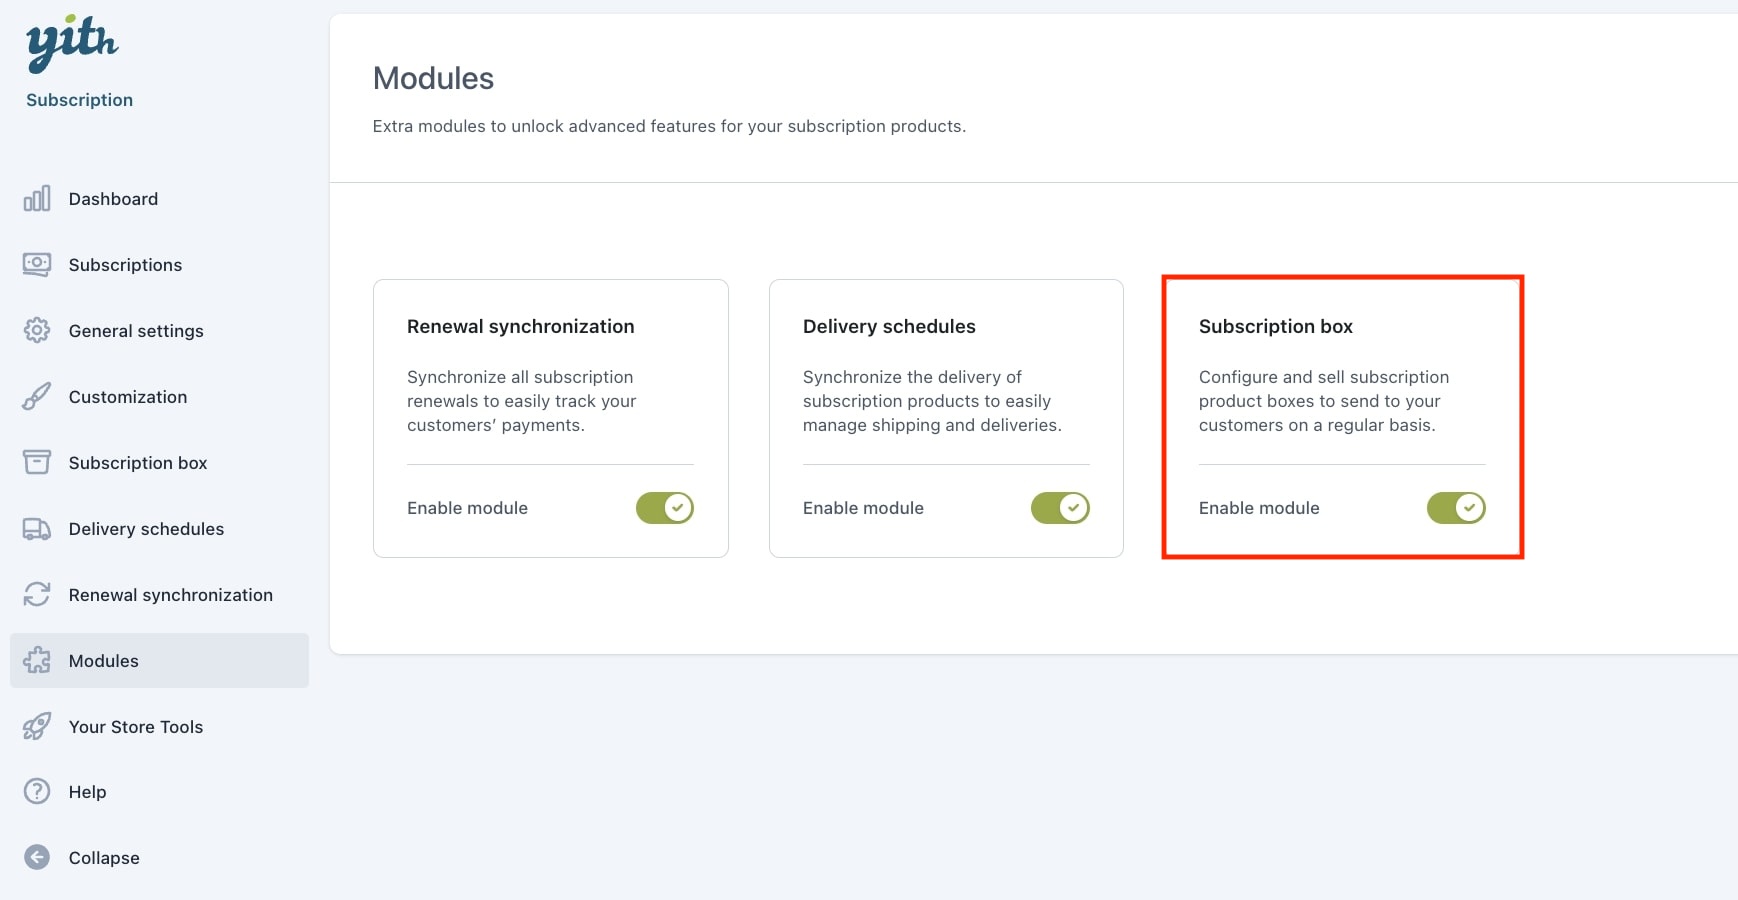
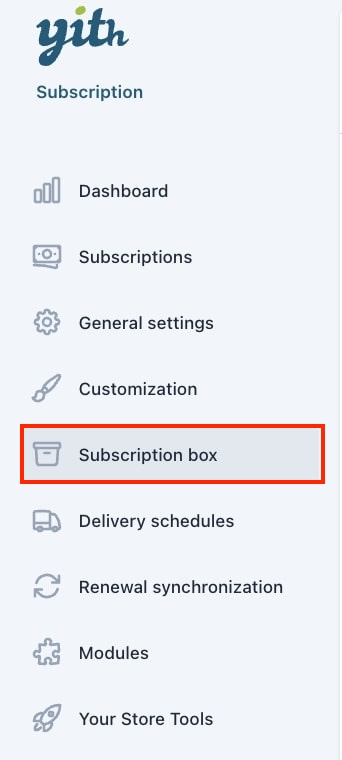
To add this section to the plugin panel, you must first enable the related module going to the plugin settings> Modules.
Once this option has been enabled, a new tab will show up in the plugin general settings so we can start configuring it.
Now let’s look at the configuration of the subscription box, this part focuses on the look and feel of the page that is created by using the new product type in this module.
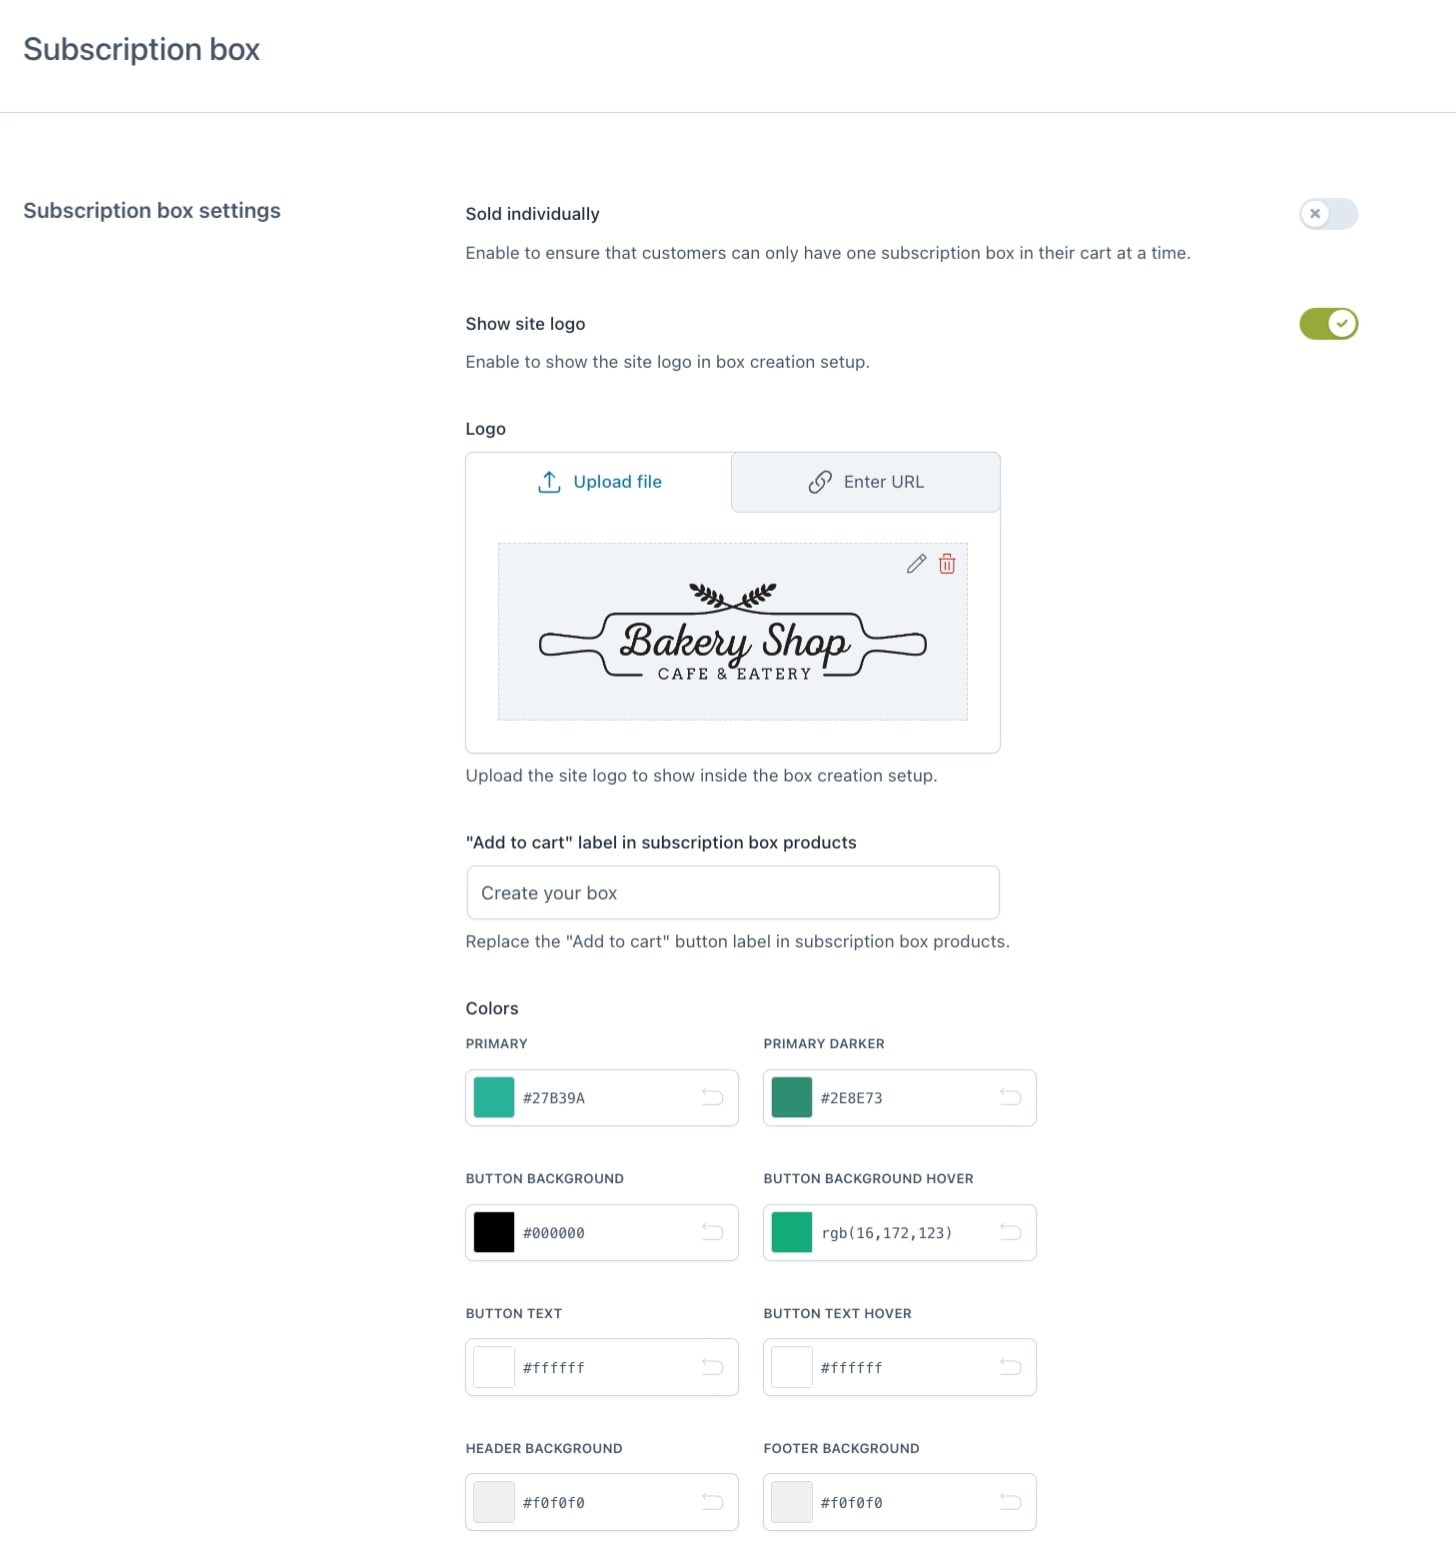
Sold individually: enable this option to allow users to add only one subscription box to the cart
Show site logo: enable to be able to upload the site logo at the top in the box creation page
“Add to cart” label in subscription box products: you can give a custom name to the “Add to cart” button label on subscription box products
Colors:
Primary/darker: change the color for the ”add to cart” label in subscription box products
Button background/hover: change the text color of the buttons in box creation pages
Button text/hover: change the color of the buttons in box creation pages
Footer/header Background: change the color for the footer and header background
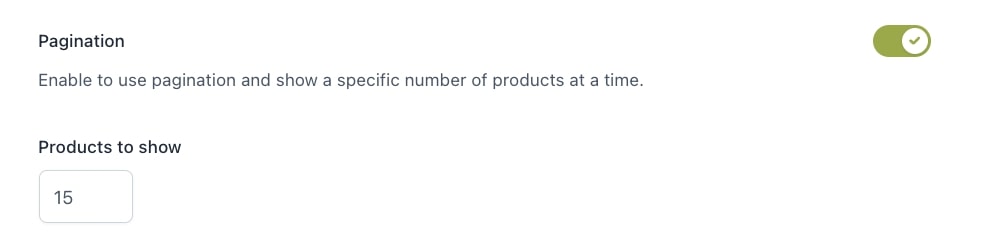
Pagination: enable this option to set how many products to show (this option works with infinite scrolling pagination)
Note: if this option isn’t enable, all products will loaded immediately in each step.
Subscription box edition
Now, if you want your customers to be able to modify the products that are already part of their active subscription, enable the option ”Allow customers to edit box content”.
Users will be able to do modify the products from my account page, go to this page to know more about the options available.
You can enable this module if you need to synchronize all subscription renewals to the same day. For example, charge all customers the 1st of every month, regardless of which day they first subscribed.
Go to the section Modules and enable Renewal synchronization.
A new section will then show in the plugin panel from which you can configure the available options.
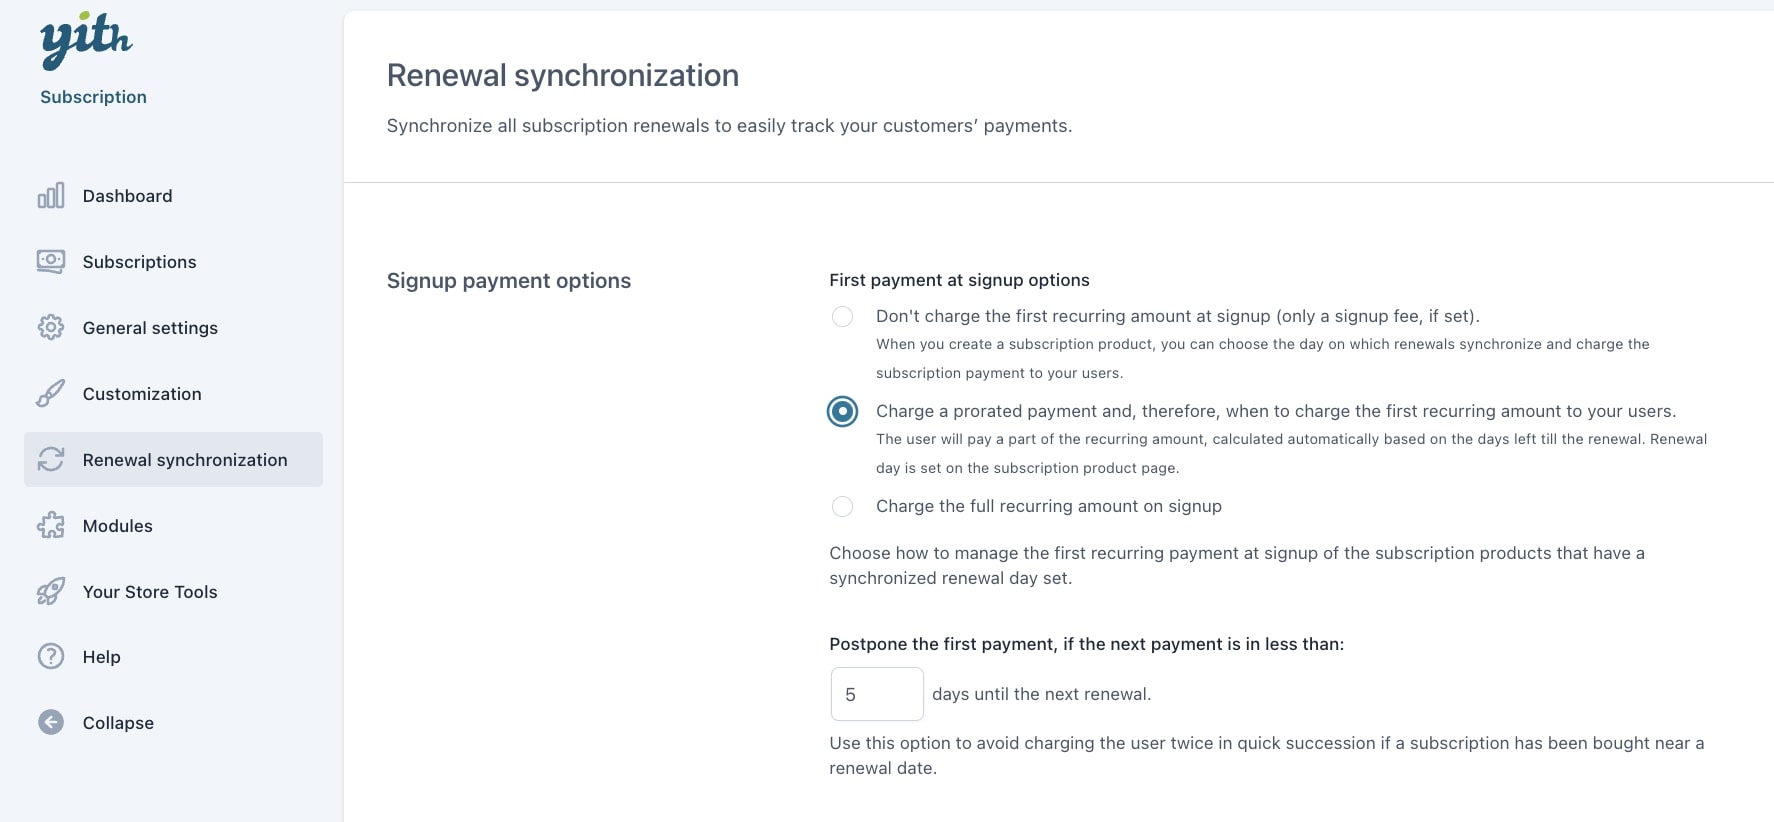
Signup payment options
First payment at signup fee options: here, you can choose how to manage the first subscription payment at signup from:
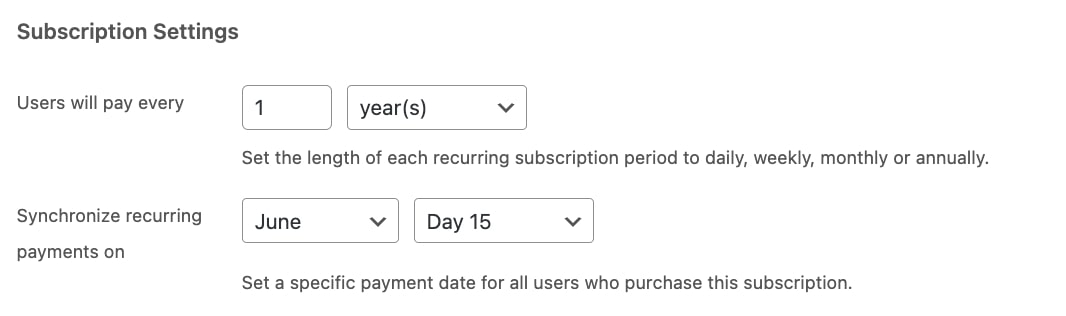
Don’t charge the first recurring amount at signup (only a signup fee, if set): When you create a subscription product, you can choose the day on which renewals synchronize and charge the subscription payment to your users.
Charge a prorated paymentand, therefore, when to charge the first recurring amount to your users: The user will pay a part of the recurring amount, automatically calculated based on the days left till the renewal. (Renewal day is set on the subscription product page).
Postpone the first payment, if the next payment is in less than: Use this option to avoid charging the user twice in quick succession if a subscription has been bought near a renewal date by setting the number of days until next renewal.
Charge the full recurring amount on signup: regardless of the number of days left for the next renewal date.
Please, note: if the product includes a trial period, no prorated amount will be charged, so the next payment date will be automatically set as the first renewal date.
Renewal synchronization
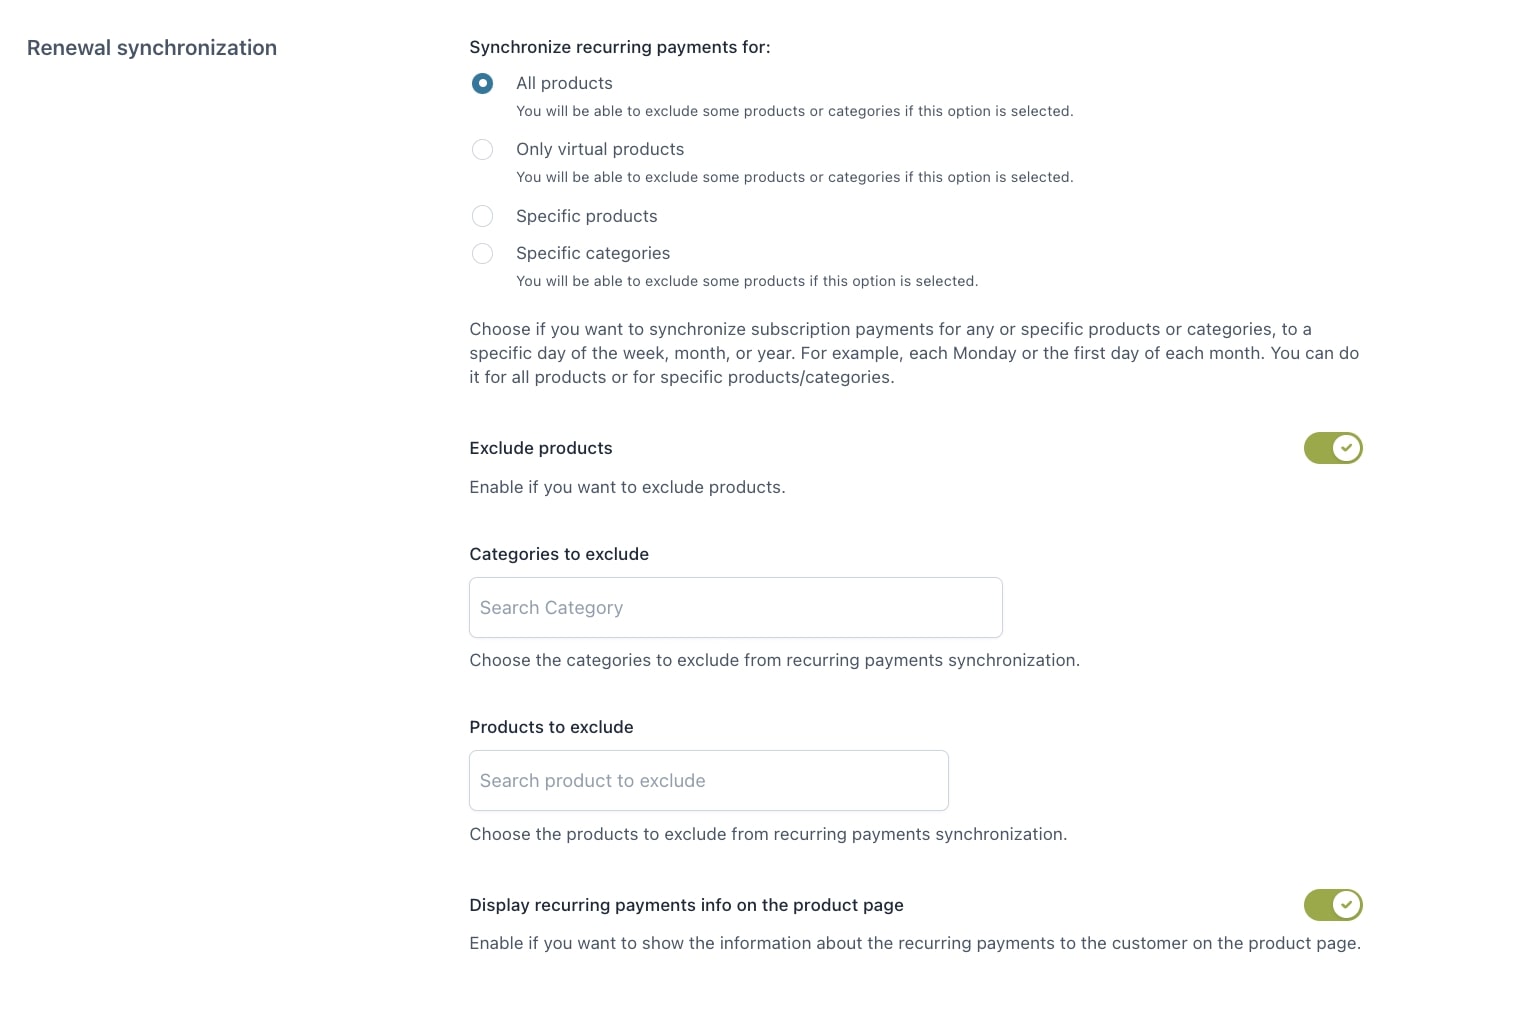
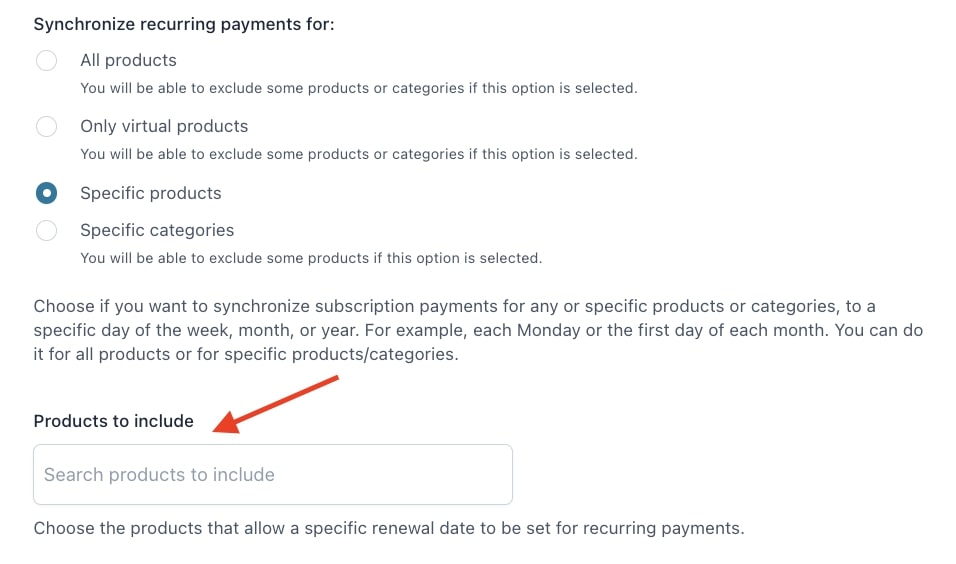
Synchronize recurring payments for: Choose if you want to synchronize subscription payments to a specific day of the week, month, or year. For example each Monday or the first day of each month. You can do that for all products or specific products/categories. Available options:
All products: You will be able to exclude some products or categories if this option is selected.
Only virtual products: You will be able to exclude some products or categories if this option is selected.
Specific products: Select the products to include in the related option.
Specific categories: Select the products to include in the related option.. You will be able to exclude some products if this option is selected.
Display recurring payments info on the product page: Enable if you want to show additional information about the synchronization on the product page.
You can continue with the settings from the product detail page (details here) where you will be able to configure the sync option based on every product billing cycle.
Please, note, the synchronization settings can only apply to new subscriptions (so subscriptions started after the settings are saved) and it does not apply to ongoing subscriptions.
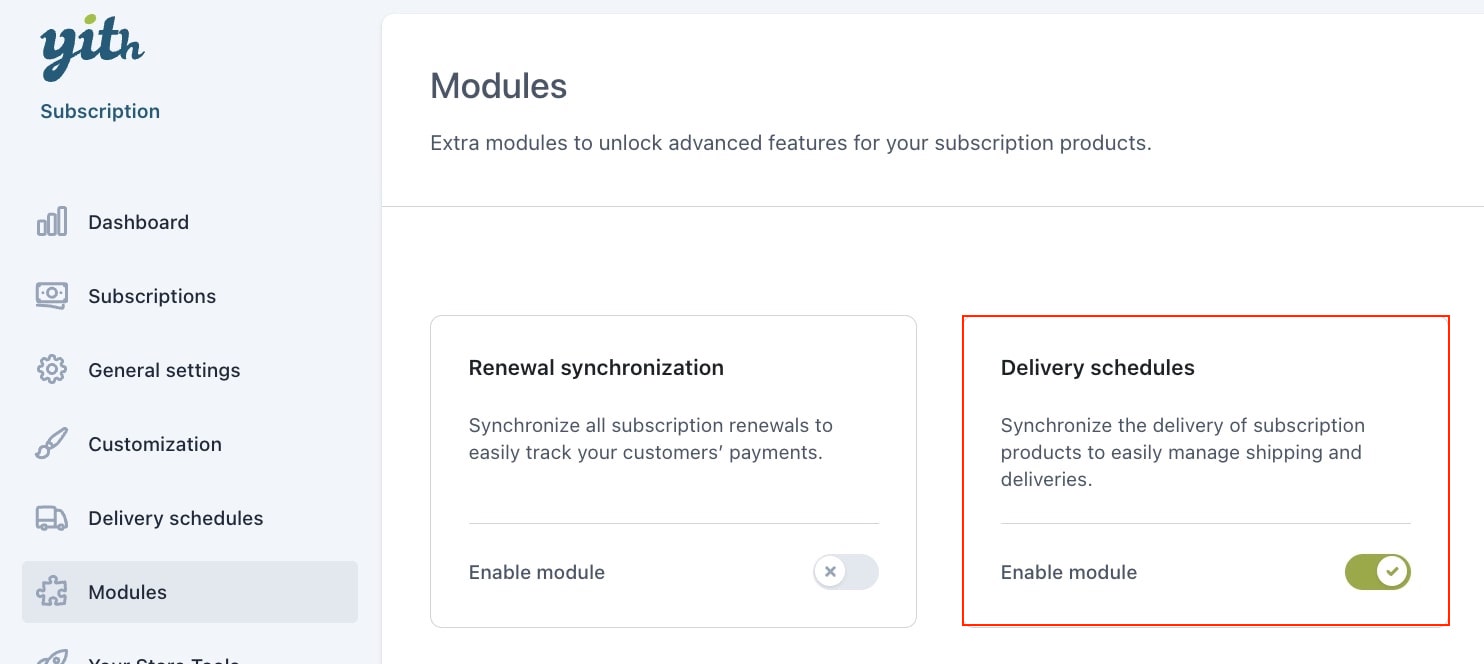
Through the Delivery schedules settings, you will be able to schedule deliveries for those subscriptions whose renewal payment does not match the delivery date. For example, you might sell a monthly subscription to a printed magazine that is billed yearly. In this case, you will charge your users yearly, so the renewal order will be generated every one year, but you will need a tool to schedule and prepare all the monthly shipping.
To add this section to the plugin panel, you must first enable the related module from Modules.
Let’s now analyze the available options:
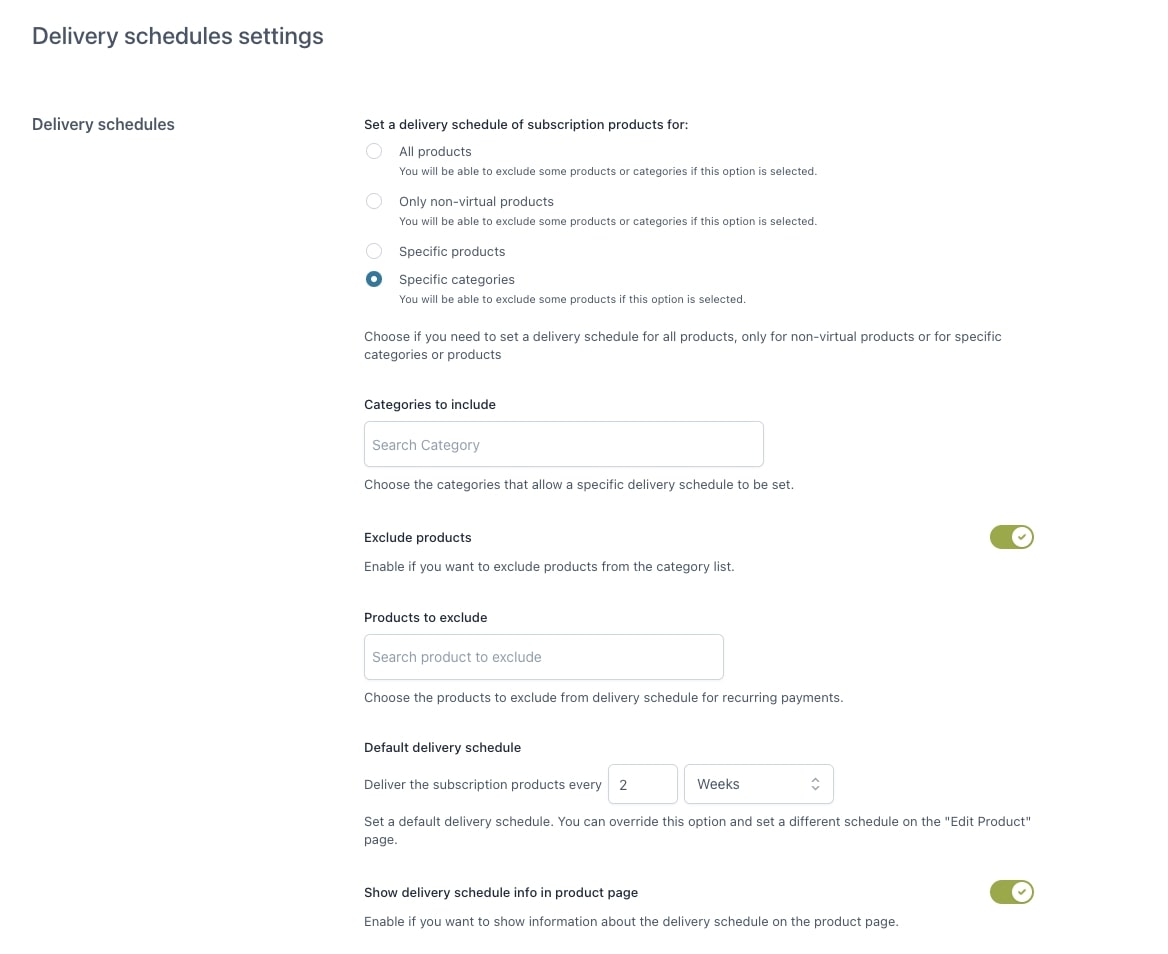
Set a delivery schedule of subscription products for: select the products or categories that will be affected by the delivery schedules.
All products: you will be able to exclude some products or categories if this option is selected.
Only non-virtual products: you will be able to exclude some products or categories if this option is selected.
Specific products: you can select the products in the option Products to include.
Specific categories: you will be able to select the categories in the option Categories to include.
Products to exclude: enable this option if you want to exclude some products from delivery.
Default delivery schedule: you can choose how frequently the subscription products have to be delivered, for example, every 1st of the month or every Monday. If the product recurrence is set in days, you will not be able to set a synchronization day. If the product recurrence is set in weeks, you will be able to choose the day of the week. Please, note that if the billing cycle is 2 weeks and Monday, it will always be the first Monday every two weeks.This is a global setting that can be overridden inside the product page. If the product recurrence is set in years, you will be able to choose month and day, for example January 1st or June 30th every year.
These general settings will apply to your product selection, but you will be able to override this on a product or variation level. For more information see here.
If you need to charge your users annually but ship every month, setting up a different delivery schedule is the perfect option for you.
Please, make sure you have enabled the Delivery schedule module and configured the global options as described on this page and the product settings as well.
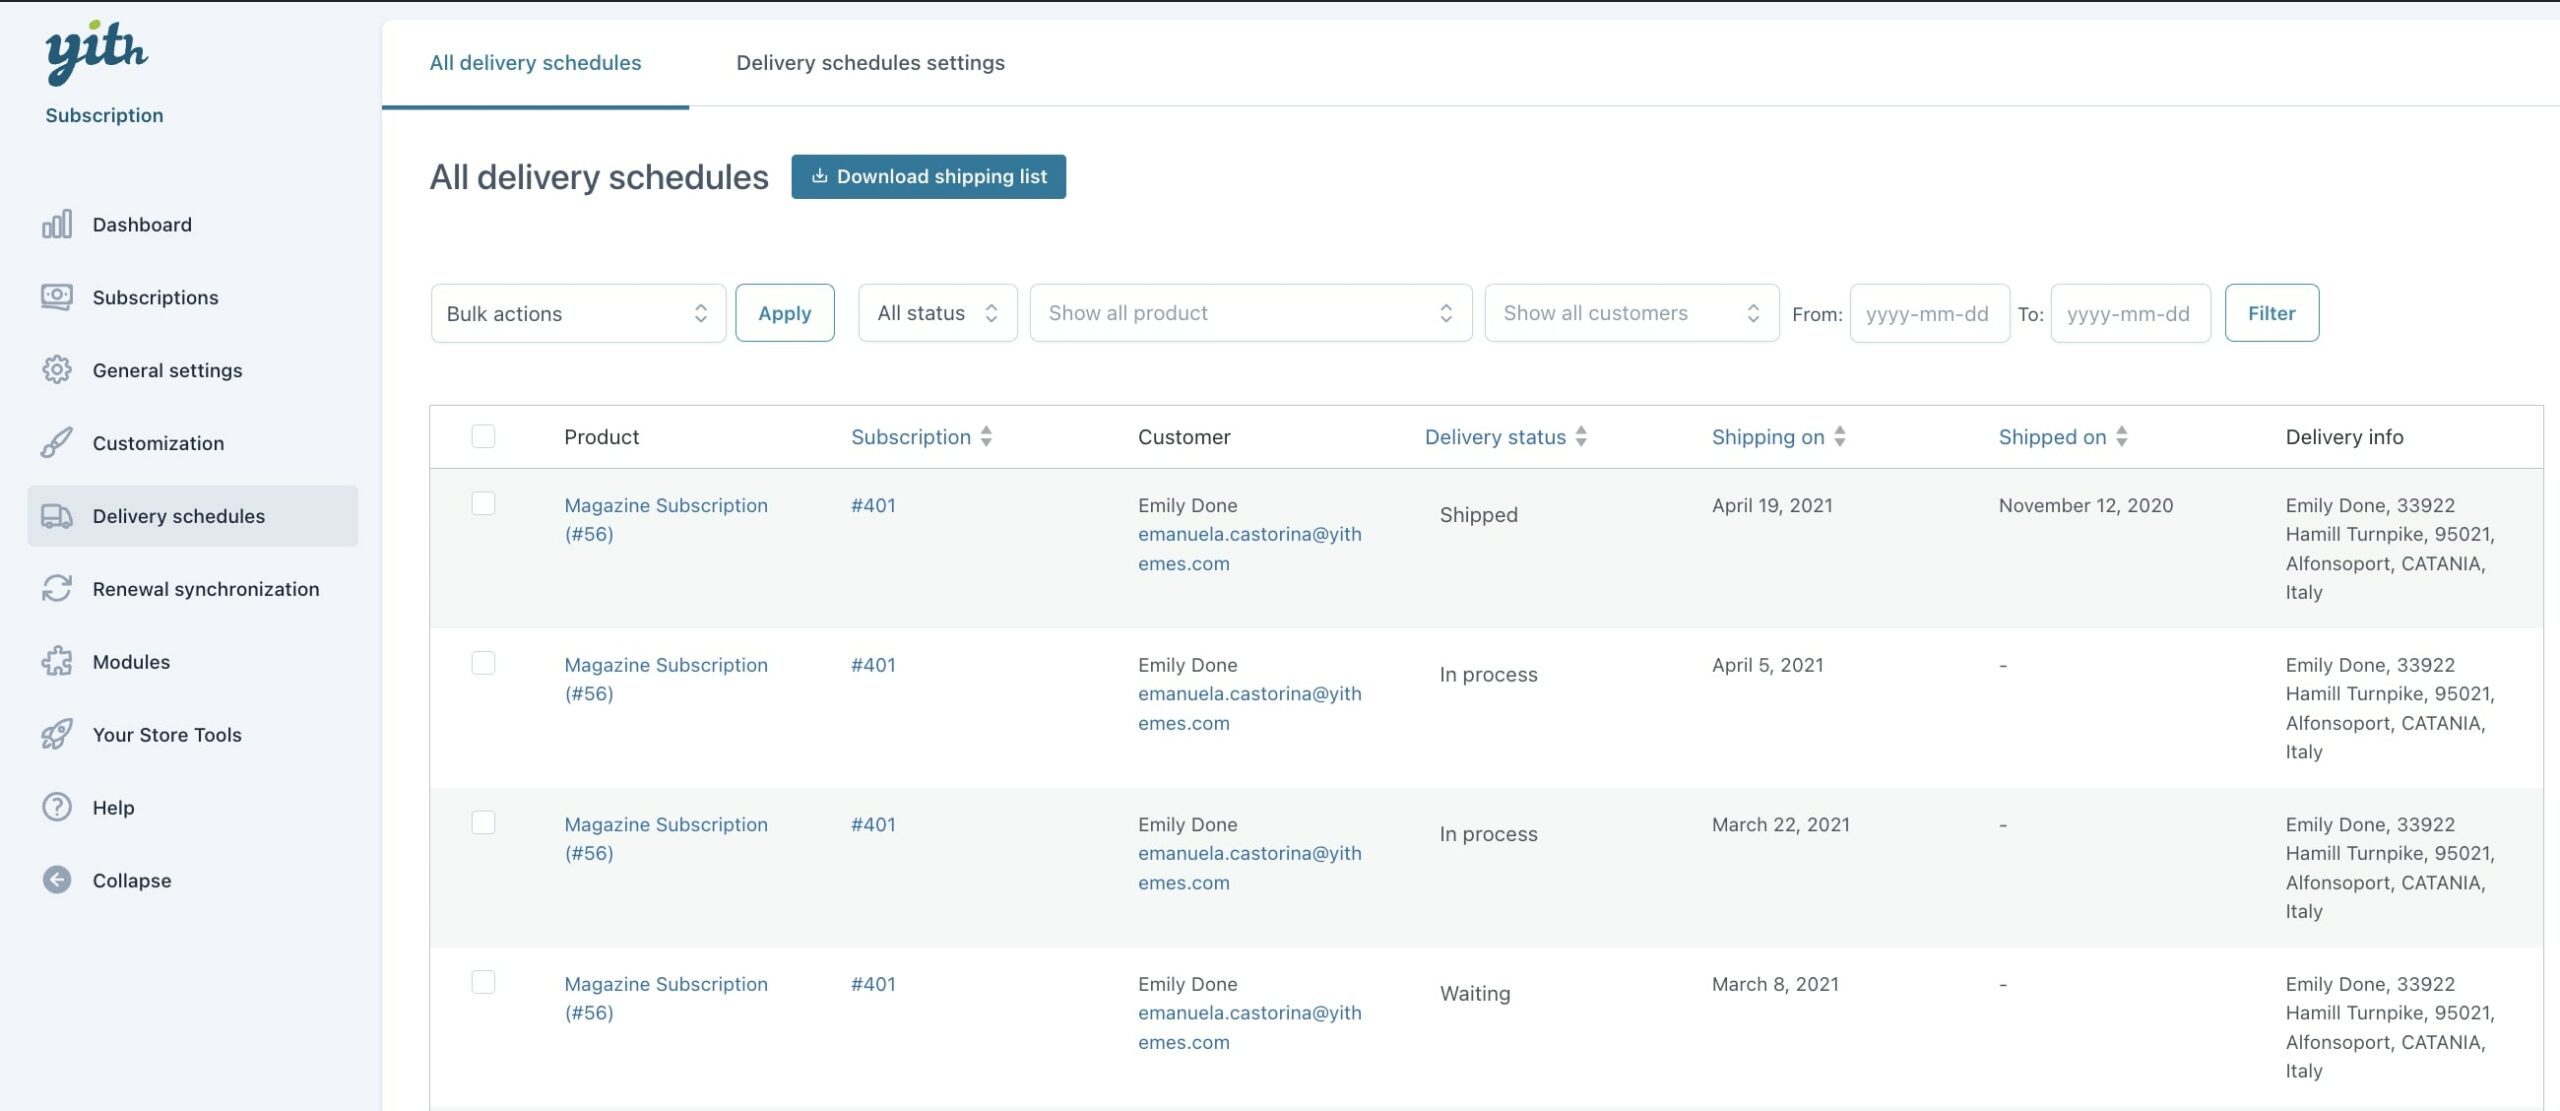
You will be able to see then the tab Delivery schedules in the plugin panel, where you can check all the next scheduled deliveries in a glance and manage them easily from this page.
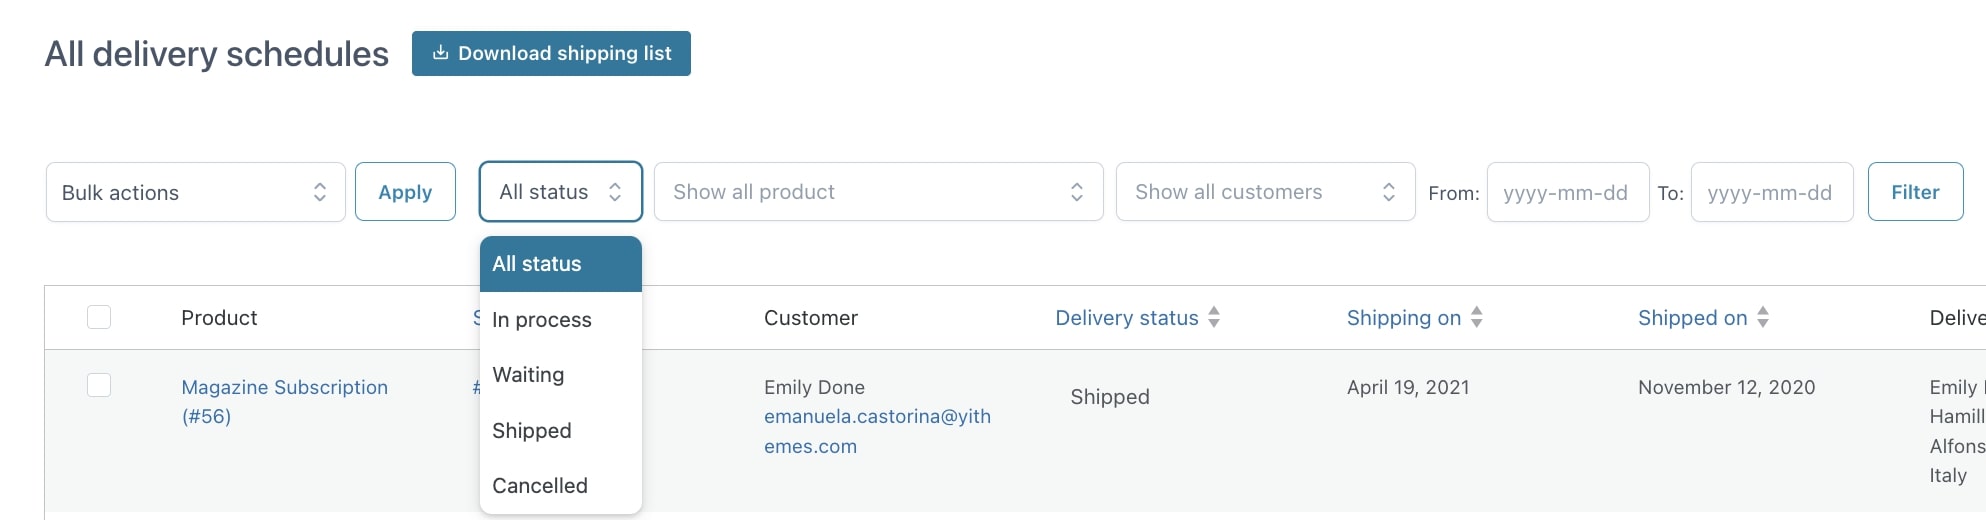
From this view, you can filter them by:
status
product
customer
date range
The list is updated daily (a daily cron is set up to update this page) based on the subscription settings.
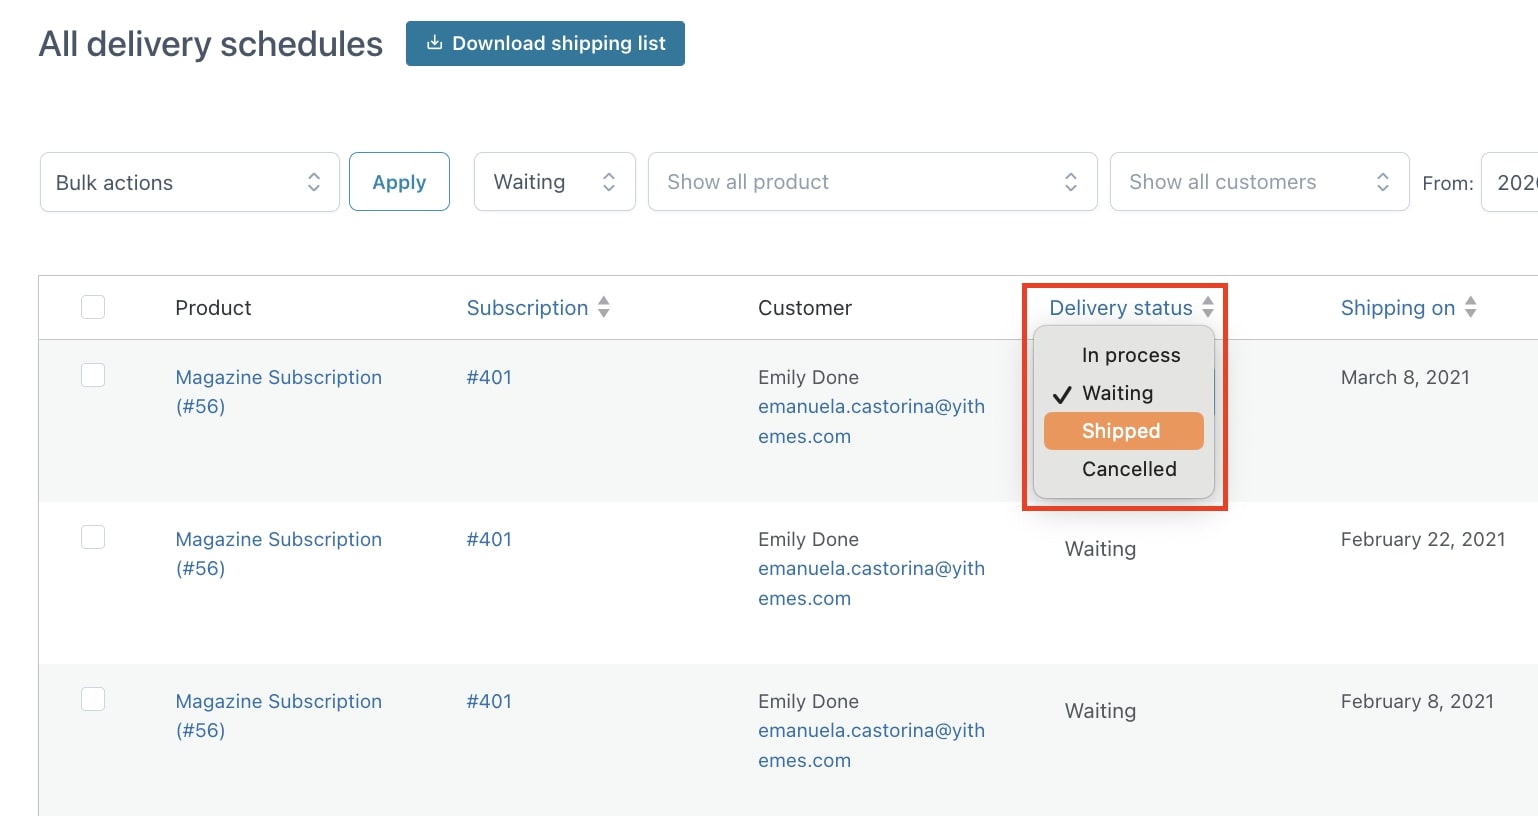
Every delivery has a specific status:
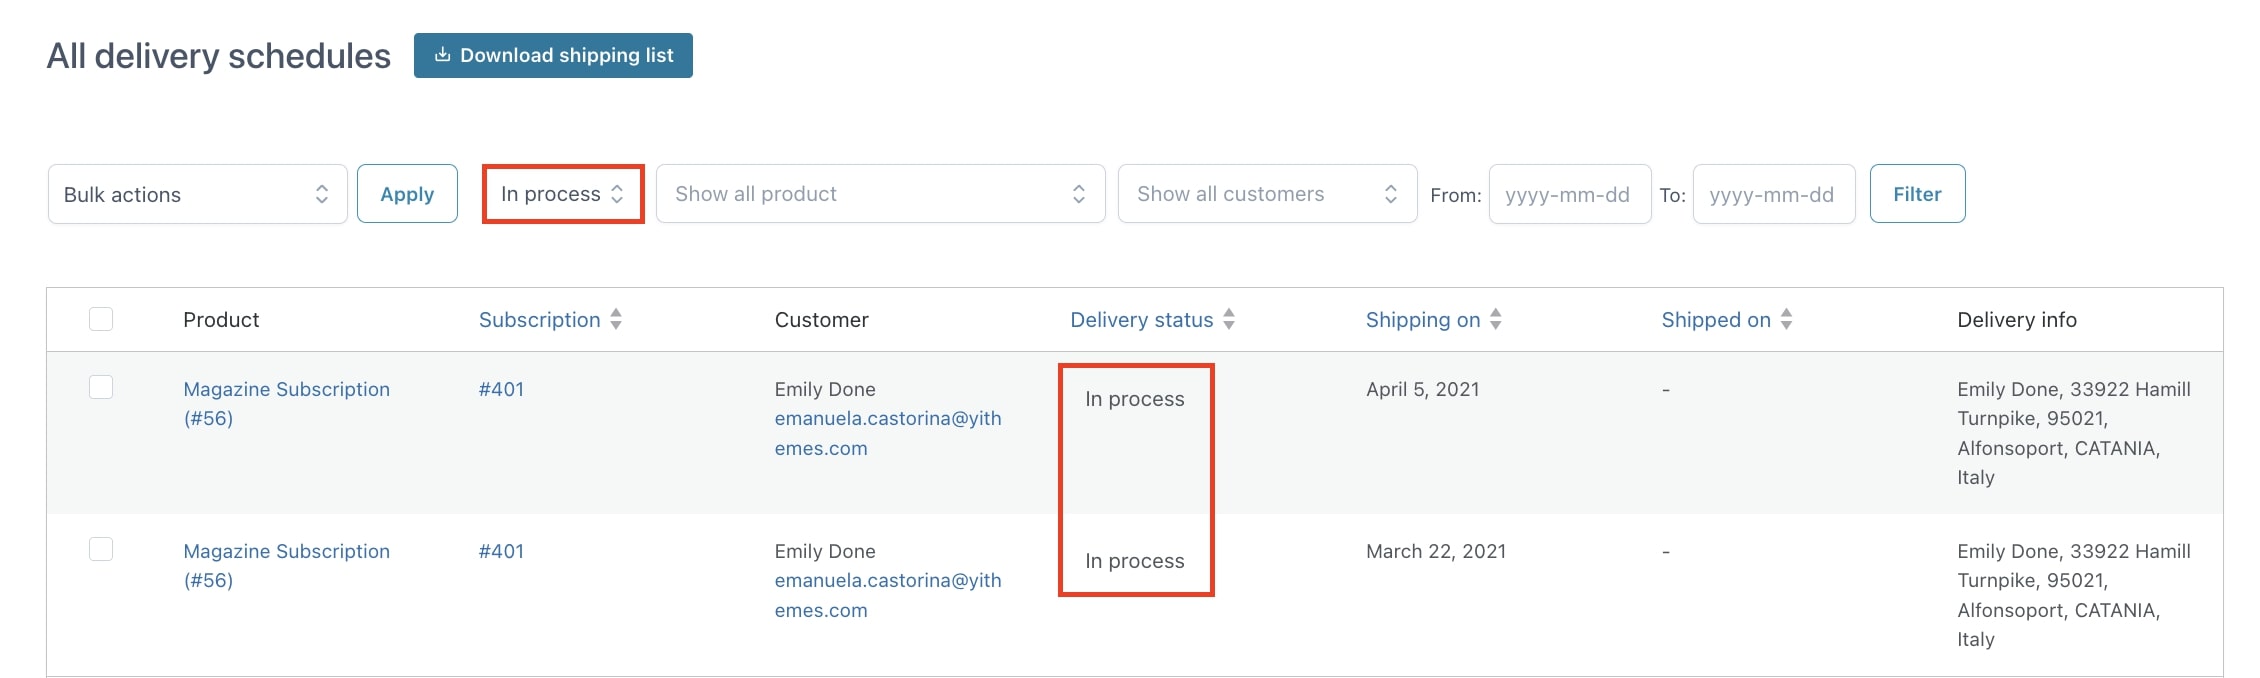
In process: this is the status of all deliveries that have to be shipped today. All subscriptions will be checked daily and will appear in this list on the day they are supposed to be shipped. So for example, if you ship a magazine every week on Monday, every Monday you will find all waiting deliveries here, so you can process them all.
Waiting: this is the status of all future deliveries.
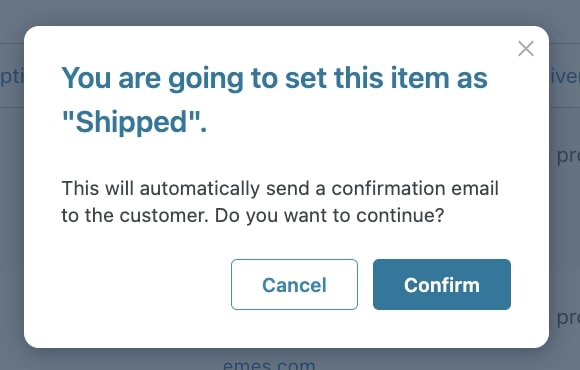
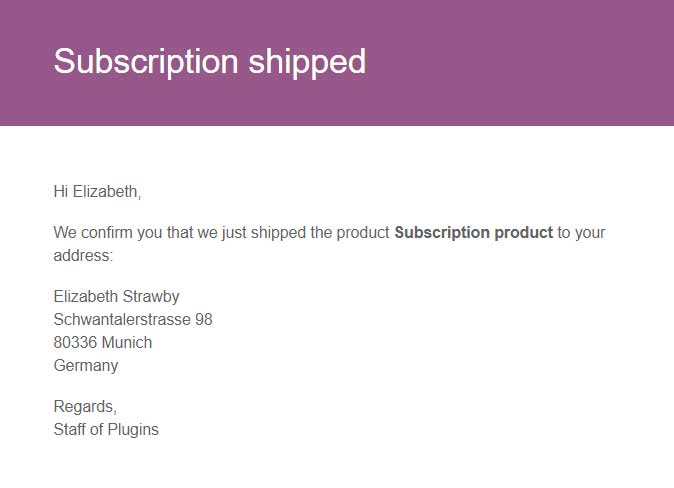
Shipped: the item has been shipped. Once you set the delivery to this status, an automatic email will be sent to the customers to inform them about the shipping.
Cancelled: the delivery of this schedule has been cancelled
So, for example, how to handle deliveries for today and prepare those for the next days?
You can start filtering the subscriptions by in process status, so you will only see those delivery entries that have to be shipped today.
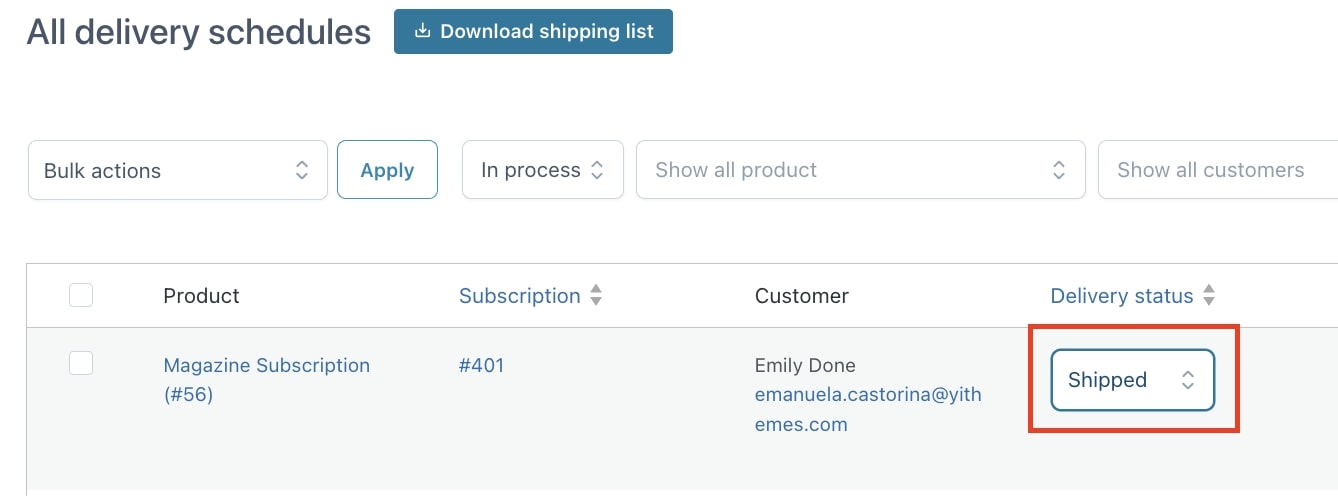
Once they are completed, you can change their status to shipped, so the customer will receive an email that informs them about the shipping.
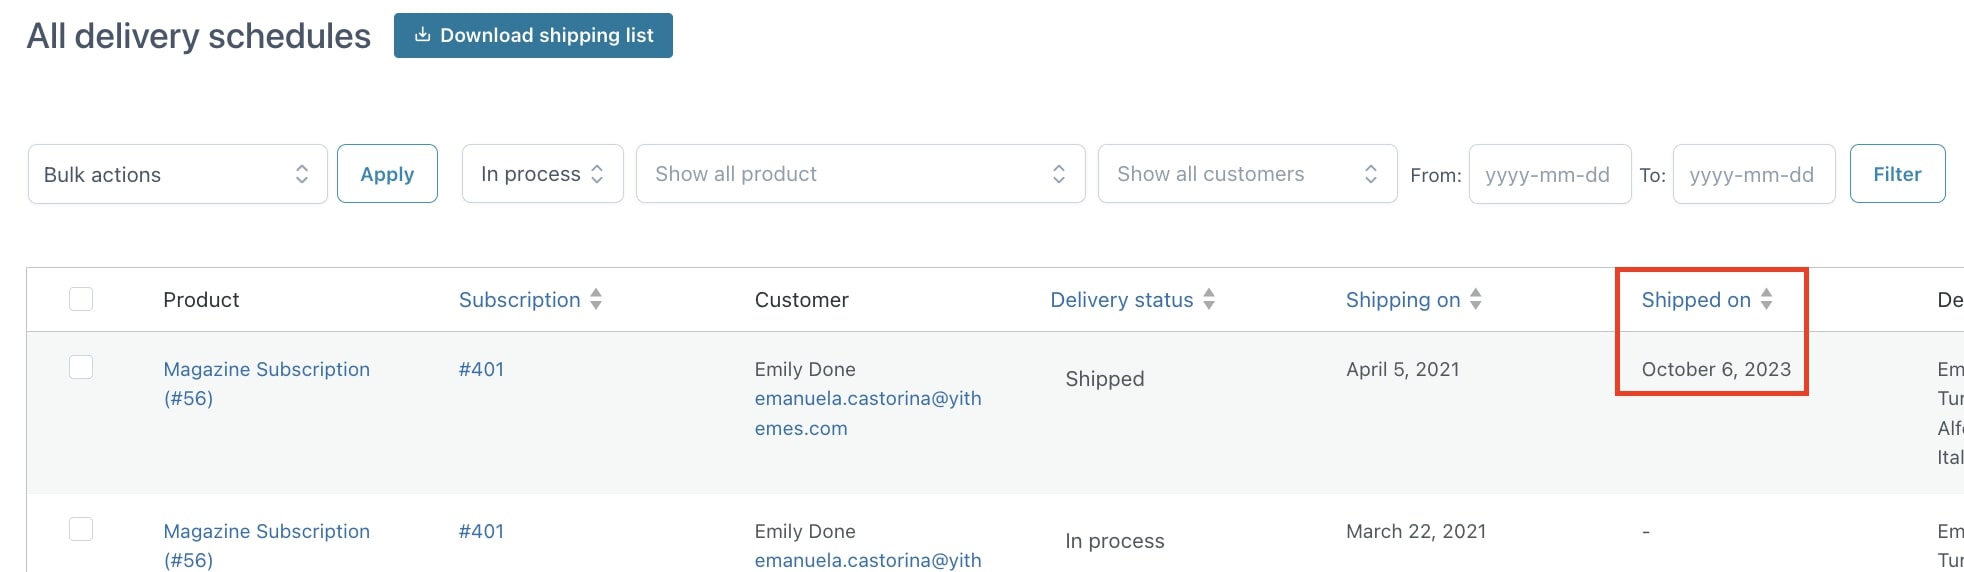
Once confirmed, the date of the shipping will be registered and shown in the Shipped on column:
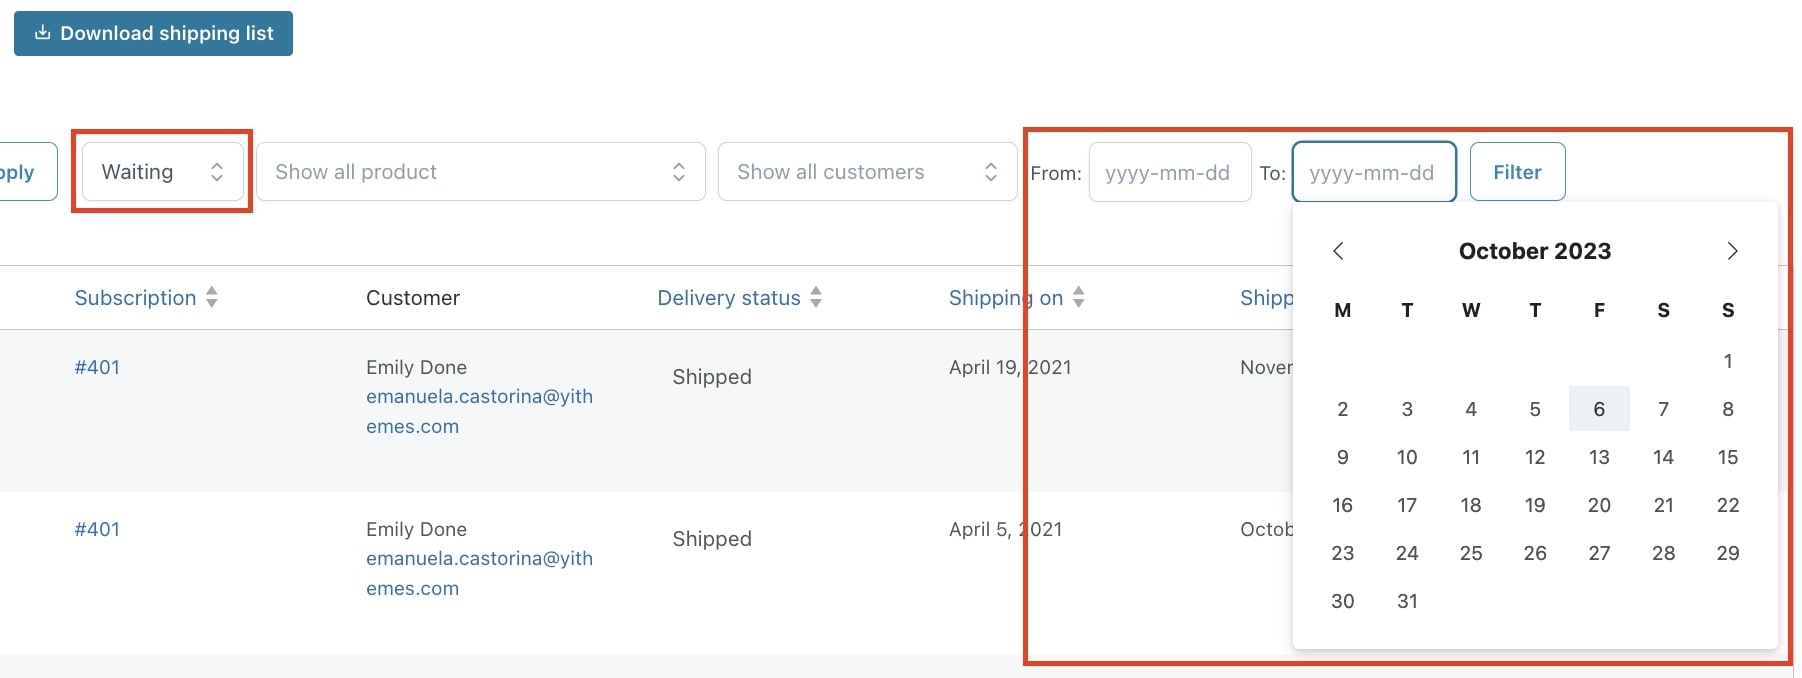
Once you’ve finished shipping all today’s deliveries, you can start preparing those that have to be shipped tomorrow.
Filter deliveries by waiting and by date as well.
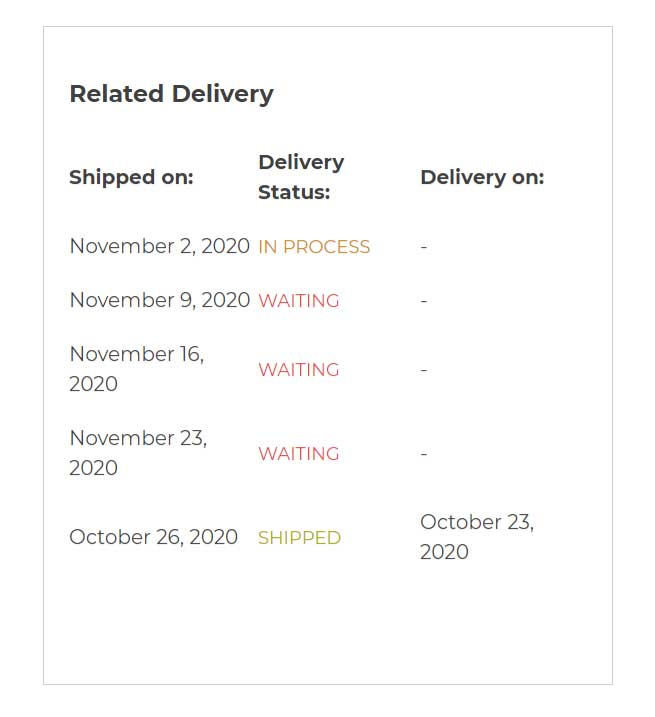
You will be able to find the list of all next deliveries for a specific subscription in the subscription details, just right below the related orders box. Here you will be able to change the status of the delivery schedule and see all the next schedules as waiting.
The customer will be able to see an additional box in My Account > Subscriptions > Related Delivery with a list of the delivery schedules for their subscription. Only the next 5 deliveries will be listed here:
Please note: It is only possible to choose 1 day per week/month/year. So for example, you cannot select deliveries each Monday and Wednesday.
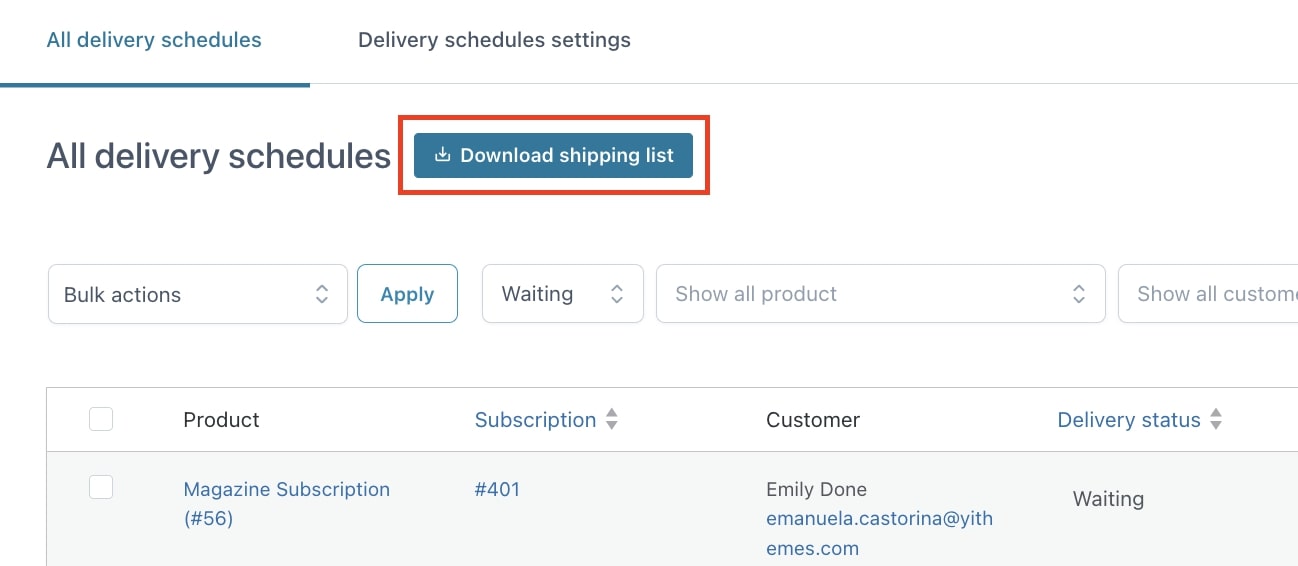
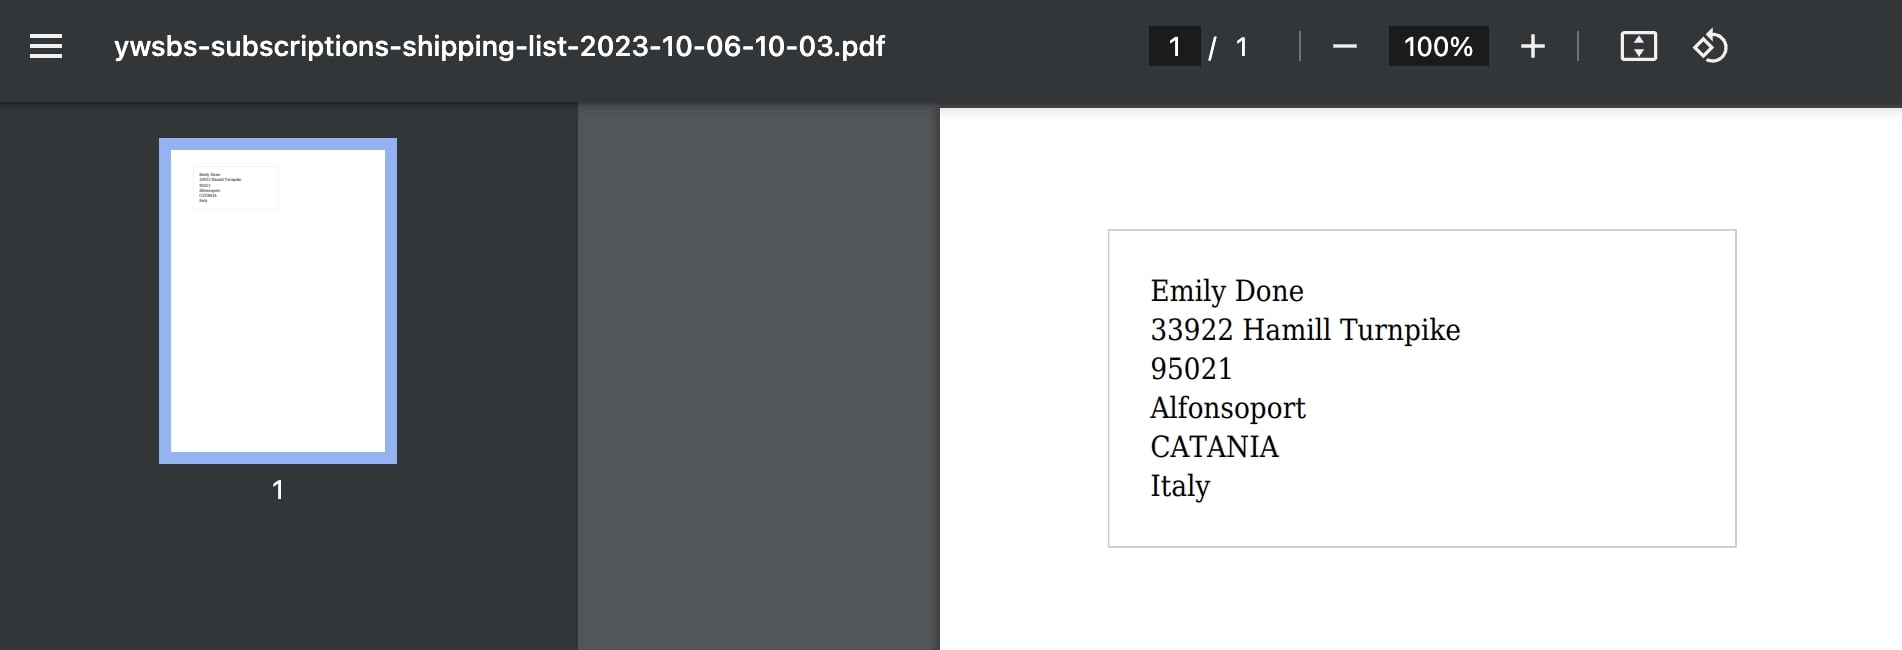
Print shipping labels
If you sell subscription-based products that need to be shipped, you can download a list with your customers’ addresses into a PDF file and print the shipping labels in one click.
Just click on the Download shipping list button on top of the table and the plugin will generate a PDF document with the shipping labels of those deliveries with status “In process“:
The PayPal Standard settings are explained below, if you wish to see the settings of the other payment gateways, simply click on the one you are interested in.
PayPal Standard
Preliminary note: if you’re using WooCommerce 5.5 or higher, PayPal standard will be hidden by default, but you can reactivate it as explained here.
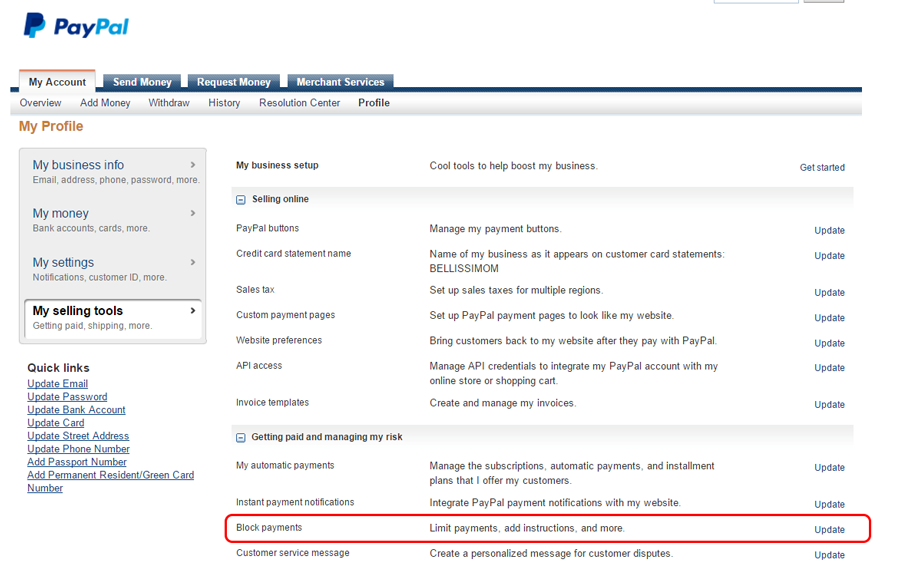
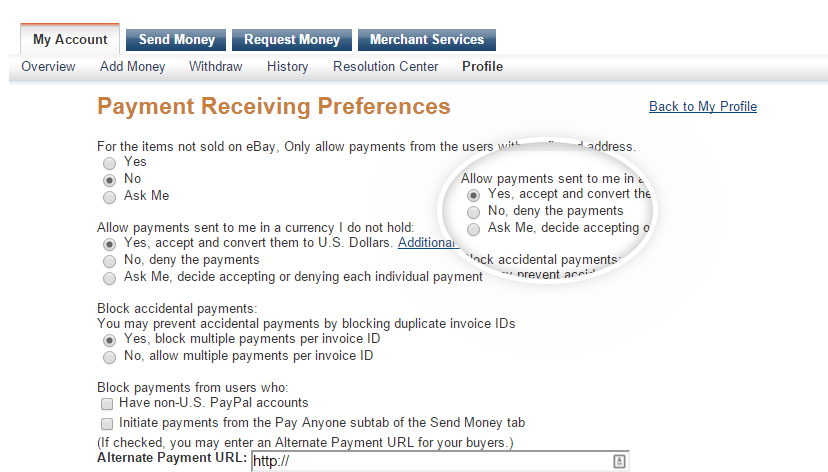
PayPal standard supports automatic recurring payments, so users don’t have to remember to pay the recurring fee. If the owed amount is not available in the users’ PayPal account, the subscription will be cancelled or will switch to “Overdue” or “Suspended” status (depending on the settings).To let the plugin work correctly, it is necessary that your PayPal account (compulsory for any type of business) is set to receive multi-currency payments. If you haven’t set this option in your PayPal account yet, follow the guidelines described below:
In Getting paid and managing my risk , click on update next to the entry Block Payments
Set the option ‘allow payments sent to me in a currency I do not hold’ to ‘yes, accept and convert theme to U.S.Dollars‘
Note: You can associate more than one subscription to the same user, however, users need to place separate orders for each subscription. The system used to integrate PayPal recurring payments doesn’t allow multiple subscriptions within the same order.
If you use PayPal Standard, the date for the payment cannot be edited in any way. It refers to the day when the first subscription payment occurred.
You can use any payment method activated in your WooCommerce to pay for a subscription, however, if it isn’t one of the supported payment methods, the customer will have to pay the renewal order manually.
To find out which payment gateways support automatic charges, please refer to this page.
How can I pay for a renewal order if a non-supported gateway has been selected?
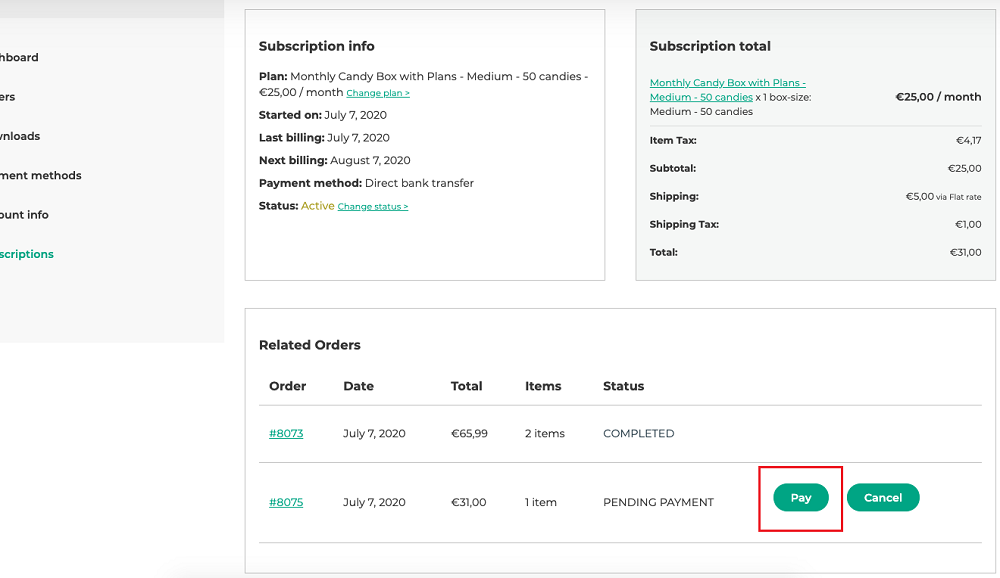
One day before the renewal date, a new order will be generated automatically. This order will be visible for the users in ‘My account > My Subscriptions’.
Customers can just click on the ‘Pay’ button that will redirect them to checkout page and complete the payment with any gateway.
Here is a list of all the gateways supported by YITH Subscription plugin. You will be able to start automatic recurring payments with all of them, but the options allowed by each of them vary. You can compare them in the following table.
* Amount and renewal date can be edited only if “YWSBS Renews” is selected.
** In order to manage recurring payments it is necessary that the reference transactions are active on your PayPal account. Verify through PayPal support if they are active before implementing the payment method.