YITH Review for Discounts allows you to send email notifications to your customers and invite them to review the products they purchased in exchange of a coupon code.
When combined with YITH Multi Vendor, also your vendors will be able to customize the emails sent to offer a coupon on their own products.
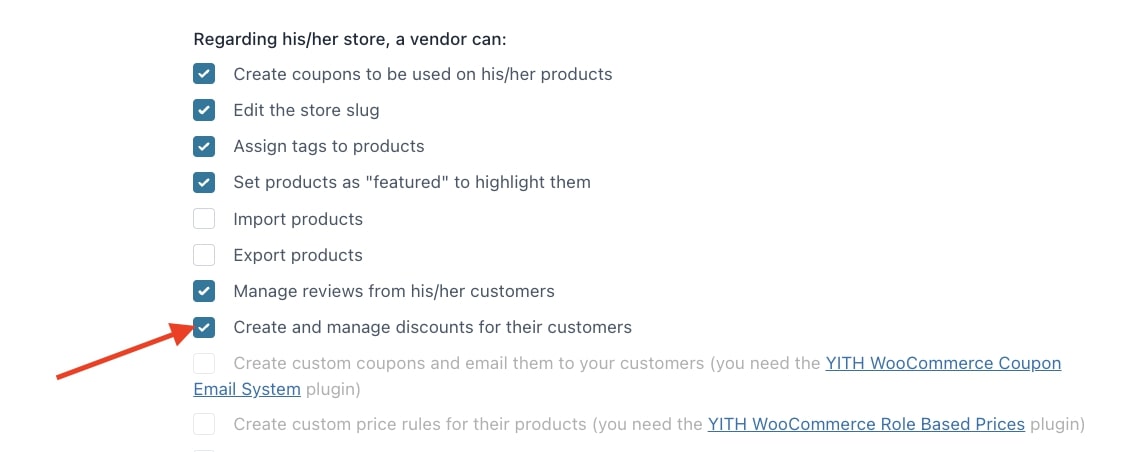
To enable this integration, activate both plugins, go toYITH > Multi Vendor > Vendors > Vendors Permissions and select Create and manage discounts for their customers in the option Regarding his/her store, a vendor can.
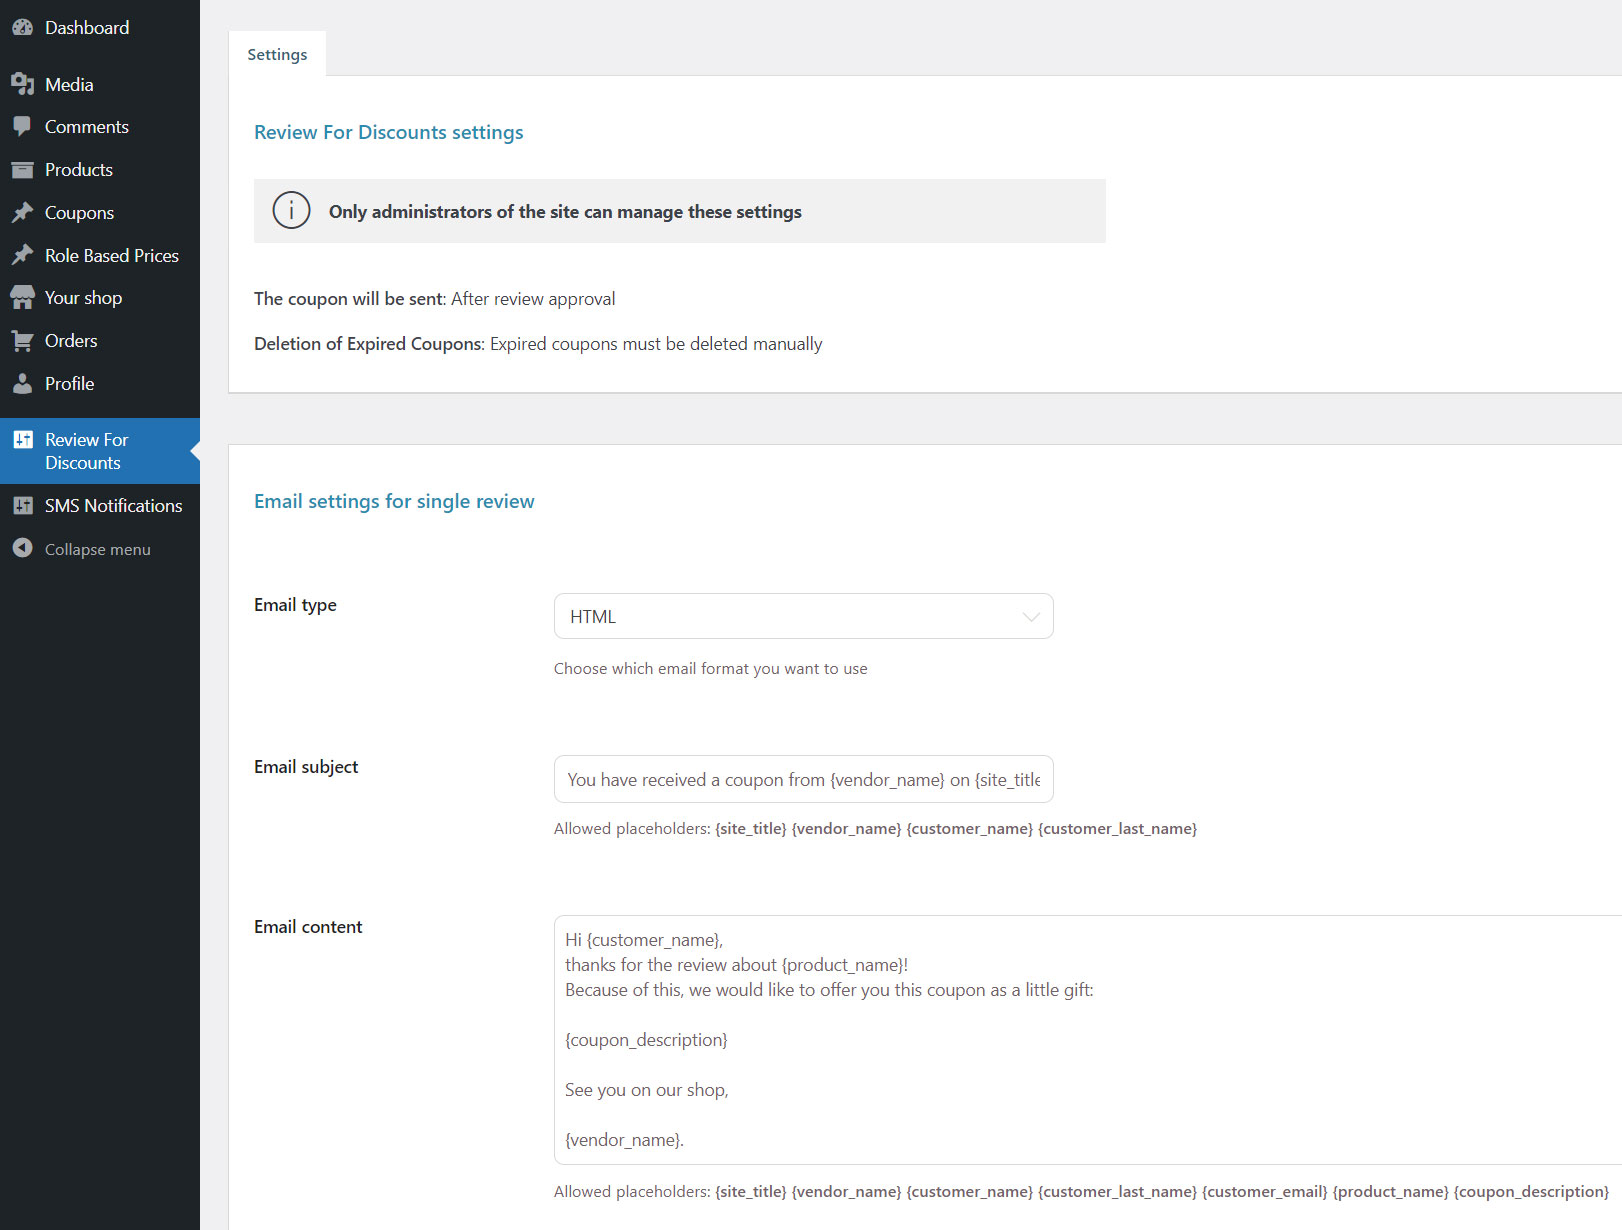
Now the vendor will be able to see a Review for discounts menu and customize the content of these emails.
For more details about how to use YITH WooCommerce Review for Discounts plugin, please, refer to the plugin documentation.
To enable this integration, just make sure that the two plugins are installed and activated. Then, enable the Role Based Prices module from YITH > Multi Vendor > Modules.To enable this integration, activate both plugins, go toYITH > Multi Vendor > Vendors > Vendors Permissions and select Create custom price rules for their products in the option Regarding his/her store, a vendor can.
Now, your vendors will be able to see a dedicated menu from where they can create their own price rules.
Vendors can set the price rule from the modal window. To read more about creating and applying price rules, you can refer to this page in the documentation.
All general rules created by the site’s global administrator won’t cause any effect on products related to a vendor.
For further information about the plugin YITH WooCommerce Role Based Prices, please, refer to the official documentation.
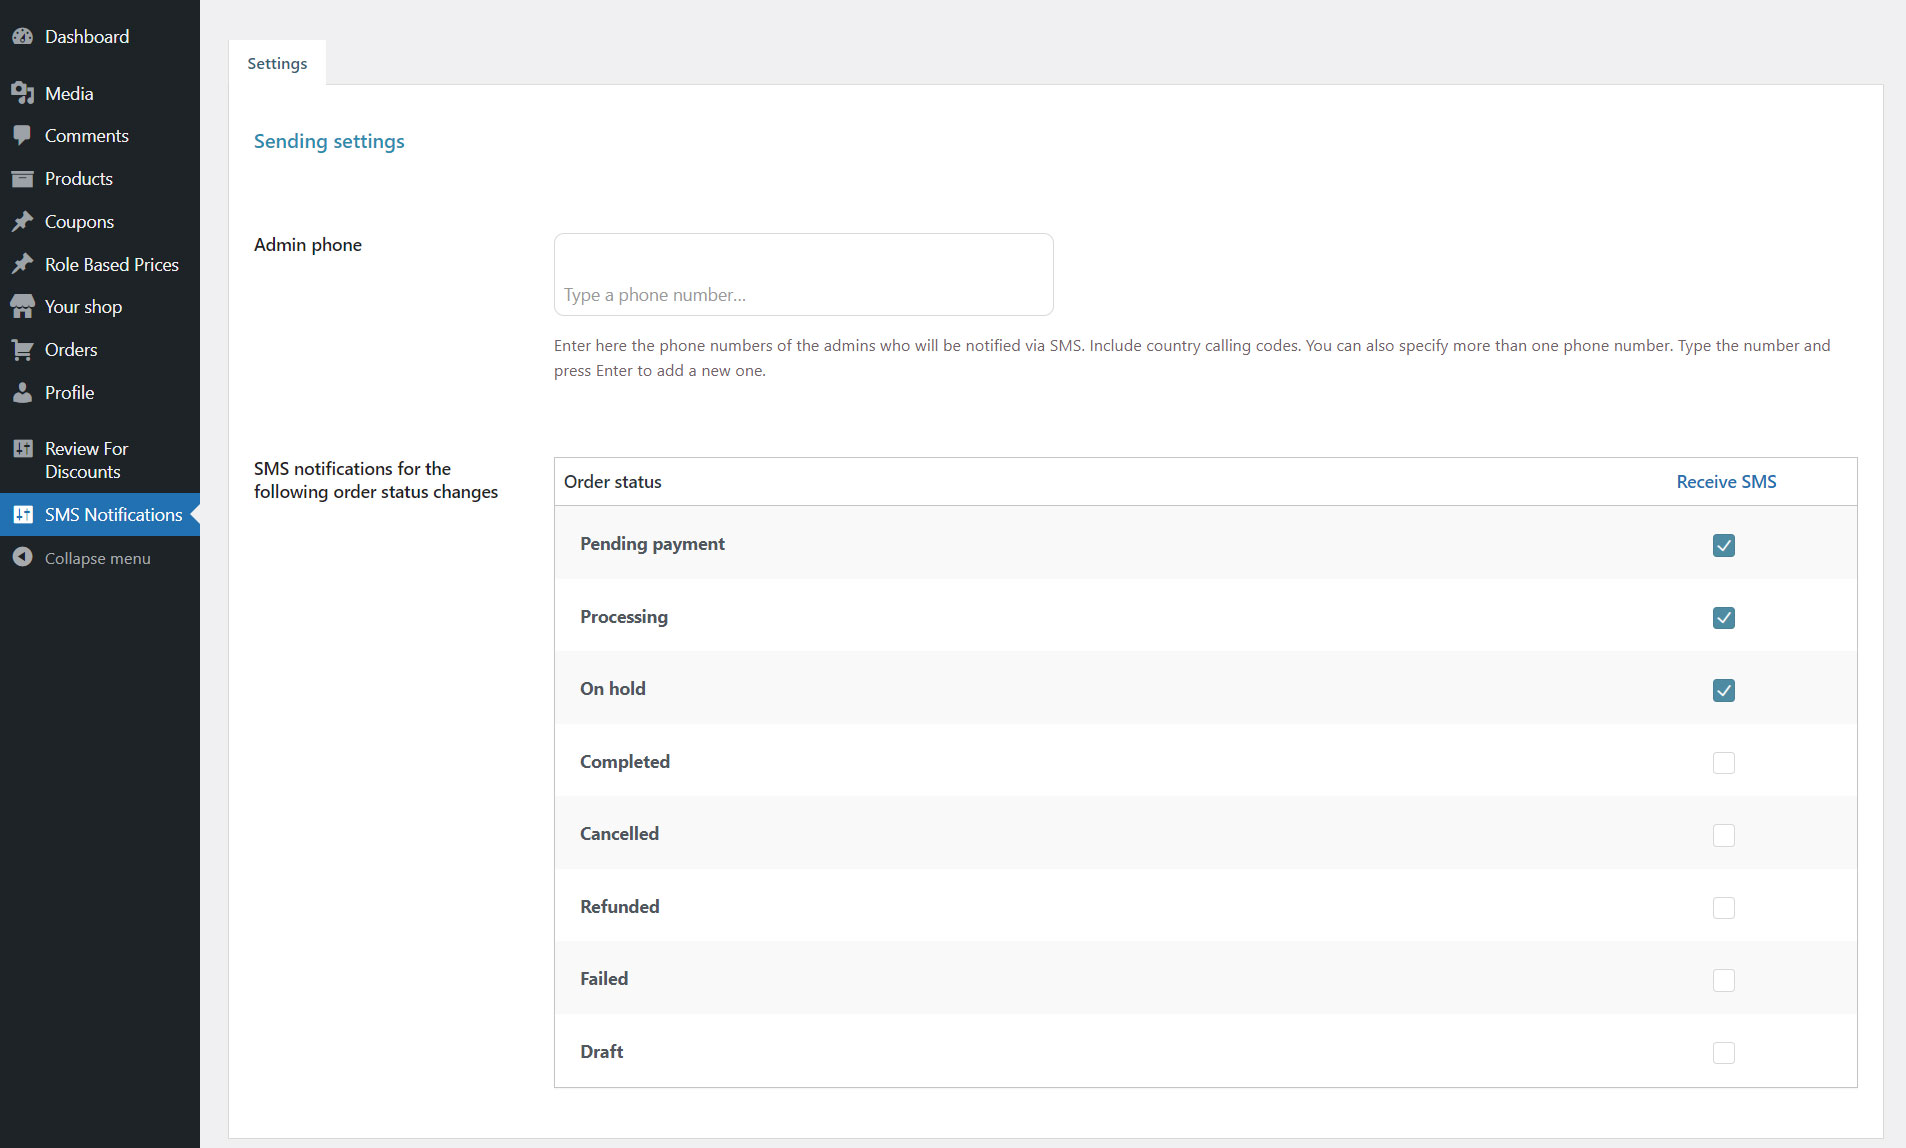
With YITH SMS Notifications you can notify your customers about any change in their order status via SMS text.
If used with YITH Multi Vendor, also your vendors will be able to enable the SMS notifications for their own orders.
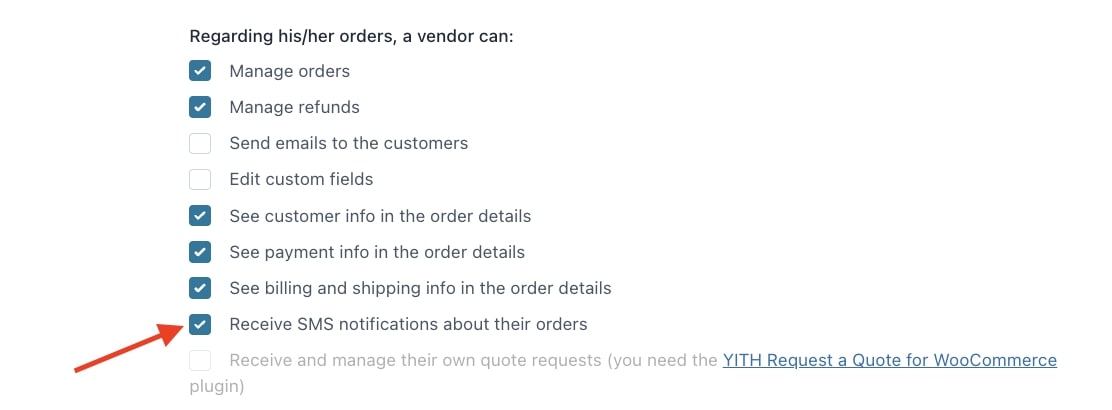
To enable this integration, install and activate both plugins. Then, select Receive SMS notifications about their orders in the option Regarding his/her orders, a vendor can, available in YITH > Multi Vendor > Vendors > Vendors permissions.
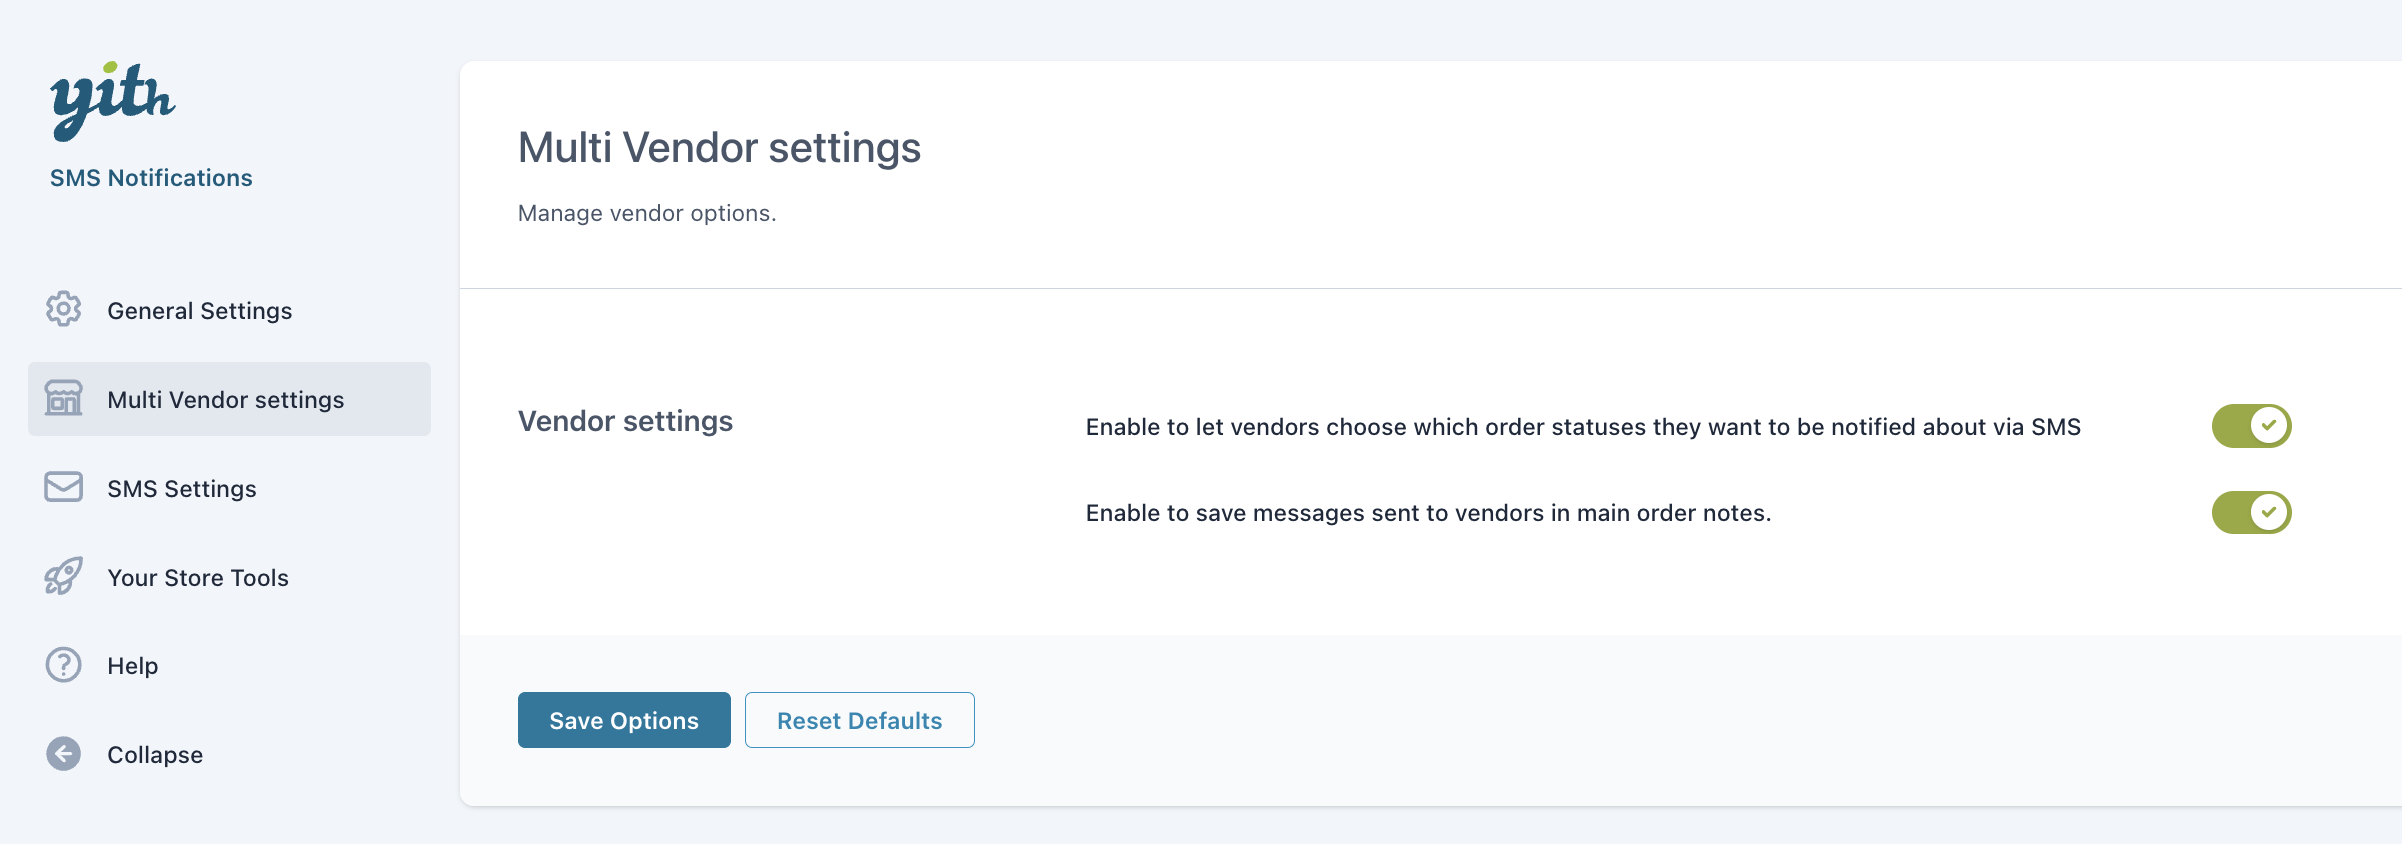
Then, you can choose to enable the following two sections for your vendors:
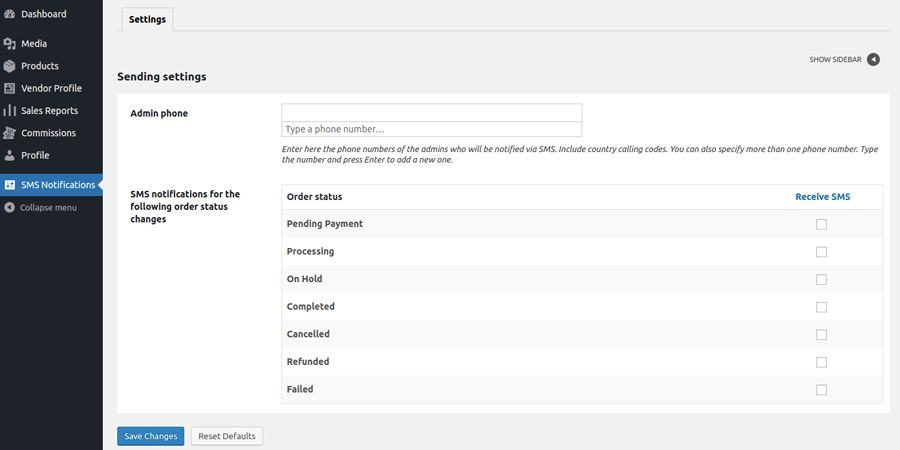
Add one or more telephone numbers where to forward the SMS notifications of the orders related to their products.
Choose for which order statuses they want to receive SMS notifications
You can do that, as an admin, from YITH > SMS Notifications > General settings > Sender settings, by enabling the following two options:
Your vendors will be able to configure these settings from the SMS Notifications menu in his/her account.
The global shop administrator is the only one who can configure the settings for the SMS sent to the users.
For more details about how to use YITH SMS Notifications, please, refer to the plugin documentation.
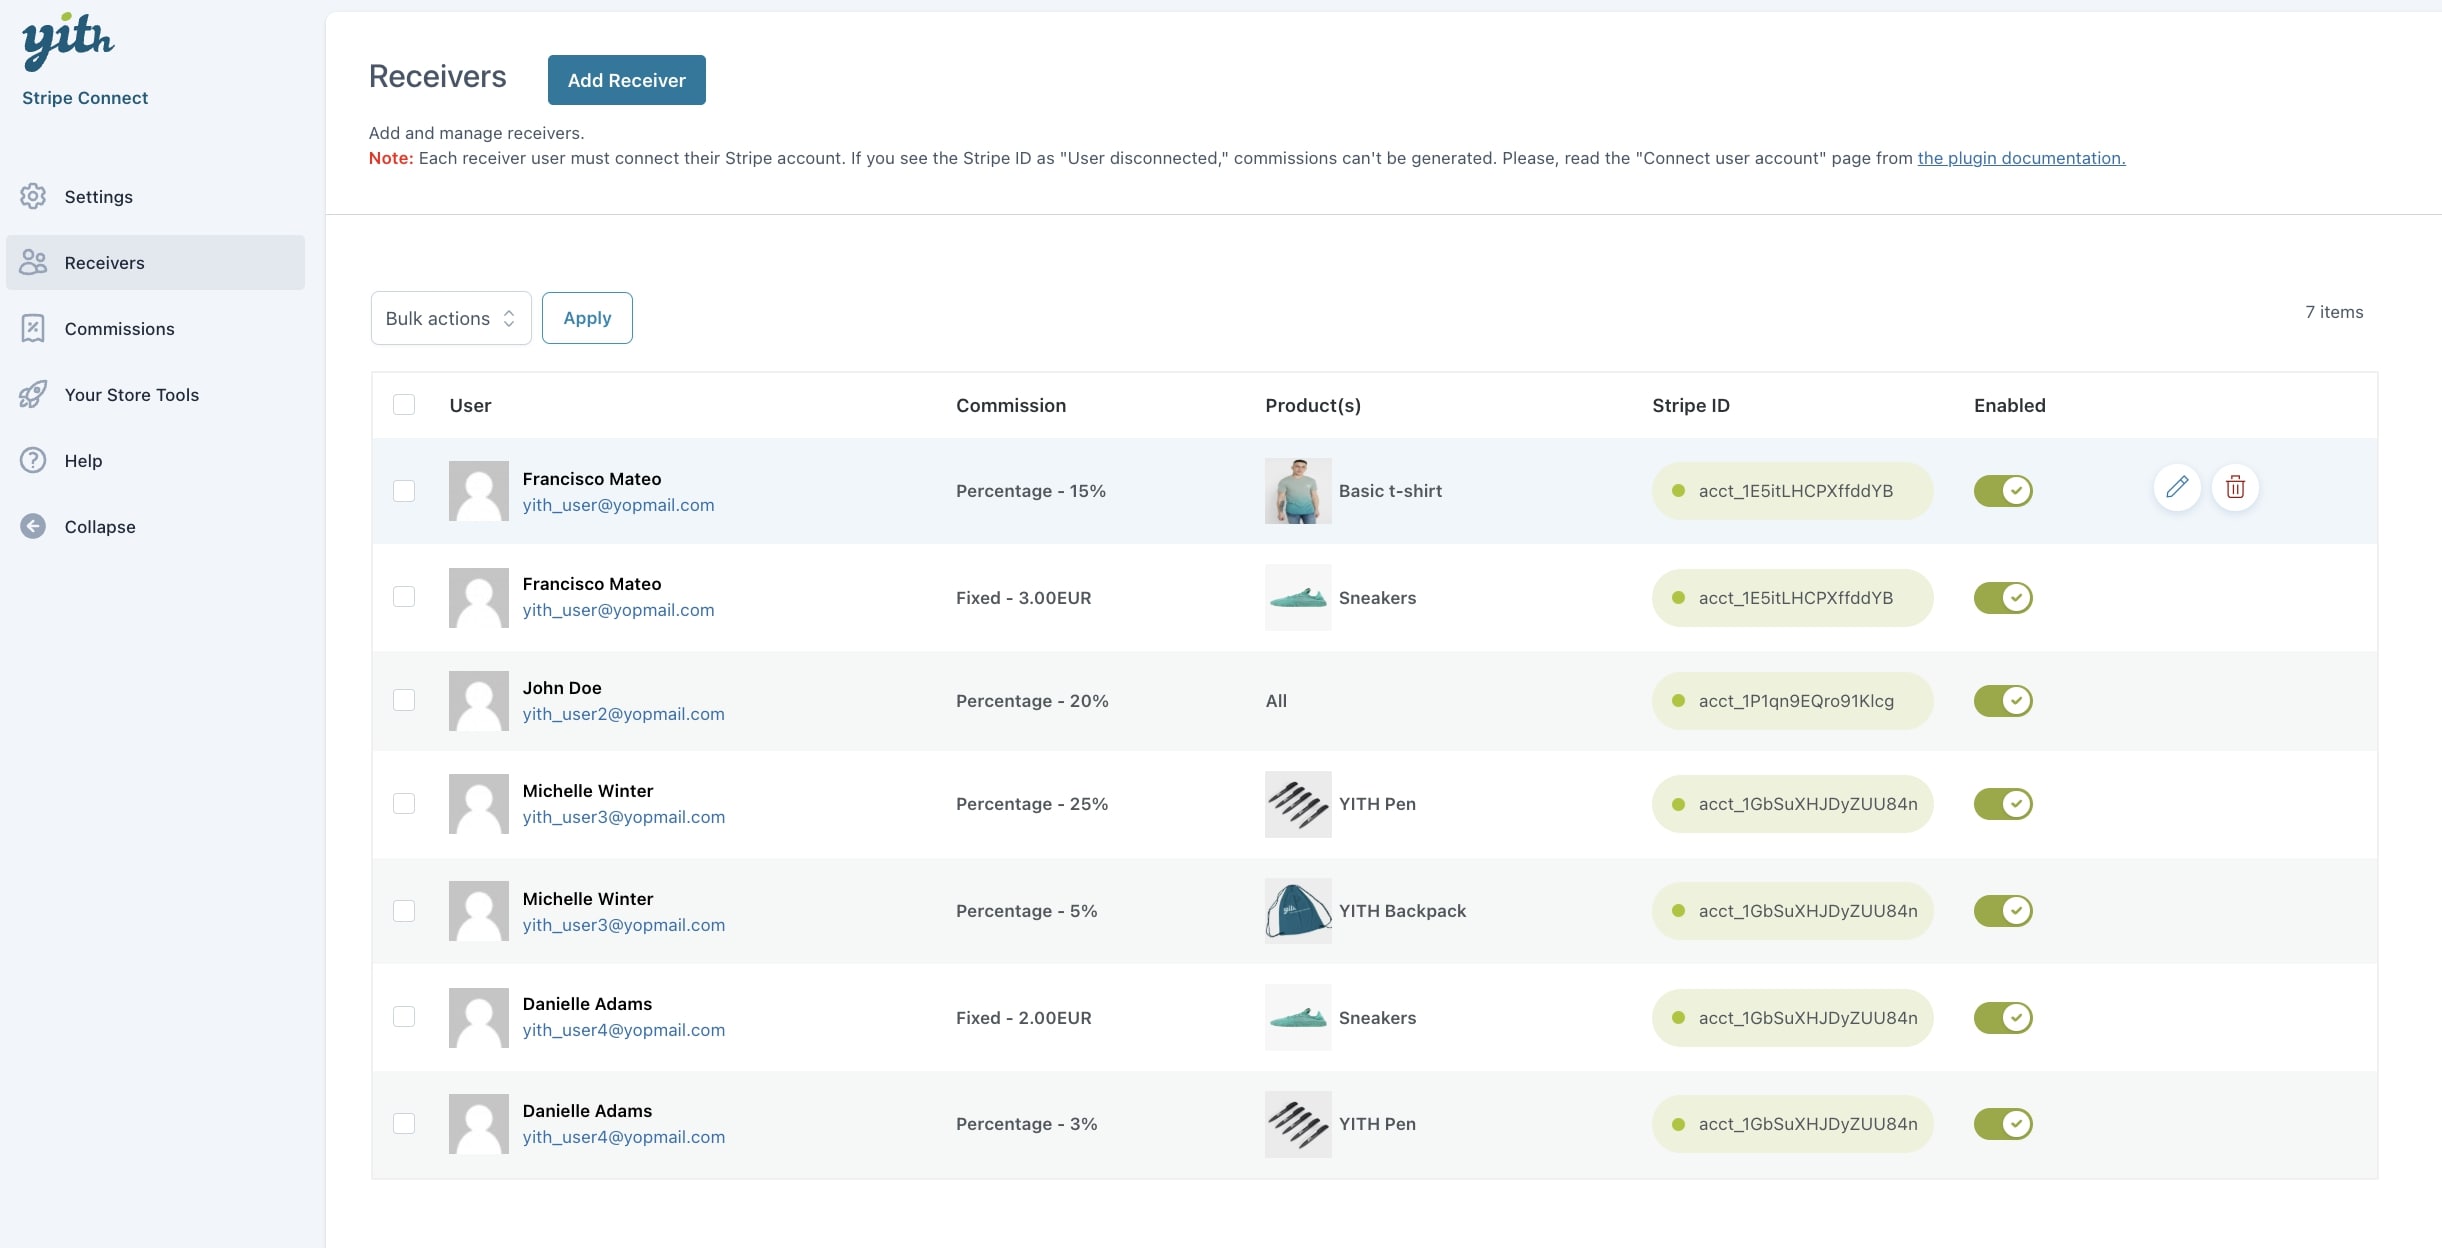
The integration with YITH Stripe Connect for WooCommerce allows the admin to split the price of one or more products between the vendor and the admin immediately after the checkout and based on the commission rate that you’ve agreed with them.
First of all, make sure you’ve installed and enabled YITH Stripe Connect for WooCommerce from Plugins menu.
Configure it as explained on the page Connect admin account from the official plugin documentation.
Then, go to YITH > Multi Vendor > Commissions > Gateways and enable YITH Stripe Connect to activate this service for your vendors.
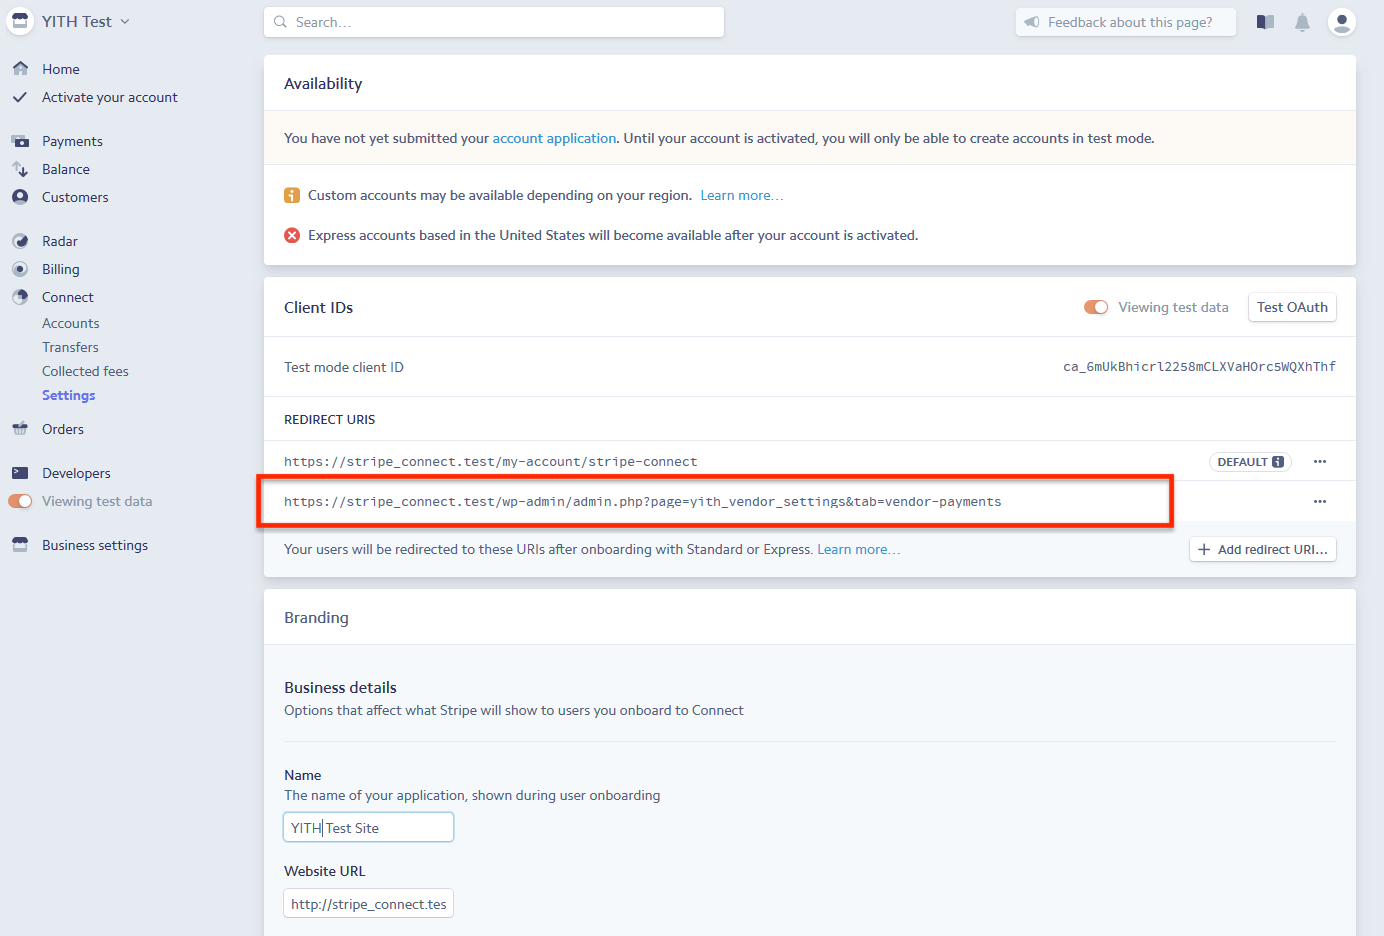
Make sure you set the redirect URI in your Stripe account. A warning message in the plugin settings panel will remind you about this and will show you the right address to add. It will look like this:
The URI that you have to add to make Multi Vendor work correctly is not Stripe default URI, but an additional one. This means that if you remove the default one, the button Connect Stripe in My Account page will not work. Make sure, then, you do not remove it.
Now, go back to the Commissions Settings section, and select Stripe Connect as the default payment gateway for vendors payouts during the checkout.
This is the gateway that will be used by default for automatic payments of vendors commissions. Yet, you can also pay the commissions manually throughStripe Connect as explained here.
How do payments on checkout work?
Stripe provides a detailed description of what the whole process is about. You will find this explained in the plugin options panel in YITH > Multi Vendor > Commissions > Gateways and can refer to Stripe official page for further details.
Send Money to vendor on payment completed When creating charges on your platform and separately creating a transfer, the platform can earn money by allocating less of the charge amount to the destination Stripe account, as in the above code example. Assuming that represents a delivery service transaction, with a charge to the customer of $100, a transfer of $20 to the delivery person, and a transfer of $70 to the restaurant:
The charge amount less the Stripe fees is added to the platform account’s pending balance
When the platform’s available balance is sufficient (at least $90), the transfers can be made, reducing the platform’s available balance by the specified amounts and increasing both connected account’s available balances by that same amount
The platform retains an additional $6.80 ($100.00 – $70.00 – $20.00 – $3.20, assuming standard U.S. Stripe fees).
Fees for the payment of commissions are charged to the admin. Please, refer to this page to learn more about transaction fees.
Payments on the backend
If, for any reason, the payment of vendor commissions fails, or if there is no default payment gateway enabled, you’ll be able to use any of the supported payment methods to pay the vendor commissions manually from the Commissions list page.
Manual payment in bulk
Single commission payment
If you have unpaid commissions, this may depend on three main reasons:
You haven’t enabled the Pay vendors commissions during checkout or have not selected any gateway in it.
Your account balance was not sufficient to pay all commissions.
Your vendors haven’t activated their Stripe account yet.
Let’s see how to solve the latter issue below.
If a vendor has not activated Stripe yet
Because of Stripe policy, every vendor has to explicitly authorize Stripe to be credited any payment to his/her account.
Note: this action can only be performed by the vendor and there is no way for the admin to do this on his/her behalf.
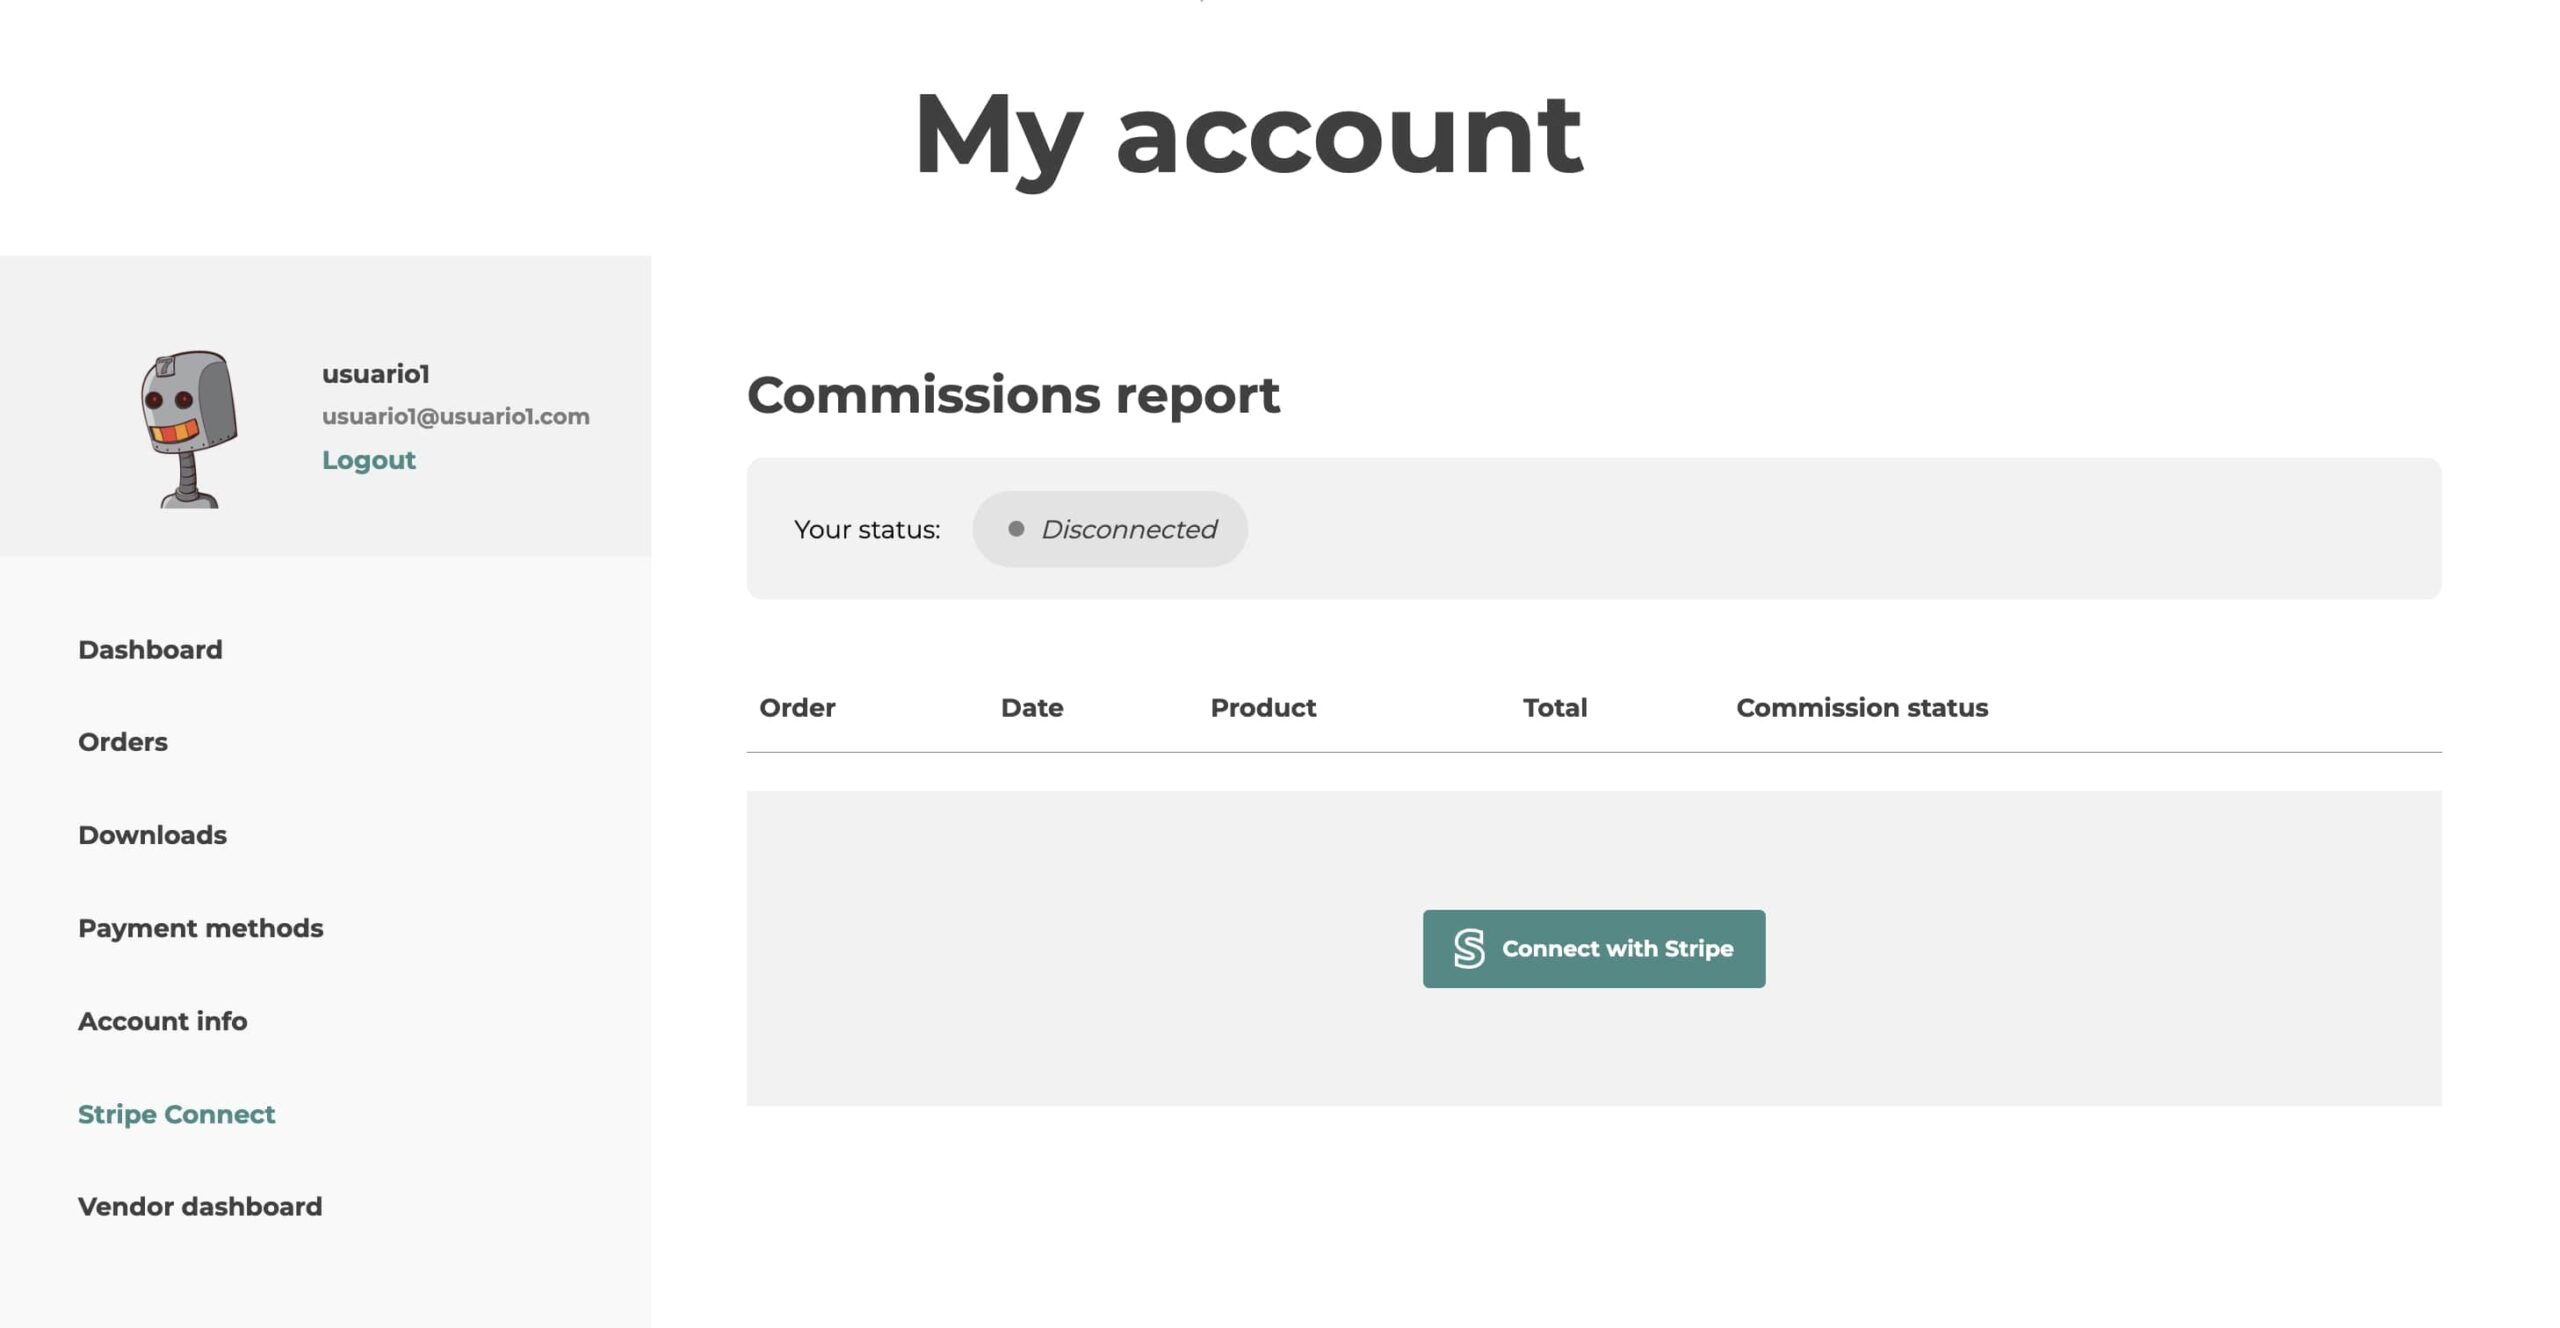
Make sure your vendor visits his/her dashboard and goes to Your shop > Payment info. Here they can find the Connect with Stripe button and click on it.
They will be taken to Stripe site. If they already have an account, they can simply log in. If they do not have any yet, they will be asked to create a new one:
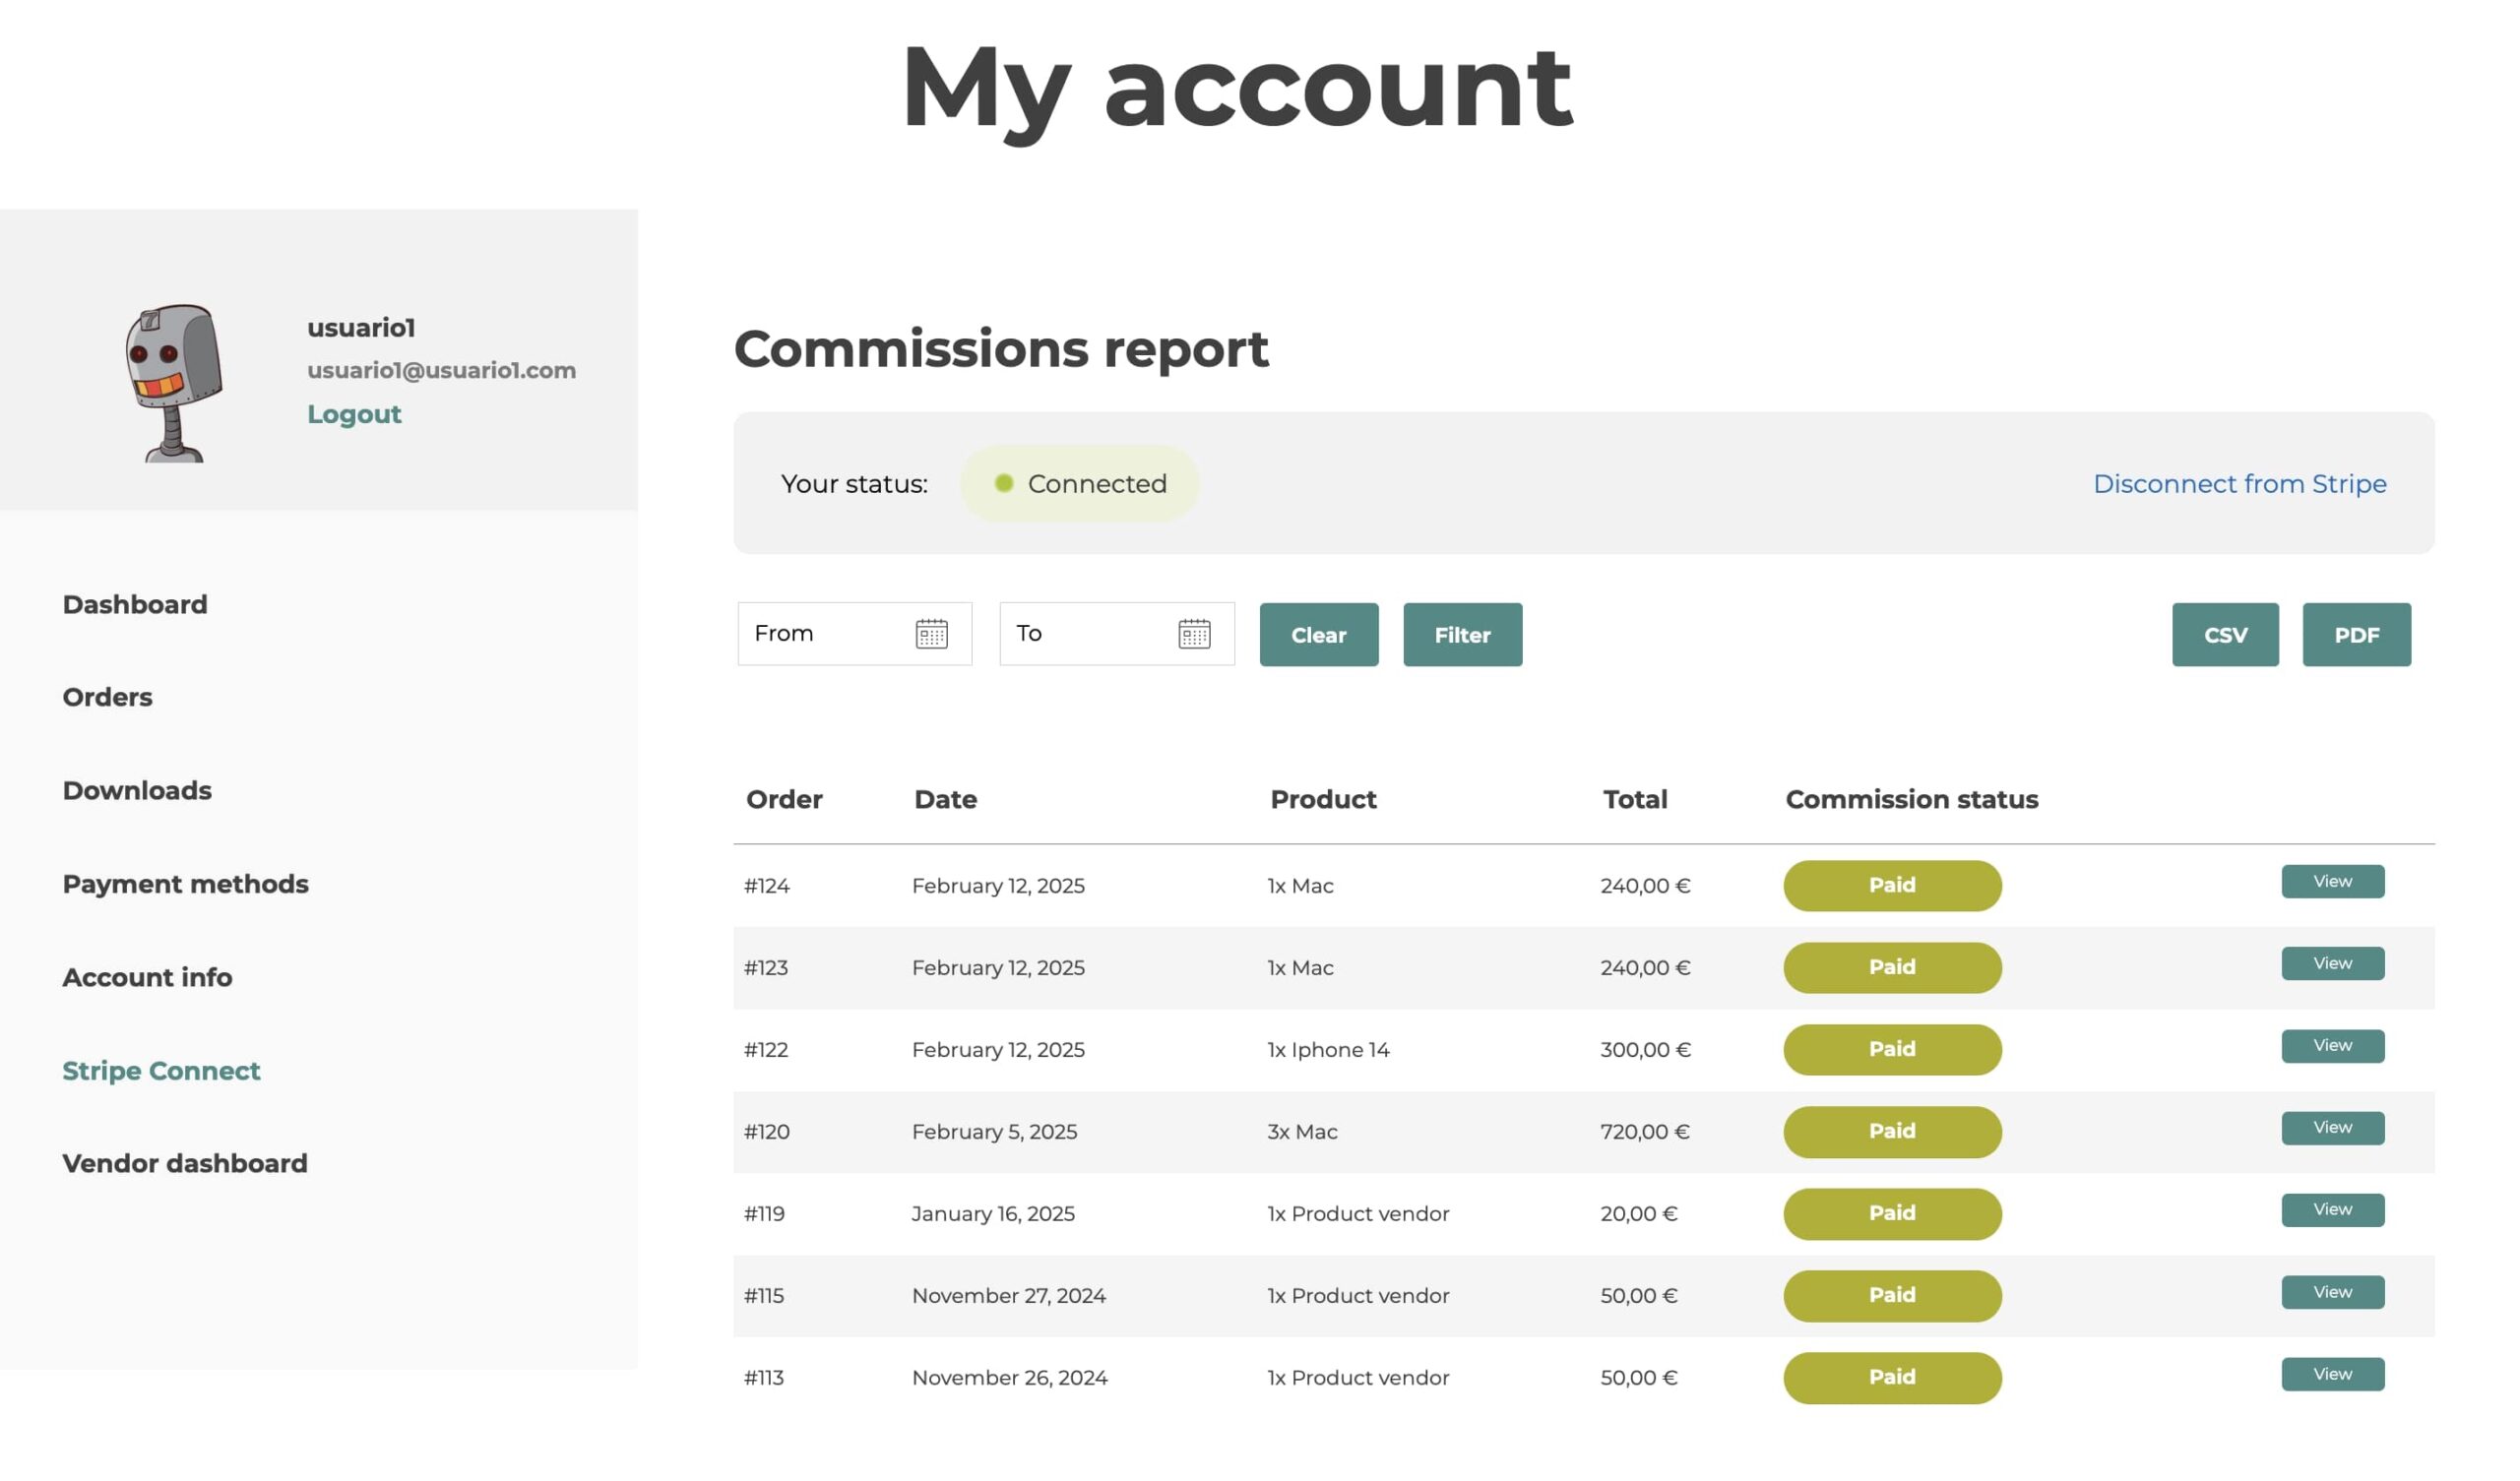
Vendors will be able to see the very same button in their reserved area, My Account > Stripe Connect.
…and will be able to also see and export a list with all transactions related to their commissions.
After the vendor has authorized Stripe account to receive money, you can go on and pay the commissions manually from the Commissions page as explained here.
Please, refer to Stripe official page for any details about the payments and transaction fees.
Commission reports
If you want to, you can also Add vendors’ commissions to Stripe Connect Commission Reports. You can enable the dedicated option from the gateway details in Commissions > Gateway as you can see below.
All commission vendors payouts made through Stripe Connect will appear in your Stripe Connect Report that you can also find in YITH > Stripe Connect > Commissions (for more details please refer to this page).
With YITH Subscription, you can enable recurring payments for the products or services that you sell in your store.
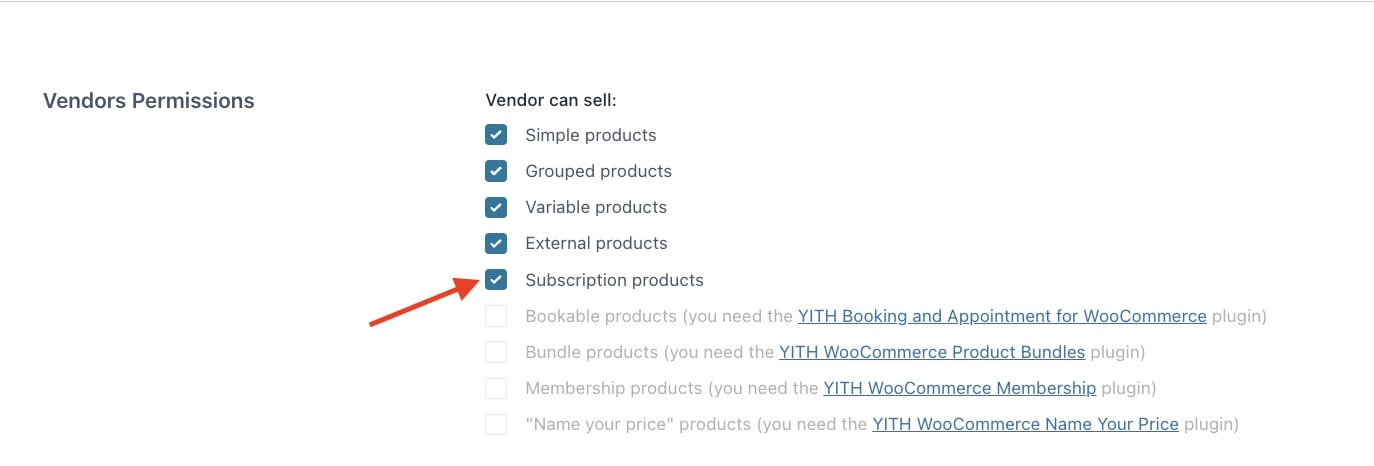
If combined with YITH Multi Vendor, your vendors will be able to sell and edit subscription-based products. It also allows to generate vendor commissions on subscription renewal orders.
To use this feature, just make sure both plugins are installed and activated. Then select Subscription products in the option Vendor can sell, available in YITH > Multi Vendor > Vendors > Vendors permissions.
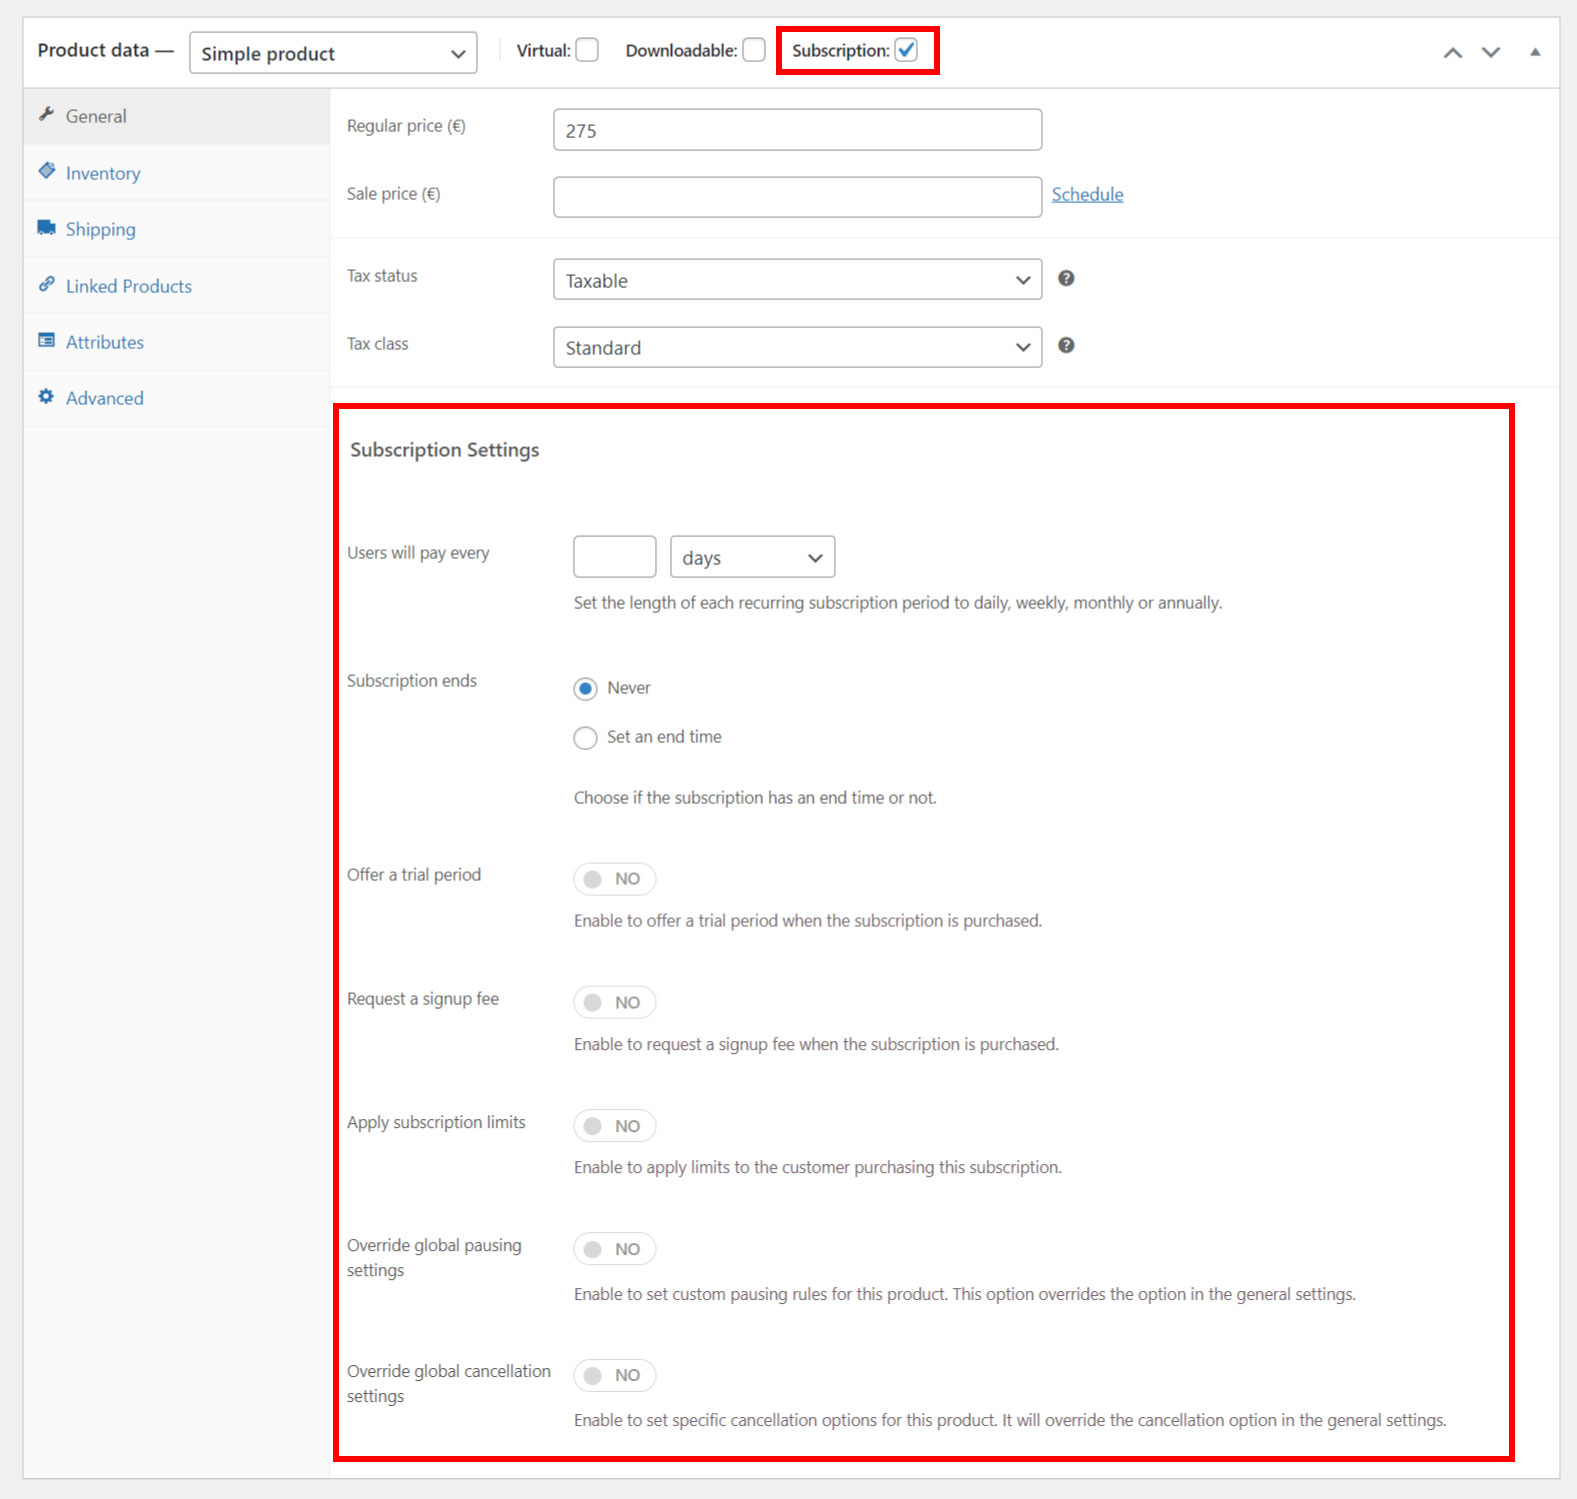
Now, your vendors will be able to configure the subscription options in their products.
For more details about how to configure a subscription product, please, refer to this page.
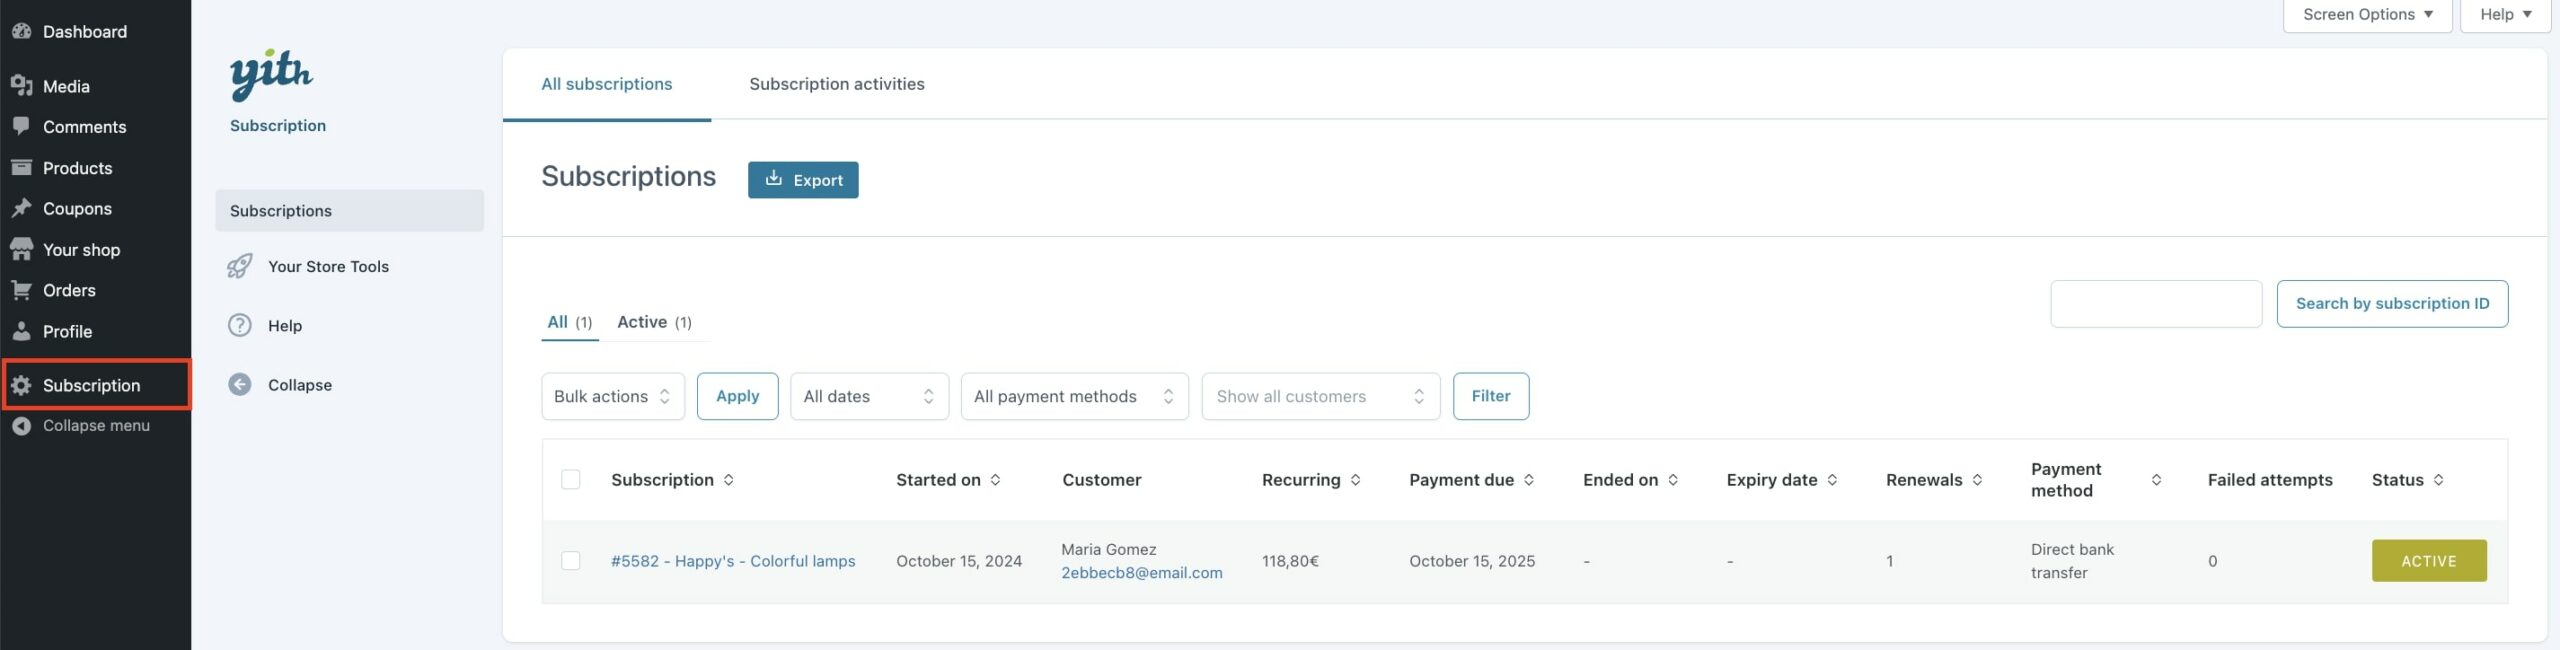
Also, the vendor will be able to see a Subscription menu where they can check all subscriptions linked to their products and the subscription activities.
For more details about how to use YITH WooCommerce Subscription, please, refer to the official documentation.
YITH Waitlist helps you not miss sales of out-of-stock products by letting your users subscribe and get notified as soon as the product is back in stock.
When used with YITH Multi Vendor, also your vendors will be able to get email lists for their out-of-stock products and inform their potential customers when the item is back in stock.
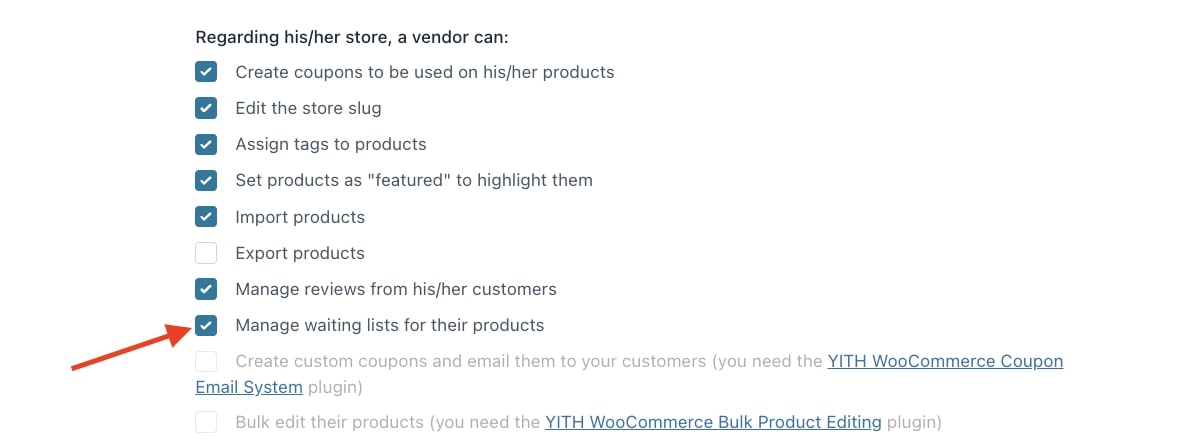
To use this feature, make sure you install and activate both plugins. Then, select Manage waiting lists for their products in the option Regarding his/her orders, a vendor can, available in YITH > Multi Vendor > Vendors > Vendors permissions.
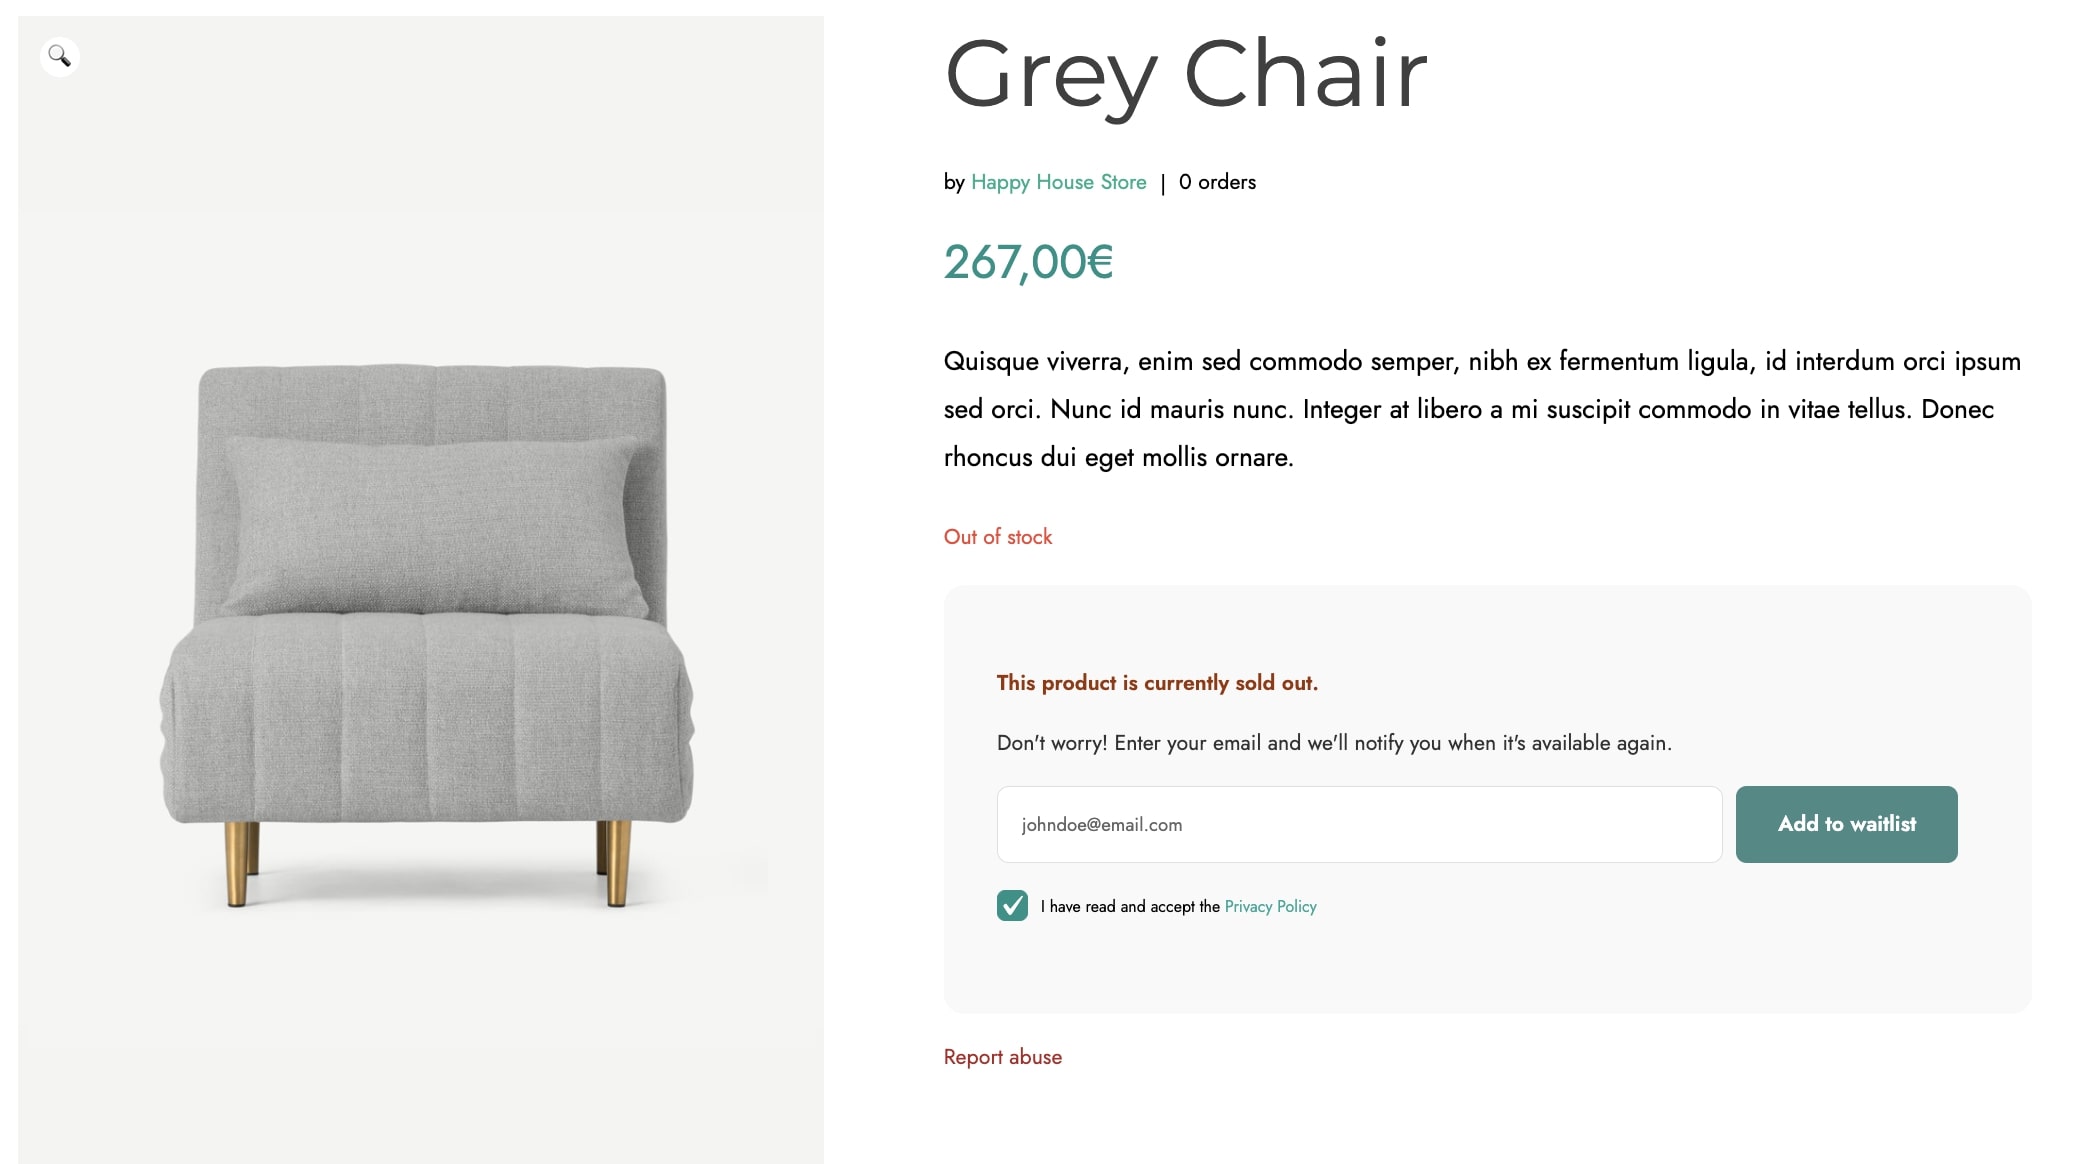
Now, whenever a product is out of stock, the user will be able to see a box on the product page to enter his/her email (or a checkbox if already logged in) to subscribe to the waitlist for that product.
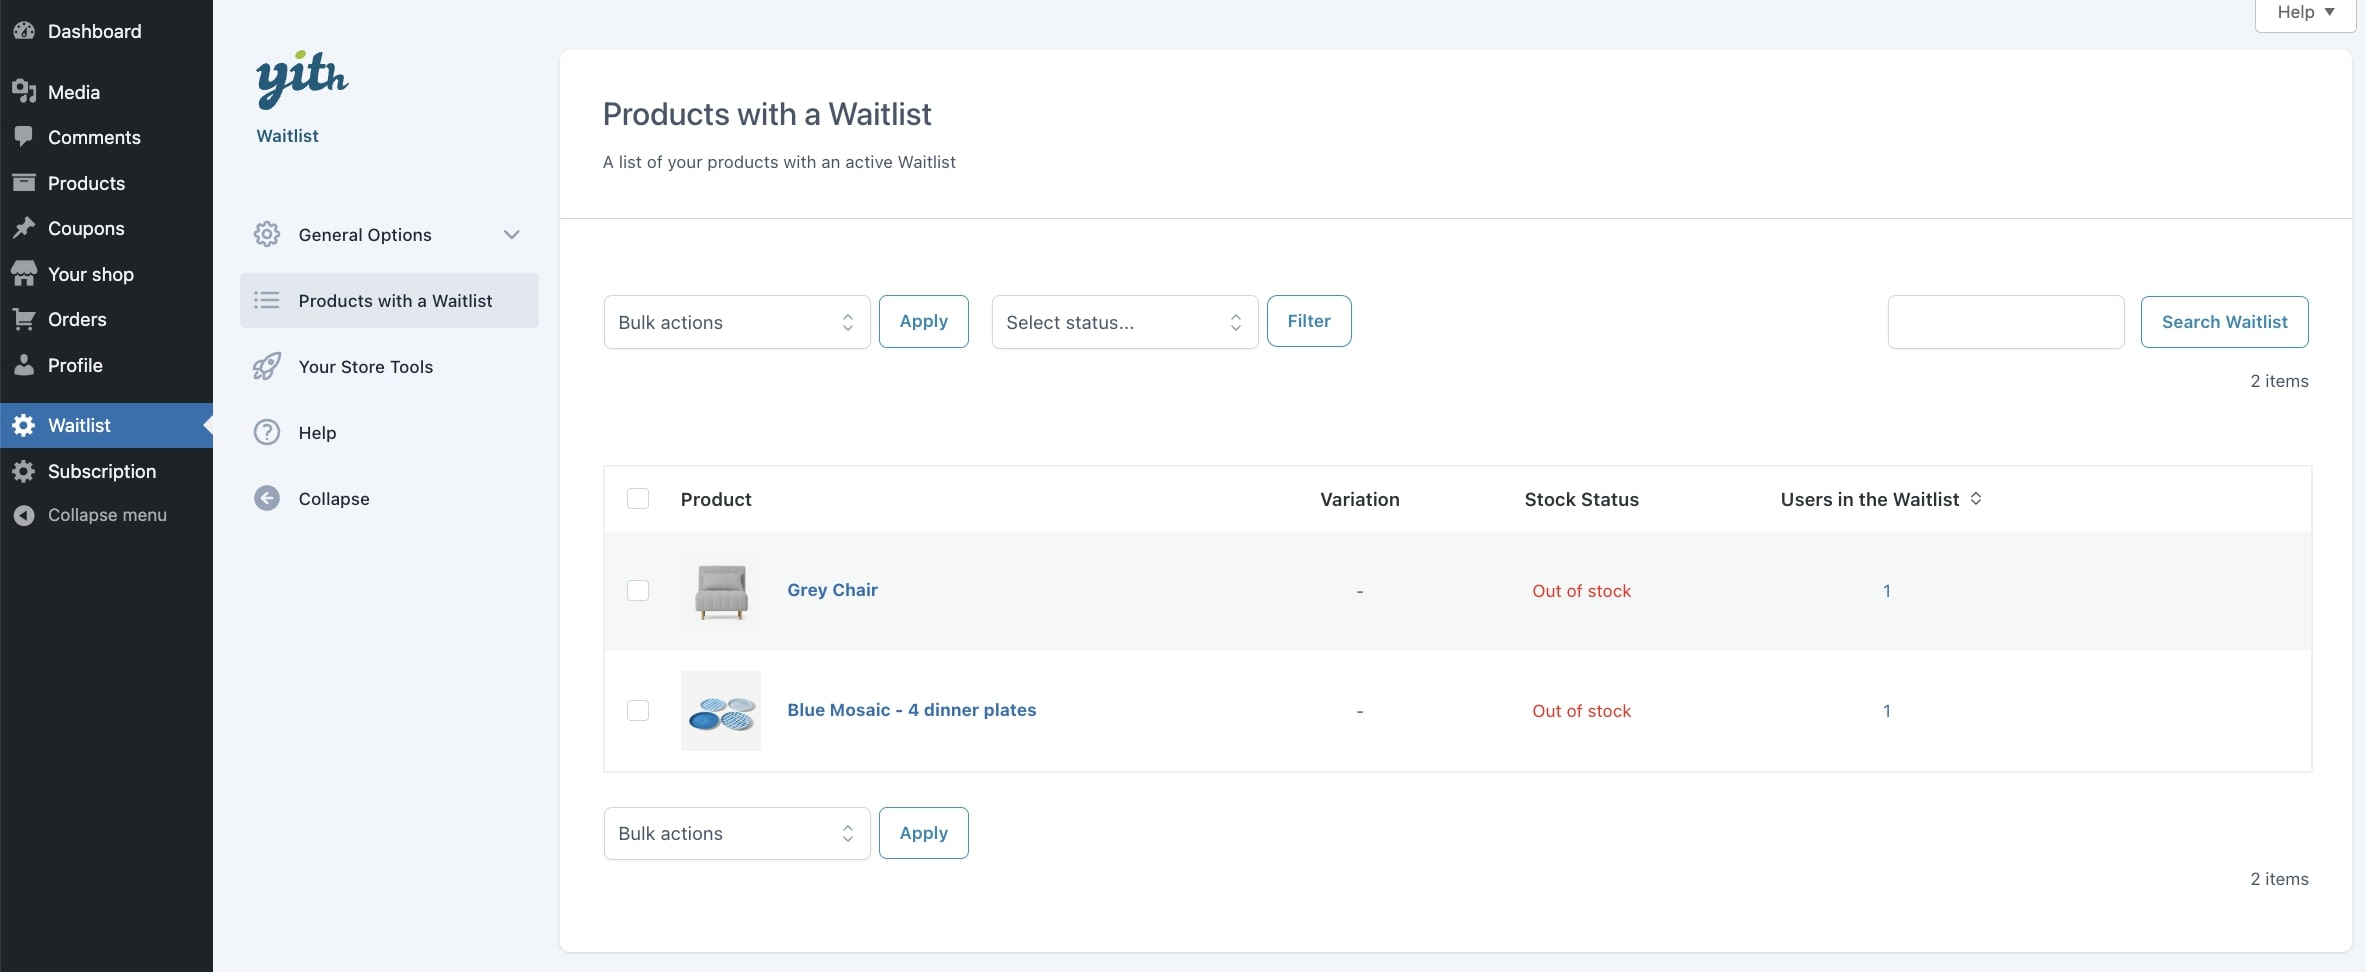
Also, vendors will be able to see a Waitlist menu in their dashboard and check all products that have an active waitlist and the users in it, send emails, delete users and so on.
For more details about how to use YITH Waitlist, please, refer to the official plugin documentation.


