View Product Page

Dashboard – Create and manage gift cards

The Dashboard page is the first page you find when you open the plugin settings from YITH > Gift Cards. Here you can find a list with all the created gift cards, edit them and create new ones. You can also edit them in bulk and import or export a file with all your gift cards.

You can also filter them by Redeemed or not and quickly enable or disable one gift card.

Create a gift card

Note: to make sure your customers can buy a gift card, refer to this page. Gift cards generated through purchases will appear on this Dashboard.

To create a new gift card without your customers to order it from the site, just go to the Dashboard and click on the Create code button.

Create code

A popup will open where you can choose to generate a single gift card code or multiple codes with the same amount.
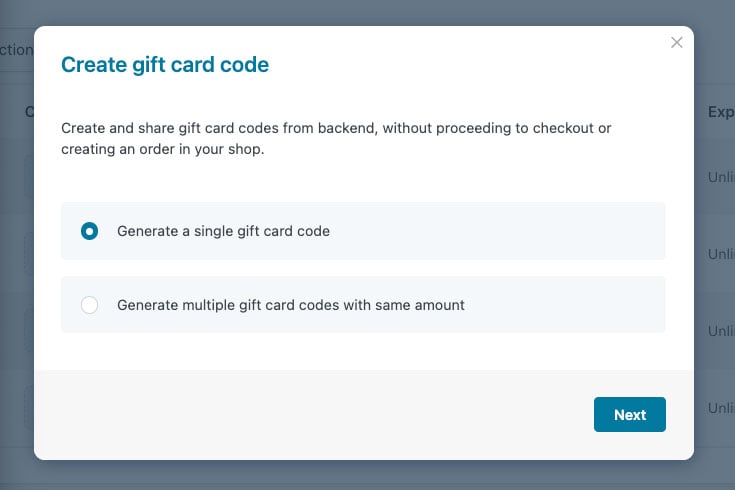
Generate single gift card code

By selecting Generate a single gift card code, you can easily generate a code by clicking on the Next button.

Enter the identification code to associate with the gift card or enable the option Generate automatically a code when creating a gift card post that you can find in the tab General > General settings to create the code automatically based on the gift card code pattern defined in the plugin settings.
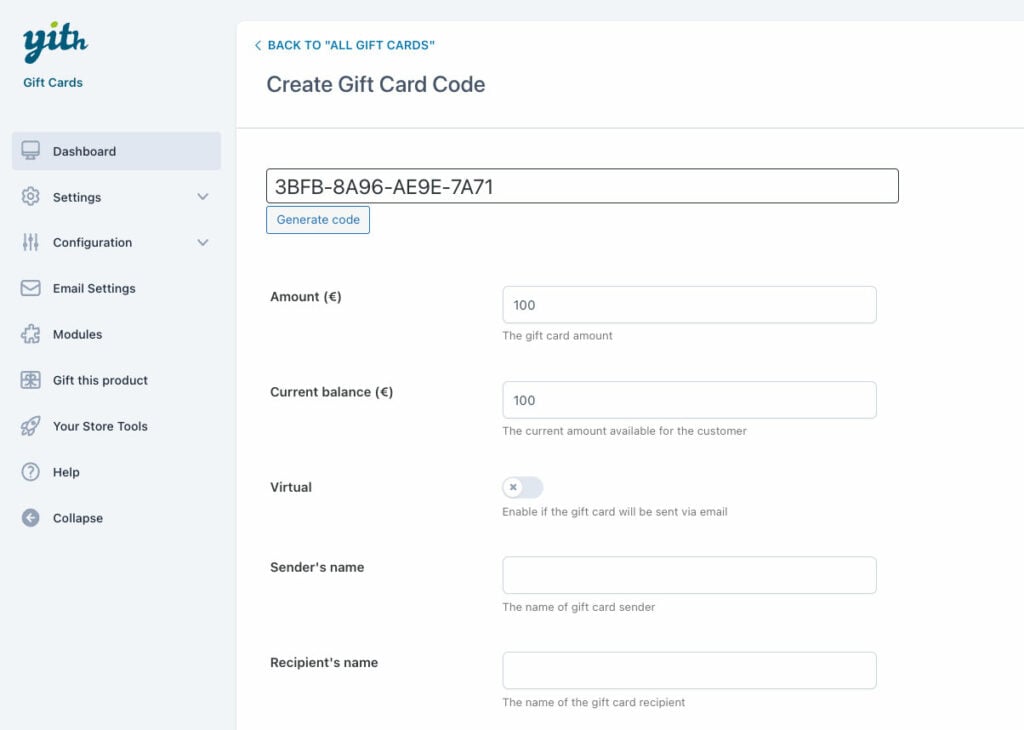
Create single gift card - manually add code

To associate the purchase value to the gift card, you must configure the following fields:

  • Purchased amount: gift card amount
  • Current balance: current purchasing power of the gift card.

If you want the gift card to be virtual, you can enable the “virtual” toggle, so you will be able to enter also the recipient email address, an image and the delivery date.
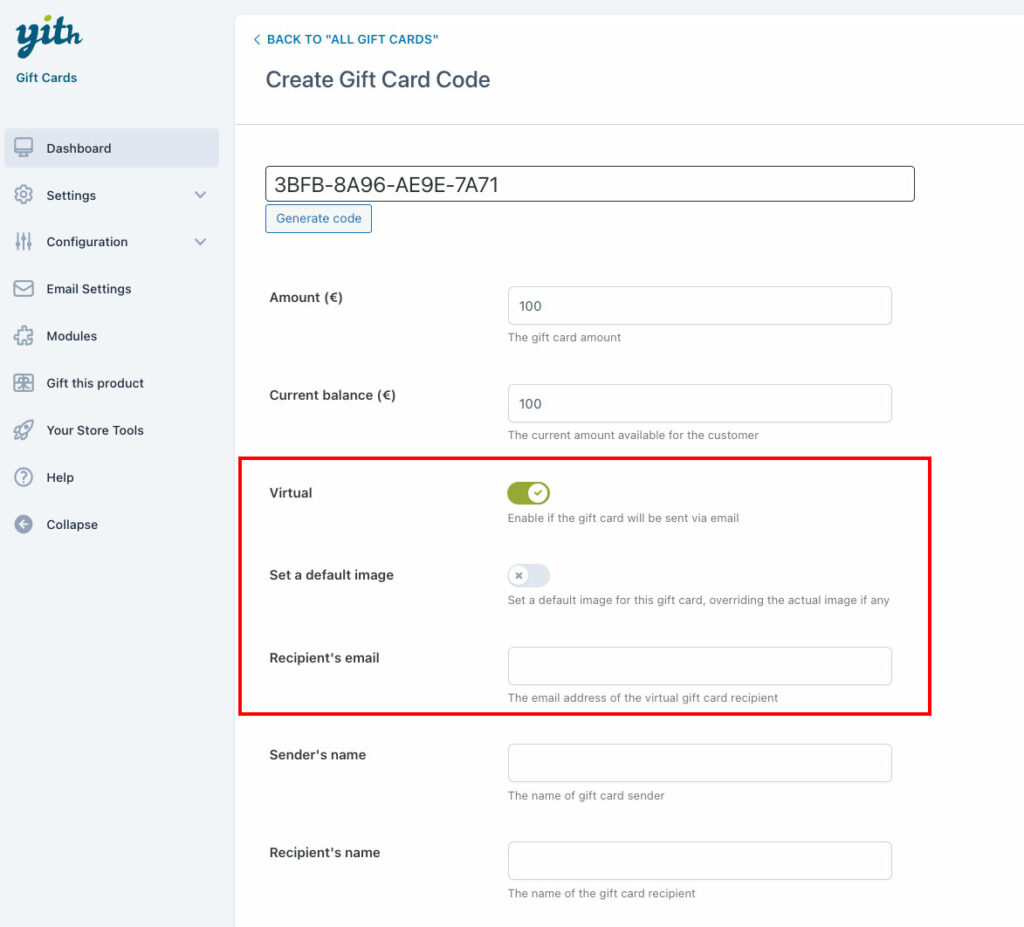
Virtual gift card

Image:
You can upload a custom image for this gift card by enable the Set a default image option.
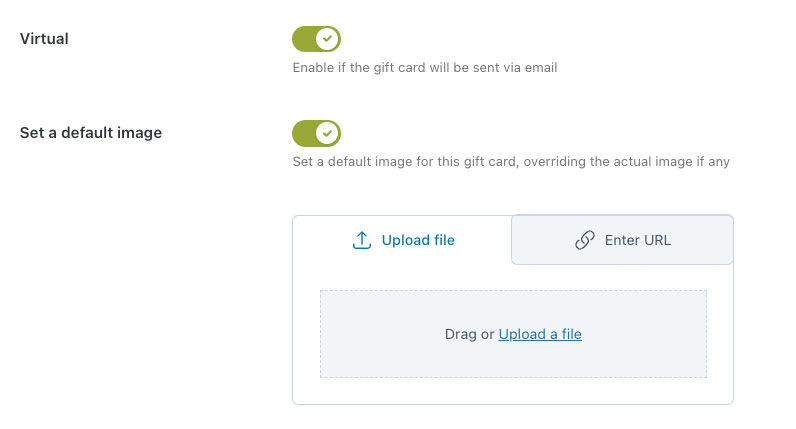
Set custom image

If not image is set, the gift card will automatically take the default image set in the general Settings > Style.

Recipient’s email:
if no email is inserted in the “Recipient’s email” field, the system will associate the gift card with the site administrator’s email address.

Delivery date:
If you set a delivery date, the gift card will be automatically sent on that date. Yet, if it has no delivery date set, you will just have to go back to the Dashboard and click on the dots icon > Send email. The email will be sent immediately.
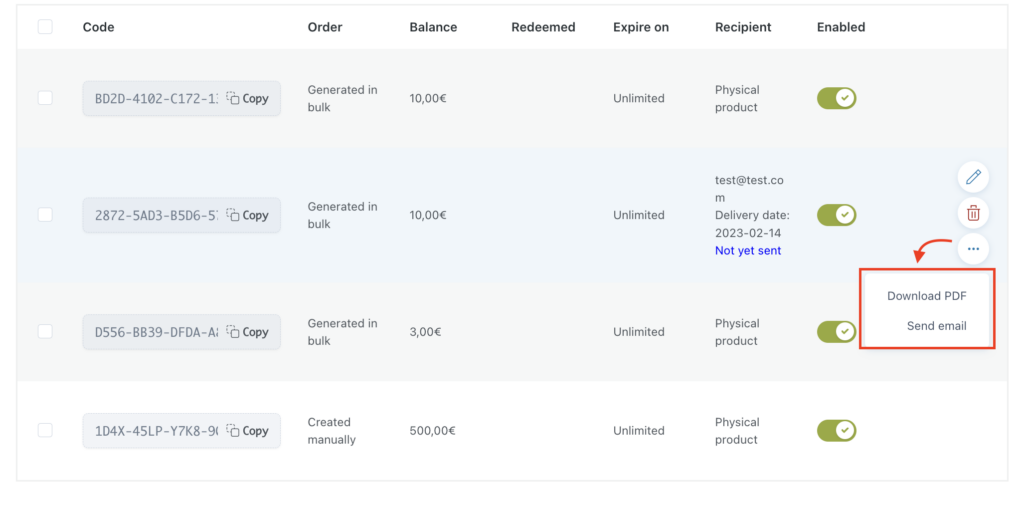
Virtual gift card actions

On the contrary, to generate multiple codes with the same amount at the same time, select the option as shown below and define the number of codes you want to generate and the gift card value.
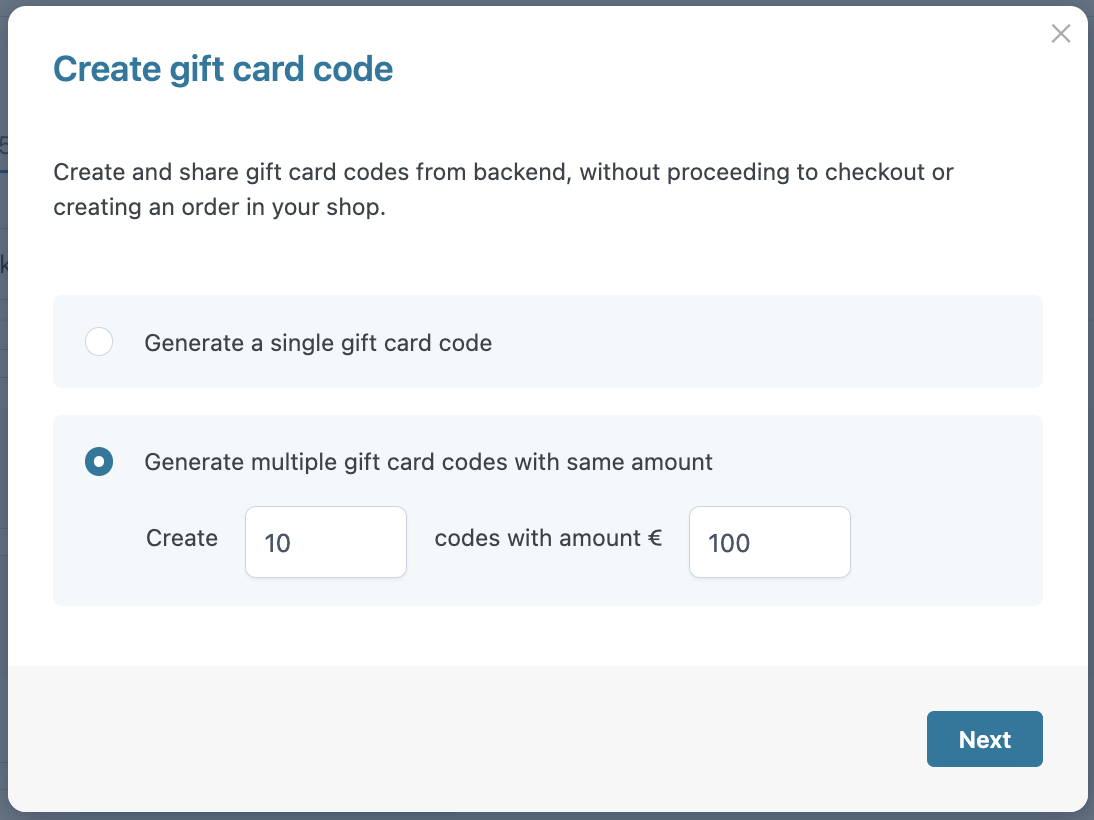
Generate single or multiple gift cards

After clicking on Next, the gift cards will be added to the Dashboard and will be identified as Generated in bulk.
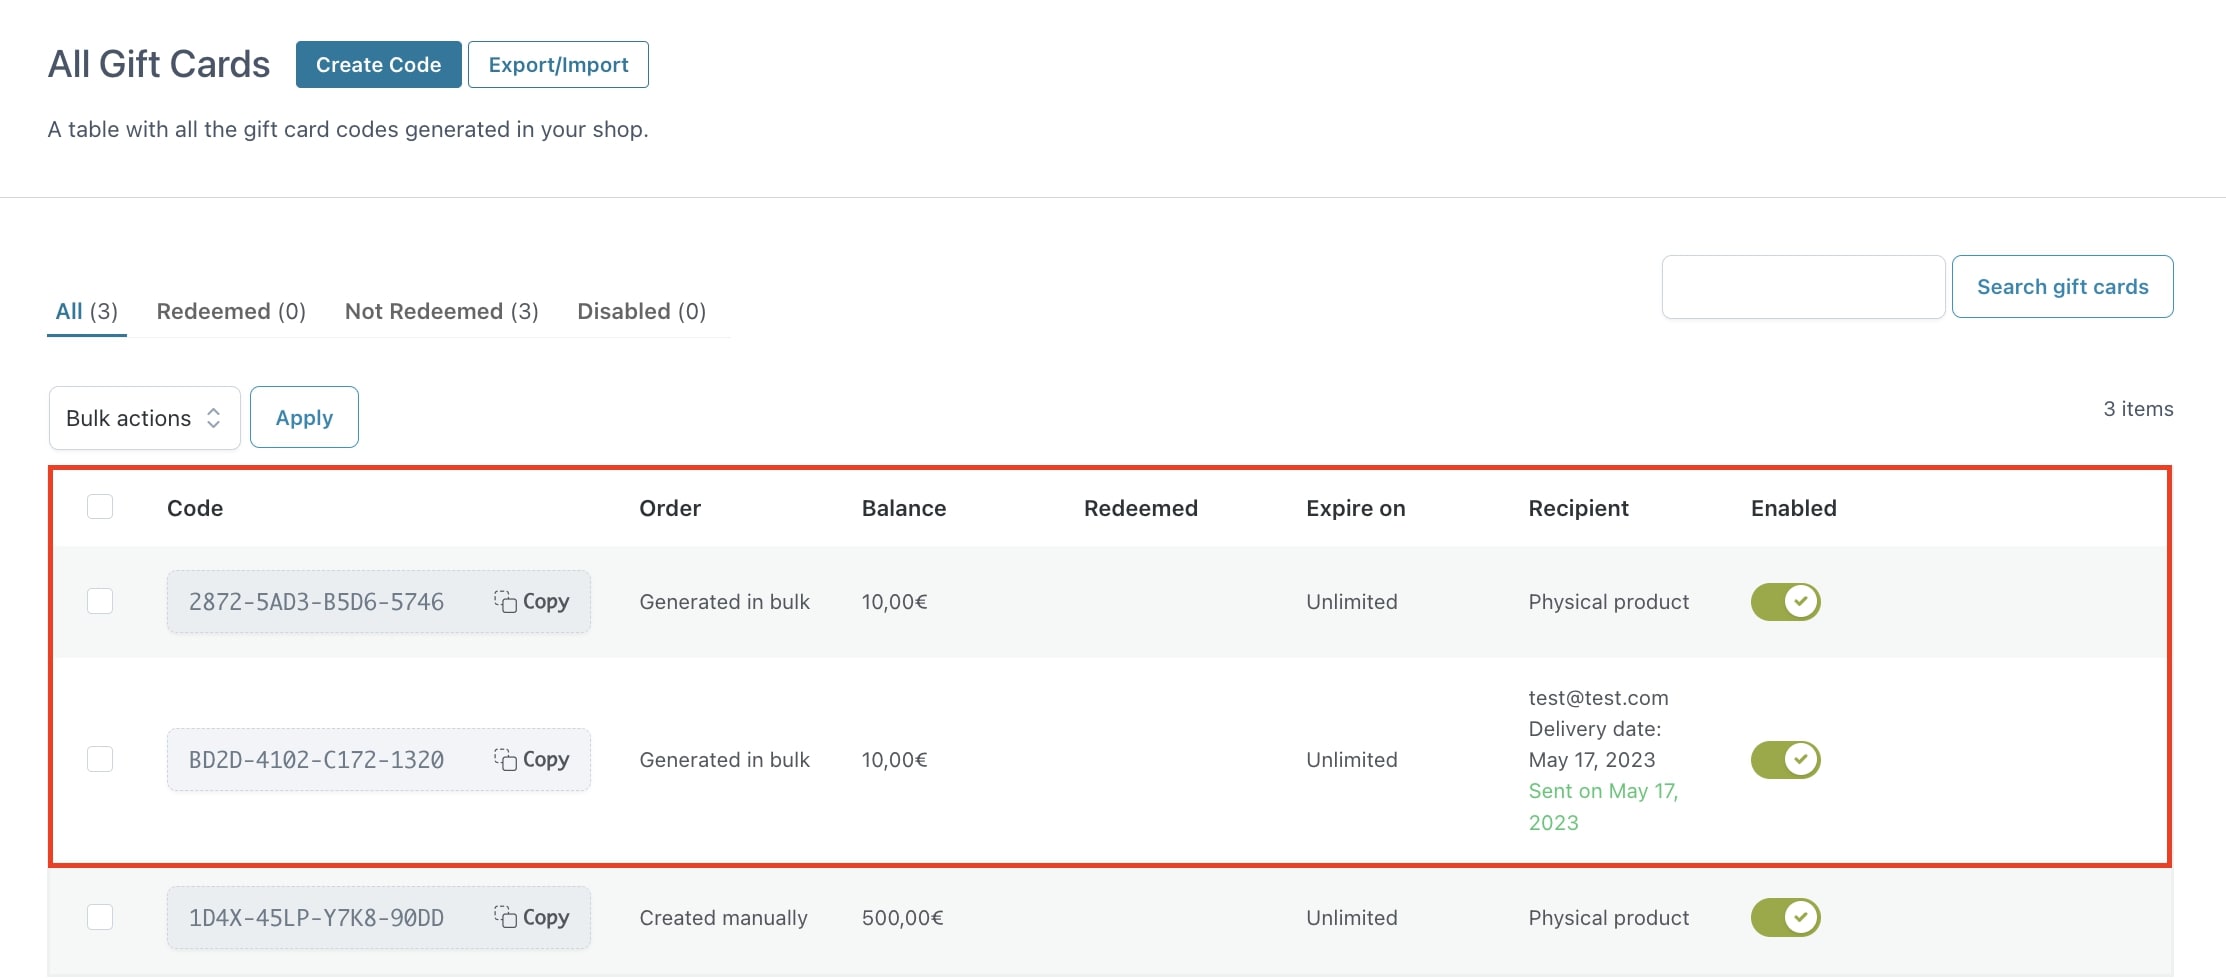
Generated in bulk

Bulk-generated codes are created as physical gift cards that you can easily edit and set as virtual by accessing each code’s details.

Actions on gift cards

From the Dashboard it is also possible to edit a gift card and you can simply do that by clicking on the Pencil icon.

Edit a gift card

You can manually edit all the gift card details.

You can also delete the gift card through the Trash icon, and download the PDF or send the email from the actions hidden in the 3-dot button.
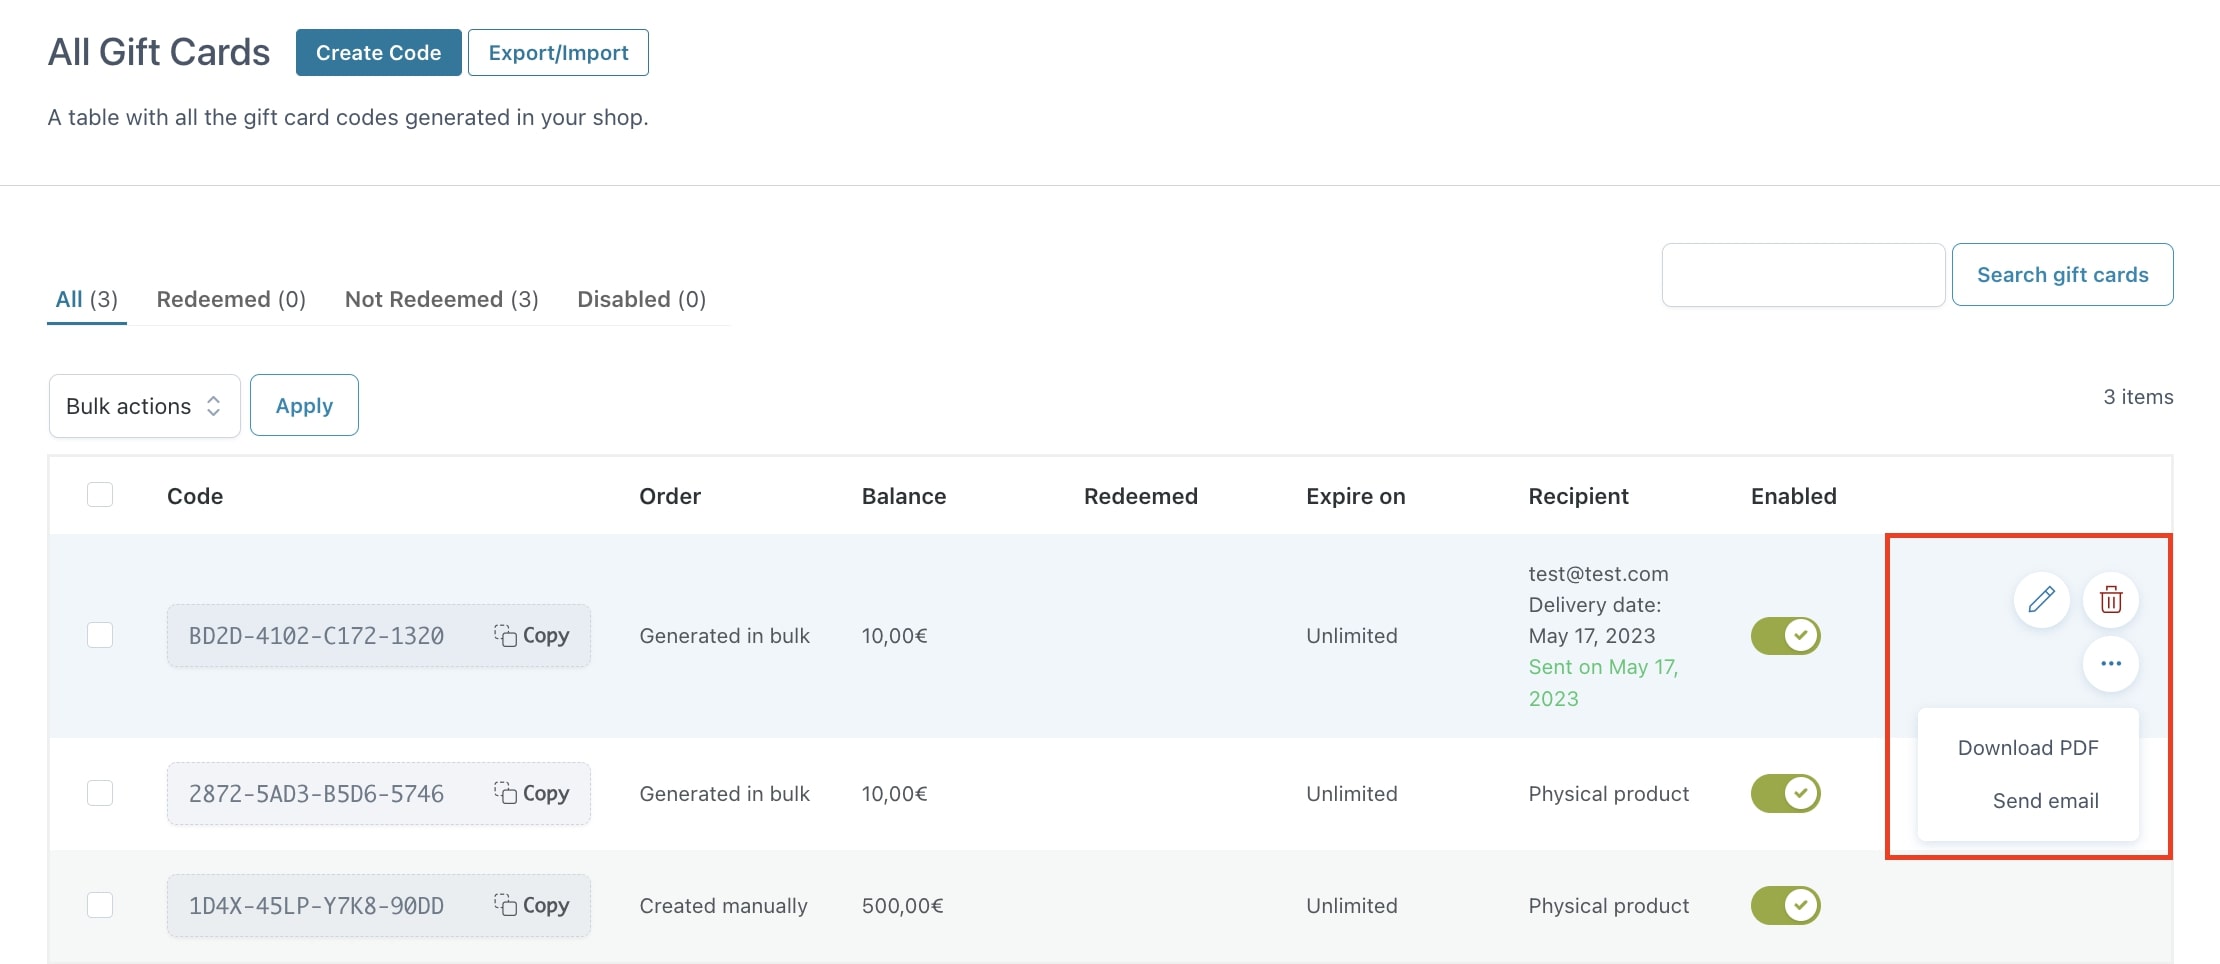
Actions

Bulk actions

If you need to simultaneously send multiple emails or delete multiple gift cards, you can use the bulk action available in the plugin Dashboard.
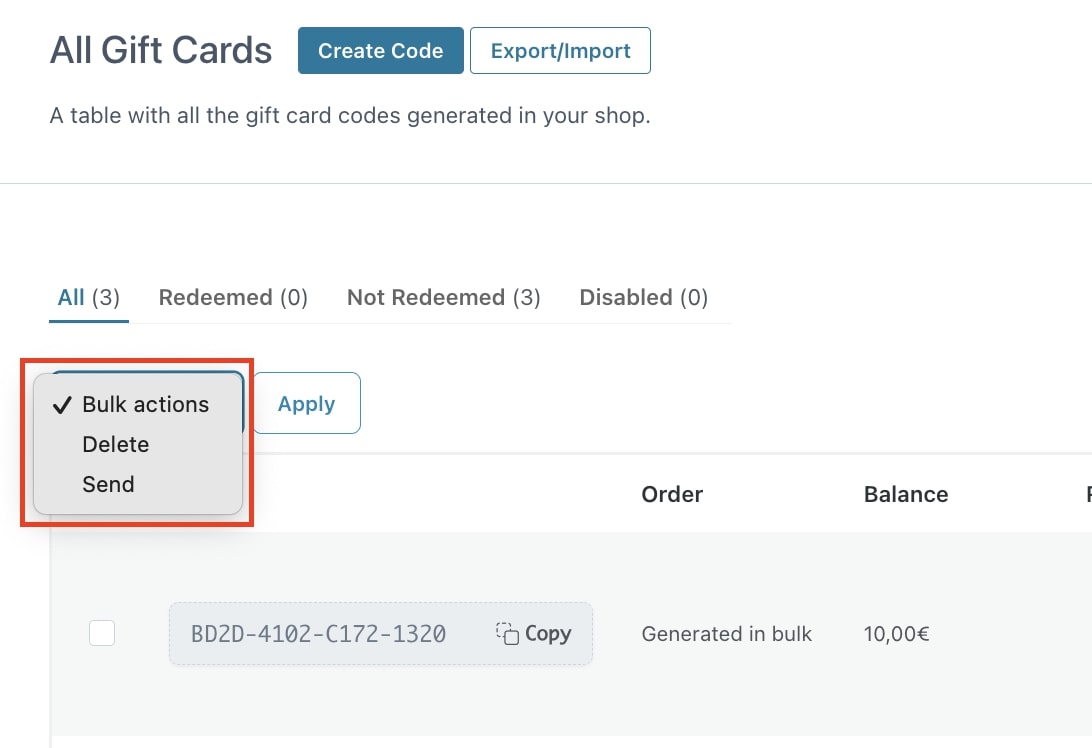
Bulk actions

This can be useful when manually creating some virtual gift cards or after importing them via a CSV file and you want to send them all with just a few clicks.

Export and import

On the Dashboard page, you also find an Export/Import button that allows you to import or export your gift card codes into a CSV file.

Export

To export gift cards, click on the Export/Import button, then select “Export gift card codes” and then “Continue”.
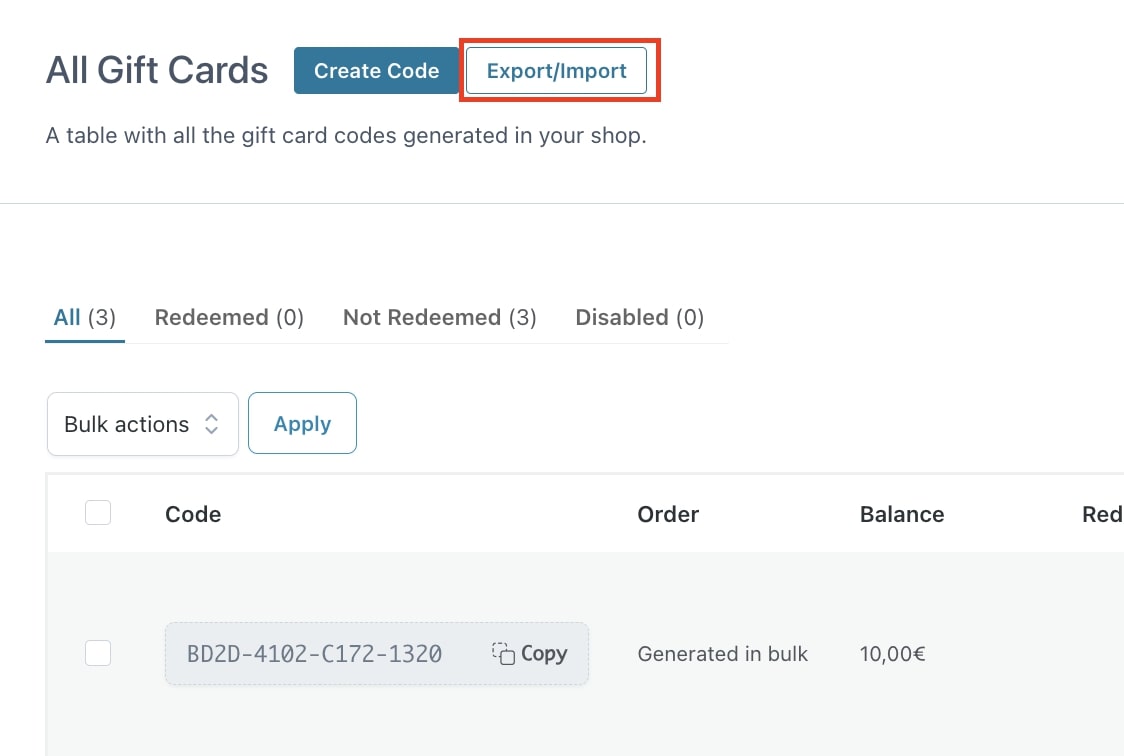
Export/import button

Now you will be able to choose whether exporting ALL your gift cards or only the ones that fall in a specific date range.
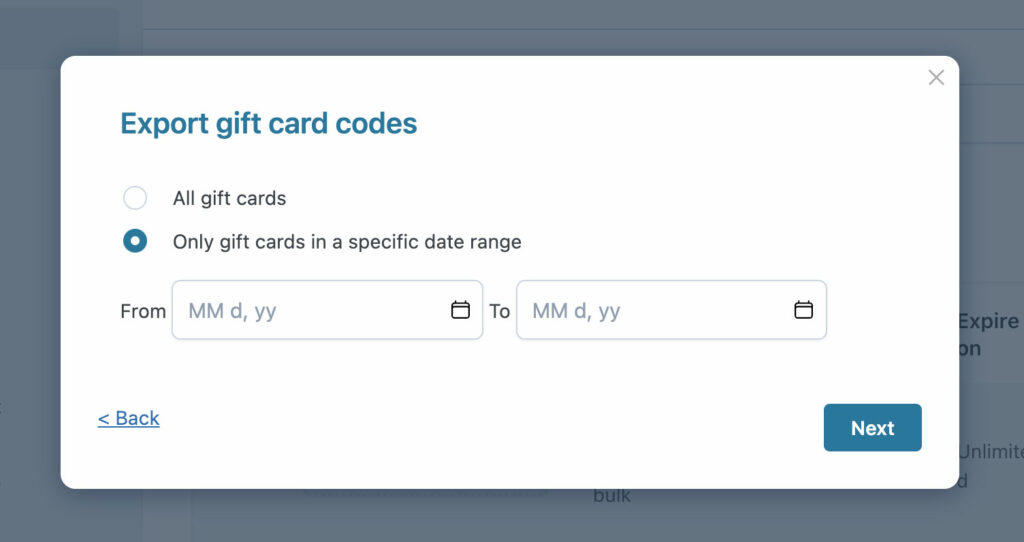
Export all gift cards or by date range

Then, you can choose which information fields have to be included in the export file, whether all or just some of them from the list below:

  • Gift card ID
  • Amount
  • Sender’s name
  • Recipient’s email
  • Message
  • Delivery date
  • Order ID
  • Code
  • Current balance
  • Recipient’s name
  • Expiration date
  • Internal notes

Also make sure you select the CSV delimiter (the character that separates the records, semicolon by default). Finally click on Export.
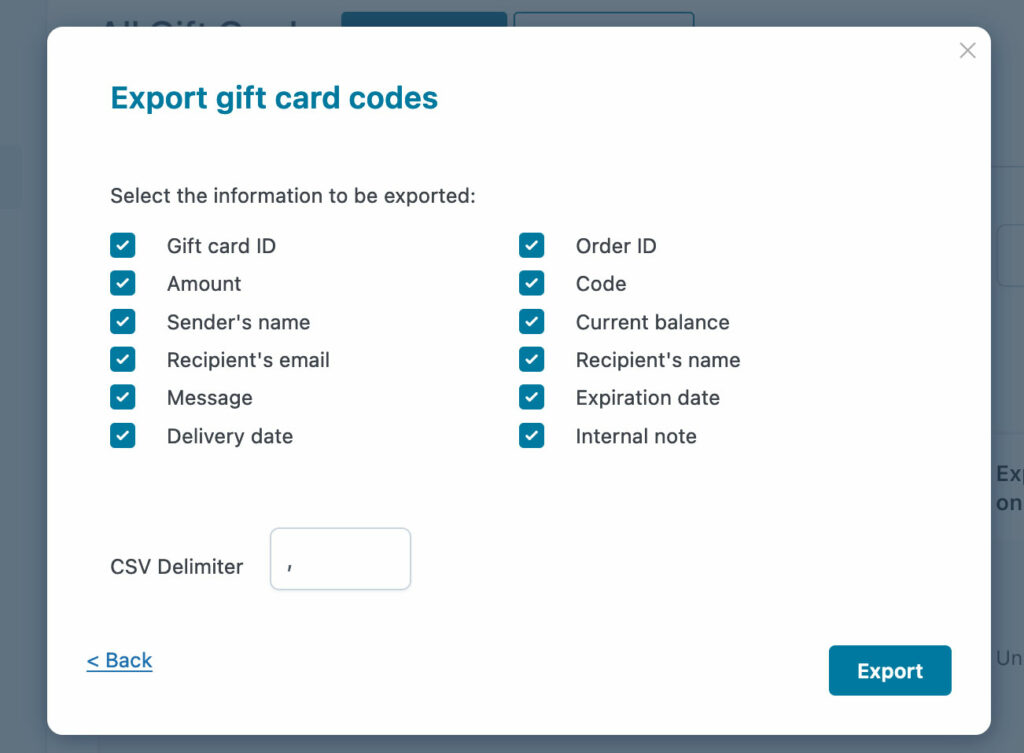
Export gift card codes

Import

To import a CSV file with your gift cards, just make sure you select the Import feature first.

Then, select the file you want to upload.
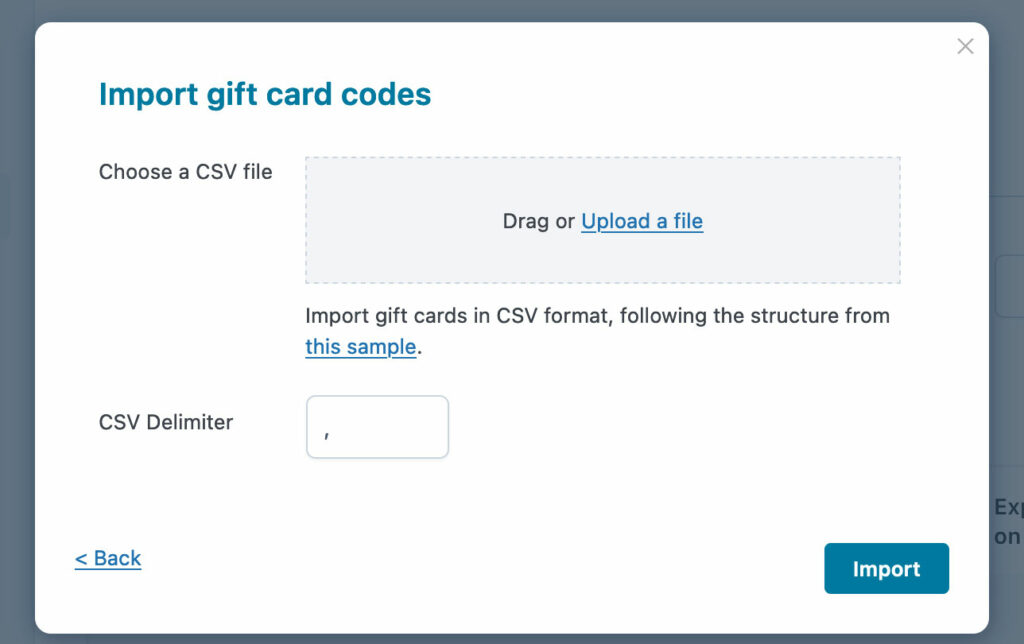
Import gift cards

If you have doubts about the CSV file format, you will be able to download a sample file too.

General settings tab

Go to Settings > General. Here you can can configure all the options that will globally apply to your gift cards.

General settings

Date format: through this option, you can choose the date format to use for the delivery date or gift card expiration, etc.

Prevent the use of a gift card to purchase another gift card: enable this option if you want to prevent users from purchasing a gift card with another gift card. Note: this option doesn’t work when gift card codes are applied to the WooCommerce Coupons field.

Enable Shop Managers: enable this option to allow shop managers to manage the plugin settings.

Gift card code settings

Gift card code settings

Gift card code pattern: here, you can set the pattern to generate the codes of your gift cards.

Generate automatically a code when creating a gift card post: enable this option if you want to generate the code automatically when creating a gift card manually from the backend.

Disable code generation in physical gift cards: enable this option if you want to override the default behavior to generate the codes automatically for your physical gift cards.

Disable code generation in virtual gift cards: enable this option if you want to override the default behavior to generate the codes automatically for your virtual gift cards.

Global settings

The options in this section will apply to all your gift card products. It is, however, possible to override these settings from the product edit page.

Giobal settings

Allow custom amount: enable this option if you want users to be able to enter the gift card amount manually.

Gift card custom amount

Minimum custom amount: insert a value for the minimum custom amount that users can insert when purchasing the gift card. Leave empty if you don’t want to set a minimum amount.

Maximum custom amount: insert a value for the maximum custom amount that users can insert when purchasing the gift card. Leave empty if you don’t want to set a maximum amount.

Gift card expiration date: insert a value (in months) for the default expiration of your gift cards. If you don’t want them to expire, set the value to 0. To manage the gift card expiration at the product level, go this page.

Gift card orders settings

In this section, you can choose the actions to apply when orders including a gift card are canceled or refunded and where autocomplete orders or not.

Gift card orders settings

When an order containing a gift card is cancelled: choose what happens to the gift cards when the order through which it was purchased is canceled:
Do nothing: nothing will change, so the gift card will remain active and can still be used.
Disable the gift cards: the gift card will be disabled but is still visible in the Gift cards list.
Dismiss the gift cards: the gift card will be disabled and deleted.

When an order containing a gift card is refunded: choose what happens to the gift card when the order through which it was purchased is refunded:
Do nothing: nothing will change, so the gift card will remain active and can still be used.
Disable the gift cards: the gift card will be disabled but is still visible in the Gift cards list.
Dismiss the gift cards: the gift card will be disabled and deleted.

Autocomplete gift card orders: by enabling this option, orders including only gift card products will be completed automatically.

YITH Multi Vendor option

If you also use the plugin YITH WooCommerce Multi Vendor, you will find an additional option in the General tab:

Gift card and multi vendor

Gift cards vendor restrictions: by enabling this option, you can limit the possibility for users to apply the gift card codes only on products of the vendors to which the gift cards have been assigned by the global admin. Vendor commissions will be generated when purchasing the gift card. In case the remaining balance of the gift card, if any, is used on another order, the commission will be generated only for the actual amount paid.
For example, if I use €20 gift card on a €100 order, I will pay €80: vendors commissions will be generated on €80 (not €100).

Style

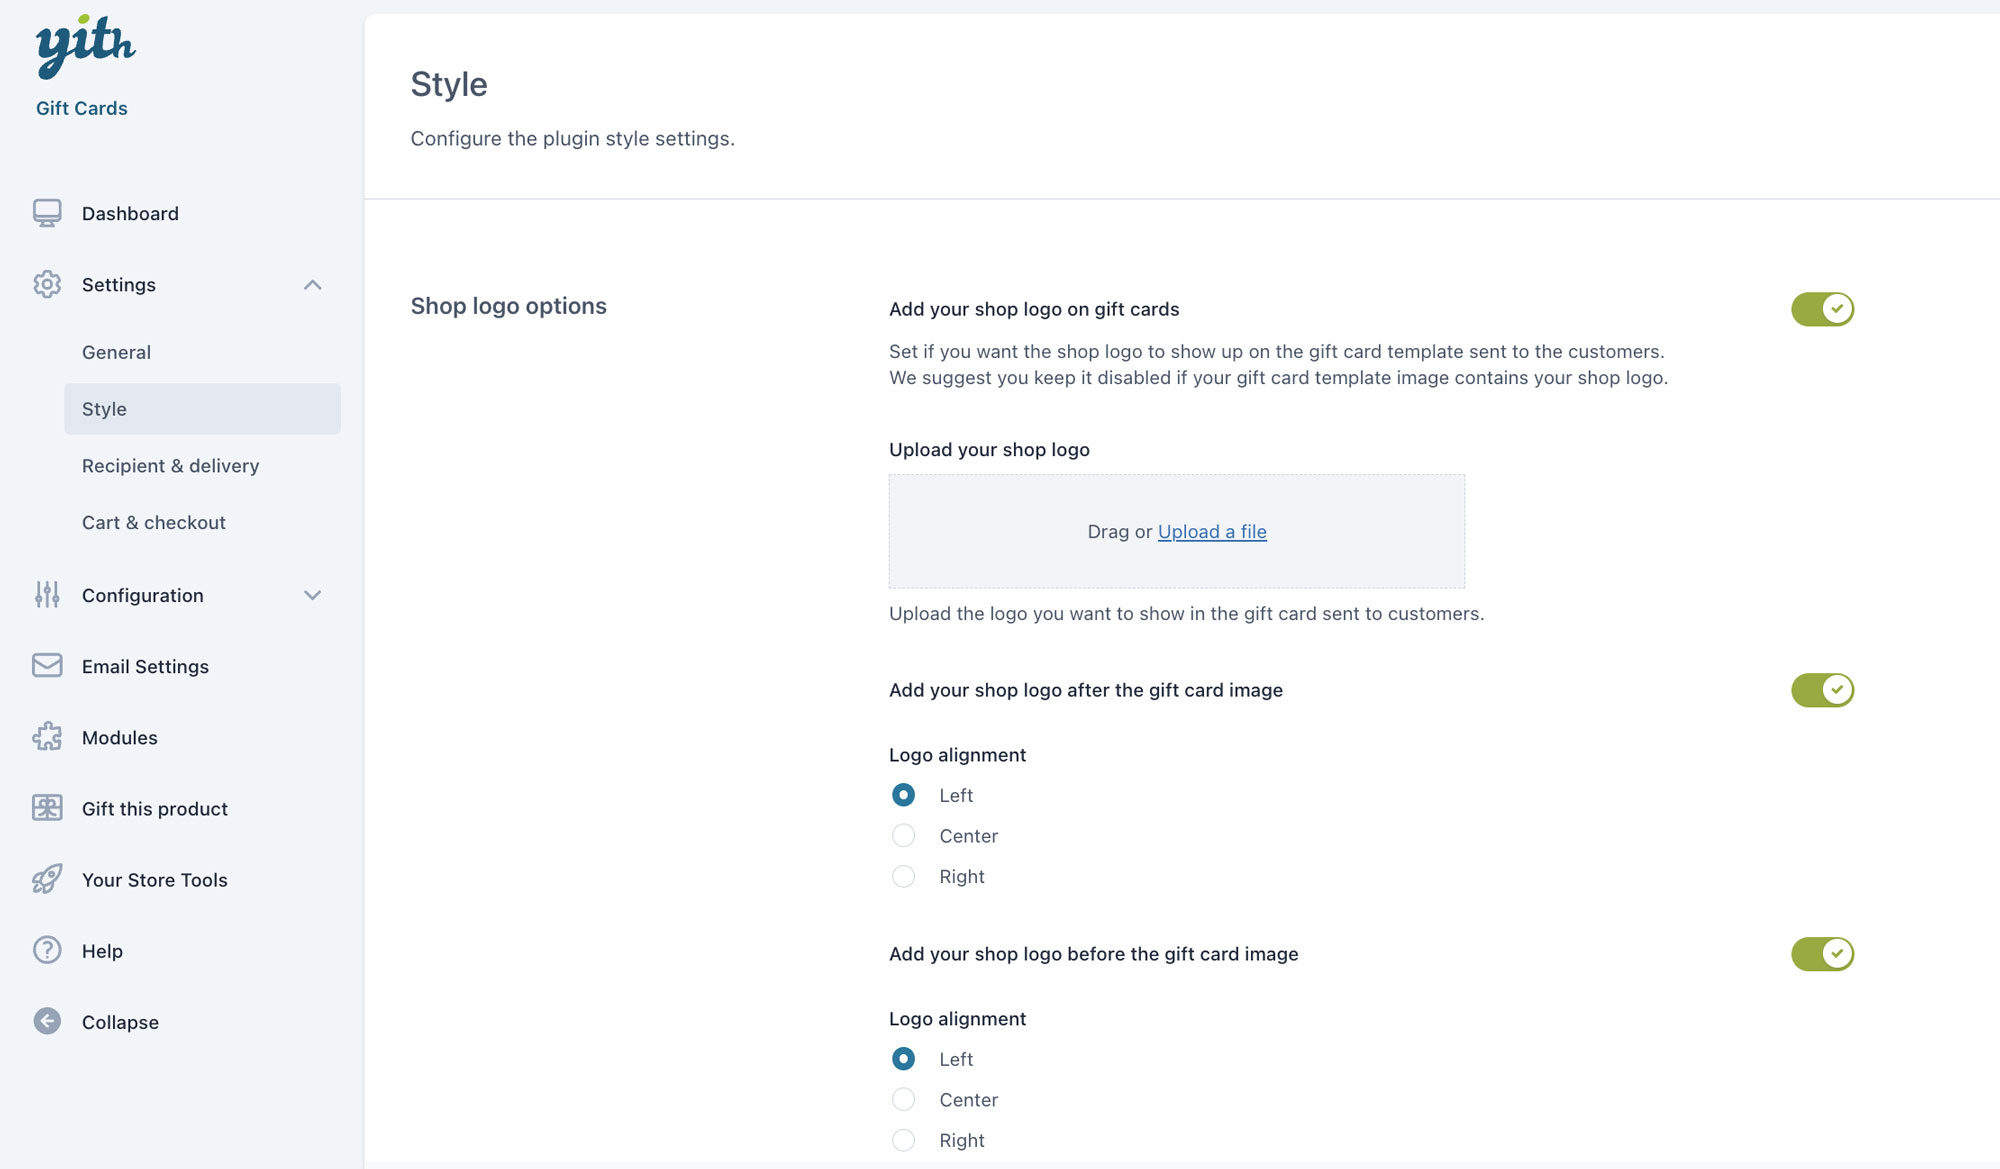
In the Settings > Style tab, you can set up the style options of your gift cards, like the logo and the gift card page.

Shop logo

Shop logo options

Shop logo options: here you can enable a logo to show on your gift card template. We suggest you keep it disabled if your gift card template image already contains your shop logo.
You can upload your logo and choose to show it after and/or before the gift card image.
Gift card page

Here you can adjust the style of your gift card page and how it appears to your users.

Gift card page options

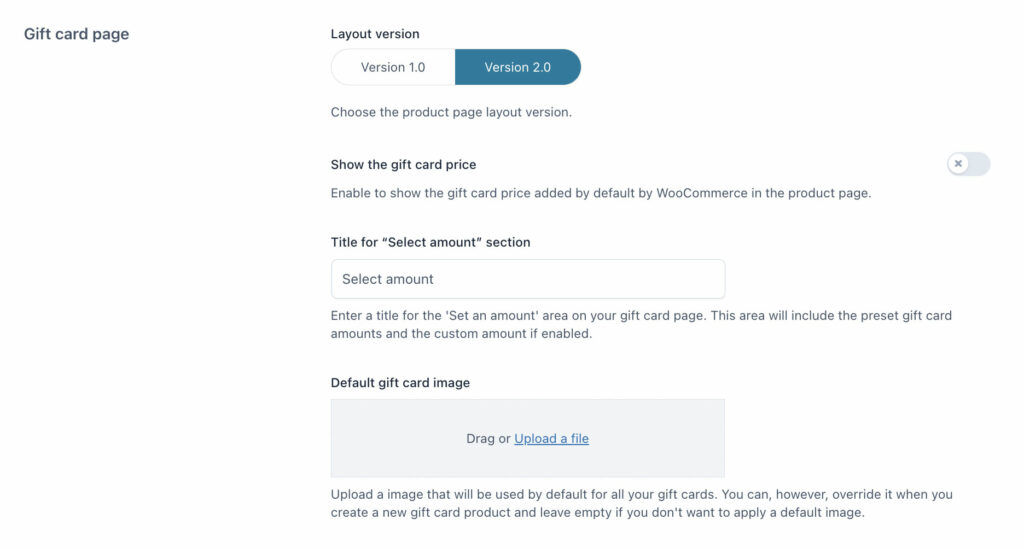
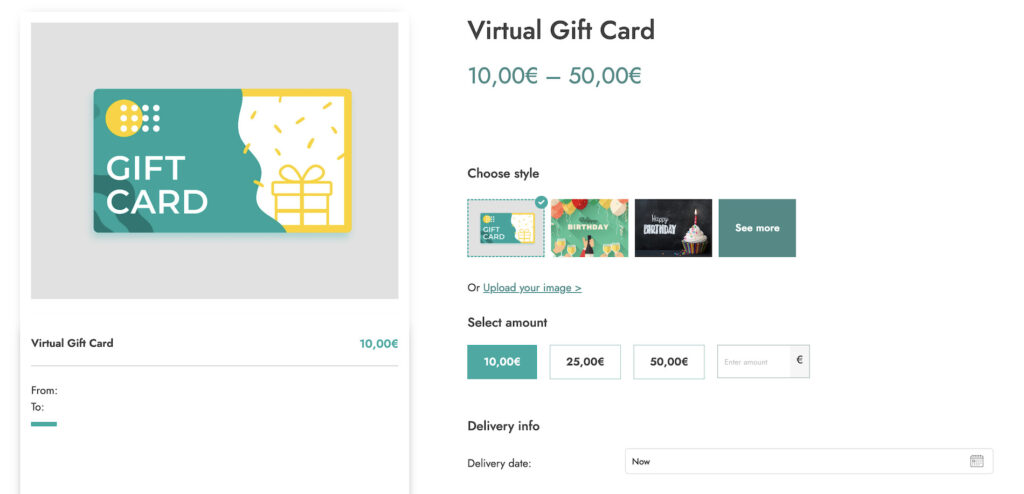
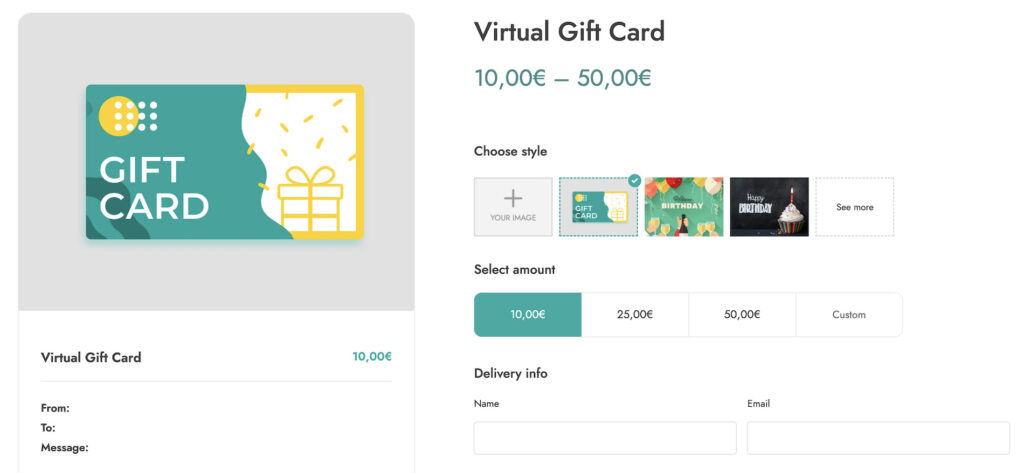
Layout version: you can choose between version 1.0 and the new version 2.0.

Gift card page style v. 1.0
Version 1.0
Gift card page style v. 2.0
Version 2.0

Show the gift card price: enable this option to show the gift card price as for other WooCommerce products.

Title for “Select amount” section: enter a title for the “Set an amount” area on your gift card page. This area will include the preset gift card amounts and the custom amount if enabled.

Gift card default image: upload an image that will be used by default for all your gift cards. You can, however, override it when you create a new gift card product and leave empty if you don’t want to apply a default image.

Gallery

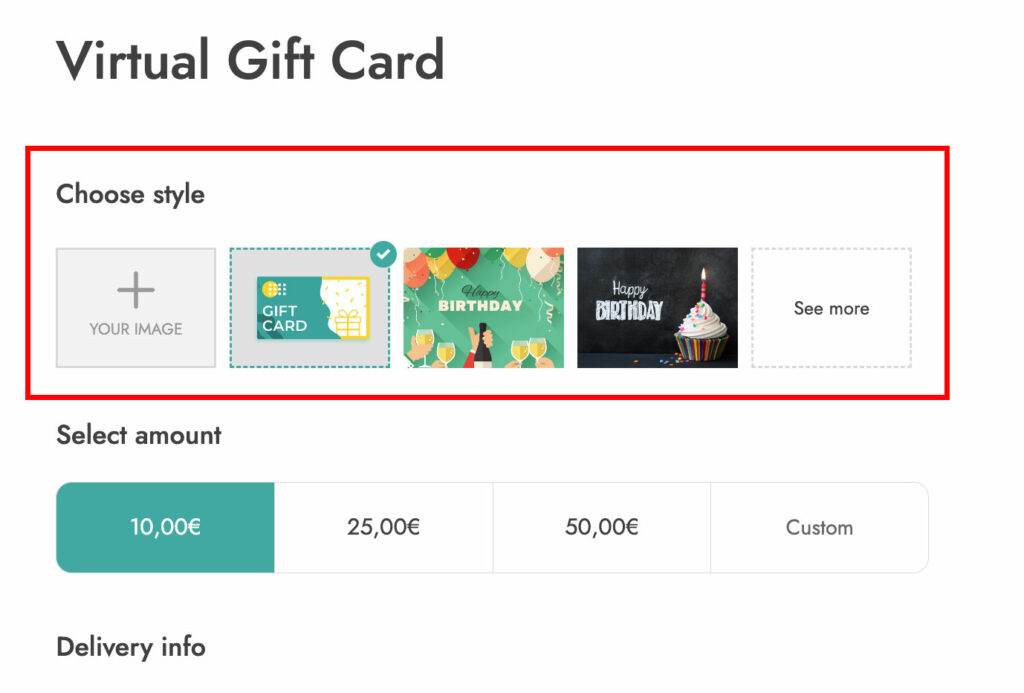
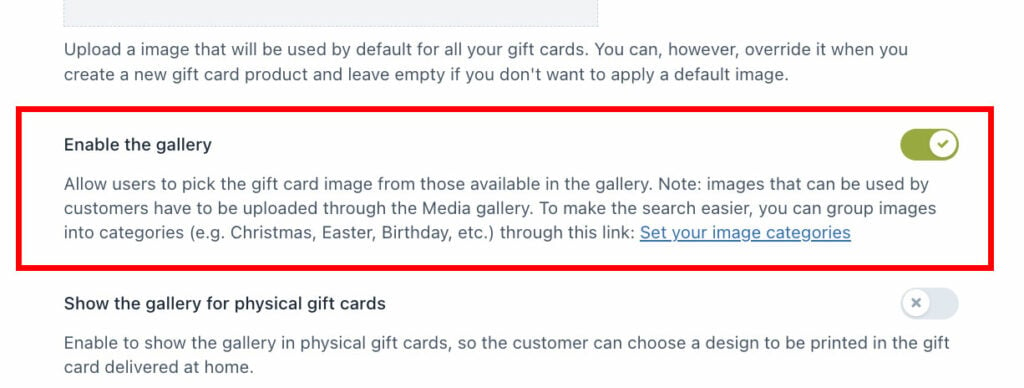
Enable the gallery allows users to pick the gift image from those available in the gallery, the section highlighted in the screenshot below.

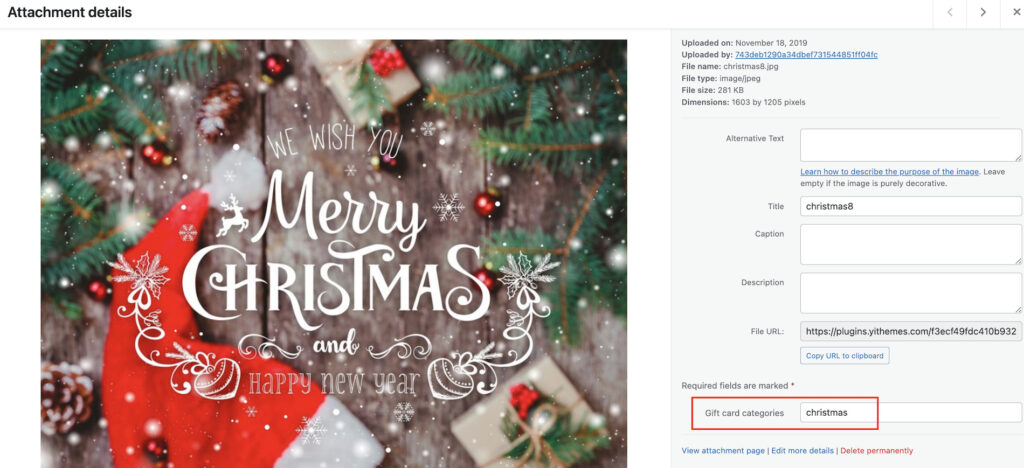
Note: images that can be used by customers have to be uploaded through the Media gallery. To make the search easier, you can group images into categories (e.g. Christmas, Easter, Birthday, etc.) through the Gift card categories page.

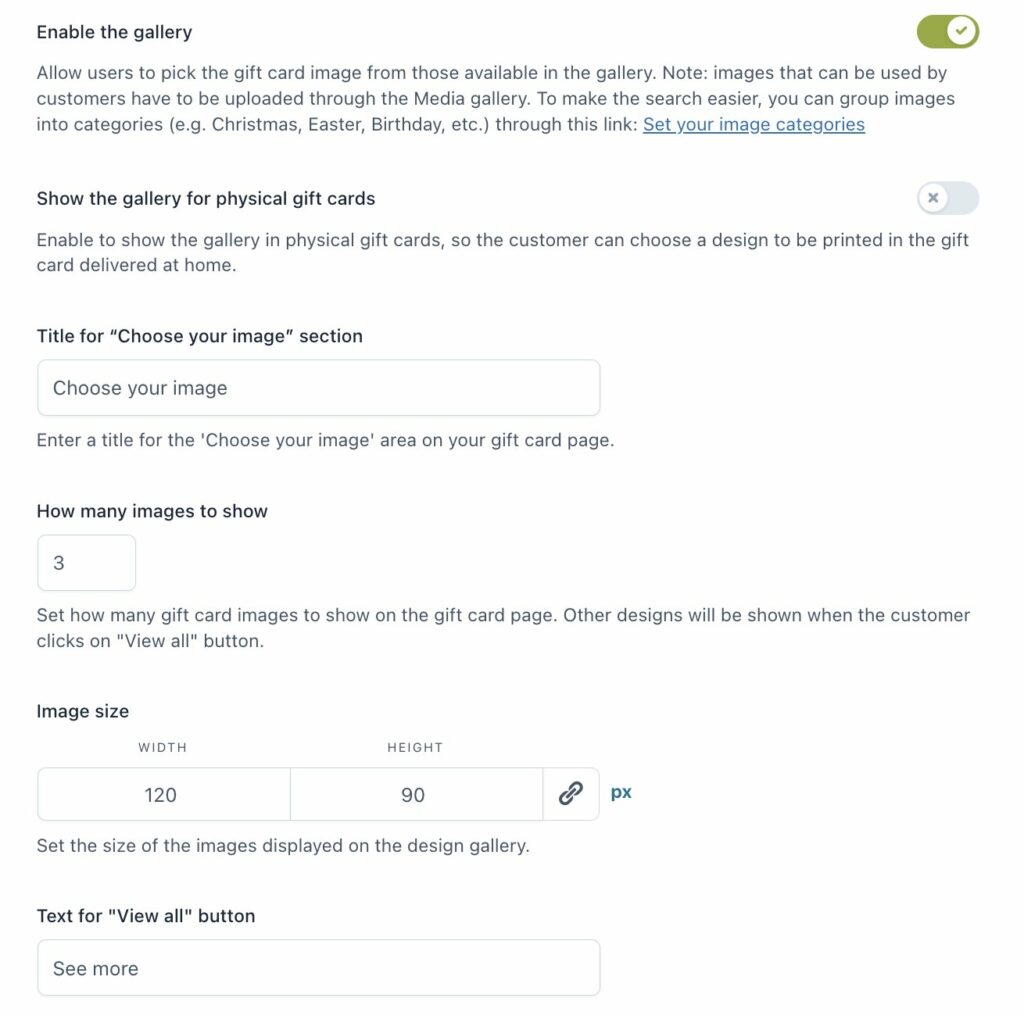
Once you enable the gallery, you will be able to set other options.

Gallery and image options

Show the gallery for physical gift cards: enable to show the gallery in physical gift cards, so the customer can choose a design to be printed in the gift card delivered at home.

Title for “Choose your image” section: enter a title for the ‘Choose your image’ area on your gift card page.

How many images to show: set how many gift card images to show on the gift card page. Other images will be shown when the customer clicks on the “View all” button.

Image size: set here the width and height of the image tiles on the gift card page.

Text for “View all” button: set here a custom text for the “View all” button.

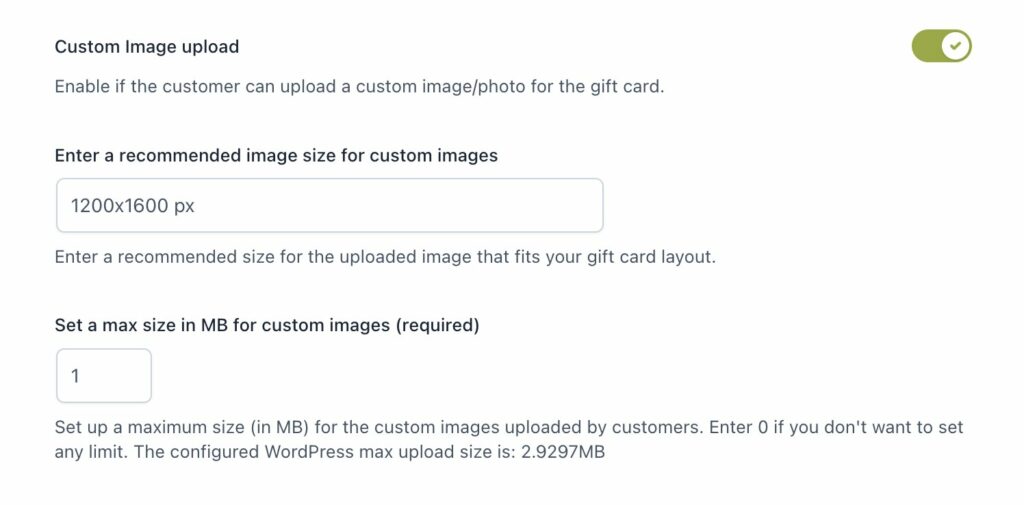
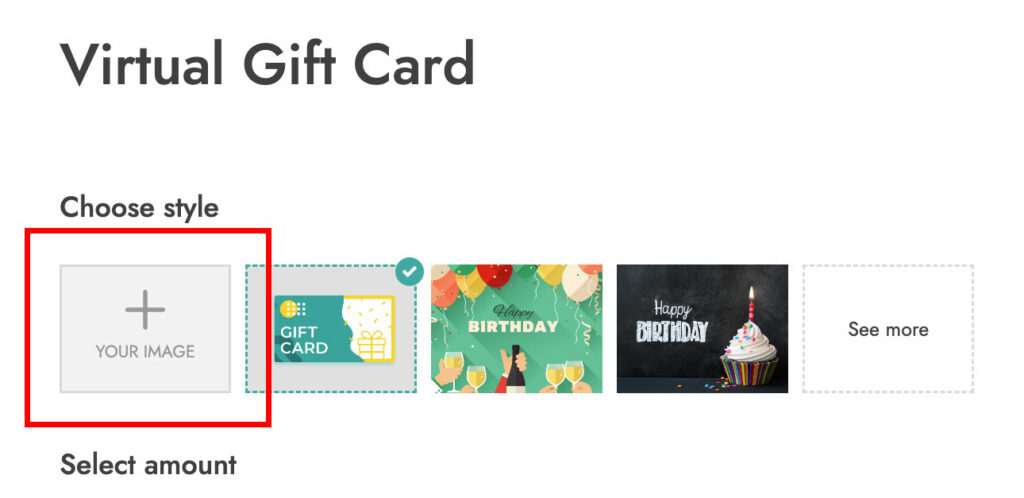
Additionally, you can choose whether to let your customers upload their own image. If you want to, you can enable the related option and set the recommended and maximum size.

Custom image upload
Custom image upload frontend

Colors

Finally, you can choose the Plugin main color option that allows you to select an accent color for all the plugin related options. This color is used for highlighting the selected image, the selected gift card amount and the overlay color in the image gallery.

Plugin main color

Recipient & delivery

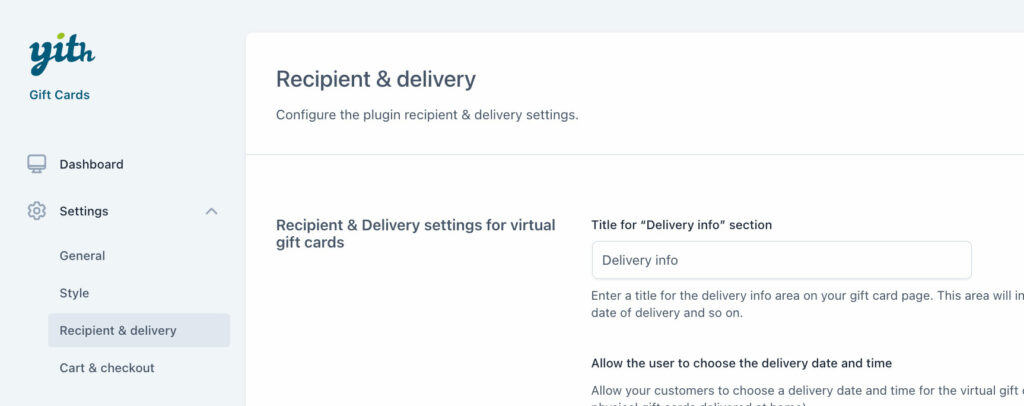
In this tab of the plugin settings, you will find all the options related to recipients and delivery, divided into multiple sections, listed below:

  1. Recipient & Delivery settings for virtual gift cards
  2. Recipient & Delivery settings for physical gift cards delivered at home
  3. Email options & customization
Recipient & Delivery

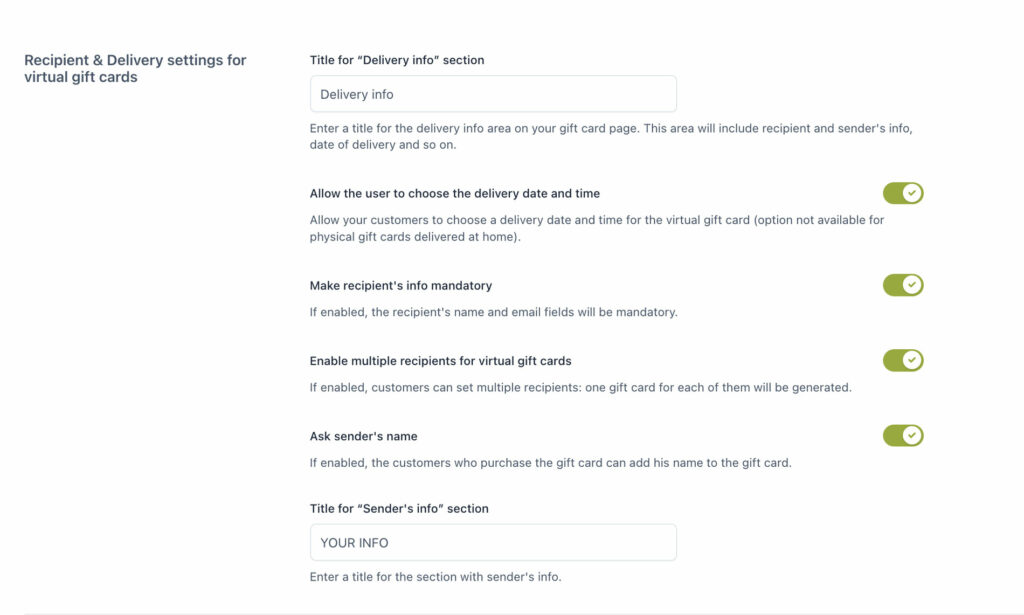
Recipient & Delivery settings for virtual gift cards

Recipient and delivery settings for virtual gift cards

Title for “Delivery info” section: enter a title for the delivery info area on your gift card page. This area will include recipient and sender’s info, date of delivery and so on.

Allow the user to choose the delivery date and time: option available only for virtual gift cards.

Title for the “Recipient info” section: enter a title for the section with the recipient’s info. Default “Recipient info”.

Make recipient’s info mandatory: if enabled, the recipient’s name and email fields will be mandatory.

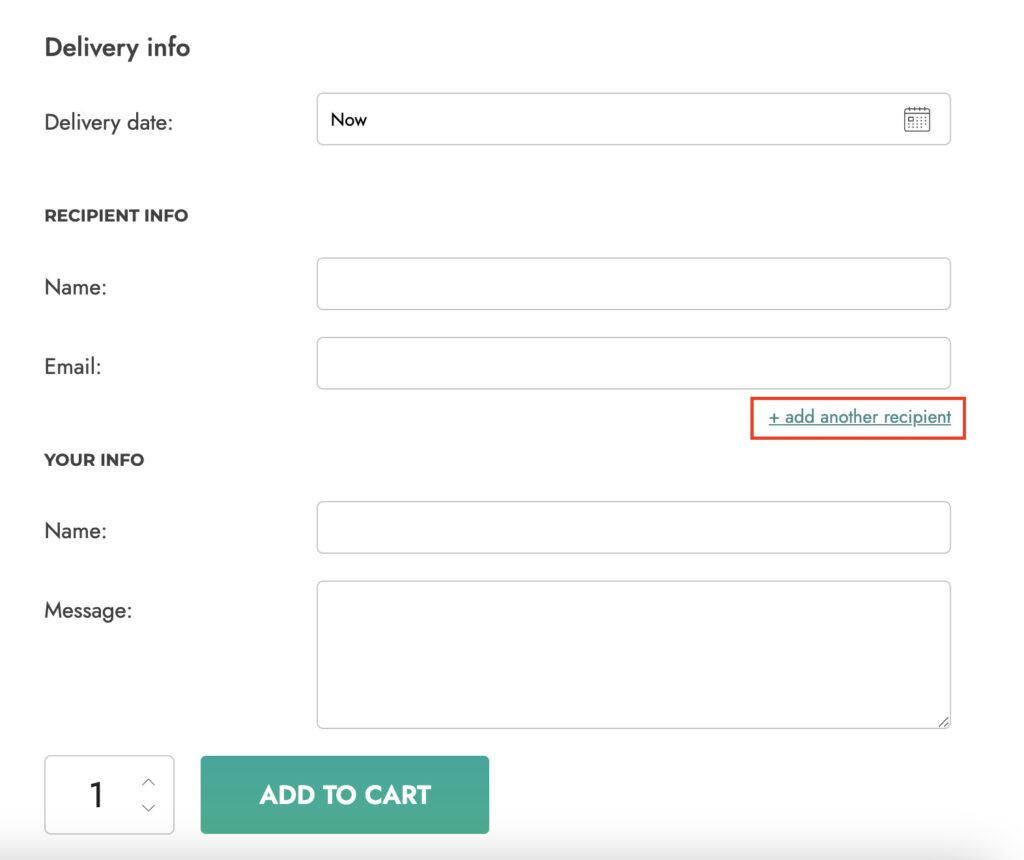
Enable multiple recipients for virtual gift cards: the user will be able to add multiple email addresses by clicking on the “+add another recipient” button and one gift card for each email address will be generated.

Enable multiple recipients

Ask sender’s name: you will be able to enter your name here so the receiver is informed about who shipped the gift card.

Title for the “Sender’s info” section: default “YOUR INFO”.

Recipient & Delivery settings for physical gift cards delivered at home

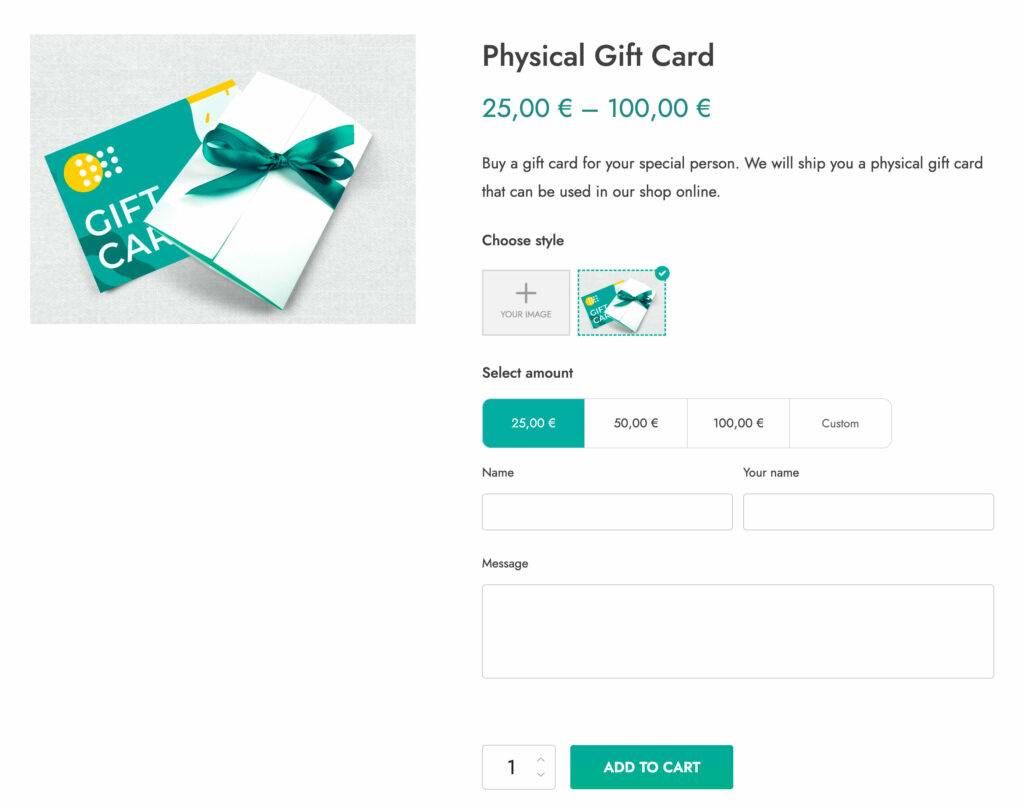
Recipient and delivery info for physical gift cards delivered at home

Allow customers to add a printed message to the gift card: this will add the “Message” box, so the customer can enter a custom message.

Ask sender’s and recipient’s name: this will let you enter both your name (as a sender) and the receiver’s name.

Physical gift card fields

The message and the names will be visible to the admin in the order details. To learn more about how to create and configure a physical gift card, please, check this page.

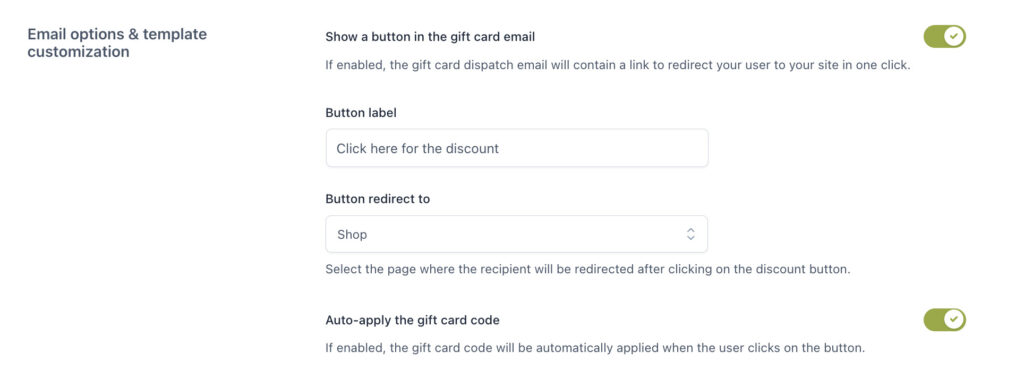
Email options & template customization

Email options and template customization 1

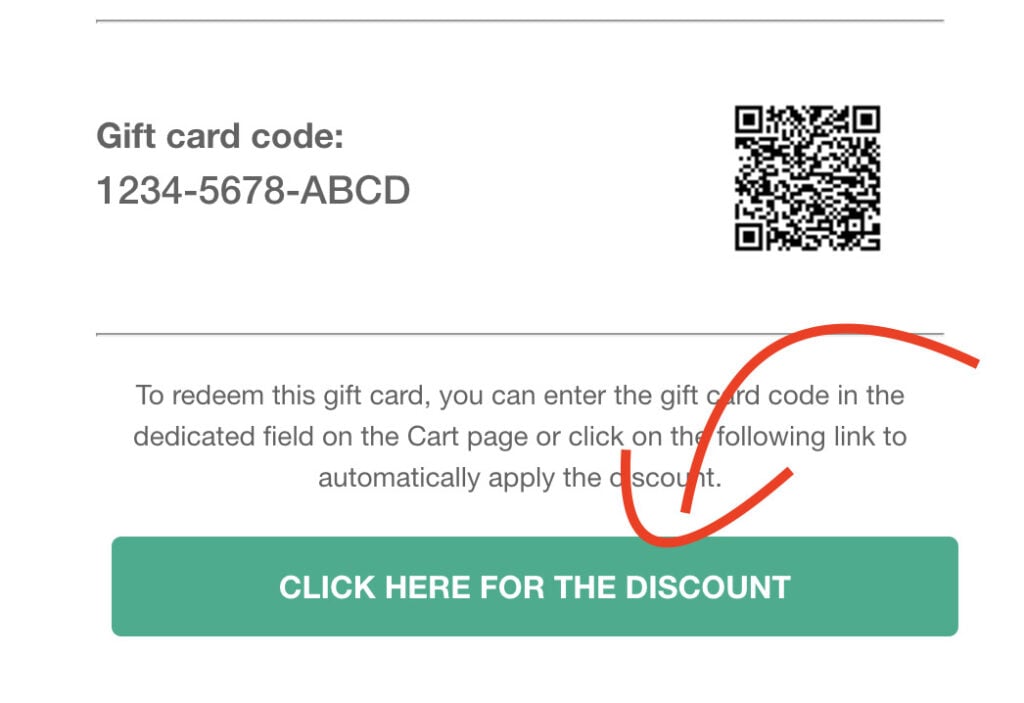
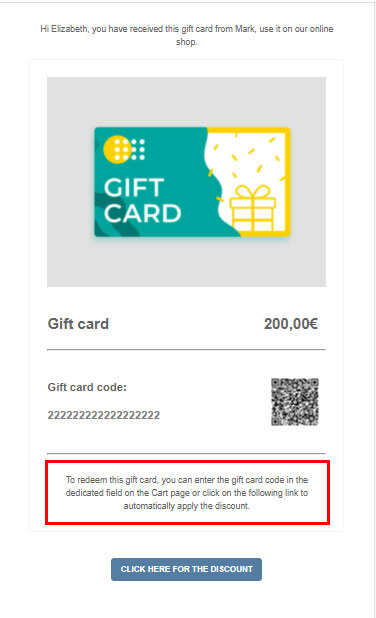
Show a button in the gift card email: if enabled, the gift card email will contain a link to redirect the user to your site in one click.

Button label: default “Click here for the discount”.

Button in gift card email

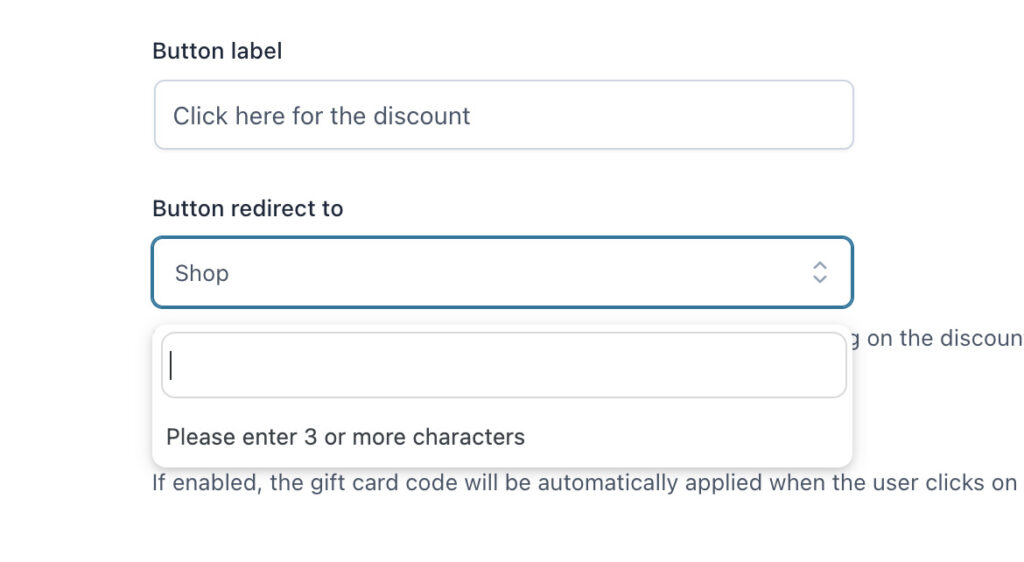
Button redirect to: select the page where the recipient will be redirected after clicking on the discount button.

Button redirect to page

Auto-apply the gift card code: if enabled the gift card code will be automatically applied when the user clicks on the button.

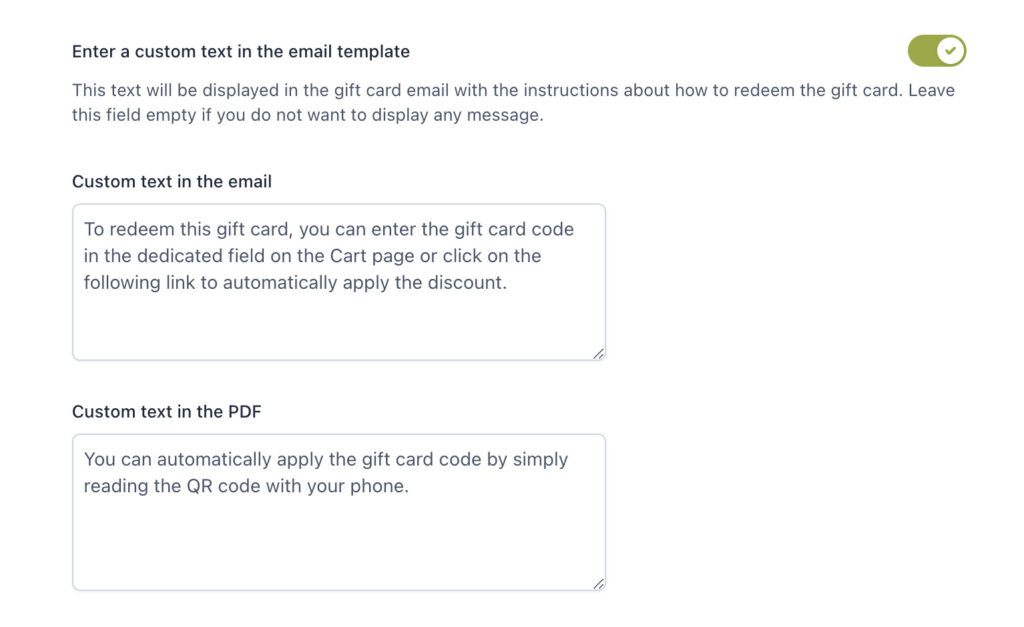
Custom text in email template

Enter a custom text in the email template: this text will be displayed in the gift card email with the instructions about how to redeem the gift card. Leave this field empty if you do not want to display any message. You will be able to select a text for the emails and a different text for the PDF attachment.

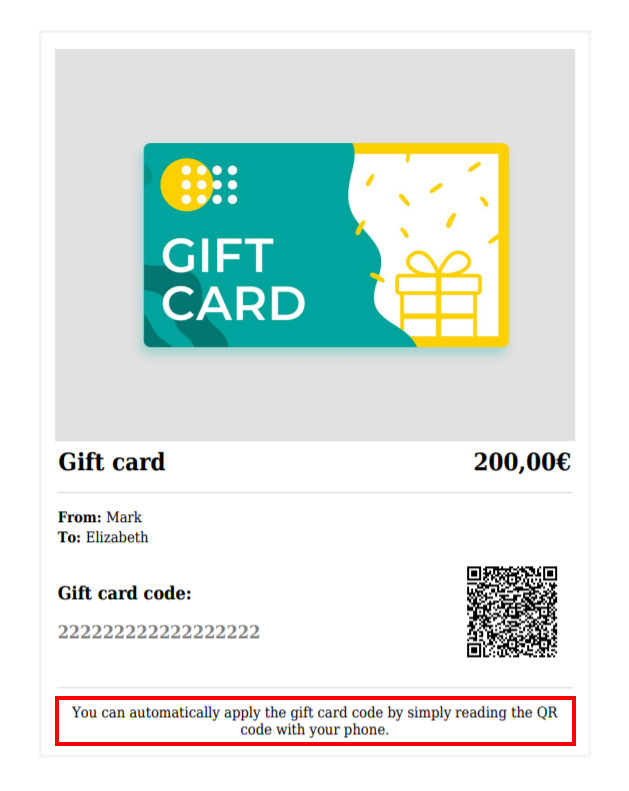
Custom text in the PDF: enter here the custom text for the PDF file attachment.

Custom text in the email: enter here the custom text to add to the email.

Custom text in the PDF: enter here the custom text for the PDF file attachment.

message in email
Custom text in EMAIL
message in PDF
Custom text in PDF

More settings for the email…

Email options and template customization 2

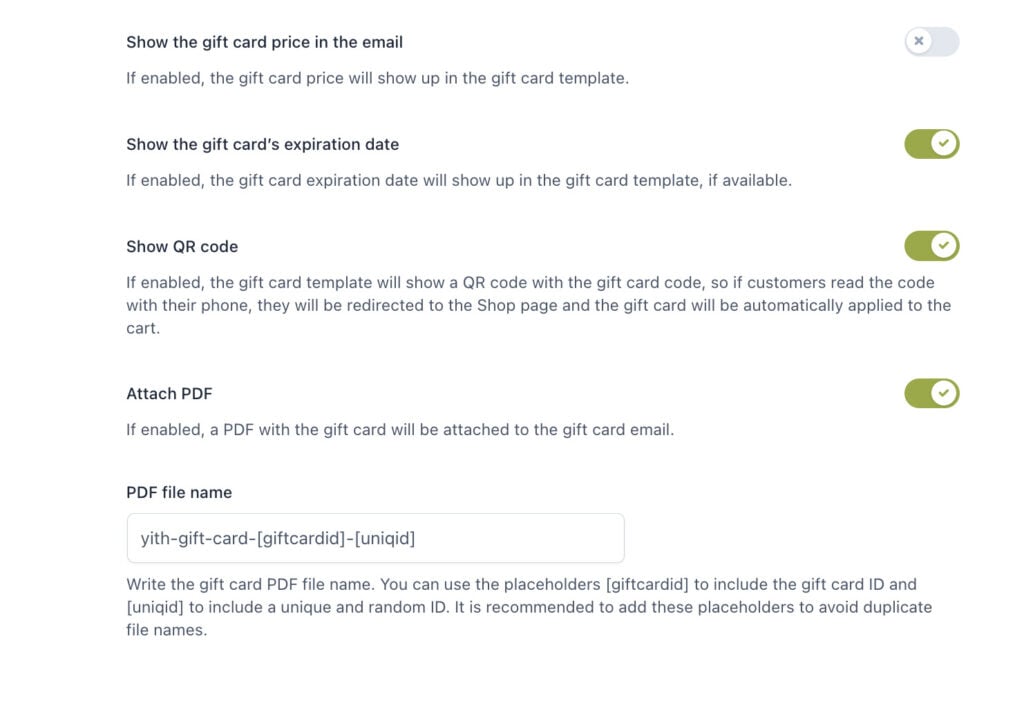
Show the gift card price in the email: if enabled, the gift card price will show up in the gift card template.

Show the gift card’s expiration date: if enabled and if available, the gift card expiration date will show up in the gift card template.

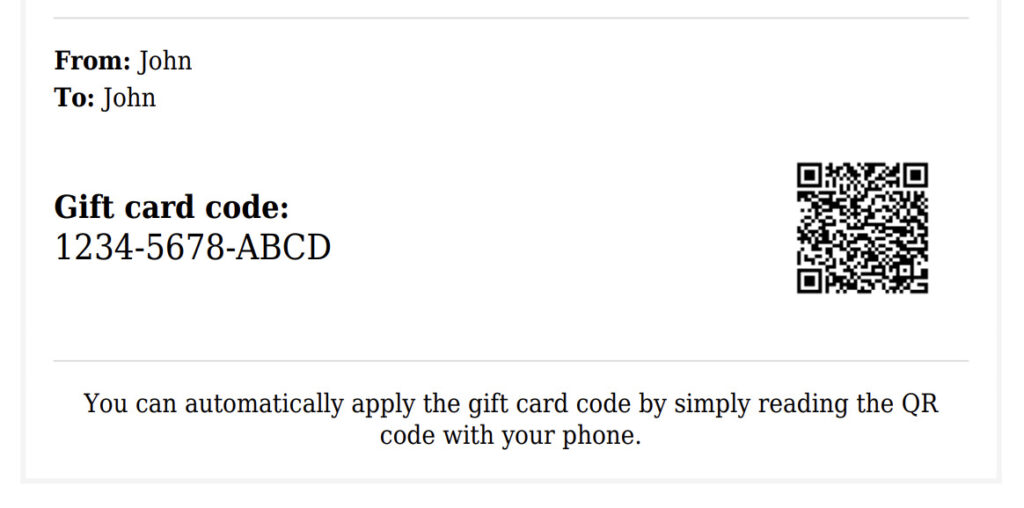
Show QR code: if enabled the gift card template will show a QR code with the gift card code, so if customers read the code with their phone, they will be redirected to the Shop page and the gift card will be automatically applied to the cart.

Show gift card QR code

Attach PDF: if enabled, a PDF with the gift card will be attached to the gift card email.

PDF File name: write the gift card PDF file name. You can use the placeholders [giftcardid] to include the gift card ID and [uniqueid] to include a unique and random ID. It is recommended to add these placeholders to avoid duplicate file names.

To customize the text of these email templates, please, refer to the Email settings page.

Cart & Checkout settings

From the tab Cart & checkout you will be able to configure all the options related to the use of a gift card on Cart and Checkout pages.

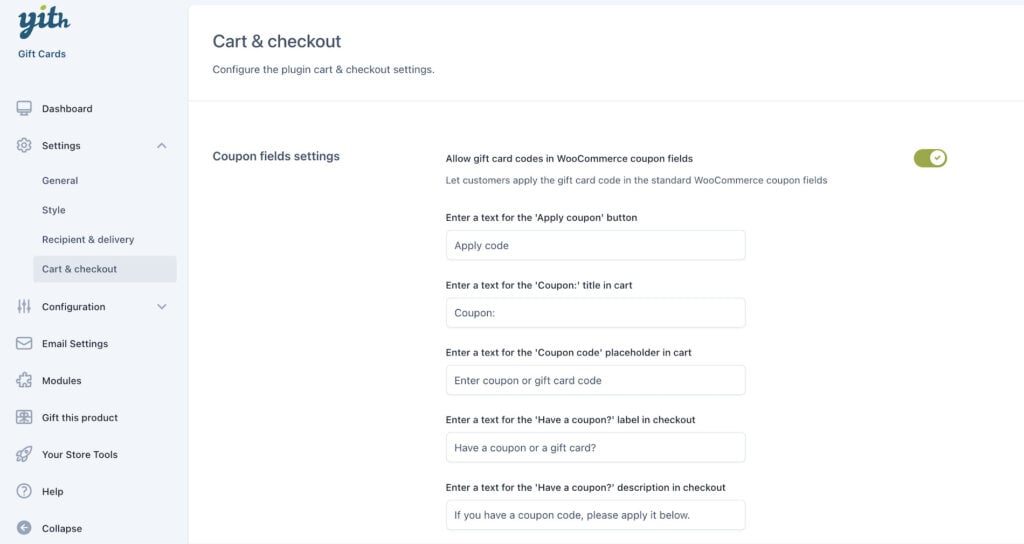
Coupon fields settings

The first section includes the option Allow gift card codes in WooCommerce coupon fields through which you can decide to let users use the WooCommerce coupon field to insert their gift card code. If enabled, another set of options will show:

Coupon fields settings
  • Enter a text for the ‘Apply coupon’ button: here, you can add a custom text to show for the “Apply coupon” button;
  • Enter a text for the ‘Coupon:’ title in cart: you can add a custom text to show for the “Coupon” title on the Cart page;
  • Enter a text for the ‘Coupon code’ placeholder in cart: you can add a custom text for the placeholder of “Coupon code” on the Cart page;
  • Enter a text for the ‘Have a coupon?’ label in checkout: you can add a custom text that defines the label of “Have a coupon?” on Checkout page;
  • Enter a text for the ‘Have a coupon?’ description in checkout: you can add a custom text for the description of “Have a coupon” on the Checkout page.

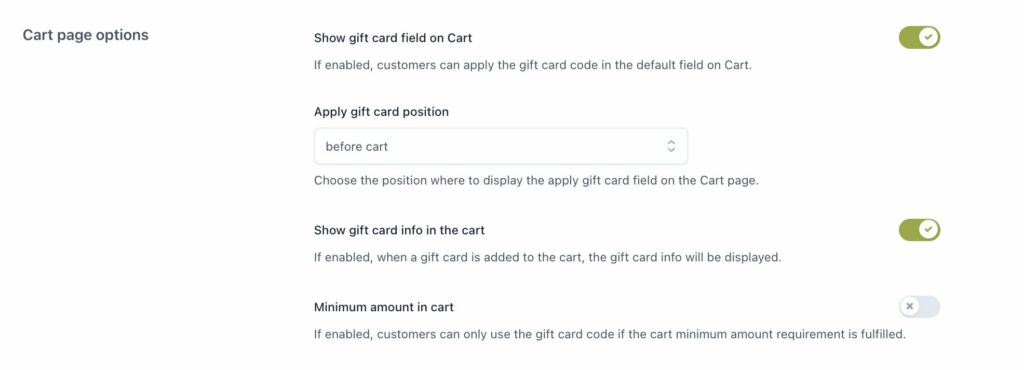
Cart page options

The second section includes a set of options that apply to the Cart page:

Cart page options
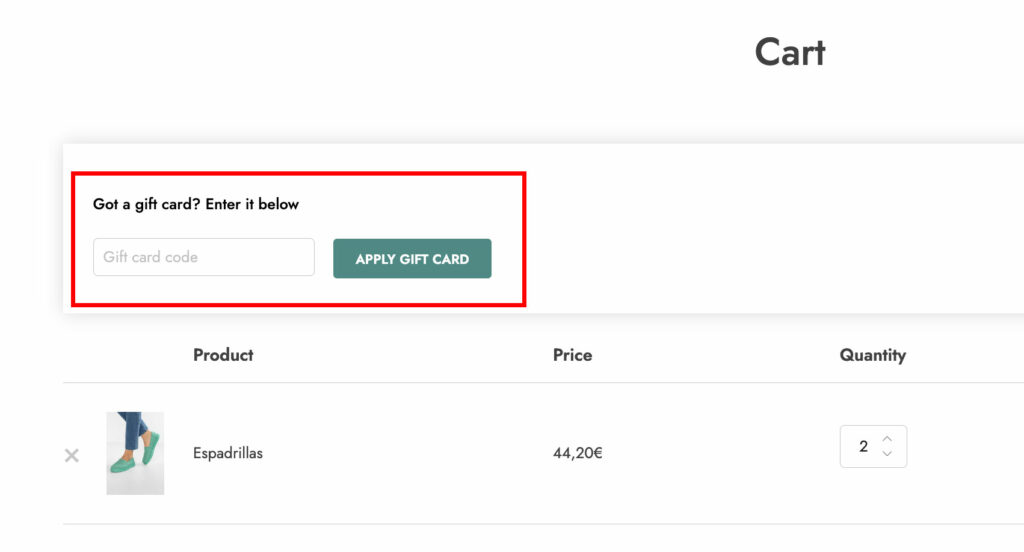
  • Show gift card field on Cart: enable this option if you want your users to apply the gift card code in the default field on Cart page;
    • Apply gift card position: choose the position where you want to show the field (before or after cart);
  • Show gift card info in the cart: enable this option to show the gift card info when it is added to the cart;
  • Minimum amount in cart: enable if you want your users to be able to use the gift card code only if the cart minimum amount is reached;

Checkout page options

In this section, you can choose whether to show the gift card field on the Checkout page:

Checkout page options
  • Show gift card field on Checkout: if enabled, you can decide the position to show the gift card field in the options:
    • Apply gift card position: select before or after checkout form.

Gift card section design

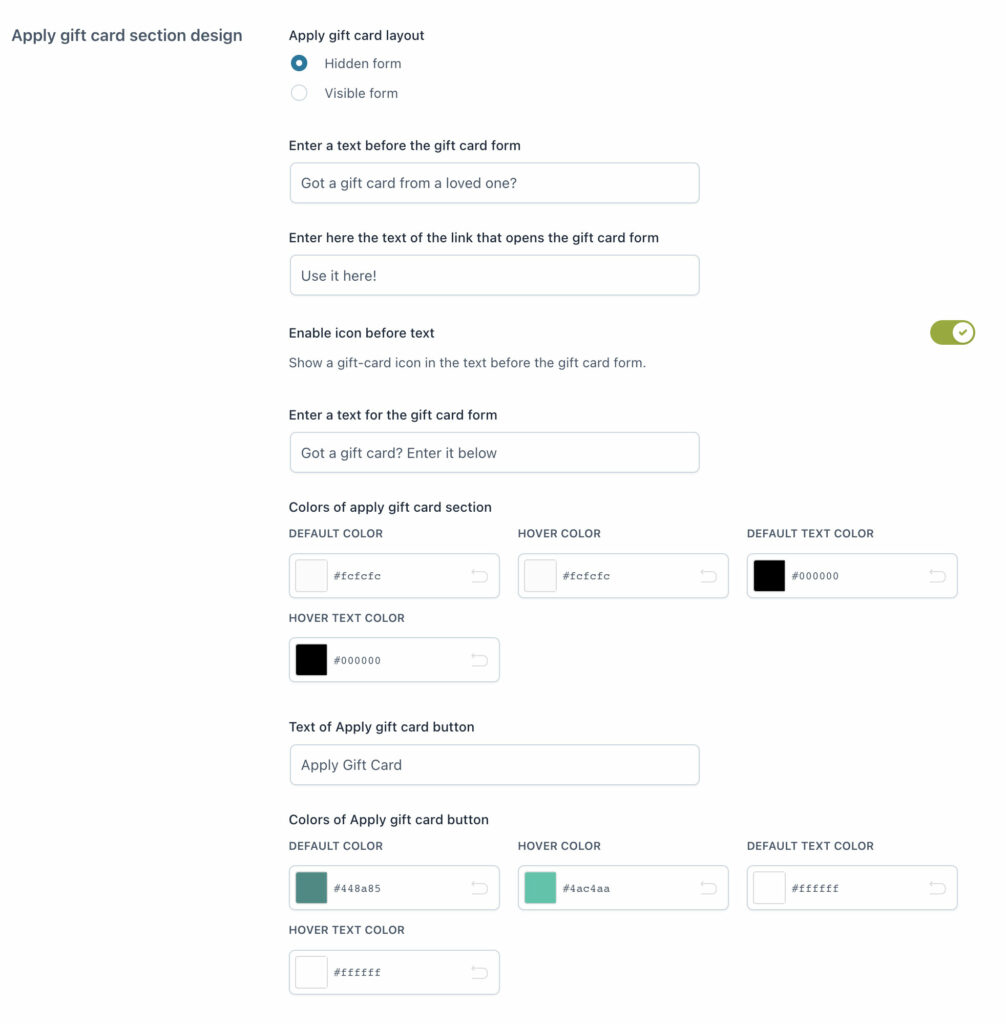
The last section includes options to configure the style of the section “Apply gift card”.

Apply gift card section design

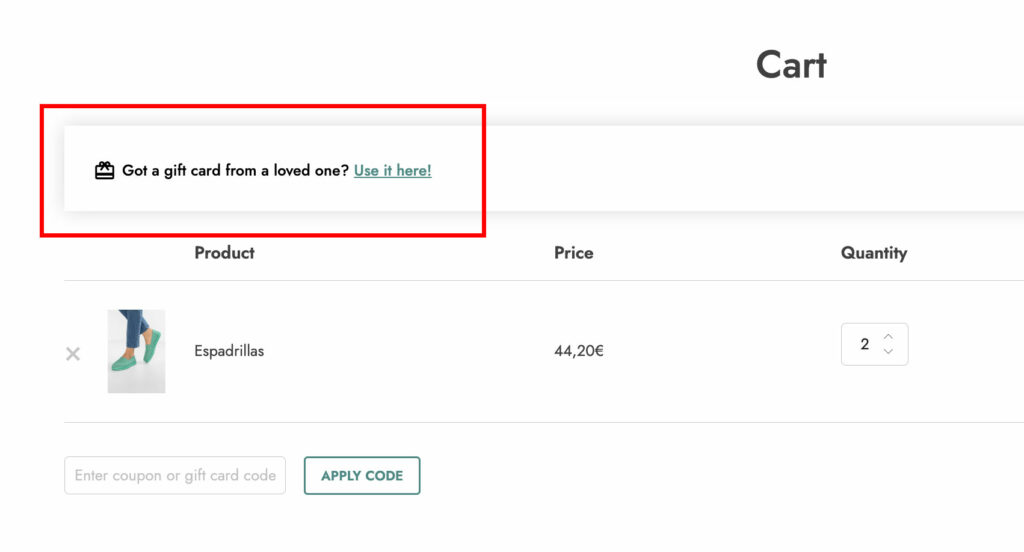
Apply gift card layout: first of all you can choose between the hidden form (users can click on the “Use it here” link to open it) or the visible form.

Hidden form with “User it here!” link to open the form
Visible form

If you choose the hidden form a few more options appear:

  • Enter a text before the gift card form: insert the text to show for the gift card form;
  • Enter here the text of the link that opens the gift card form: insert the text to show for the link of the gift card form;
  • Enable icon before text: enable if you want to show an icon before the gift card form;

Then, the other options apply to both layouts:

  • Enter a text for the gift card form: insert the text for the gift card form;
  • Colors of apply gift card section: choose the colors for the “Apply gift card” section;
  • Text of Apply gift card button: insert the text for the button “Apply gift card”;
  • Colors of Apply gift card button: choose the colors for the button “Apply gift card”.

Configuration – Gift card categories

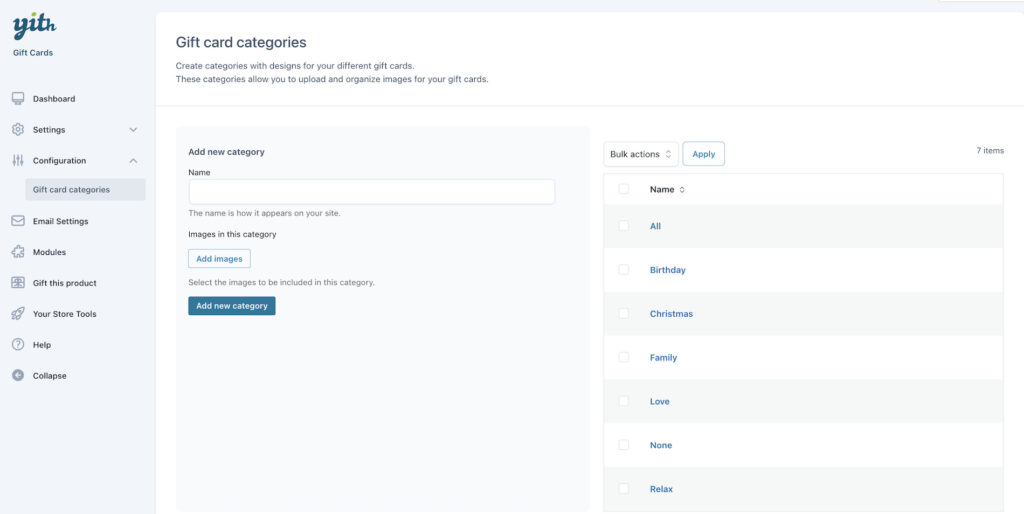
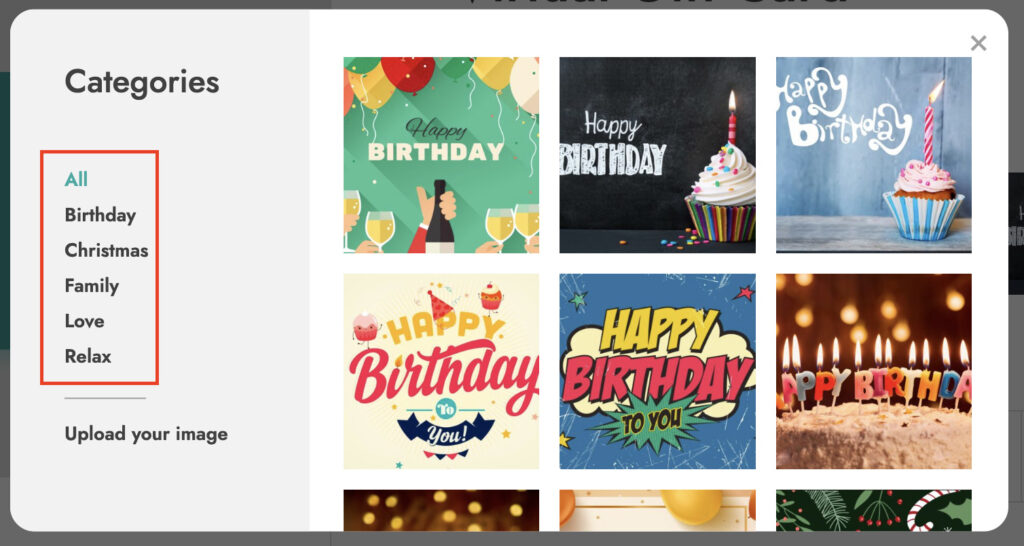
From the Configuration tab > Gift card categories, you will be able to create unlimited categories for your gift card images. This allows you to have a gallery on the gift card product page, so your users can choose among a list of preset images sorted by category, e.g. Christmas, Birthday, Love, Family and so on.

The image gallery option is supported on both virtual and physical gift cards.

Before starting setting up your gift card image categories, you have to Enable the gallery option from Settings > Style > Gift card page.

Enable the gallery

Then, from Configuration > Gift card categories, you can start setting up your images.

Gift card categories

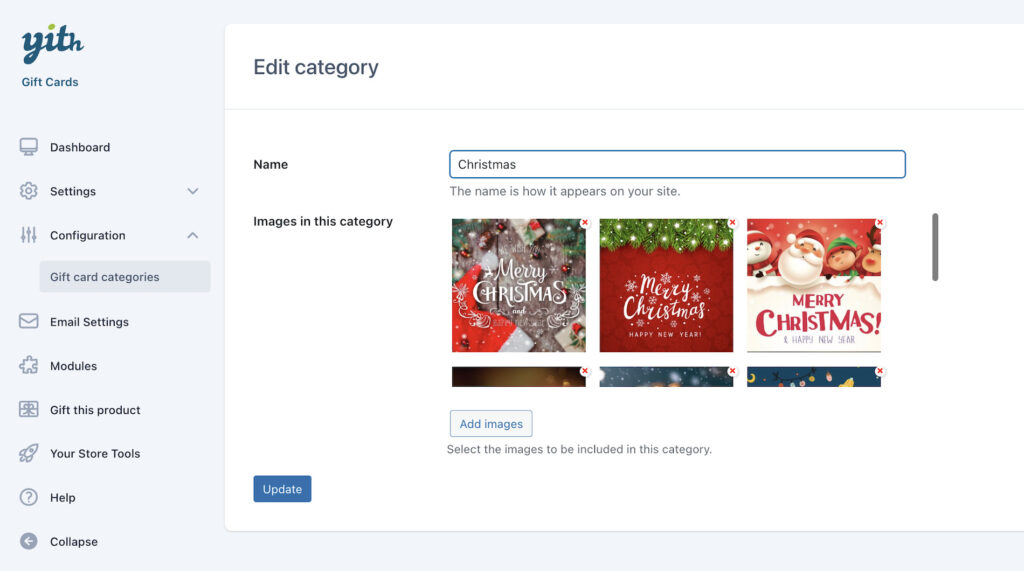
Enter a name and then click on “Add images” to start uploading your images or select them from the Media gallery.

Finally click on Add new category and it’s done, it appears now in the list on the right.

If you want to edit the category you can simply click on it and you will be able to edit the name and the images in it.

Edit category

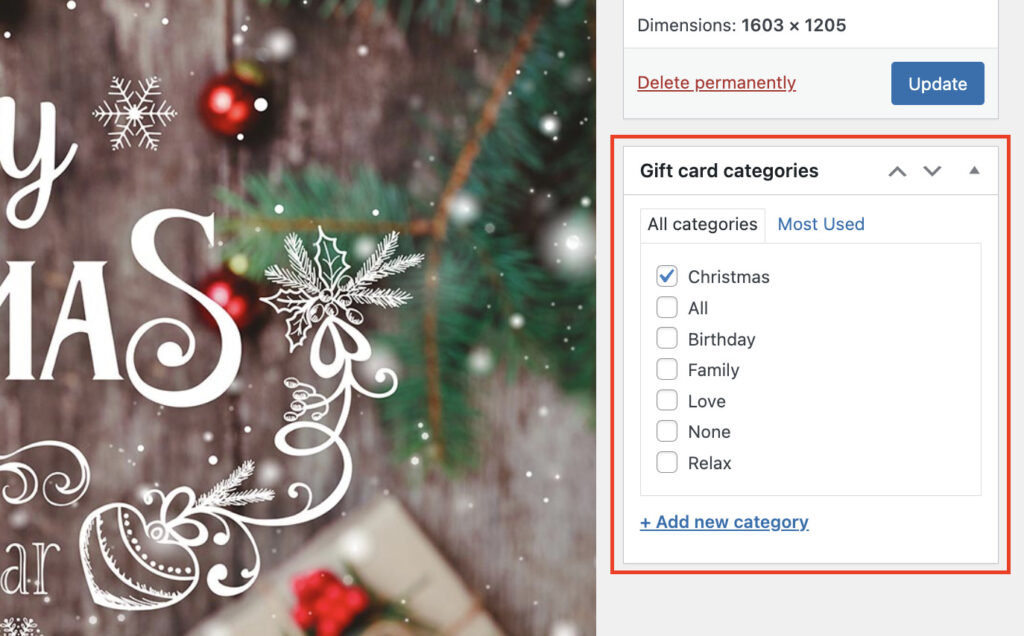
If you want to, you can also update the gift card category from the Media gallery, from the box at the bottom. More categories are supported too, you can separate them with commas.

Gift card category from media options

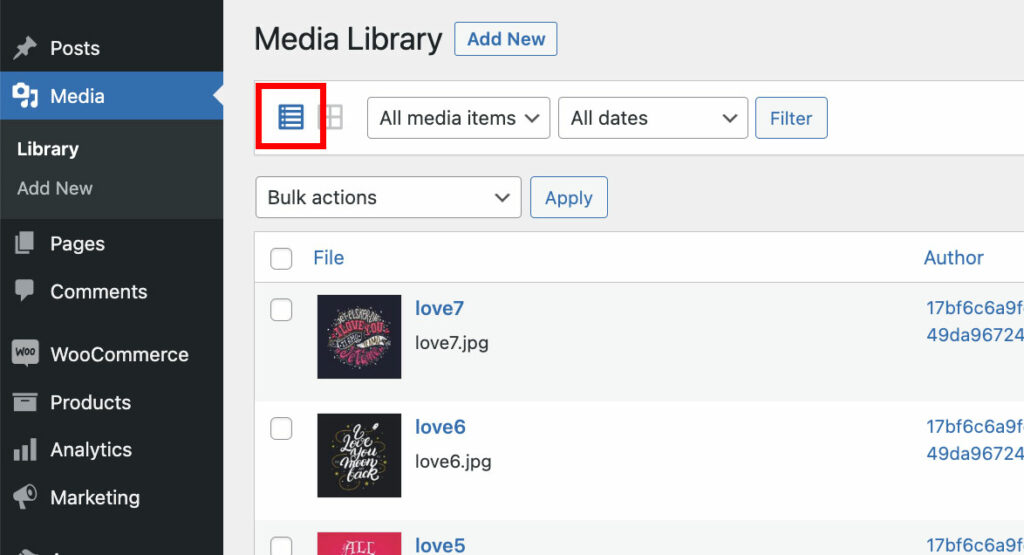
Alternatively, for an easier management, you can also view the Media as list, click on the image and check category boxes.

List view

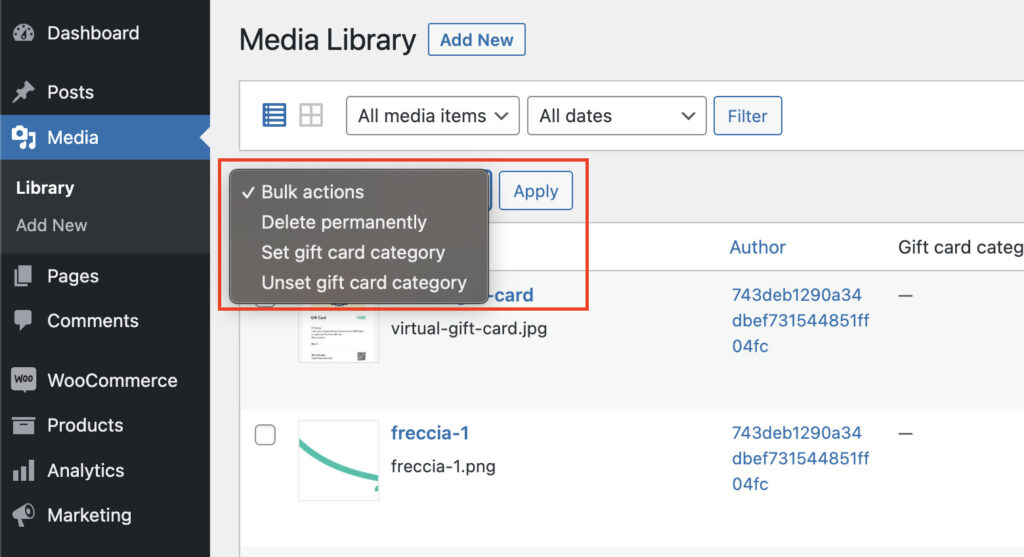
You can also bulk edit the categories from the Media gallery thanks to the action available in the Bulk actions.

Bulk actions

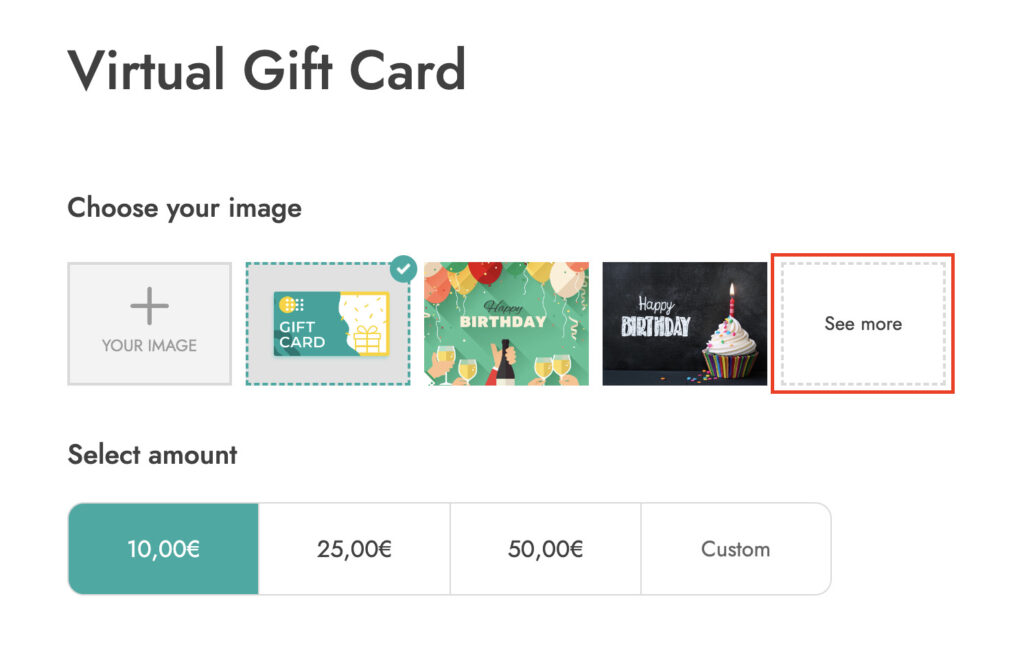
Now users can select a template in the “Choose your image” section from the gift card product page when you click on the “See more” button.

See more images
Gift card categories on frontend

Email settings

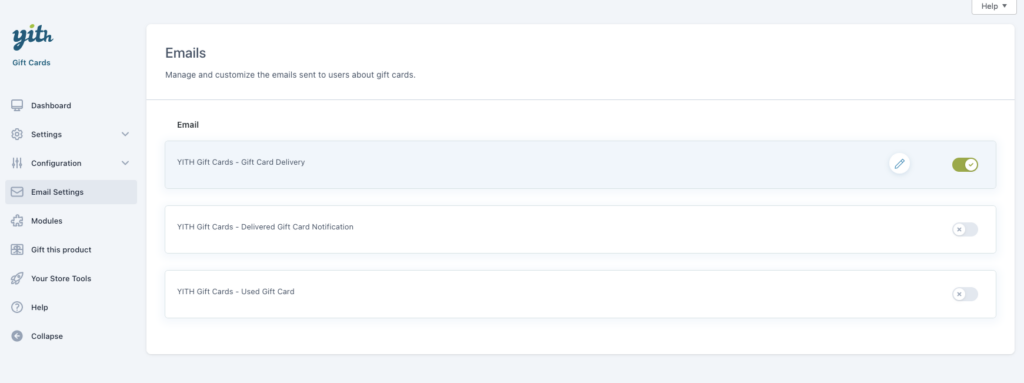
From this section, you can enable/disable and customize the emails sent to customers and admin related to gift cards.

Email settings

Just click on one of them to edit the content.

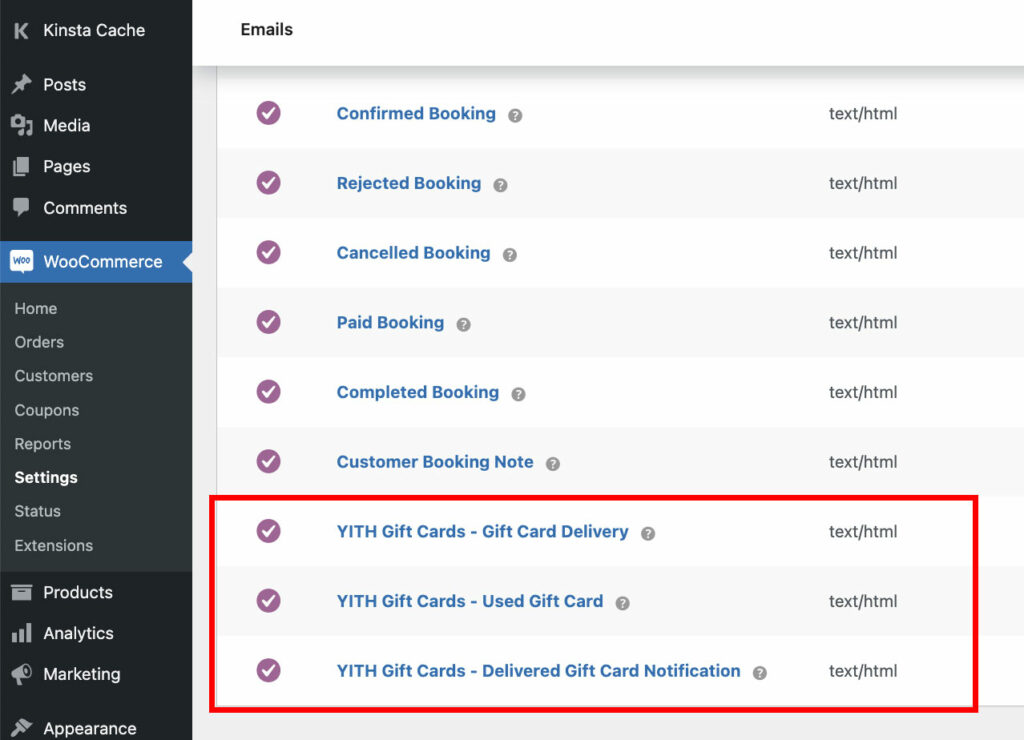
This is the same content that you can also update from WooCommerce > Settings > Emails: every change to one email will be synced between the two sections.

WooCommerce emails

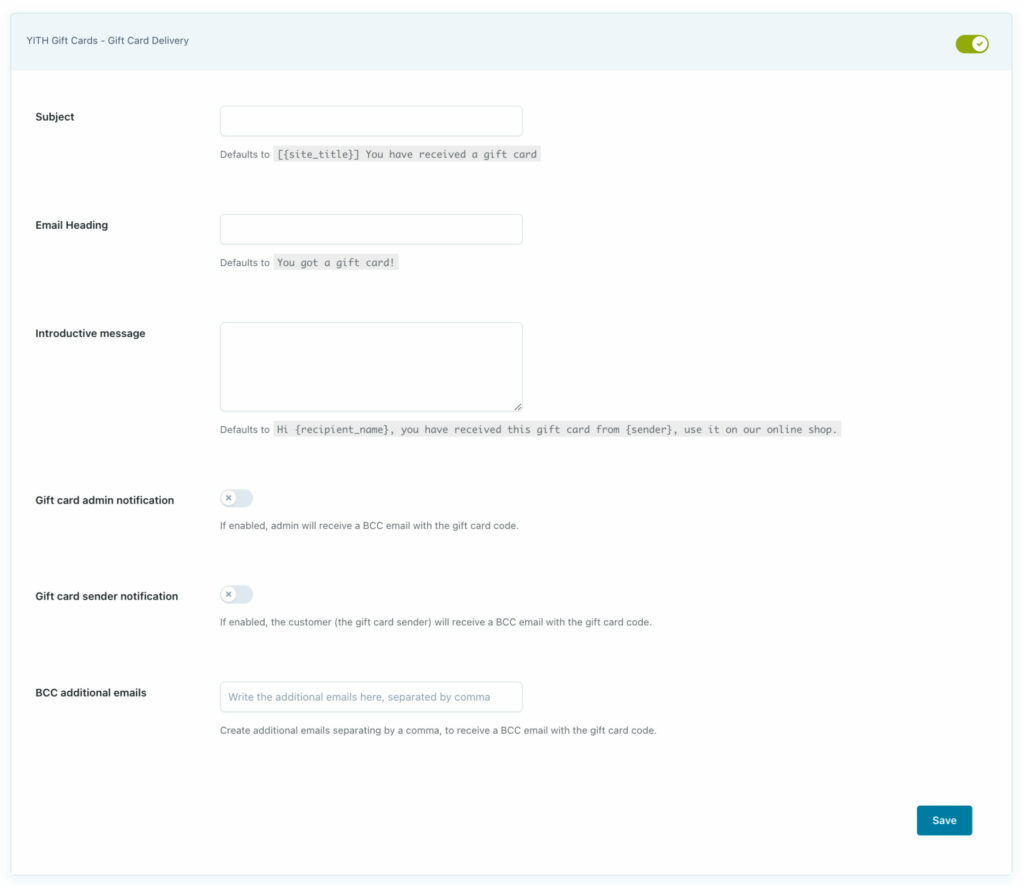
Gift card delivery email

This is the email sent to the recipients of the purchased gift card. Here, you can set the following options:

Gift card delivery email
  • Subject: enter the email subject;
  • Email heading: enter the text for the email heading
  • Introductive message: enter the text for the email body;
  • Gift card admin notification: enable if you want the admin to receive a copy of the email;
  • Gift card sender notification: enable if you want the sender to receive a copy of the email;
  • BCC additional emails: enter other email addresses, comma separated, that will receive a copy of the email.

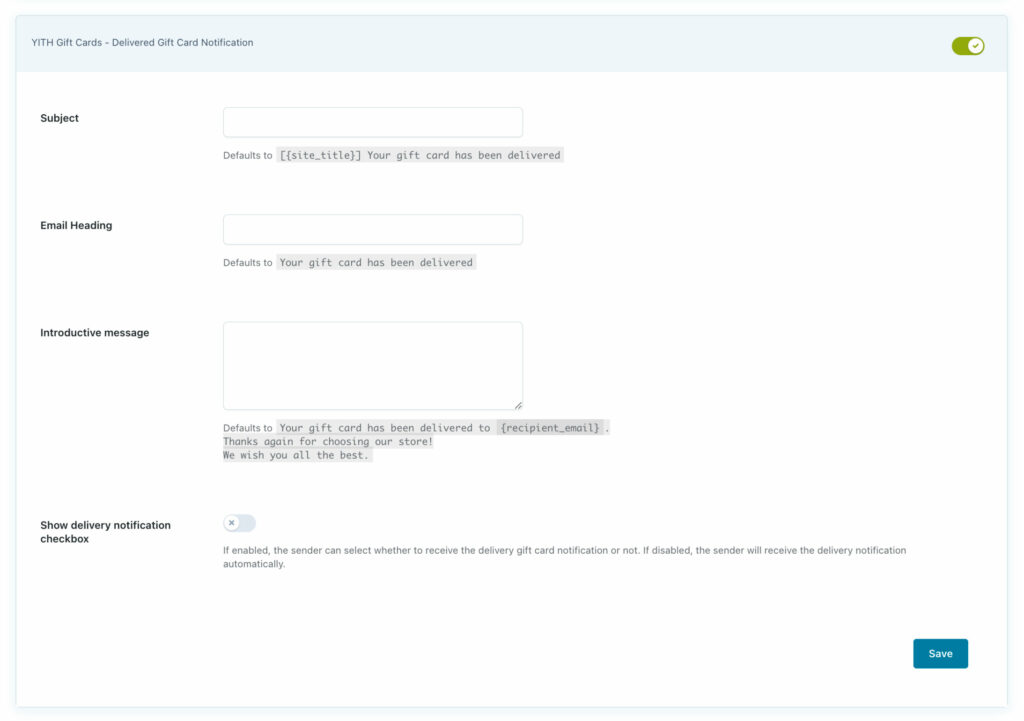
Delivered gift card email notification

This is the email sent to the customer (the gift card sender) when the gift card has been delivered. Here, you can set the following options:

Delivered gift card notification
  • Subject: enter the email subject;
  • Email heading: enter the text for the email heading
  • Introductive message: enter the text for the email body;
  • Show delivery notification checkbox: enable if you want to show a checkbox to let customers choose whether to receive the email notification or not. If disabled, the email will be automatically sent to the customers.

Used gift card email

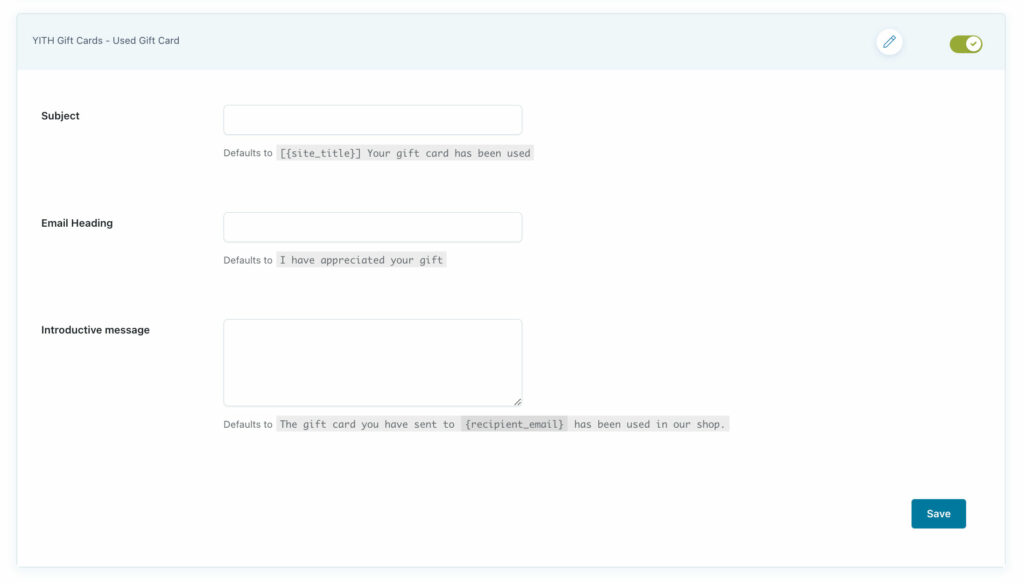
This is the email sent to the customer (the gift card sender) when the gift card has been used.

Used gift card email

Here, you can set the following options:

  • Subject: enter the email subject;
  • Email heading: enter the text for the email heading
  • Introductive message: enter the text for the email body.

For more customization options on the gift card emails, please, refer to this page.

How to create a “virtual” gift card product

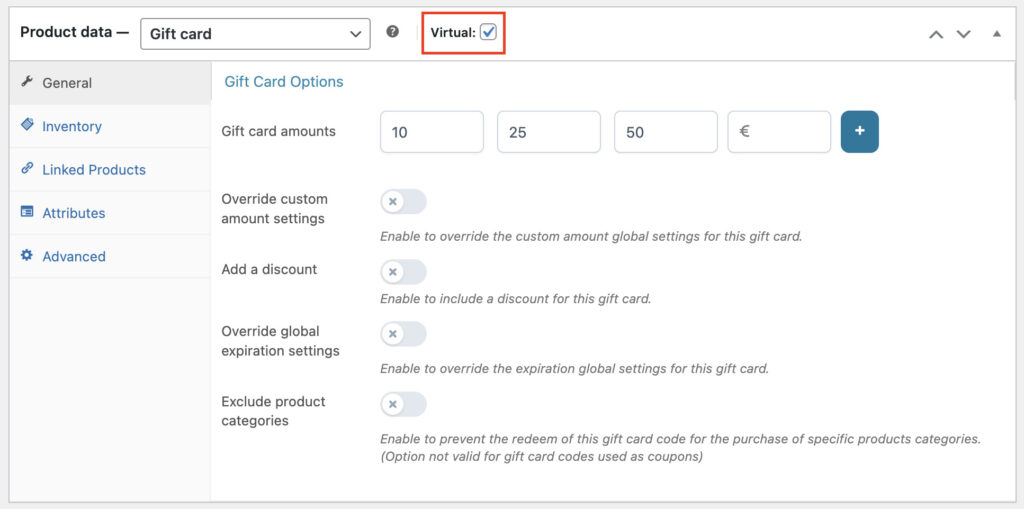
For each gift card type you want to sell, you’ll need to create a new “gift card” product type. Add a new product and choose “gift card” type.

To create a virtual gift card, you will have to select the checkbox “Virtual“.

Set "virtual" gift card option

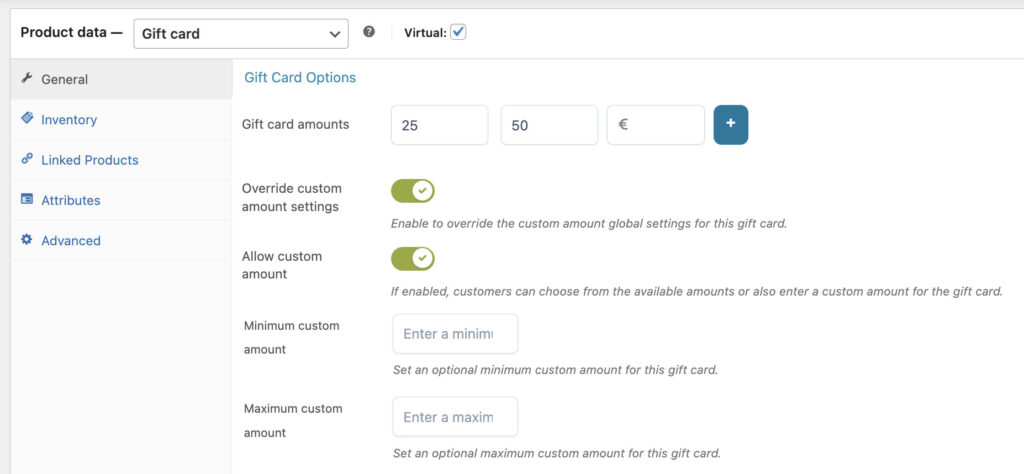
The price of the gift card can either be a fixed amount or have variable amounts (including the manual amount option).

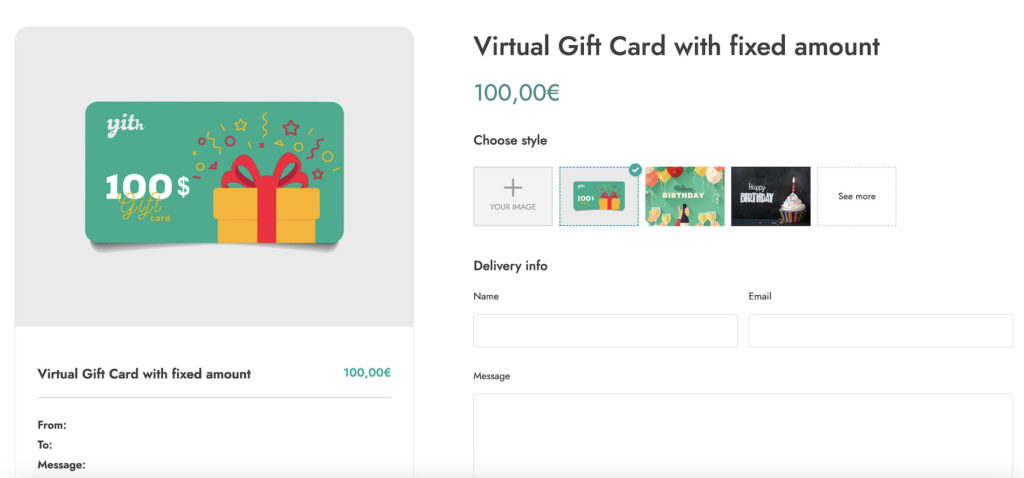
Fixed amount

For a fixed amount you decide the amount of the gift card. During the purchase, the customer will only see this price, there are no other options.

Virtual gift card with fixed amounts
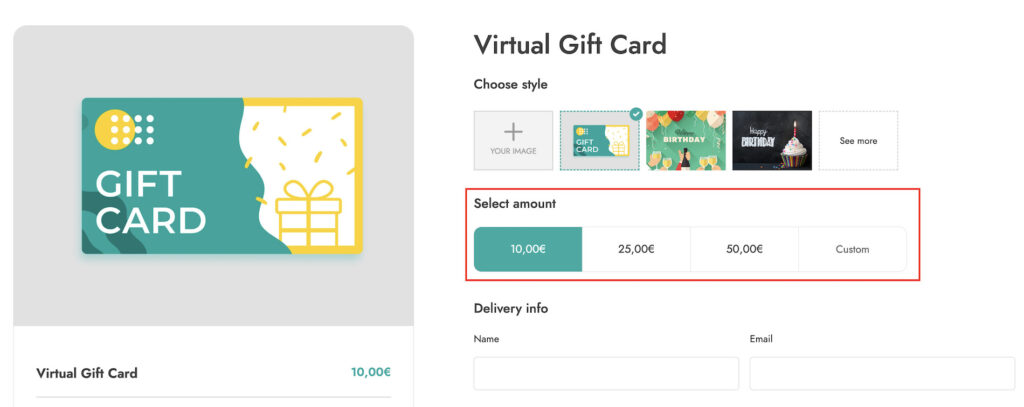
Variable amount

In case of a variable amount, the customer has the possibility to choose among pre-set amounts or manually insert the amount of the gift card.

Virtual gift card with different amounts

To make this possible, you must enable the option “Enable/disable custom amount” in the plugin general settings.

You can also decide the minimal amount the customer needs to add to be able to purchase the gift card.

Virtual gift card options

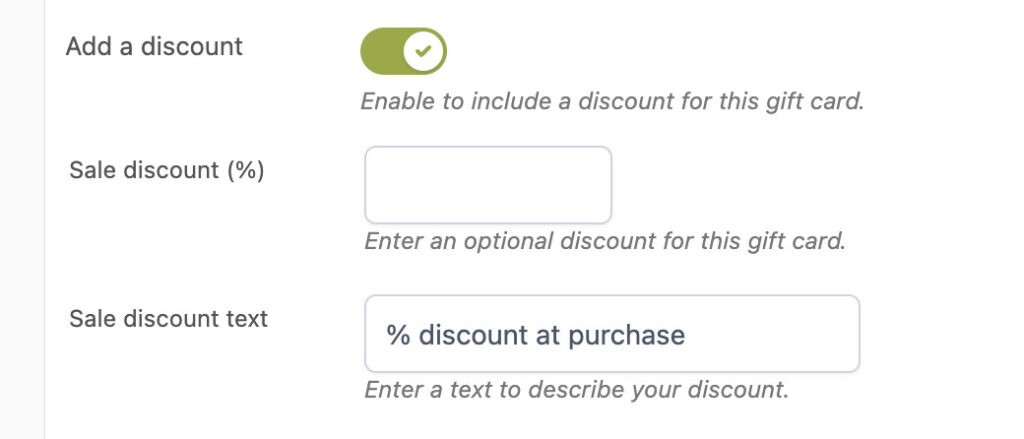
If you want to sell the gift card at a discounted price, enable the option Add a discount. Enter the discount percentage value and, additionally, a text.

Add a discount

If you have set a global expiration for your gift cards, you can override it by enabling the option Override global expiration settings.

Override global expiration settings

Finally, you can also exclude one or more product categories from gift card use. By enabling the option Exclude product categories users won’t be able to redeem the gift card code on the product categories you have selected.

Exclude product categories