YITH WooCommerce Points and Rewards allows your shop users to collect points and use them as a discount on new orders. The discount amount can vary based on the products, categories, user roles, and levels that you can configure through the plugin settings.
Please note: for the plugin to work properly, it is essential that the WooCommerce couponsmanagement option is enabled (WooCommerce > Settings > Enable Coupons).
We recommend following all the steps in this guide to configure the plugin based on your needs.
From the section Customers points, youcan monitor and manage the points collected so far by your customers. In the table, you’ll see the list of users, the number of points they earned, their points balance and the rank.
Bulk actions and filters
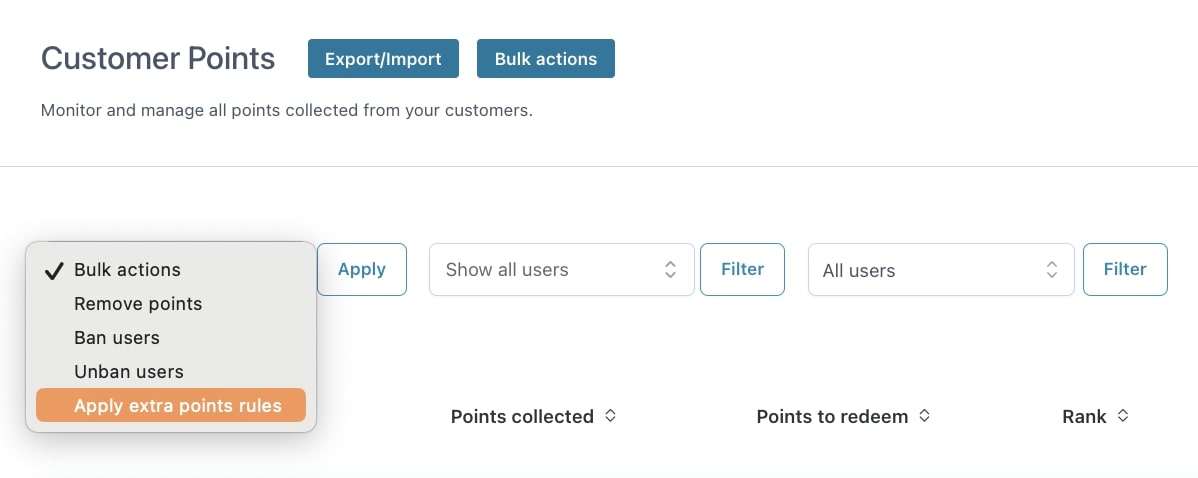
Just above the list, you will be able to see three dropdowns for the following actions:
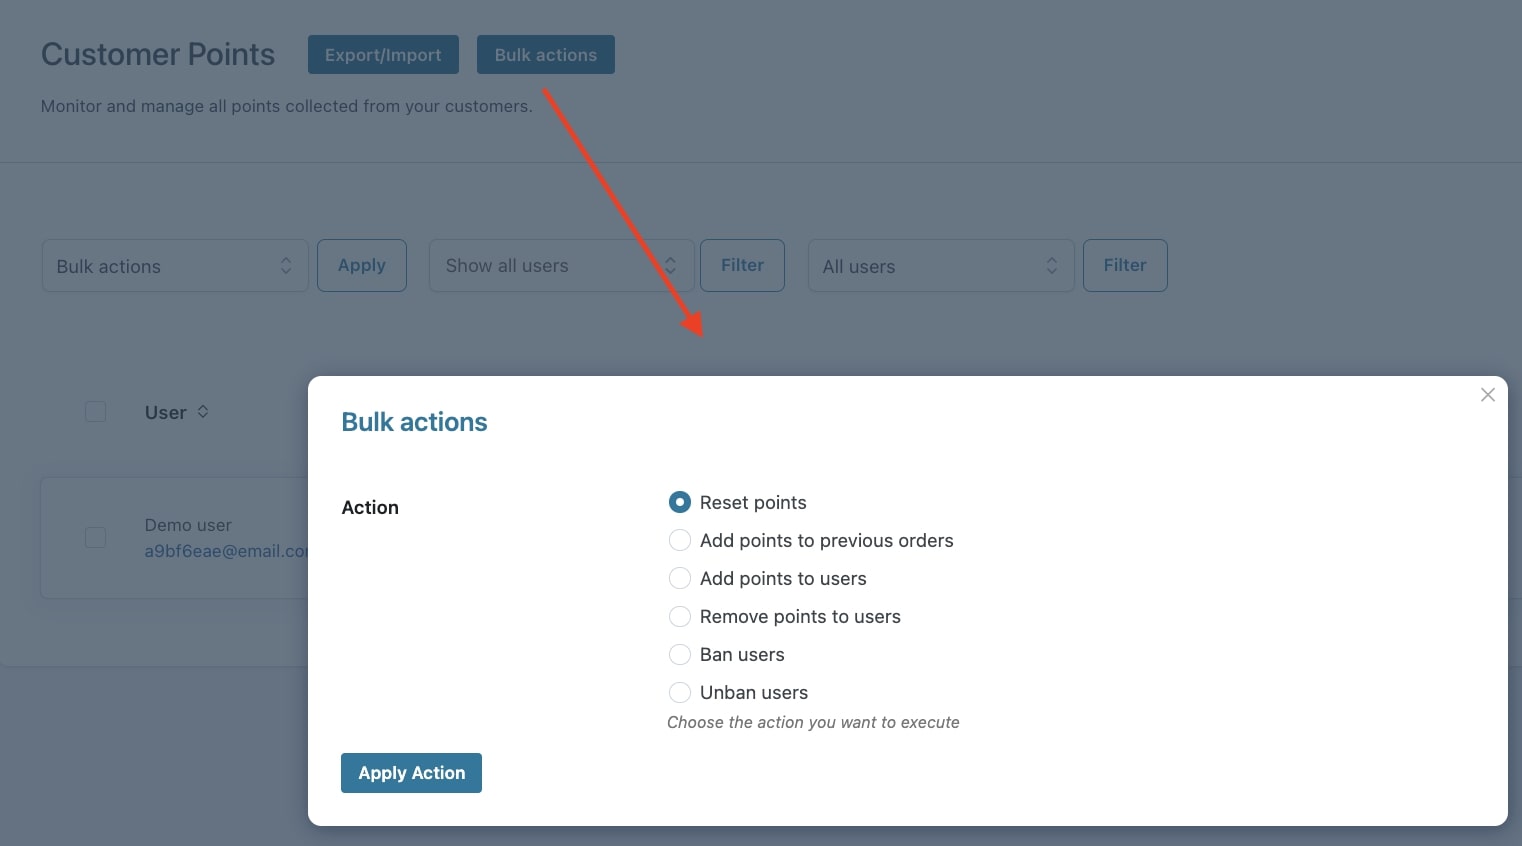
You can apply Bulk actions to one or more customers in this list:
Available options are:
Remove points
Ban users
Unban users
Apply extra point rules Alternatively, you can apply these and more actions from the Bulk Actions tab. Please, refer to this page for more details.
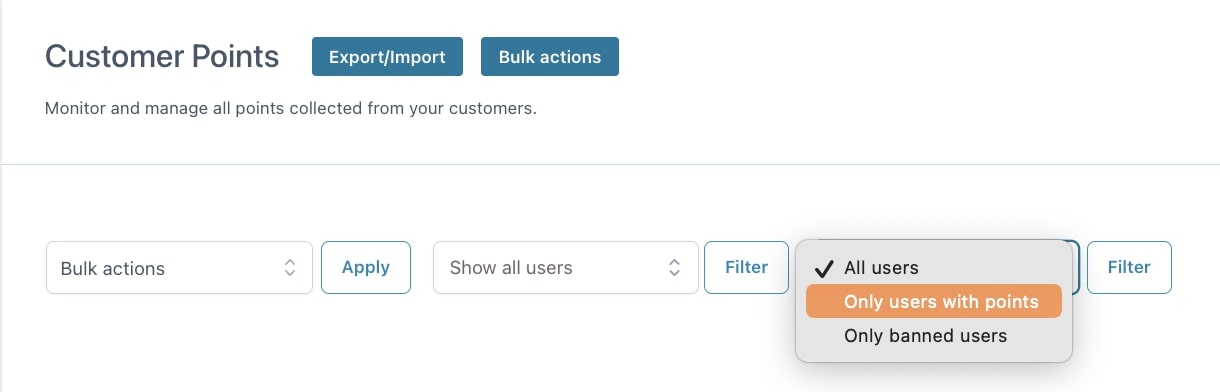
You can filter customers by name.
You can filter users and show whether to show all users, only users who have collected points or only banned users.
Moreover, the list can be sorted by User, Points collected, Points to redeem, and Rank. So for example, you can choose to show first the ones with the highest number of points.
For every user in the list, on mouseover, the plugin will show three buttons: View history, Remove Points and Ban User. Yet, these and other actions can be also applied after clicking on View history from the customer’s detailed view. Let’s see what’s available in the View history details.
View history
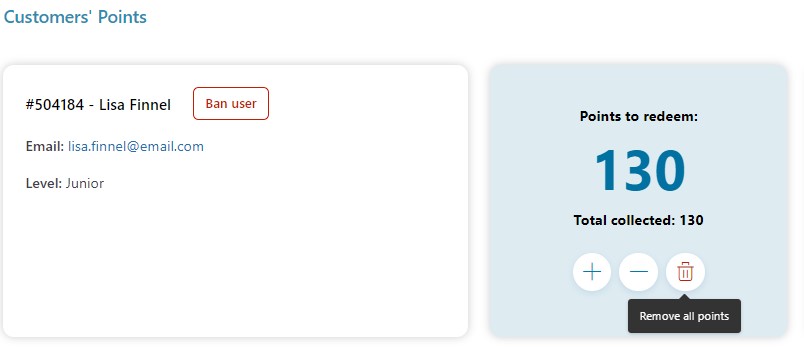
Ban user
In the first box on the left, you will be able to see the customer’s name, email, levels achieved (if any) and the Ban user button that allows you to make exclude the user from the points programme, so he/she will no longer be able to earn or redeem points.
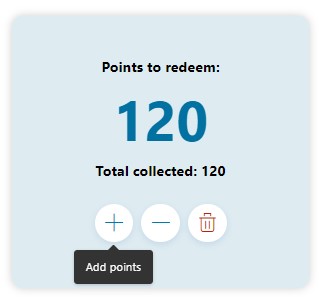
Update points
In the second box on the right, you will be able to see the customer’s total points available and update them by clicking on the + or - signs, or to remove all of them in one go by clicking on the trash icon.
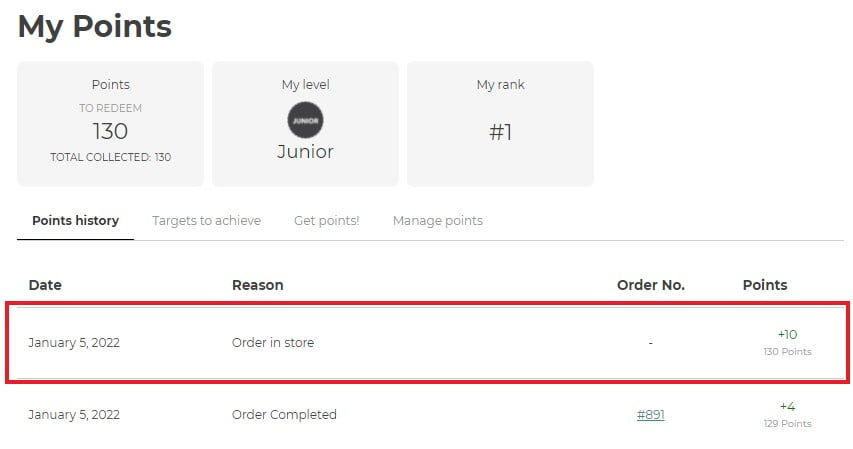
You can also add a description, so you can easily remember why those points have been added or removed. It will appear in the history below, together with all other actions on points.
The same description will be visible to the customer on the frontend, on My Account page in the Reason field (make sure the option Show points on My Account is enabled).
You will also be able to remove all points in one go, by clicking on the Trash icon button.
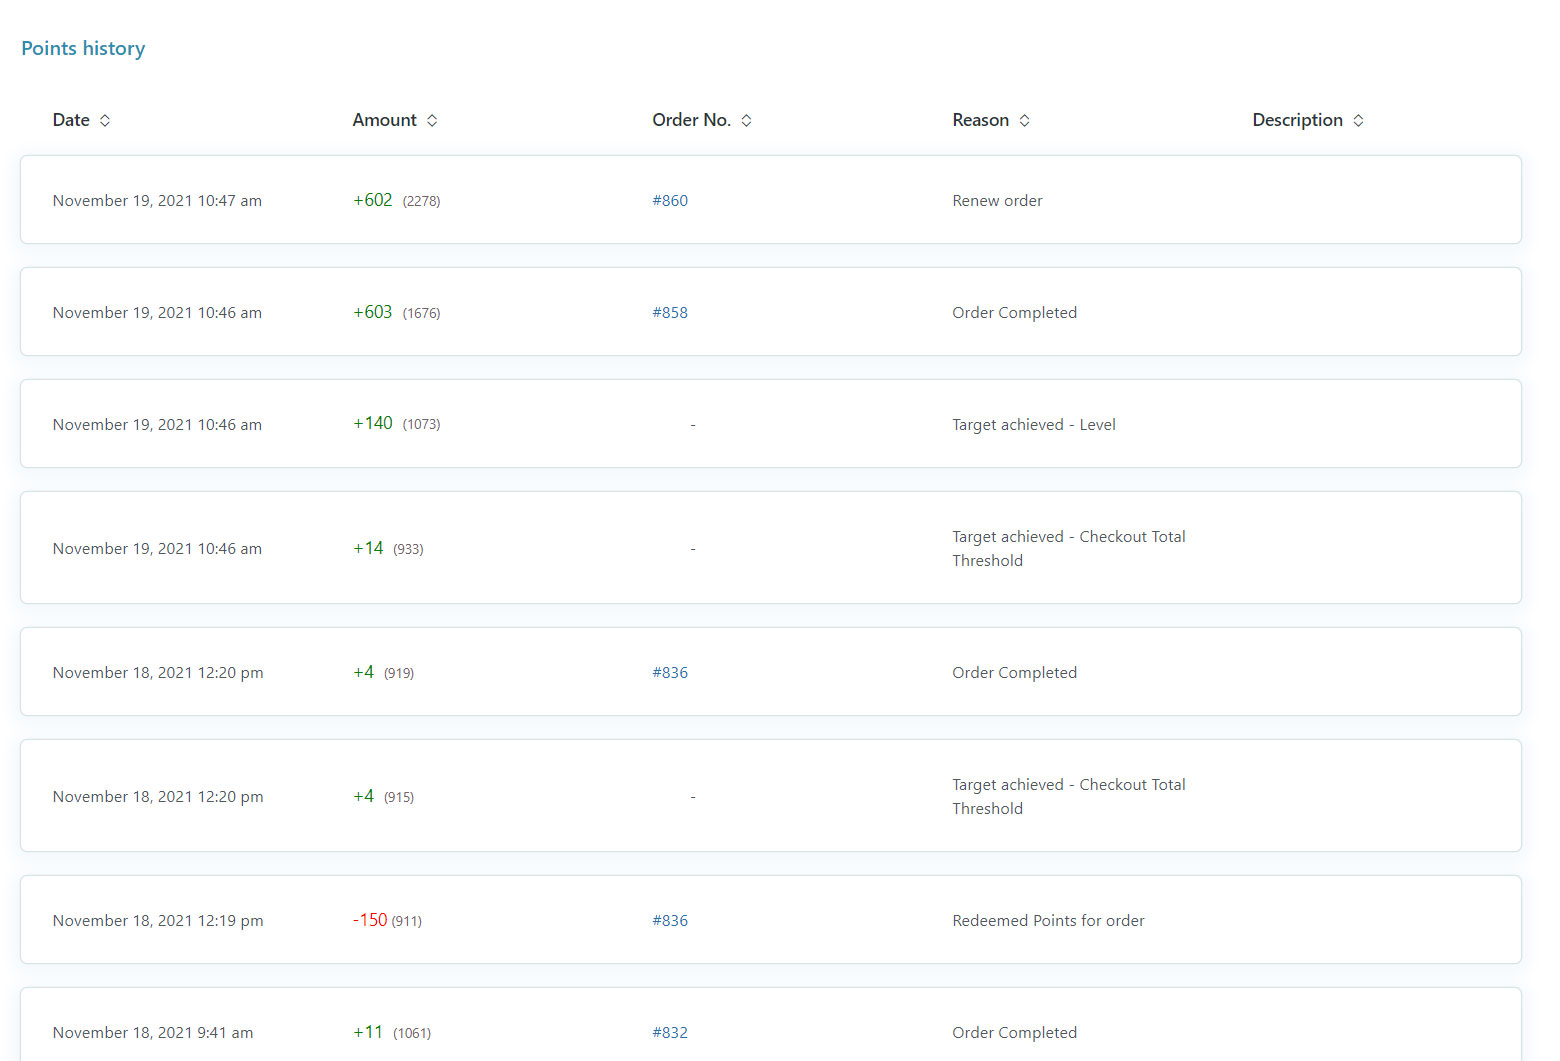
Points History
In the points history, you can find any action that assigned or removed points to the customer (orders completed, extra points, admin actions, levels achieved).
In the table you will find the following info that will work also as filter to sort the table:
Date;
Amount of points and in brackets the total achieved with that action;
Order No: this is filled only when points are earned through a purchase;
Reason: this field will be populated automatically so you can quickly understand what kind of action generated the points;
Description: this is the text entered by the admin when points are edited from the backend.
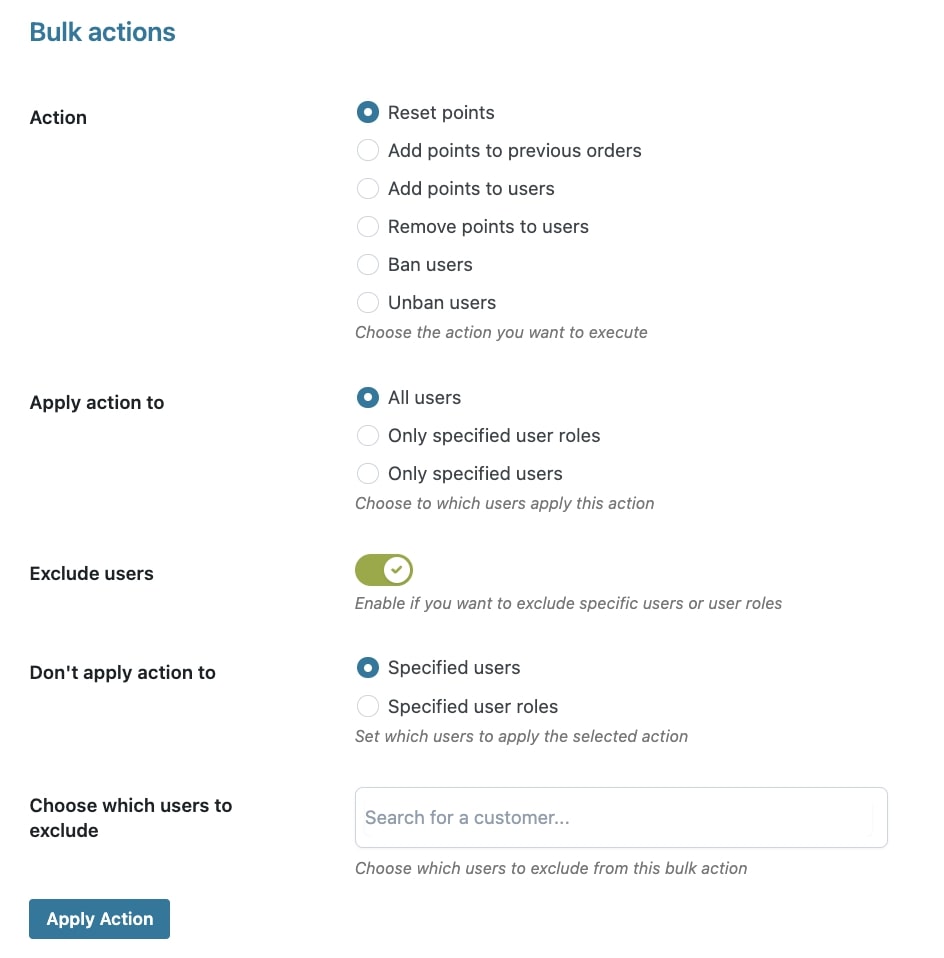
To reset points to your users through a bulk action, select Reset points in Action then choose to which users you want to apply the reset:
All users: this will allow resetting the points to all the users with the possibility to Exclude user rolesor users (both specific customers or certain user roles) that you will define in the fields below.
Only specified users: that you will select in the field Choose which users.
Only specified user roles: that you will select in the field Choose which roles. You can also exclude some specific users.
Please note: this will set all your customers’ points to zero. Please, make sure you want to apply this action as it is irreversible.
Then click on Apply action.
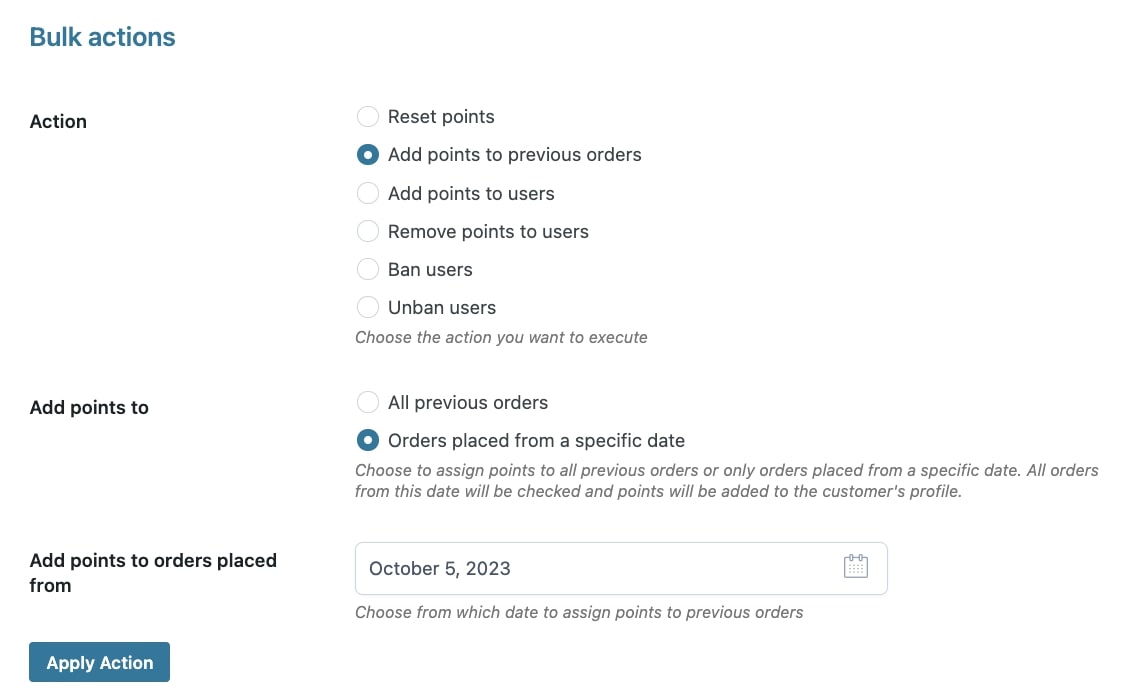
Add points to previous orders
You can generate points for orders placed before activating the plugin. You can apply this action to all previous orders or only to orders placed from a specific date that you can select in the dedicated option.
Then click on Apply action.
Add points to users
To add points to your users through a bulk action, select Add pointsto users then choose to which users you want to apply this action:
All users: this will allow adding the points to all the users with the possibility to Exclude users (both specific customers or certain user roles) that you will define in the related fields > Specified users and Specified user roles.
Only specified user roles: that you will select in the field Choose which roles.
Only specified users: that you will select in the field Choose which users.
Now enter the number of points you want to add in the entry Points and insert a text in Description (optional) to inform your customers about the reason for applying this action.
Then click on Apply action.
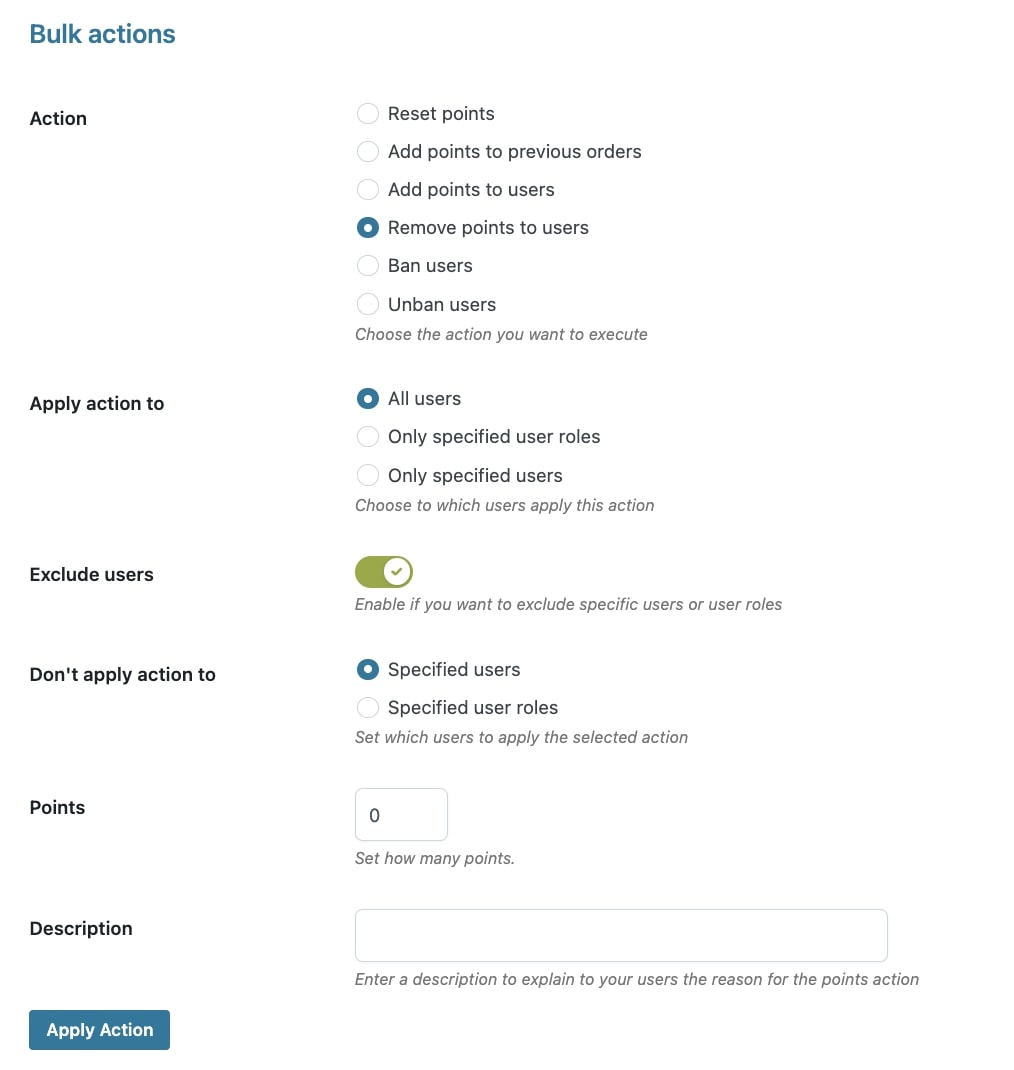
Remove points to users
To remove points to your users through a bulk action, select Remove pointsto users then choose to which users you want to apply this action:
All users: this will allow removing the points to all the users with the possibility to Exclude users (both specific customers or certain user roles) that you will define in the related fields > Specified users and Specified user roles.
Only specified user roles: that you will select in the field Choose which roles. You can also exclude some specific users.
Only specified users: that you will select in the field Choose which users.
Now enter the number of points you want to remove in the entry Points and insert a text in Description (optional) to inform your customers about the reason for applying this action.
Then click on Apply action.
Ban Users
To ban your users through a bulk action, select Ban users in Action then choose to which users you want to apply the ban:
All users: this will allow banning all the customers with the possibility to Exclude users (both specific customers or certain user roles) that you will define in the related fields.
Only specified user roles: that you will select in the field Choose which roles. You can also exclude some specific users.
Only specified users: that you will select in the field Choose which users.
With this action, the users will no longer be able to earn points, neither when they place new orders, nor on specific occurrences (extra points). You will, however, be able to update their points manually.
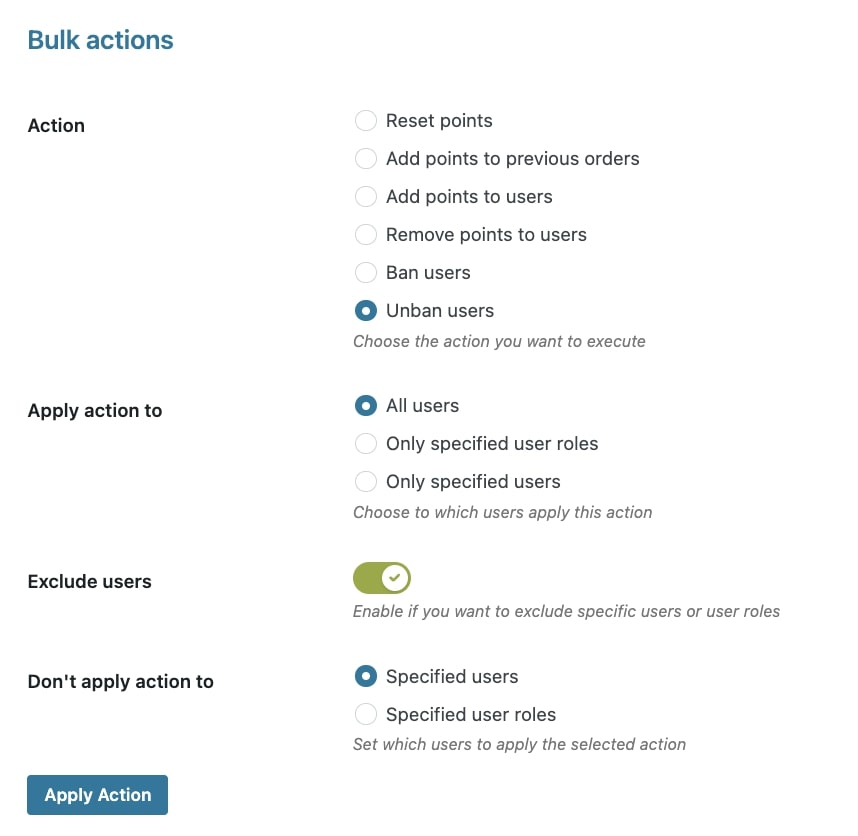
Unban users
To unban your users through a bulk action, select Unban users in Action then choose which users you want to unban:
All users: this will allow unbanning all the customers with the possibility to Exclude users (both specific customers or certain user roles) that you will define in the related fields.
Only specified user roles: that you will select in the field Choose which roles. You can also exclude some specific users.
Only specified users: that you will select in the field Choose which users.
In the Customers’ points main window, you will be able to find also the Export/Import button. From the modal, you can export or import your users’ points through a CSV file.
Export
To export the points into a CSV file, select the option Export points and click on Continue.
Now choose the format of the CSV file:
User ID / Points
User email / Points
and the delimiter you want to use (e.g. , / ;) then click on “Submit” to start the process.
Import
To import the points into a CSV file, select the option Import points and click on Continue.
Now choose the format of the CSV file:
User ID / Points
User email / Points
Choose which action you want to apply when importing the data:
Add points to the current balance
Override points
Choose the delimiter you want to use (e.g. , / ; )
Finally, upload the CSV file you want to import then click on “Submit” to start the process.
In the section Points options, you will find multiple sub-sections to configure all the options and rules related to how to generate points through orders, extra points, levels and banners.
Let’s start with the first sub-section, the Points assignments, where you can configure the global options. Let’s check all the available options.
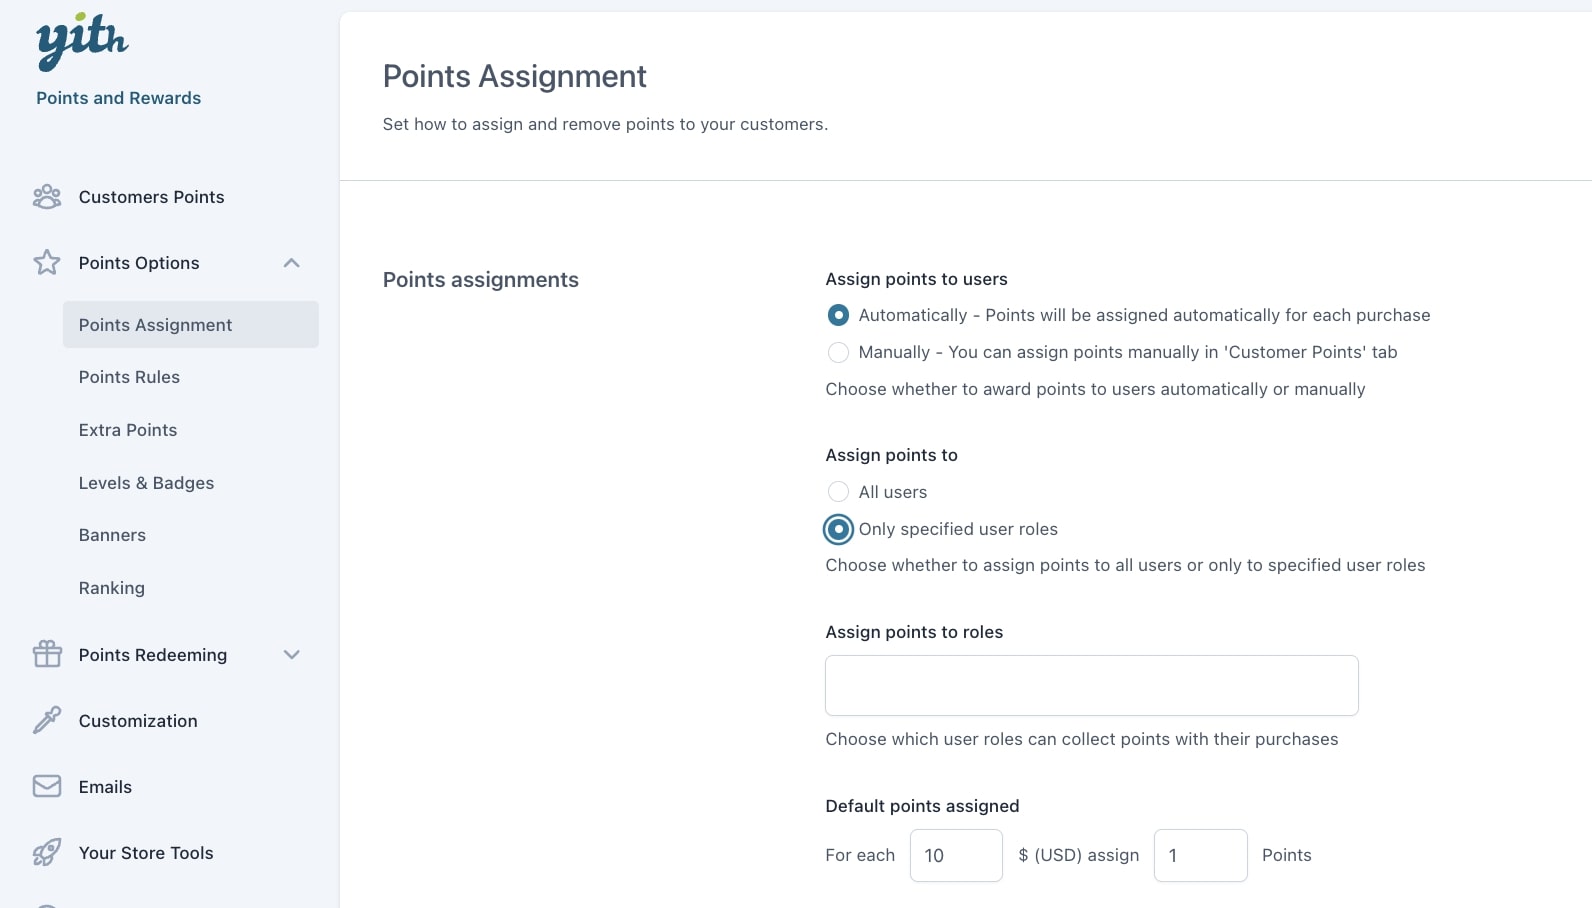
Points assignments
Assign points to users: choose whether to assign points to your users automatically or manually. By selecting Manually, you will assign points from the tab Customers points. By selecting Automatically, you will be able to configure the following options.
Assign points to: choose whether to assign points to all users or only specified user roles that you will be able to select in the option Assign points to roles.
If you want to assign a different number of points to specific roles, instead, leave this option enabled for All users and set up a custom rule by user role in the Points rules.
Default points assigned: this is the main conversion rule that applies to the entire store. It is based on the product price.
Considering the above image as an example, you can see that for each 10 $ (USD), customers will be assigned 1 point.
Please, note: this conversion rate is applied to each product price and not to the cart total, meaning that the points are generated from each single product price first and then they are summed up.
The example below will help clarify this.
There are two products in the cart:
Dark navy t-shirt: €19.90
Shopping bag: €79.90
As the conversion rate is 1 point every 10€, the total points collected with this purchase is 10, which is the result of:
2 points for Dark navy t-shirt
8 points for Shopping bag
Besides this basic conversion, you will be able to set many more custom rules to assign a different number of points based on specific products, categories, user roles, and membership plans (if used with YITH Membership plugin). You can find out more in the Points options > Points rules sub-section.
Let’s go on with more options in thePoints assignments tab.
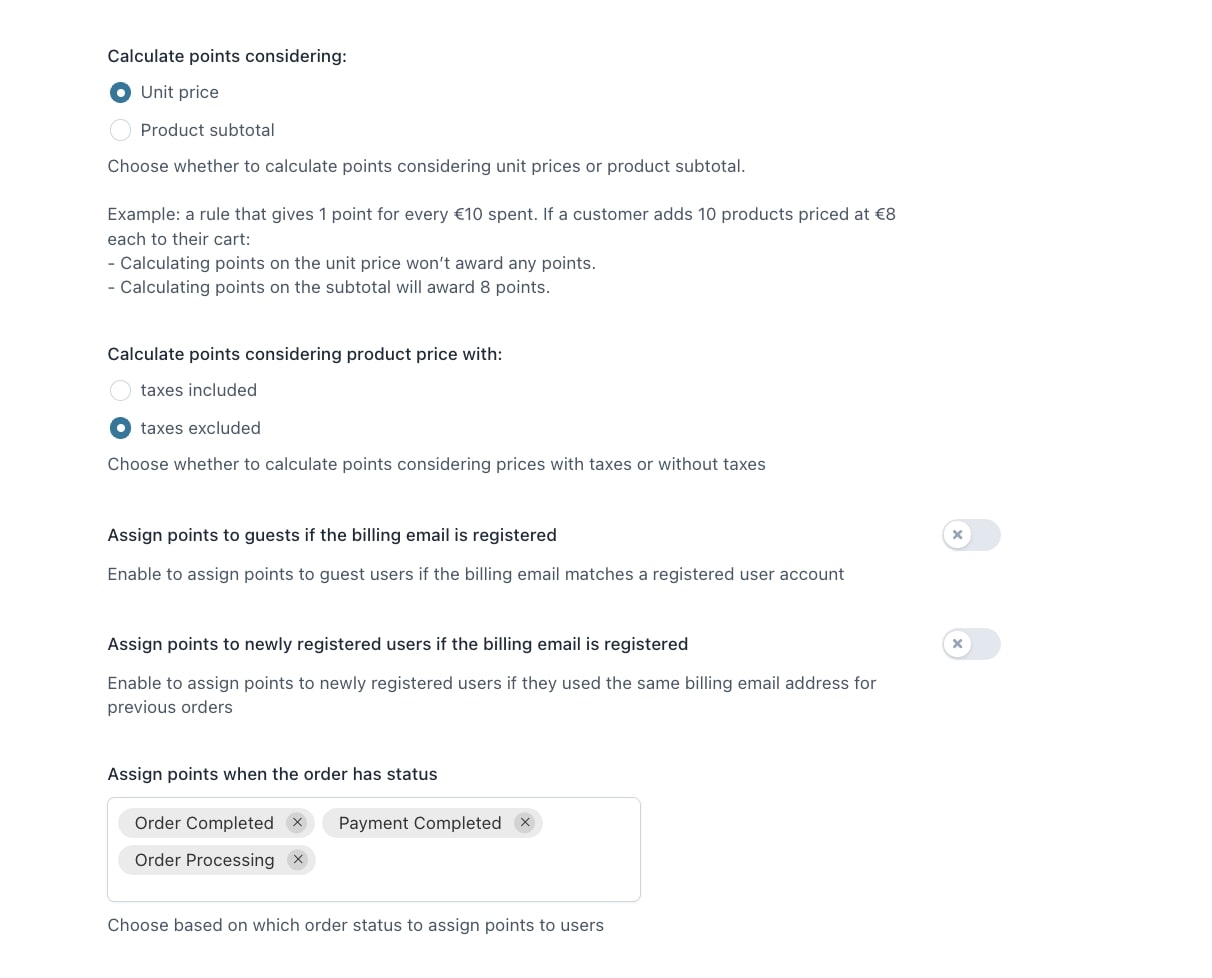
Calculate points considering:
unit price
product subtotal
Calculate points considering product price with:
taxes included
taxes excluded
Assign points to guests if the billing email is registered: enable to assign points to guest users if the billing email matches a registered user.
Assign points to newly registered users if the billing email is registered: enable to assign points to newly registered users if they use the same billing email address of previous orders.
Assign points when the order has status: here you can decide on which status of the order the points have to be added to the customer’s balance. You can decide that the action is triggered on one or all of the following statuses: Order completed, Payment completed, Order processing.
Points removal and exclusion
In the sub-section Points removal and exclusion, you can manage the options to exclude products from points collection, or remove and reassign points on specific conditions.
Exclude on-sale productsfrom points collection: by enabling this option, on-sale products will not assign points to your users.
Remove earned points if order is cancelled: enable if you want to remove earned points when an order is cancelled.
Reassign points when an order is refunded: enable if you want to reassign all the redeemed points to a customer when an order is refunded.
Remove earned points if order is refunded: whenever a refund is issued, the points awarded with the refunded order will be detracted from the customer’s balance. e.g. if the total balance is 100 points and you refund an order that was worth 10 points, the customer’s balance will be updated to 90 points. You will be able to see points assigned, removed or refunded in the order notes:
Do not assign points to the full order amount if a coupon is used: enable this option if you do not want the user to earn points on a full order amount if they use a coupon. Instead, they will only earn points on the amount minus the coupon discount. For example: order total €30 minus €10 coupon discount, the user earns points on €20 order value only.
Do not assign points to orders in which the user is redeeming points: enable this option to make sure that whenever customers are checking out and redeeming points, they will not get any new points for the current order.
Other options
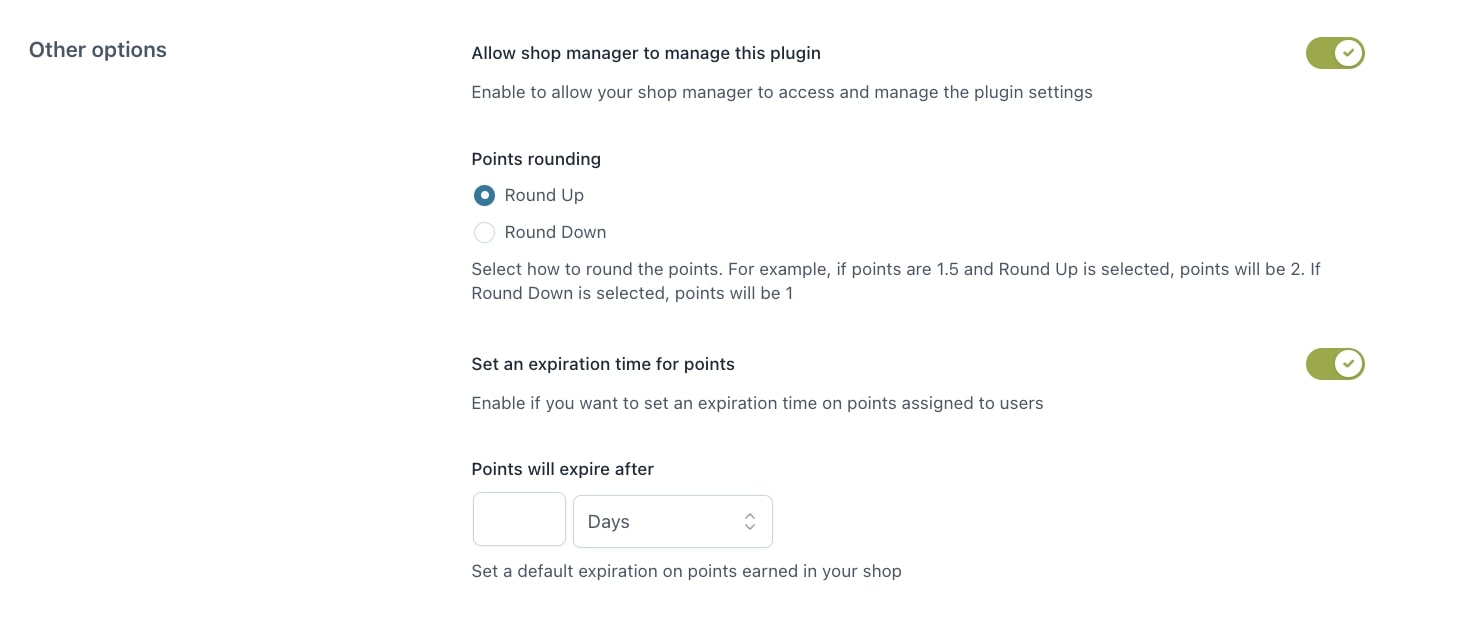
Allow shop managers to manage this plugin: enable to let all your shop managers to edit the plugin settings.
Points rounding: select how to round points, if the resulting points are decimal numbers. You will be able to choose how the rounding works, either up (to the higher integer number) or down (to the lower integer number. e.g. 1.5 points > for ‘Round up’ it will be 2, for ‘Round down’ it will be 1.
Set an expiration time for points: enable to set an expiration time for users’ points and encourage them to use the points before they expire. After enabling the option, you can enter the value in days or months in the entry Points will expire after and enter a custom number of days or months.
Example: today you earn 100 points that expire after 30 days (X date) and two weeks later you earn 200 points that also expire after 30 days (Y date). You spend 180 points before X date, and the 120 remaining points expire on Y date.
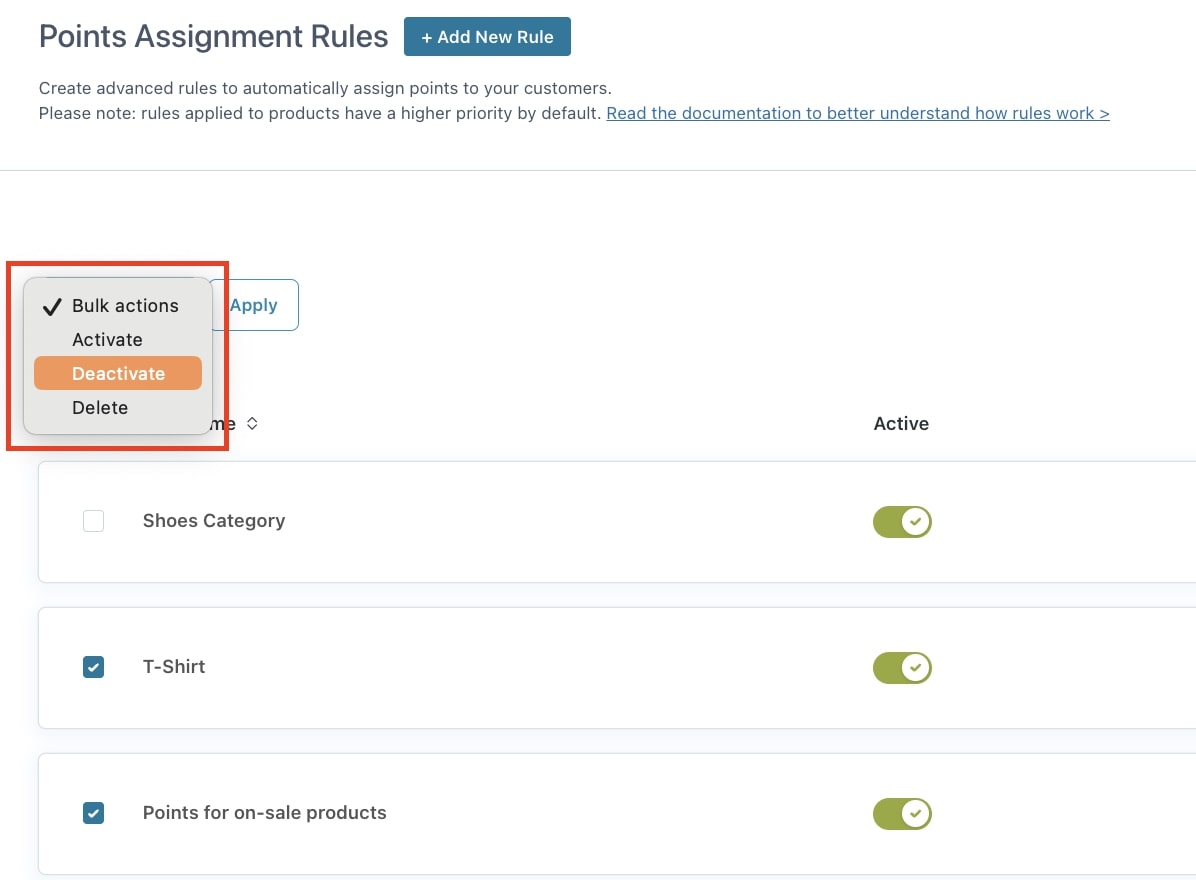
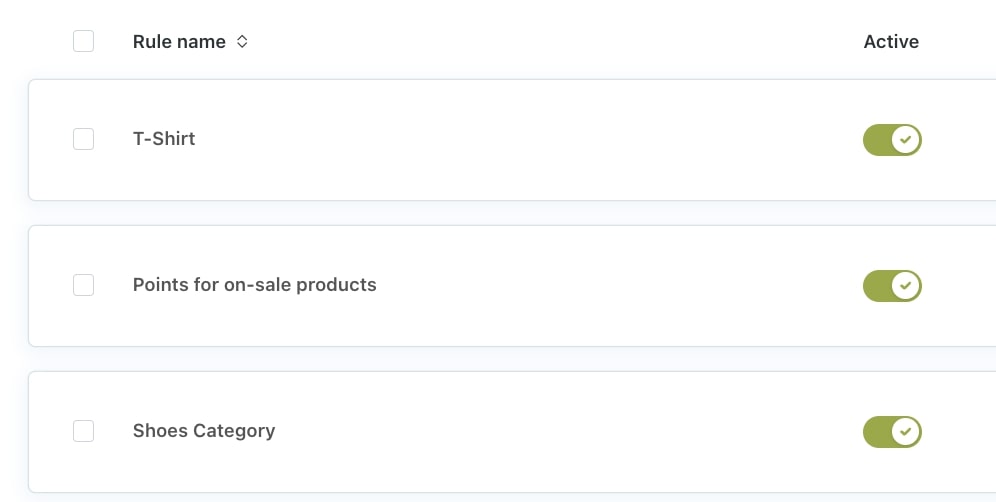
In the Points rule sub-section that you find in Points options, you can configure many more additional rules for your points.
Here you find all the rules that you’ve configured and you can quickly enable/disable them through the toggle button, and from the quick actions you can edit, duplicate, sort with drag&drop and trash each of these rules.
You can also bulk edit multiple rules at the same time through the Bulk actions button on top.
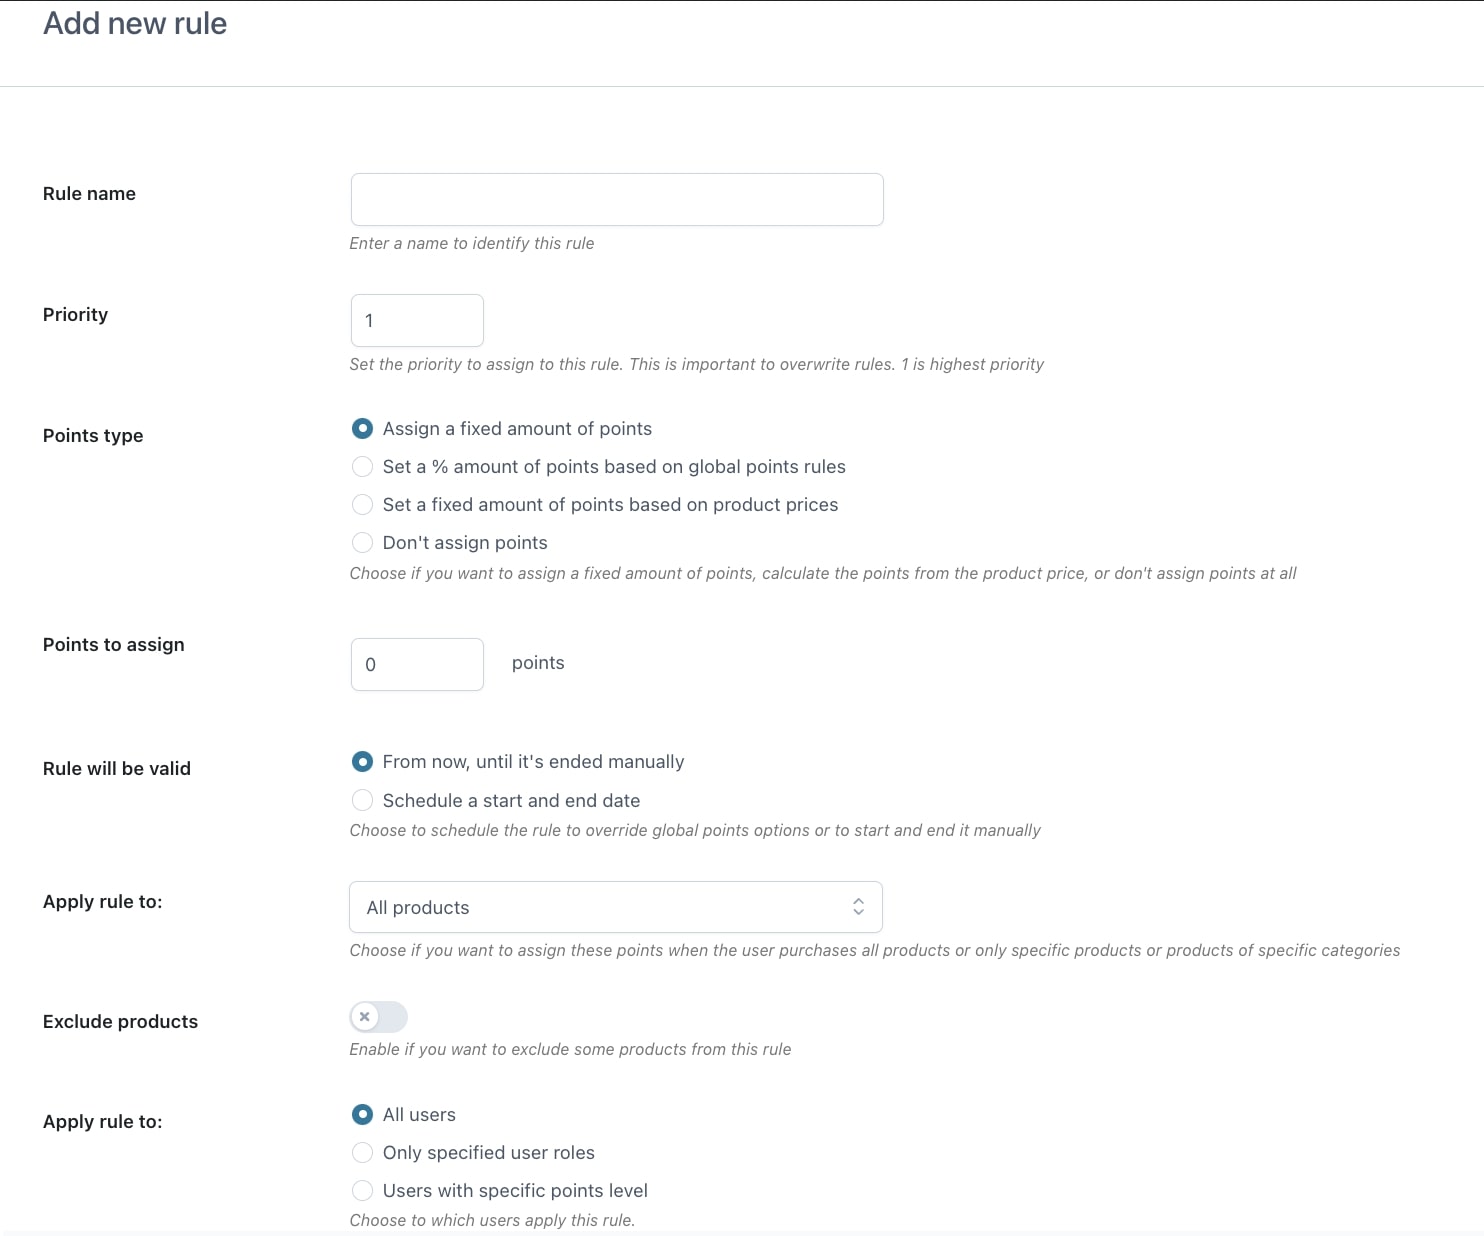
Click on + Add new rule to create your rules. This is what it looks like:
Rule name: give a name to this rule to make it easy for you to remember what it is about.
Priority: in case more than one rule applies to the same product, the rule with higher priority will apply. Priority 1 is the highest.
Important note about the priority. The priority order works only among rules of the same type. You can have three types of rules: product rules, category rules and global rules. Product rules are always highest priority, then category rules and finally global rules. Within each rule type, you can set a priority order, but you cannot change the basic order as product rules always win over category rules and category rules always win over global rules.
Only one rule applies, so, when multiple rules apply to the same product, if there are product rules set, the plugin will take the product rule with highest priority. If only the category and global rules apply, the plugin will apply the category rule with highest priority. If only the global rules apply, the plugin will apply the global rule with higher priority.
So, when creating the rules, we suggest you add a note to the name of the type of rule. Like this:
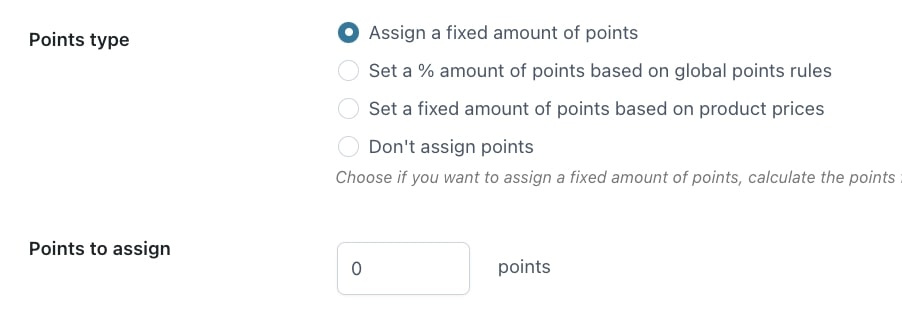
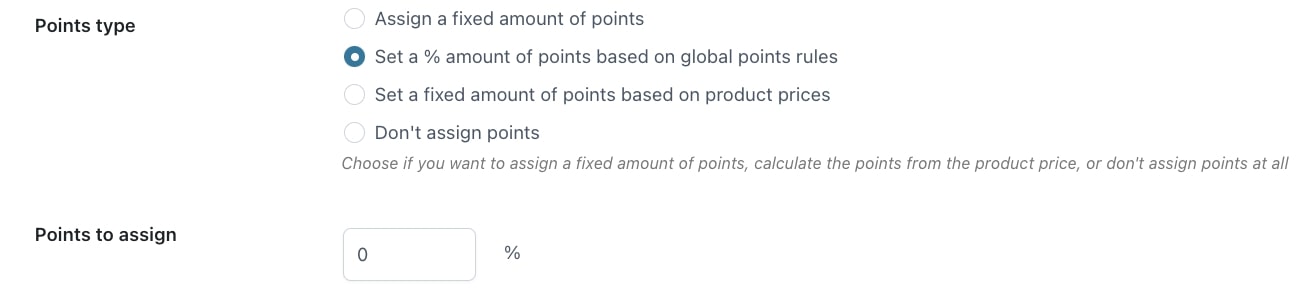
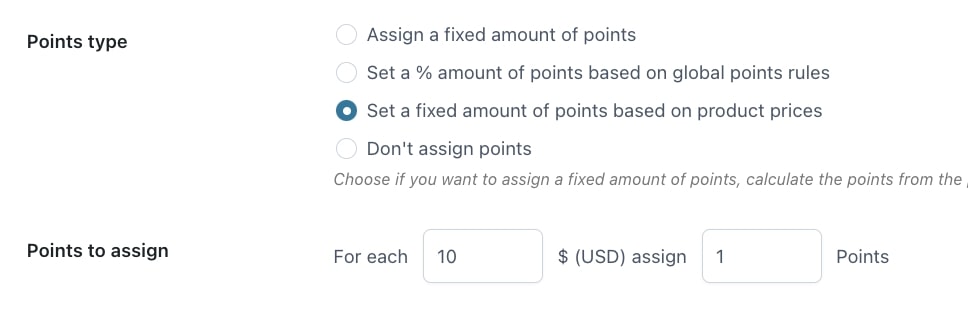
Points type: choose whether to assign a fixed number of points or calculate points from the product price. Based on the selected option, you can enter the number of points or the percentage.
Assign a fixed amount of points: whenever the product is in the cart, the customer will earn a fixed number of points, no matter how points are calculated for other products.
Set a % amount of points based on global points rules: this will increase by a percentage the number of points that the product would generate. For example, if the “T-shirt” product is normally worth 2 points, but you want it to give triple points, you can select this option and set a 300% rate.
Set a fixed amount of points based on product prices: you can set specific conversion points in this option. e.g. for each $10 give 10 points.
Don’t assign points: with this rule, you can make sure that the product will not generate any points even if there is another category or global rule that applies to it, as the product rule will always have the highest priority.
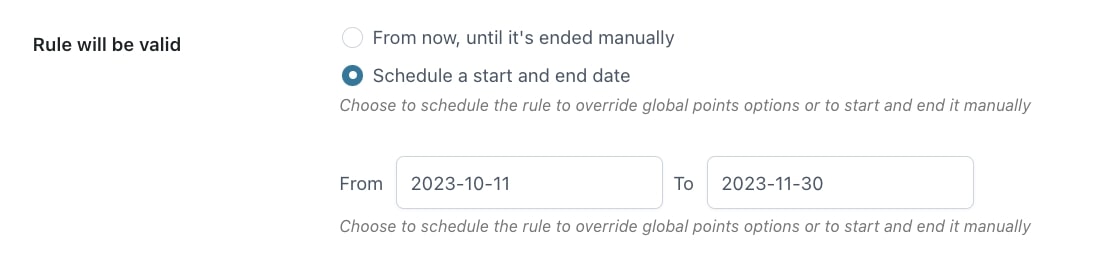
Rule will be valid: you can choose whether to schedule this rule for a limited time, or start it now and end it manually.
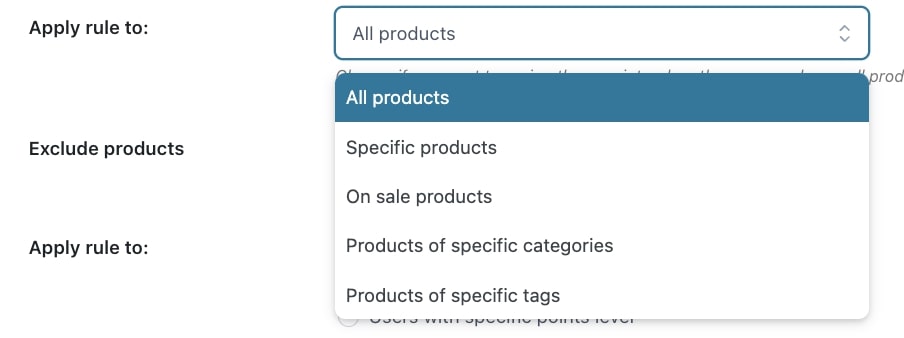
Apply rule to: here you can choose to apply this rule to:
all products
specific products
on sale products
products of specific categories
products of specific tags
Exclude products: enable to excludespecific products.
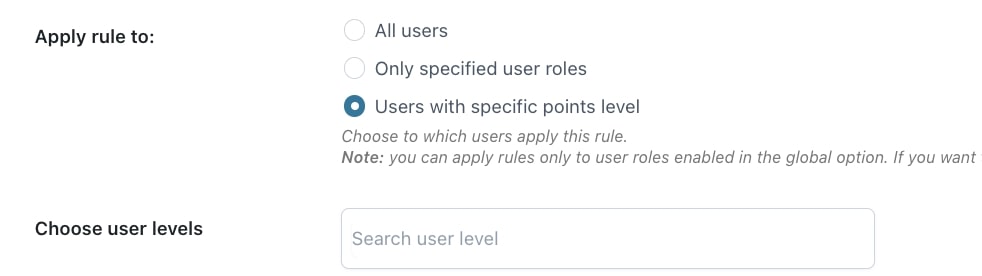
Apply rule to: here you can choose to apply the rule to
This is a one-time action that allows you to give a certain number of points to every user who registers in your shop.
Daily login
This is a daily reward for your users that are assigned points whenever they log in. If they log in multiple times on the same day, they will only get the extra points once.
If you want to incentivize your users to complete all their profile fields on My Account page, make sure you enable this option and inform them about this extra points reward.
You can reward your user with a specific number of points for every new user registered through their referral link.
Optionally, you can choose whether to revoke the referred points if the accounts are deleted. This is useful to prevent users from creating fake accounts.
To enable the referral option on My Account page, create a Get points banner as explained here.
Referral purchase
You can reward your user with a specific number of points for every purchase made by users that have been referred through their referral link.
Optionally, you can delete the referred points on these purchases if the accounts are deleted.
To enable the referral option on My Account page, create a Get points banner as explained here.
Users that collected the most points
Here you can set up a fixed number of points for users who collect the most points in the week or month. You can choose whether to calculate points on the 1st or last day of the week (always Monday) or month.
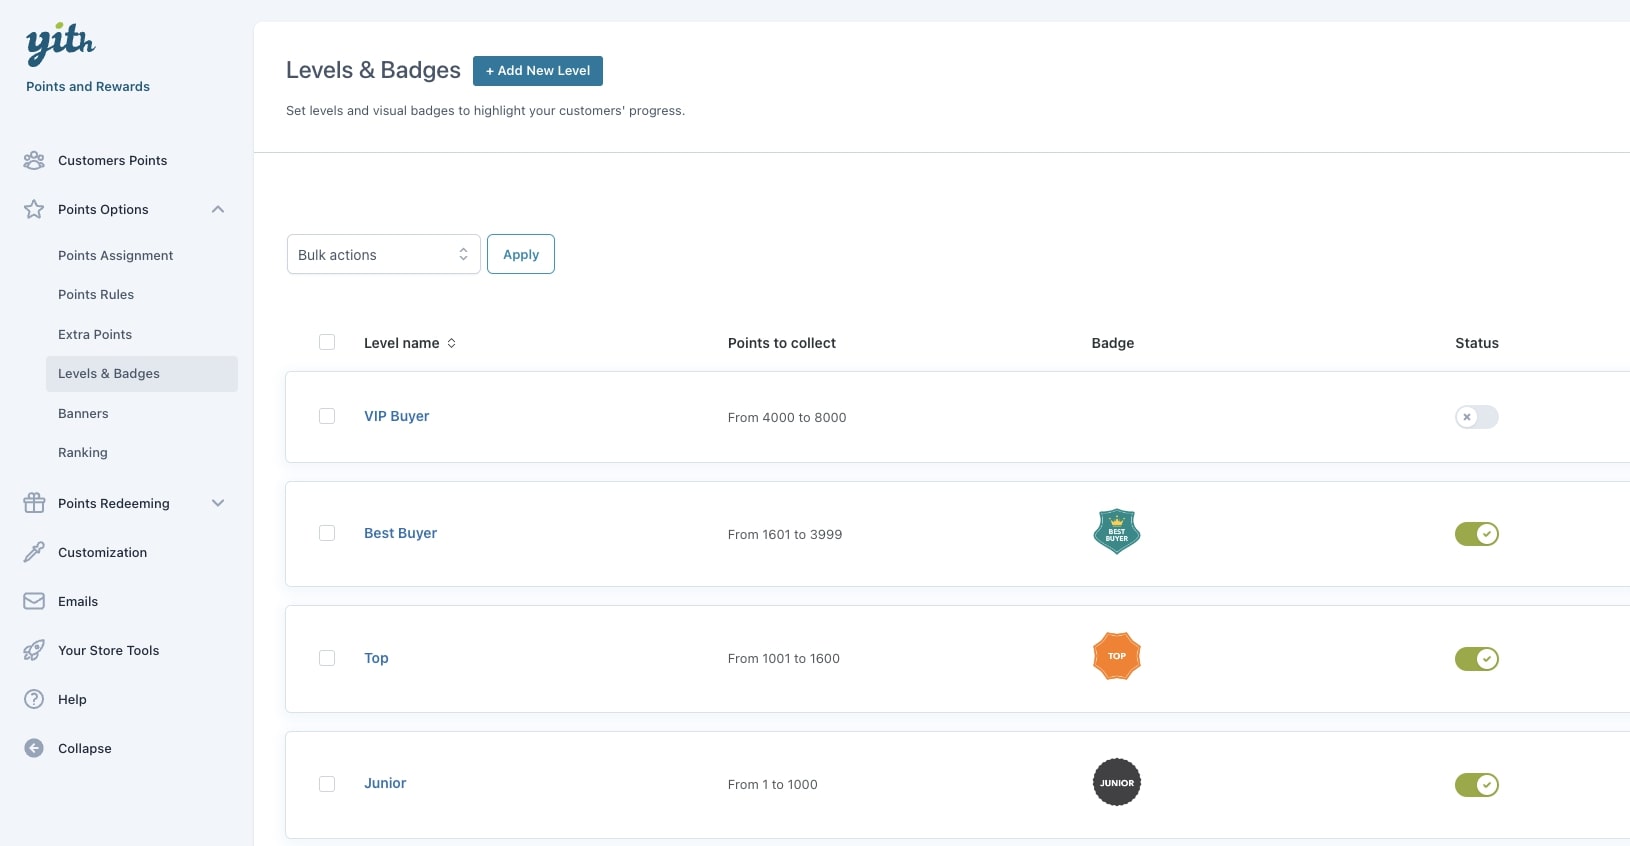
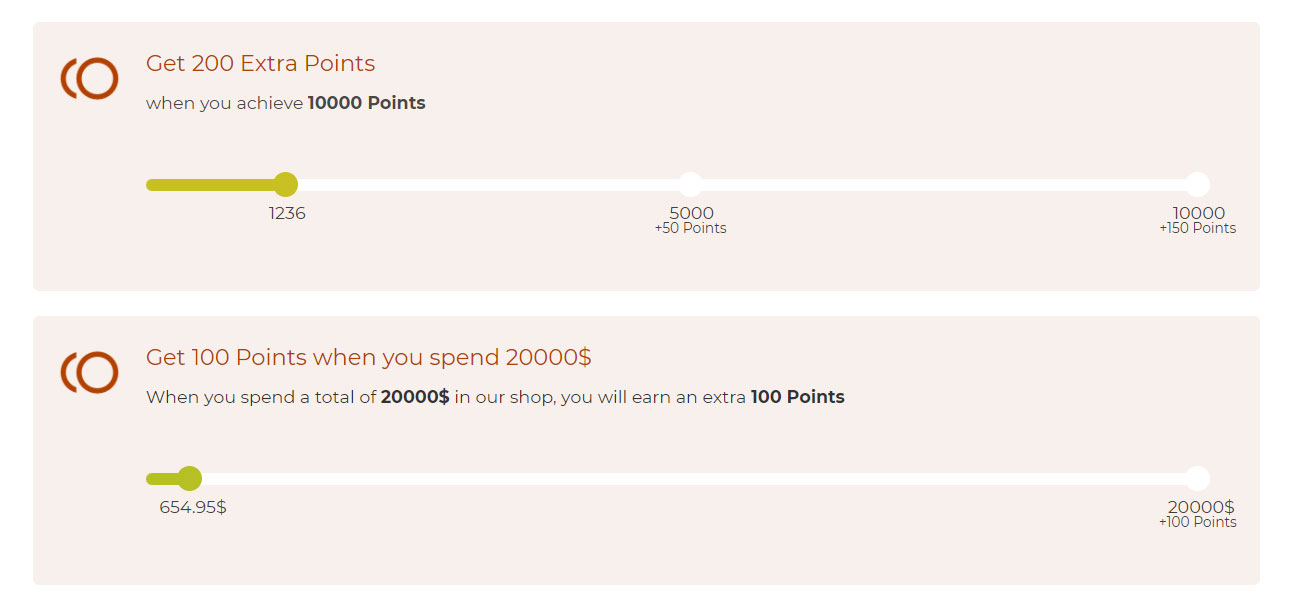
With this option, you can reward your users with extra points whenever they reach a specific amount of points collected. You can create multiple rules. Additionally, the last rule can also be “Repeated”.
Example: in the screenshot above, your user will earn 50 points whenever they reach a total balance of 5000 points. Then, when they get to 10,000 points, they can get 150 extra points (for a total of 200 points). As the last rule is set to “Repeat”, if they get to 20,000 points, they will earn another 150 points and so on.
With this option, you can give a treat to your customers on their birthday.
To make sure this is possible, they have to enter their birthday and you can choose on which pages the birthday field has to appear: My Account page, Registration form, Checkout page, and decide the format it will use.
You can also set your customer’s date of birth from the backend, in the user details page.
With this option, you can reward your users with extra points whenever they leave one or more reviews for the products they have purchased. You can create multiple rules. Additionally, the last rule can also be “Repeated”.
Example: in the screenshot above, customers will get 5 points for the first review, 10 points when they reach 5 reviews. As the “Repeat” option is enabled, when they reach 10 reviews, they will get 20 points and so on.
With this option, you can reward additional points for every order or for a specific number of orders. You can add multiple rules and enable the “Repeat” option for the last.
The counting of orders starts when you activate this rule for the first time. It does not take previous orders into account.
Example: in the screenshot above, you can reward users for their first order only. If you set the “Repeat” option, you can reward users for every order they place.
You can assign points based on the Cart total. You can set up multiple rules and make sure that either all of them apply (and so the points are summed up) or just the one with the highest number of points.
To make sure that your users are aware of this option and that it works as a real incentive to spend more, you can enable the Show threshold message in cart and checkout option and customize the message that will show on the Cart and Checkout pages. It will look like this:
Amount spent
This option allows you to assign points based on the total amount spent so far in your shop, so the total spend ever (since installing the plugin).
Also in this case, you can add multiple rules and enable the “Repeat” option on the last one.
Example: in the screenshot above, your users will get 100 points when they collect a total of 20,000 points (regardless of how many points have been used and redeemed so far), another 100 when they reach 40,000 and so on.
Besides the banners that you can show on My Account page, you can also enable the Update points email notification, so every time the points are updated, your users will be notified via email. You can read more about this notification here.
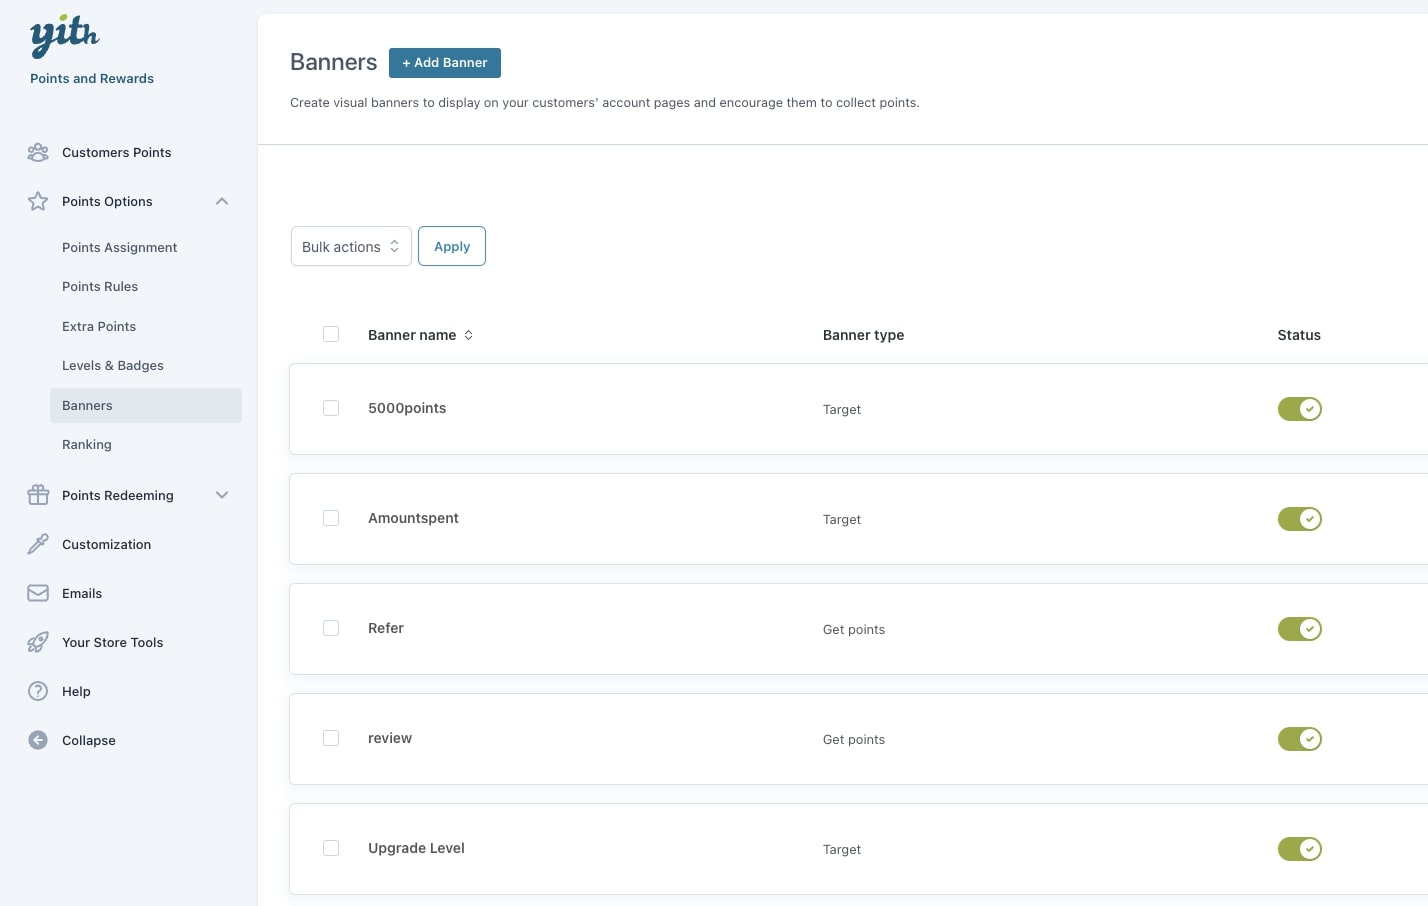
From this sub-section, you can configure the Banners, which allow you to inform your users about all the available actions they can take to get more points.
Go to YITH > Points & Rewards > Points options > Banners.
From this page, you can quickly
enable/disable,
edit,
duplicate,
sort with drag&drop and
trash a banner.
You can also apply these actions to multiple banners at the same time using the Bulk actions on the top left.
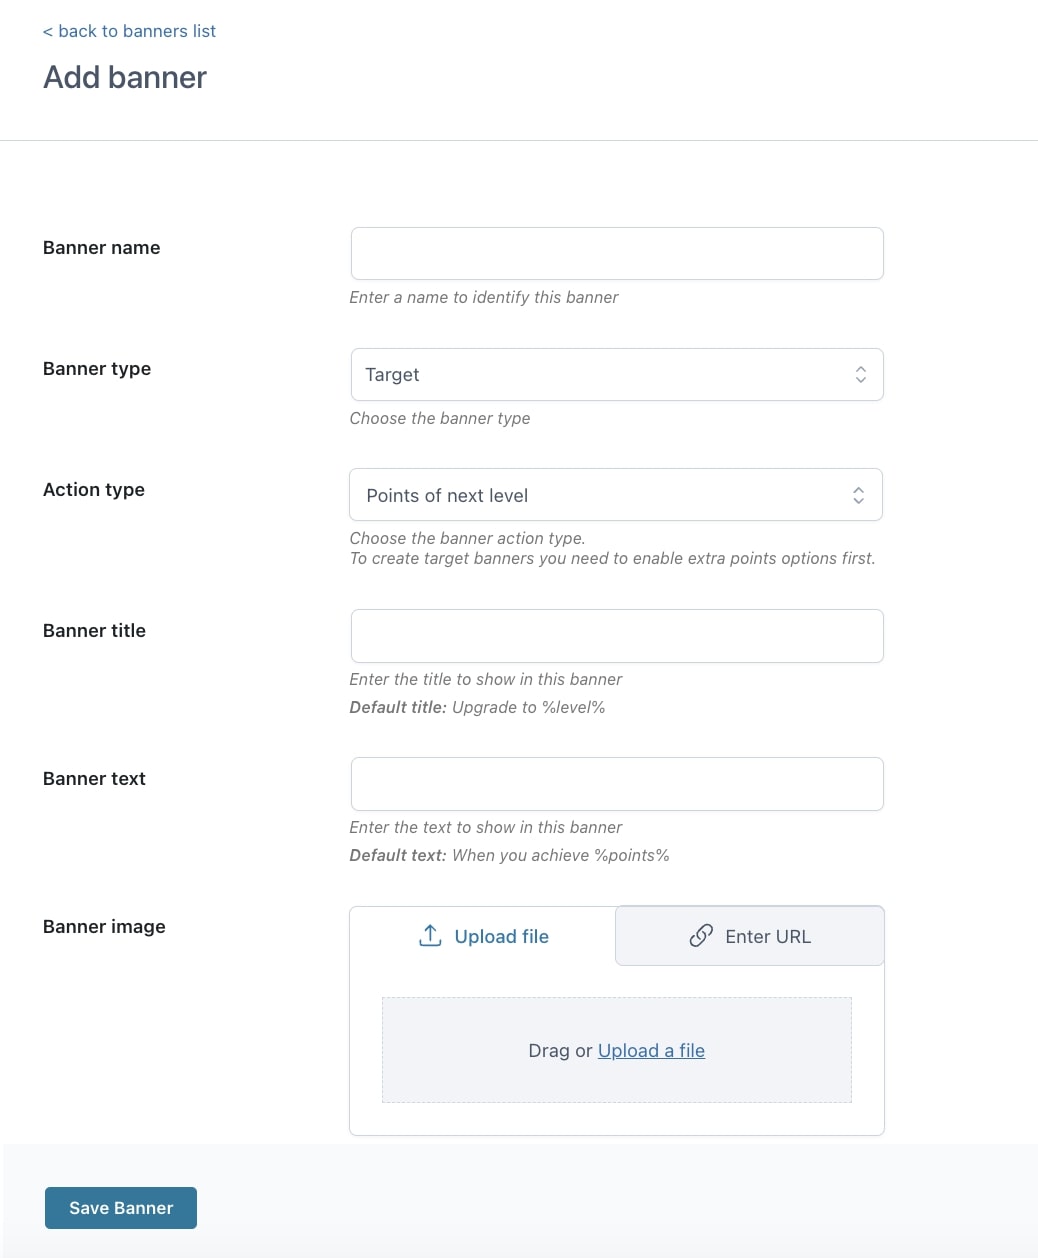
To create a new banner, just click on + New banner. Let’s see all the available options.
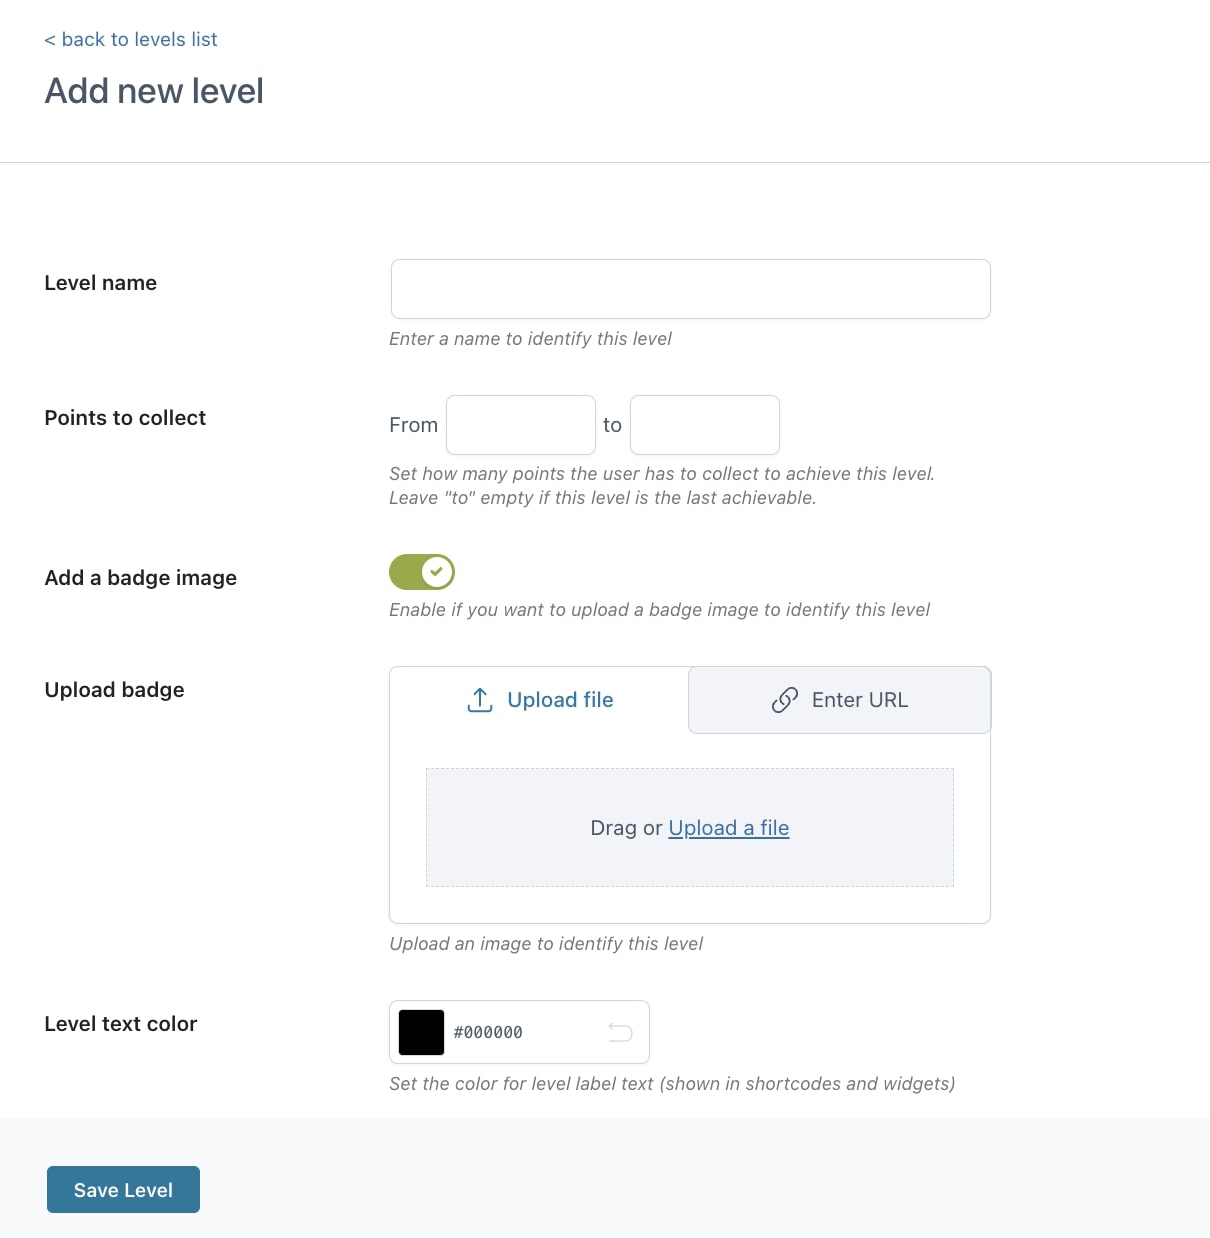
Banner name: enter a name to identify this banner.
Banner type: choose the banner type from Simple, Target and Get points. Based on the selected type, the available actions in the Action type option below will change.
Let’s check them one by one, as some of the options change.
SIMPLE banner: this is a simple text that you can configure in the options below.
Simple banner with image and text
Banner title: enter the title to show in the banner.
Banner text: enter the text to show in this banner.
Banner image: upload a custom image to show in the banner title.
Banner colors: set here the background, title and text colors for your banner.
Add link: enable this and add a custom link to show in your banner.
Banner links to: enter the URL for the banner.
The entire banner will link to the page that you set and show a right-arrow icon on the right like in the following banner:
Simple banner with image and link
Show: choose where to show the banner from:
in Target tab
in Get points tab
2. TARGET banner
TARGET banner: for this specific banner type, you can choose one of the actions below that are linked to the related extra points rule.
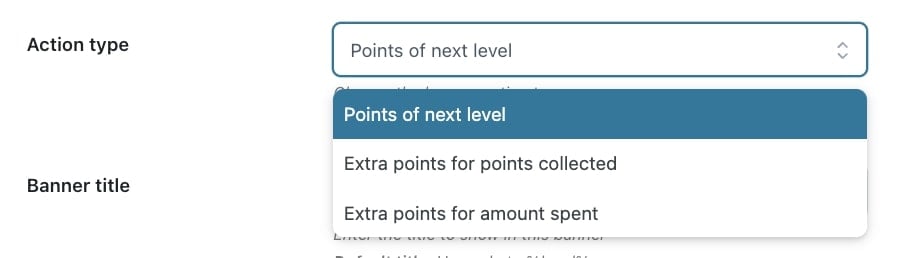
Action type: choose the action for the banner:
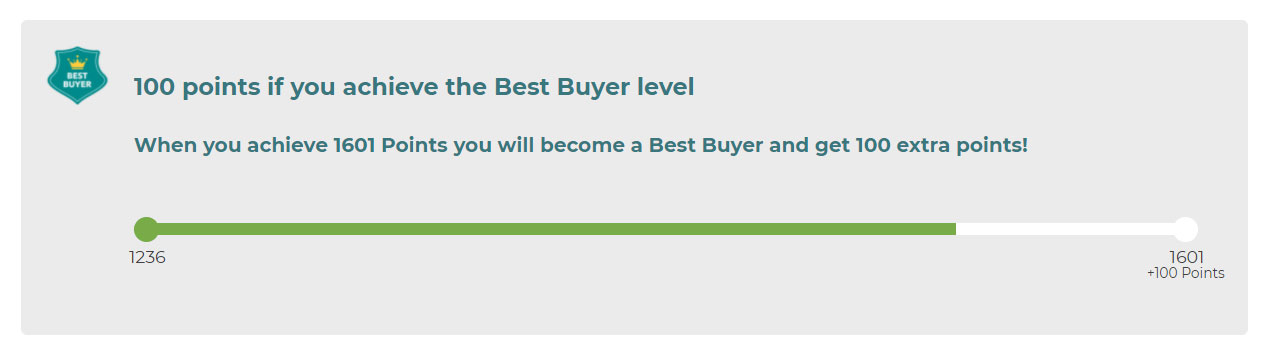
Points of next level: this creates a banner that automatically checks the settings of the Users that achieve specific levels in extra points settings (see here).
Target level with progress bar
Extra points for points collected: this creates a banner that automatically checks the settings of the Points incentive on total collected points extra points settings (see here).
Extra points for amount spent: this creates a banner that automatically checks the settings of the Amount spent extra points settings (see here).
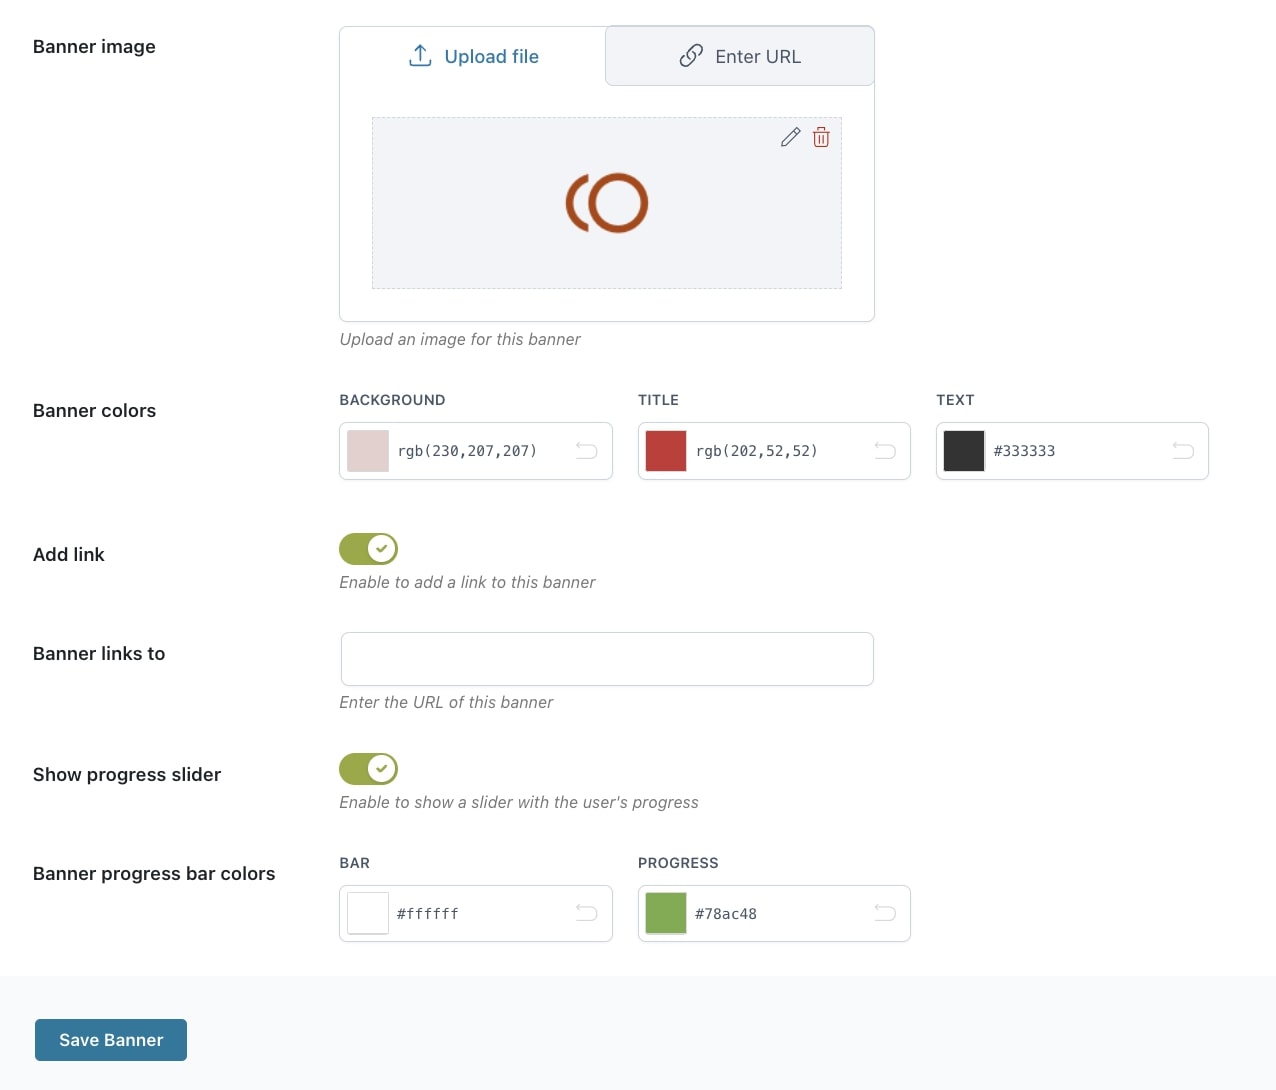
Banner title: enter the title to show in the banner.
Banner text: enter the text to show in this banner.
Banner image: upload a custom image to show in the banner title.
Banner colors: set here the background, title and text colors for your banner.
Add link: enable this and add a custom link to show in your banner. Only available for Simple and Target banners.
Banner links to: enter the URL for the banner.
The entire banner will link to the page that you set and show a right-arrow icon on the right like in the following banner:
Show progress slider: only available for Target banners.
Banner progress bar colors: set here the color of the bar and of the progress.
Target banners with progress slider
3. GET POINTS banner
GET POINTS banner: for this specific banner type, you can choose one of the actions below that are linked to the related extra points rule.
Action type: choose the action for the banner:
Complete profile: this creates a banner that automatically checks the settings of the Completed profile extra points settings (see here).
Refer a friend: this creates a banner that automatically checks the settings of the Referrals extra points settings (see here).
Referral purchase: this creates a banner that automatically checks the settings of the Referral purchase extra points settings (see here).
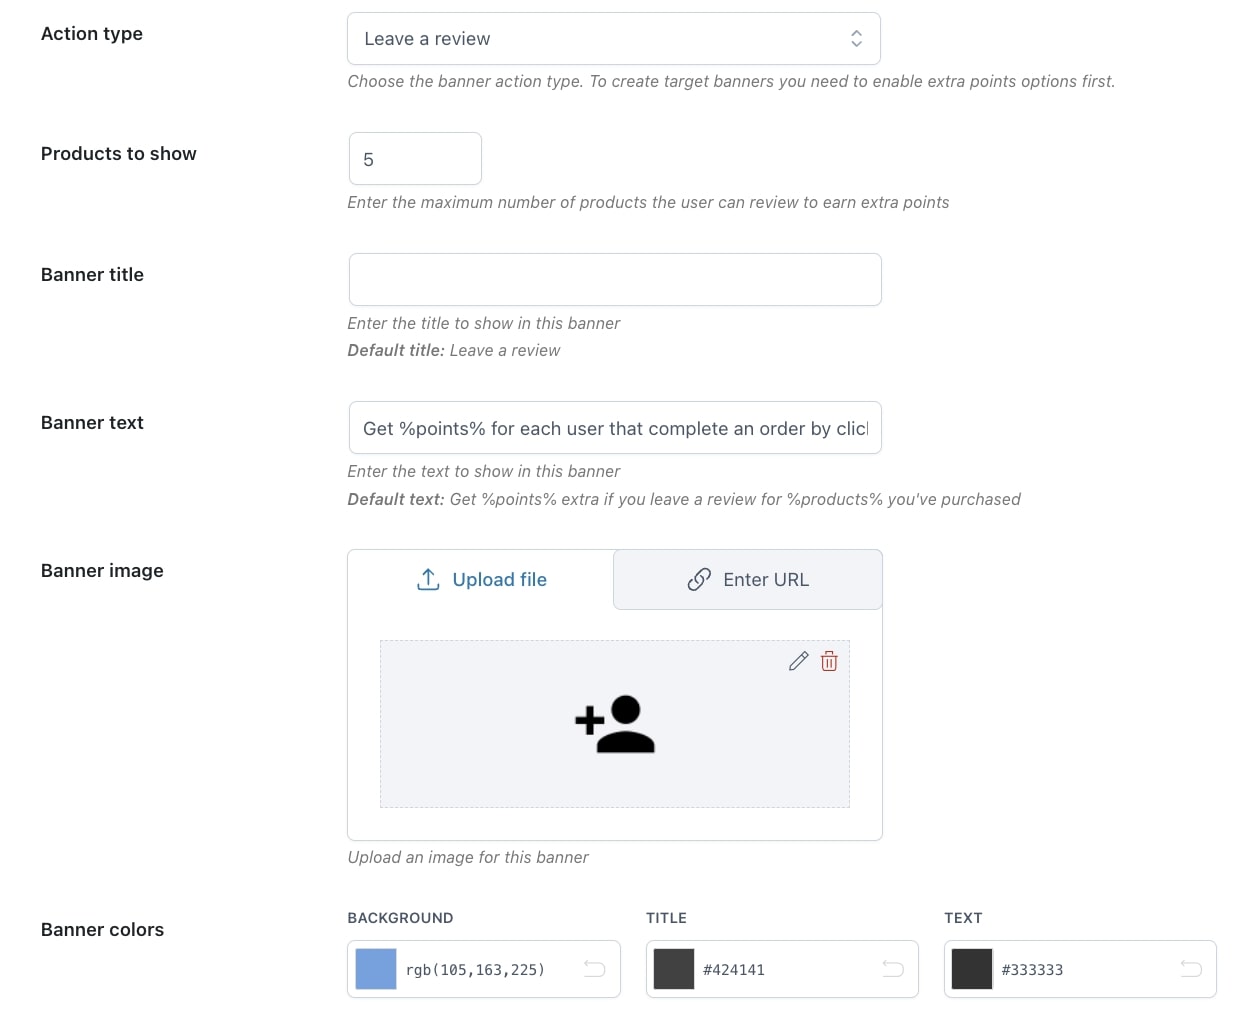
Leave a review: this creates a banner that automatically checks the settings of the Review extra points settings (see here).
The number of products displayed is automatically calculated based on the settings in the Extra points for review settings. It will show only products that have not been reviewed yet.
Products to show: enter the maximum number of products to show in the banner. It will only show products available to be reviewed. This option is only available for Leave a review banner.
Banner title: enter the title to show in the banner.
Banner text: enter the text to show in this banner.
Banner image: upload a custom image to show in the banner title.
Banner colors: set here the background, title and text colors for your banner.