View Product Page

Membership users

When a user buys the product associated with a membership, you will be able to see this membership listed on the main page with All memberships together with a reference to the related order and user.

All memberships

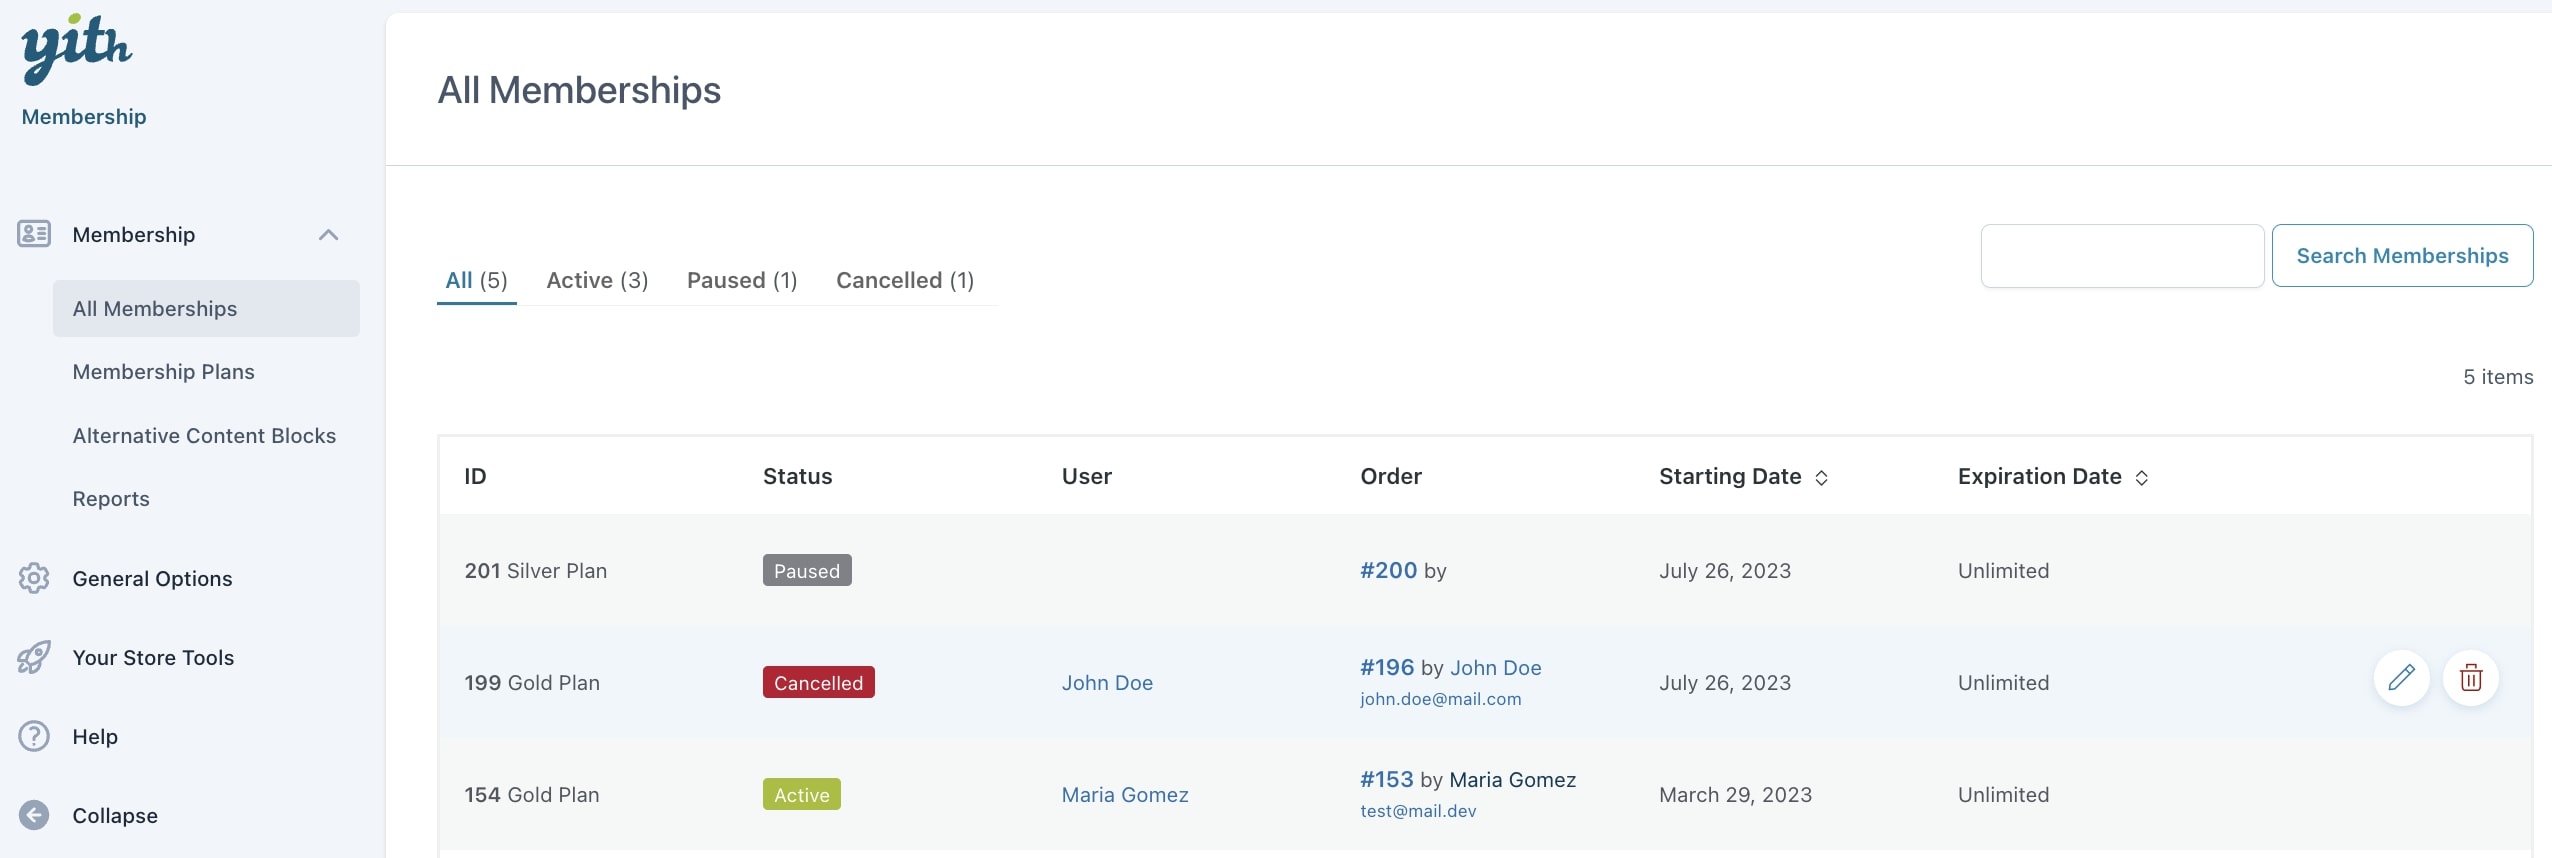
When no user is listed under the User column, it means that the membership has been purchased by a guest user. Refer to this page to add a user to this membership.

You can also see at a glance which membership plan is associated with the user from the Users list, as you can see below:

Membership from users page

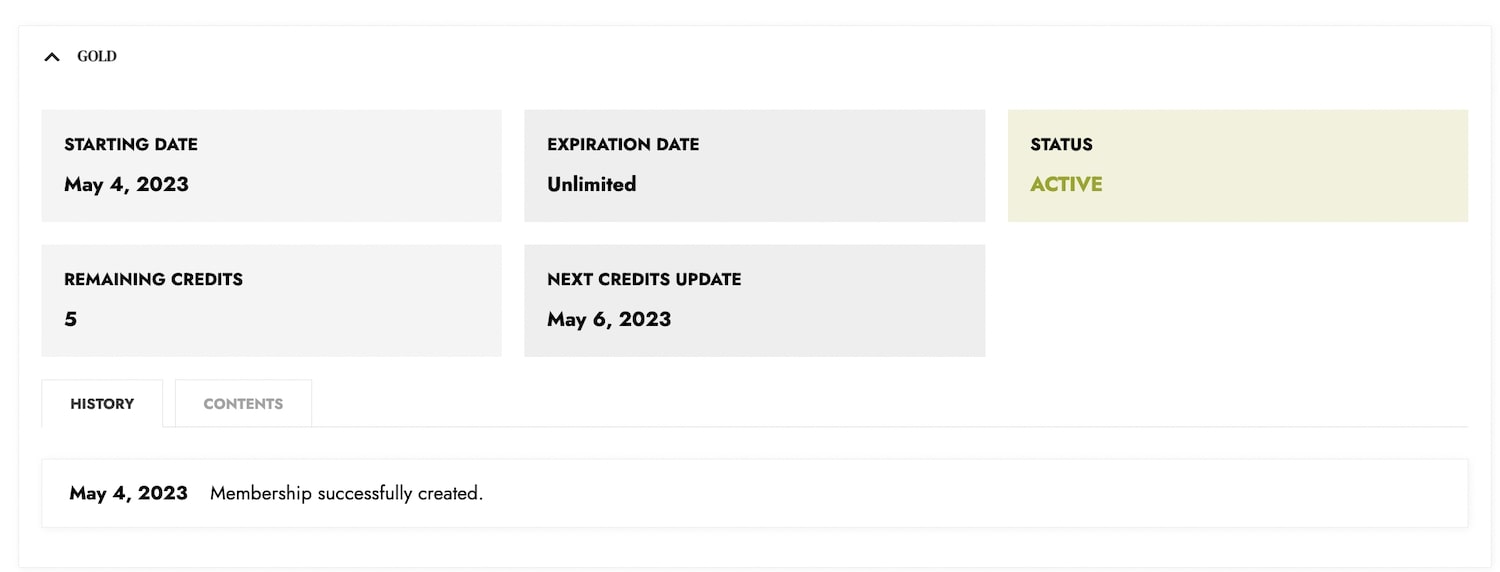
If you open the user’s profile, you can see the history of his/her membership.

Bulk actions

Additionally, from the Users page, you can apply some specific changes to the membership of one or more users at the same time (with bulk actions).

First of all, you can filter users by the membership plan they possess (if you need to) by simply picking the plan name from the dropdown.

Filter by membership plan

Then, select one or more users from the list:

Select users

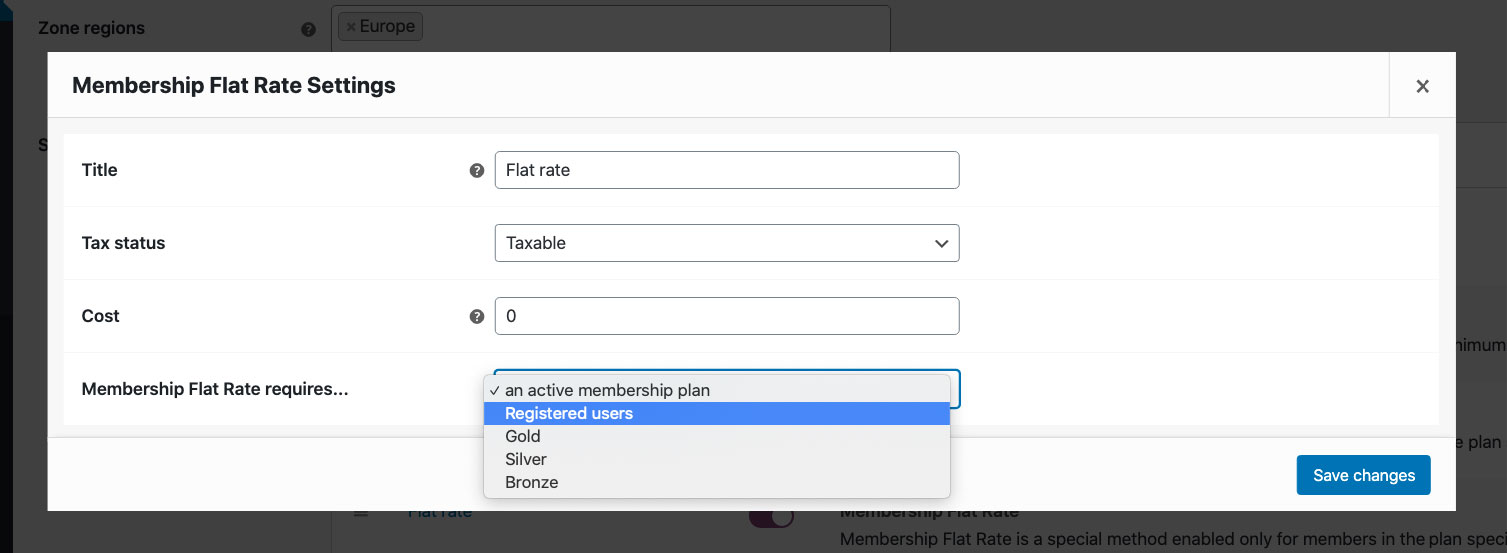
Make sure you select the action to perform in the Membership bulk action dropdown menu:

Bulk editing
  • Membership bulk editing: this allows you to bulk edit the memberships of selected users.
  • Cancel membership: this will set the membership plan selected in the next dropdown to ‘Cancelled’ status.
  • New membership: this will apply a new membership plan among the available ones in your site that you can select in the next dropdown menu.
  • Delete history: this will delete the history of ALL the membership plans the user has (it is NOT possible to select one specific plan only).

Then, select the membership plan on which you want to apply a change from the Select membership plan dropdown menu (not available for Delete history).

Choose plan

Finally, click on Apply to make sure the change is applied.

Example

If you want to assign the plan Gold to Amelia and Elizabeth, you’ll just have to select them from the users’ list, select the action New membership from the first dropdown and Golden plan from the second dropdown and then click on Apply.

Bulk edit memberships

Now Amelia and Elizabeth have access to the contents of the Golden membership plan.

Please, note: every membership assigned manually by the admin will be given the order ID equal to zero.

Alternative contents

When a user does not have access to a specific page of your site, as it is part of a membership plan, they should get enough information about why they are not seeing this content and how they can get access to it.

This is why it is extremely important to set up informative content that is shown to non-members and this is what you can do with the Alternative content in our membership plugin.

First of all, make sure that the alternative content option has been enabled from YITH > Membership > General options > How to manage access to restricted content and select Show Alternative Content.

Save and open the called Alternative contents in Membership.

Alternative content

You will be able to choose between two ways of building your alternative contents.

  • The first way is through the built-in editor from the General options tab:
  • The second way is by creating an advanced page from the Alternative contents tab. This is particularly useful if you want to build your page using Gutenberg blocks, adding CTA buttons etc.
    To do that, create a new content from the Alternative Content tab, then from the General settings select Load on alternative content and select one of the contents you’ve previously saved.
Alternative content block

Custom alternative content on product/page/post

Please, consider that this global option can be overridden from every page, post or product with some custom content, meaning that you can have a global setting but also specific settings for every post or page or product if you want to.

If you want to override these settings, you will be able to set this from the Membership options metabox and either create custom content from the built-in editor or load one of the alternative contents you’ve previously created.

Emails

YITH WooCommerce Membership allows you to send notification emails to your users whenever one of the following actions on memberships occur:

  • a new membership is created;
  • a membership gets cancelled;
  • a membership is going to expire;
  • a membership has expired.

To edit content and general settings for emails, go to WooCommerce > Settings > Emails.

In the email content you can use the following placeholders to print dynamic information about the user or the membership:

  • {firstname}: user’s first name
  • {lastname}: user’s surname
  • {site_title}: the name of your website
  • {membership_name}: membership plan name
  • {membership_expire_date}: membership expiring date
  • {site_address} or {site_url}: the URL of your website

Users receive the email informing them about their expiring membership 10 days before it expires.

Shipping

Free shipping for registered users

The plugin allows you to create a new shipping method that resets the fee to zero for all the users registered to one or more membership plans on your shop.

Go to WooCommerce > Shipping > Add new shipping method and select “Membership free shipping” from the drop-down menu.

Now select the membership plan you want to associate to the new shipping method.

In this way all the users registered to the specified plan could select free shipping during the checkout.
For example, if the Gold plan includes all the items in Silver plan, you will just have to set the free shipping for the Silver plan and will automatically be available for members of both plans.

Flat rate shipping

You can also set up a flat rate option for users of a specific membership plan. To do that, add a new shipping method and select Membership Flat Rate.

You can add a title, tax and the flat rate cost. Decide what is required in order to apply the flat rate shipping and select the membership plan it applies to.

Members-only content starts here

This block gives you the possibility to insert a divider line in your posts and pages so you can hide the content of the post partially, namely everything that is AFTER the divider.

In this way, members will see the whole content, whereas non-members will only see the first part.

Members only content block

After the divider, the plugin will automatically show the default alternative content (if set in the Membership options from the page/post).

Members only content example

Please, note that this block only works if you have chosen to show an alternative content for non-members from the General options, as explained here.

Yet if you want to hide the alternative content, you can enable the “Hide alternative content” option (if necessary) from the page builder editor:

Hide alternative content

If you enable this option, the alternative content will be completely hidden for non-members, so they will only see the content previous to the members-only block:

Hidden alternative content example

Membership protected links

This block allows you to display protected links within a specific page, post or product in your website. Only members of a specific membership plan can see and download these files.

  • Print protected links set into: Select the post, page or product that has the protected links you wish to display.

You can choose the current post options to print the protected links from the post you’re creating the block in:

Protected links block

You can use custom HTML classes for the link element that will be printed, using the Link Class option in the page builder editor:

Link class option

Once you select the option for the protected links, the plugin will automatically lay out the protected file links as download buttons. Here is an example of what users with the membership plan will see in the frontend:

Protected downloadable links frontend example

Membership protected content

This block allows you to set specific content based on a membership plan and specific user types. You can add as many blocks as you prefer and every content added within this protected content block will only be displayed to the selected type of user.

  • Click on the “Add block” button to select the type of content you want to add:
Add protected content
  • Users that can see this block content: Choose the user that will be able to see the content set in this block. You can choose to show content for Guest users, Members of a membership plan or a Non-member. Keep in mind that non-members still have to be members of a plan, but not from the plan selected in the block.

If you select Member or Non-member, you have to select the specific membership plan:

Select user for the protected content block

Example 1:

If you want to create content only visible for members of specific plans (for example, Gold members), you would have to set it up as it follows:

Protected content set up example 1

Only members of the Gold membership plan would be able to see this content:

Protected content frontend example 01

Example 2:

If you want to create a content visible only to Non-members of a Gold plan, this would be the set up:

Protected content set up example 2

All users, except users with a Gold membership plan and Guests, will be able to see this content:

Protected content frontend example 2

Membership protected media

This block allows you to print protected media links that can only be downloaded by members of the selected membership plan(s).

Keep in mind that the media should be set as protected from the media settings options before printing the link, as shown in the following image:

Set protected media

After doing that, select the block in your page or post. It will open like this:

Protected media block

The media URL cannot be edited, but you can edit the linked text that will appear in the frontend:

Linked protected media text

In the frontend, enabled users can click on the link to automatically download the selected media:

Membership protected media example

Membership history

This block allows you to show to the users of a membership all the details regarding their plan.

  • Membership plans to print: Select the membership plan details you wish to include. You can choose between showing the details from all the membership plans the user has purchased or from a specific plan only.
Membership plans to print option

If you select the option “Choose a specific plan“, then a second selection will be shown where you can search for a membership plan:

Choose a specific plan
  • Text to show to customers without a membership: You can write a specific text to show to those users who do not have access to the selected membership plan for this block.
Custom tem for users without membership

As shown in the example below, the details include the starting and expiration date, the status of the membership, the history of their plan and the content available with the plan.

Membership history in the frontend

This is what an user without the membership would see if you select a custom message for them:

Membership history custom text for non members

Membership plan items

This block allows you to show a complete list of all elements associated to a specific membership plan. This list is visible only to users who have purchased this plan.

  • Print items included in plan: Choose the plan that you wish to add to this block.
Membership Plan Items - select a plan

This is how it would look like after selecting the plan:

Membership plan items - selected plan

In the frontend, it would look like this for members of the selected plan:

membership items frontend example