View Product Page

Reports

From the tab Reports, you will get an overview of all the active waitlists, the number of users registered to waitlists, the emails sent and the total earning generated by users who purchased the products through the received emails.

Reports

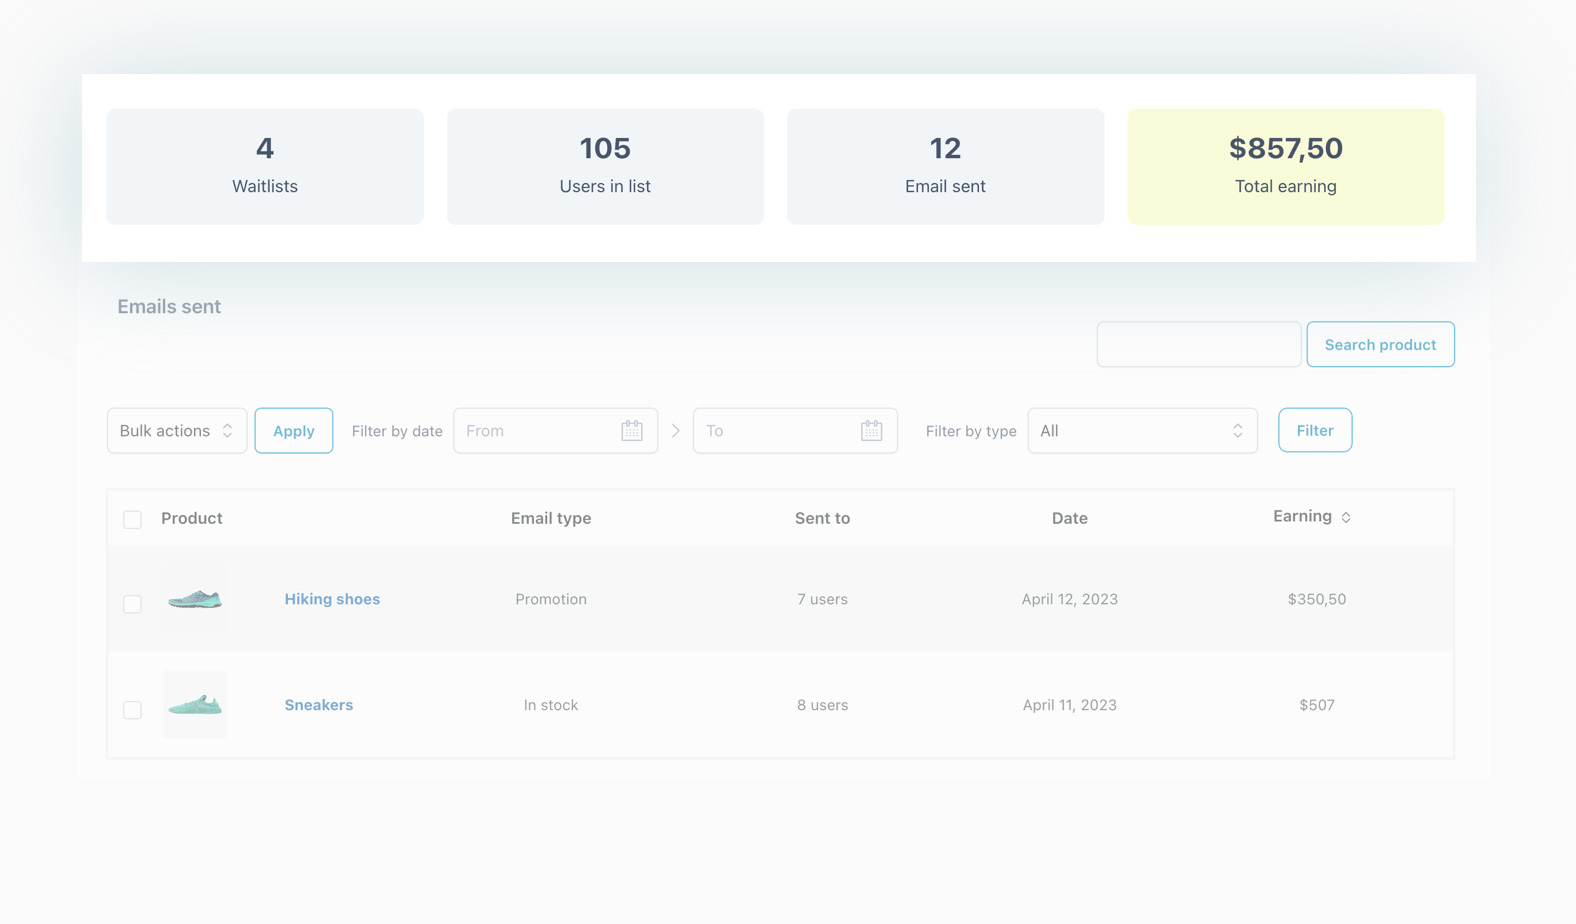
For each product waitlist listed in the table Emails sent, you will also see the email type that has been sent (Promotion or Back in stock), how many users it has been sent to, the sending date and the earning generated by these emails.

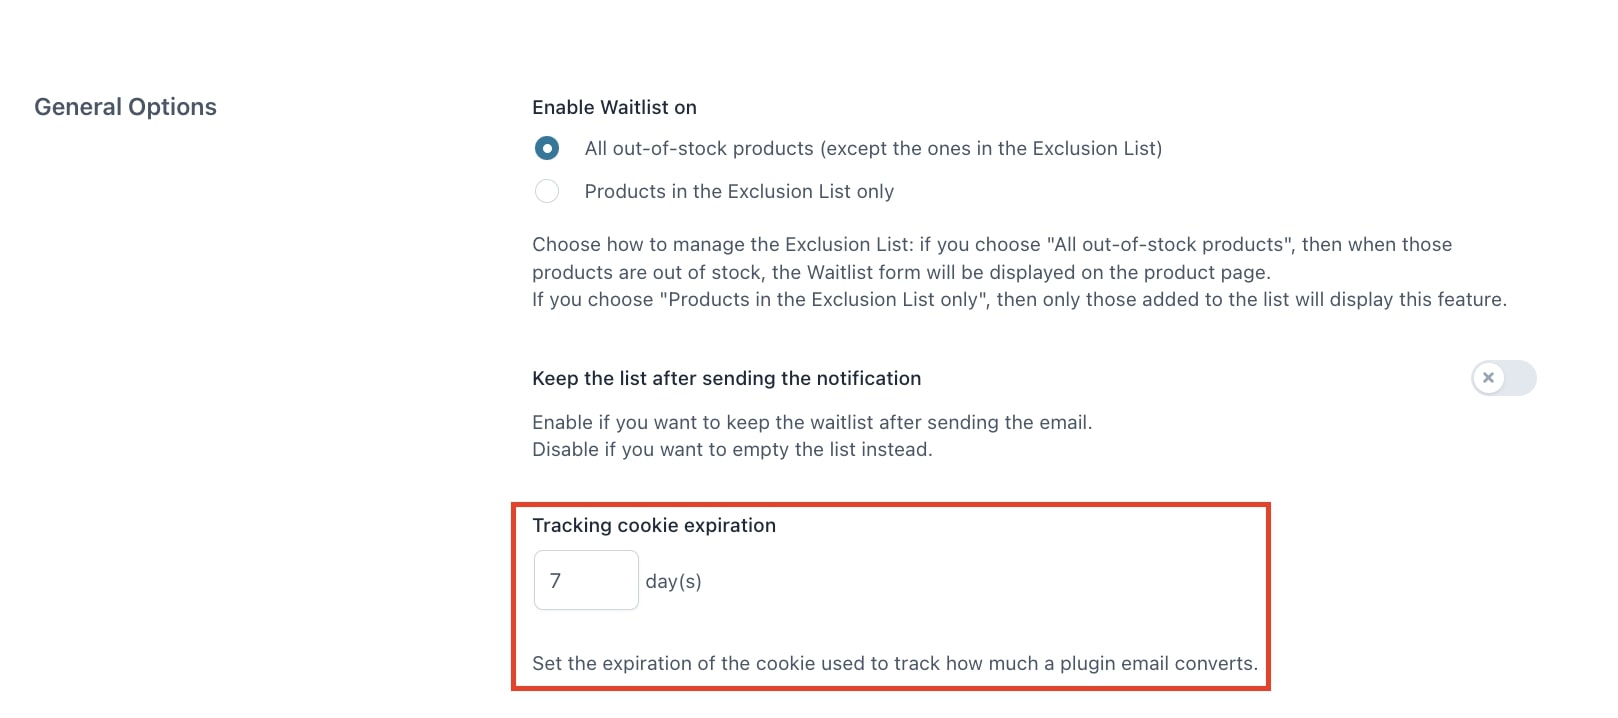
To track the conversions generated by the sent emails, you must define the tracking cookie expiration (in days) in the dedicated option available in the plugin General options tab.

Tracking cookie expiration

Actions

Bulk actions and filters

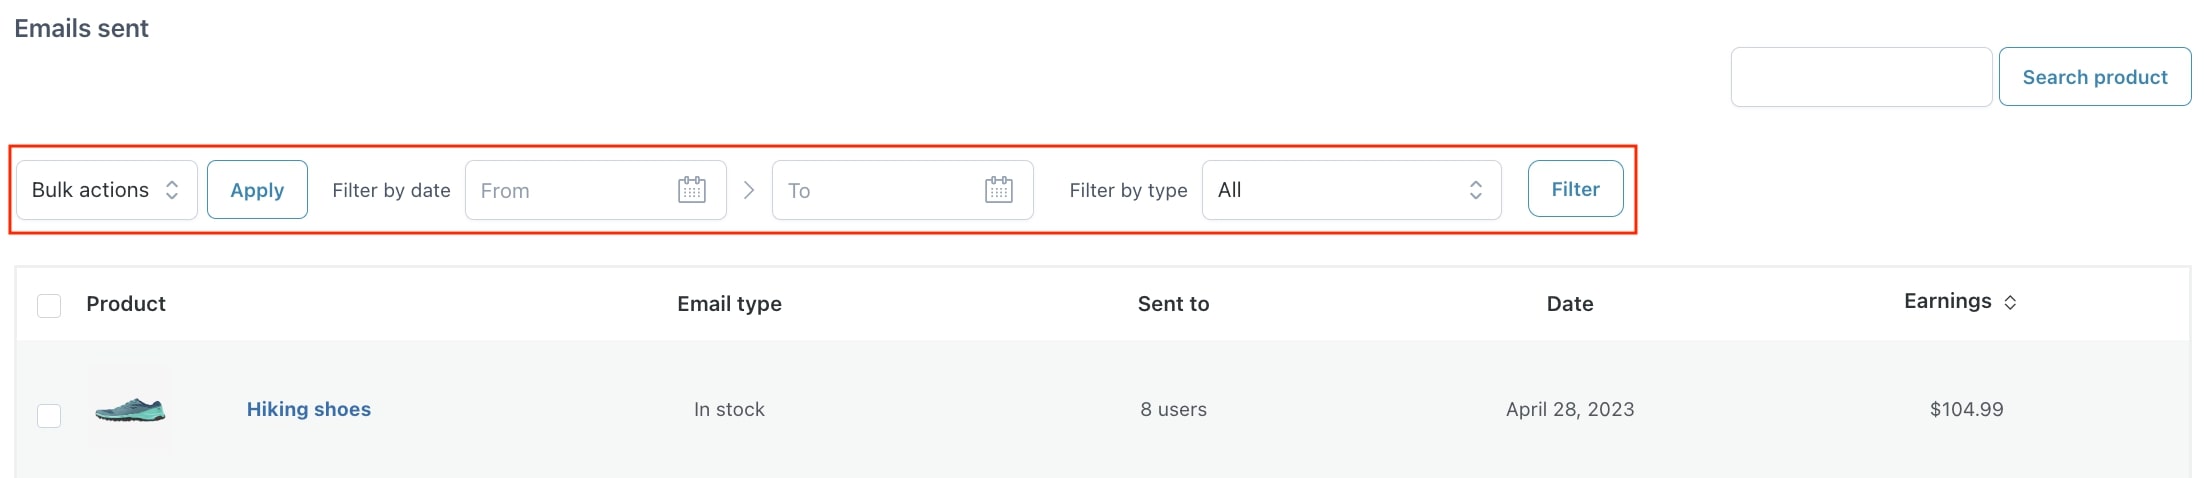
From the Emails sent section, you can apply the following actions:

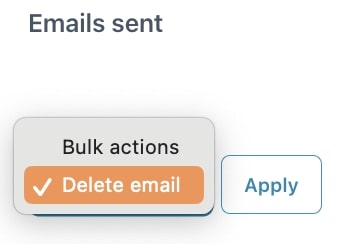
  • delete the emails with a bulk action after selecting them, choosing Delete email then clicking on Apply;
Bulk actions
  • filter emails by a range of dates by selecting them in the date pickers;
Filter by date
  • filter the emails by type by selecting In stock or Promotion.
Filter by type

Options

To let your users subscribe to waitlists for out-of-stock products, open the plugin panel and go to General options > Options. Here, you must enable the option Enable Waitlist on by choosing the products on which the waitlist form will show from:

Enable Waitlist features

  • All out-of-stock products (except the ones in the Exclusion List): this will show the form on the product pages of all products that are out of stock;
  • Products in the Exclusion List only: this will show the form only on product pages of products added to the Exclusion list. Go to this page to learn how to add products to the Exclusion list.

And this is what the waitlist form looks like on the product page.

Waitlist button on product page

But, what happens when clicking on the button? This is when the form shows and users are invited to enter their email address so that they will receive a notification email once the product will be back in stock.

Waitlist form

After successfully subscribing to the waitlist, a message will show.

Waitlist subscription message

Keep the list after sending the notification

The next option, if enabled, allows you to keep the waitlist even after sending the “Product back in stock” email to the users when the products become available. By keeping the list, you will have the possibility to send the email again in the future.


Keep waitlist option

Mandrill Options

If you want to use the Mandrill service to send emails, you can enable the option Mandrill Options.
After enabling it, you will have to enter the Mandrill API key, which is required to use Mandrill email service, in the related field.

Mandrill options


Exclusion list

If there are products, categories or tags you want to exclude from the Waitlist features, you can add them to the Exclusion List by clicking on the button Add exclusion available in General options > Exclusion list.

Exclusion list

In the popup, you can then select the exclusion type by choosing from

  • products
  • categories
  • tags

How to add the exclusion list

Products

Add products to the Exclusion list

Select Products in the Exclusion type option and start searching for the product/s you want to add to the Exclusion list.
For example, by adding Cherokee T-Shirt and Slippers, no Waitlist form will show on these two products and it won’t be possible for users to subscribe to a waitlist.

Exclusion list - Frontend example

Categories

How to add categories to the Exclusion list

Select Category in the Exclusion type option and start searching for the product categories you want to add to the Exclusion list.
For example, by adding Accessories, no Waitlist form will show on products of this category and it won’t be possible for users to subscribe to a waitlist.

Exclusion type - Category

Tags

Select Tag in the Exclusion type option and start searching for the product tags you want to add to the Exclusion list.
For example, by adding Short sleeved, no Waitlist form will show on products with this tag and it won’t be possible for users to subscribe to a waitlist.

Add product tags to the Exclusion list

All the exclusion lists created will now show in the Exclusion list table.

Exclusion lists

Bulk actions on Exclusion lists

From the Exclusion list table, you can easily and quickly remove the lists you have previously created by using the bulk actions.

Moreover, you can filter the exclusion lists by type (products, categories or tags) to make the removal procedure even faster.

GDPR compliance (Privacy Policy)

This plugin is fully compliant with the General Data Protection Regulation (GDPR).

Specifically, users will have the possibility to be redirected to the Privacy Policy and give their consent to be added to a waitlist through a dedicated checkbox.

To add this checkbox to the waitlist form, go to YITH > Waitlist > Form in Product Page > Options and enable the option Enable Privacy Policy checkbox.

Enable Privacy Policy checkbox

After enabling it, you can enter a custom text to show next to the checkbox. You can also include the shortcode [terms] and [privacy_policy] that will redirect users to the Terms and Privacy Policy pages if you have created and configured them in Appearance -> Customize -> WooCommerce -> Checkout.

Below is an example of what the checkbox looks like in the waitlist form.

Privacy Policy checkbox example

If the user clicks on the Submit button without selecting the checkbox, a notice will show to invite them to accept the Privacy Policy.

Privacy Policy notice

reCAPTCHA

To prevent spam registrations to your site waitlists, you can enable Google reCAPTCHA from YITH > Waitlist > Form in Product Page > Options.

But first of all, let’s see how to get your reCAPTCHA site key and secret key.

Register an account on Google (if you don’t have any yet), go to https://www.google.com/recaptcha/about/ and click on v3 Admin Console.

How to enable reCAPTCHA

Now choose the reCAPTCHA version to use, fill in the available fields and click on the submit button to add the reCAPTCHA to your site.

The plugin supports reCAPTCHA v3 and v2 “I’m not a robot”.  On the contrary, v3 is not visible and doesn’t require any action from the users.

The site key and secret key are now created.

Go to the Form options section of the plugin, make sure you select the reCAPTCHA version for which you have registered your site and copy and paste the site and secret keys into the related fields.

    Customization

    To customize the form style and notices added by the plugin, go to YITH > Waitlist > Form in Product Page > Customization where you will find the following options.

    Waitlist customization options

    • Section background: choose the background color for the waitlist section that will show on product pages;
    • Section padding: set the padding (in px or %) for the waitlist section;
    • Section border-radius: set the border radius for the waitlist section;

    Advanced editor

    • Notice to show in out-of-stock products: use the advanced editor to enter a custom message to show before the form through which users can subscribe to the waitlist. You can also use the following placeholders:
      • {blogname}
      • {site_title}
      • {product_title}
      • {product_sku}
      • {product_price}
      • {unsubscribe}here{/unsubscribe}

    Waitlist customization options

    • Form placeholder: use this field to add an optional text to show in the form input field;
    • Button label: enter the text to show in the Waitlist button;
    • Button colors: choose the background and text colors for the button;

    Enable Waitlist counter

    • Show counter: enable this option to show the number of users who subscribed to the product waitlist;

    Waitlist counter on frontend

    • Counter text: enter the text that you want to show in the counter section. To dynamically show how many users subscribed to the waitlist so far, you can use the placeholder {counter};

    Show removal button

    • Show removal button: enable this option to show the button through which users can remove the email address previously registered on the product waitlist;
    • Removal button label: enter the text to show in the removal button;
    • Removal button colors: choose the background and text colors for the button.

    Removal button on frontend

    Success/Error Notices

    From the Customization section in Form in Product Pages settings, you can customize the messages shown to users when they subscribe to a waitlist.

    How to customize Waitlist notices

    Here, you can also set the text and background colors of the notices.

    Subscription message

    This is the message to show to your users when they subscribe to a product waitlist. You can customize it as you prefer by entering a text that will replace the default one.

    Waitlist subscription message


    Removal message

    This is the message to show to your users when they unsubscribe to a product waitlist. You can customize it as you prefer by entering a text that will replace the default one.

    Waitlist removal message

    Notice to show when confirmation is required

    This is the message to show to your users when they are asked to confirm if they want to be subscribed to a product waitlist. You can customize it as you prefer by entering a text that will replace the default one.

    Waitlist confirmation message

    Error message

    This is the message to show to your users when an error occurred while subscribing to a product waitlist. You can customize it as you prefer by entering a text that will replace the default one.

    Waitlist error message

    Error message for users that are already subscribed

    This is the message to show to your users when they try to subscribe to a product waitlist to which they are already registered. You can customize it as you prefer by entering a text that will replace the default one.

    Waitlist error message

    Message example

    Confirmation message example


    Variable products

    In the case of variable products, if one or more variations are out of stock, users can subscribe to the waitlist and get notified as soon as that product variation is back in stock.

    Waitlist for product variations

    When users subscribe to the waitlist for a specific product variation, this will show in the waitlists table like in the example below.

    Subscription email

    From the Email settings section in the panel, you can manage and customize all the emails automatically sent by the plugin.

    Waitlist emails

    On this page, we will analyze the options available in the Subscription email which is the email sent to all users who subscribe to a product waitlist.

    Waitlist - Subscription email

    Click on the pencil icon to access the email options.

    Waitlist subscription email options

    • Subject: you can enter a custom text to replace the default email subject;
    • Email heading: you can enter a custom text to replace the default email heading;
    • Email type: choose the email type from HTML, plain text or multipart;
    • Email content: use the advanced editor to add the content of the email received by users. The available placeholders are:
      • {blogname}: the name of the blog
      • {site_title}: the name of the site
      • {product_title}: the product name
      • {product_sku}: the SKU of the product
      • {product_price}: the price of the product
      • {unsubscribe}here{/unsubscribe}: the link to unsubscribe
    • Footer text: use the advanced editor to add footer text for the email received by users. The available placeholders are:
      • {blogname}: the name of the blog
      • {site_title}: the name of the site
      • {product_title}: the product name
      • {product_sku}: the SKU of the product
      • {product_price}: the price of the product
      • {unsubscribe}here{/unsubscribe}: the link to unsubscribe

    Waitlist placeholders

    • Show product image: enable this option if you want to show the product image in the email.

    Email example

    Subscription email example