View Product Page

Points redeeming options

In the Points redeeming section, you will be able to find all the options and rules to redeem the points, create restrictions and share points.

Let’s start with the first one and go to YITH > Points and Rewards > Points redeeming.

Points redeeming

Redeeming points

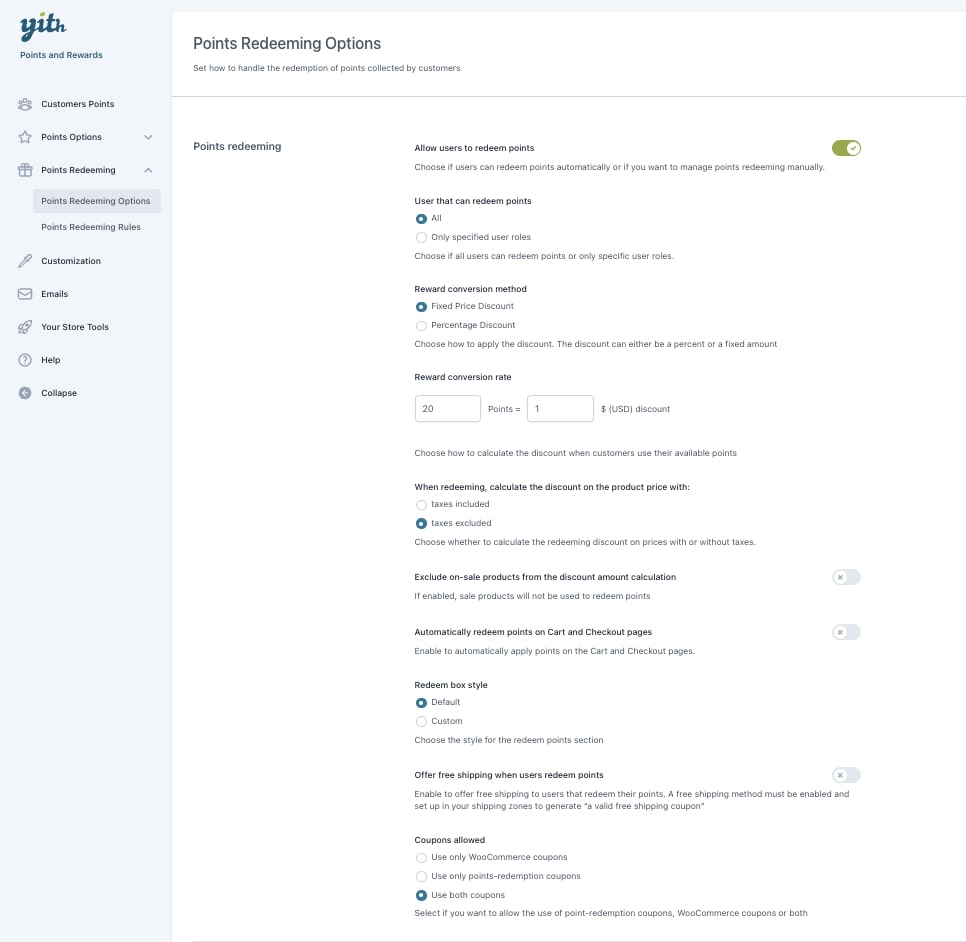
How can customers redeem their points? They will automatically see a message that informs them about how many points they have and the corresponding discount they can have on the next purchase. The message will be visible on the Cart page and they can decide whether to use them or not.

  • Allow users to redeem points: turn this on if you want so that your users can use their points to get automatically notified of an available discount in Cart. Please, note: if you don’t enable this option, your users will not be able to redeem their points, unless they convert them into a coupon code (as explained here).
  • Users that can redeem points: choose whether to let all users or only specific user roles redeem their points in Cart and Checkout.
User roles that can redeem points
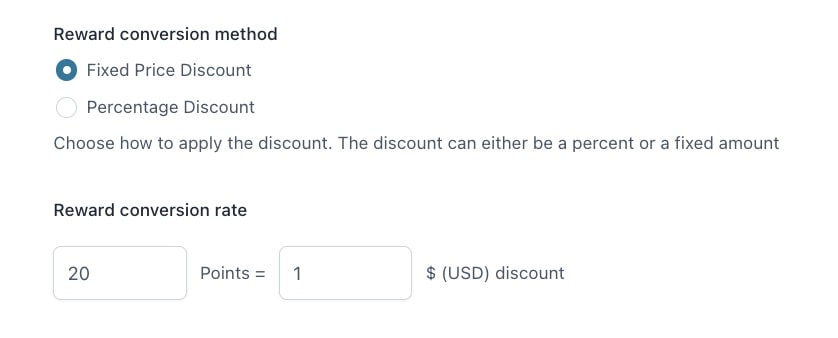
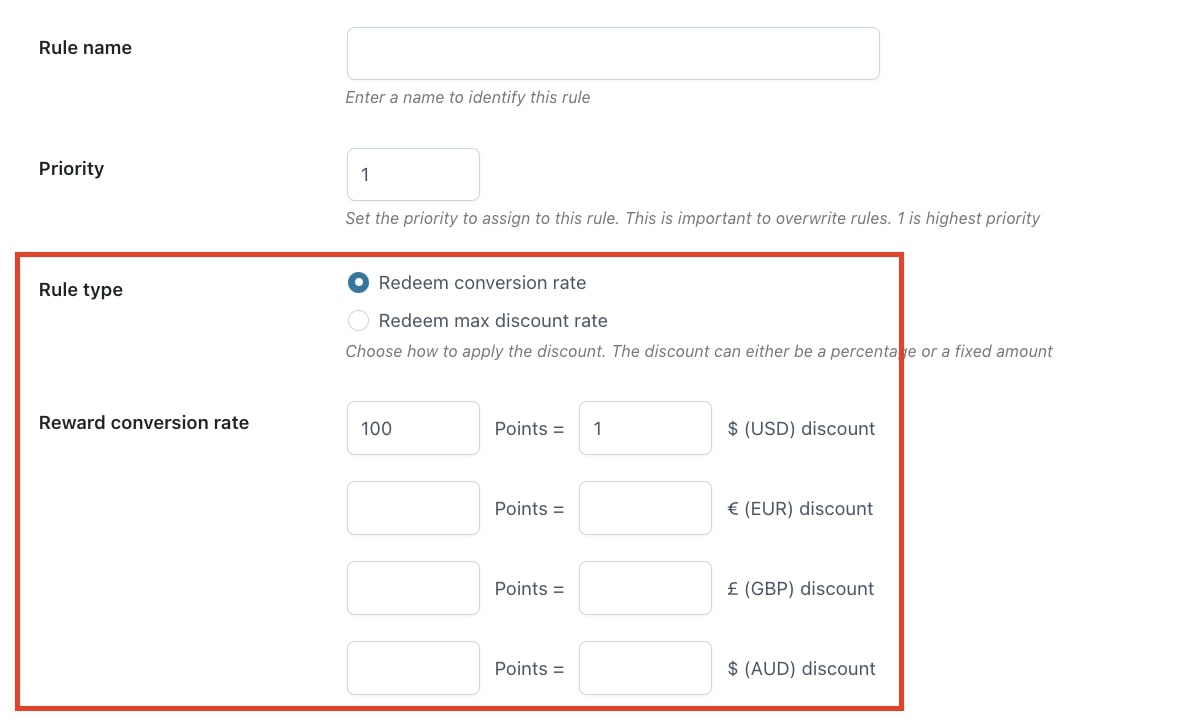
  • Reward conversion method: here you can choose what the conversion should be:
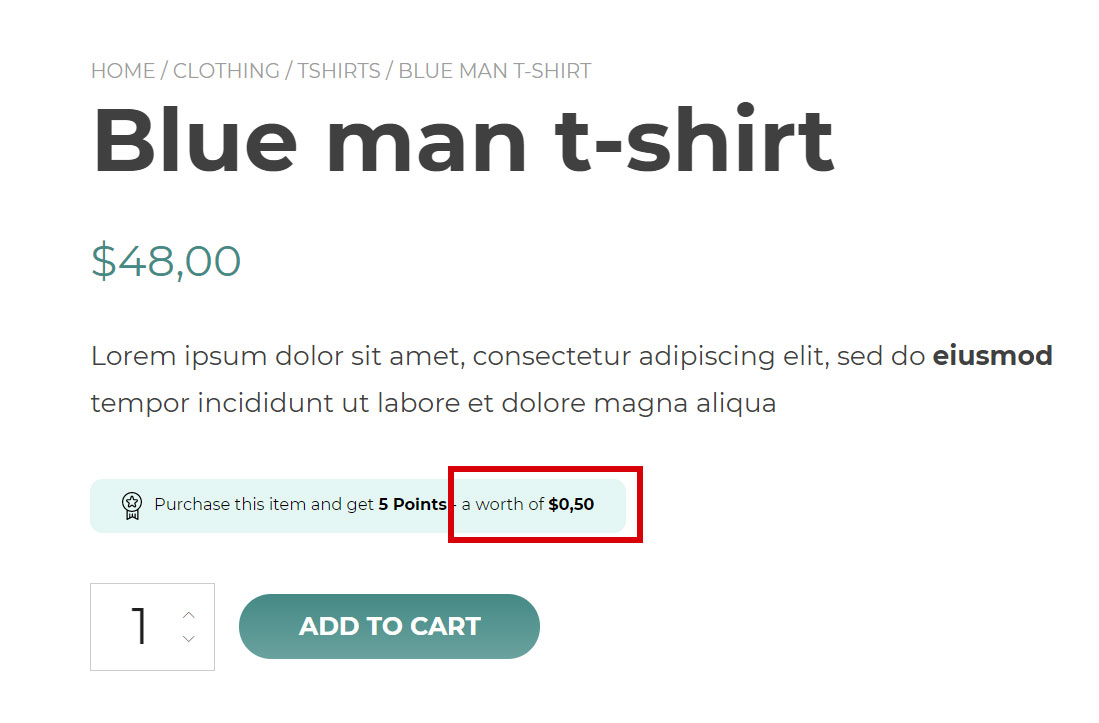
  1. Fixed price discount: this option lets you convert points into a fixed price discount. For example, every 100 points give €1 discount.
Fixed price discount

2. Percentage discount: this option lets you convert points into a percent discount in the cart. For example, every 50 points give a 30% off.

Percentage discount
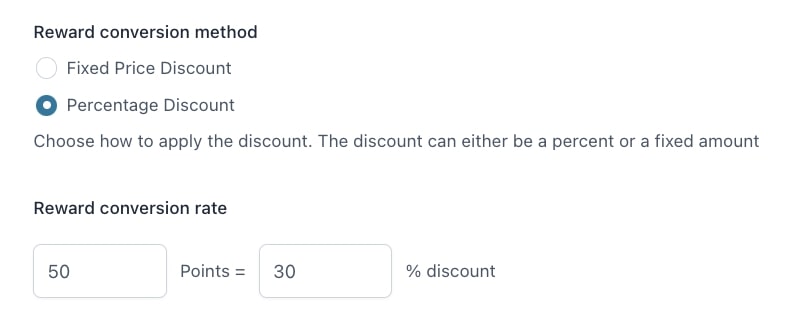
  • Reward conversion rate: here you can enter the rule. This option updates dynamically based on the previous settings (fixed or percent discount). Based on the selected method, the plugin will save different options, so whenever you want to switch you’ll be able to find your previous settings.
  • When redeeming, calculate the discount on the product price with:
    • taxes included
    • taxes excluded.
      In this way, the discount amount will be calculated out of the price with or without taxes.

Example: the product costs $10 + 20% VAT = $12.
I set a maximum points-based discount of 50%.
If I select “taxes included”, the discount will be $6 (50% of $12);
if I select “taxes excluded”, the discount will be $5 (50% of $10).

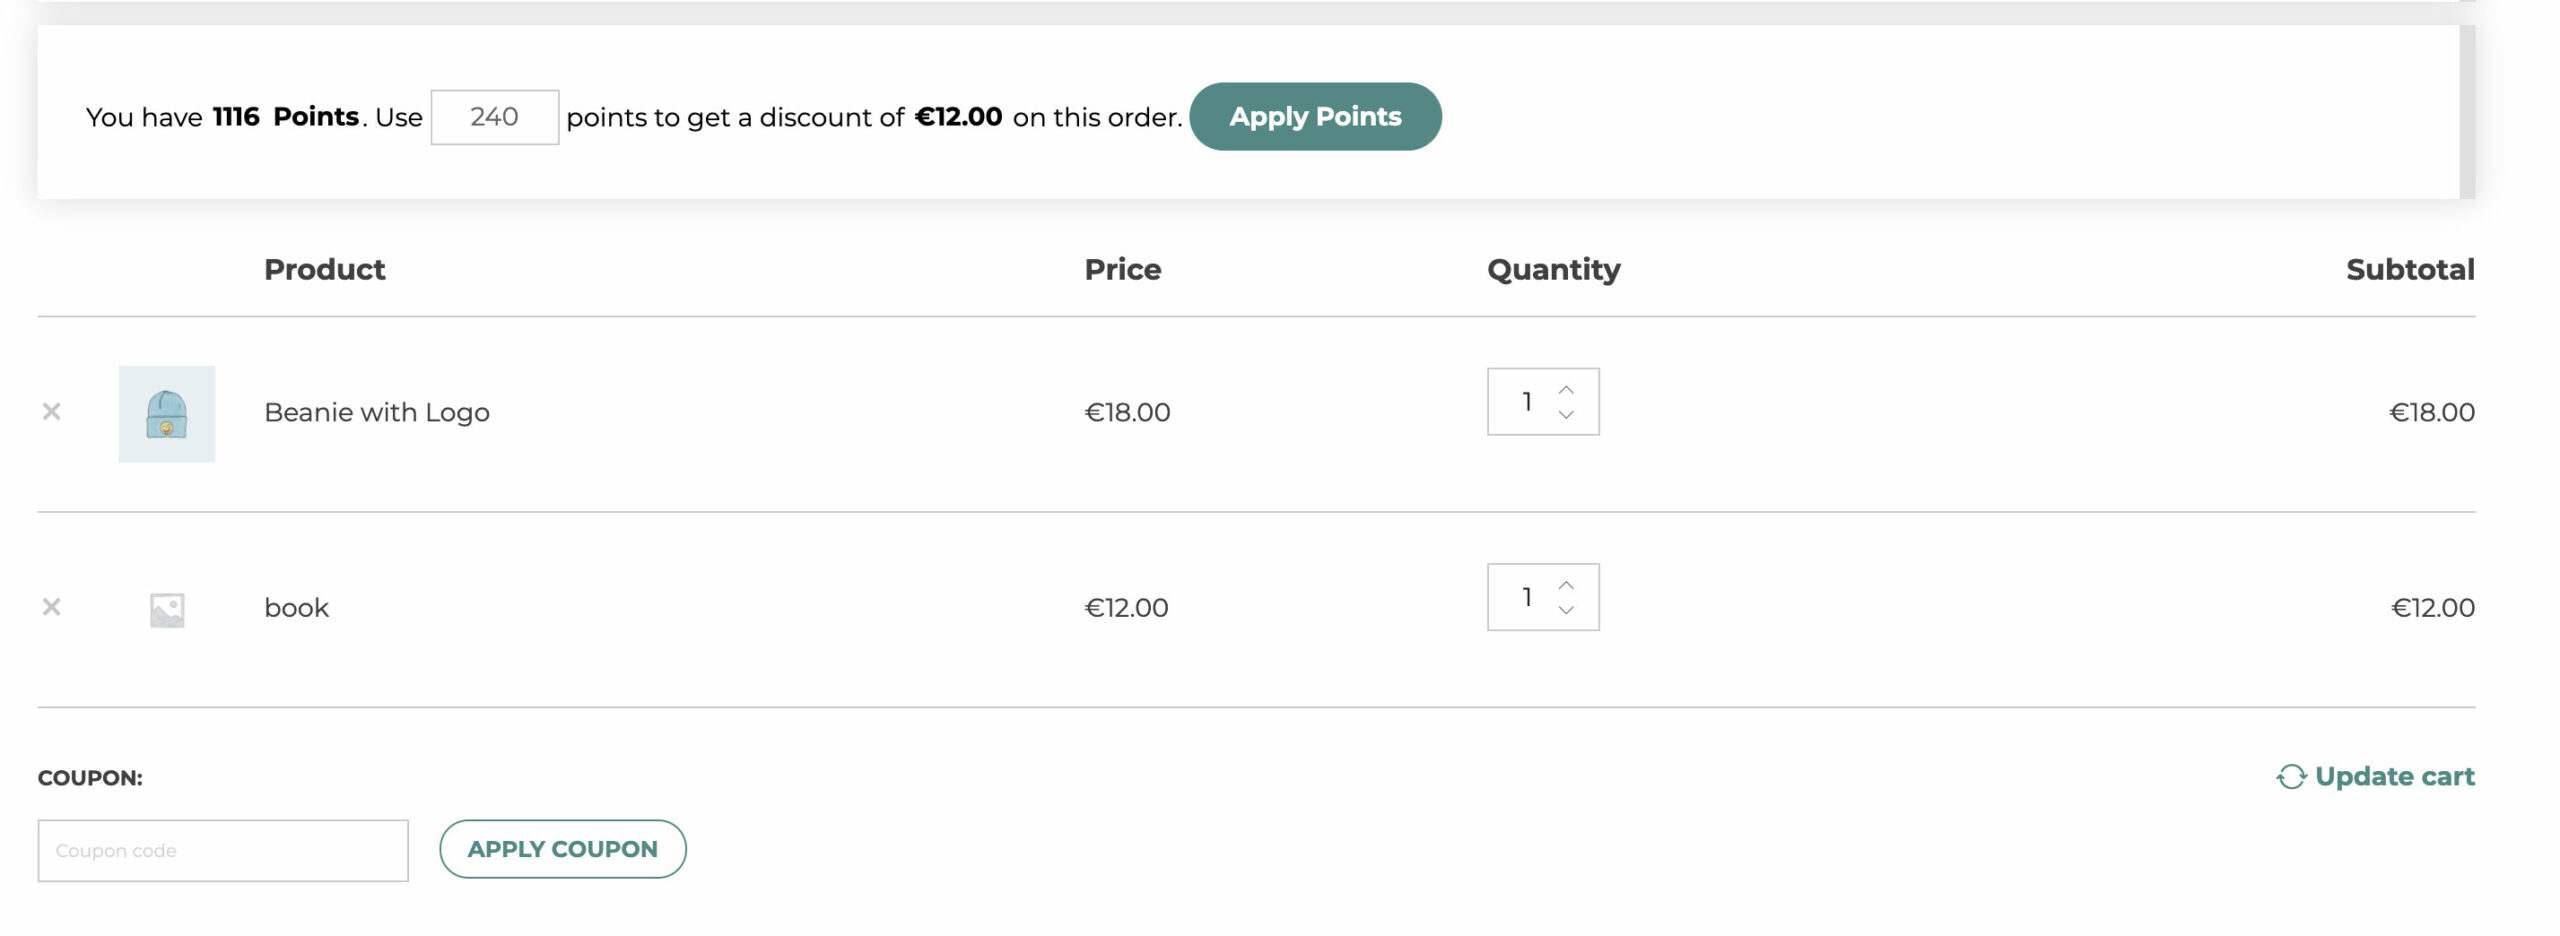
  • Exclude on-sale products from the discount amount calculation: if enabled, sale products will not be used to redeem points. So, in the points box on the Cart page, the maximum number of usable points will be calculated for all products except for the on-sale ones.

Example: with this option enabled, let’s consider the following screenshot. Beanie with Logo is on-sale, so the maximum amount of points that can be used on this order is the equivalent of the Book price, that is a maximum discount of €12.00, instead of €30.00 (the price of Beanie with Logo, €18.00, cannot be discounted through points).

Example redeem points exclude on sale

On the other hand, if you use a points-generated coupon code, this will apply the discount to all products in cart, no matter if they are on-sale or not.

  • Automatically redeem points on Cart/Checkout pages: enable to automatically apply points on the cart/checkout page. If disabled, the user will have to click on the “Apply points” button in the box on top.
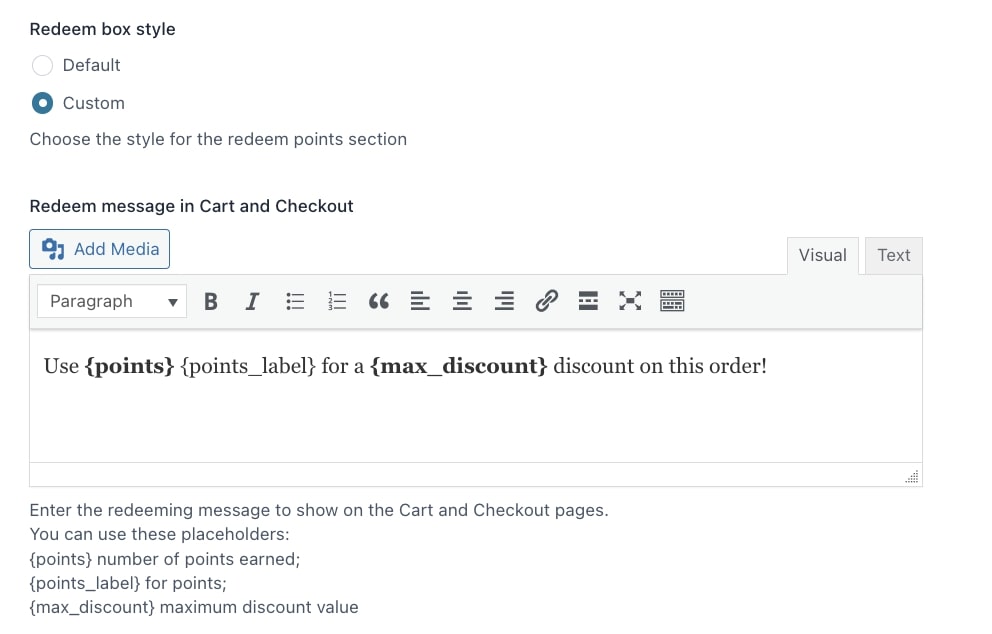
  • Redeem box style: you can choose between a default style or a custom one where you can customize the text and add media through a standard WordPress editor.
Redeem box style
Default box style
Default box style
Custom box style
Custom box style with image
  • Offer free shipping when users redeem points: enable this option if you want that the points-generated discount lets users not only redeem points but also take advantage of free shipping. Please, note: to make this feature work, you have to enable a free shipping method in WooCommerce > Settings > Shipping (learn more about this here). Users will, then, be able to select free shipping on the Checkout page.
  • Coupons allowed: pick what you want to do when your customers use their points and other WooCommerce coupon codes. You can choose one of the following options:
    • Use only WooCommerce coupons: they will be able to use only the standard coupon, and they can’t use their points to get extra discounts.
    • Use only points-redemption coupons: they will only be able to get the discount generated by their points.
    • Use both coupons: they can use both discounts.

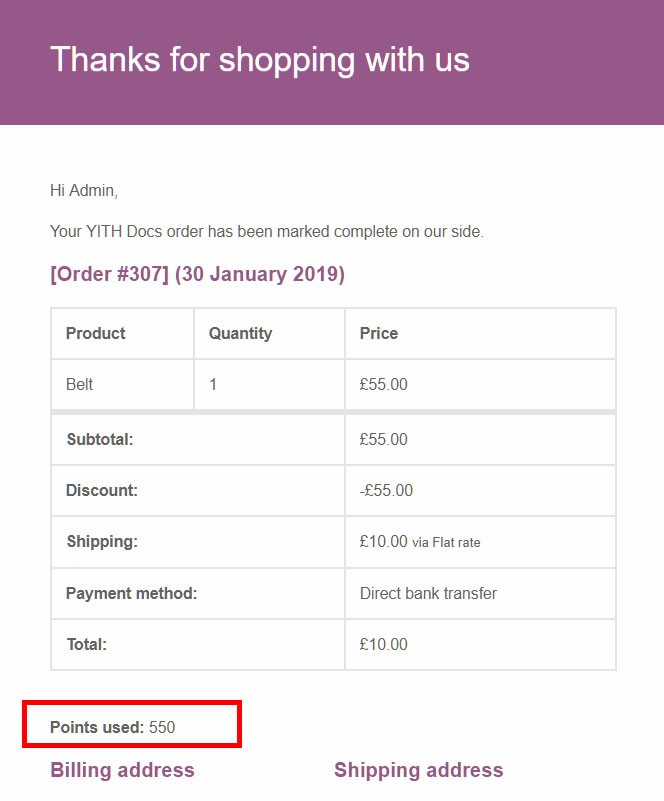
An example of the points redemption

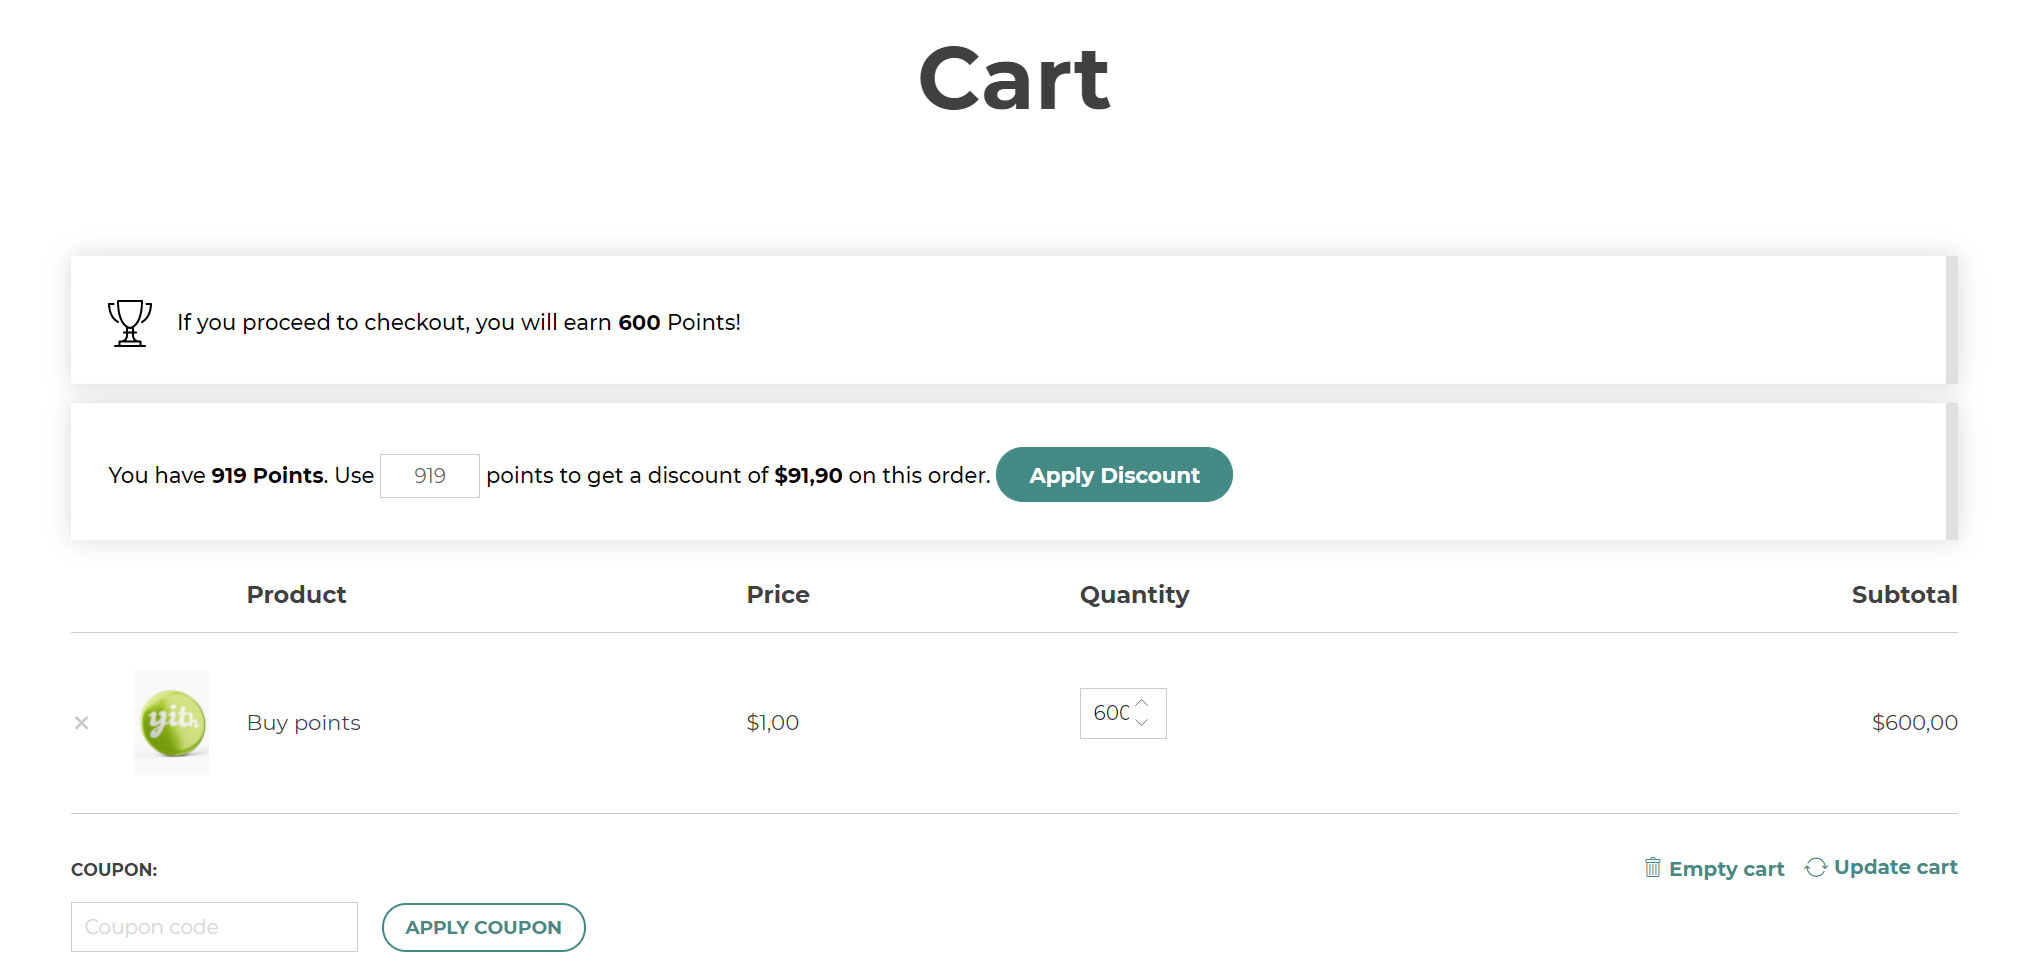
This is an example of how your users will be invited to use their points to get a discount.

Cart redeem points

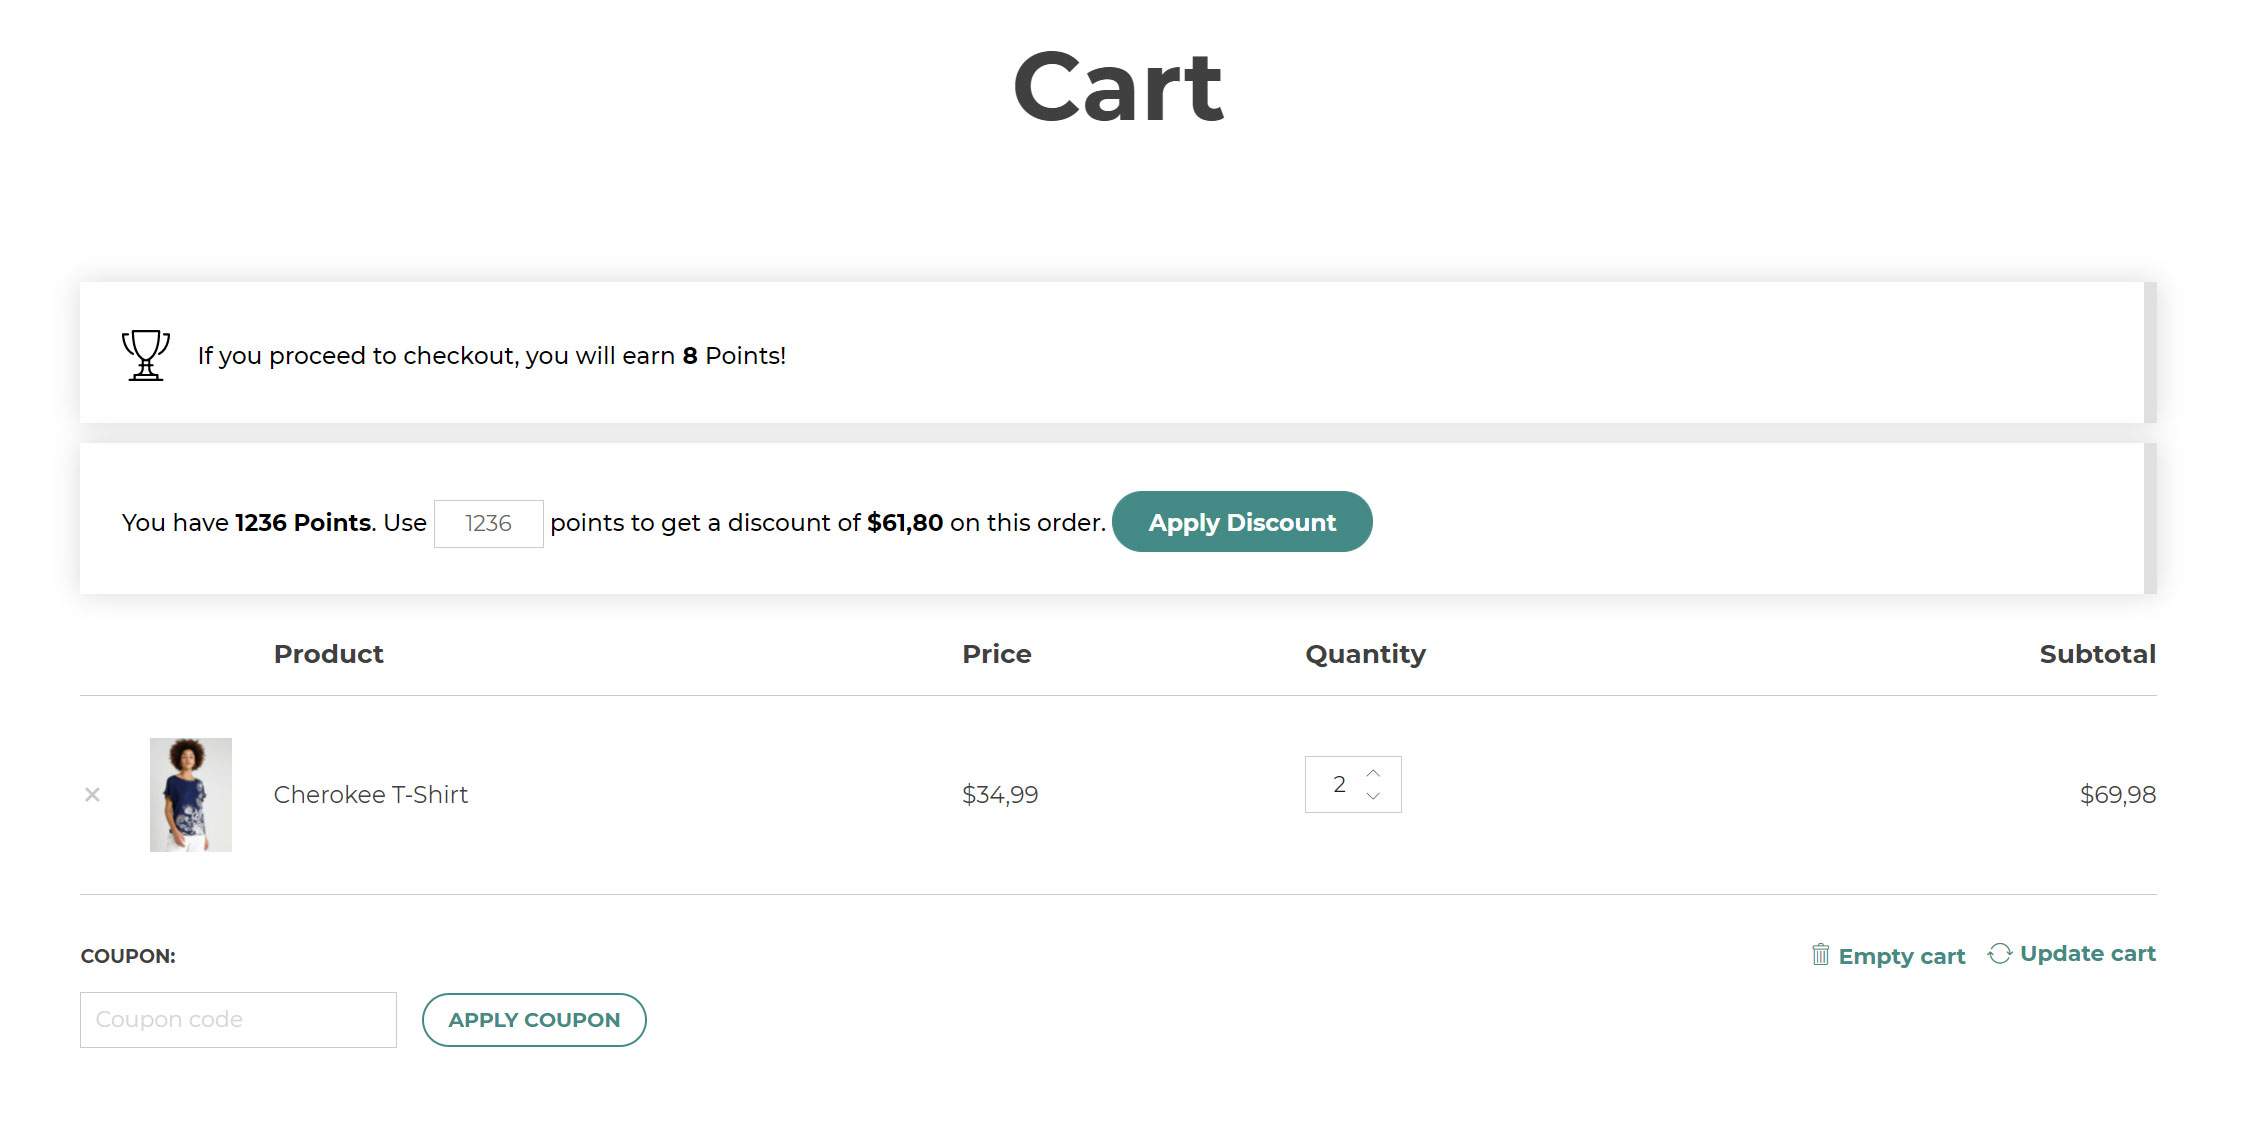
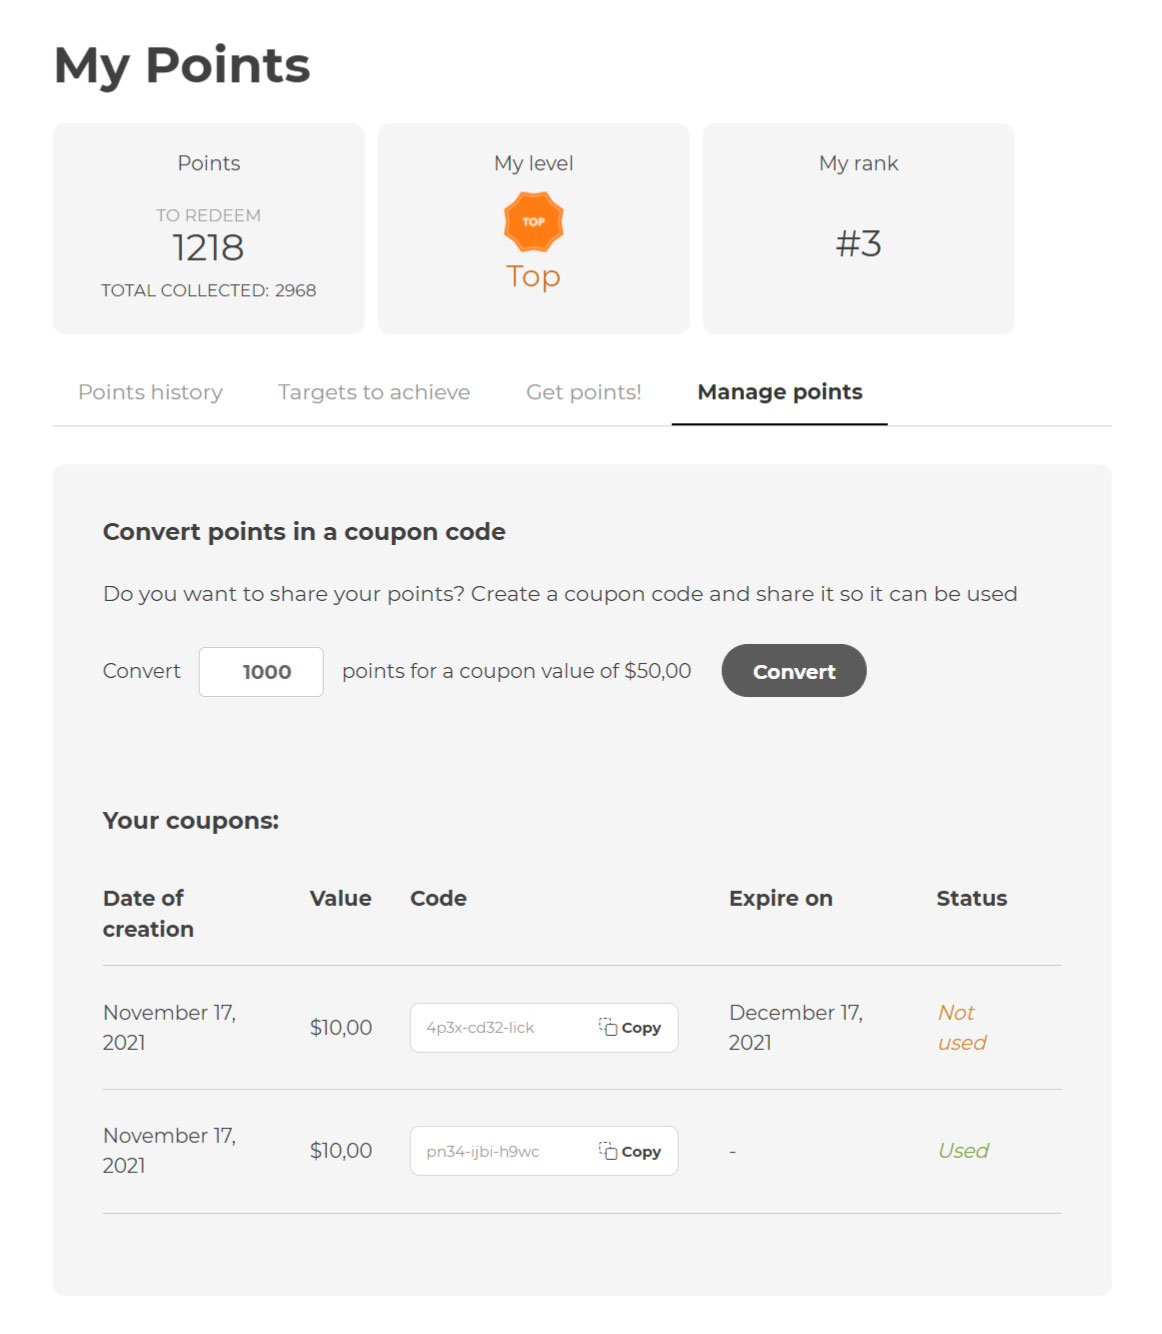
By clicking on Apply Discount the maximum number of points available will be used. Yet, you can also change the number of points as displayed in the example below:

Redeem points and get discount in Cart

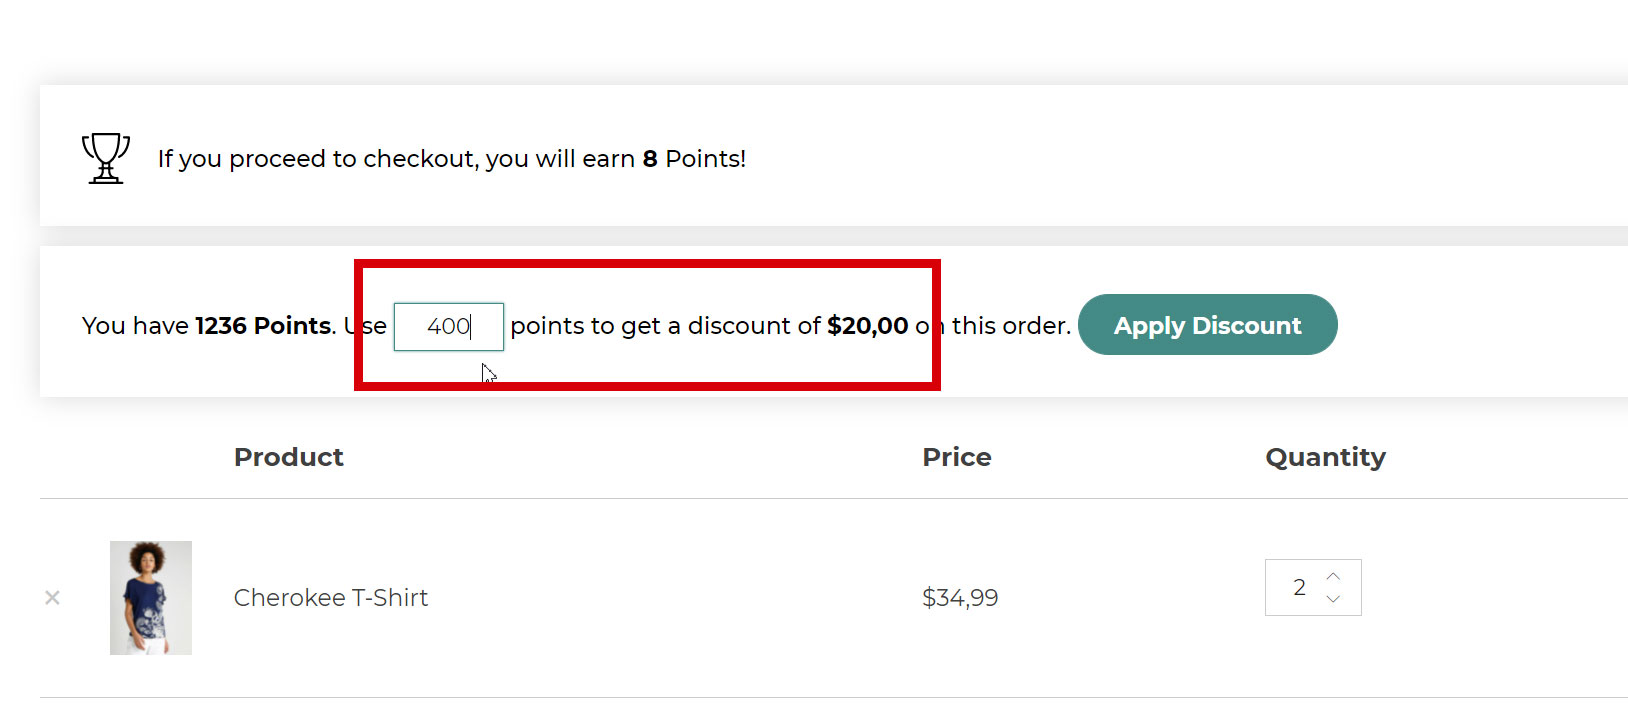
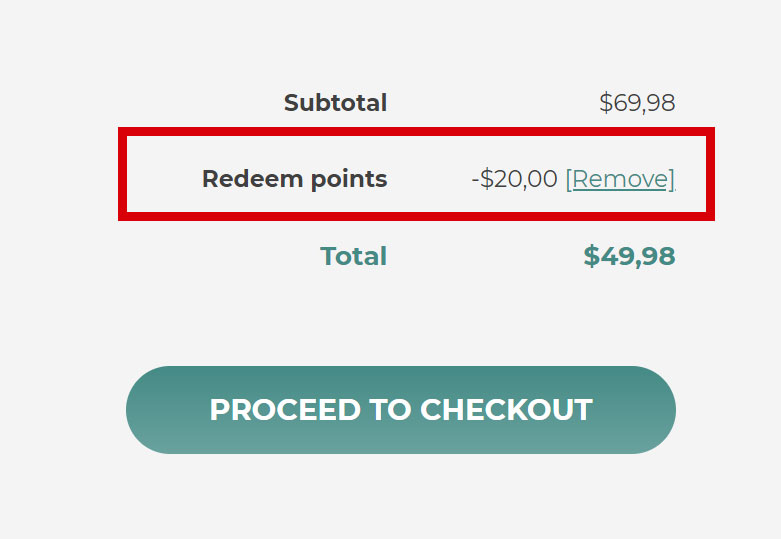
So, changing from 1236 to 400 points will only apply a $20 discount.

Discount in cart

Go to the next page to read about the Redeeming restrictions >

Redeeming restrictions

Let’s go to YITH > Points and Rewards > Points redeeming. You can find two sub-sections, Points redeeming and Redeeming restrictions.

Here in the redeeming restrictions section, you can find more options and restrictions for when users will redeem points.

Please, note: these settings change based on the Reward conversion method you’ve selected above (Fixed or Percent discount).

Yet, the plugin settings for Fixed and Percent Discount are saved as two separate settings, so that whenever you switch from one method to the other, you can restore your previous settings, no need to configure everything from scratch every time you want to switch.

For example, you can set up a Maximum discount of €100 with a fixed discount method, but a maximum discount of 30% with the percent method.

Let’s see, then, all the available options here.

Restrictions for Fixed price

Redeeming restrictions - fixed price

First of all, to set up your redeeming restrictions, you must enable the option Apply redeeming restrictions.

  • Maximum discount users can get: here you can enter the maximum discount amount that your users can get when they redeem their points. Based on what you select as a conversion method (fixed or percent discount), this value will either be a fixed maximum discount or a maximum percentage applied to each product.

You can override this value either on category or on product level from the Redeem rules tab.

  • Minimum cart amount to redeem points: enter here the minimum cart amount required to redeem points. E.g. if you enter €10 here, users cannot use their points for orders below €10.
  • Minimum discount required to redeem: here, you can enter the minimum discount required to redeem points. For example, if your user has 10 points worth €1 discount, and the minimum discount is €5, they will not be able to redeem those points yet, they’ll have to collect at least 50 points worth a €5 discount.
  • Maximum discount for a single product: here you can enter the maximum points-generated discount that can be applied per product.

Please, note: the points-generated discount is always divided by all the products in the cart, so, for example, if your users use 1000 points worth a €100 discount in a cart with 5 products, the discount per product would be €20. If you enter a maximum of €15 here, the discount applied would be a maximum of €15 per product, so €75 (€15 * 5 products).

Restrictions for Percentage discount

Redeeming restrictions - percentage price
  • Minimum discount users can get: set the minimum discount percentage allowed in cart when redeeming points.
  • Maximum discount users can get: set the maximum discount percentage allowed in cart when redeeming points
  • Minimum cart amount to redeem points: set the minimum cart amount required to redeem points.

Share points – coupons

Last but not least in the Points redeeming section, you can find the Points sharing options. Here you can enable the options to allow your users to convert their points into coupon codes and share them with other users as a gift.

The generated coupon code will be available in My Account > My Points > Manage points.

Convert points into a coupon code

Let’s now see the settings.

Points sharing
  • Allow users to convert points into a coupon to share: enable to allow customers to convert their points in a coupon code that will be available on My Account page.
  • Apply limits to points coupons: enable to set a minimum or maximum of points that can be converted into a coupon code
    • Minimum amount of points that can be converted: set the minimum number of points that the user can convert into a coupon code.
    • Maximum amount of points that can be converted: set the maximum number of points that the user can convert into a coupon code.
  • Set the expiration for points coupon codes: enable to set an expiry date for points coupon codes to be used. You can set the value in days in the option Points coupon will expire after.

When the coupon code expires, the points are NOT re-assigned, so they are lost. Make sure your users are well informed about the expiration of the points coupon code if enabled.

The generated coupon codes will be available in My Account ready to be copied by the customer.

Coupon codes in my account

Once generated, the customer cannot edit nor delete the coupon code, but the admin and shop managers will be able to find the code in the standard WooCommerce Coupons section and edit them as they prefer.

Points Coupons

Points redeeming rules

From this section, you can create custom rules that override the global redeeming options and assign this rule to specific users and user roles and also to specific categories or products.

Redeem rules settings
  • Rule name: enter a name to identify this rule.
  • Priority: in case more than one rule applies to the same product, the rule with higher priority will apply. Priority 1 is the highest.

Important note about the priority. The priority order works only among rules of the same type. You can have three types of rules: product rules, category rules and global rules. Product rules are always highest priority, then category rules and finally global rules. Within each rule type, you can set a priority order, but you cannot change the basic order as product rules always win over category rules and category rules always win over global rules.

Only one rule applies, so, when multiple rules apply to the same product, if there are product rules set, the plugin will take the product rule with highest priority.
If only the category and global rules apply, the plugin will apply the category rule with highest priority.
If only the global rules apply, the plugin will apply the global rule with higher priority.

So, when creating the rules, we suggest you add a note in the name to the type of rule. Like this:

Renaming rules
  • Rule type: you can either choose to apply the discount by using the redeem conversion rate or a redeem max discount rate. Based on the selection, the options will change, so, let’s check them one after the other.

Redeem conversion rate

When you select the Redeem conversion rate you will be able to set up a conversion rule from points to discount.

So, for example, as in the image below, you can set that 100 Points = 1 $ (USD) discount and if I have a total of 1000 points, you can get a maximum of 10$ discount.

Redeem conversion rate

Apply rule to: finally, you can decide to apply this rule to:

  • all users
  • specific user roles or
  • users with a specific points level.
Apply rule to user levels

Example: your shop’s global conversion rate is 10 points = 1$ discount, but you want to give a double discount to “Top” level users.
You can create a rule, where the conversion rate is 5 points = 1$ discount and assign the rule to “Top” level only.

Redeem max discount rate

When choosing this option, you will be able to apply a maximum discount restriction to the discount your customers can get.

Redeeming rule options

These rules override the global “Redeeming restrictions”.

  • Max discount type: you can either make sure that the maximum discount is calculated from the global discount settings or as a fixed amount that you can set in this rule. So choose from:
    • Set a % max discount based on the global max discount. e.g. with a global max discount of 50$, if you set a max discount of 10% for this product, the user will get a max discount of 5$ for this product.
    • Set a fixed max discount value. e.g. max 5$ of discount for this product.
  • Apply rule to these products: this allows you to apply the maximum discount restriction to specific products and choose from:
    • all products
    • specific products
    • on sale products
    • products of specific categories
    • products of specific tags

You can further refine the selection and exclude some of them.

Apply rule to: finally, you can decide to apply this max discount rule to:

Example: your shop’s global discount is set to be 50%, but you want to allow “Best buyers” level to get up to a 75% discount on Accessories category.

Customization settings

In the Customization section, you will be able to edit all the options to adapt your plugin style to your website.

It’s made of multiple sections:

General

Let’s start with the General section where you can enable one option only if you want to hide all messages to guest users on the frontend.

Hide points messages to guest users

This is particularly useful if you want to set up your loyalty programme and gamification strategies only for registered users.

Points in shop pages

From this section, you can configure the texts and colors of what appears on the frontend on the Shop page, archive pages (like category or tag pages), and on the product page.

Let’s check all the available options.

Points in shop pages
  • Show points messages in shop pages (loop): enable this option to show the points message on all archive pages (Shop, category and tag pages).
  • Loop message: you can use the standard editor to customize the text and upload also media files. You can also use the following available placeholders:
    • {points} number of points earned;
    • {points_label} of points;
    • {price_discount_fixed_conversion} the value corresponding to points
  • Colors: finally you can customize the colors of the text, background and border of this message.
SRkBAYClQs^1#zcOfZbwZqbx

Points in product page

Points messages in product page
  • Show points messages in product page: with this option you can show a custom message on the product pages and inform your users about how many points that product will allow them to collect.
  • Update the message when the product quantity changes: enable this option to show the point message updated when the user changes the product quantity.
Default message
Updated message
Updated message
  • Message position: choose the position where this message will appear among:
    • Before “Add to Cart” Button (as in the image below)
    • After “Add to Cart” Button
    • Before excerpt
    • After excerpt
    • After product meta
  • Single product page message: you can use the standard editor to customize the text and upload also media files. You can also use the following available placeholders:
    • {points} number of points earned;
    • {points_label} of points;
    • {price_discount_fixed_conversion} the value corresponding to points
  • Colors: finally you can customize the colors of the text and background of this message.
Points on product page

Points in My Account

Points in My account page
  • Show points on My Account: enable to show the My Points section on My account page. This will add an endpoint in the My Account section that will look like this:
Points history in My Account

Here you can see a visual summary showing:

  • Points. In the first tile, you can see points available to redeem (1218 in the screenshot above) and the total points collected so far, including the ones that have been redeemed (2968 in the screenshot above).
  • Your level (if any achieved): the level will be calculated from the total collected points.
  • Your rank in the general rankings. The position in the ranking will be calculated from the total collected points (ever, month, week, day).

Then, you will see four tabs for:

  • Points history: a table with all the points-related actions, so points earned through orders, points redeemed, for target achievements, extra points, coupons generated and so on (see screenshot above).
  • Targets to achieve: in this tab, you can see the banners that inform your users about the achievable targets. It automatically shows all the Target banners here, and optionally Simple banners (based on the banner settings).
My account - target banners
  • Get points: in this tab, you can see all the Get points banners, so the ones that inform your users about extra actions they can take to earn more points, like reviewing a product or referring a friend. Optionally, you can also show Simple banners here (this can be done from every Simple banner settings).
My account - get points
  • Manage points: here is where you can generate a coupon code from your points and see all the generated coupon codes.
My account - coupons

Let’s check the other options in the Show points in My Account settings:

  • Label for points section: here you can change the name of the Points section in My account.
My points label
  • Endpoint for points section: enter the endpoint of the Points section in My account page. Endpoints cannot contain any spaces or uppercase letters. Default to: my-points.
  • Show points value: enable this option to make sure that the money worth of points is shown on the product page and in the tile in My account summary. This will encourage your users to buy as they can see the discount that they can accumulate on a future purchase.
Points worth
  • Show points in My Account: enable this option to show points earned and spent in My Account > Order details.
Points earned
  • Show points in email: enable this option to show points earned and spent in the Order completed email.
points-in-email

Points in Cart & Checkout

Points in Cart & Checkout pages
  • Show points in Cart page: enable to show the points message on the Cart page.
  • Message text in cart: you can use the standard editor to customize the text and upload also media files. You can also use the following available placeholders:
    • {points} number of points earned;
    • {points_label} of points;
    • {price_discount_fixed_conversion} the value corresponding to points
Points message on cart page
  • Show points in Checkout page: enable this option to show the points message on the Cart page.
  • Message text in checkout: you can use the standard editor to customize the text and upload also media files. You can also use the following available placeholders:
    • {points} number of points earned;
    • {points_label} of points;
    • {price_discount_fixed_conversion} the value corresponding to points

Labels settings

Here, you can edit many of the texts of the plugin with your own text. You can find the list of all available labels below.

Labels
  • Singular label replacing ‘point’: default ‘point’
  • Plural label replacing ‘points’: default ‘points’
  • Order Completed
  • Order Processing
  • Order Cancelled
  • Admin Action
  • Reviews
  • Registration
  • Target – Total Points: default ‘Target achieved – Points collected’
  • Target – Total Amount: default ‘Target achieved – Total spend amount’
  • Target – Total Orders: default ‘Target achieved – Total Orders’
  • Target Checkout Total Threshold: default ‘Target achieved – Checkout Total Threshold’
  • Birthday: default ‘Target achieved – Birthday’
  • Daily login: default ‘Target achieved – Daily Login’
  • Registration by referral: default ‘User registration by referral’
  • Removed registration points due to a referred user cancellation
  • Purchase by referral
  • Removed points due to a referred user cancellation
  • Collected Points
  • Level Achieved: default ‘Target achieved – Level’
  • Profile Complete: default ‘Target achieved – Profile Completed’
  • Expired Points
  • Order Refund
  • Order Refund Deleted
  • Redeemed Points: default ‘Redeemed Points for order’
  • Shared Points: default ‘Shared point with a coupon’
  • Apply Discount Button: default ‘Apply discount’
  • Applied Points Discount Label: ‘Redeem points’

Emails

Go to YITH > Points and Rewards > Emails to enable, configure and edit the two emails sent by the plugin.

Expiring points

The first one you find is to inform your user about their expiring points. You can set how many days before the points expiration it has to be sent and customize the content.

Expiring points email

Use the following placeholders in the text to recover customer information dynamically:

  • {username}: customer’s username
  • {first_name} = customer’s first name
  • {last_name} = customer’s last name
  • {expiring_points}: number of expiring points (as not all points might have the same expiry date)
  • {label_points}: the text that you have set up to replace the default one “Points”
  • {expiring_date}: point expiry date
  • {total_points}: current points balance
  • {shop_url}: URL of the shop
  • {discount}: value of the discount
  • {website_name}: website name

To edit other details of this email, go to WooCommerce > Settings > Emails and click on Expiring Points.

Expiry email settings

Here you can change the sender’s name and email address, subject (you can also use placeholders here), any additional recipient, email heading, description and type.

This is an example of how the email sent to customers will look like.

Expiring points email

When points expire, this information will be registered in the operation table, both for users and shop administrators.

Updated points notification

Updated points email

On the same page, you can also edit the email that is automatically sent to customers and make sure it’s sent:

  • either once a day if points have been updated
  • or as soon as points balance is updated.

When selecting the option As soon as points are updated, you can choose not to send the email when points are manually updated by the admin by enabling the option Avoid email sending for manual update.

You can choose whether to enable this notification or not and edit the content, where you can also use the following placeholders:

  • {username}: customer’s username
  • {first_name} = customer’s first name
  • {last_name} = customer’s last name
  • {latest_updates}: this prints a list with the latest updates to the points balance
  • {total_points}: this prints the current balance
  • {shop_url}: shop URL
  • {website_name}: website name
Updated points email

Shortcodes & Widgets

The plugin includes multiple shortcodes and widgets.

  1. Shortcode – Customer rankings
  2. Shorcode – Available points
  3. Shortcode – My points
  4. Shortcode – Product points
  5. Shortcode – Points for cart total
  6. Shortcode – Referral link
  7. Widget – Customers points
  8. Widget – Balance
  9. Backend widgets

1. Customer rankings

From the Ranking tab in YITH > Points & Rewards > Points options > Ranking, you can find the 2 styles of the customer ranking shortcode ready to copy and paste, but let’s see all the available options.

Ranking shortcodes

This shortcode allows you to print the ranking of your customers wherever you want on your website. The ranking lists top users of your store who have collected the most points.

This is the shortcode:

[ywpar_customers_points style="simple" tabs="yes" num_of_customers="3"]

Attributes available

style: this can either be simple or boxed.

Simple style
Simple style with tabs
Boxed style
Boxed style without tabs

tabs: this can either be yes or no.
If set to yes it will show the tabs All time, last year, last 30 days, this week, today.
If set to no, it will show the list of users as All time with the number of points on the right.

Customers ranking with tabs
With tabs
Customers ranking without tabs
Without tabs

num_of_customers: here you can enter the number of customers to show in the rankings. It will automatically show only the ones with the most points.

The total number of points is calculated out of the total points they have earned in their history/week/month, regardless of how many points they have already redeemed (which would be instead their points balance).

So, for example, this week, Paul earns 1000 points, Mark 500 and Tony 300. Paul will be the first in the ranking, even if he has redeemed all his points to get a discount, while Mark and Tony still have not used them.

For the weekly ranking, the lists are updated every Monday.

2. Available points

[yith_ywpar_points]: shows remaining points to logged-in users;

shortcode balance

Parameters are:

label: default value “Your credit is “
show_worth: default value “no”

E.g. [yith_ywpar_points label="Your credit is " show_worth="no"]

3. My points

[yith_ywpar_points_list]: shows the content of points as it appears in My Account, so points, levels, rank position recap tiles and the tabs with point history, target and get-point banners, and coupons.

4. Product points

[yith_points_product_message]: shows points that will be earned if you purchase the displayed product.

Points on product

You can either use it as is on a product page, and it will automatically show the points of that product, or use it on other pages and specify the product_id like this:

E.g. [yith_points_product_message product_id="488"]

5. Points for cart total

[yith_checkout_thresholds_message]: shows the number of assigned points based on the extra points rule for total in cart. Check here for more details about how to set up this extra points rule.

Points for cart total

Parameter:

title: default value “Checkout total thresholds”

E.g. [yith_checkout_thresholds_message title="Checkout total thresholds"]

[ywpar_referral_link user_id=”]: shows the referral link by using the user ID or retrieving it automatically by setting the user_id as “auto” > [ywpar_referral_link user_id=auto]

The available parameters are:

  • title: default value “Share to earn”
  • subtitle: default value “Your referral link”

7. Customers points

From the widget area in Appearance > Widgets, you can pick the Customers points widget.

Customers points widget

You can configure:

  • title
  • style: simple or boxed
  • number of customers to show

8. Balance

Points balance widget

You can configure:

  • title
  • label: the text displayed before the number of points
Points balance frotnend

9. Backend widgets

In WordPress Dashboard you will be able to find two extra widgets, available only for the admin, that show:

  1. Best point earners: the top users who have collected the most points
  2. Best rewards: the top users who have redeemed the most points
Backend widgets

By clicking on the View history button, you will open the user’s profile where you can edit the points and check the full points history.

Multi-currency support

The plugin supports the following multi-currency plugins:

and lets you configure a different number of points for each currency.

Whenever you create new rules for awarding (Points options > Points assignments) and for redeeming points (Redeem options > Points redeeming), you will see one field for each currency available in your shop, like this:

Points by currency

The same configuration is replicated in the Points rules and Redeem rules and for each role in your shop:

Redeeming rules

Or for every Extra points setting where you can set a conversion from points to money or vice versa.

Currencies in extra points settings

For further details about the configuration of YITH Multi Currency Switcher plugin, please, refer to the official documentation.

Purchasing points

How can a customer ‘purchase’ points?

By default it is not possible for your customer to directly purchase points, however, there is a solution. Here we explain how you can set up a product so the customers can purchase the number of points they want.

Step 1. Points settings

Automatically assign points

First, we enable Assign points to user > Automatically – Points will be assigned automatically for each purchase in the points assignments settings. We also edit the labels and messages based on ‘purchasing’ points.

Step 2. Creating the product

Product price

Creating a simple product and setting the price to 1 USD for 1 point. Since we will only use the option to ‘purchase’ points and not gain them on purchases of products, we will override the general settings and adapt the labels of the points by creating a points rule in Points options > Points rules.

In the Points type let’s select Set a fixed amount of points based on product prices and let’s set it like this: “For each 1 $ (USD) assign 1 point”.

Override points by product

As this rule applies to a specific product, it will override any other global settings or by category.

So you might have a category where you get 1 point every 10$, or categories where you don’t earn any points at all.

Step 3. Purchasing points

Buy points product page

As we can see on the product page, we get 1 point for 1$ USD. Wanting to purchase 600 points, we fill out the quantity of 600 and click on ‘add to cart’.

Step 4. Cart page

Points in cart

We see our points product and a message with regard to the number of points we are going to purchase. 

Step 5. My Account page

After completing the purchase, we will see the point total in our My Account page > My Points. Furthermore, we see the order related to these points.

Order details