View Product Page

Pre-orders

In the Overview section, you will find two tabs:

Products

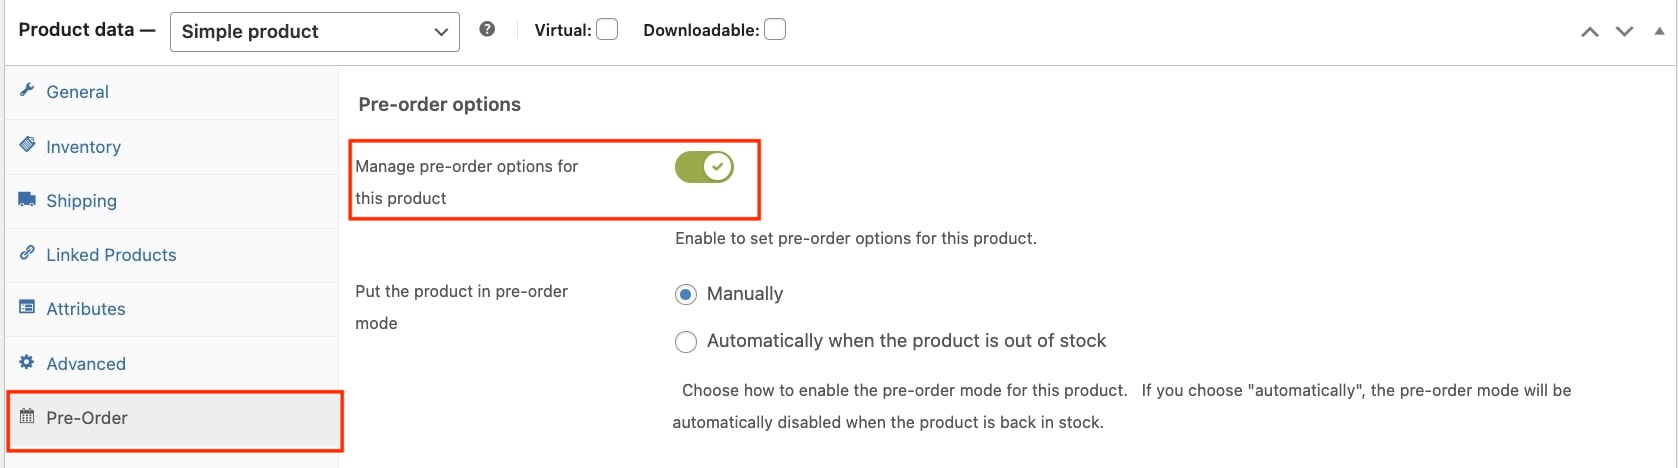
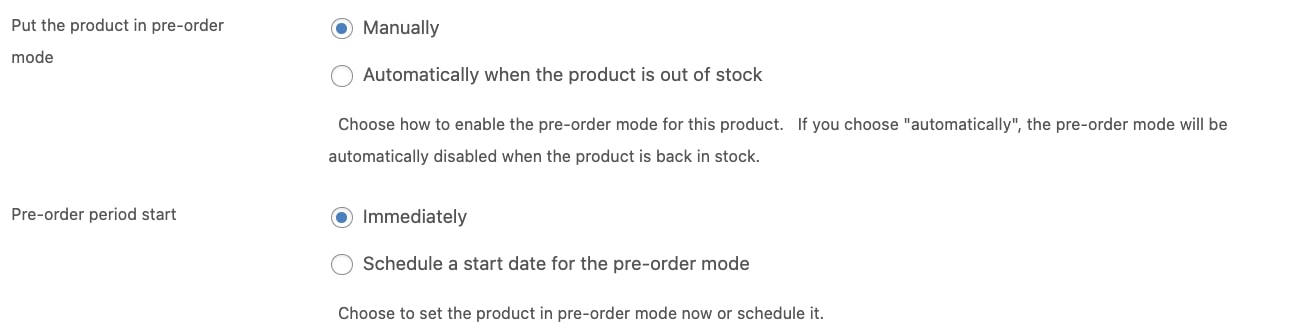
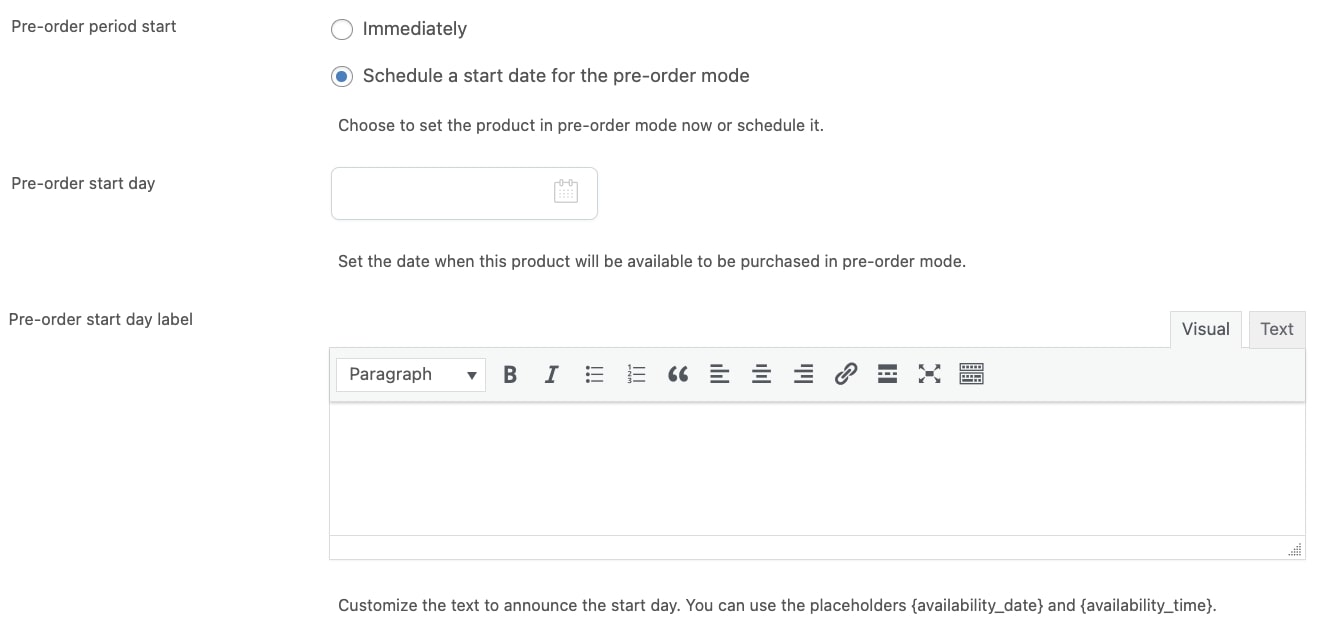
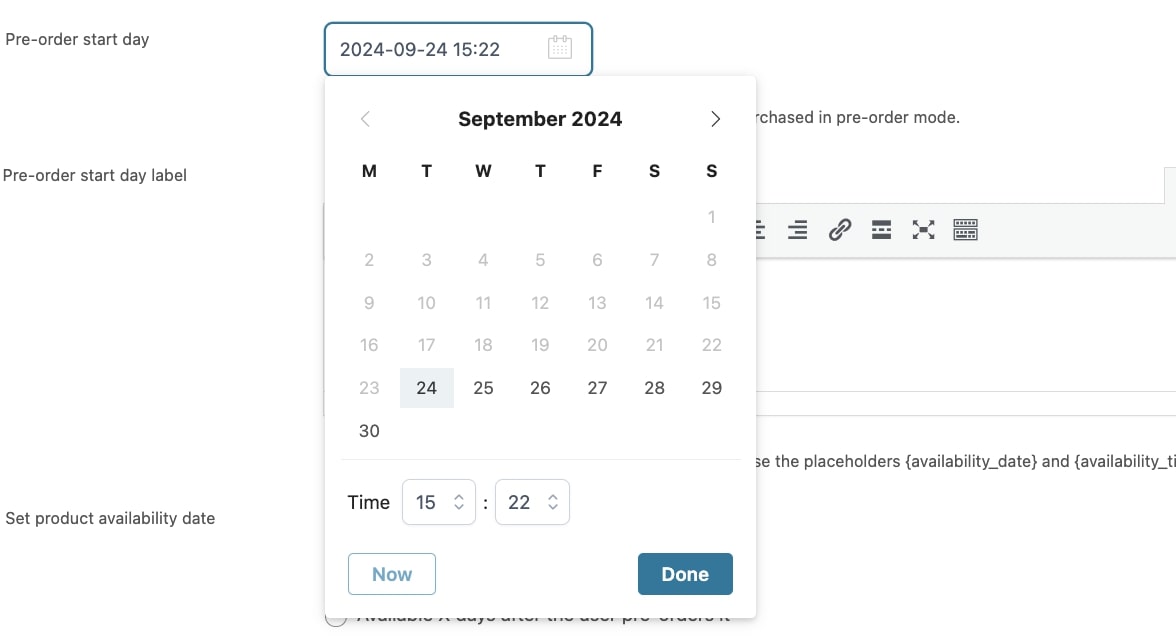
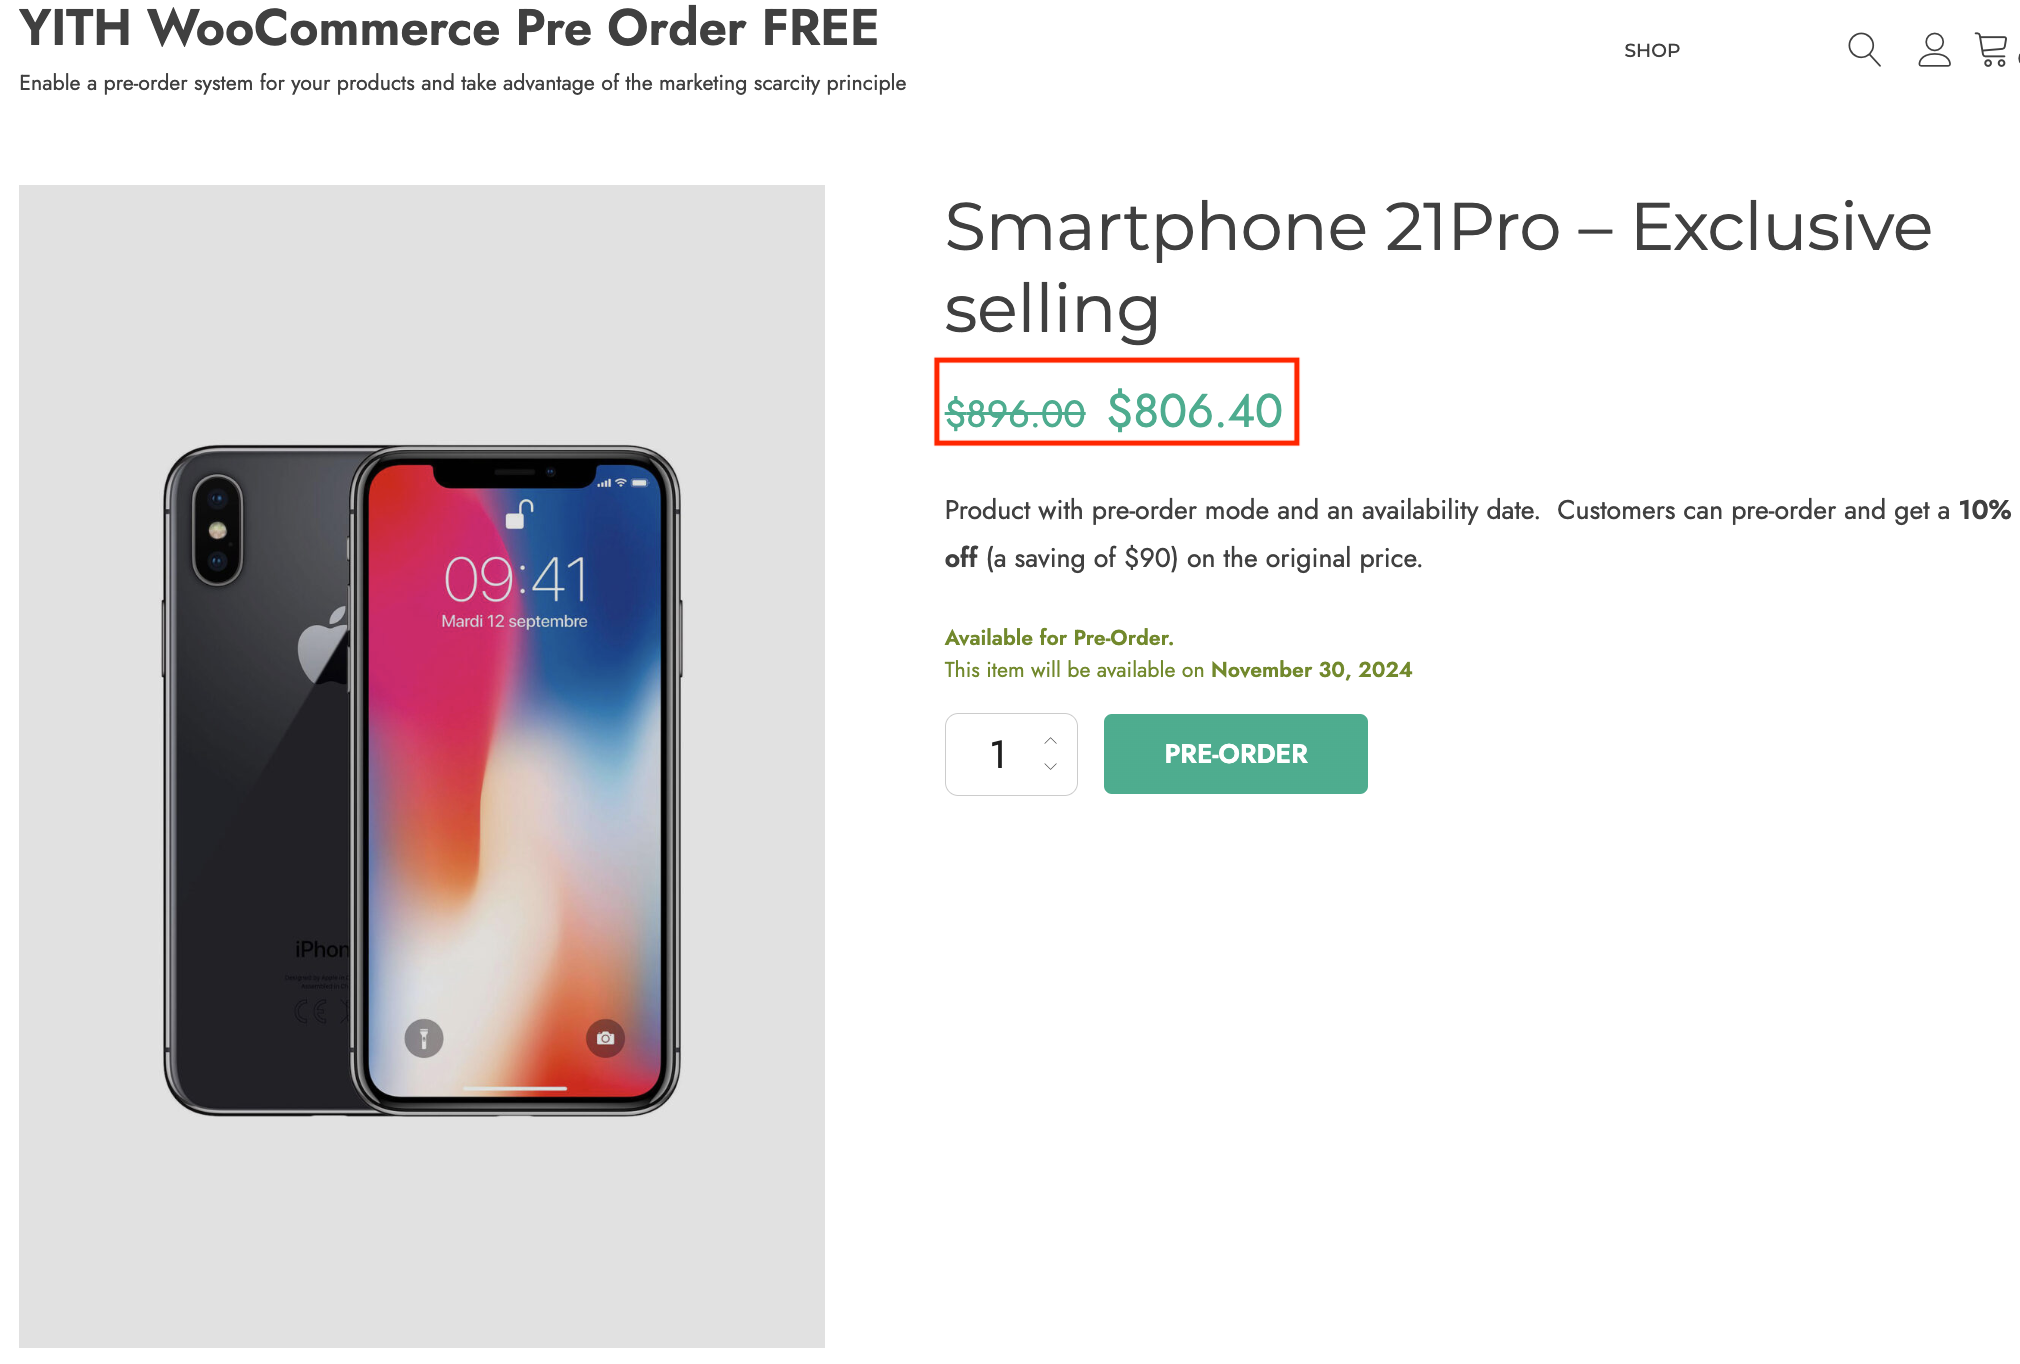
In this tab, you will be able to create pre-order products by clicking on Create product. You’ll be redirected to WooCommerce > Products where you can configure your product and the pre-order options as described here.

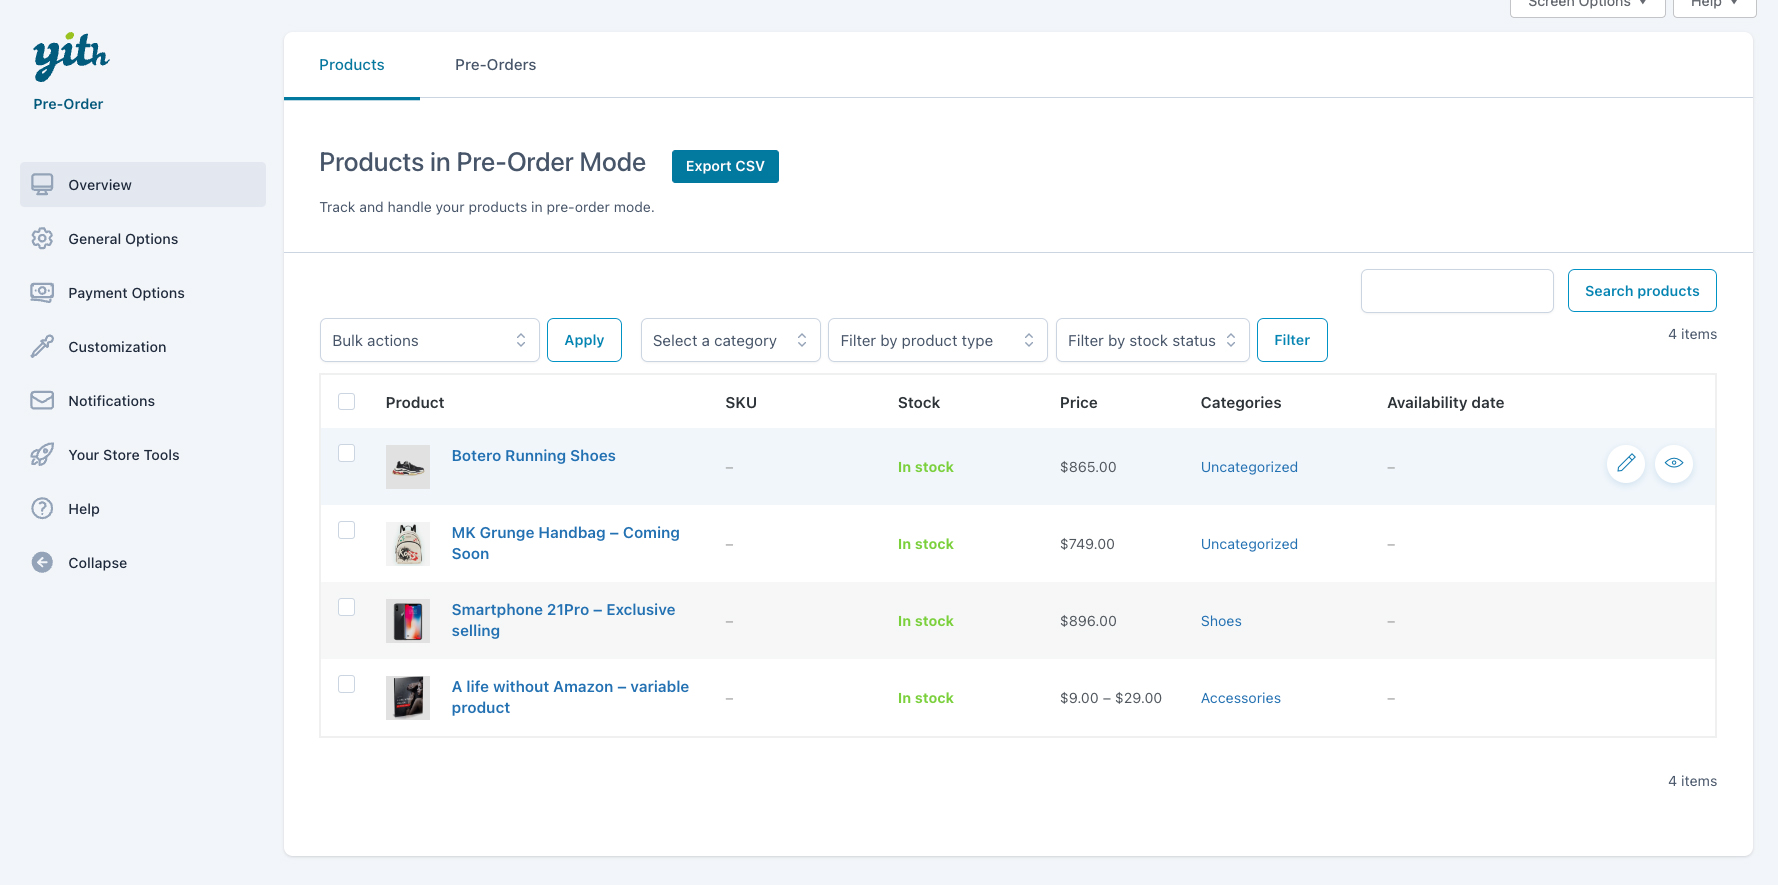
All the products with the pre-order mode enabled will be then added to the Products in pre-order mode table as shown below.

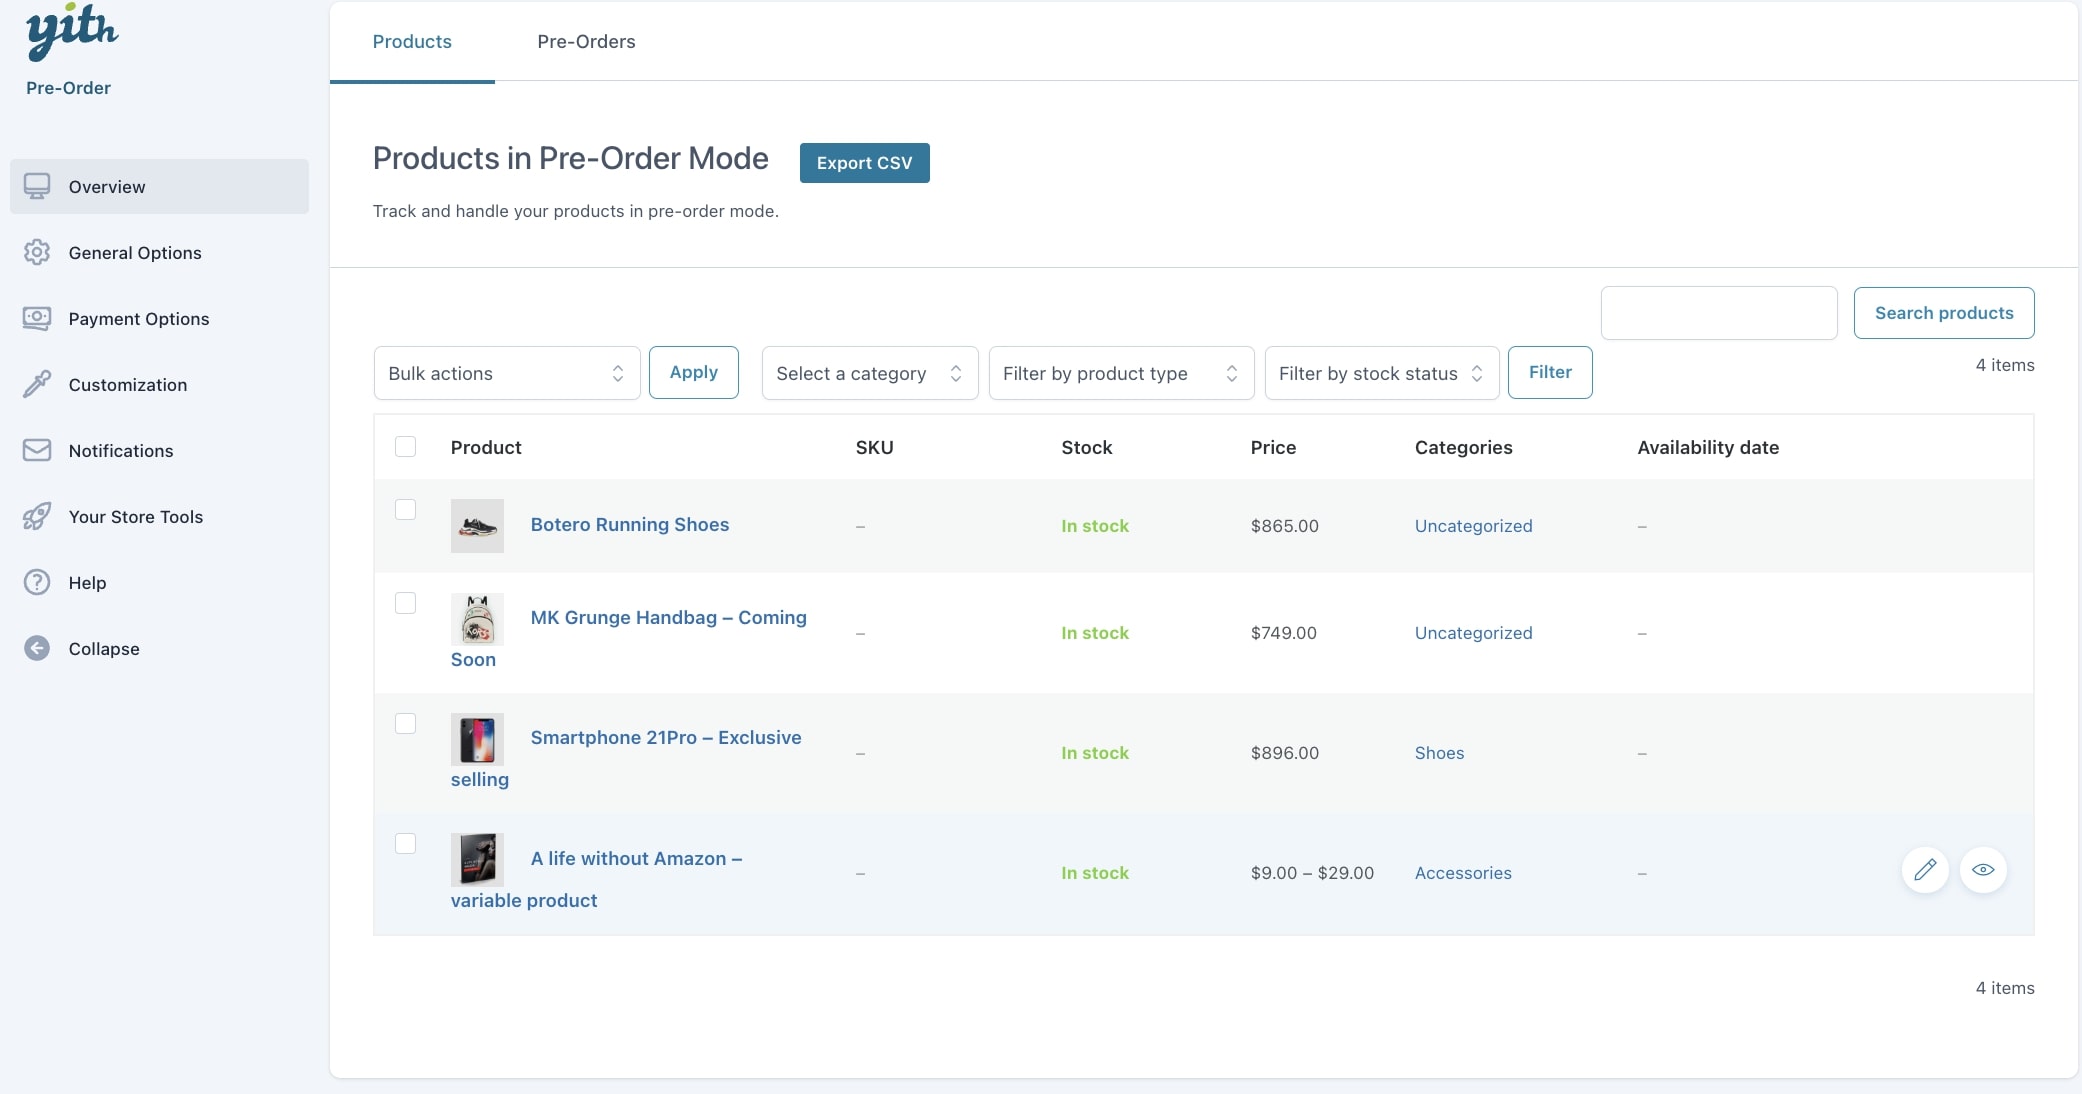
Through this table, you will have an overview of different data related to products set in the pre-order mode such as SKUstock statuspricecategories linked to the product, and availability/release date.

If you need to apply any changes to the product, just click on it to open the edit page.

Bulk actions and filters

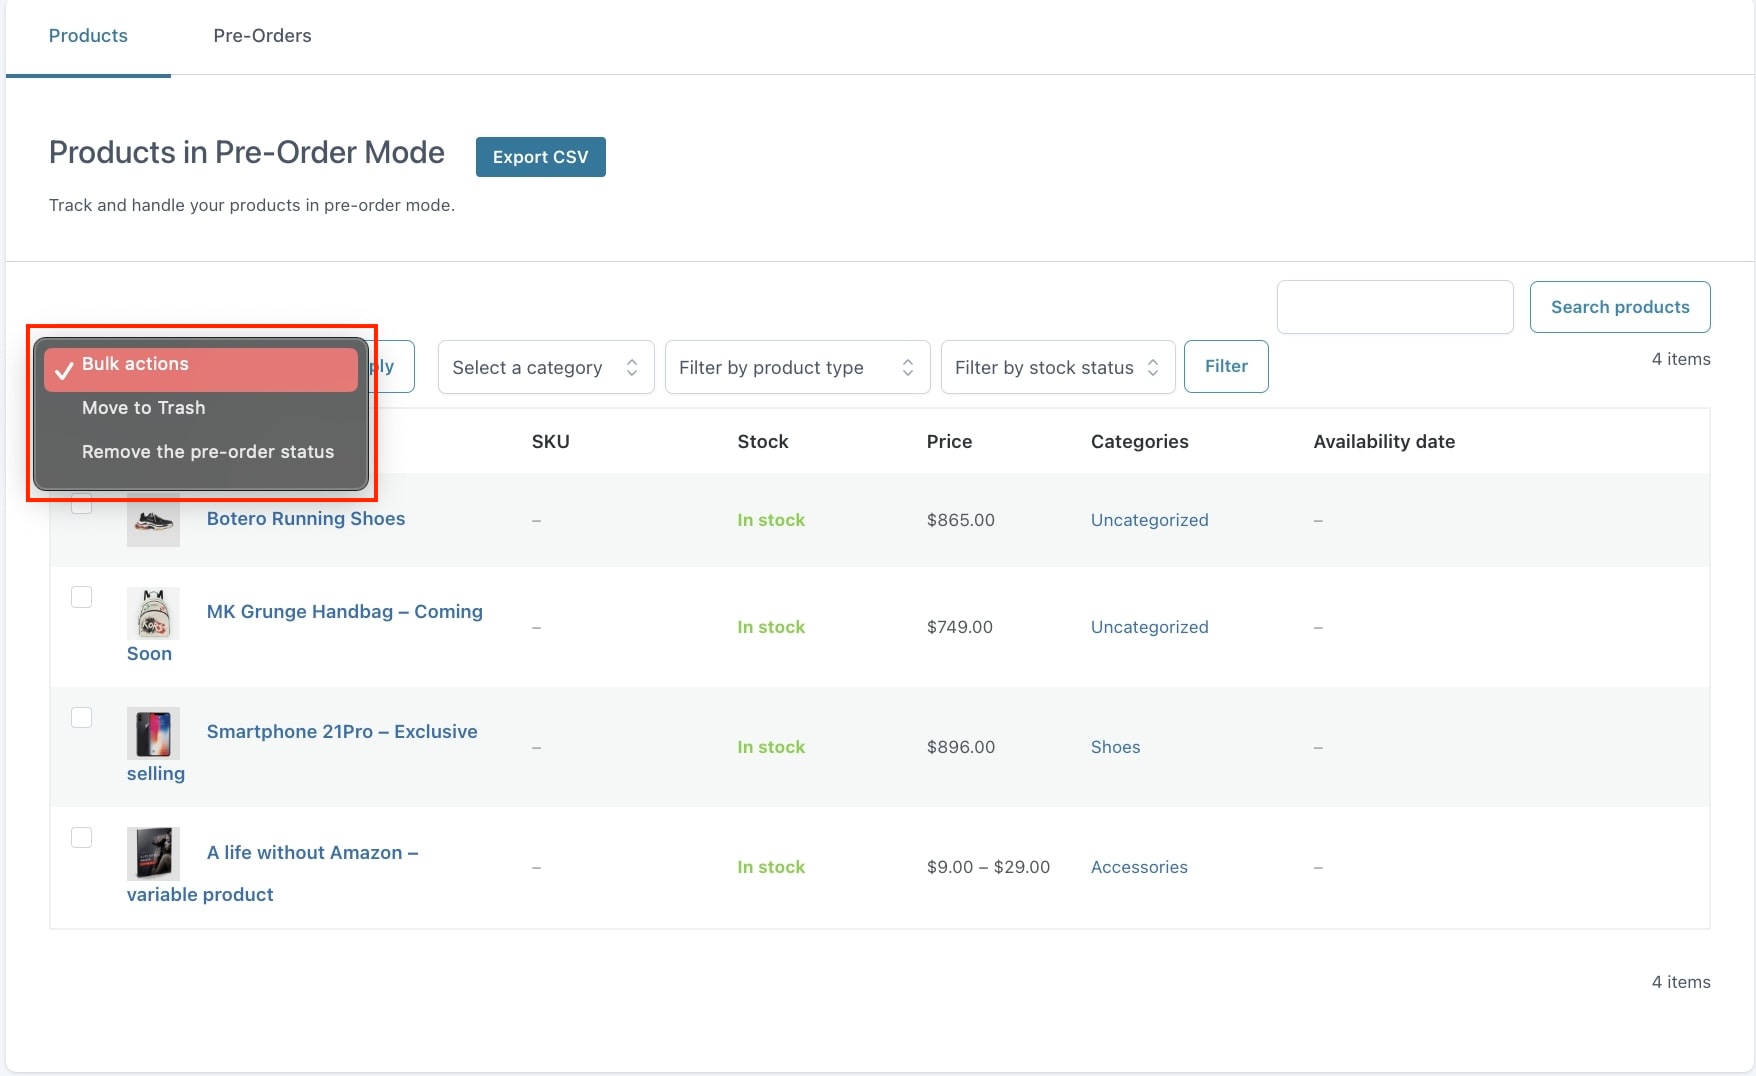
To quickly remove the pre-order status on different products at the same time, you can take advantage of the bulk actions. The same can be done to move products to the trash.

You can also quickly find specific products in pre-order mode by filtering them by categoryproduct type, and stock status or searching for a certain product through the search field.

Export

You can easily export products in pre-order mode into a CSV file by clicking on the button Export CSV.

Pre-orders

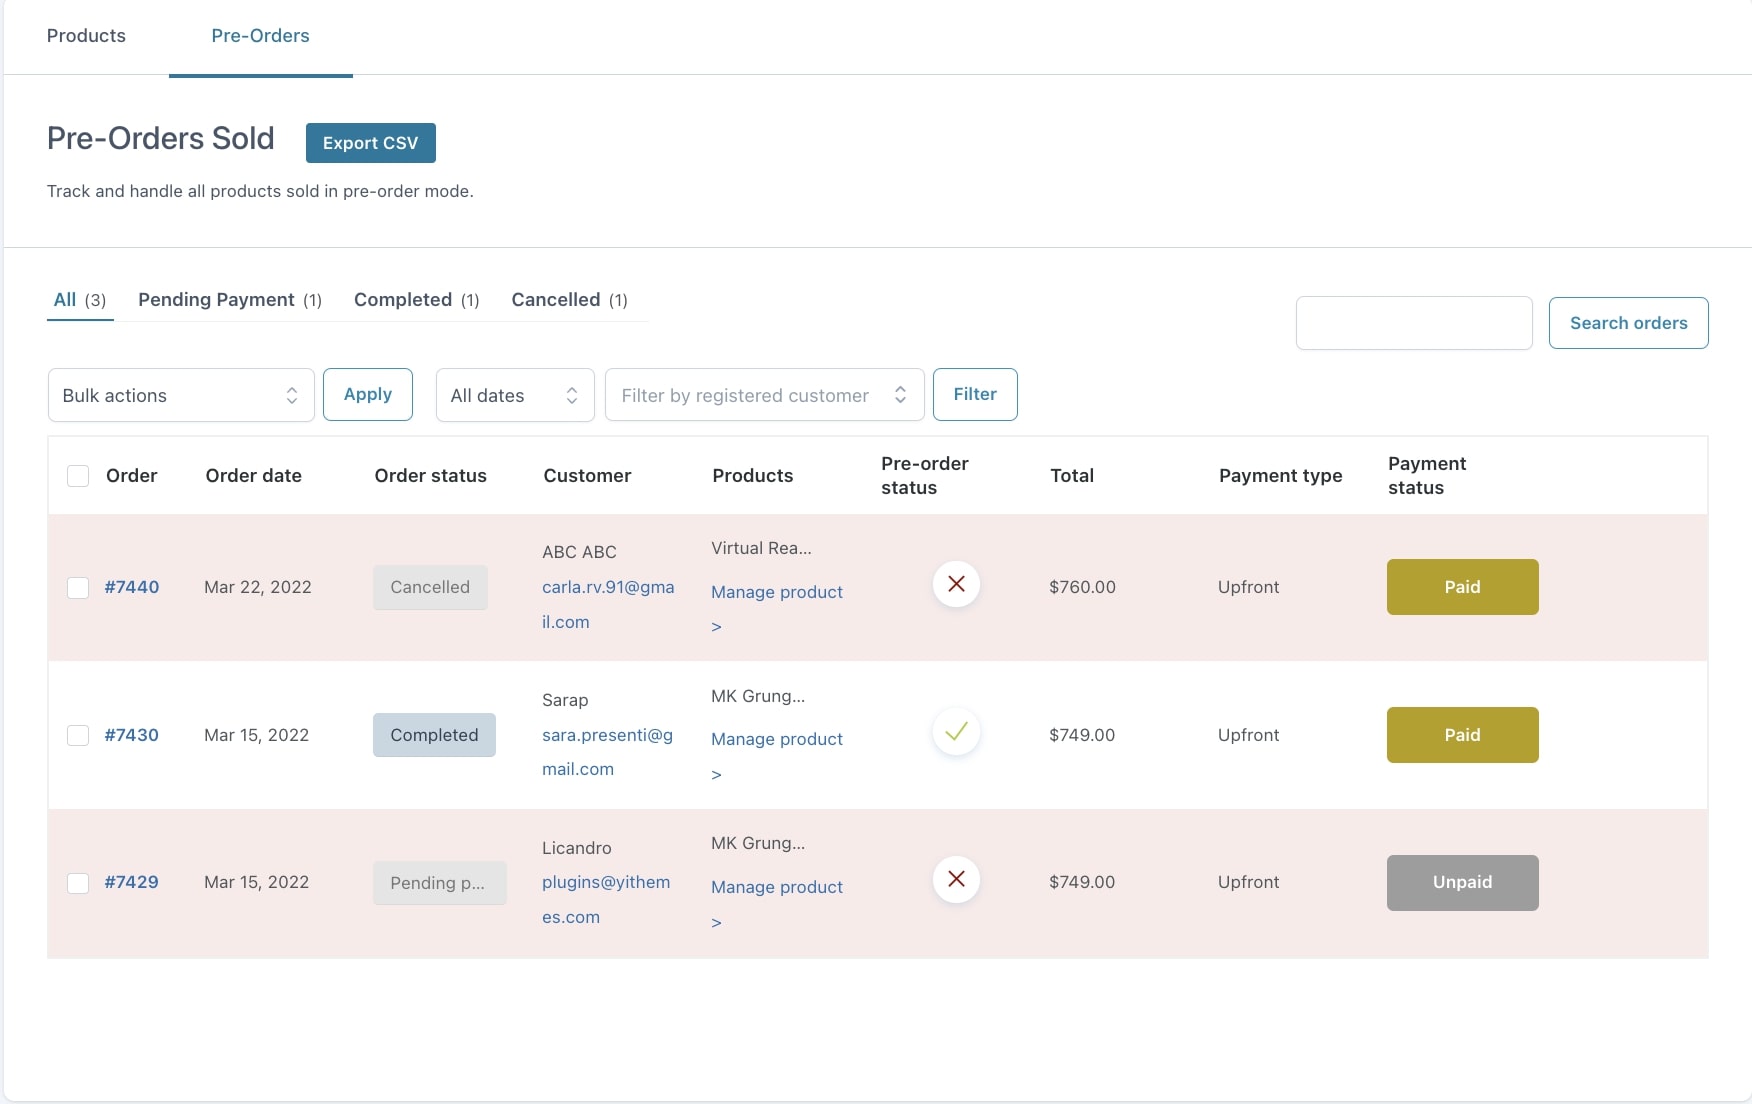
In this tab, you will find all the orders including one or more pre-order products that have been placed in your shop. The available columns will show the order IDorder date, order status, customer, products, pre-order status, total, payment type, and payment status.

Please note – The status shown in the Pre-order status column depends on the product availabilitynot on the payment status.

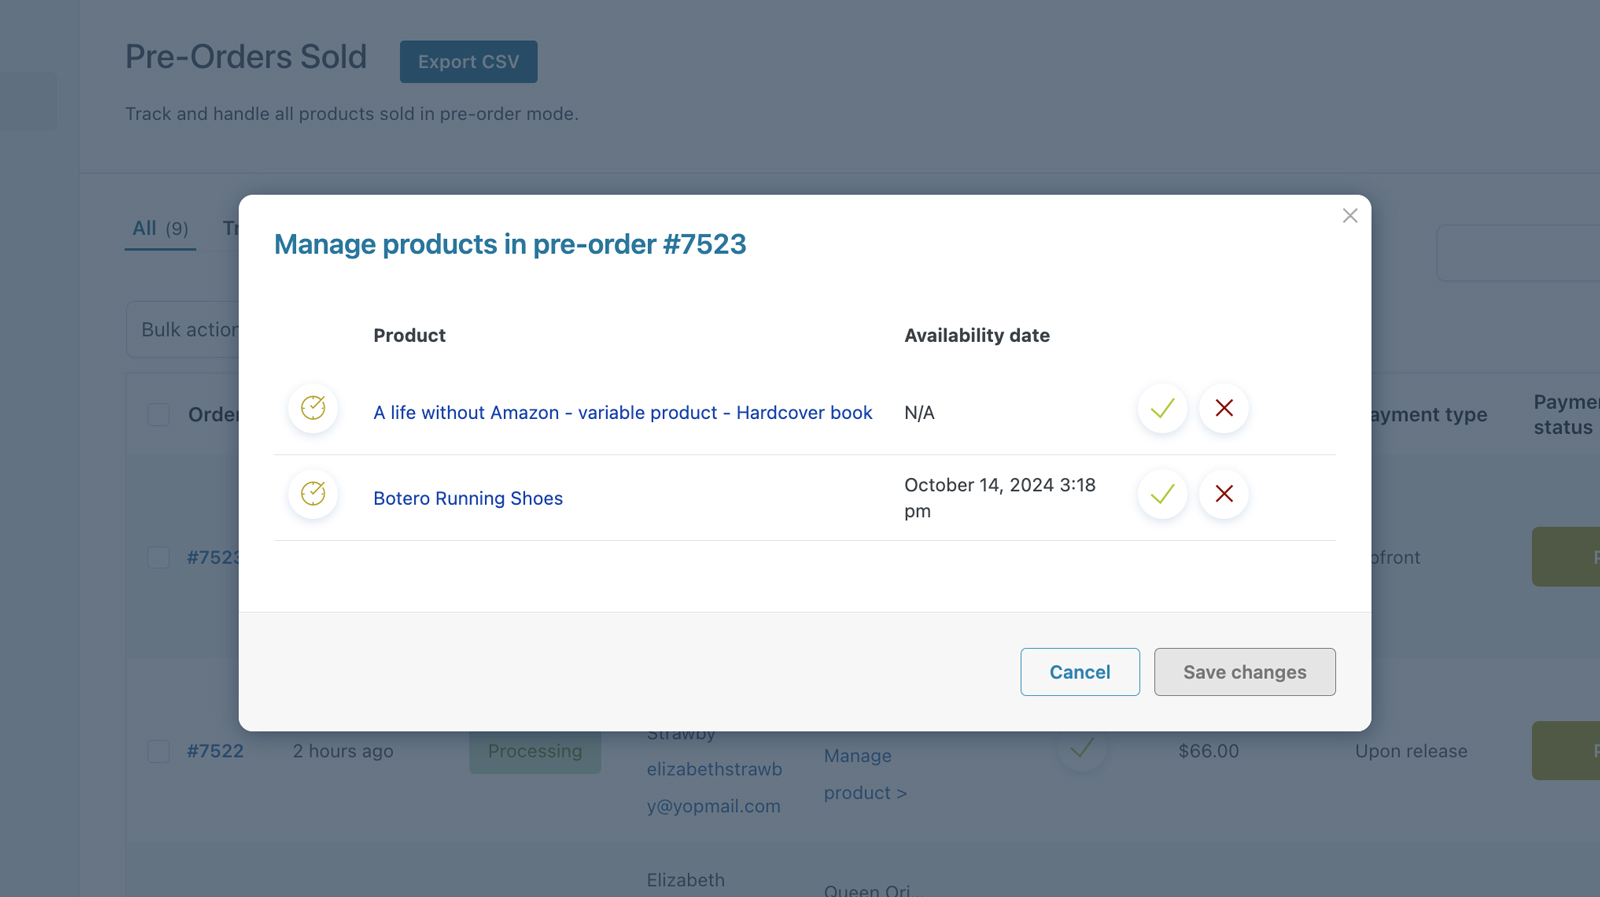
By clicking on Manage product in the Products column, a popup will open. Here, for each pre-order product, you can force the completion or cancel it. These two actions can also be applied to all the pre-order products included in the order as explained below.

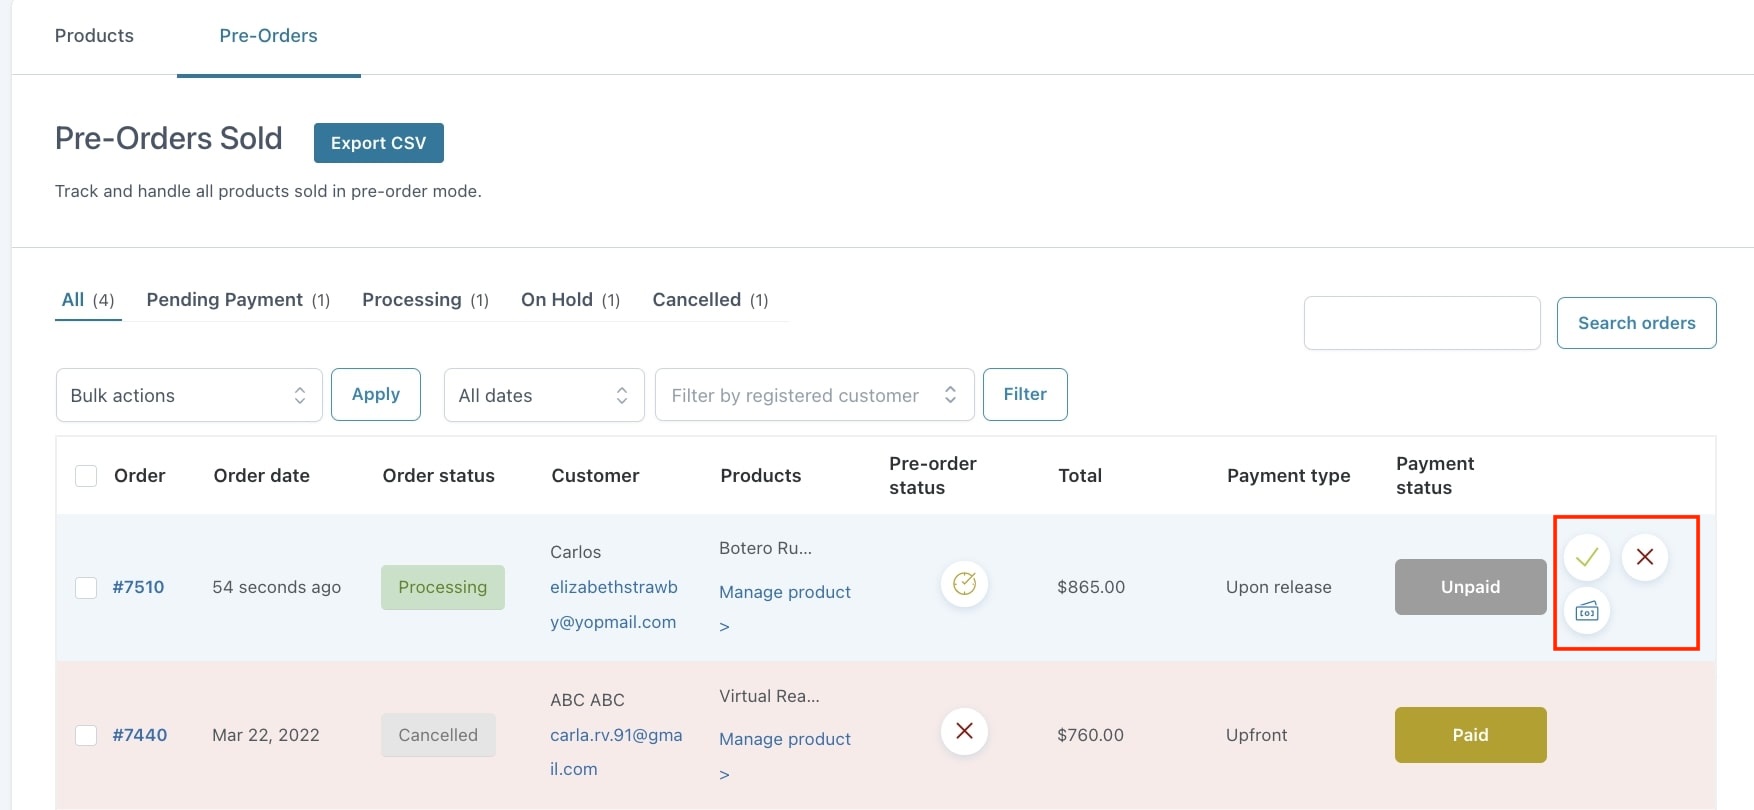
Based on the order payment status, you will be able to apply some actions on the single order:

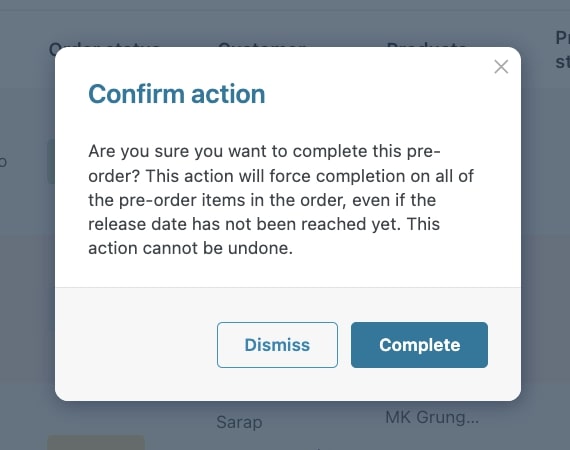
  • Force completion of all pre-order items: this action will force completion of all pre-order items included in the order, even if the release date has not been reached yet. As this action cannot be undone, you’ll be asked for confirmation through a popup;
  • Cancel all pre-order items: this action will cancel all of the pre-order items included in the order. As this action cannot be undone, you’ll be asked for confirmation through a popup;
  • Force marking this pre-order as paid: this action will force marking the pre-order as paid. It can be useful for pre-orders placed using an offline payment gateway (e.g. bank transfer) to avoid sending pending payment reminders to the customer after you have received the payment. As this action cannot be undone, you’ll be asked for confirmation through a popup.
Popup example

Bulk actions and filters

The bulk actions allow you to quickly apply changes to different pre-orders simultaneously. These are the available actions:

  • Force completion on all the pre-order items for the selected orders: this action will force completion of all pre-order items included in the orders, even if the release date has not been reached yet;
  • Cancel all pre-order items for the selected orders: this action will cancel all of the pre-order items included in the orders;
  • Force marking the pre-orders selected as paid: this action will force marking the pre-orders as paid. It can be useful for pre-orders placed using an offline payment gateway (e.g. bank transfer) to avoid sending pending payment reminders to the customer after you have received the payment;
  • Change order status to processing: turn the order status into processing;
  • Change order status to on hold: turn the order status into on hold;
  • Change order status to completed: turn the order status into completed.

You can also quickly find specific pre-orders by filtering them by date and registered customer or searching for a pre-order through the search field.

Export

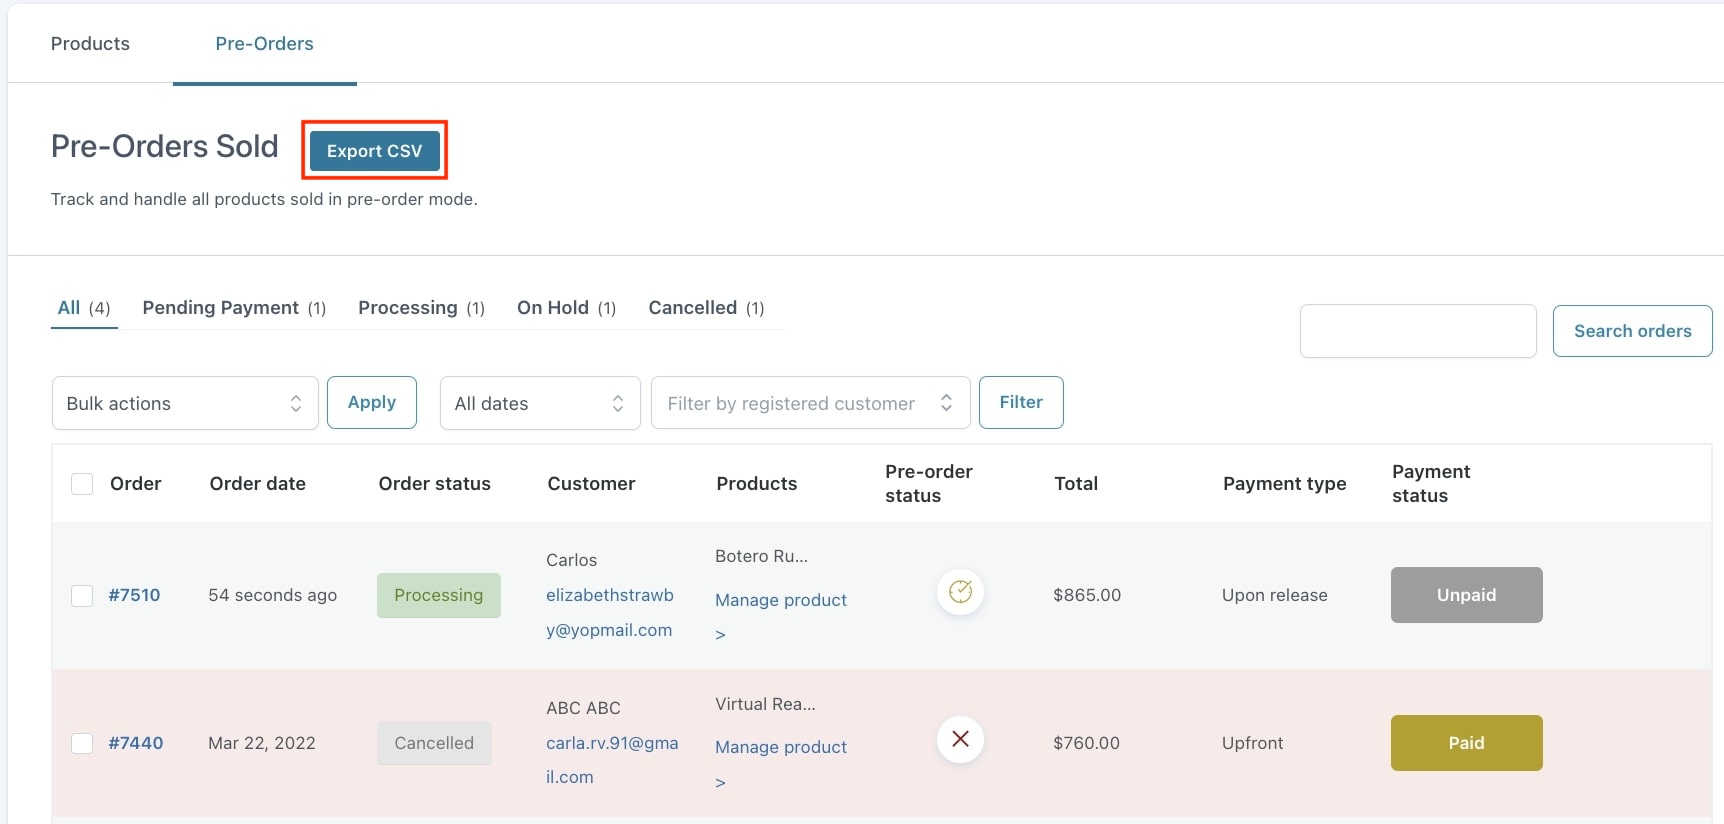
You can easily export pre-orders into a CSV file by clicking on the button Export CSV.

How to set pre-order options on a simple product

To set an existing product in the pre-order mode, go to its edit page.

From the section Pre-Order, enable the option Manage pre-order options for this product.

Pre-order mode start

Now, you can start configuring when the pre-order period will start through the following options:

  • Put the product in pre-order mode: choose when you want to put the product in pre-order mode from:
    • Manually
    • Automatically when the product is out of stock: this will put the product in pre-order mode as soon as it becomes out of stock and will disable the pre-order mode as soon as the product is back in stock;

By choosing Manually, you will also be able to set the Pre-order period start option:

  • Immediately: the pre-mode starts right away;
  • Schedule a start date for the pre-order mode: you can schedule when the pre-order mode will start by defining the date through the following option;
  • Pre-order start day:  choose the day and time in the calendar;
  • Pre-order start day label: through the built-in editor, you can customize the text shown to users to inform them when the product will be available for pre-order;

Product availability

If you have chosen to put the product in pre-order mode manually in the previous option, you can set when the product will be available/released. You can select one of the following options:

  • No date – end pre-order mode manually: you can decide to set no date. In this case, the pre-order mode will need to be manually disabled;
  • Choose a date from the calendar: by selecting this option, a new field will show where you can select the day and time when the product will be available/released;
  • Available x days after the user pre-orders it: through this option, you can dynamically make the product available a specific number of days after a user pre-orders it. You can define the number of days in the option The product will be available.

Product quantity restriction

In case you need to apply a restriction on the product quantity that can be pre-order by the same user, you can take advantage of the option Set a maximum quantity that can be ordered by a user and decide the maximum number of product units by entering a value in Users can pre-order a maximum of.

With this option active, when users will click on the pre-order button after adding a quantity exceeding the value you have configured, a message will show to inform them of the quantity restriction.

Max quantity message

How to set pre-order options on a variable product

The plugin supports variable products and allows managing the pre-order mode options differently for each product variation.

Select the variation you want to configure and enable the option Manage pre-order options for this product.

Now, you can start configuring the pre-order options as described here.

To show an additional custom text for variable pre-order products,  you need to enable the option in Show an additional text in variable pre-order products that you can find in the Customization tab of the plugin panel.

Note: the text will show only if you have set the pre-order mode in all pre-order product variations.
 

Plugin options

To allow your users to benefit from the plugin features and be able to pre-order the products not yet available or released, enable the option Enable all Pre-Order features for your visitors in the plugin General options tab.

Optionally, you can decide to enable the pre-order mode only on out-of-stock products. This will prevent your sales from getting interrupted when a product becomes temporarily unavailable.

  • Automatically enable pre-order mode in out of stock products: if enabled, the plugin will automatically enable the pre-order mode on products that turn into out-of-stock. The price will be the same as the regular product price, but you can override it through the plugin options available on the product edit page. You can check the price options on this page;
  • Automatically enable pre-order mode in: choose whether to apply the pre-mode to all out-of-stock products or only on specific products or categories. By selecting to enable the pre-order mode on specific products or categories, you will be able to select them in the related fields;

Note: When these options shown above are enabled, there will be a new option ”Put the product in pre-order mode” on the product edit page showing two different choices:

  • Keep the product in automatic pre-order mode: by choosing this option, the pre-order mode will be automatically disabled when the product is back in stock;
  • Use manual pre-order options and override the automatic pre-order option: by choosing this option, you can override the global settings and manually manage pre-order options for the product.

Now, let’s go back to the general options

  • Disable pre-order mode when the product becomes available: enable this option if you want the pre-order mode to be automatically disabled when the release date is reached and the product becomes available. By leaving it disabled, you will need to manually deactivate the pre-order mode directly from the product edit page;
Free shipping on pre-order products
  • Offer free shipping for all pre-order products: enable if you want to offer free shipping for orders including one or more pre-order products;
  • Users that can pre-order: decide if you want to allow all the users to pre-order your products or only registered users or users with a specific role. By selecting only specific user roles, you will need to choose the roles that will be affected.
  • Pre-order price for guest users: decide the price you want to show to guest users. You can show the pre-order price, the regular price or show no price at all.

Pre-order fee

  • Add a fee to each pre-order: enable if you want to add a fee to pre-order products in order to be purchased;
  • Pre-orders fee: enter the value in your currency that defines the fee users have to pay to pre-order;
  • Tax in pre-orders fee: choose how to apply tax to the pre-order fee:
    • tax included
    • tax excluded
    • not taxable

The configured fee will be calculated on the product quantity selected by the user. So, for example, if you set the fee to $10 and the user pre-orders 2 product units, the total fee will be $20.

Cart options

In the General options tab, you will find a section where you can manage options to prevent pre-order products from being purchased:

  • Prevent the purchase of pre-order products (with upfront payment) and standard products in the same order: enable if you want to prevent your customer from purchasing pre-order products with upfront payments and standard products in the same order;
  • Prevent more than one pre-order product with upfront payments in cart: enable if you want the cart not to include more than one pre-order product with upfront payment;
Error message on cart page
  • How to prevent the purchases: choose the behavior to apply to prevent customers from buying pre-order products from:
    • The customer can add the product to cart but can’t proceed with the payment
    • The customer can’t add products to cart; let’s see an example of this message:
Notice not possible pre order
not possible message

Pre-order payments

Let’s see how to manage the payment options for your pre-orders.

In the tab Payment options, you will find two important settings you can use based on the solution that better suits your needs.

  • Charge pre-orders: choose when customers will be charged when pre-ordering your products from:
    • Upfront – when the user pre-orders the product: by selecting this option, customers will pay for the products when they place the pre-order;
  • Upon release – automatically after the product release (a supported payment gateway is required): by selecting this option, customers will be automatically charged as soon as the pre-order product becomes available. To work properly, you need to use at least one of the supported gateways which are: YITH Stripe, YITH Stripe Connect, YITH PayPal Braintree, and WooCommerce Stripe;
  • Pay Later gateway – manually after the product release (the customer will receive an email and will be redirected to the Checkout page to pay: by selecting this option, customers will be able to manually pay for the pre-order products after their release through the payment link received by email.

Since these settings can be overridden at the product level, if users add two or more pre-order products for which different payment options have been set, an error message will show on the Cart page.

Pay later gateway

The plugin includes the gateway YITH Pre-Order Pay Later which allows your customers to manually pay for the products they have pre-ordered after their release or when they become available. To activate and use this gateway in your shop, go to WooCommerce > Settings > Payments.

By clicking on the Manage button, you will be able to set a few simple options:

  • Enable/Disable: through this option, you can enable or disable the YITH Pre-Order Pay Later gateway;
  • Label: enter the label that will define the gateway on the Checkout page;
  • Description: enter the text customer will see as the payment method description;
  • Order status for pre-orders placed with the Pay Later gateway: choose the order status to apply to pre-orders when using the Pay later gateway. Any changes to this option won’t affect the pre-orders placed so far.

Here is a sample of what the checkout will look like when using the Pay later gateway.

Customization

In the tab Customization, you can manage how to show prices, labels, texts, etc. Let’s analyze all the available options:

  • Show date according to the user’s format: enable if you want to show the date format and timezone to users based on their location;
  • Product price: choose to
    • Hide the regular sale price
    • or Show the regular sale price crossed out
  • Show fee cost on product page: enable if you want to show the additional fee cost on the product page, next to the product price;
    • Fee label: enter and customize the label that defines the fee through the built-in editor;
  • Pre-order button label: enter the label that will replace the default “Add to cart” on products in pre-order mode;
  • Customize the pre-order button’s colors: enable if you want to set a different color for the pre-order button (this won’t affect the Add to cart button which will keep the theme colors);
    • Pre-order button colors: set the colors for the background and text;

  • Text to show in products with availability date: use the built-in editor to add the default text to show the availability/release date to users;
  • Text to show in products without availability date: use the built-in editor to add the default text to show to users on pre-order products without the availability/release date;
  • Show availability text in the Shop pages: enable if you want to show the availability text in the Shop pages;

Cart & Checkout

  • Show availability text in the cart: enable if you want to show the availability text on the Cart page;
  • Show an additional text in variable pre-order products: enable if you want to show a custom text when all product variations are in pre-order mode;
    • Additional text in variable pre-order products: use the built-in editor to add the text;
  • Customize the “Place order” button at checkout: enable to customize the label and colors of the default Place order button on the Checkout page;
    • “Place order” button label: enter the label that will replace the Place order one;
    • “Place order” button color: choose whether to use the default color or customer colors;
      • Colors: set the custom colors for the background and text.

Product Countdown

Within the Customization tab, you will also find an option to customize the label shown next to the countdown added by the plugin YITH WooCommerce Product Countdown. To learn more about the integration between these two plugins, please go to this page.

Pre-Order emails

The plugin creates 8 automatic emails that will be added to the list of the emails automatically sent by WooCommerce.

The emails are:

  • YITH Pre-Order: Pre-order cancelled: this email is sent to customers when a pre-order has been canceled;
  • YITH Pre-Order: Pre-order completed: this email is sent to customers when a pre-order product has been released;
  • YITH Pre-Order: Pre-order confirmed: this email is sent to customers when  a pre-order has been placed successfully;
  • YITH Pre-Order: New pre-order: this email is sent to the admin when a new pre-order is placed;
  • YITH Pre-Order: An out-of-stock product became pre-order: this email is sent to the admin when a product turns into out-of-stock and becomes a pre-order product;
  • YITH Pre-Order: Payment reminder: this email is sent to customers when a pre-order is completed and needs to be paid;
  • YITH Pre-Order: Release date changed: this email is sent to customers when the administrator changes the release date;
  • YITH Pre-Order: Release date is near: this email is sent to the admin when the release date is approaching and the pre-order mode will be disabled.

Moreover, in the Notifications tab of the plugin panel, you can find further options related to these emails.

Admin notifications

Options for emails sent to the administrator are the following:

  • Email when a pre-order release date is near: by enabling this option, you can specify the number of days before the release date that will trigger the email sending. Specify this value in The email will be sent;
  • Email when a pre-order product is sold: by enabling this option, the admin will receive an email when a new order for a pre-order product is placed;
New pre-order email example

Customer notifications

Options for emails sent to the administrator are the following:

  • Pre-order confirmation email: by enabling this option, an email will be automatically sent to customers when they pre-order a product;
  • Email upon pre-order product release: by enabling this option, an email will be automatically sent to customers when a pre-order product they purchased is released;
  • Email when a pre-order is cancelled: by enabling this option, an email will be automatically sent to customers after the admin canceled a pre-order;
  • Email when the release date is changed: by enabling this option, an email will be automatically sent to customers when the release date for a product they pre-ordered has been changed;
  • Payment reminder email: by enabling this option, an email will be automatically sent to customers who pre-ordered products with upon release payment option to remind them that the payment is pending.
Confirmation email example

Overriding options

In the product edit page and single variations, you can find some options that allow overriding the global settings at the product or variation level.

Texts and labels

Options to override what was previously set in the Customization tab.

By enabling the option Override text and labels, you can use a different text, specifically for that product, to replace the default Add to cart label.

Through the built-in editor, you can also override the text about the availability/release date of the pre-order product.

For the texts and labels global settings, you can refer to this page.

Fee

Options to override what was previously set in the General options tab.

By enabling the option Override fee options, you can set a different fee value that users will have to pay for that specific product. The fee value must be entered in the field Fee.

For the payment fee settings, you can refer to this page.

Payment options

Options to override what was previously set in the Payment options tab.

By enabling the option Override payment options, you can set a different payment type for that pre-order product.

For the payment global settings, you can refer to this page.

Pre-order price

A very important feature to use the plugin at its best is the chance to offer a discount or a mark-up during the pre-order period.

Based on your needs, you can use one of the following price options:

  • Use the selling price: the pre-order product will have the same price set as the regular price;
  • Set a fixed pre-order price: you can set a specific price for the pre-order product by defining it in the related option Price;
  • Discount a percentage % of the selling price: if you want to offer an exclusive promotion on the pre-order product, you can decide to set a percentage discount on the regular price by defining the value in the related option Discount on selling price;
  • Discount a fixed amount of the selling price: if you want to offer an exclusive promotion on the pre-order product, you can decide to set a fixed amount discount on the regular price by defining the value in the related option Discount on selling price;

  • Increase a percentage % of the selling price: if you want to apply a mark-up on the pre-order product, you can decide to set a percentage increase on the regular price by defining the value in the related option Increase on selling price;

  • Increase a fixed amount of the selling price: if you want to apply a mark-up on the pre-order product, you can decide to set a fixed amount increase on the regular price by defining the value in the related option Increase on selling price;

You can also require an extra cost for pre-order products by setting an additional fee. The fee can be set globally through the options available in the General options tab or differently on each pre-order product edit page.

Example of a pre-order product with discount