YITH Custom Thank You Page for WooCommerce allows you to replace the WooCommerce default Thank You page with any of the pages you can create through the plugin.
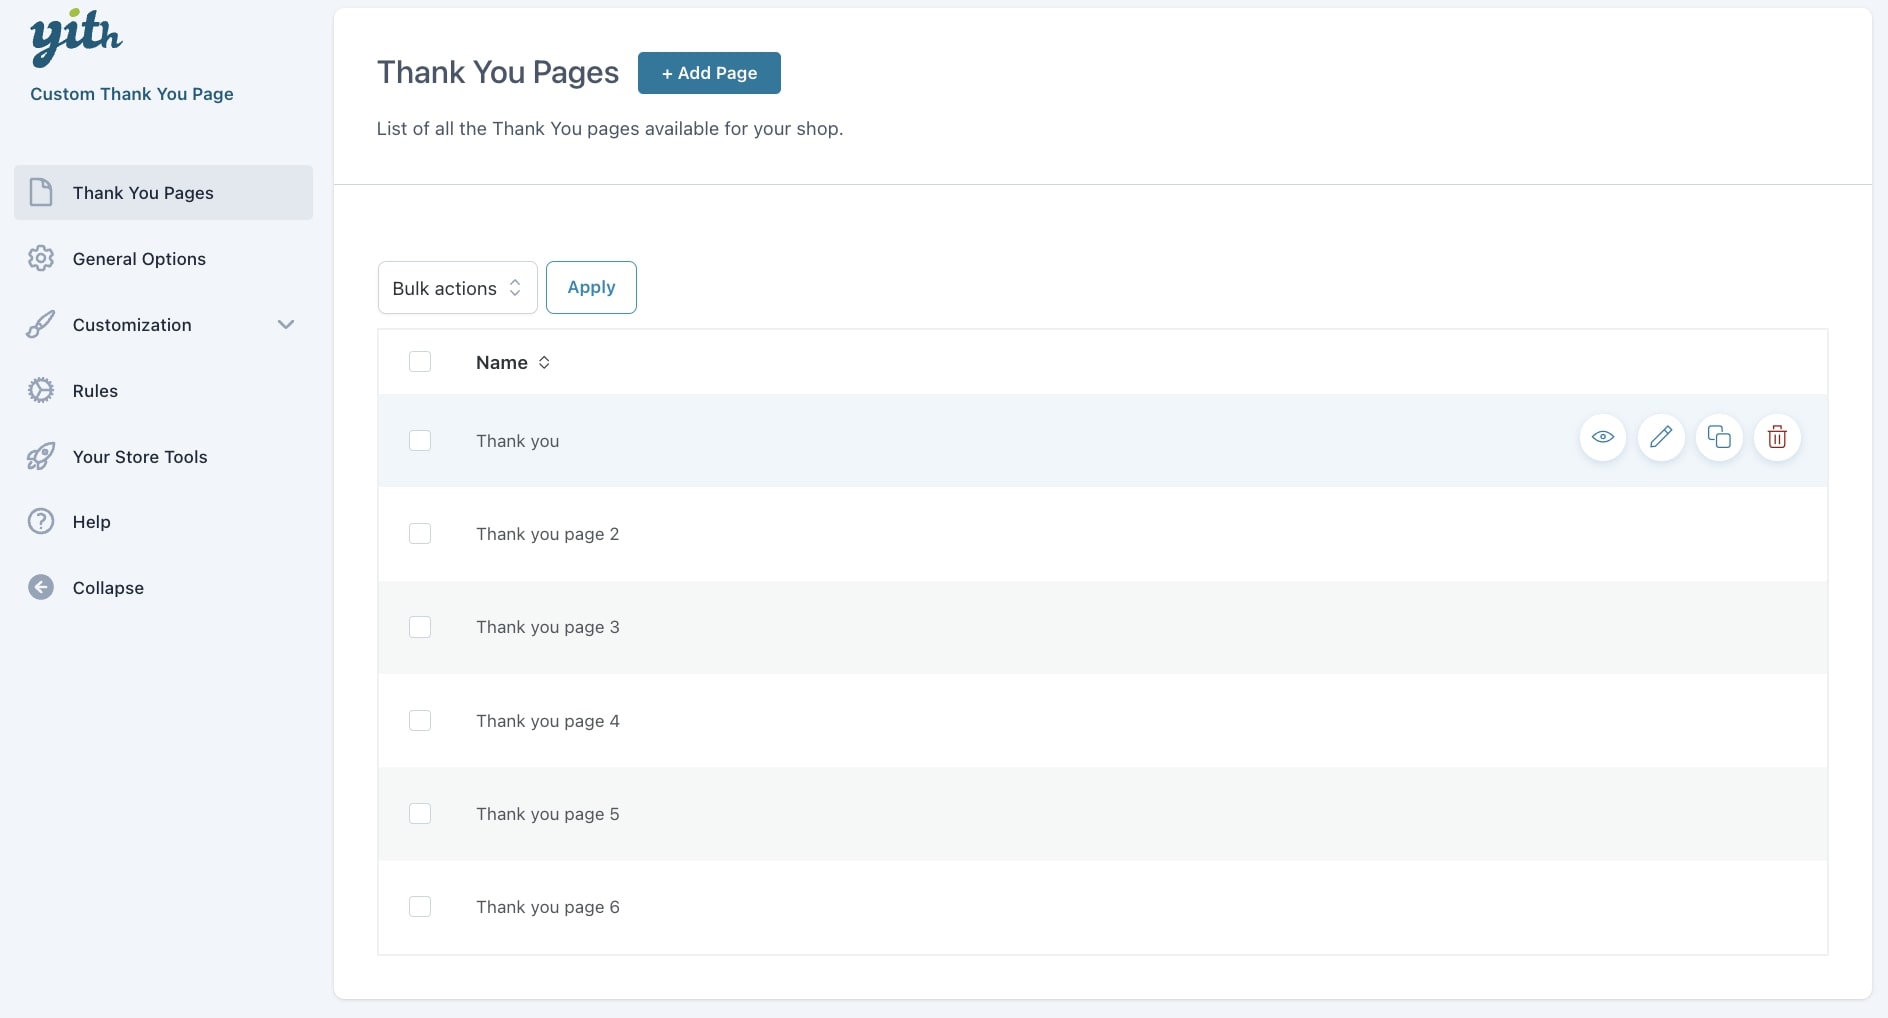
When installing it, you will find 6 Thank you pages already created (Gutenberg-based) and ready to be used as they are or by editing them by clicking on the related icon. You can also duplicate and/or delete each page.
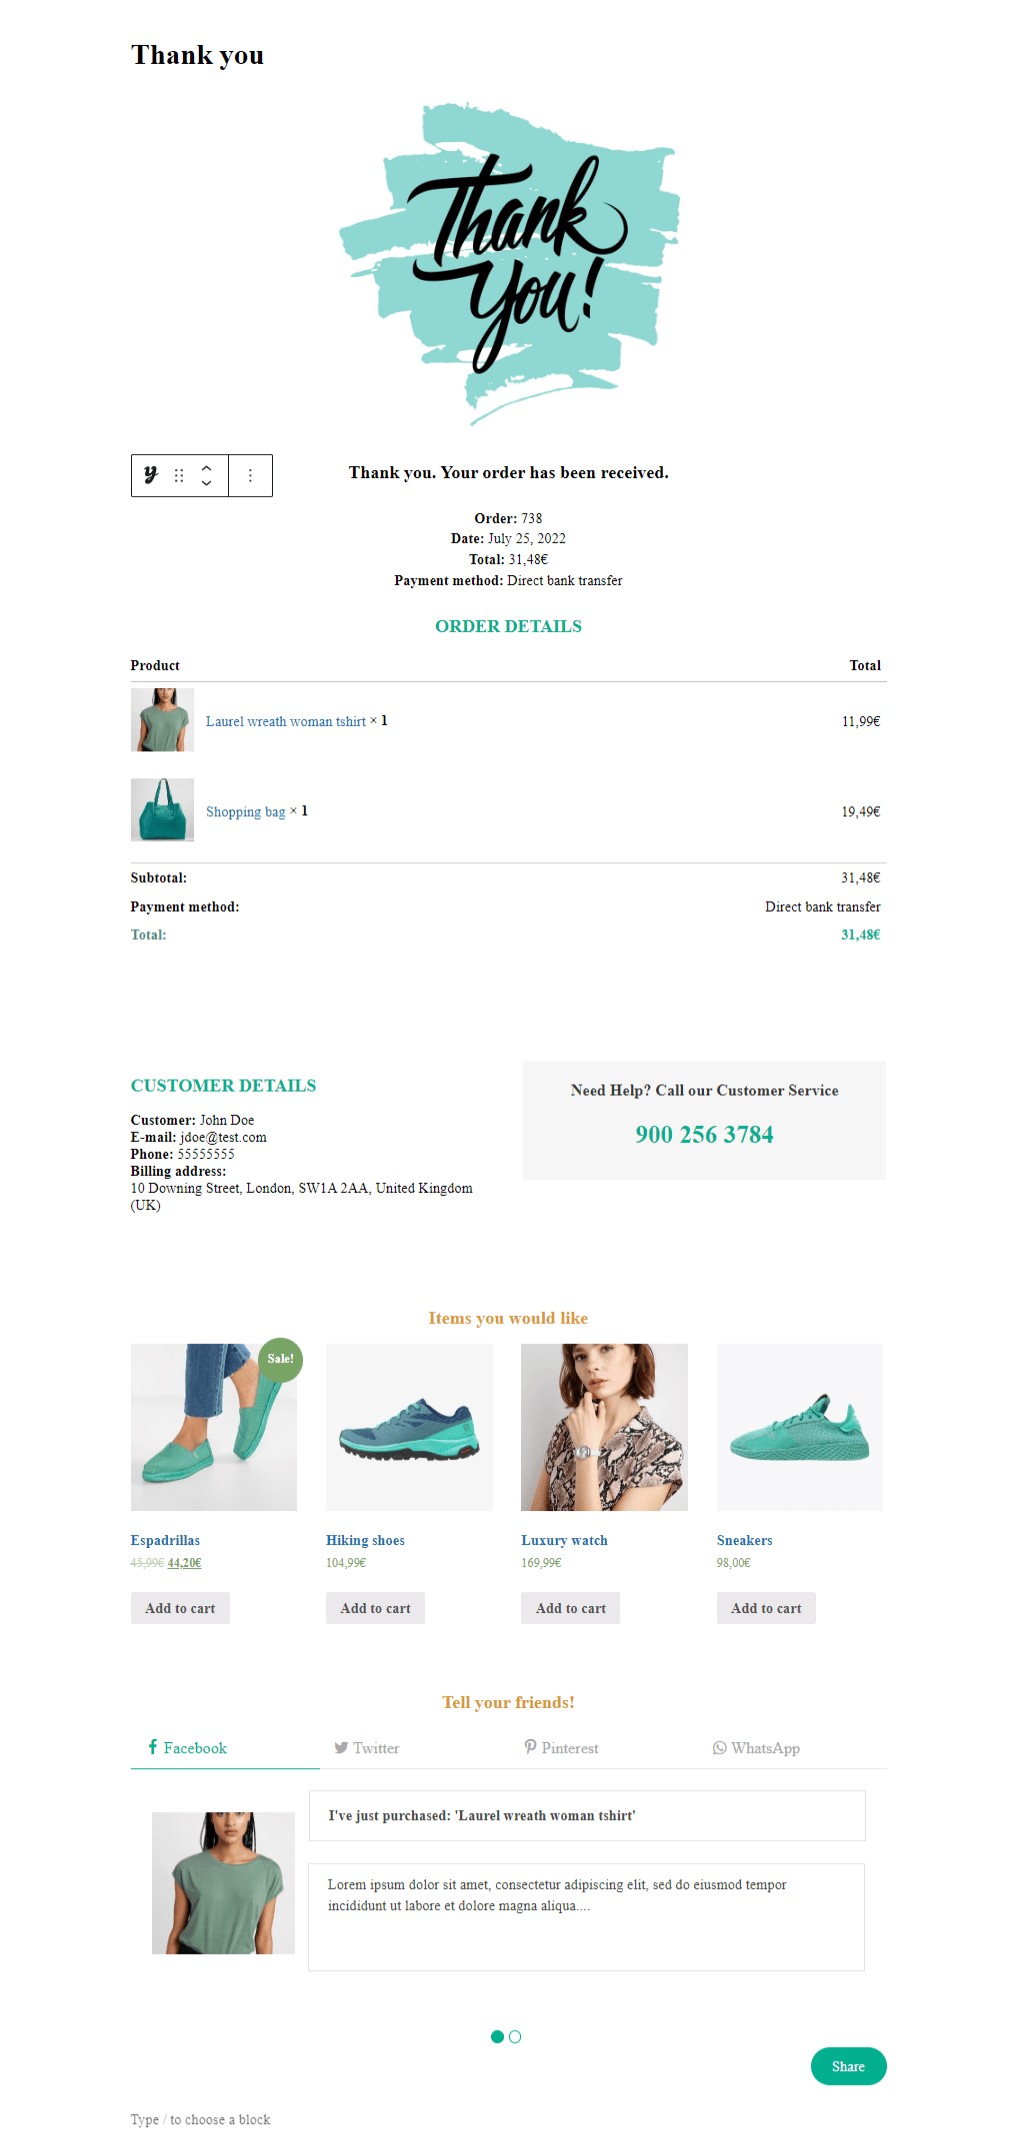
Example of a Thank You page
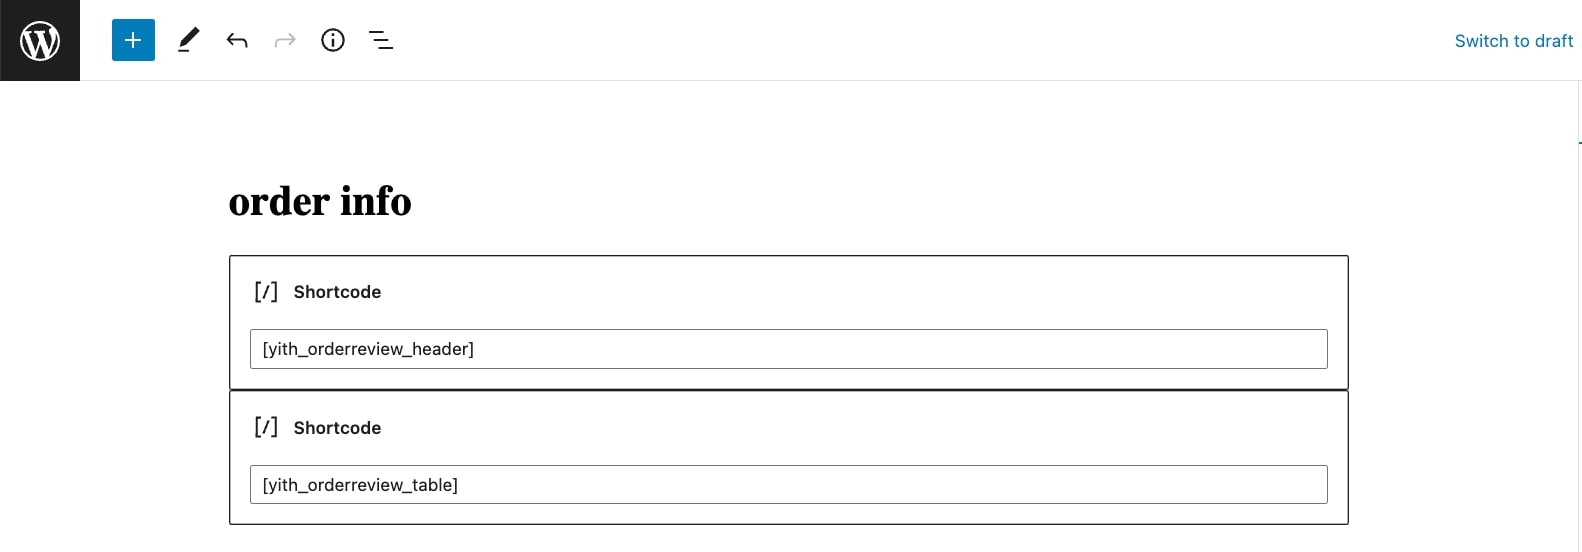
If, on the contrary, you are using WordPress classic editor, the page will include simple texts and shortcodes. To learn more about the different settings, shortcodes and their parameters, please go to this section.
Let’s now analyze how to edit the included custom Thank you pages or create new ones.
To edit an existing page, just click on the pencil icon that will show on mouse hover.
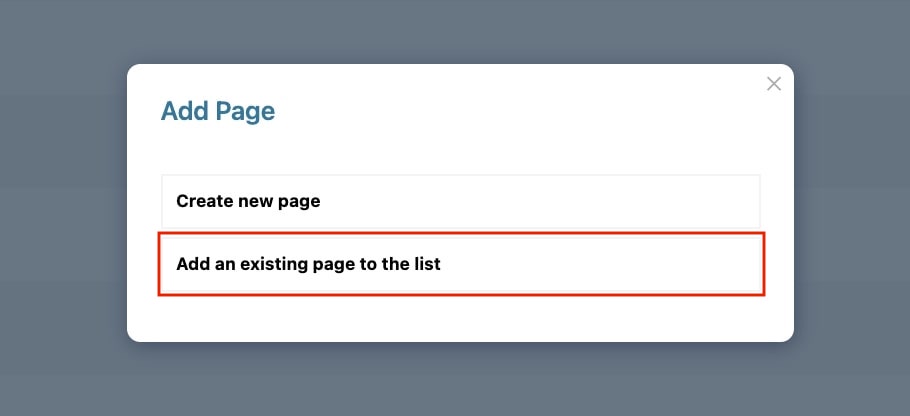
To create a new page, just click on the Add new button.
Now select Create new page in the popup.
When the page opens, you can edit/enter a title that will define it, replace/add an image to adapt the page to your site style and add anything you want through Gutenberg options.
Note: To preview the Thank you page you are building you can follow the steps in this page.
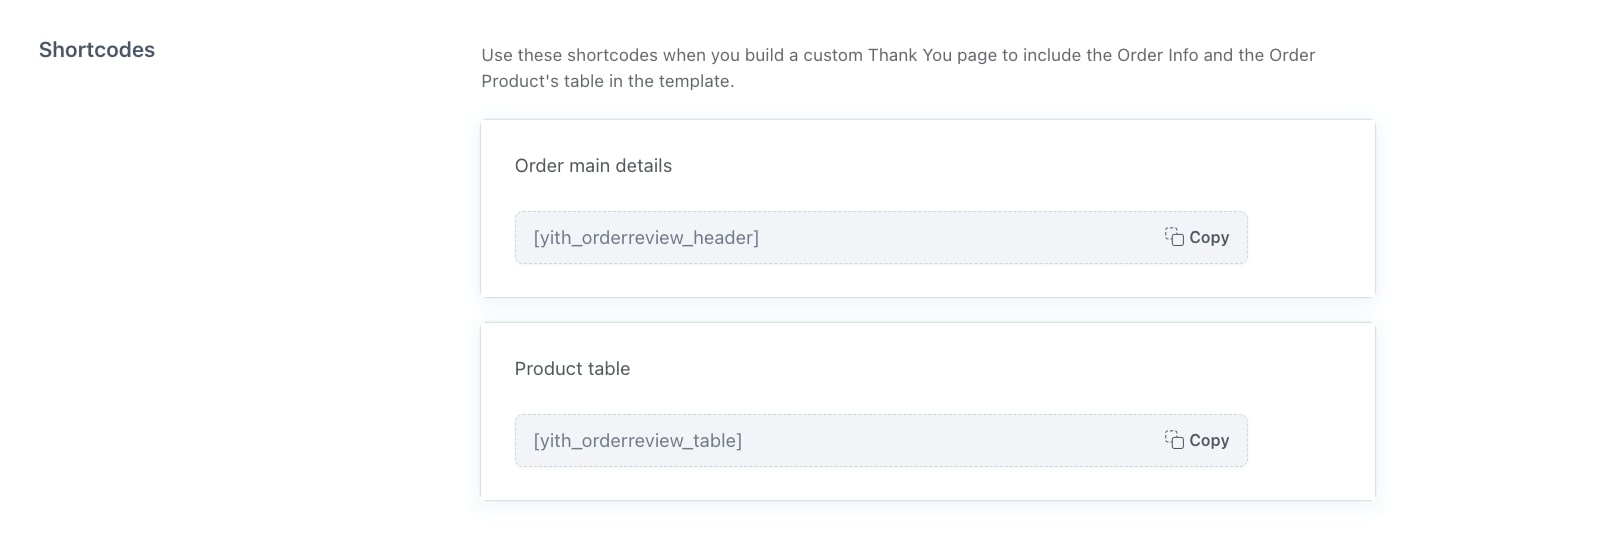
Let’s now set up a custom Thank you page by using the available shortcodes which are:
If, on the contrary, you are using WordPress classic editor, the page will include simple texts and shortcodes. To learn more about the different settings, shortcodes and their parameters, please go to this section.
Thank You Page Upsells
This section allows you to promote and sell upsell products through the Thank you page.
The available options for this block are:
Show title: (Yes, No) this controls the upsell section title;
Title alignment: choose the alignment for the upsell section title (Left, Center, Right);
Title color: choose the color for the upsell section title;
Number of products to show: decide how many products to show in the upsell section;
Columns number: select the number of columns to show the upsell products (from 1 to 4);
Order by: choose how to order products (by title, date or random);
Choose the type of products to promote: select the type of products to show as upsell (Best-sellers, Featured, Related, Custom). By selecting Custom, you will need to search and add the products from the field Products to show;
Responsive visibility: choose whether to show or hide the upsell section on
desktop
tablet
mobile
Responsive text alignment: set the alignment of the text for
mobile
tablet
Additional CSS Class(es): here, you can enter additional CSS classes;
Hide on Logged in Users: enable if you want to hide upsells to users when they are not logged in;
Hide on Logged out Users: enable if you want to hide upsells to guests or logged-out users.
Thank You Page Order Overview Header
You can use this block to add the order overview header to the page. The available options are:
Order ID: enter an order ID to see the rendered shortcode;
Style: select the style to apply to show the order overview
compact – single line
multiple lines
Text alignment: choose the alignment for the order overview text (Left, Center, Right);
Show thank you message: (Yes/No) this controls the thank you message;
Responsive visibility: choose whether to show or hide the order overview on
desktop
tablet
mobile
Responsive text alignment: set the alignment of the text for
mobile
tablet
Additional CSS Class(es): here, you can enter additional CSS classes;
Hide on Logged in Users: enable if you want to hide order overview to users when they are not logged in;
Hide on Logged out Users: enable if you want to hide order overview to guests or logged-out users.
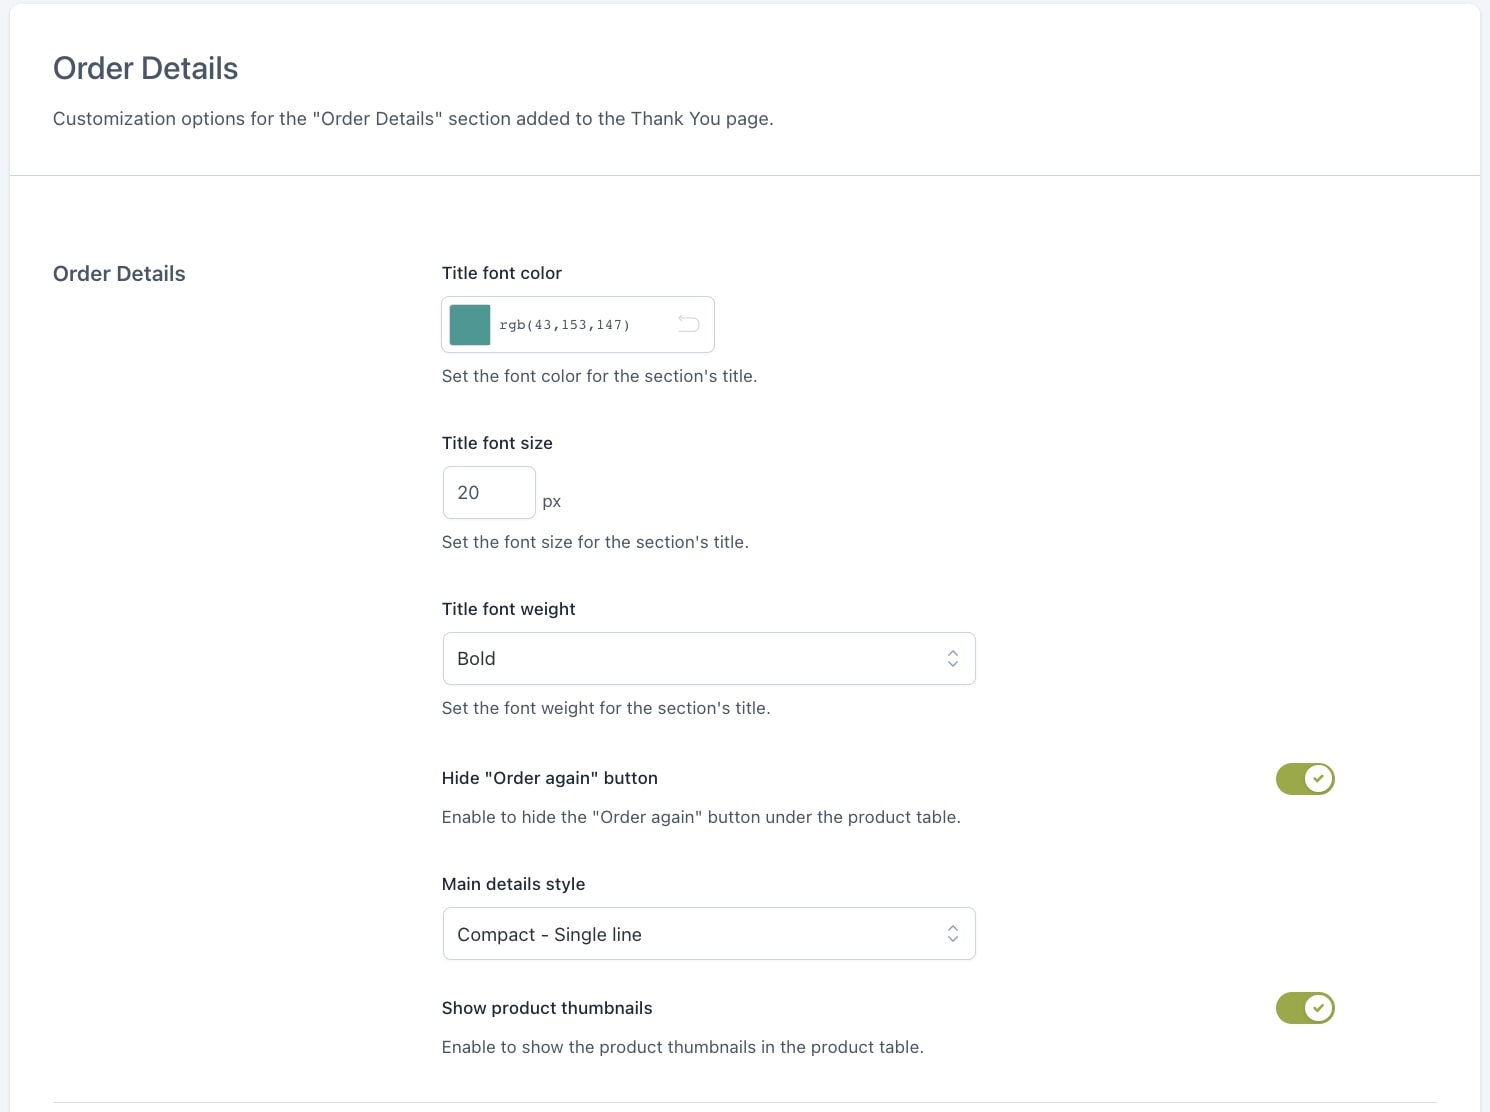
Thank You Page Order Table
You can use this block to add the order table to the page. The available options are:
Order ID: enter an order ID to see the rendered shortcode;
Show title: (Yes, No) this controls the order table title;
Show product thumbnails: (Yes, No) this controls the thumbnails of products;
Title color: choose the color for the order table;
Text alignment: choose the alignment for the order table (Left, Center, Right, Justified);
Accent color: set the accent color;
Responsive visibility: choose whether to show or hide the order table on
desktop
tablet
mobile
Responsive text alignment: set the alignment of the text for
mobile
tablet
Additional CSS Class(es): here, you can enter additional CSS classes;
Hide on Logged in Users: enable if you want to hide order table to users when they are not logged in;
Hide on Logged out Users: enable if you want to hide order table to guests or logged-out users.
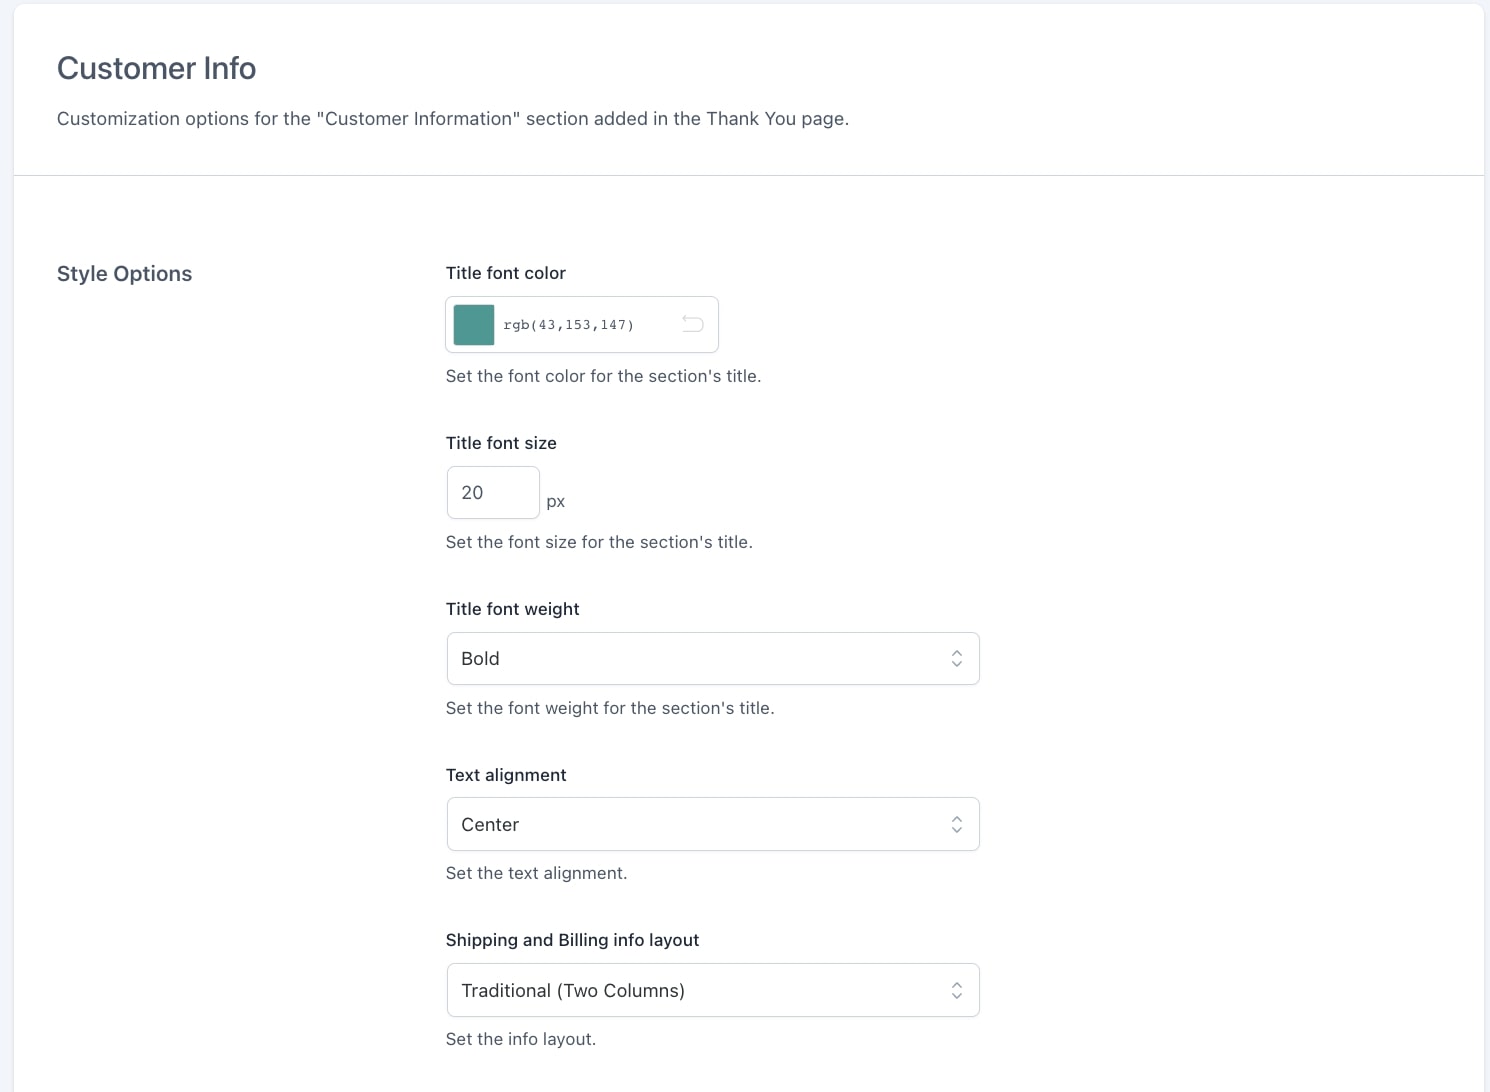
Thank You Page Order Customers Details
You can use this block to add the customer’s details to the page. The available options are:
Order ID: enter an order ID to see the rendered shortcode;
Show title: (Yes, No) this controls the customer’s details title;
Title color: choose the color for the customer’s details title;
Text alignment: choose the alignment for the customer’s details (Left, Center, Right);
Shipping and Billing info layout: choose the layout for the customer’s shipping and billing info from
Compact (single block)
Traditional (two columns)
Responsive visibility: choose whether to show or hide the customer’s details on
desktop
tablet
mobile
Responsive text alignment: set the alignment of the text for
mobile
tablet
Additional CSS Class(es): here, you can enter additional CSS classes;
Hide on Logged in Users: enable if you want to hide customer’s details to users when they are not logged in;
Hide on Logged out Users: enable if you want to hide customer’s details to guests or logged-out users.
Thank You Page Order Number
You can use this block to add the order number to the page. The available options are:
Responsive visibility: choose whether to show or hide the order number on
desktop
tablet
mobile
Responsive text alignment: set the alignment of the text for
mobile
tablet
Additional CSS Class(es): here, you can enter additional CSS classes;
Hide on Logged in Users: enable if you want to hide the order number to users when they are not logged in;
Hide on Logged out Users: enable if you want to hide the order number to guests or logged-out users.
Thank You Page Customer Name
You can use this block to add the customer’s name to the page. The available options are:
Name type: choose the name type to show as the customer’s name from:
first name
billing first name
Order ID: enter an order ID to see the rendered shortcode;
Responsive visibility: choose whether to show or hide the customer’s name on
desktop
tablet
mobile
Responsive text alignment: set the alignment of the text for
mobile
tablet
Additional CSS Class(es): here, you can enter additional CSS classes;
Hide on Logged in Users: enable if you want to hide the customer’s name to users when they are not logged in;
Hide on Logged out Users: enable if you want to hide the customer’s name to guests or logged-out users.
Thank You Page Order Customer Email
You can use this block to add the customer’s email to the page. The available options are:
Responsive visibility: choose whether to show or hide the customer’s email on
desktop
tablet
mobile
Responsive text alignment: set the alignment of the text for
mobile
tablet
Additional CSS Class(es): here, you can enter additional CSS classes;
Hide on Logged in Users: enable if you want to hide the customer’s email to users when they are not logged in;
Hide on Logged out Users: enable if you want to hide the customer’s email to guests or logged-out users.
Thank You Page Social box
Thanks to the Social box section, your customers will be able to share the products they have just purchased on Facebook, Twitter, Pinterest and/or WhatsApp.
The available options for this block are:
Order ID: enter an order ID to see the rendered shortcode;
Show title: (Yes, No) this controls the social box title;
Title alignment: choose the alignment for the social box title (Left, Center, Right);
Title color: choose the color for the social box title;
Show or hide the following social media in the box:
Facebook
Twitter
Pinterest
WhatsApp
Set the color for:
accent color
button background
button background on hover
button text
button text on hover
Button border radius (in px): set the border radius for the social box;
Responsive visibility: choose whether to show or hide the social box on
desktop
tablet
mobile
Responsive text alignment: set the alignment of the text for
mobile
tablet
Additional CSS Class(es): here, you can enter additional CSS classes;
Hide on Logged in Users: enable if you want to hide the social box to users when they are not logged in;
Hide on Logged out Users: enable if you want to hide the social box to guests or logged-out users.
Thank You Page PDF Button
Show a PDF button to allow your customers to download the order info as a PDF file.
The available options for this block are:
Button text: enter the text for the PDF button;
Set the color for:
button background
button background on hover
button text
button text on hover
Button border radius (in px): set the border radius for the PDF button;
Responsive visibility: choose whether to show or hide the PDF button on
desktop
tablet
mobile
Responsive text alignment: set the alignment of the text for
mobile
tablet
Additional CSS Class(es): here, you can enter additional CSS classes;
Hide on Logged in Users: enable if you want to hide the PDF button to users when they are not logged in;
Hide on Logged out Users: enable if you want to hide the PDF button to guests or logged-out users.
Thank You Page Coupon Box
The Coupon box can be very useful if you want to promote your running offers and discounts.
The available options for this block are:
Coupon code: select one of the coupons previously created in WooCommerce;
Title: enter a title for the coupon box;
Title color: choose the color for the coupon box title;
Title font size (in px): select the font size for the title;
Responsive visibility: choose whether to show or hide the PDF button on
desktop
tablet
mobile
Responsive text alignment: set the alignment of the text for
mobile
tablet
Additional CSS Class(es): here, you can enter additional CSS classes;
Hide on Logged in Users: enable if you want to hide the coupon box to users when they are not logged in;
Hide on Logged out Users: enable if you want to hide the coupon box to guests or logged-out users.
To set a Thank you page that will be globally applied when orders have been placed, go to the tab General options.
Here you will be able to set the following options:
By default, when the order is placed: choose what to show to users after placing their order from:
Show the default WooCommerce Thank You page: by selecting this option, the standard WooCommer Thank you page will show;
Show a custom Thank You page: by selecting this option, you will be able to choose one of the custom Thank you pages included or created with the plugin;
Redirect users to a specific URL: by selecting this option, you will be able to define the URL where you want to redirect users;
Delete plugin options on Uninstall: enable this option to delete the saved options when uninstalling the plugin.
These general options can be overridden from the tab Rules. Go this page to learn how to create rules to show specific custom Thank you pages based on the products or categories purchased by users or the payment method used to pay for the order.
In the Customization tab, you can find all the settings and shortcodes available if you need to create your custom thank you pages with WordPress classic editor.
This tab is divided into sub-tabs, each one linked to the related shortcode:
In this tab, you can configure the style and options of the PDF buttonshown on the custom Thank you page.
Button options
Here, you can find the following options for the PDF button:
Button label: enter the label for the PDF button;
Button colors: set the colors of the button (background, background on hover, text, text on hover);
Border radius (in px): set the border radius for the PDF button.
PDF Options
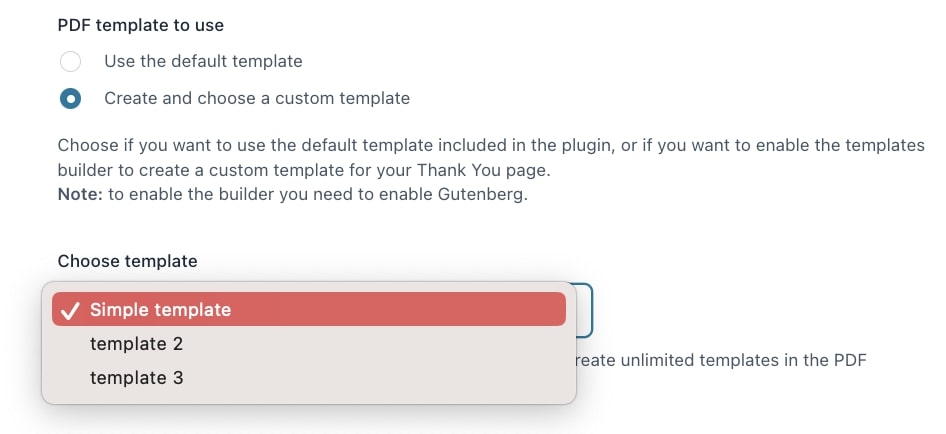
You would be able to decide to either use a default template or create and select a custom one.
Use the Default template:
This option uses an already created template and you can decide what information to hide in the PDF that will be downloaded by the customer. The available options are:
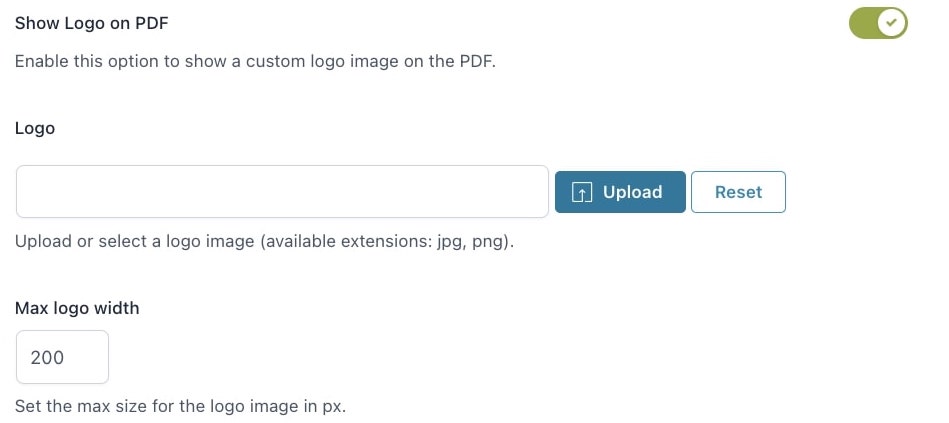
Show Logo on PDF: enable this option if you want to show a custom logo;
Logo: upload here the image you want to show as a logo;
Max logo width (in px): set the max width for the logo;
Show Order Header Table: enable this option if you want to show the order header table;
Show Order Details Table: enable this option if you want to show the order details table;
Show Customer Details: enable this option if you want to show the customer details;
Footer text: insert a custom text for the PDF footer;
Preview PDF: click on the PDF preview button to see a preview of the PDF.
Create and choose a template to use:
Selecting this option you would be able to use any of the templates created and customized as your PDF in this page.
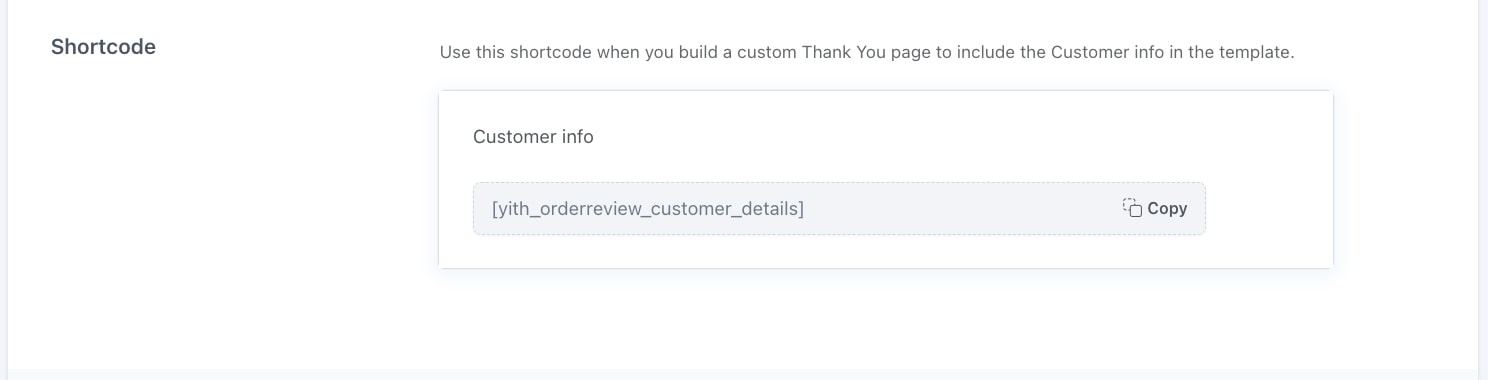
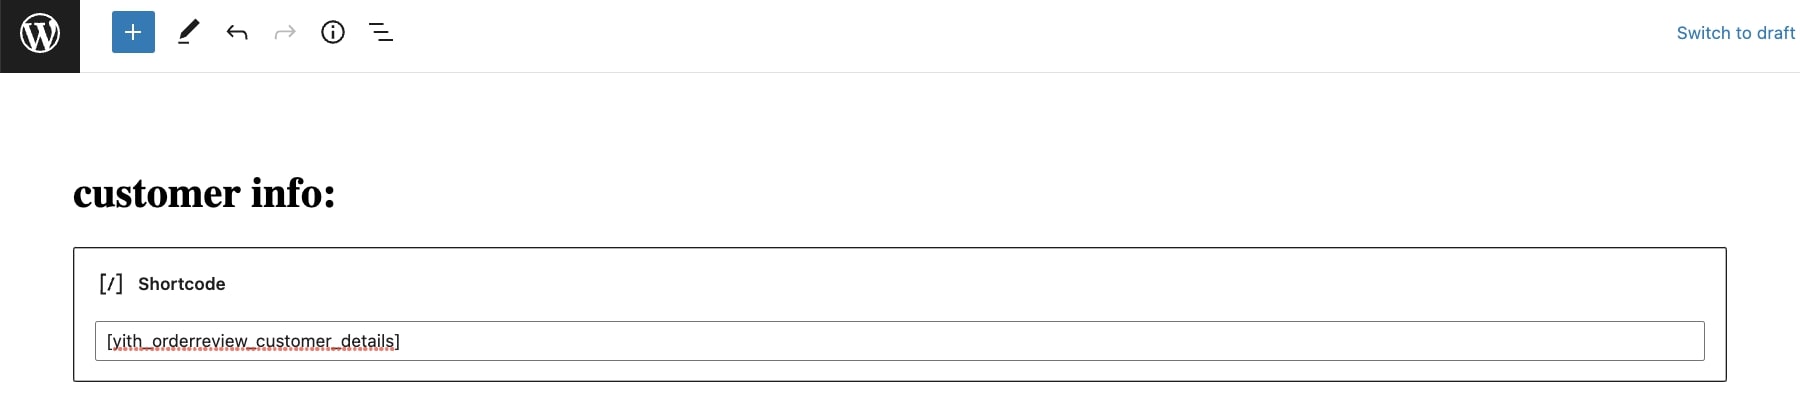
Shortcode
[yith_ctpw_pdf_button]: use this shortcode to print the PDF button.
To learn more about the shortcode parameters, please refer to this page.
In this tab, you can create as many templates as you wish for the PDF the users will download when using the PDF button in their Thank you page.
By clicking the button users will download the same PDF.
The plugin automatically creates a simple template if you have previously selected create and choose a custom template in Customization> PDF as a PDF template to use.
How to create a new template
Just click +Add new template.
This would open up the template editing page, select one of the options, define the name and edit it based on your needs using the YITH block options available.
Please note – to use the other 8 templates available in the plugin library, you need to have a valid and active license.
The options and blocks that you will be able to use to create the template as you prefer are the following:
Text: build your texts by using a paragraph, heading, and list style;
Media: you can add images to your blocks;
Design: choose the layout from buttons, columns, separator, and spacer;
YITH: ready-to-use Thank you page plugin blocks to quickly add the:
Thank You Page Order Number
Thank You Page Products Table
Thank You Page Products Totals
Thank You Page Customer Information
Thank You Page Order Date
Thank You Page Payment Method
Thank You Page Coupon Code
Thank You Page Paragraph
Plugin block options
Thank You Page Order Number
This block will allow you to show the order number in the place of your preference inside the PDF template, when adding this block, you will find a set of options and you will be able to rename “order” as you prefer.
Dimensions: set the margin (right, top, bottom, left) and padding
Color: set the color for the text;
Typography: set the font size and letter case;
Advanced: here, you can enter additional CSS classes.
example:
Thank You Page Products Table
If you want to add the product table to the PDF template, you can take advantage of the Thank You Page Products Table block. When adding this block, you will find a set of options.
Enable/disable what you want to show among:
product thumbnail
product name
product SKU with the product name
quantity
price
total
You can also change the titles of the product table items as you prefer.
Titles: customize titles by setting the color and border color, size, and letter case;
Advanced: here, you can enter HTML anchor and additional CSS classes.
example
Thank You Page Products Totals
If you want to add the total table to the PDF template, you can take advantage of the Thank You Page Products Totals block. When adding this block, you will find a set of options.
Table settings: customize the color and background color, and size of the table;
Subtotal labels: set color and size of the subtotal text;
Total settings: customize the color and size of the total;
Advanced: here, you can enter HTML anchor and additional CSS classes.
example
Thank You Page Customer Information
If you want to show the customer details in the PDF template, you can take advantage of the Thank You Page Customer Information block. When adding this block, you will find a set of options and you will be able to rename “customer info” as you prefer.
Customer’s data will be added through the following placeholders:
BILLING PLACEHOLDERS:
{{billing_first_name}}
{{billing_last_name}}
{{billing_company}}
{{billing_address_1}}
{{billing_address_2}}
{{billing_city}}
{{billing_state}}
{{billing_country}}
{{billing_email}}
{{billing_phone}}
{{billing_postcode}}
SHIPPING PLACEHOLDERS:
{{shipping_first_name}}
{{shipping_last_name}}
{{shipping_company}}
{{shipping_address_1}}
{{shipping_address_2}}
{{shipping_city}}
{{shipping_state}}
{{shipping_country}}
{{shipping_phone}}
{{shipping_postcode}}
Dimensions: set the margin (right, top, bottom, left) and padding;
Color: set the color for the text;
Typography: set the size and letter case;
Advanced: here, you can enter additional CSS classes.
Example
Thank You Page Order Date
If you want to show the quote date info in the PDF template, you can take advantage of the Thank You Page Order Date block. When adding this block, you will find a set of options and you will be able to rename the “dates” as you prefer.
Dimensions: set the margin (right, top, bottom, left) and padding;
Color: set the color for the text;
Typography: set the font size and letter case,
Advanced: here, you can enter additional CSS classes.
example
Thank You Page Payment Method
This block will allow you to show the payment method used during the checkout. When adding this block, you will find a set of options.
Dimensions: set the margin (right, top, bottom, left) and padding;
Color: set the color for the text;
Typography: set the font size and letter case;
Advanced: here, you can enter additional CSS classes.
example
Thank You Page Coupon Code
If you want to share coupons with users and target future sales you will be able to tie an already created woocommerce coupon code to it. When adding this block, you will find a set of options and you will be able to give the ”title” you prefer.
Box border: set the color of the box border;
Style: here you will find 9 possible border styles;
Title: set the text color;
Coupon Label: set the color and size of the coupon text;
Color: set the background color of the box;
Dimensions: set the padding;
Advanced: here, you can enter additional CSS classes.
example:
Thank You Page Paragraph
If you are looking to customize the PDF with a custom message you can take advantage of the Thank You Page Paragraph. When adding this block, you will find a box to enter a freehand text and a set of options.
Dimensions: set the margin (right, top, bottom, left) and padding;
Color: set the color for the text;
Typography: set the size and letter case;
Advanced: enter additional CSS classes.
example
Through the plugin and the use of Gutenberg and your creativity, you can build as many custom PDF templates as you want. Below, you can see one of the unlimited results you can achieve.


