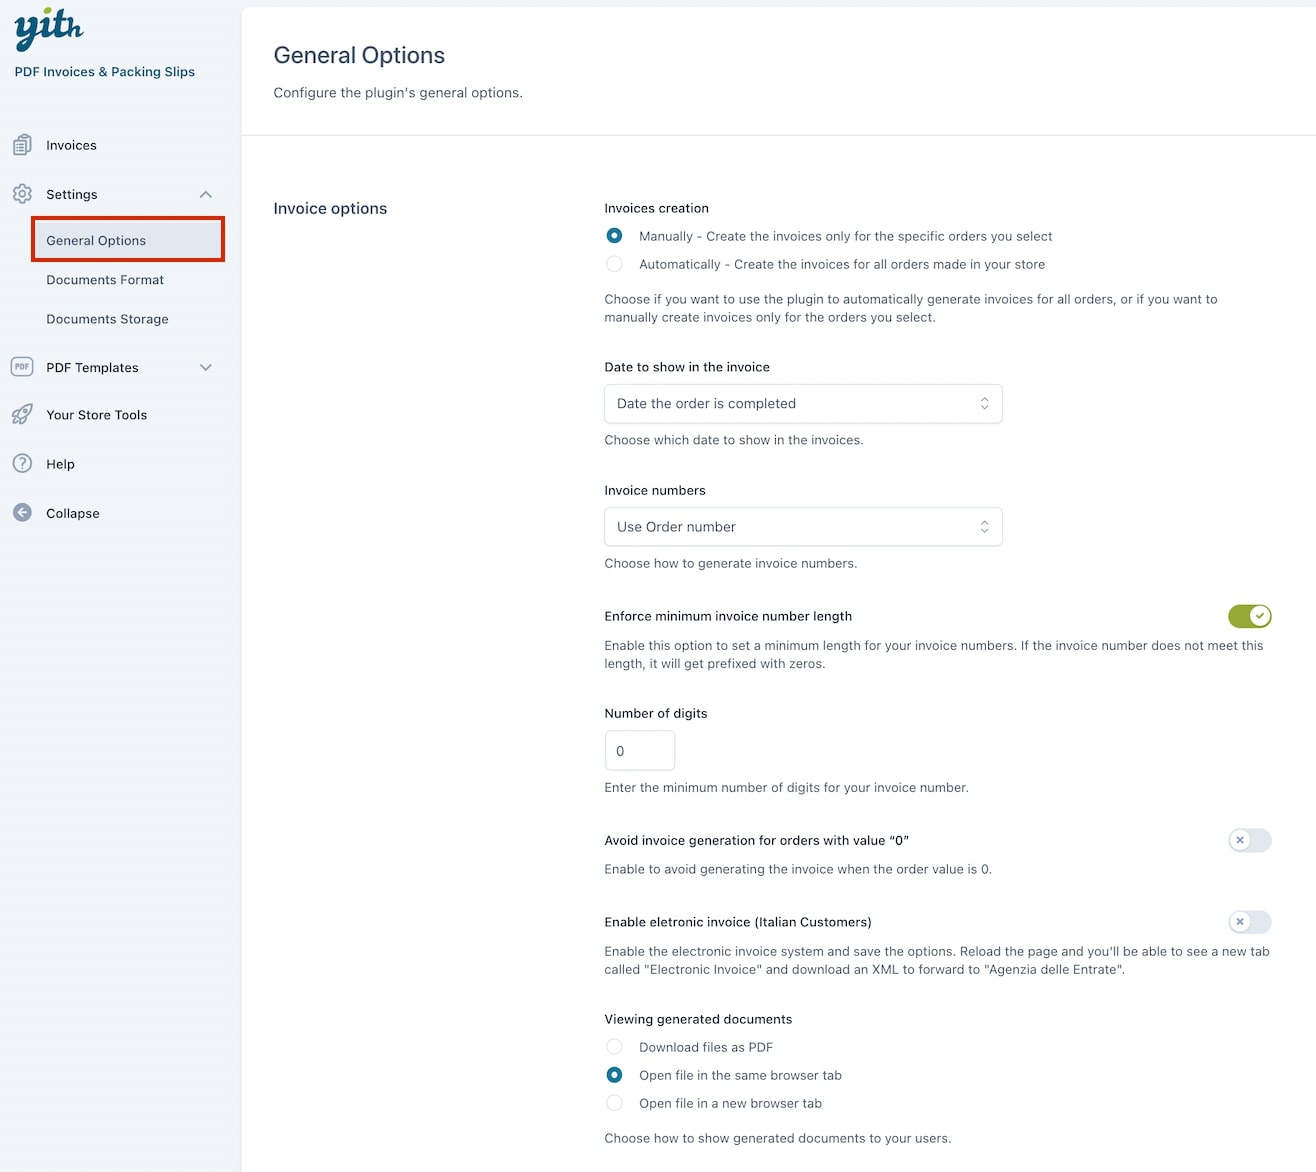
From the General Options tab you can configure the plugin’s general options. Here, we’re going to focus on the Invoice options section:
Invoice creation: either manually or automatically. For more details on how to generate an invoice, refer to this post.
Date of invoice creation: this option only appears when choosing ‘Automatic’ invoice creation. It consists of the following options:
Date of order creation.
Date of the invoice, when the order changes to processing status.
Date of the invoice, when the order changes to completed status.
Date to show in the invoice: date to show on the invoice:
Date of order creation.
Date the order is completed.
Date of invoice creation.
Invoice numbers: how to generate invoice numbers:
Use order number.
Use order ID.
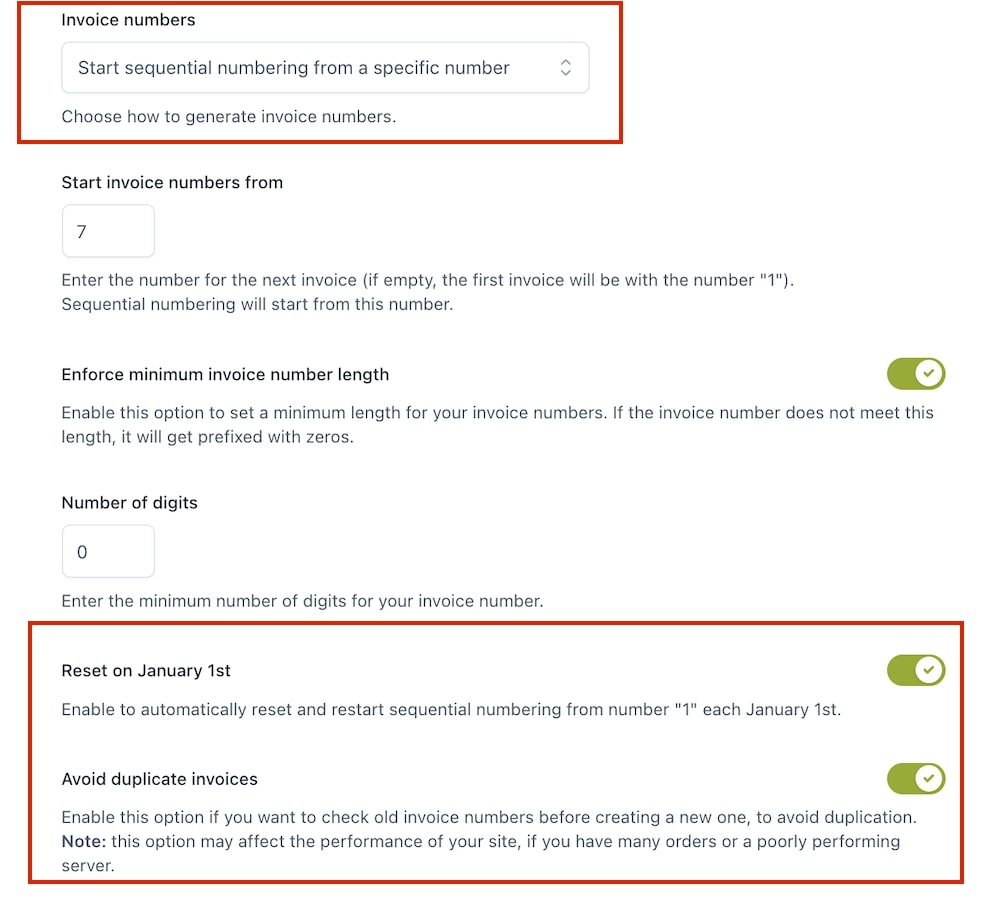
Start sequential numbering from a specific number.
Enforce minimum invoice number length: set a minimum invoice number length. In case the invoice number won’t match this value, a prefix with zeros will apply.
Number of digits: minimum number of digits for the invoice number.
Avoid invoice generation for orders with value “0”: This prevents invoices from being generated if the order value is “0”.
Enable electronic invoice (Italian customers): specific options for Italiancustomers that comply with the Italian standards to sell goods online. For more details regarding this option, you can refer to this post.
Viewing generated documents: decide if the customer can:
Download the files as a PDF.
Open the file in the same browser tab.
Open the file in a new browser tab.
Sequential numbering
When selecting “Start sequential numbering from a specific number” in the “invoice numbers” dropdown, you will see a set of new options.
Start invoice number from: the invoice numeration is sequential and begins from the value specified in this field (if empty, the first invoice will be “1”).
Reset on 1st January: reset the numeration and restart its cycle at the beginning of the new calendar year.
Avoid duplicate invoices: old invoice numbers will be checked before creating a new one, to avoid duplication.
The value specified in the image automatically increases and shows the next invoice number that will be generated. If you change the value and save new settings, the first new invoice will no longer follow the previous numeration, but it will begin from the new specified value.
From YITH > PDF Invoices & Packing Slips > General options > “Pro-forma options” you can enable the pro-forma options.
Allow users to download pro-forma document in my account: users can find and download pro-forma from their My Account page.
Allow pro-forma in new orders emails: pro-forma will be sent as an attachment to their order emails.
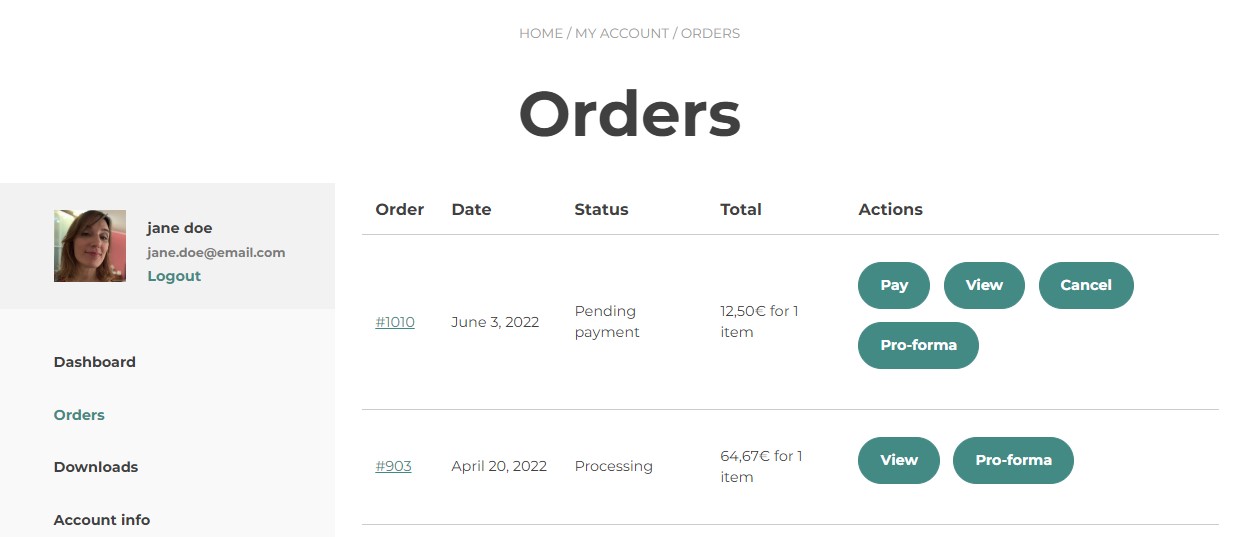
Download from My Account
The pro-forma document is automatically generated by the system. The user is able to see it on their My Account page, and the admin can see it from the edit order page.
Pro-forma example
It differs from a normal invoice for not having an invoice number.
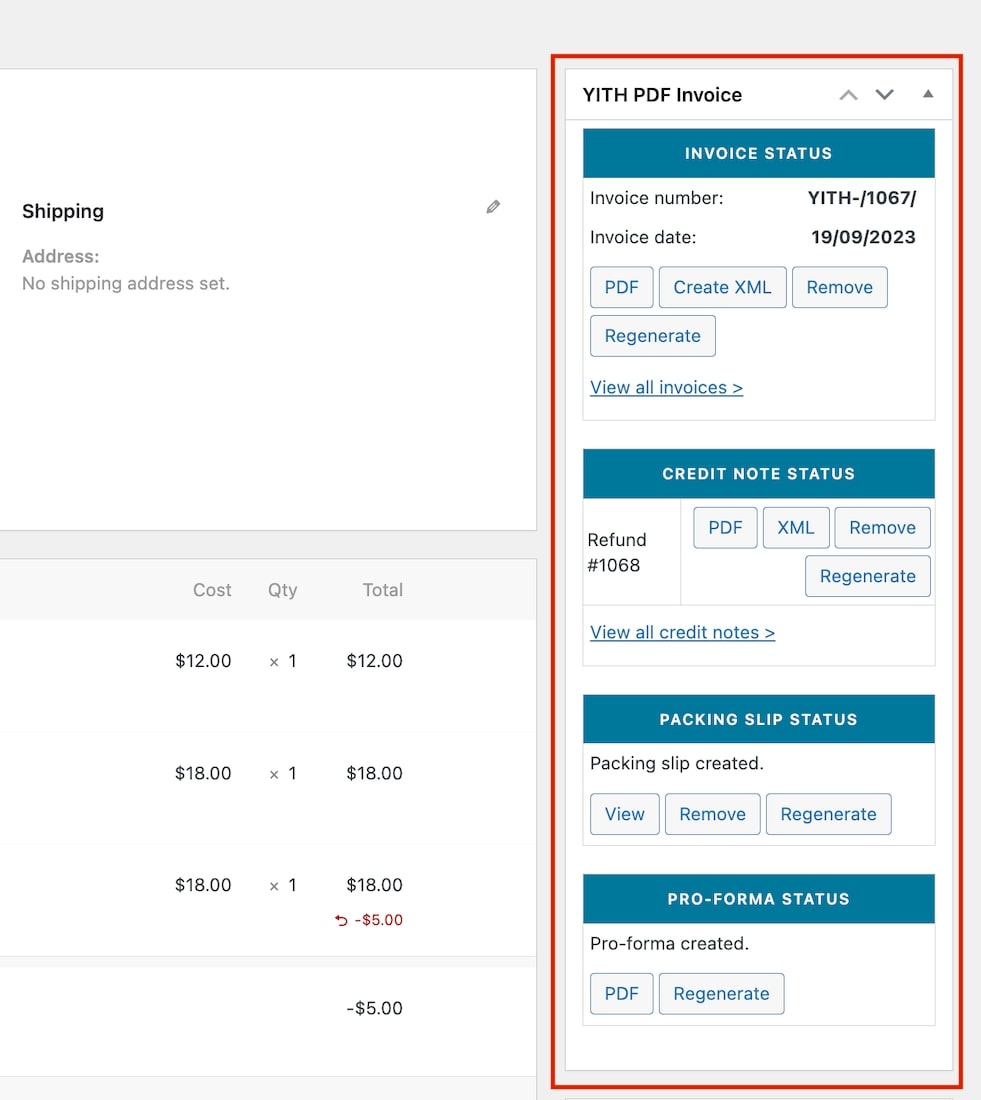
Each generated document can be viewed, removed and regenerated at any time. To apply an action on the invoice/credit note/packing slip/proforma, go to the right side of the order detail page and click on the specific button(s).
All generated documents (invoices, credit notes, pro-forma, packing slips) are saved with a default name provided by the plugin. However you can easily change this in YITH > PDF Invoices & Packing Slips > “Documents format”.
Date format for all documents: Choose the date format as it appears on the documents.
Invoices format
Add prefix/suffix to the invoice number: decide to show a custom text before/after the invoice number.
Invoice prefix: text before the invoice number.
Invoice suffix: text after the invoice number.
Invoice number format: how to show the invoice number, created using placeholders. (the [number] placeholder is required).
Invoice file name format: how to show the file name, created using placeholders. (the [number] placeholder is required).
Credit notes
Add prefix/suffix to the credit note number: decide to show a custom text before/after the credit note number.
Credit note prefix: text before the credit note number.
Credit note suffix: text after the credit note number.
Credit note format: how to show the credit note number, created using placeholders. (the [number] placeholder is required).
Credit note name format: how to show the file name, created using placeholders. (the [number] placeholder is required).
Pro-forma invoice format
Pro-forma invoice file name format: how to show the pro-forma file name, created using placeholders. (the [number] placeholder is required).
Packing slips format
Packing slip file name format: how to show the packing slip file name, created using placeholders. (the [number] placeholder is required).
Placeholders for file name
You can use the following placeholders to set the file format:
[number]: document invoice number
[prefix]: invoice number prefix, if any
[suffix]: invoice number prefix, if any
[year]: year of document generation, 4-figure format
[month]: month of document generation, 2-figure format
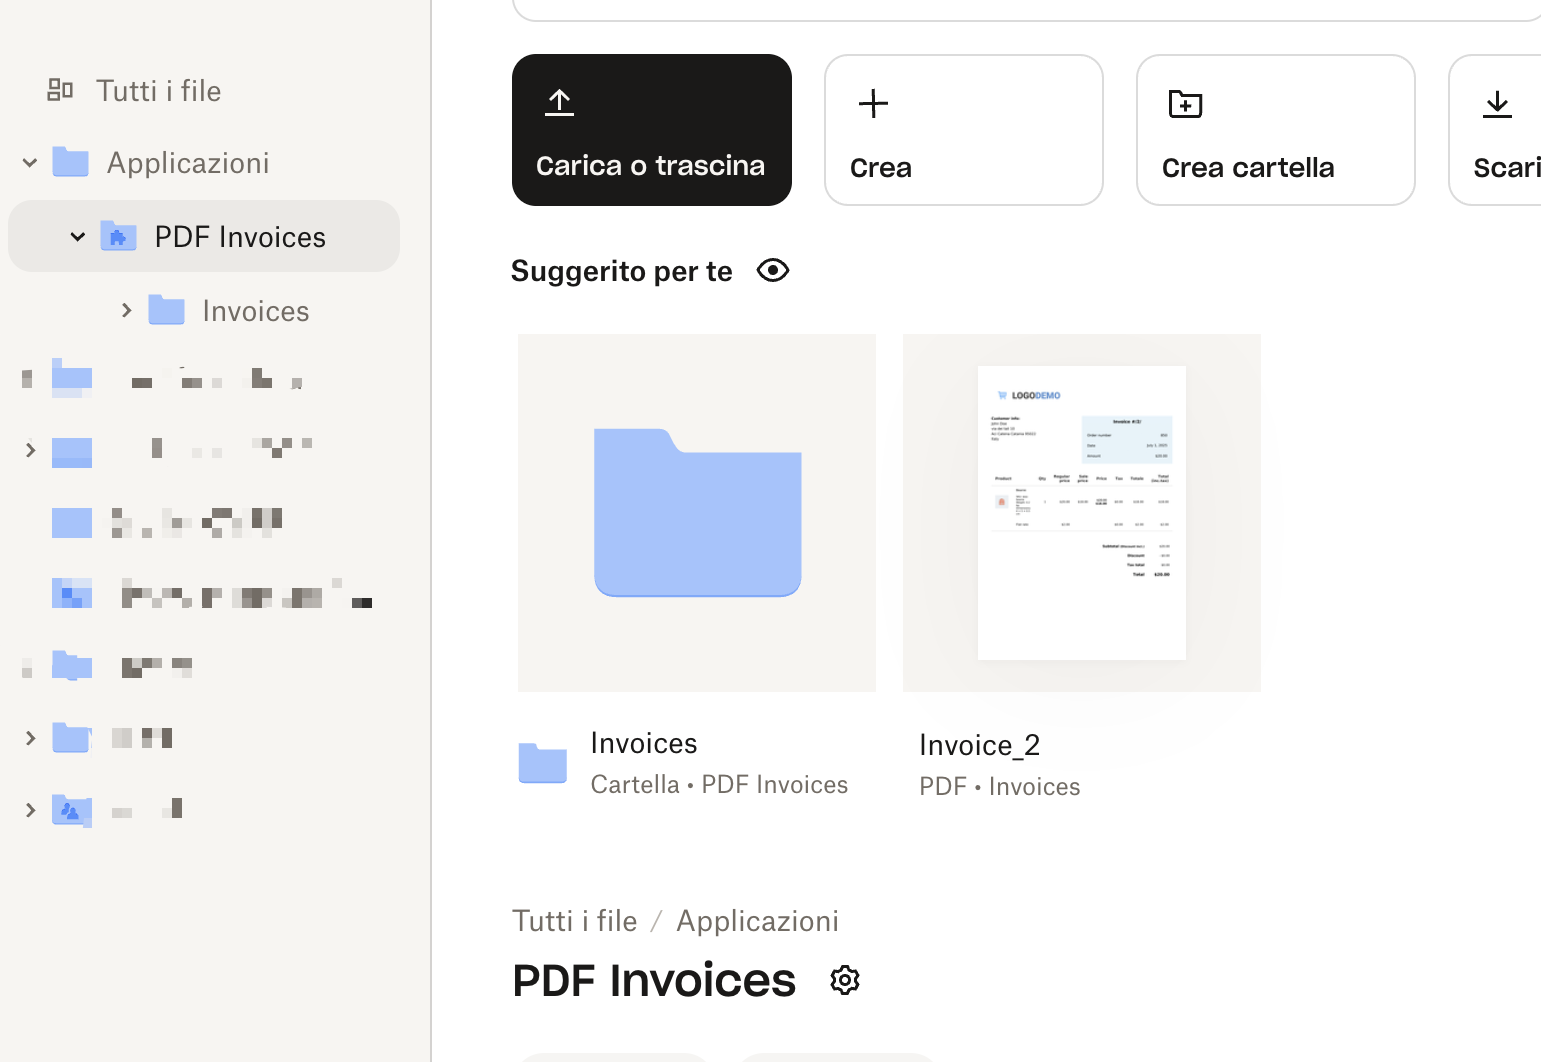
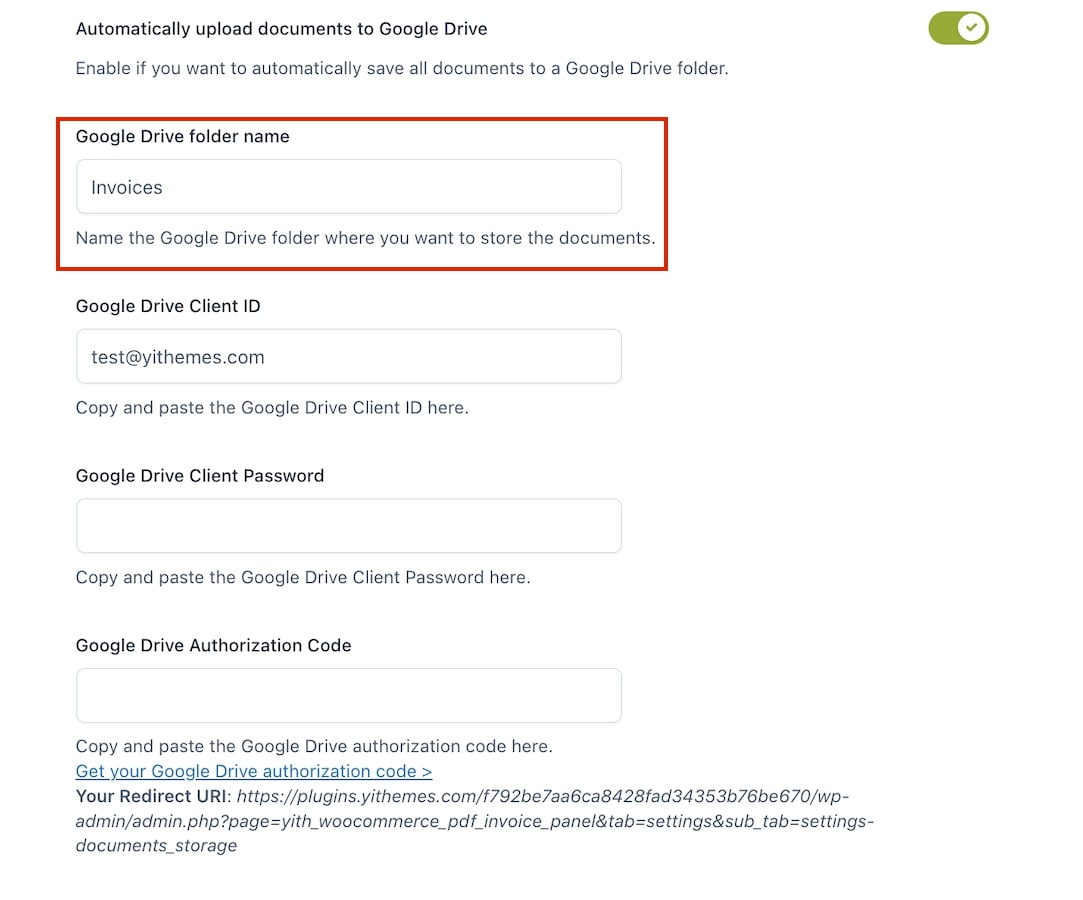
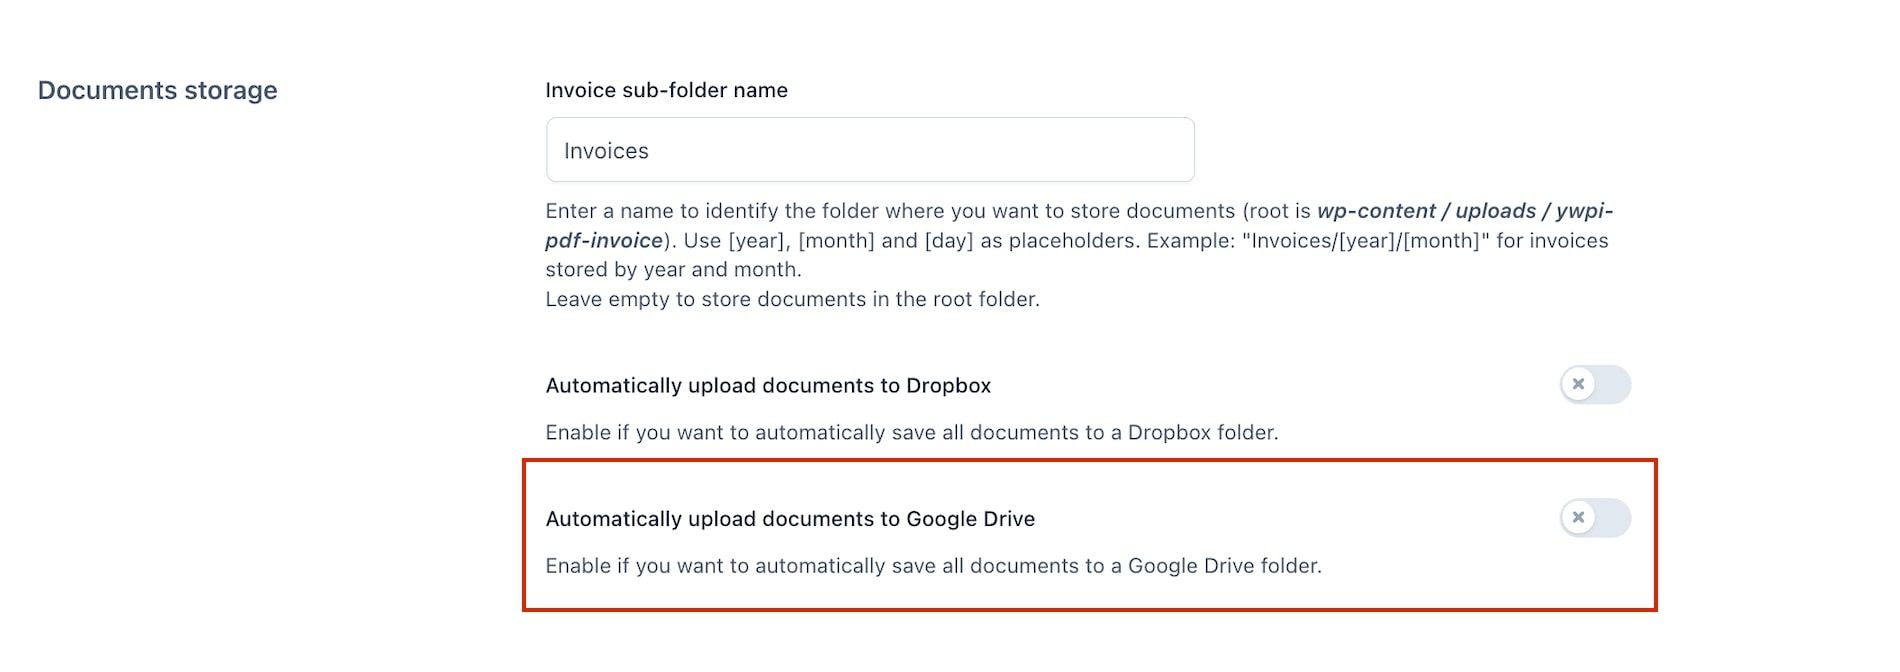
Invoices are saved in the “Invoices” folder by default. You can find this folder in “wp-content > uploads >ywpi-pdf-invoice” of your WordPress installation.
In case you want to set a custom path for saving, you can use [year], [month] and [day] as placeholders (according to the date that is generated).
Path example
If you gave in: “Invoices/[year]/[month]” an invoice generated on “17 February 2016” will be saved in the path “invoices/2016/02”.
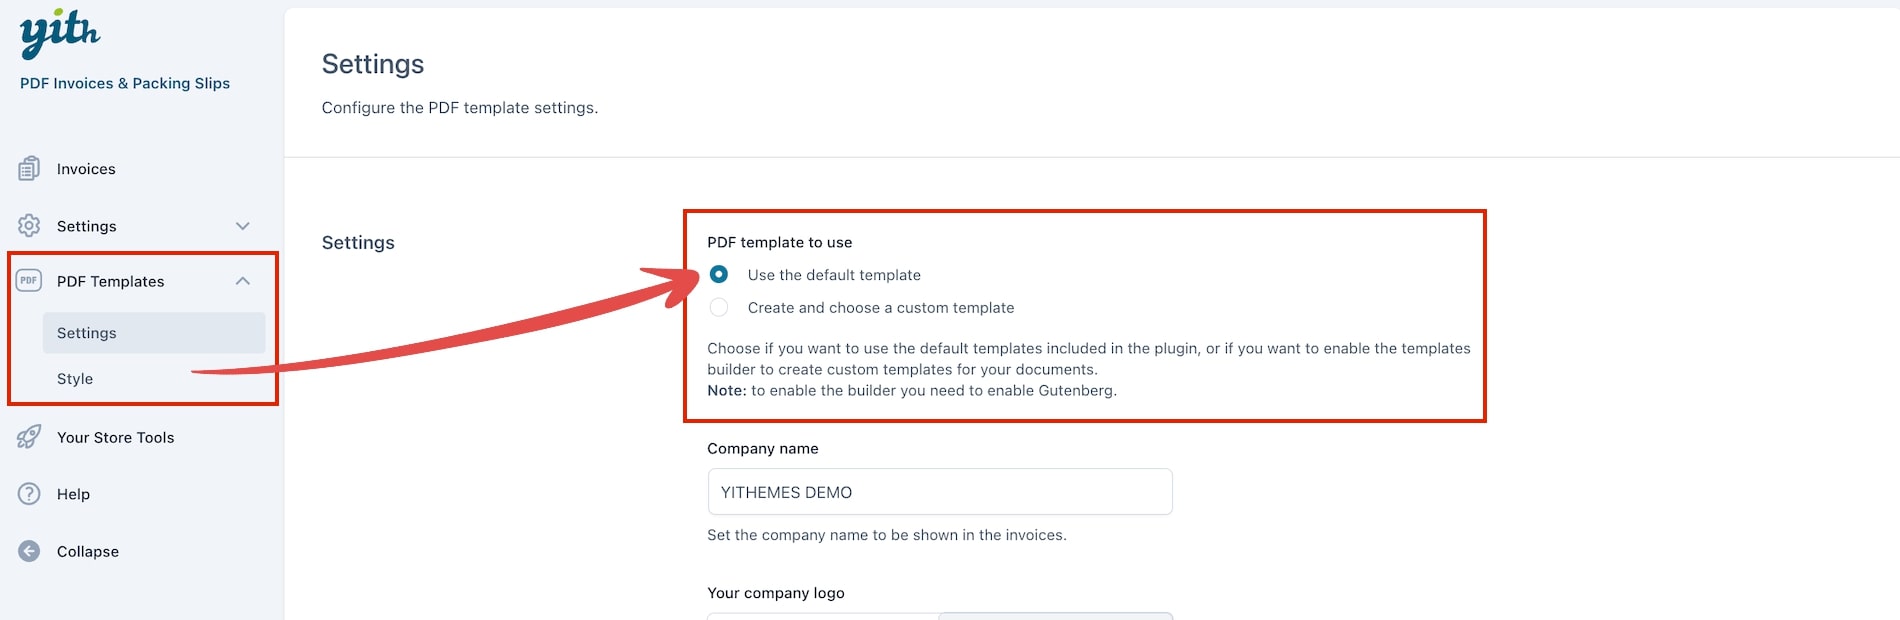
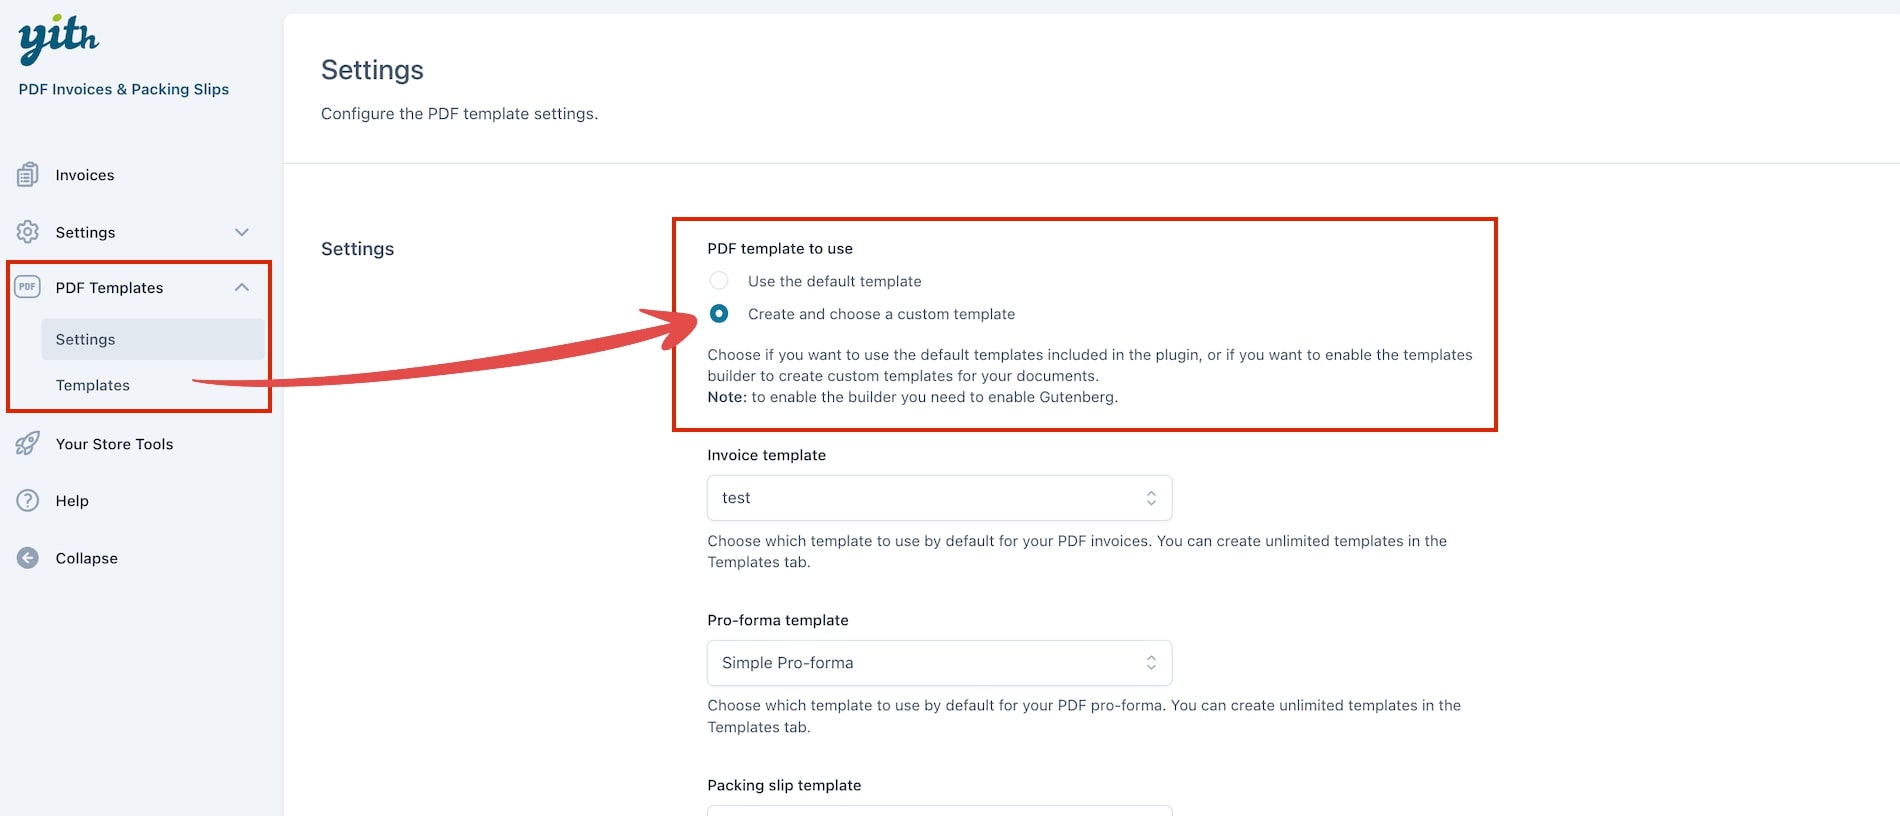
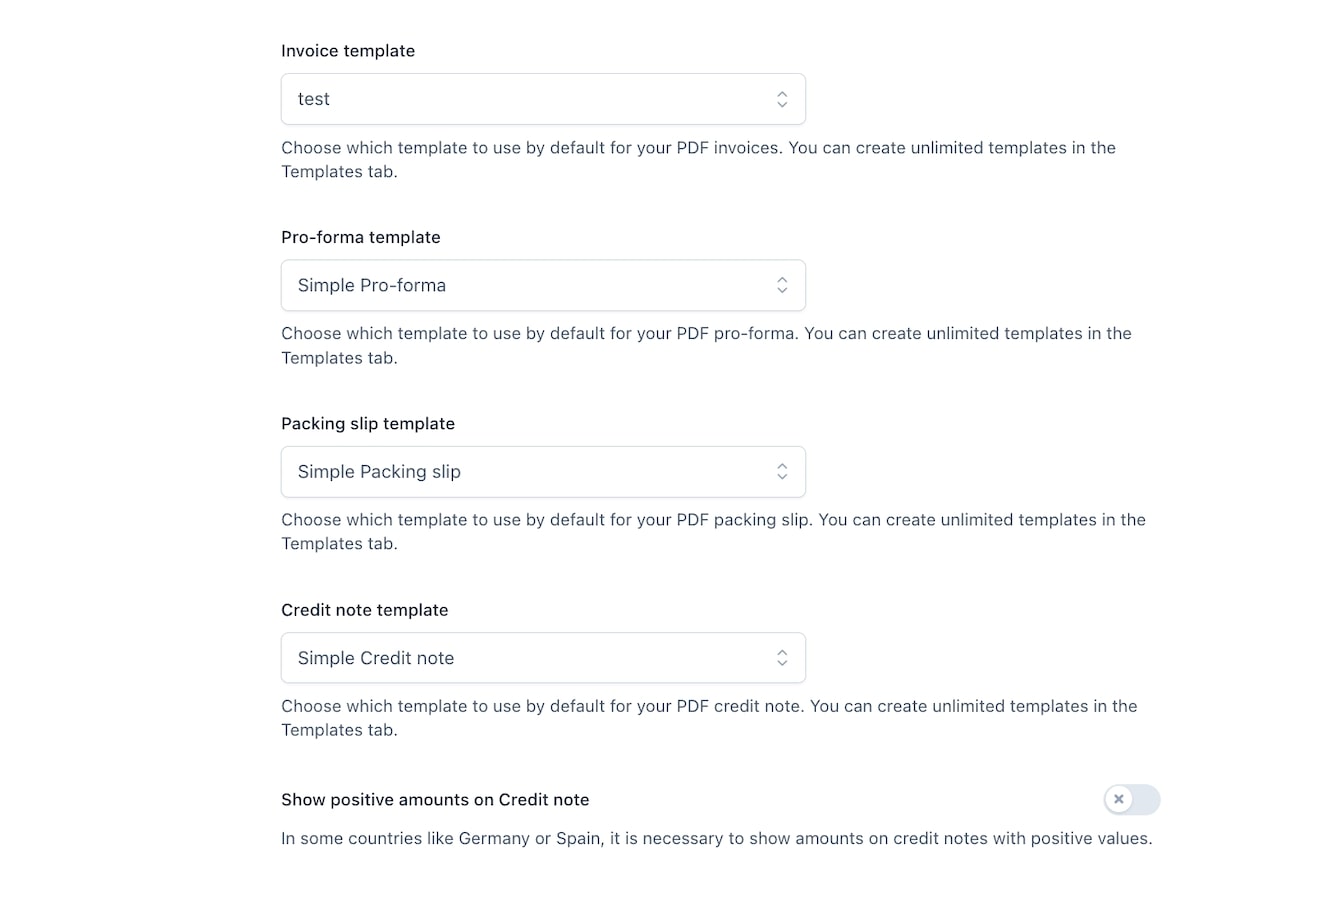
To use the default template for your PDF documents, go to YITH > PDF Invoices & Packing Slips> PDF Templates > Settings and select Use the default template in the option PDF template to use.
A new tab, Style, will appear under the Settings tab if you select the option of default templates (please, refer to this section in the documentation regarding the Style options).
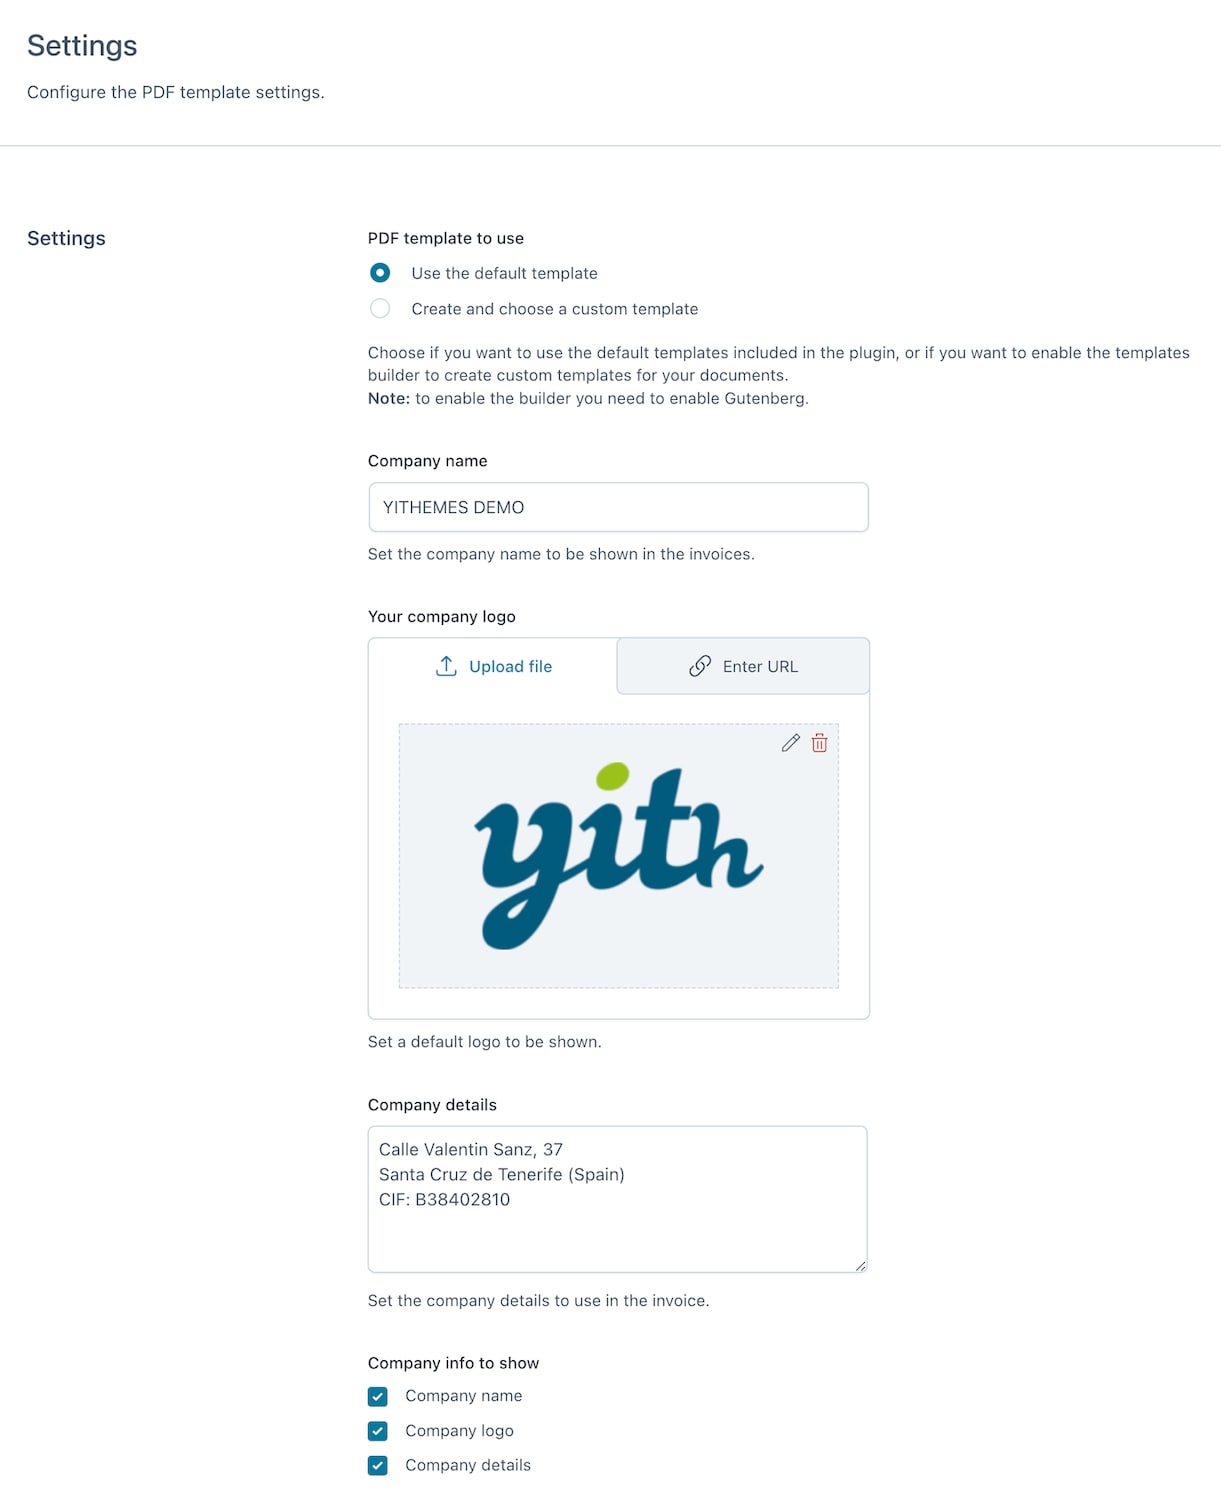
Settings
In the Settings tab, besides which PDF template to use, you will be able to configure the following options:
You can set here everything related to your company information in the invoices: company name, logo, and details, and choose whether to show them or not by selecting the related checkboxes.
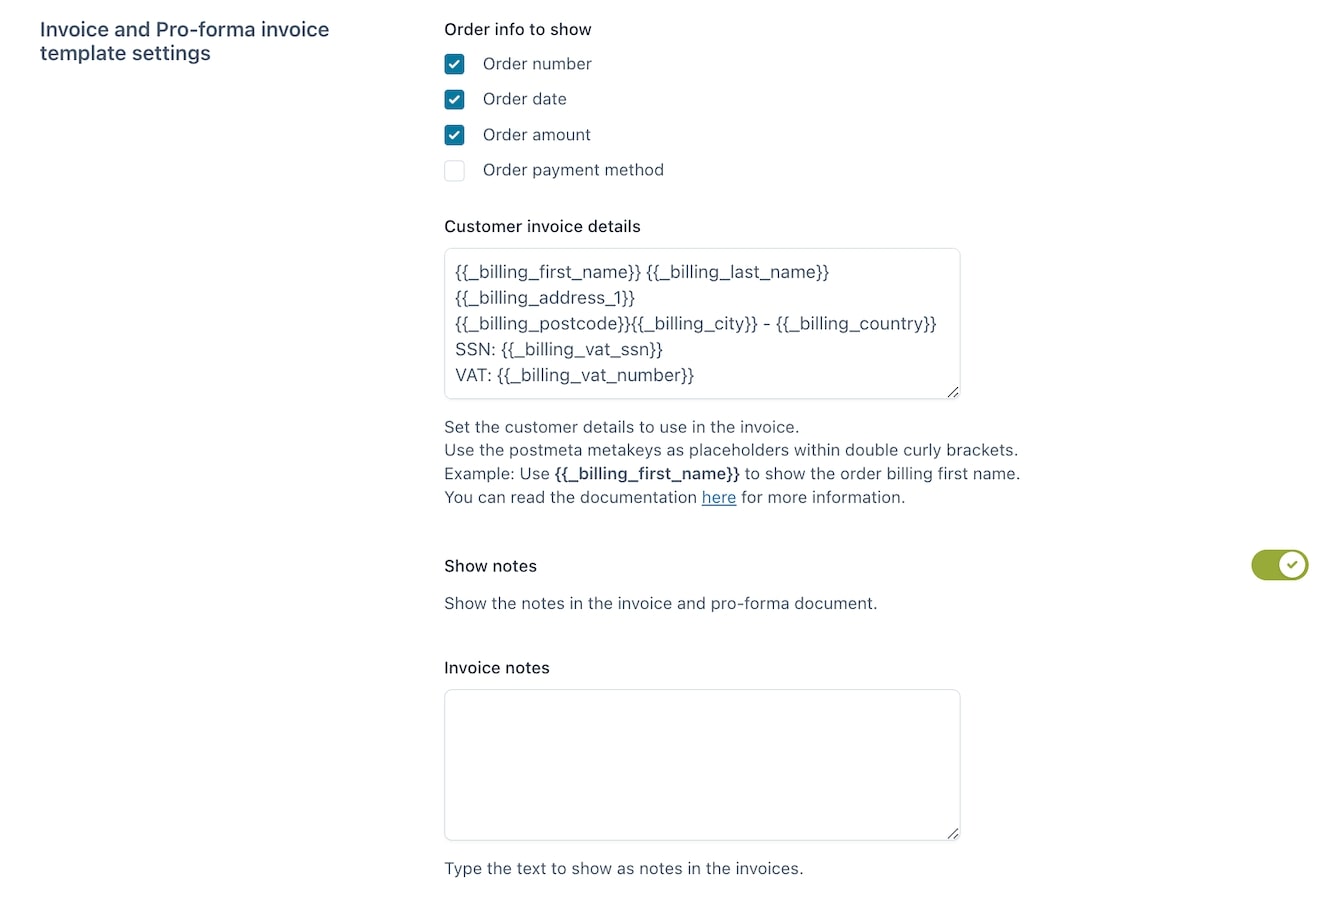
Invoice and pro-forma template settings
In this section, you can configure other settings that should appear on the invoice and on the pro-forma invoice.
Choose the order info to show from the order number, order date, order amount, and order payment method.
You can also print the customer’s details related to the invoice or the pro-forma using the placeholders provided (check the complete placeholders list here).
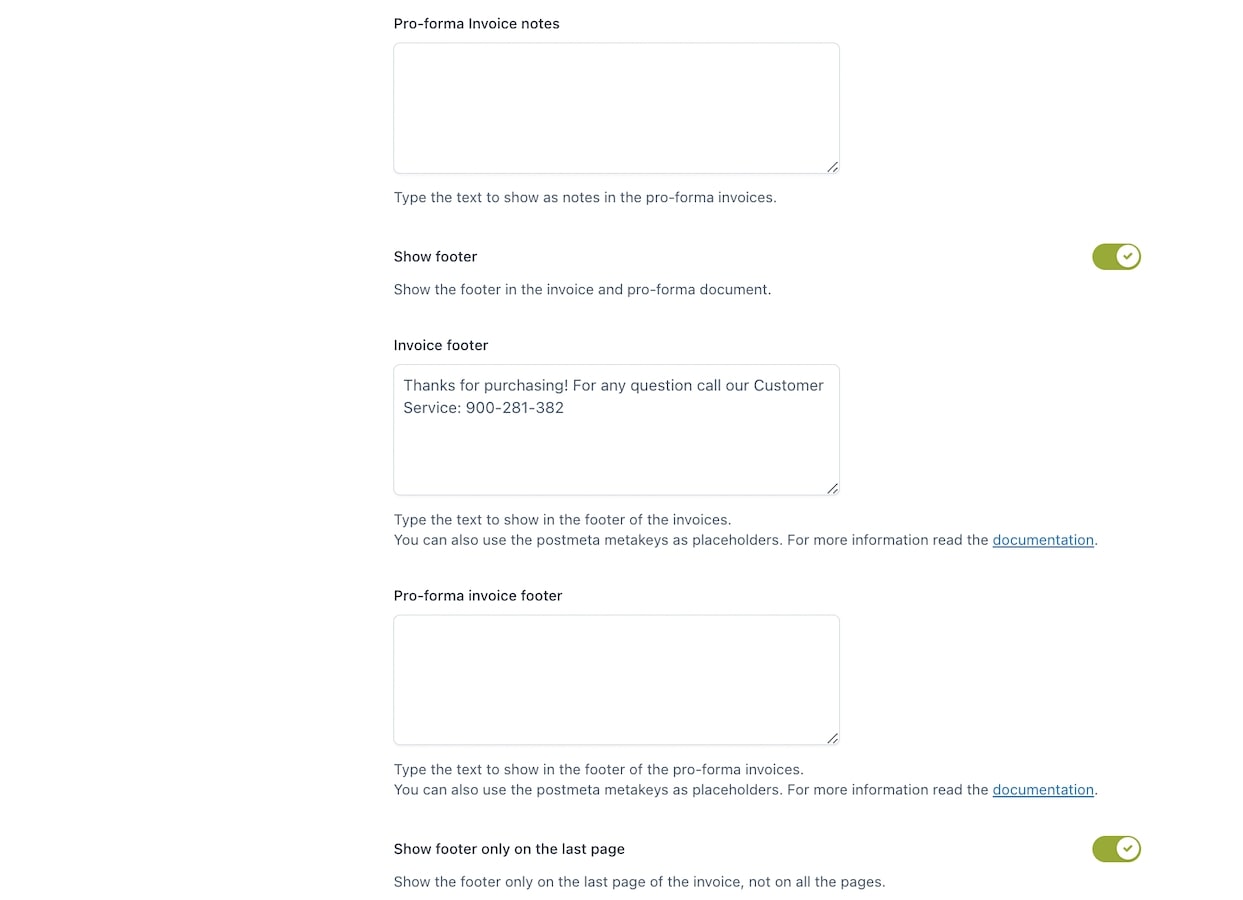
You can choose to enable notes and a footer on the invoice and the proforma invoice. When you enable these options, you will see the according fields where you can add your text:
Invoice notes
Pro-forma invoice notes
Invoice footer
Pro-forma invoice footer
Show footer only on the last page
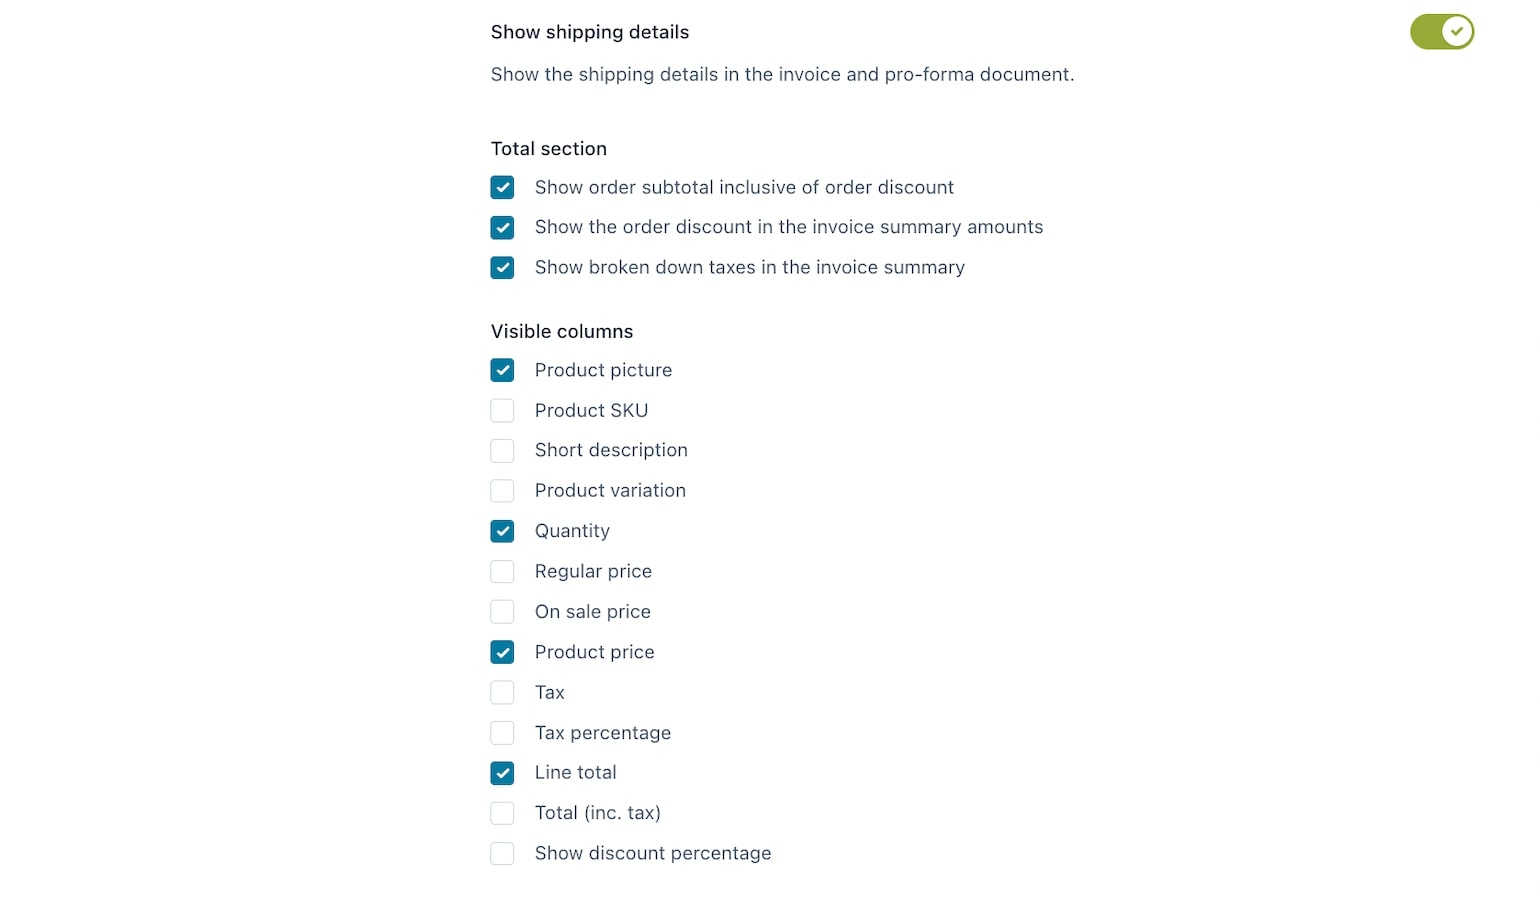
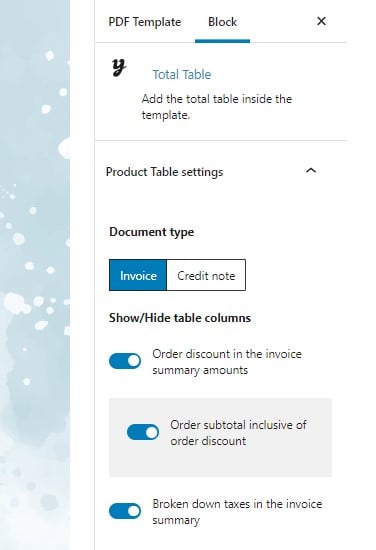
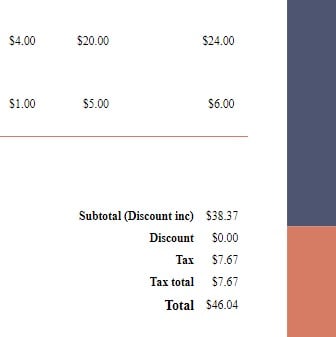
There are extra options to decide whether you want to show or hide certain information in the Total section:
Show order subtotal inclusive of order discount.
Show the order discount in the invoice summary accounts.
Show broken-down taxes in the invoice summary.
Visible columns:
Product picture
Product SKU
Product short description
Product variation
Quantity
Regular price
On sale price
Product price
Line total
Tax
Tax percentage
Total (incl. tax)
Show discount percentage
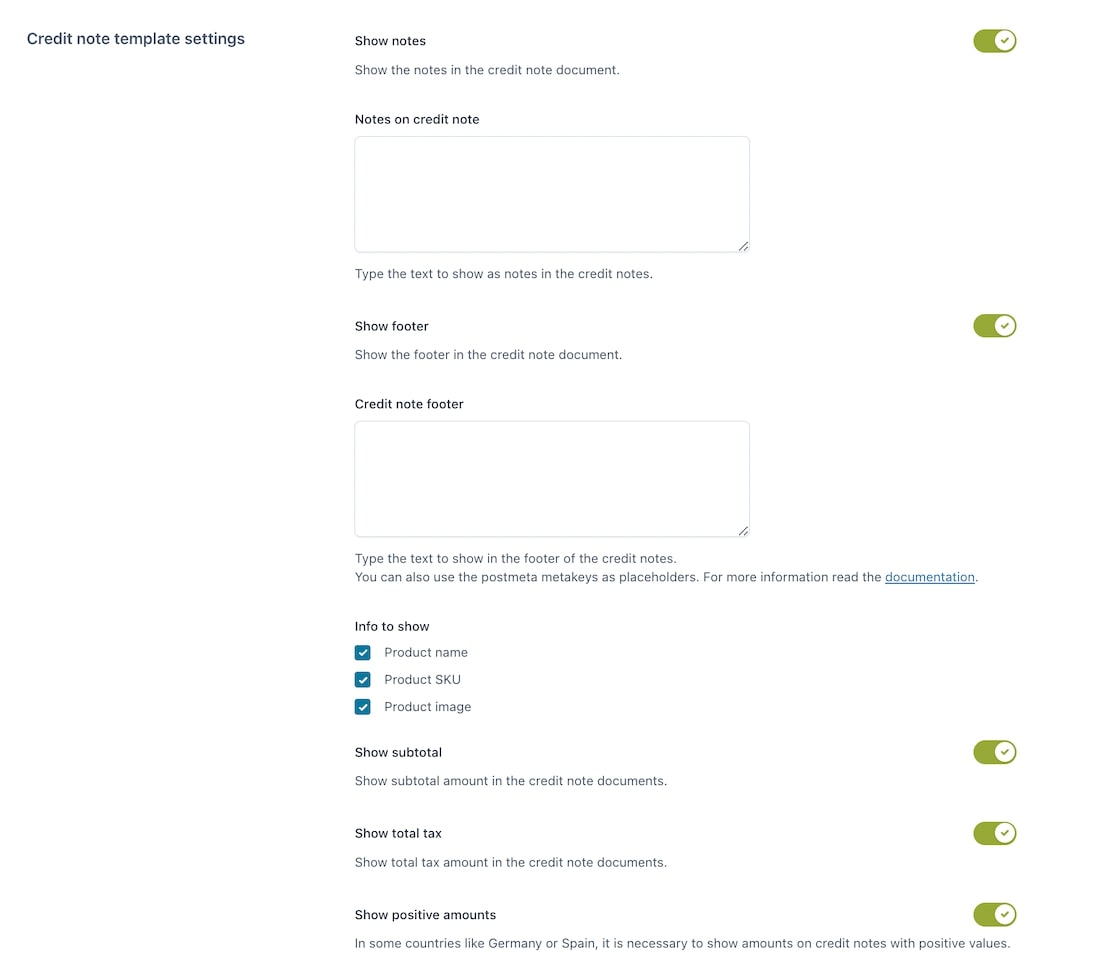
Credit note template setting
Here you can configure the settings that should show on the credit note.
Decide to enable notes and a footer on the credit note. When you enable these options, you will see the according fields where you can add your text:
Notes on credit notes
Credit note footer
There are other options related to which information to show:
Info to show: decide to show or hide this information on the credit note:
Product name
Product SKU
Product Image
Show subtotal
Show total tax
Show positive amounts: Show amounts with positive values (if necessary for your country).
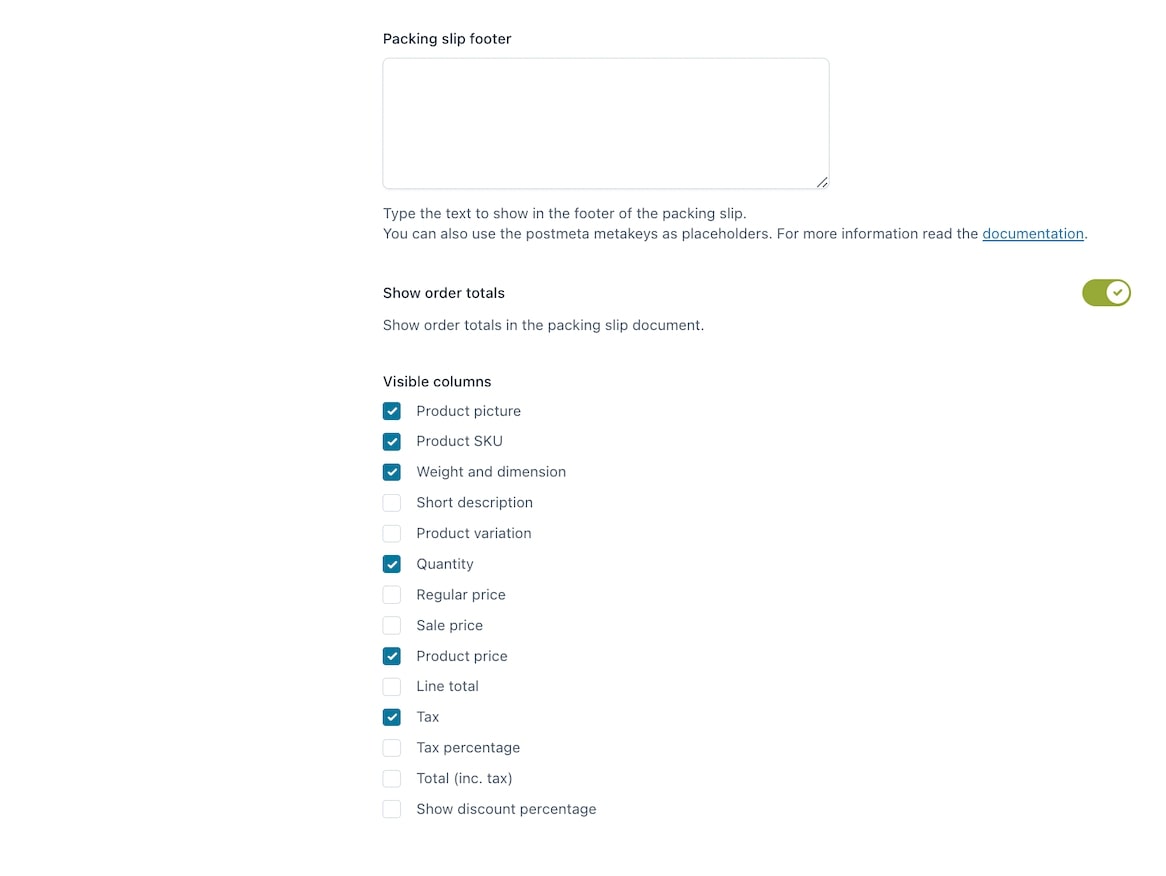
Packing slip template settings
Here you can configure other settings that should appear on the packing slip.
Print the customer’s details related to the packing slip using the placeholders provided (check the complete placeholders list here).
Decide to enable notes and a footer on the packing slip. When you enable these options, you will see the according fields where you can add your text:
Packing slip notes
Packing slip footer
Show order totals: decide to show or not show the order total.
Visible columns:
Product picture
Product SKU
Weight and dimension
Product short description
Product variation
Quantity
Regular price
On sale price
Product price
Line total
Tax
Tax percentage
Total (incl. tax).
Show discount percentage
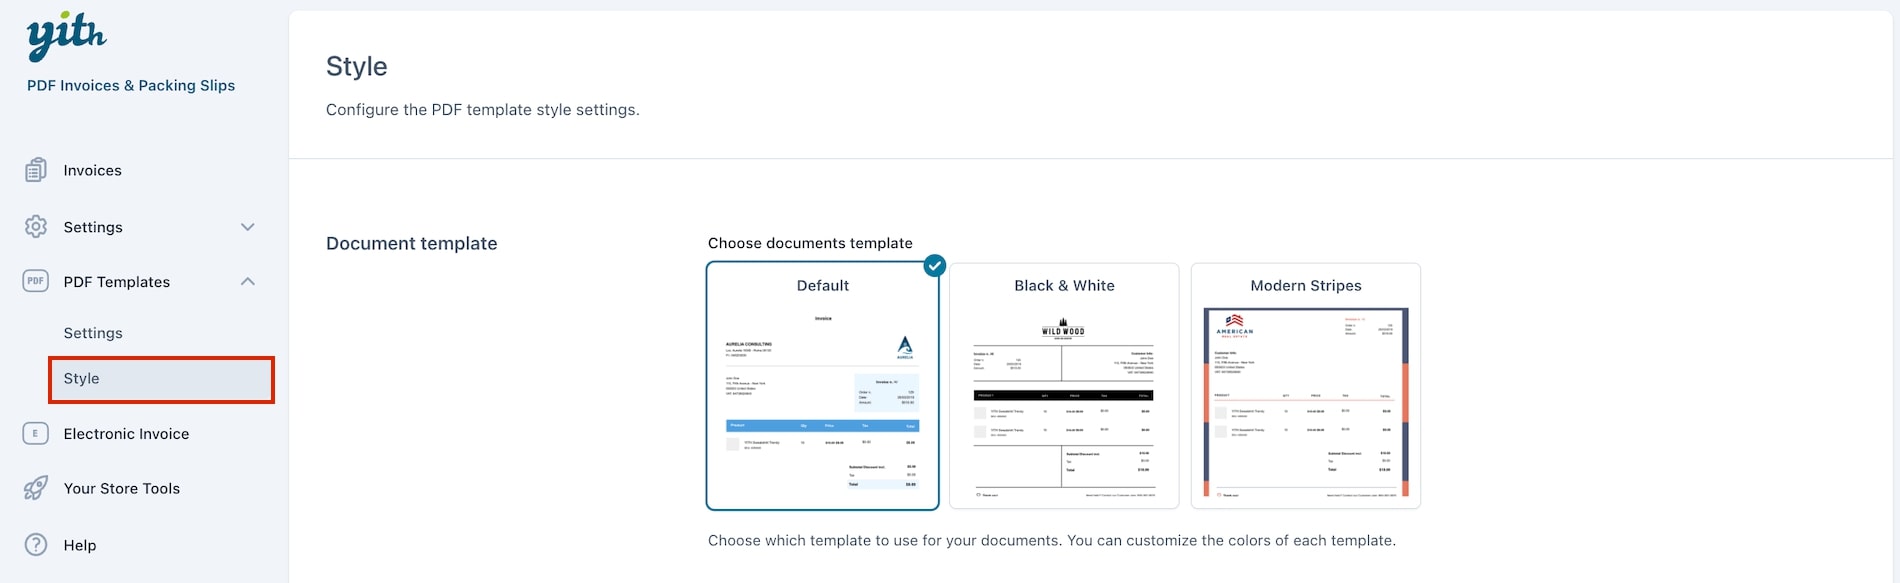
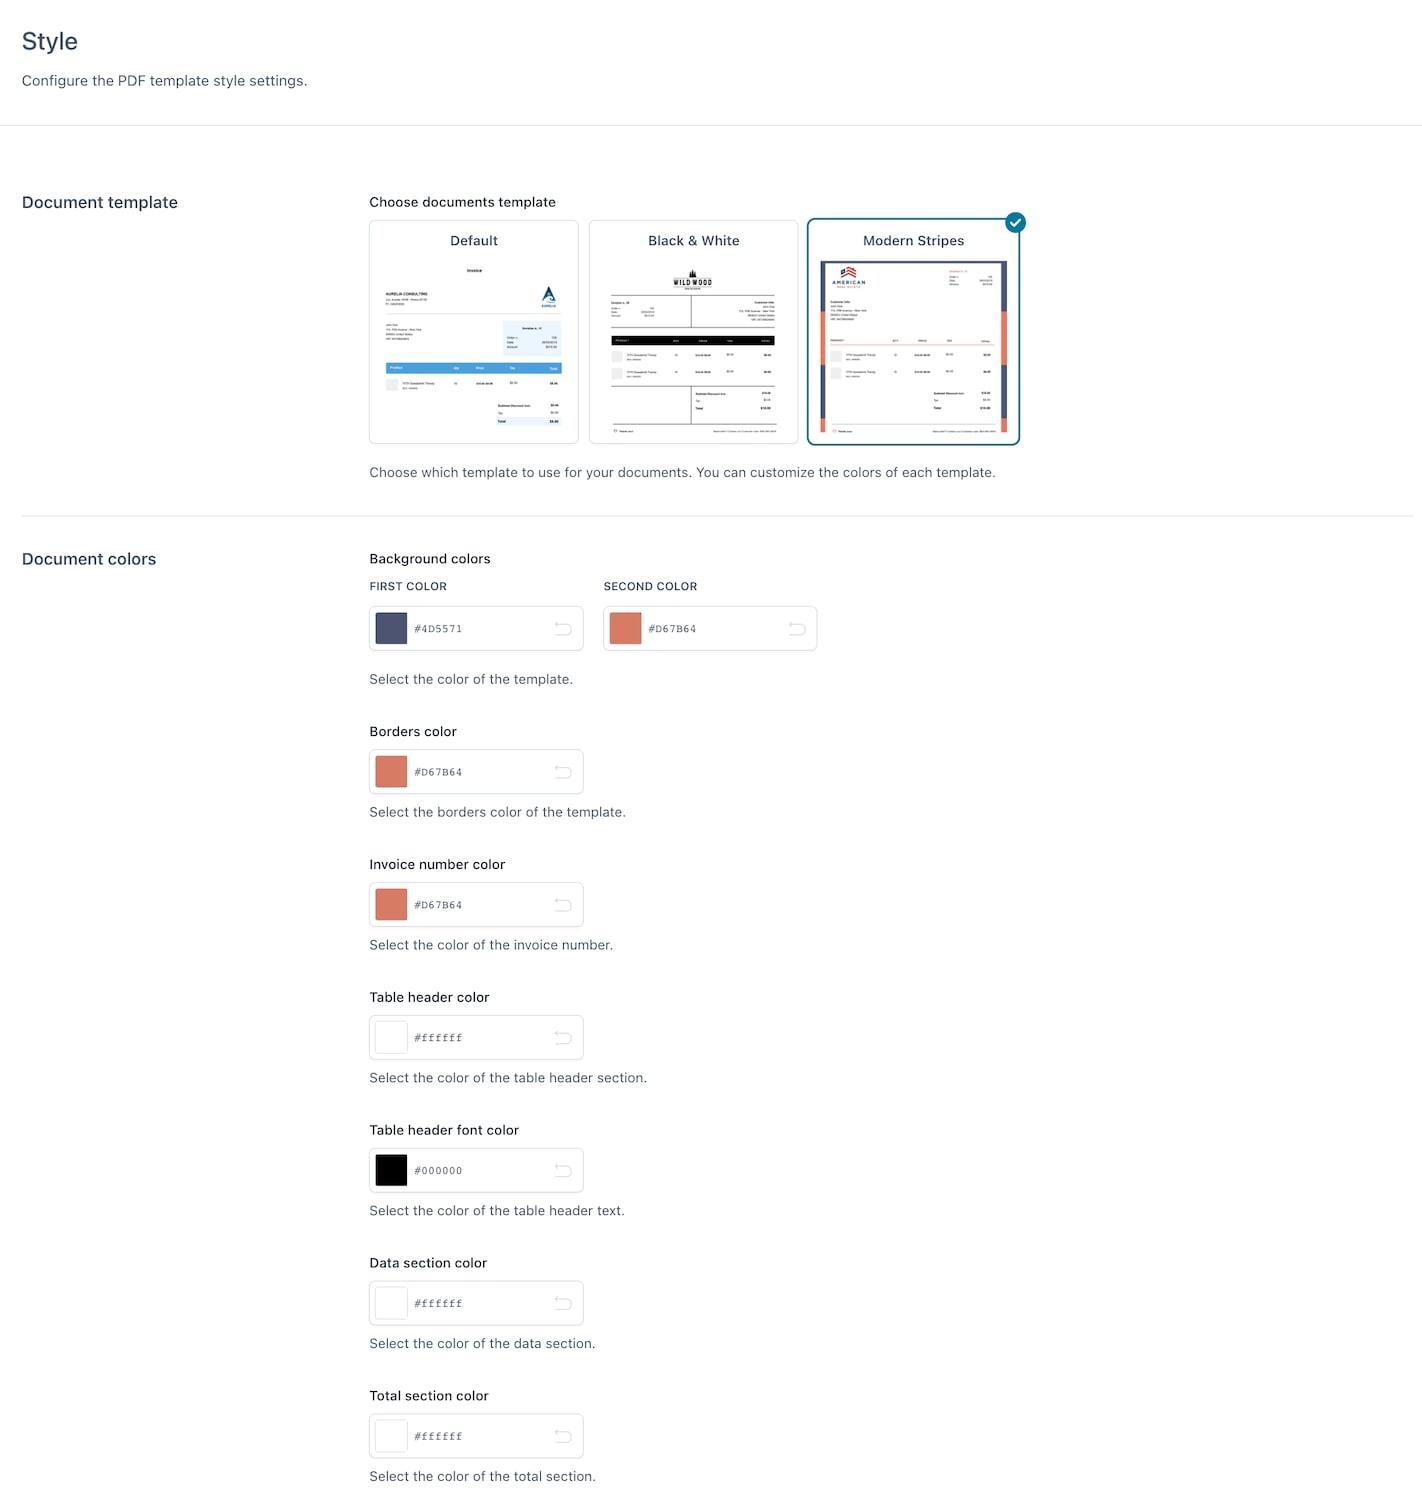
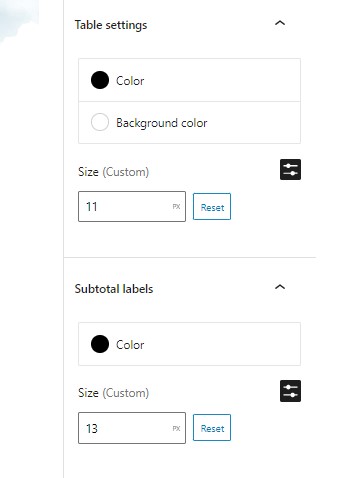
Style options
If you have chosen to use the default template, you can change the template of your documents through the Style section.
There are 3 default templates that come with the plugin (if you wish to have a templated with advanced customization, we suggest to check the options of the Custom templates from this page).
The 3 styles available that come with the plugin are the following:
Default
Black & White
Modern stripes
Based on the selection you make here, the options below will change. These options allow you to change the colors of your selected template. (It is not possible to get a live preview of the changes).
Depending on the template you choose, you can change the following colors:
To create custom templates for your PDF documents, go to YITH > PDF Invoices & Packing Slips > PDF Templates > Settings and select Create and choose a custom templates.
A new tab, Templates, will show under the Settings tab if you select the option of custom templates (please, refer to this section in the documentation regarding the Templates options)
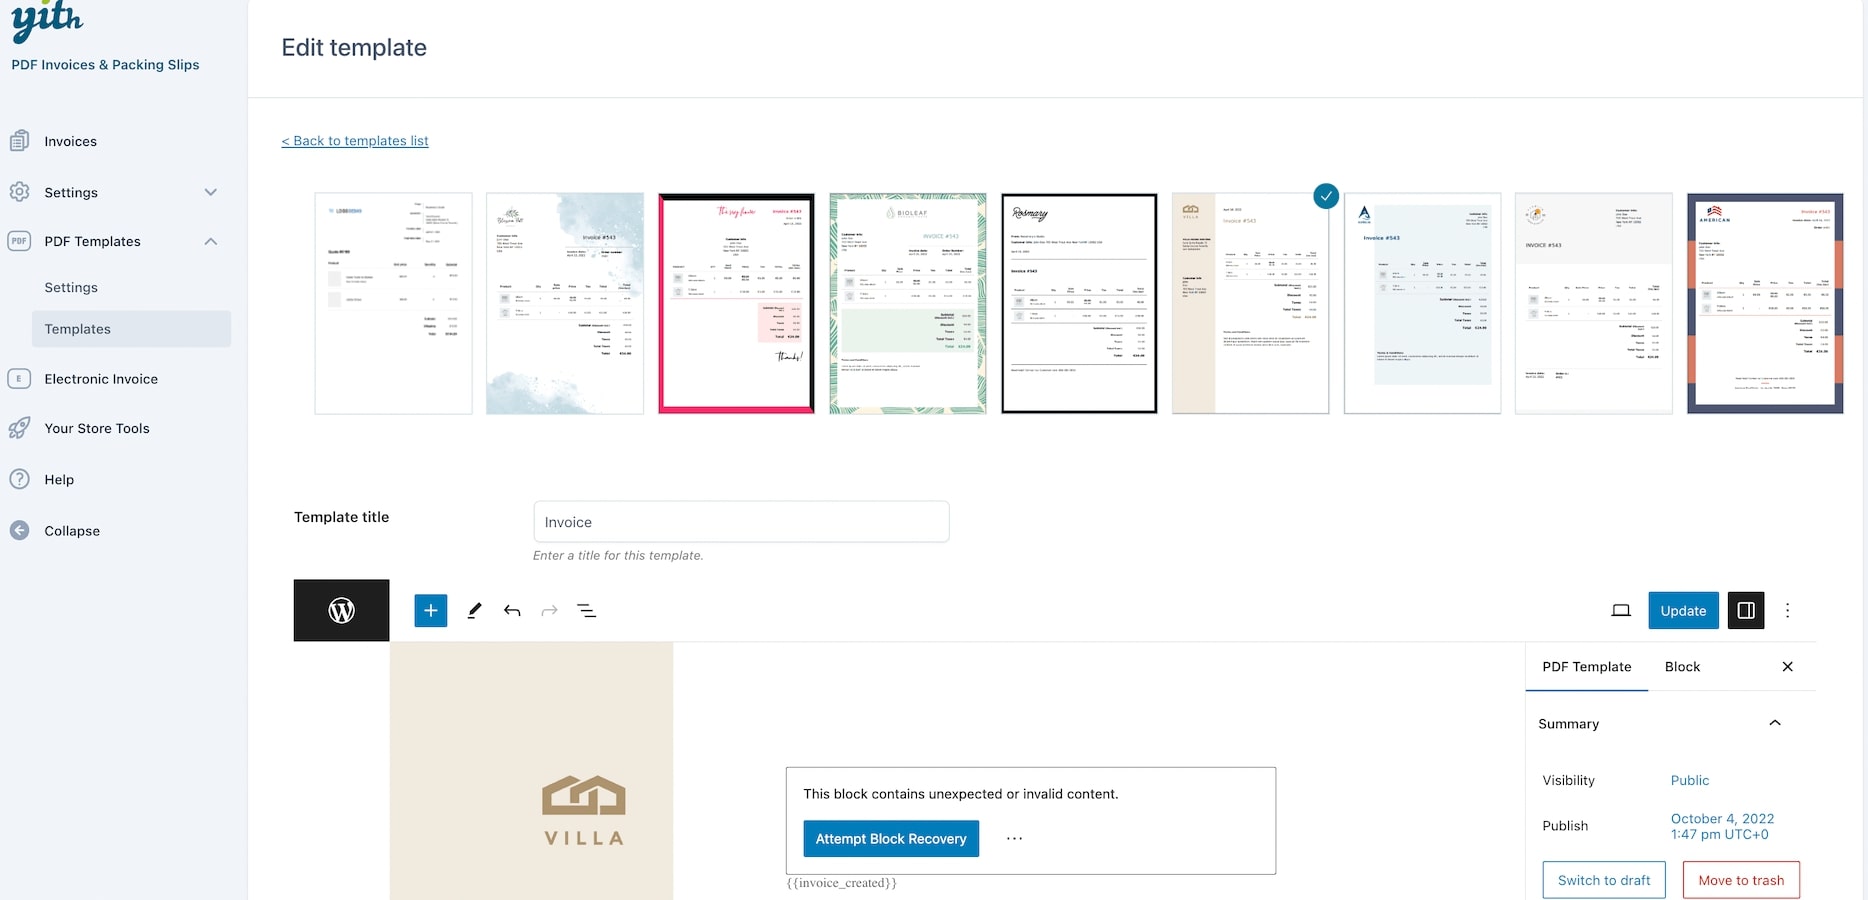
To edit the default PDF template and create new ones, make sure to enable Gutenberg first.
Settings
In the Settings tab, you will be able to choose a different template for each document: invoice, pro-forma, packing slip, and credit note. Select one from the dropdown to set it as the template for that specific document.
You can also enable the option to show amounts with positive values (if necessary for your country) for the credit note.
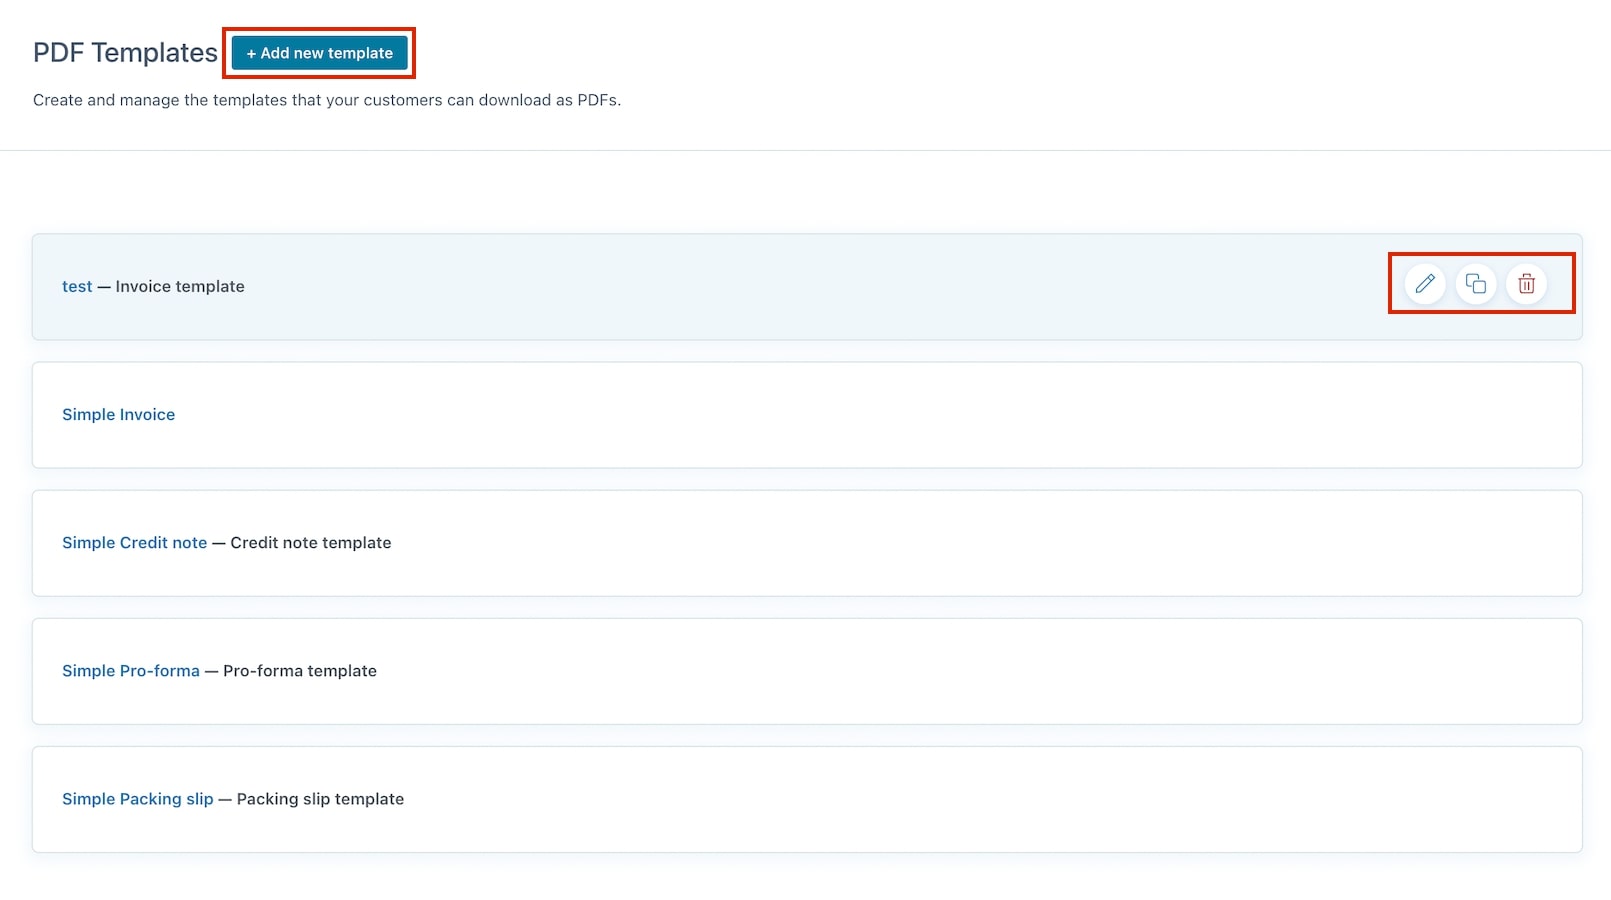
How to create a new template
In the Templates tab you will find the list with all the available custom templates. Click on the button +Add new template then select one of the available templates and enter a title to identify it.
In this list, you can also use the action buttons to edit, duplicate or delete an existing template.
Please note – to use the other 8 templates available in the plugin library, you need to have a valid and active license.
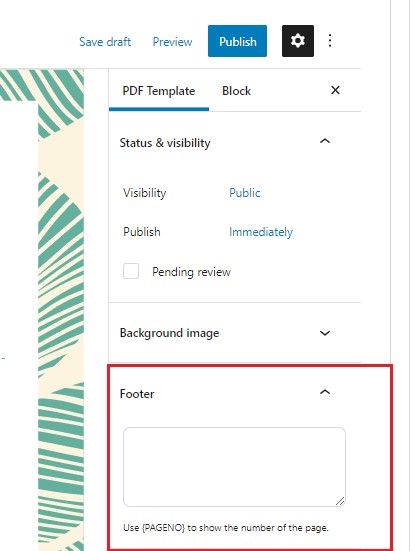
You can upload a background image and enter your company name in the Footer, and, if the template will have more than one page, use the placeholder {PAGENO} to show the number of the page in the PDF.
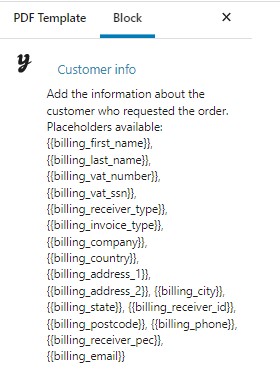
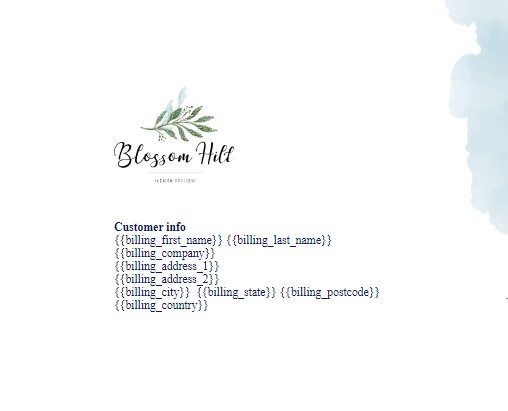
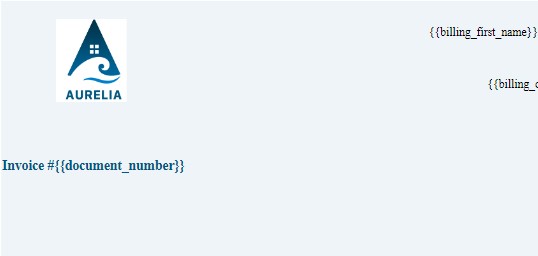
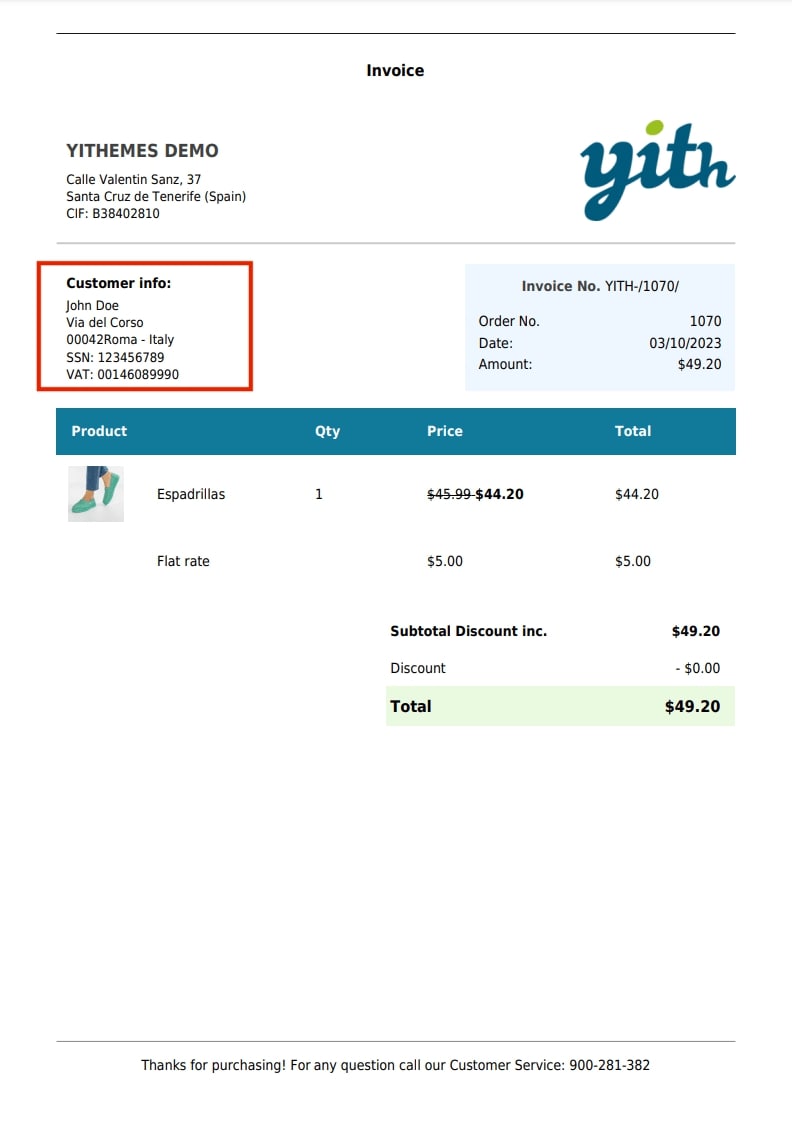
If you want to show the customer details in the PDF template, you can take advantage of the Customer info block. When adding this block, you will find a set of options and you will be able to rename “customer info” as you prefer.
Customer data will be added through the following placeholders:
{{billing_first_name}}
{{billing_last_name}}
{{billing_vat_number}}
{{billing_vat_ssn}}
{{billing_receiver_type}}
{{billing_invoice_type}}
{{billing_company}}
{{billing_country}}
{{billing_address_1}}
{{billing_address_2}}
{{billing_city}}
{{billing_state}}
{{billing_receiver_id}}
{{billing_postcode}}
{{billing_phone}}
{{billing_receiver_pec}}
{{billing_email}}g_postcode}}
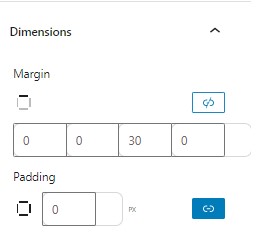
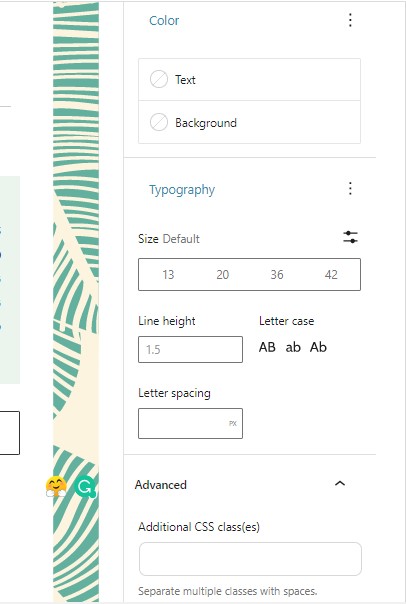
Dimensions: set the margin (right, top, bottom, left) and padding (in px).
Color: set the color for the text and/or background.
Typography: set the size, appearance, line height, letter spacing.
Advanced: here, you can enter additional CSS classes.
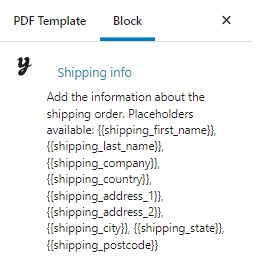
Shipping info
To show the shipping info in the PDF template, you can use the Shipping info block. When adding this block, you will find the following set of options.
Shipping info will be added through the following placeholders:
{{shipping_first_name}}
{{shipping_last_name}}
{{shipping_company}}
{{shipping_country}}
{{shipping_address_1}}
{{shipping_address_2}}
{{shipping_city}}
{{shipping_state}}
{{shipping_postcode}}
Color: set the color for the text and/or background.
Typography: set the size, appearance, line height, and letter spacing.
Advanced: here, you can enter additional CSS classes.
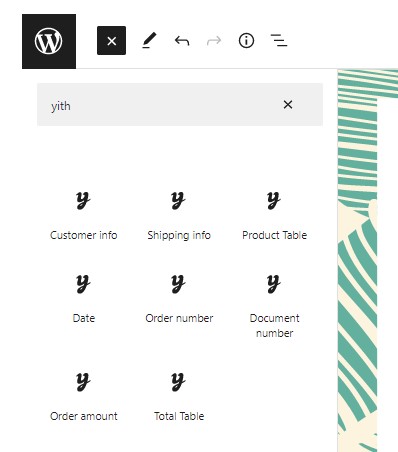
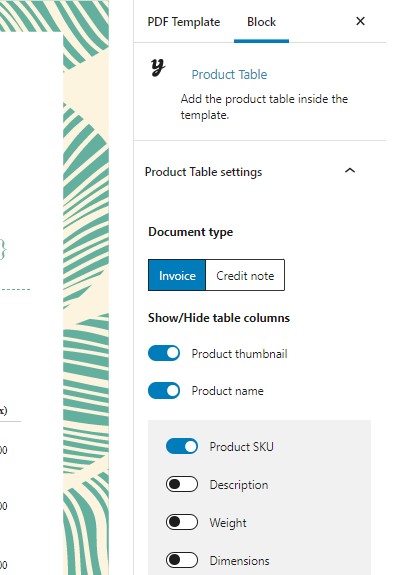
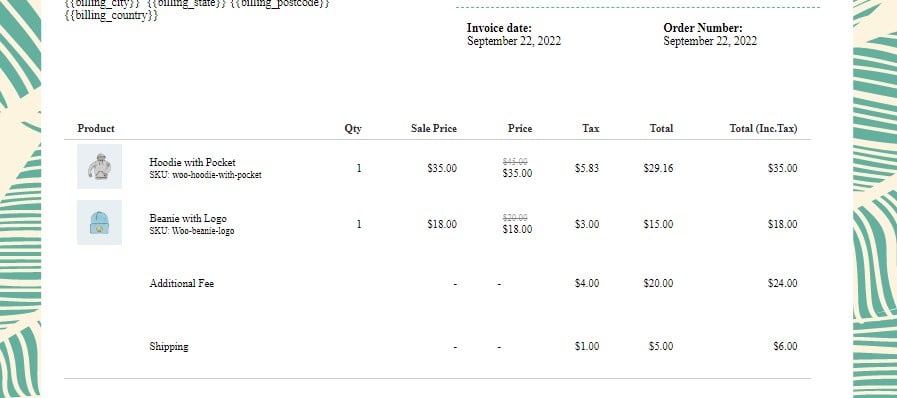
Product table
To show the product table in the PDF template, you can use the Product table block. When adding this block, you will find the following set of options.
Invoice
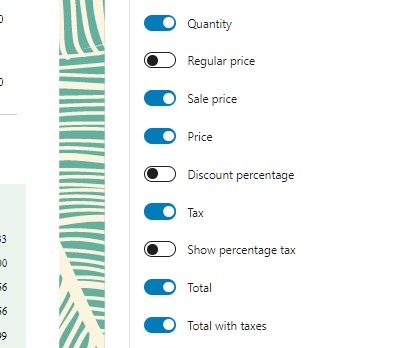
Enable/disable the info you want to show in the PDF:
product thumbnail
product name
product SKU
description
weight
dimensions
quantity
regular price
sale price
price
discount percentage
tax
show percentage tax
total
total with taxes
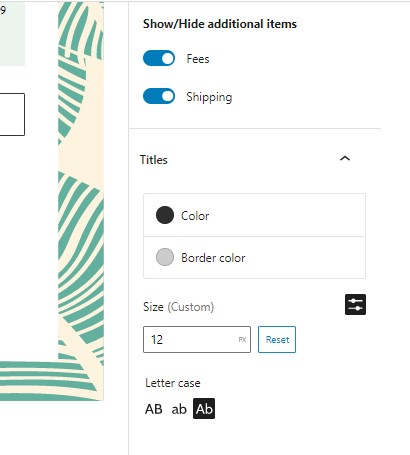
Show/Hide additional items: choose whether to show
Fees
Shipping
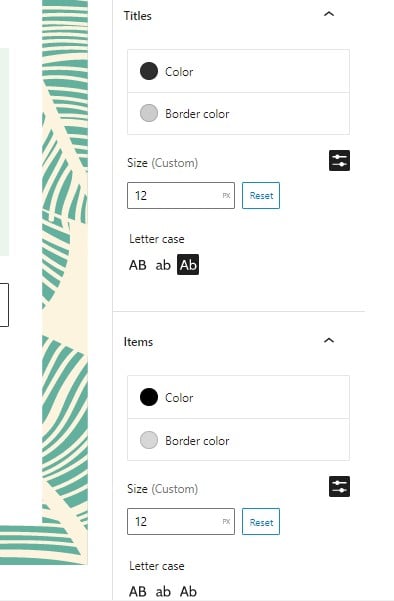
Titles:
color
border color
size
letter case
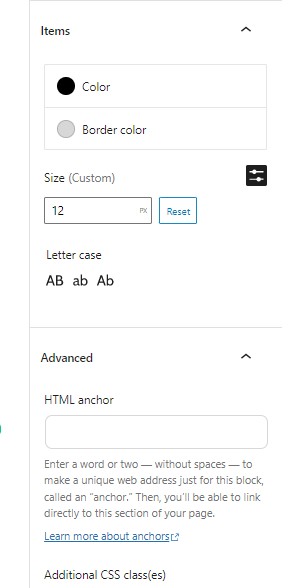
Items
color
border color
size
letter case
Advanced: here, you can enter HTML anchor and additional CSS classes.
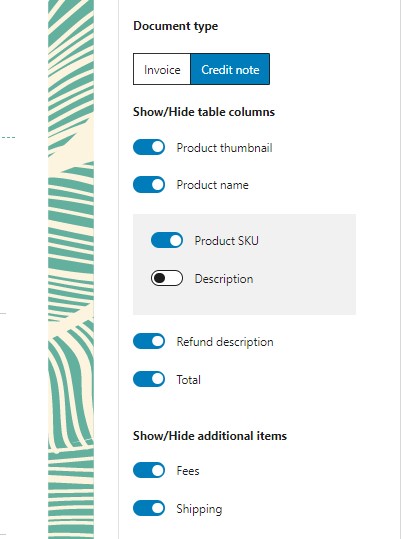
Credit note
Enable/disable the info to show by choosing among:
product thumbnail
product name
product SKU
description
refund description
total
Show/Hide additional items: choose whether to show
Fees
Shipping
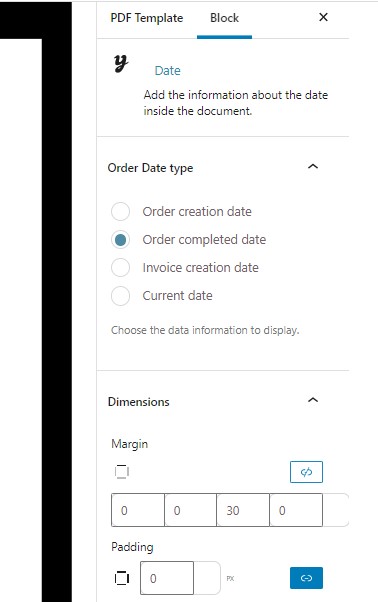
Date
To show the date in the PDF template, you can use the Date block. When adding this block, you will find the following set of options.
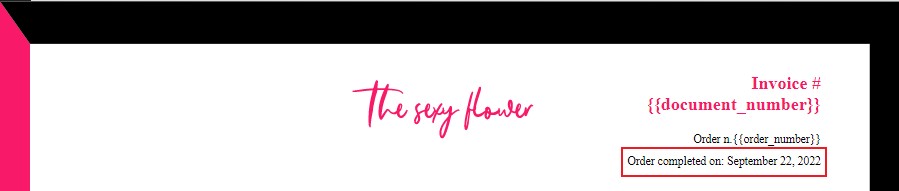
Order date type: choose the date to show from
order creation date
order completed date
invoice creation date
current date
Dimensions: set the margin (right, top, bottom, left) and padding (in px).
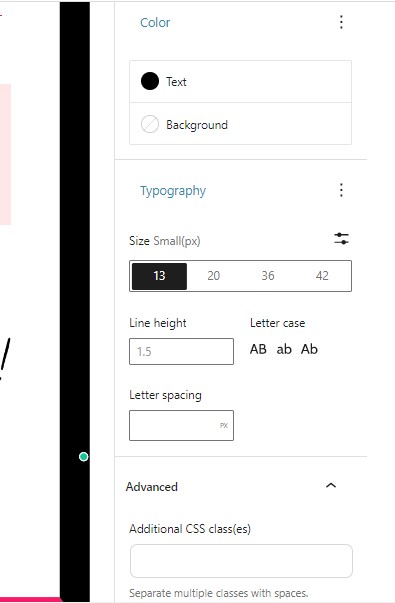
Color: set the color for the text and/or background.
Typography: set the size, line height, letter case, and letter spacing.
Advanced: here, you can enter additional CSS classes.
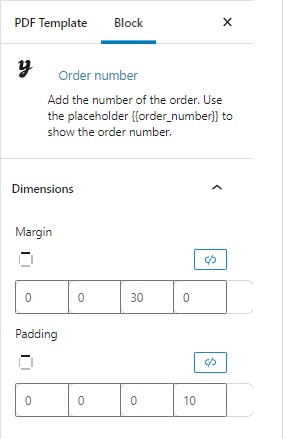
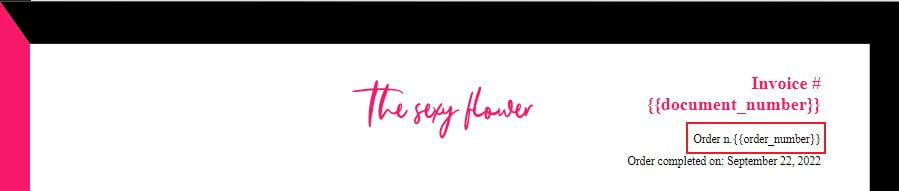
Order number
To show the order number in the PDF template, you can use the Order number block. The available placeholder is {{order_number}}. When adding this block, you will find the following set of options.
Dimensions: set the margin (right, top, bottom, left) and padding (in px).
Color: set the color for the text and/or background.
Typography: set the size, line height, letter case, and letter spacing.
Advanced: here, you can enter additional CSS classes.
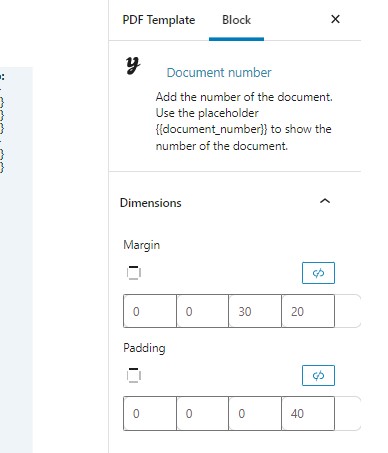
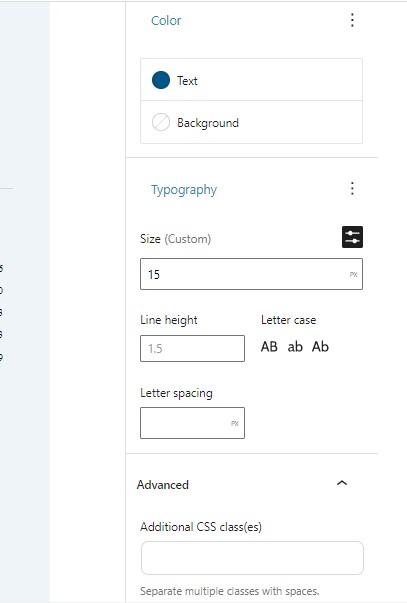
Document number
To show the document number in the PDF template, you can use the Document number block. The available placeholder is {{document_number}}. When adding this block, you will find the following set of options.
Dimensions: set the margin (right, top, bottom, left) and padding (in px).
Color: set the color for the text and/or background.
Typography: set the size, line height, letter case, and letter spacing.
Advanced: here, you can enter additional CSS classes.
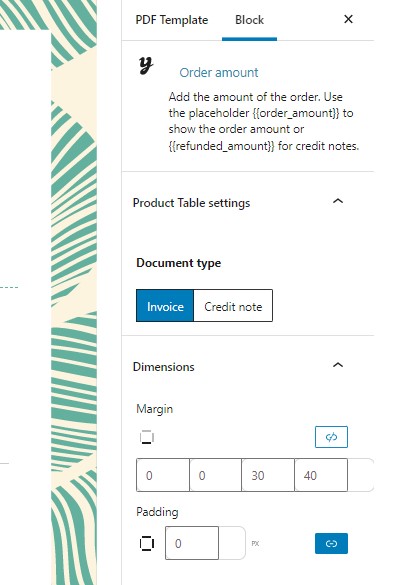
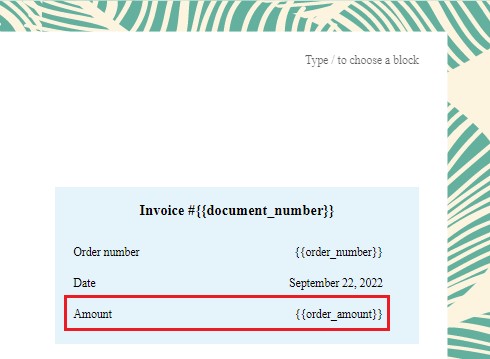
Order amount
To show the order amount in the PDF template, you can use the Order amount block. The available placeholders are: {{order_amount}} and {{refunded_amount}} (for the credit note). When adding this block, you will find the following set of options.
Invoice/Credit note
Dimensions: set the margin (right, top, bottom, left) and padding (in px).
Color: set the color for the text and/or background.
Typography: set the size, line height, letter case, and letter spacing.
Advanced: here, you can enter additional CSS classes.
To insert any information related to the user, for either the customer invoice and/or the packing slip details, use the postmeta metakeys as placeholders within double curly brackets.
For example: {{_shipping_first_name}} to show the order shipping first name.
Below, the complete list of placeholders that you can use:
All the templates used by the plugin are available in the templates path templates > yith-pdf-invoice.
To overwrite each document template it is essential to repeat the specific files in your theme “woocommerce” folder (in case it is not included, you must create it).
Copy and paste files in your theme “woocommerce” folder, by including them in the “yith-pdf-invoice” folder.
Please note. Plugin updates will be ignored in your site for the files you have overwritten.
For the Black & White template or the Modern Stripes template, dedicated folders are added.
Since 1st January 2019, the Italian government requires a specific standard for all the companies that sell goods online. All of them are required to issue an electronic invoice for each order and to provide the Italian Agenzia delle Entrate with all invoices in a specific format.
This plugin includes a section that has been specifically developed to give Italian companies an easy tool to generate this required file, together with the PDF file.
If your company is based in Italy and if you sell online, you will be required an .xml file for every order placed in your online shop.
This plugin will help you do that the right way and without much trouble.
Go to the plugin settings at YITH > PDF Invoices & Packing Slips > General Options > Invoice options and enable the option called Abilita la fatturazione elettronica (clienti italiani)
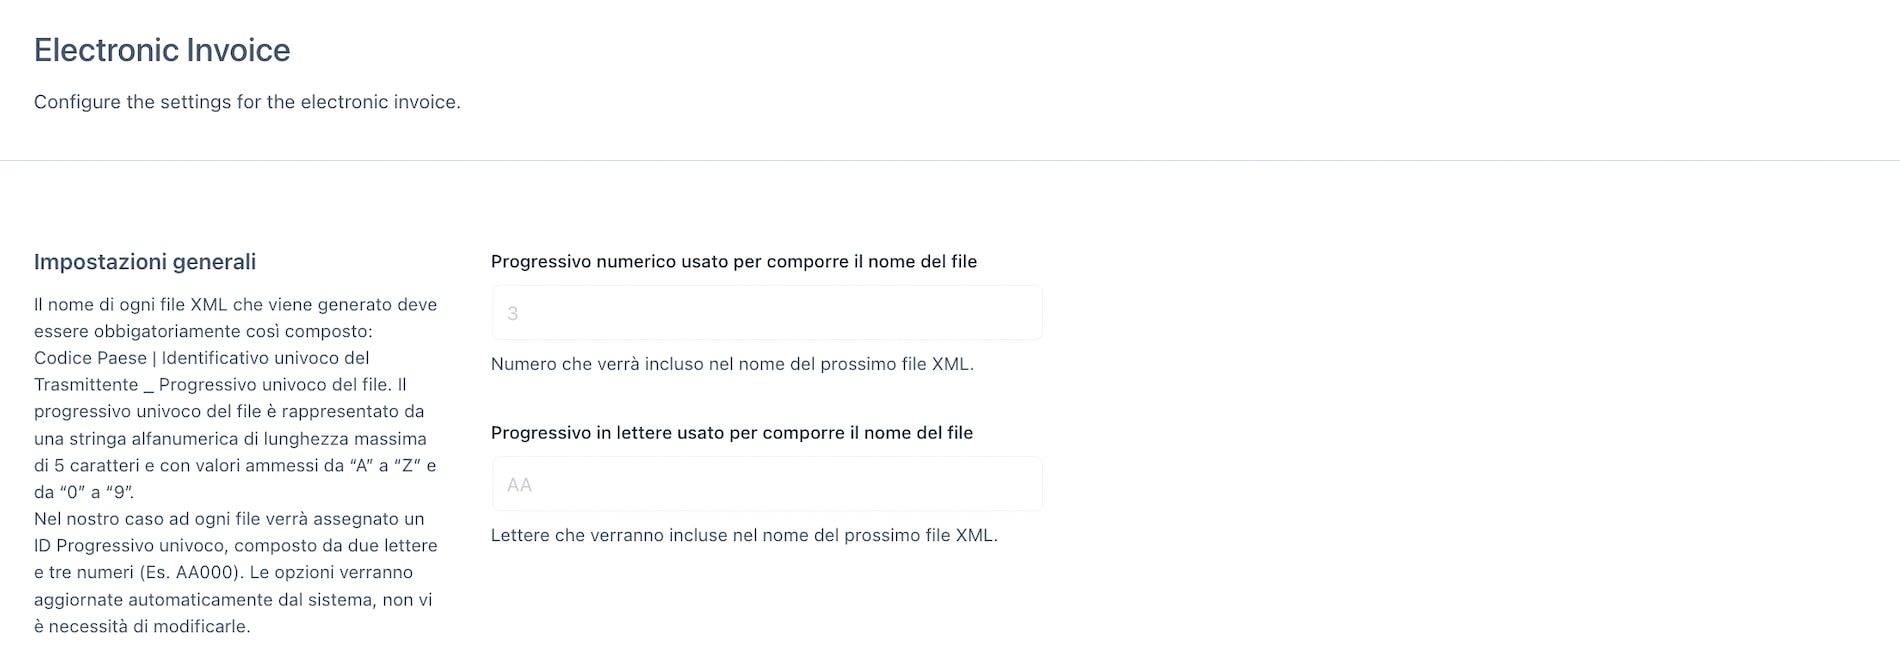
Then, save the changes. After enabling the option, you’ll see the tab in the plugin called Fatturazione elettronica, where you can enter your company details so they will appear in the .XML file.
Specifically, you will be able to configure the following options:
The first section is about the file name format, which is made out of 5 characters, two letters and three numbers.
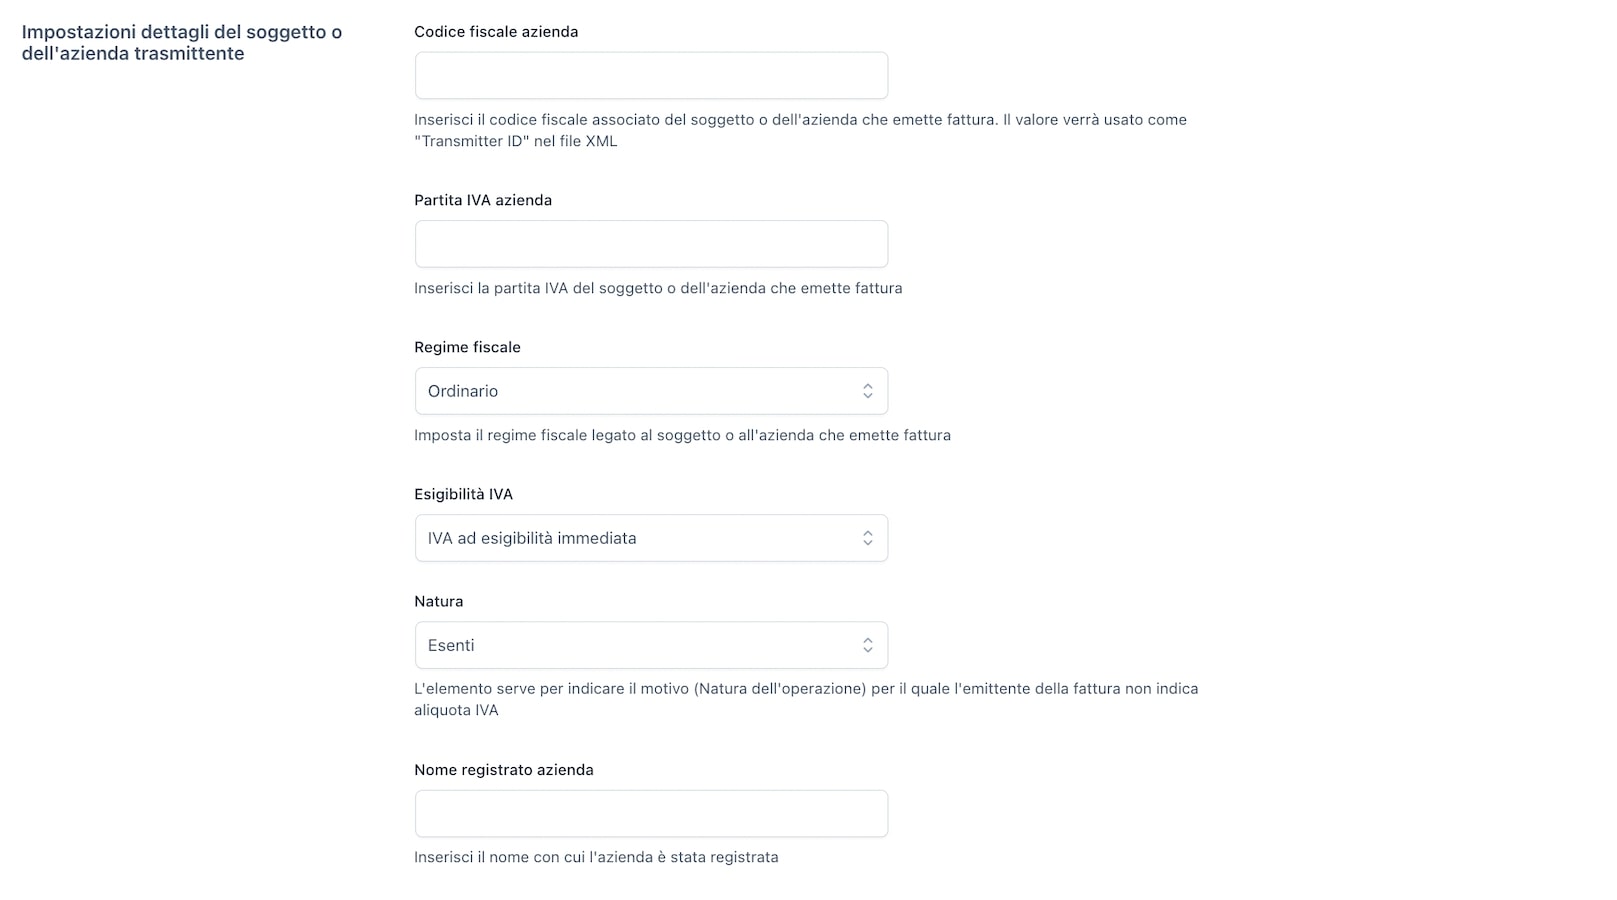
Soggetto o azienda trasmittente
Next, you find a section where you can enter all your details.
Codice fiscale azienda
Partita IVA azienda
Regime Fiscale
Esigibilità IVA
Nome registrato azienda
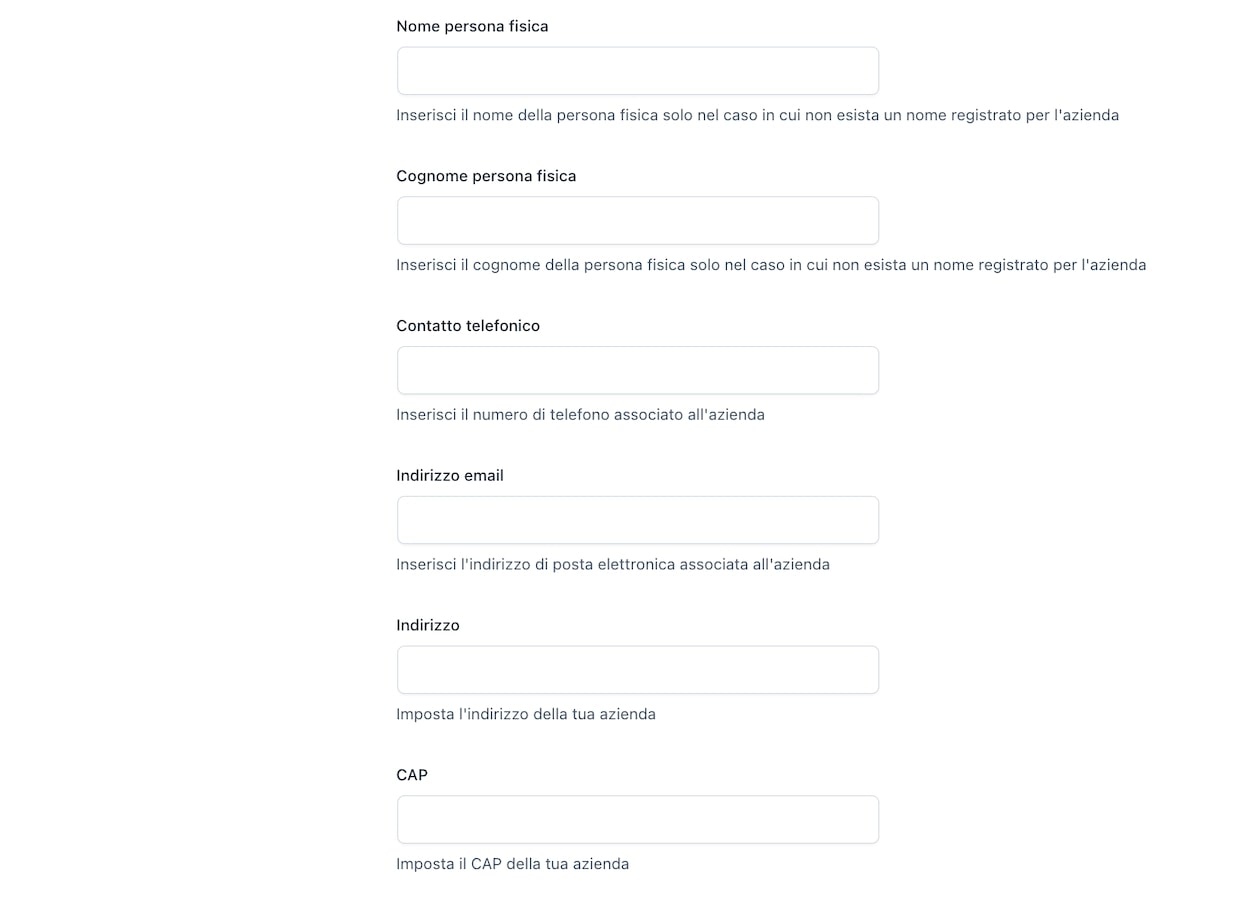
Nome persona fisica
Cognome persona fisica
Contatto telefonico
Indirizzo email
Indirizzo
CAP
Città dell’azienda
Provincia azienda
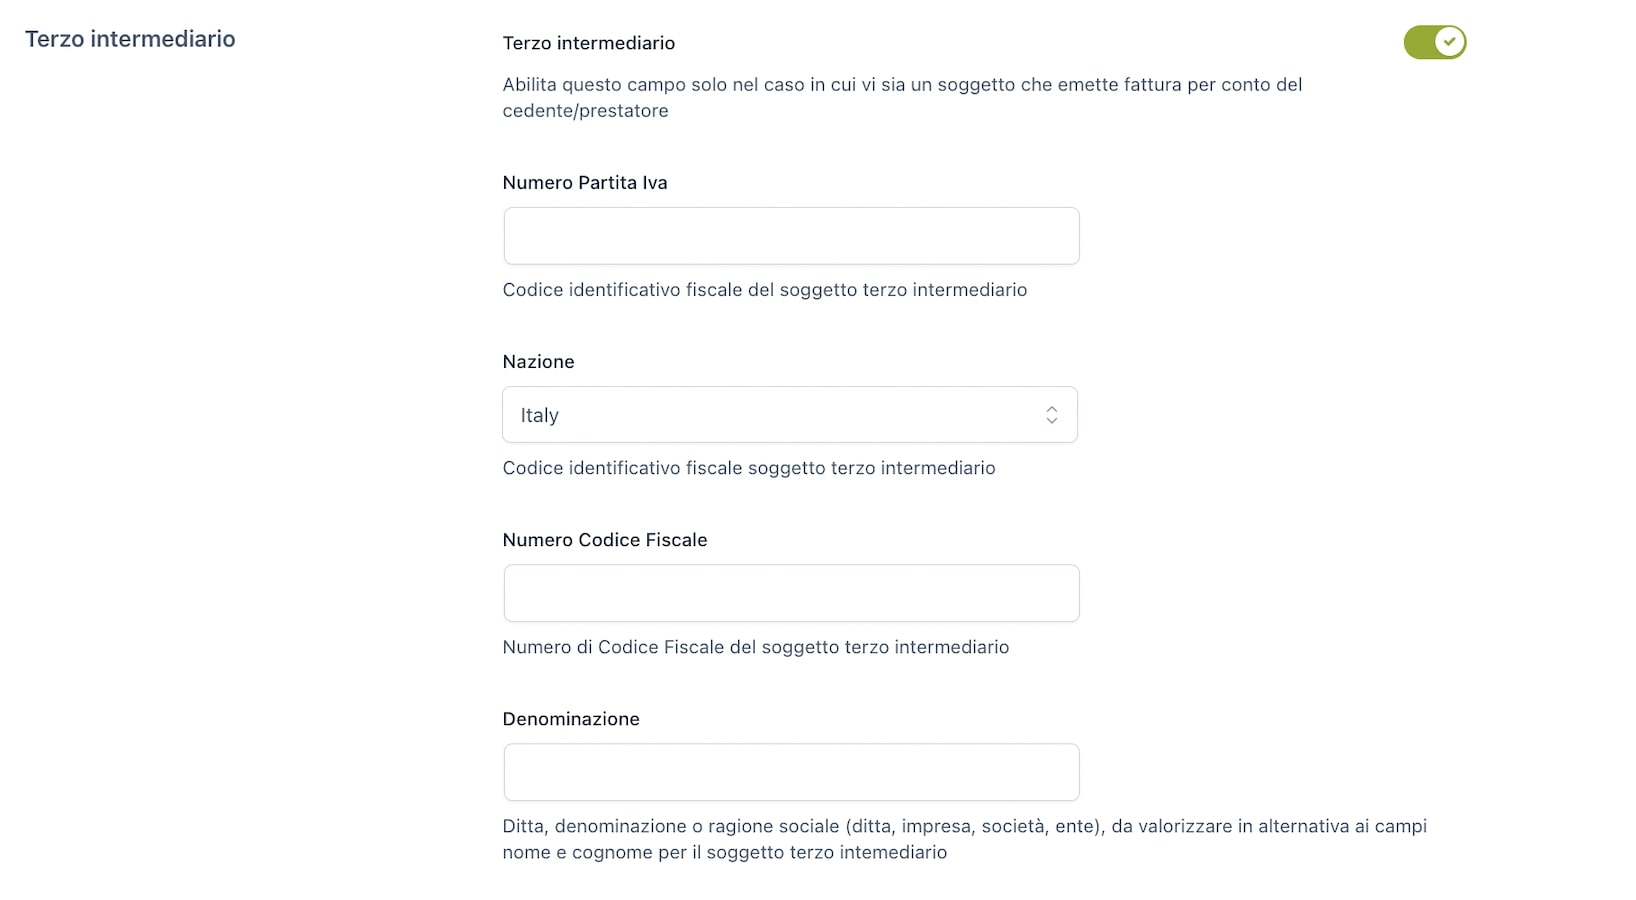
Terzo intermediario
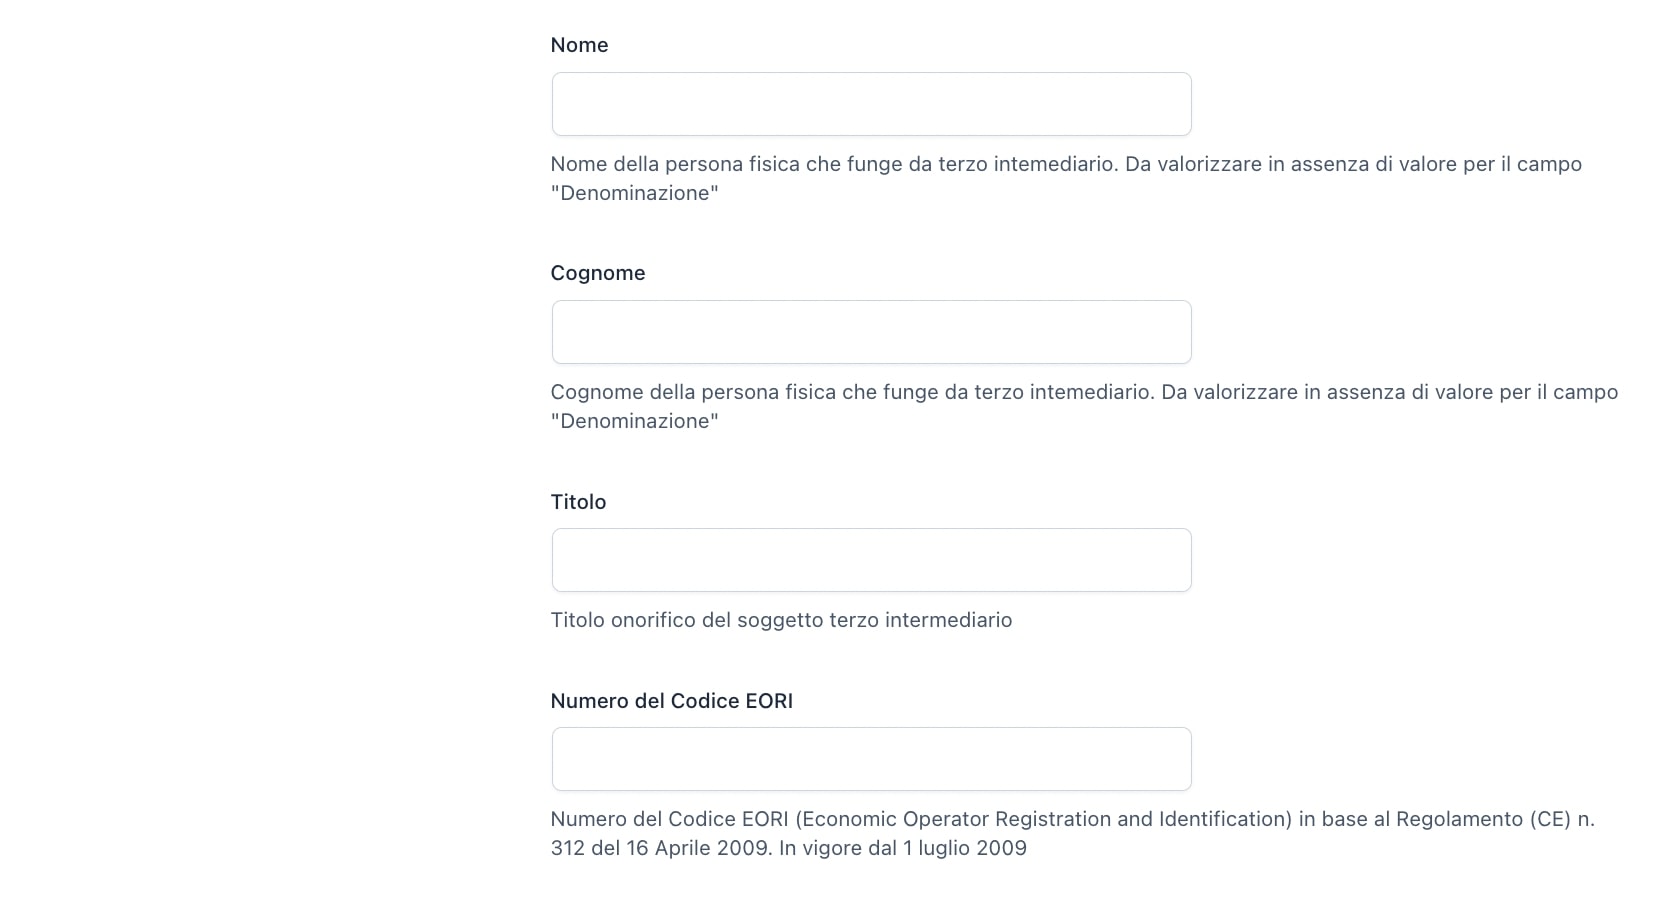
In this section, it is possible to configure the details of a third-party company that is issuing the invoice, if applicable. You will be able to add the following details:
Numero partita IVA
Nazione
Numero codice fiscale
Denominazione
Nome
Cognome
Titolo
Numero del Codice EORI
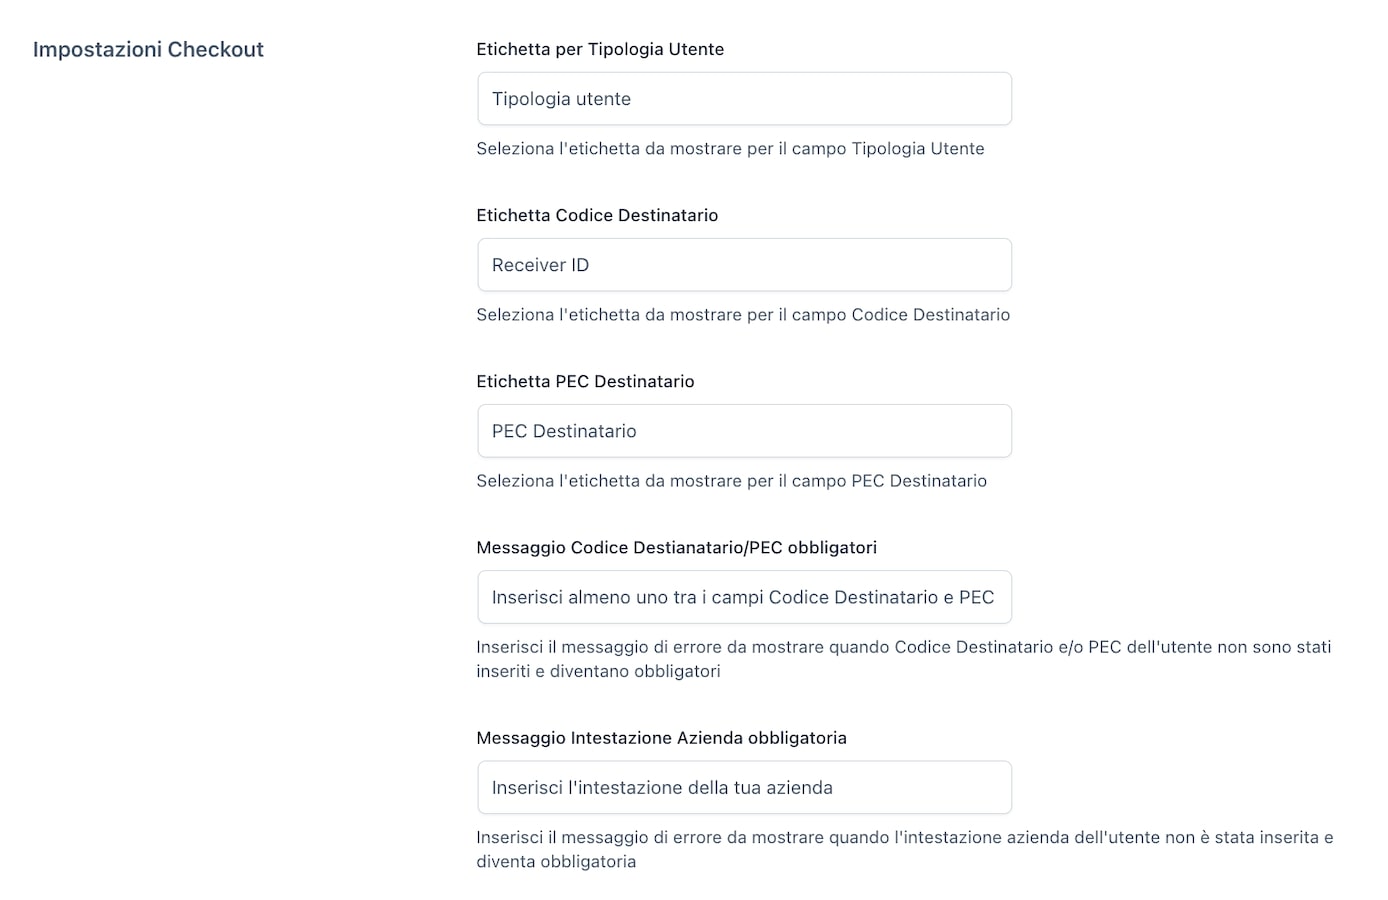
Impostazioni Checkout
In the last section, you can configure checkout options:
Etichetta per tipologia utente
Etichetta Codice Destinatario
Etichetta PEC Destinatario
Messaggio Codice Destinatario/PEC obbligatori: here you can enter a custom message to show whenever the receiver ID or the PEC email address is required.
Messaggio Intestazione azienda obbligatoria: here you can enter a custom message to show when the company name is required.
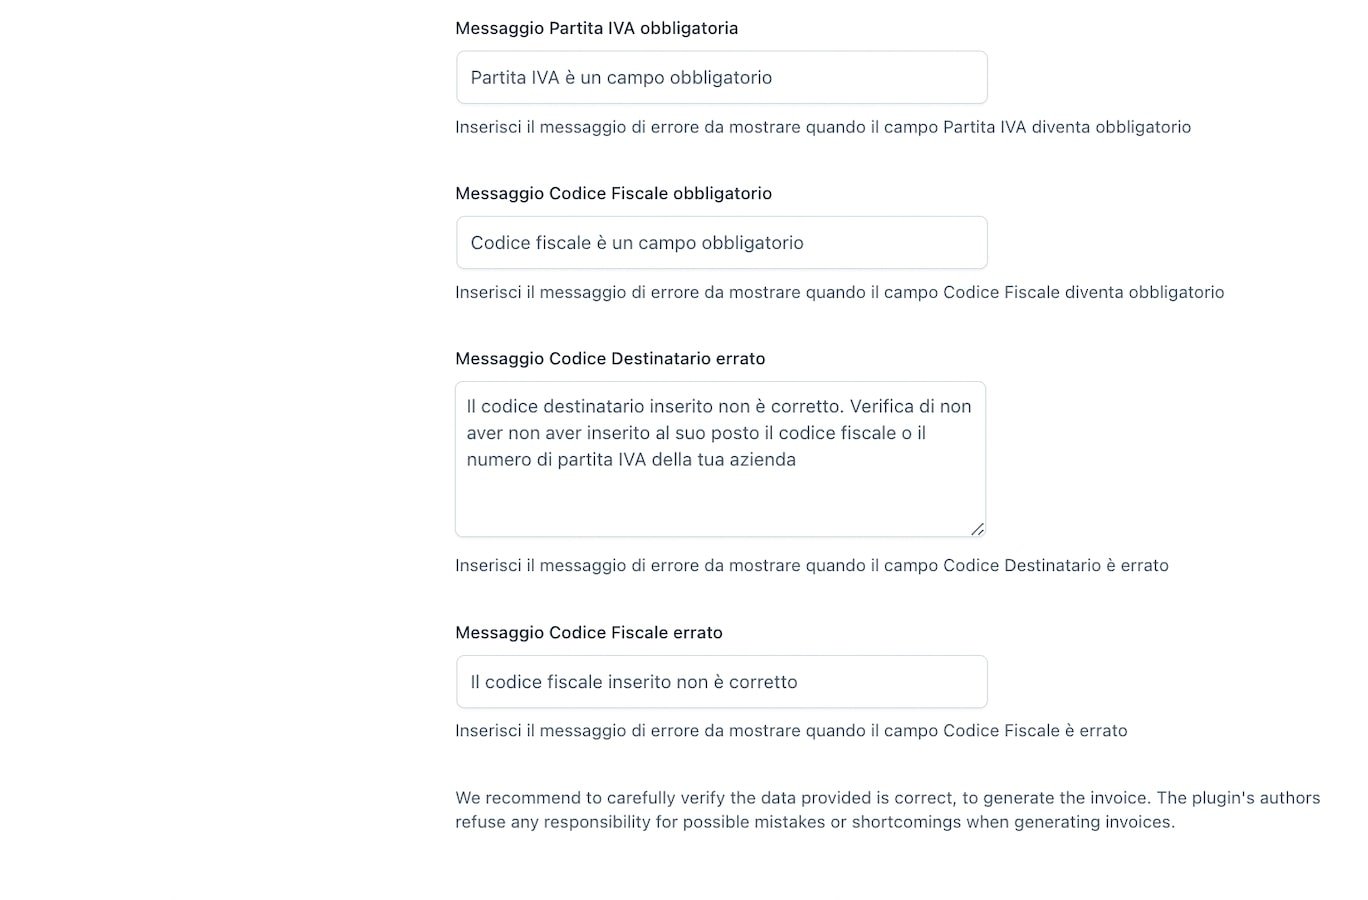
Messaggio Partita IVA obbligatoria: here you can enter a custom message to show whenever the VAT number is required.
Messaggio Codice Fiscale obbligatorio: here you can enter a custom message to show whenever the Fiscal Code (SSN) is required.
Messaggio Codice Destinatario errato: enter here a custom error message when the code validation returns an error.
Messaggio Codice Fiscale errato: enter here a custom error message when the code validation returns an error.
Checkout page on the customer side
Whenever your customers are on the checkout page, they will be asked to fill in their details.
The plugin updates the checkout fields dynamically based on what the customer selects in the field Company Name: this way, whether the customer is a private entity or a company, they will be asked to fill in only the right information. Following you can see how it’s updated:
Italian company/freelancer:
Company VAT number is required for a company, but optional for freelancers
One between Codice destinatario and PEC email address is required
Company/freelancer from other countries:
Company VAT number is required for a company, optional for freelancers, but the extra fields will not show up
Italian private subject:
Codice fiscale is required but the extra fields will not show up
Private customer from other countries:
SSN number is optional
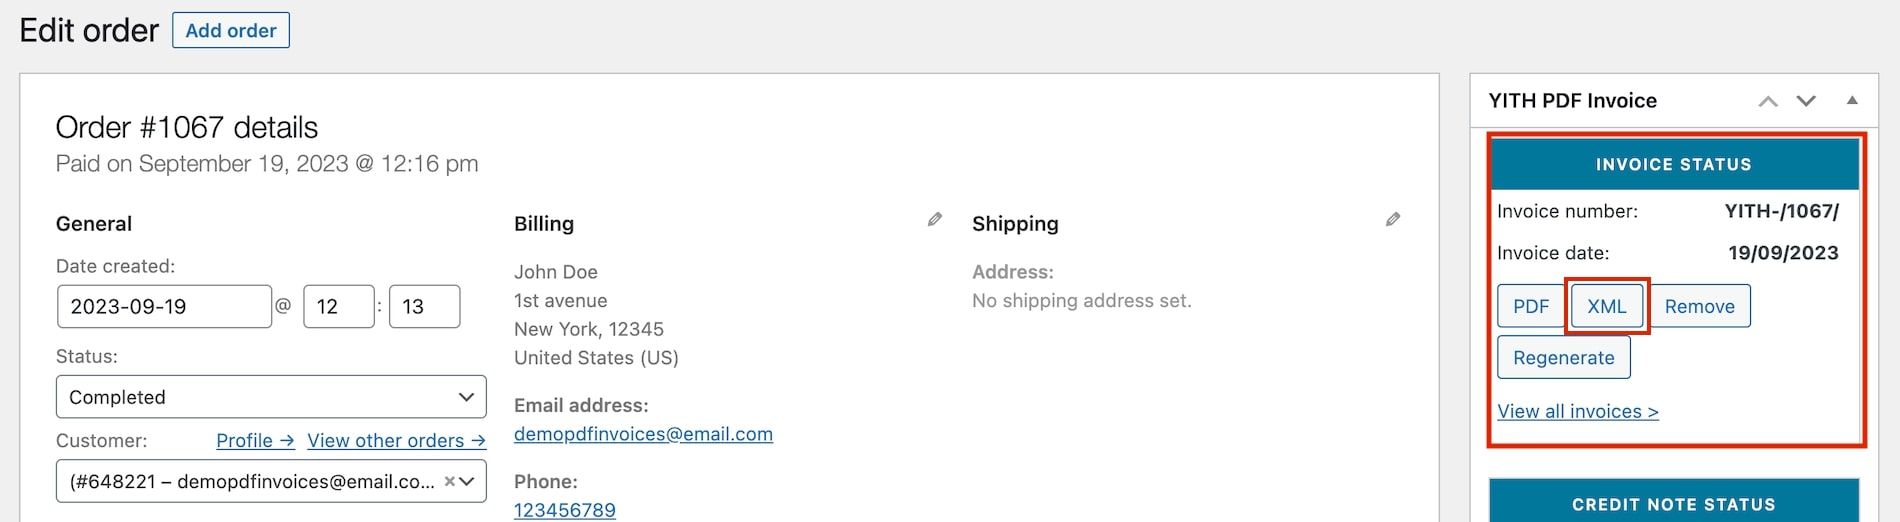
Download the .XML file
Now, if you have configured all the other settings for the generation of automatic invoices, whenever a new invoice is generated also the .xml file will be generated. You can see it on the right side, in the box Invoice status.
Click on the XML button to download the file.
Please, note: if you can’t see the .XML button in the order details, make sure to disable the option for the preview (YITH > PDF Invoices & Packing Slips > Preview Mode), because the .XML file cannot be generated out of a preview.
Now I am sure you are wondering, what will the customer see exactly?
The customer will be able to see the created documents on his “My Account” > “Orders” page.
The buttons that you see here are not customizable with the plugin, these depend on the theme you use. For the example above, we used our own free YITH Proteo Theme.
YITH Frontend Manager for WooCommerce adds a frontend dashboard to your site through which the administrator and shop managers can manage orders, products, and coupons as they would do from WordPress dashboard.
The only thing you need to do, is install both premium plugins and that is it.
From the frontend dashboard you will now be able to generate pdf invoices, packing slips and credit notes.
YITH WooCommerce Point of Sale allows you to turn your WooCommerce installation into an easy-to-use and powerful cash register for each type of store or business..
The combined use with YITH PDF Invoices allows showing the fields (VAT and SSN and fields related to the Italian Electronic Invoicing) added by the PDF Invoices plugin.
When creating a new customer profile or editing an existing one, YITH PDF Invoices fields will show in the form.
Additional fields will show when using Electronic Invoicing for Italian customers.
For further details about YITH Point of Sale settings, please refer to the official documentation.
YITH WooCommerce Checkout Manager is a plugin that allows you to customize the checkout fields by adding, removing or editing any of them. You can take advantage of many types of fields.
The combination with YITH WooCommerce PDF Invoices & Packing Slips allows you to also edit the fields (VAT and SSN) that the PDF invoice plugin adds to the checkout.
Just make sure you have enabled and activated both plugins to make the integration work. No other action from your side is required.
With the YITH WooCommerce Delivery Date plugin you can allow your customers to choose a specific delivery date for the products they purchase.
By activating both plugins, a new option will become available in the YITH > PDF Invoices & Packing Slips > General Options > “YITH WooCommerce Delivery Date integration”.
By enabling this option, the delivery date information will be shown in the packing slip pdf, like the example below:
YITH WooCommerce Deposits / Down Payments is a plugin designed to offer users the opportunity to leave a deposit for a specific order, which they will then finish paying at a later time. The integration between these two plugins allows generating two separate invoices, one for the deposit order and one for the balance order.
Please refer to the official documentation for further details about YITH WooCommerce Deposits / Down Payments settings.
YITH WooCommerce EU VAT, OSS & IOSS automatically applies the right VAT to your products for EU companies which VAT number is valid for INTRASTAT.
When using these two plugins together, the VAT inserted by the customer can be shown in the customer info within the invoice generated with YITH PDF Invoice.
With YITH WooCommerce Product Bundles you can create bundles with the combination of some products of your shop. You can assign an ad-hoc price to the bundle or a price given by the sum of the single elements contained in the bundle itself.
The integration between these two plugins will give you the ability to show the bundles in the invoice.
In order to make the plugins work together, you will only have to activate them both. For further detailed settings on the product bundles, you can check the documentation here.
YITH WooCommerce PDF Invoices & Packing Slips allows you to automatically generate the invoice in PDF format for each registered order in your shop. The features of this plugin integrate with those of YITH WooCommerce Order & Shipment Tracking which will allow entering tracking data in the packing slips generated with YITH WooCommerce PDF Invoices & Packing Slips.
After activating both plugins, you will be able to enable the option Show in packing slip, thanks to which the order tracking data will be automatically inserted in the generated document.
For further details about YITH WooCommerce Order & Shipment Tracking, please refer to the official documentation.
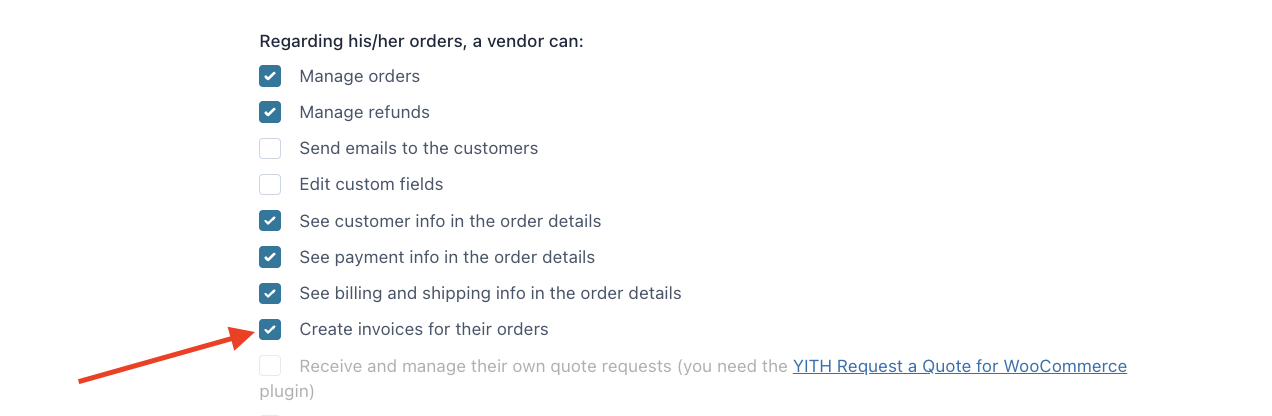
With YITH Multi Vendor you can turn your e-commerce store into a marketplace (a multi-vendor platform) like Amazon or Etsy. Turn your e-commerce store into a marketplace (a multi-vendor platform) and earn commissions on orders generated by your vendors.
When the plugin is used with YITH WooCommerce PDF Invoices & Packing Slips, also vendors will be able to generate their own invoices with their own template and logo.
To enable the integration, make sure that both plugins are installed and activated, then, select Create invoices for theirorders in the option Regarding his/her orders, a vendor can available in YITH > Multi Vendor > Vendors > Vendors permissions.
When enabling this option, the vendor can can set up their own invoicing and invoice template settings by clicking in PDF Invoices & Packing Slips from their backend panel.
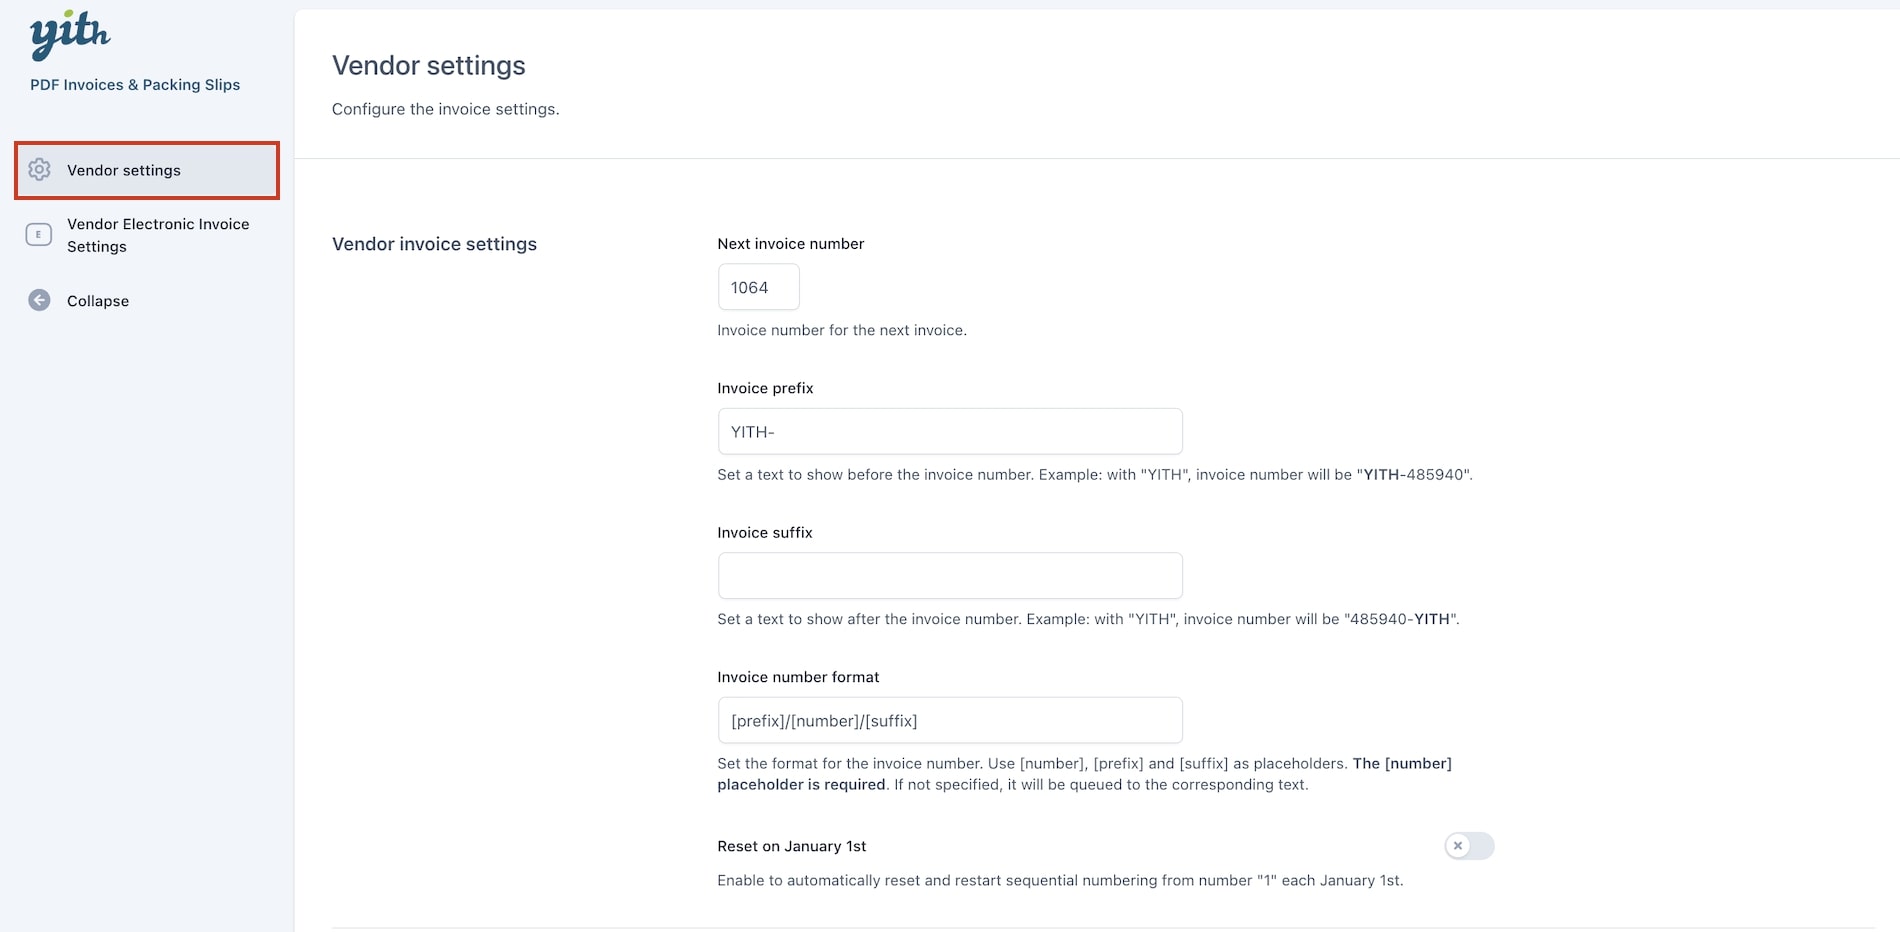
Vendor settings
From this tab, the vendor can configure the following invoice settings:
Vendor invoice settings:
Next invoice number: Choose the number for the next invoice.
Invoice prefix: Set a text to show before the invoice number. Example: with “YITH”, invoice number will be “YITH-485940″.
Invoice suffix: Set a text to show after the invoice number. Example: with “YITH”, invoice number will be “485940-YITH“.
Invoice number format: Set the format for the invoice number. Use [number], [prefix] and [suffix] as placeholders. The [number] placeholder is required. If not specified, it will be queued to the corresponding text.
Rest on January 1st: Enable to automatically reset and restart sequential numbering from number “1” each January 1st.
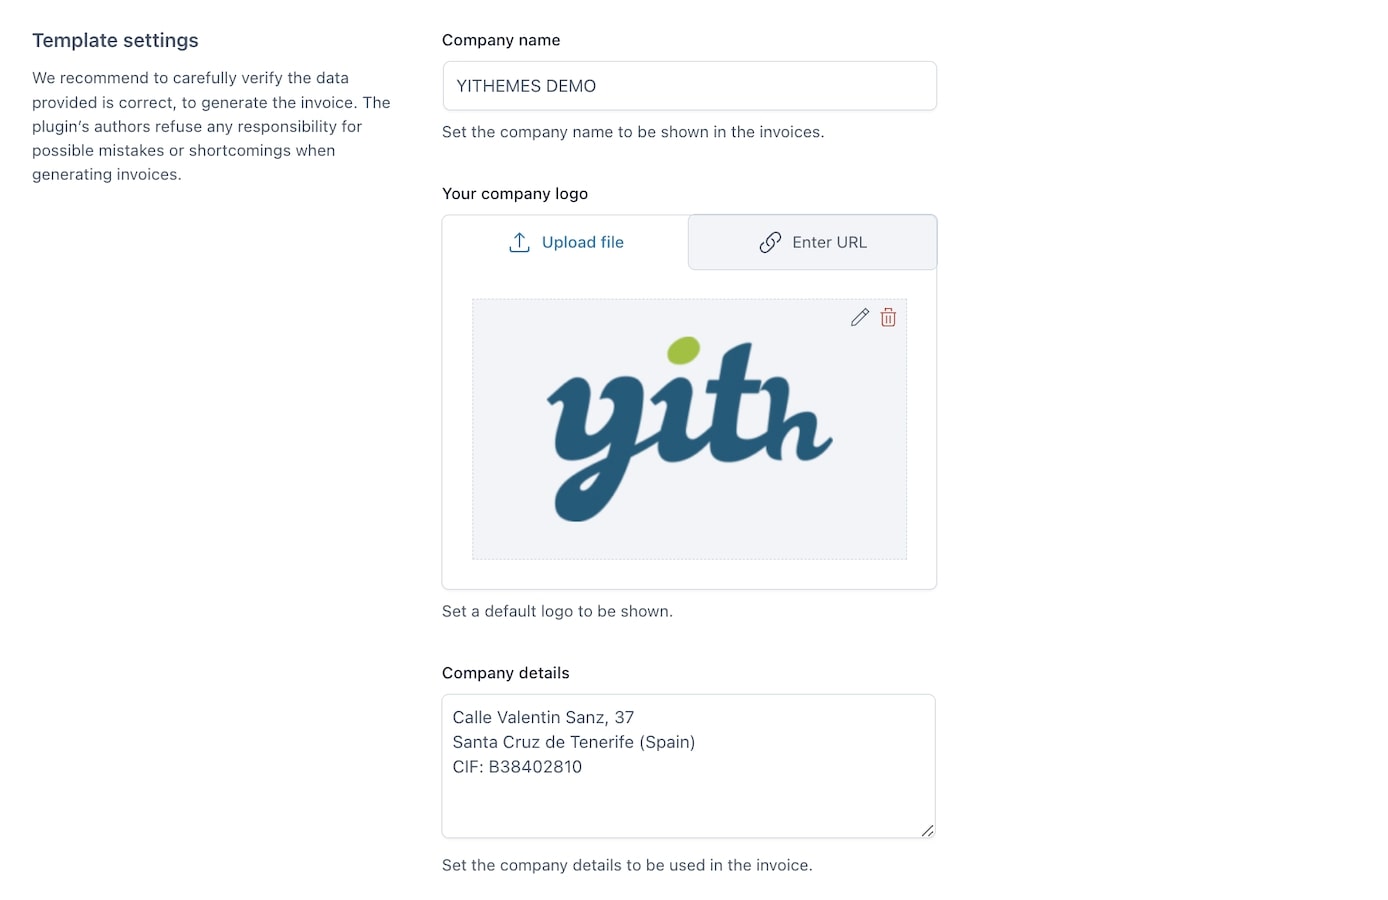
Template settings:
Company name: Set the company name to be shown in the invoices.
Your company logo: Set a default logo to be shown.
Company details: Set the company details to be used in the invoice.
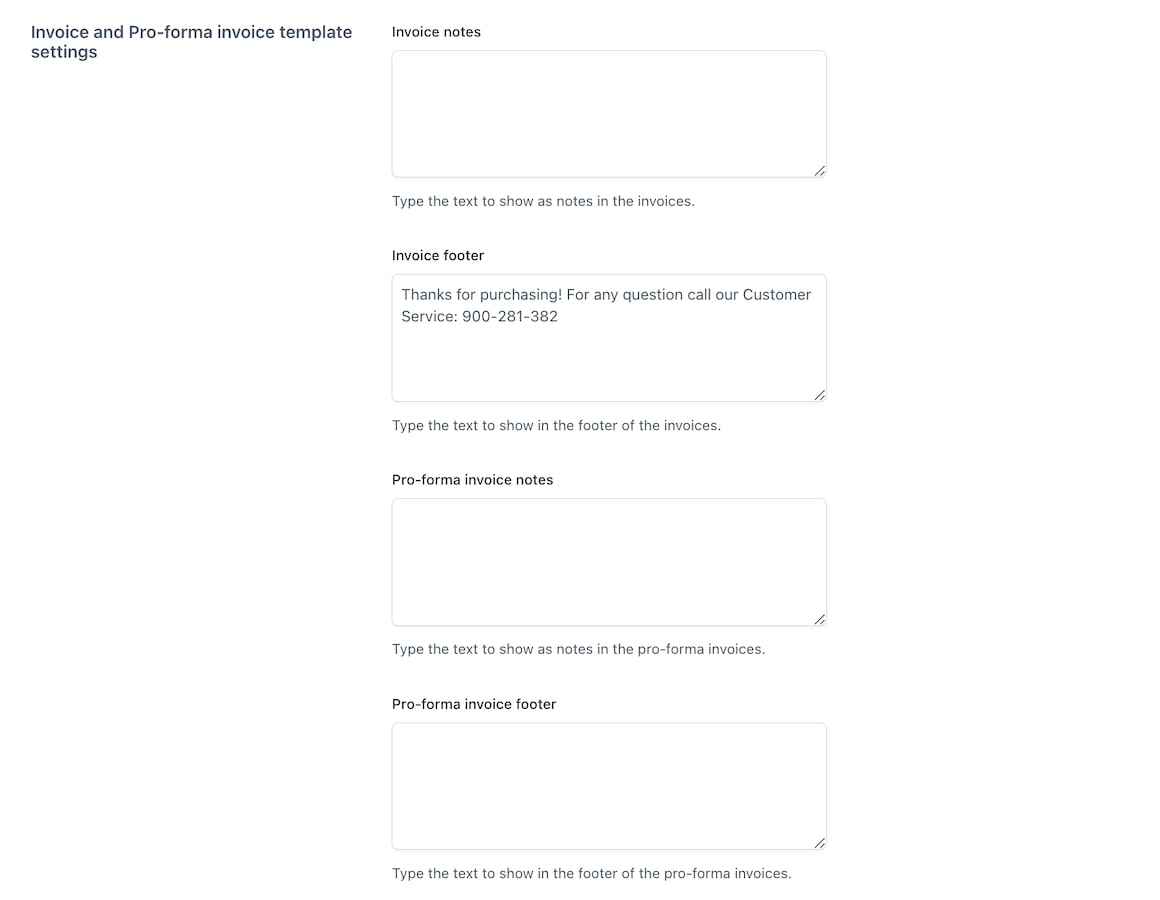
Invoice and Pro-forma invoice template settings:
Invoice notes: Type the text to show as notes in the invoices.
Invoice footer: Type the text to show in the footer of the invoices.
Pro-forma invoice notes: Type the text to show as notes in the pro-forma invoices.
Pro-forma invoice footer: Type the text to show in the footer of the pro-forma invoices.
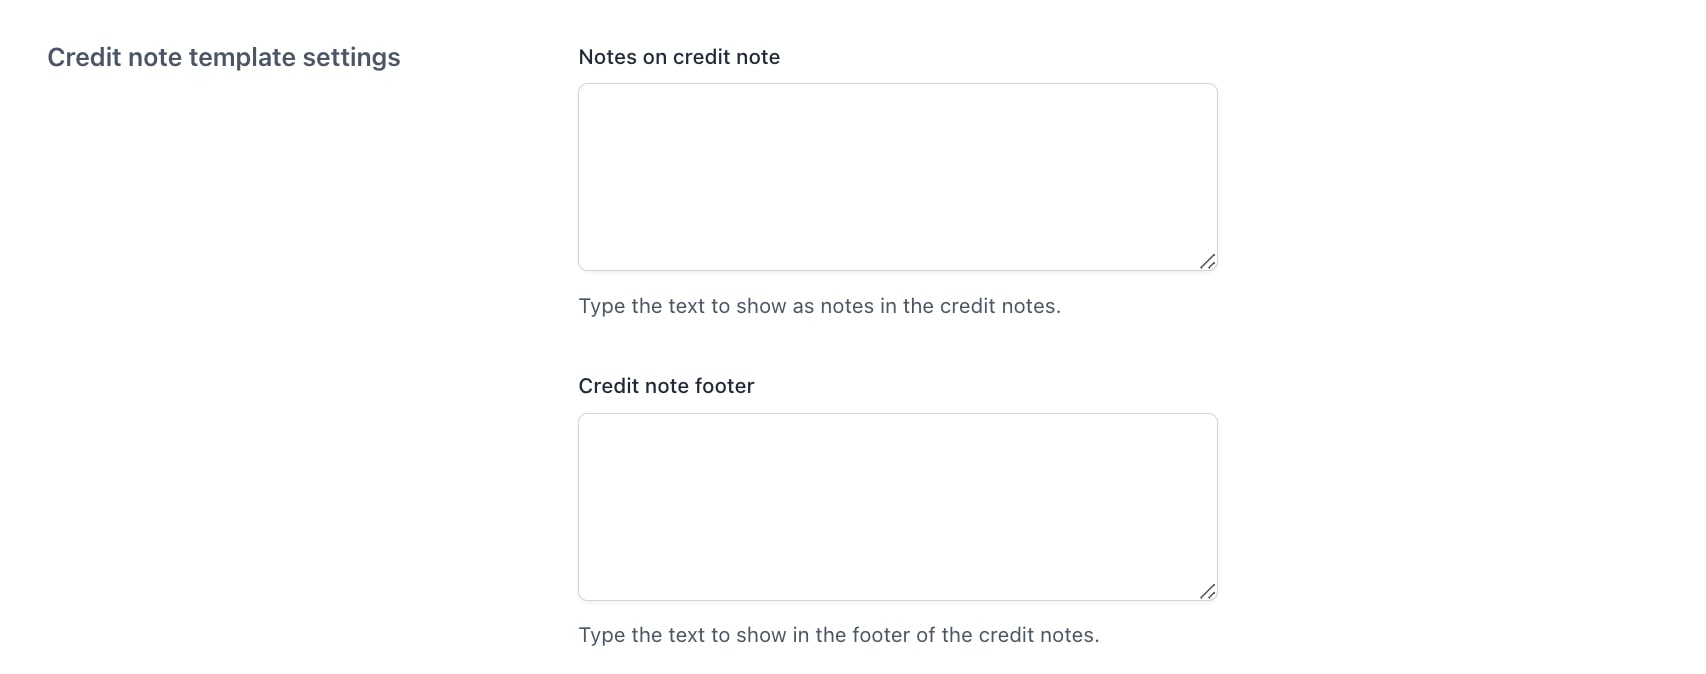
Credit note template settings:
Notes on credit note: Type the text to show as notes in the credit notes.
Credit note footer: Type the text to show in the footer of the credit notes.
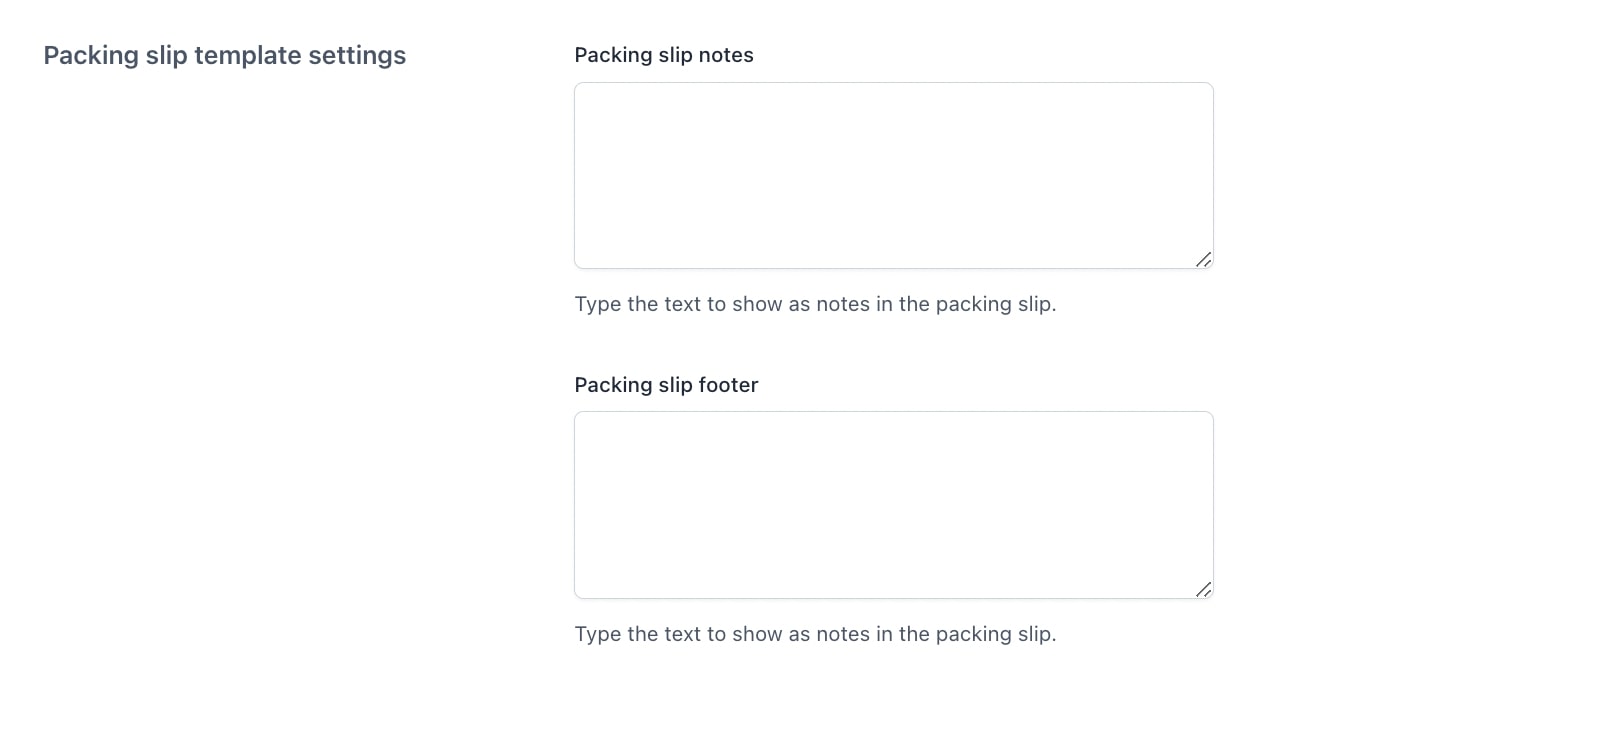
Packing slip template settings:
Packing slip notes: Type the text to show as notes in the credit notes.
Packing slip footer: Type the text to show in the footer of the credit notes.
The vendor’s company logo and details will be the same across all documents issued by the vendor (so for invoices, credit notes and shipping lists), but the vendor can customize notes and footer for each type of document.
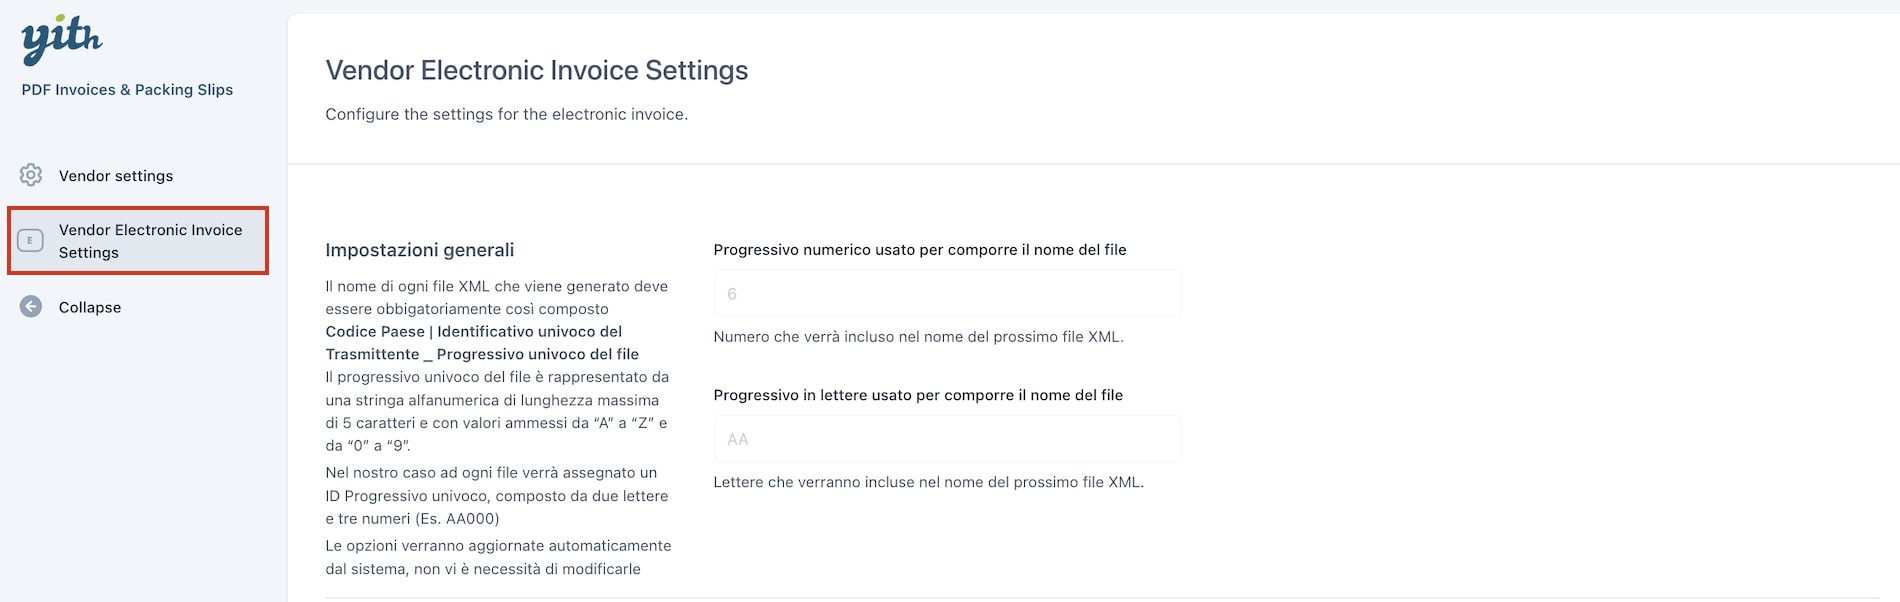
Vendor electronic invoice settings
Please, note: The Electronic Invoice Settings will be available only if you activate it from the main options by going to YITH > PDF Invoices & Packing Slips > General Options > Invoice options and enable the option “Enable electronic invoice (Italian Customers)”
In this tab, the vendor will be able to configure the settings for the Italian electronic invoice. The options are divided in the following sections:
Impostazioni generali:
The first section is about the file name format, which is made out of 5 characters, two letters and three numbers.
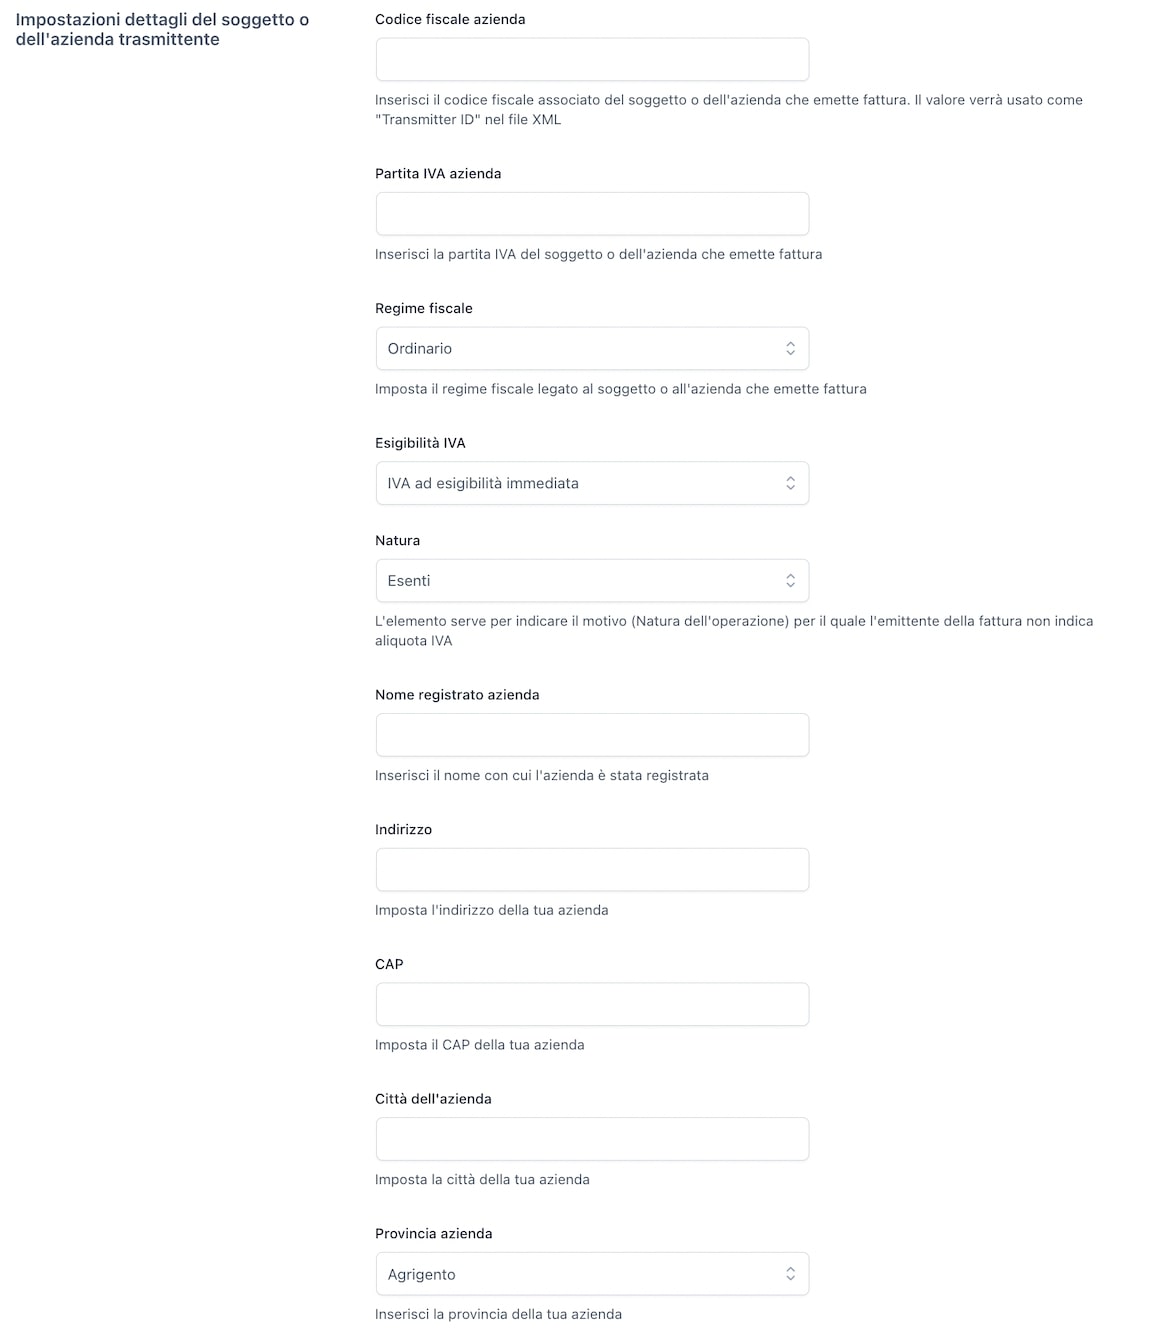
Impostazioni dettagli del soggeto o sell’azienda transmittente:
Next, you’ll find a section where the vendors can enter all their details.
Codice fiscale azienda
Partita IVA azienda
Regime Fiscale
Esigibilità IVA
Nome registrato azienda
Nome persona fisica
Cognome persona fisica
Contatto telefonico
Indirizzo email
Indirizzo
CAP
Città dell’azienda
Provincia azienda
When the plugin is used in combination with YITH WooCommerce Multi Vendor, the automatic generation of invoices will be disabled. The only way to create a new document, invoice or shipping document, is manually through the specific buttons you find in WooCommerce > Orders or in order detail page.
For what concerns users, the various documents can be downloaded from My Account > Orders. Administrator and/or vendor related to the order must generate the document to allow the user to have access to it. The customer will get one invoice for each vendor suborder that is generated for his/her purchase.
For further details about YITH Multi Vendor, please, refer to the official plugin documentation.


