View Product Page

How to customize tabs by product

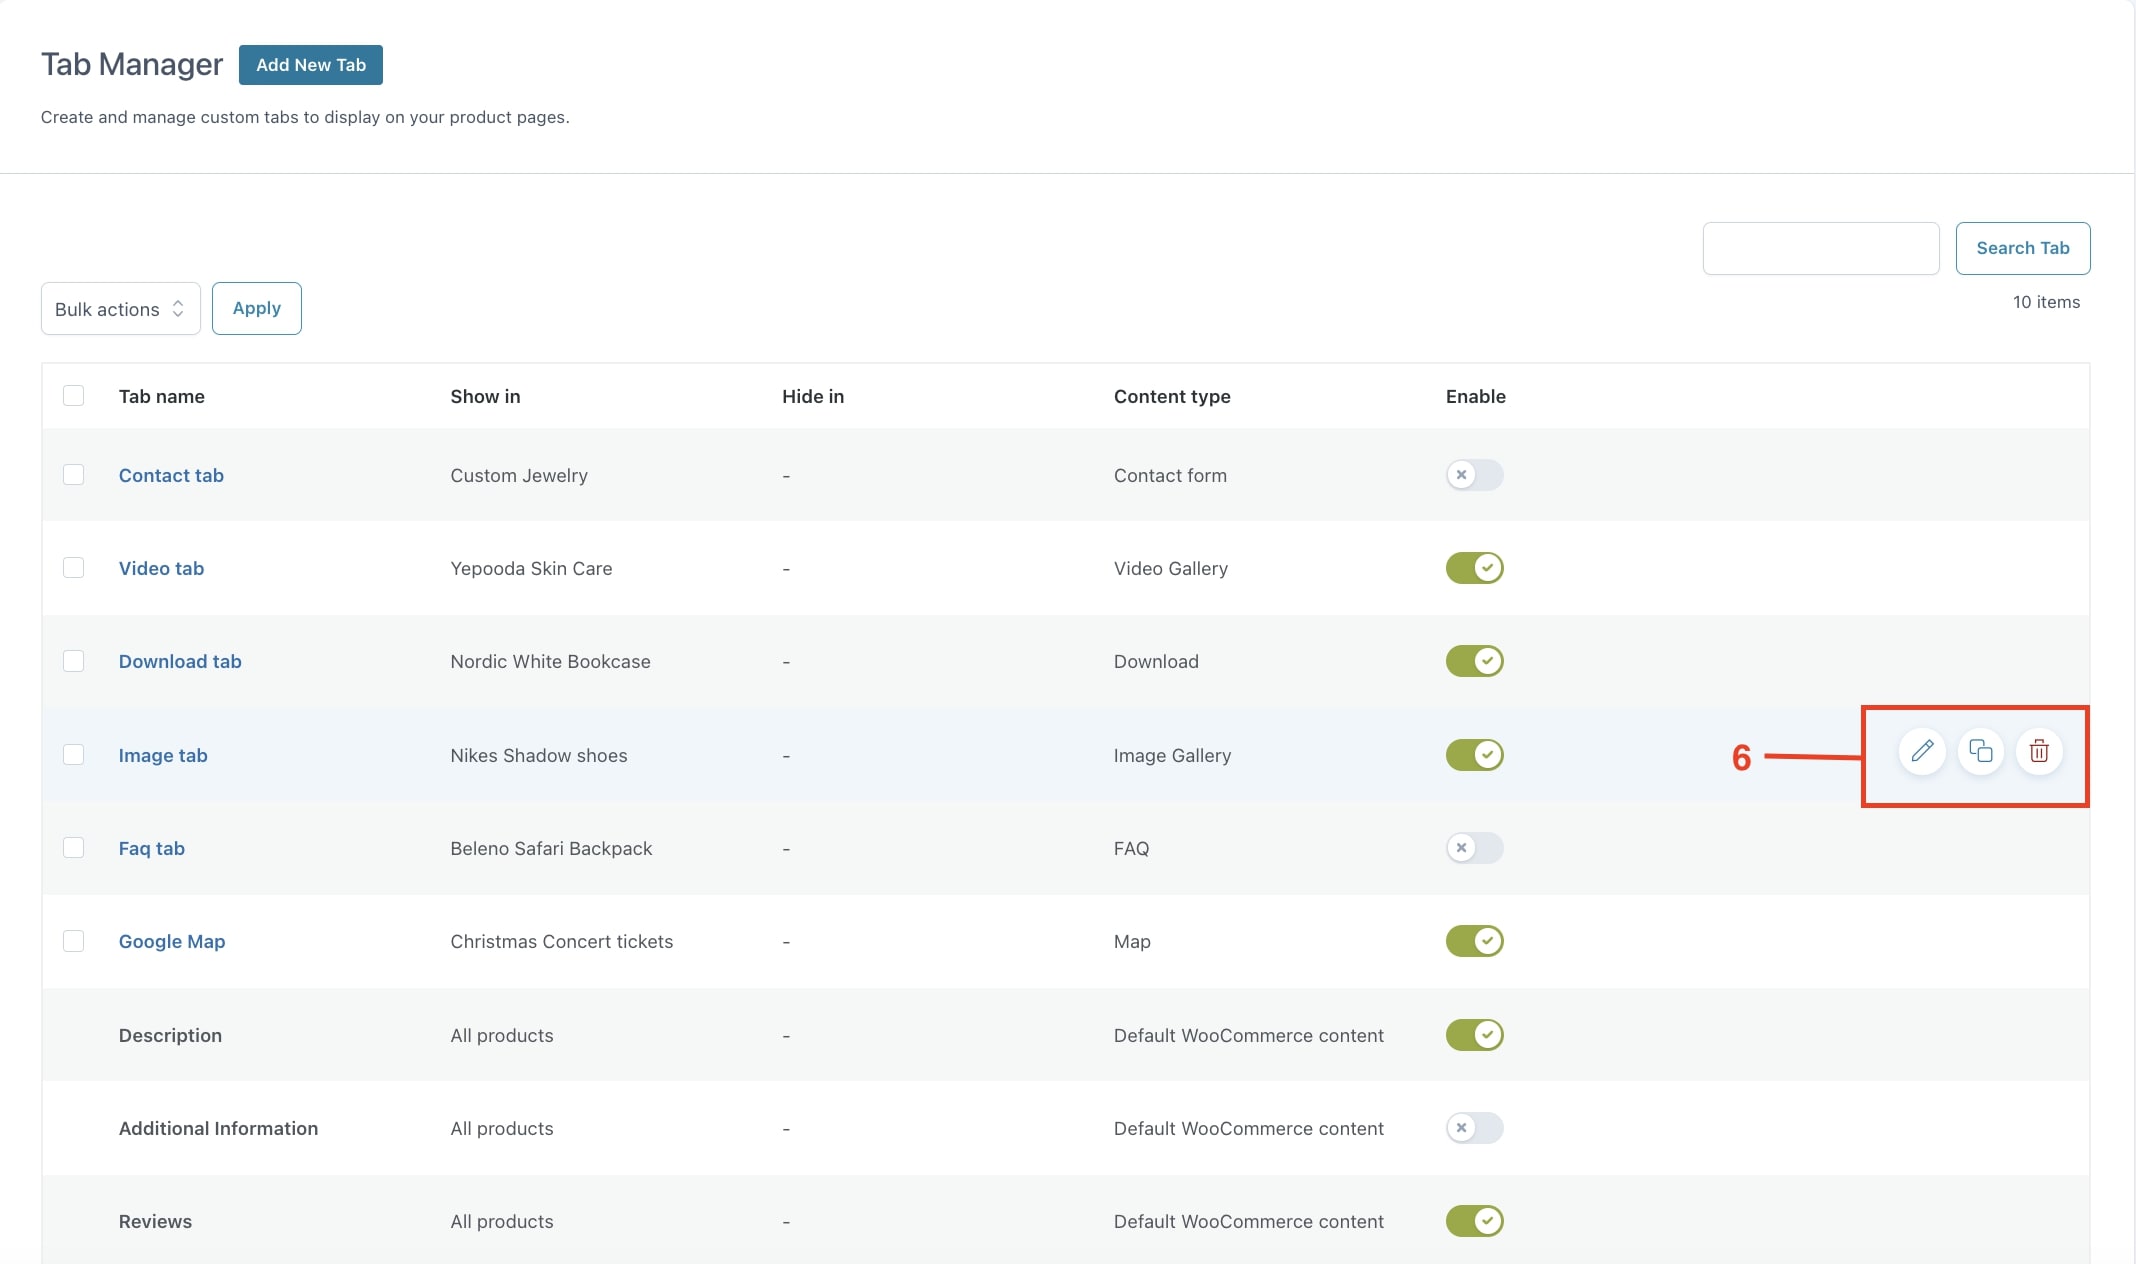
In addition to the assignment rules, it is also possible to customize the tabs at the product level. Based on the selection of products in the Show in option, the tabs will show on the product edit page with the name assigned to them. If the tab is created for specific products or categories, it will only be possible to customize it on the page of those products involved in the assignment rule.

We are going to see an example of how to override tab customization in the product. Assuming we want to display a download-type tab with assembly instructions for the furniture we sell.

Step 1 – Tab configuration

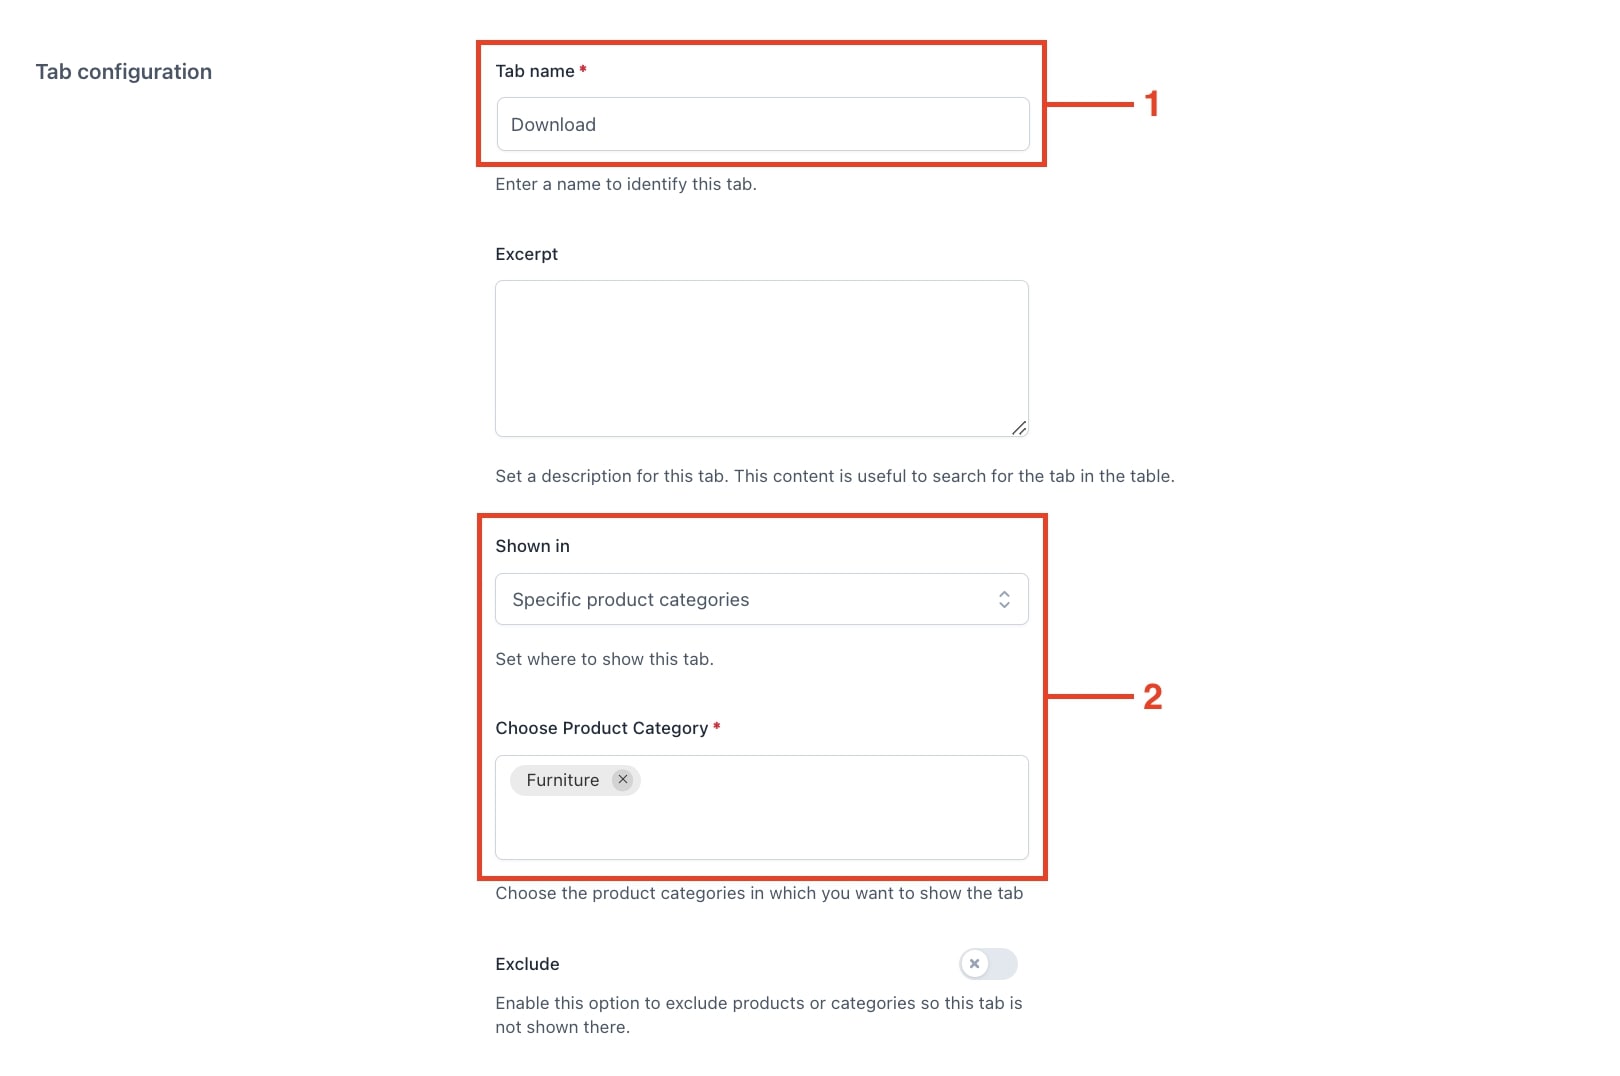
We create a tab named Download (1) and choose to show it on products of the Furniture category (2).

Category tab

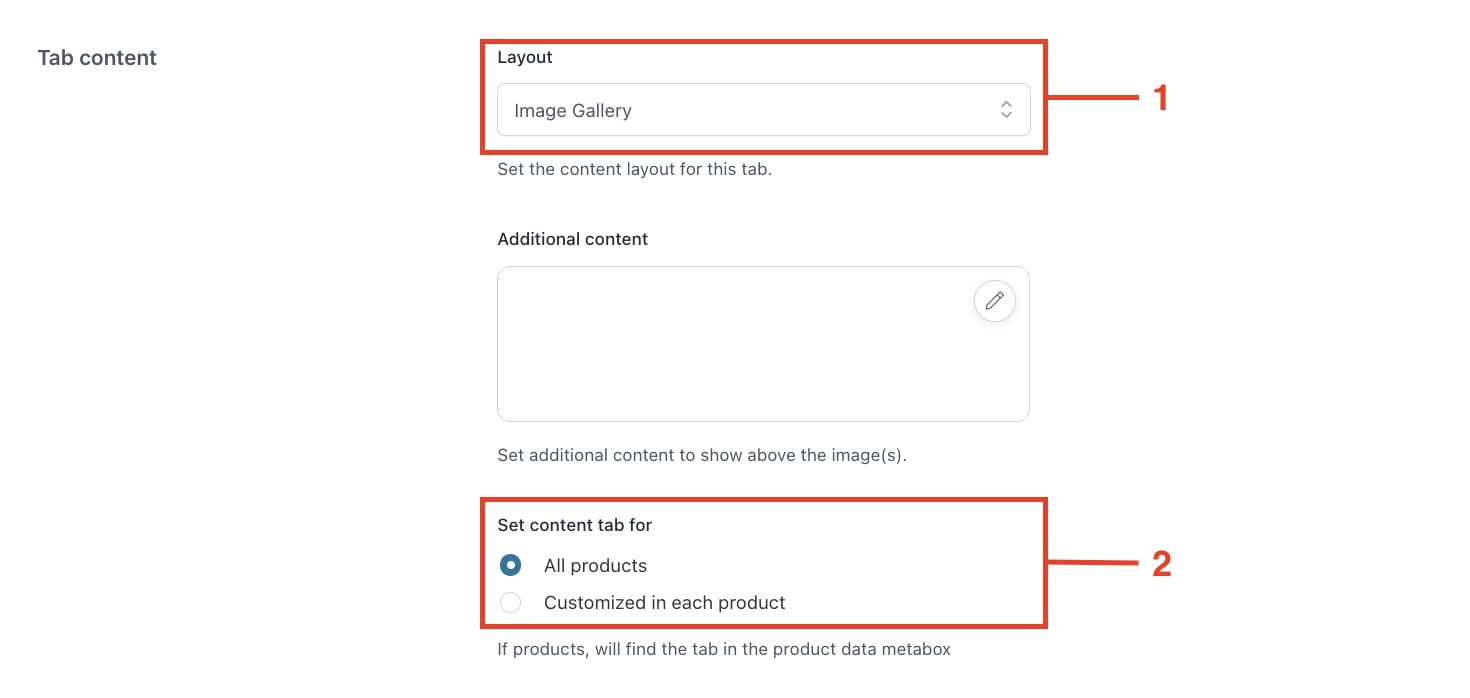
Step 2 – Tab content

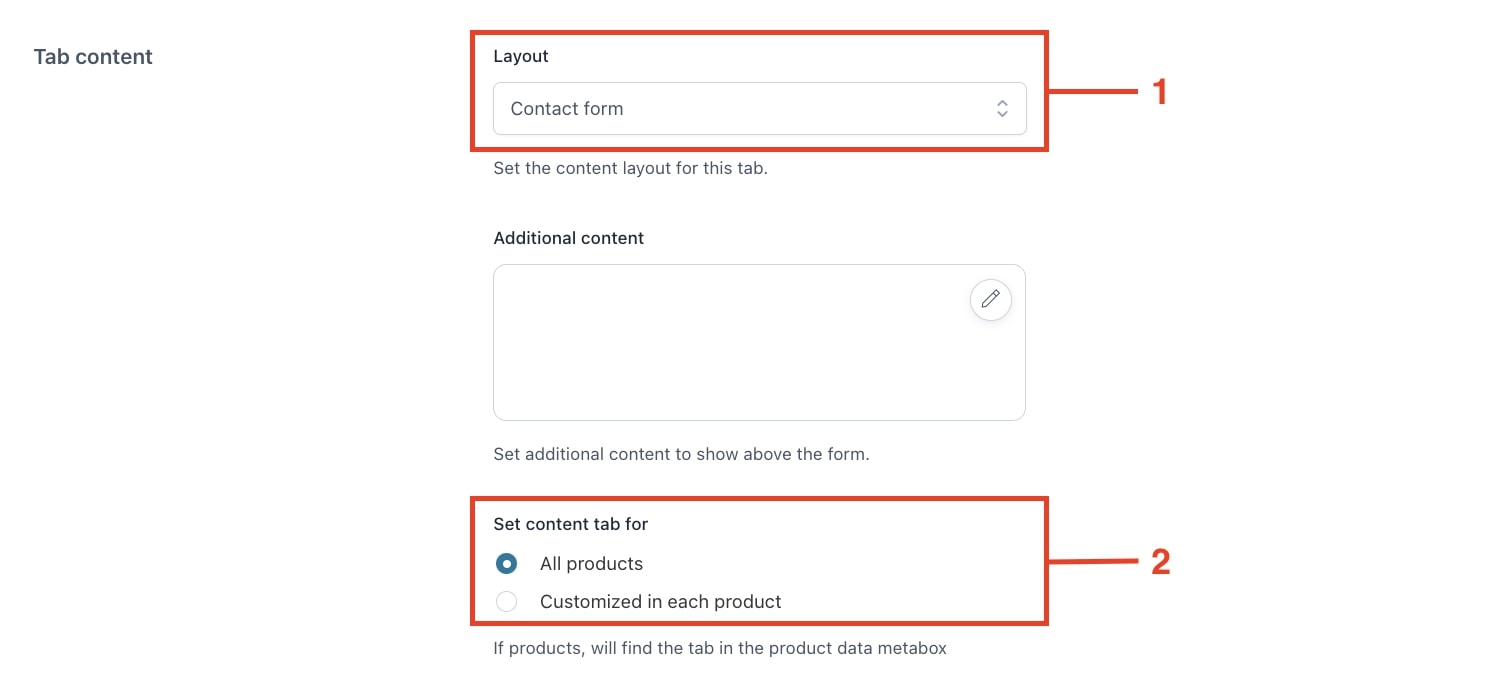
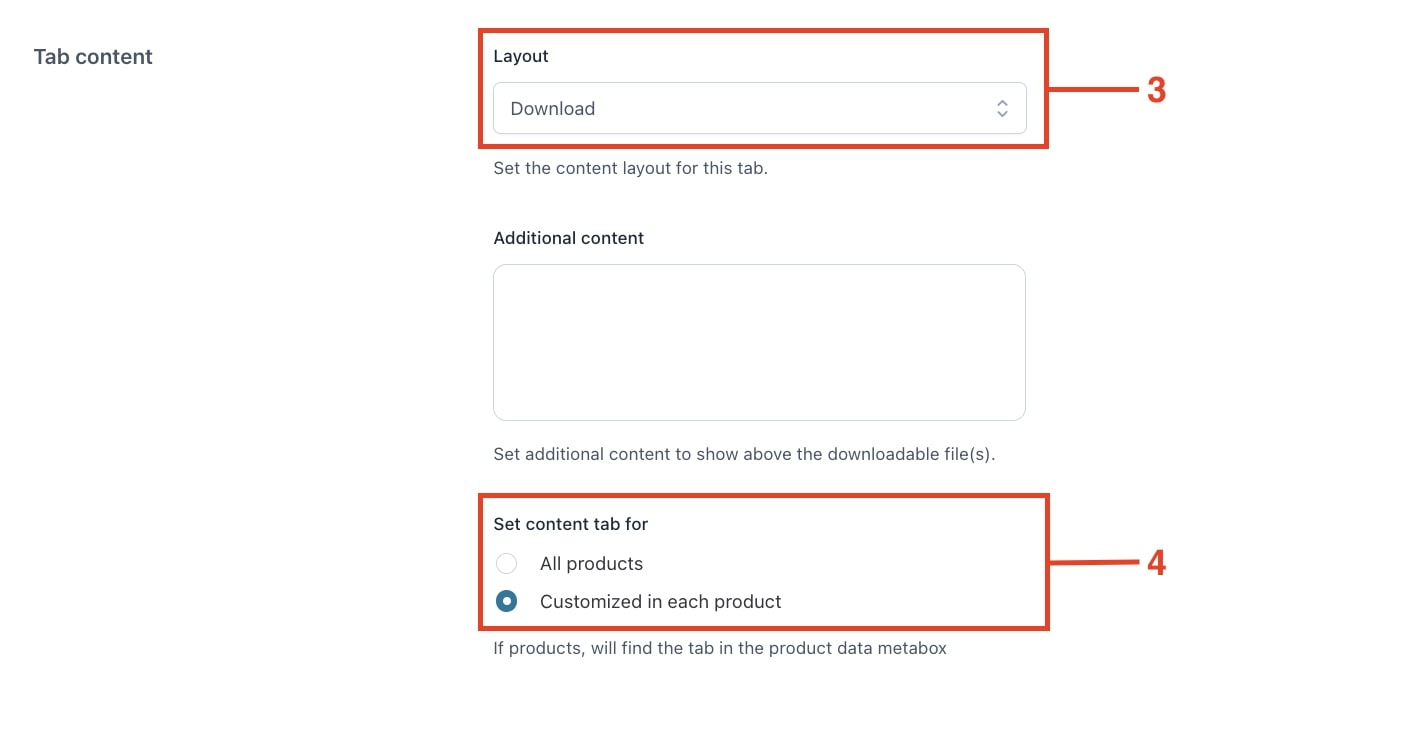
We move to the Tab content section and select the layout Download (3). In the option Set content tab for, we select Customized in each product (4). This way we can upload different assembly files for each product as the instructions vary from product to product.

Tab content example

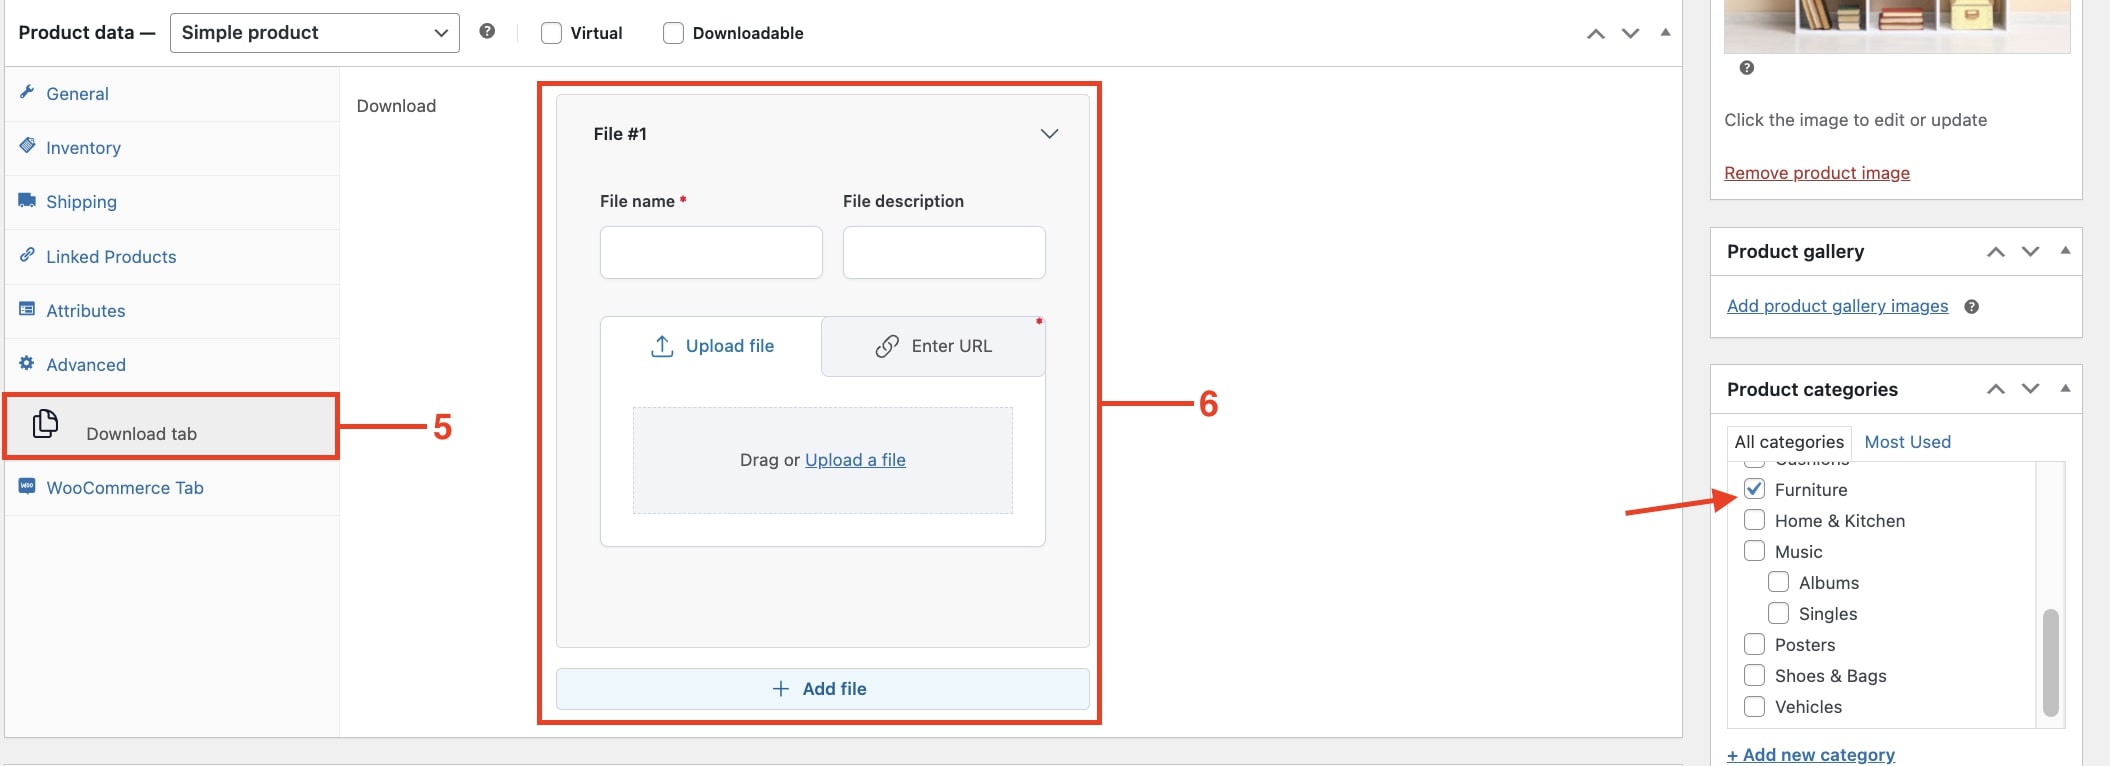
Step 3 – Customize from product

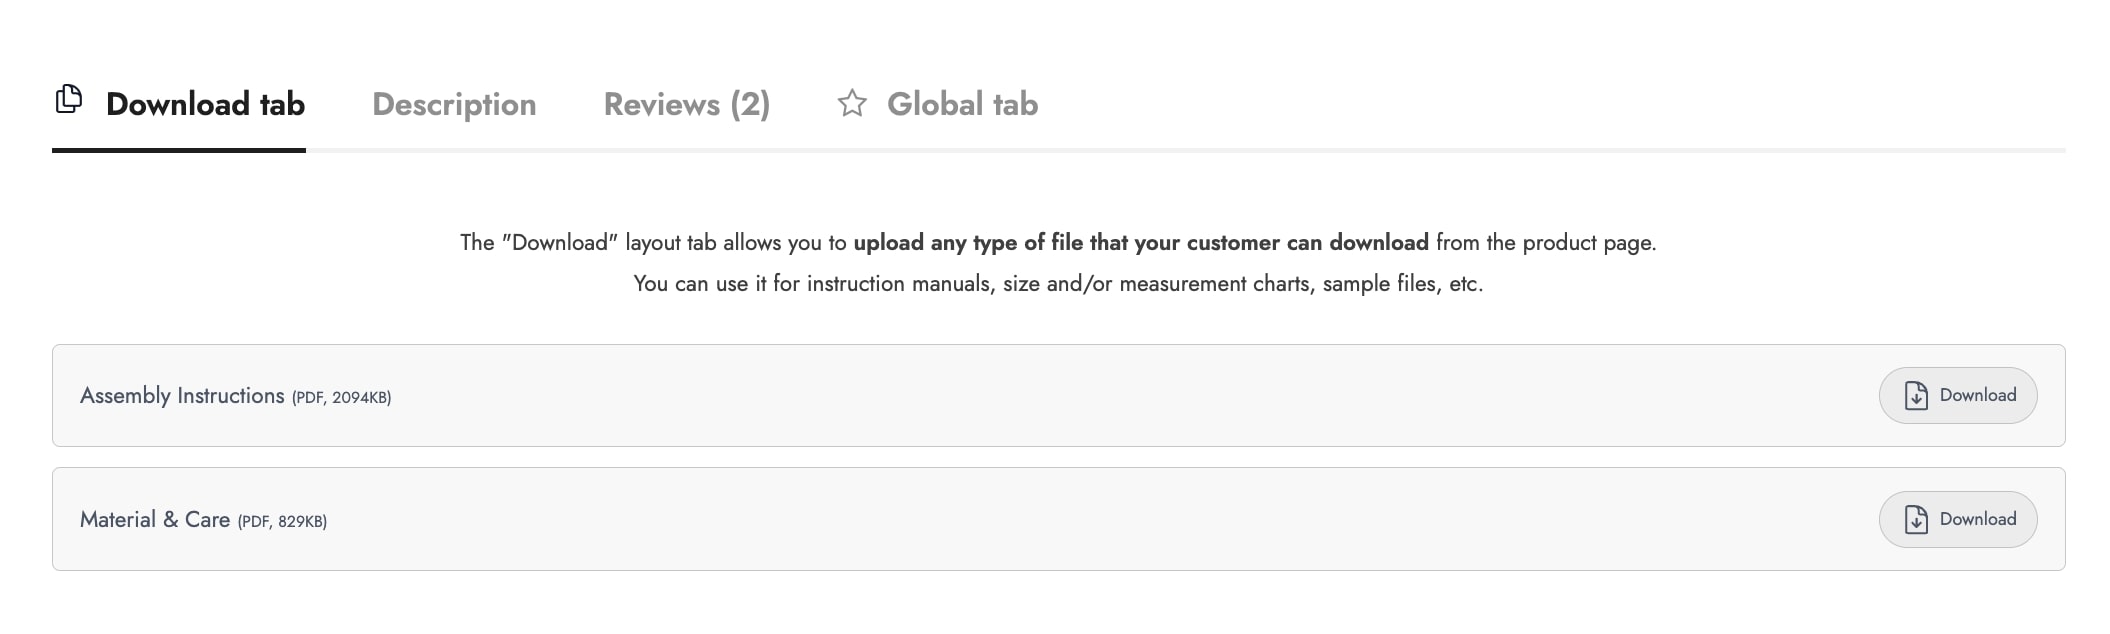
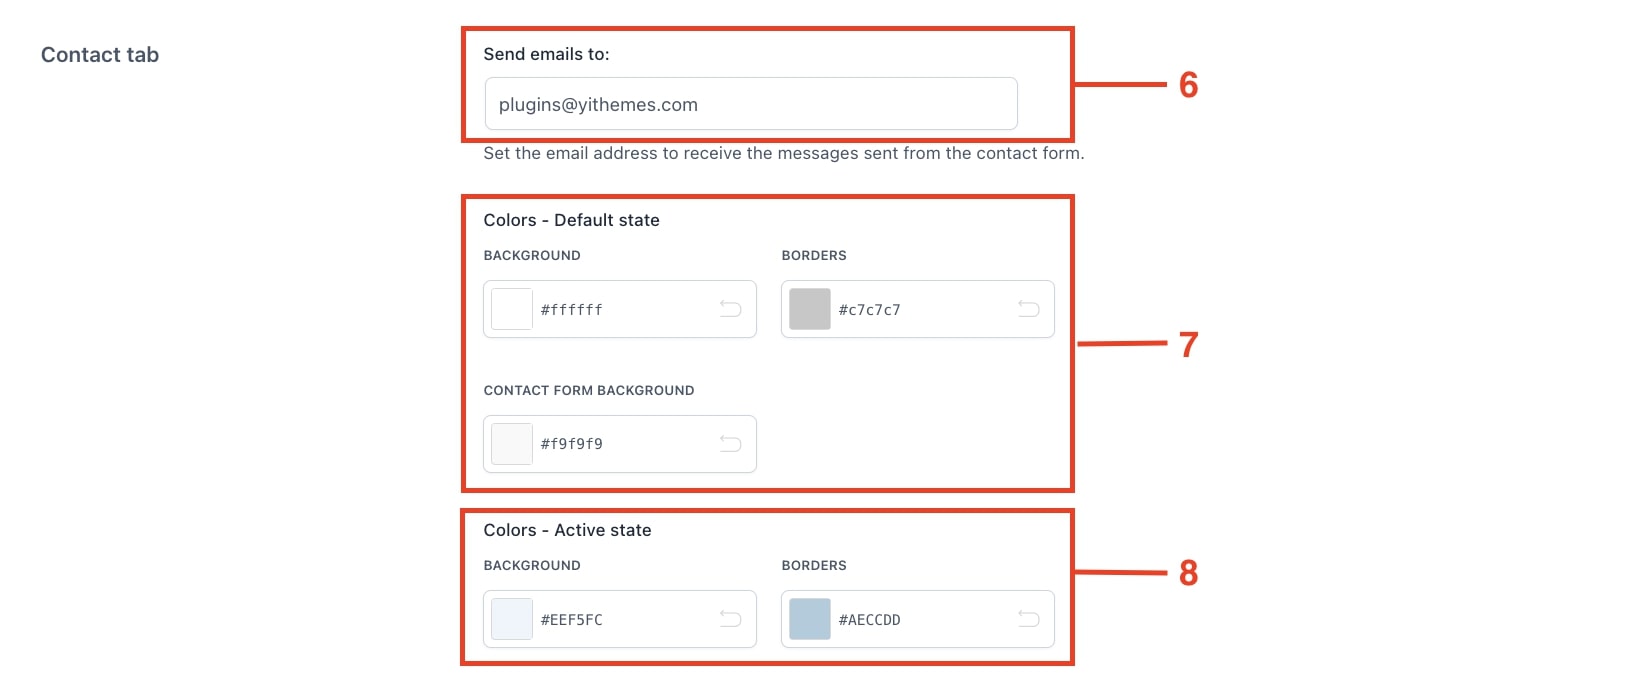
After creating and saving the tab, we move to the WooCommerce products and select one from the Furniture category. On the edit page, we find the created Download tab ( 5) from which we can upload the downloadable files for this product (6).

Tab in product edit page

We will repeat this procedure for each product of the same category by uploading different files so that users can download the correct instructions for that piece of furniture.

How to create and show tabs

In this section, we will examine how to create tabs with the different layouts provided by the plugin.

Step 1 – Add a new tab

Go to the Tab Manager section and click on the Add new tab button (1):

Create a new tab

Step 2 – Configure the tab

Now, through the Tab configuration settings, define a name for the tab (2), add an excerpt to easily identify the tab in the table, and choose whether to show the tab in All products, Specific products or Specific product categories (3). If selecting Specific product categories and Specific products, search for categories or products in the related option.

Tab configuration

To prevent the tab from showing on specific products or categories, enable the option Exclude, then select the products or categories to exclude (4). Optionally, you can assign an icon, a default or custom one, to show in the tab header.

Exclude products or categories

Step 3 – Choose the layout

Let’s now move to the section Tab content where it is possible to set up the content to show in the tab. First, choose the Layout (5) of the tab among the available ones. Then, set up the available options for each of them. Click on the following links for more details about each tab options.

Tab content layout

Step 4 – Enable/disable tabs

Each tab you create will be added to the table from which you can enable or disable each single tab and sort them via drag and drop in the order you wish to display them.

From the table, you can also edit, duplicate and delete the tabs through the related actions (6).

Actions on tabs

Default

Now, let’s see how to create the tab content using the default layout.

First, select Default in the Layout option (1), then choose for which products this tab is being created from All products or Customized in each product (2). Finally, click on the pencil icon showing on the mouseover in the Tab content (3).

Default layout

Set the content (text, links, images, etc.) using the WordPress classic editor, then click on Set content.

Tab content editor

Default tab example

Default tab example

Video gallery

Below, we will learn how to create a tab to show videos.

First, set the tab options by following the first two steps described here, select Video Gallery in the Layout option (1), then choose for which products this tab is being created from All products or Customized in each product (2).

Video gallery tab

Now add the video specifying the name, the hosting service (YouTube or Vimeo), the video ID, and the video URL (3). To add more videos, click on the Add video button (4). When adding several videos, define the number to show per row in the option Videos per row (5).

Add videos to the tab

Video gallery tab example

Video tab

Image gallery

In this guide, we will see how to show images in a tab.

Set the tab options by following the first two steps described here. Select Image Gallery in the Layout option (1), then choose for which products this tab is being created from All products or Customized in each product (2).

Image gallery tab

Now add the first image by dragging or uploading it in the Images option.To add other images, just click on the plus symbol (+) shown below (3). When adding several images, define the number to show per row in the option Images per row (4).

Add more images

Image gallery tab example

Image tab

FAQ

Step 1 – Tab creation

To create a tab to show FAQs, set the tab options by following the first two steps described here. Now select FAQ in the Layout option (1), then then choose for which products this tab is being created from All products or Customized in each product (2).

FAQ tab content

Step 2 – Add FAQs

Now, you can enter the question and answer in the related fields – Question and Answer (3). To add more FAQs, click on the Add FAQ button (4).

Add FAQs

Step 3 – Customization

Now, you can customize the tab by setting the icon position (5), the default state colors (6), and the active state colors (7). These options are available in the Customization section of the plugin panel.

FAQ tab customization

FAQ tab example

FAQ tab

Download

Step 1 – Tab creation

Now, we will move to the creation of the tab where to make downloadable files available to users.

Set the tab options by following the first two steps described here. Now, select Download in the Layout option (1), then choose for which products this tab is being created from All products or Customized in each product (2).

Download tab

Step 2 – Add files

Now, you can add the first file specifying the file name and the description, then drag or upload the file (3). To add more files, click on the Add file button (4).

Add downloadable files

Step 3 – Customization

Now, you can customize the tab by setting the default state colors (5) and the active state colors (6). These options are available in the Customization section of the plugin panel.

Download tab customization

Download tab example

Download tab

Map

You can also create a tab to show a map. To do so, set the tab options by following the first two steps described here, then select Map in the Layout option (1), then then choose for which products this tab is being created from All products or Customized in each product (2). Now, add the address used by Google Maps to generate the map in the Address option (3).

Map tab content

Set the map width, height and zoom (4) or enable the option Full-width map (5) to show the map in full width.

Map options

Map tab example

Map tab example

Contact form

Let’s see how to create a tab that includes a contact form.

Step 1 – Tab creation

Set the tab options by following the first two steps described here, then select Download in the Layout option (1) and choose for which products this tab is being created from All products or Customized in each product (2)..

Contact form tab

Step 2 – Enable fields

The default form consists of the Email and Message fields, but you can also enable the name (3), website (4), and subject (5) fields. Each of these fields can be set as required.

Contact form fields

Step 3 – Tab customization

You can customize the tab by setting the email address (6) of the recipient of messages sent through the contact form, the default state colors (7) and the active state colors (8). These options are available in the Customization section of the plugin panel.

Contact tab customization

Contact form tab example

Contact form tab

Mobile devices and map option

Through the plugin Settings, it is possible to define how to manage the visibility of WooCommerce tabs and those created with the plugin on mobile devices.

In addition, it is possible to insert the Google API key in order to show the map in the Map tabs.

Step 1 – Hide tabs

To hide WooCommerce default tabs when visiting product pages from mobile devices, go to Settings > Tabs in mobile devices and enable the option Hide WooCommerce tabs (1). To also hide the tabs created with the plugin, enable the option Hide plugin’s tabs (2).

Hide tabs on mobile

Step 2 – Google Maps

To show the map in the dedicated tab, go to Map tab and enter the Google Maps API key in the Google API KEY field (3).

Google Maps API key