View Product Page

How to associate products to one or more stores

The plugin allows the association of WooCommerce products to one or more stores to let the users interested in your products check the stores where they are available by simply clicking the dedicated button.
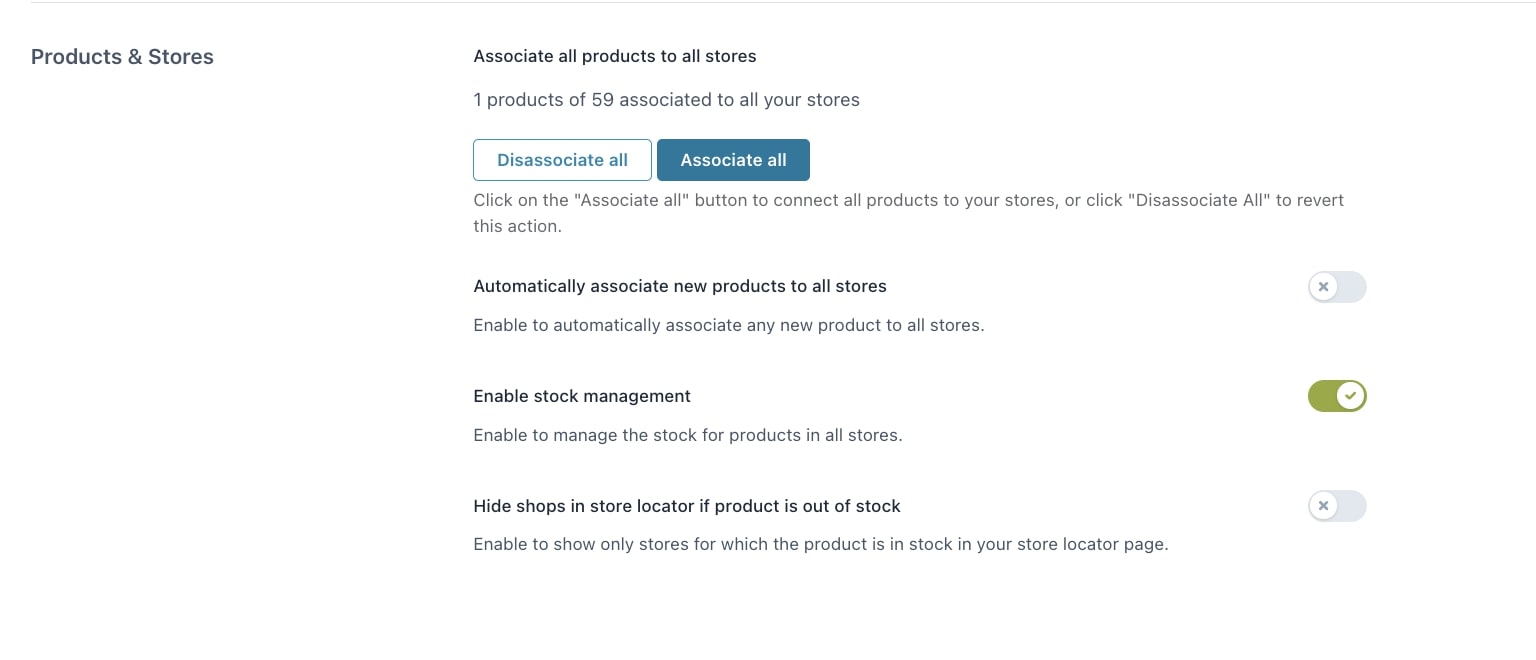
You can associate a product to your stores from the Store locator section in the product edit page or massively and automatically from the General options (for further details, please refer to this page).

To associate the product, just select one or more stores of those available and save. With just one click, your products will be linked to these stores.

Associate stores from product edit page

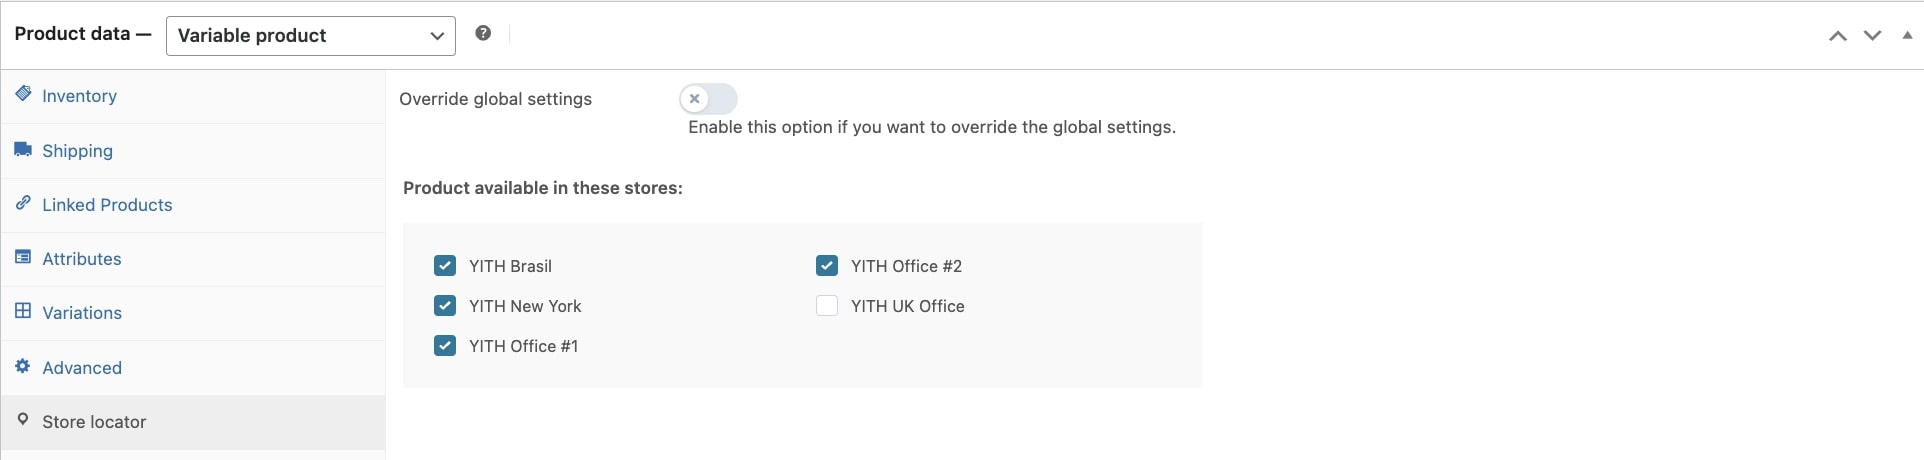
Moreover, by enabling the option Override global settings, you will be able to manage the Find in stores button independently.

Override Store locator settings

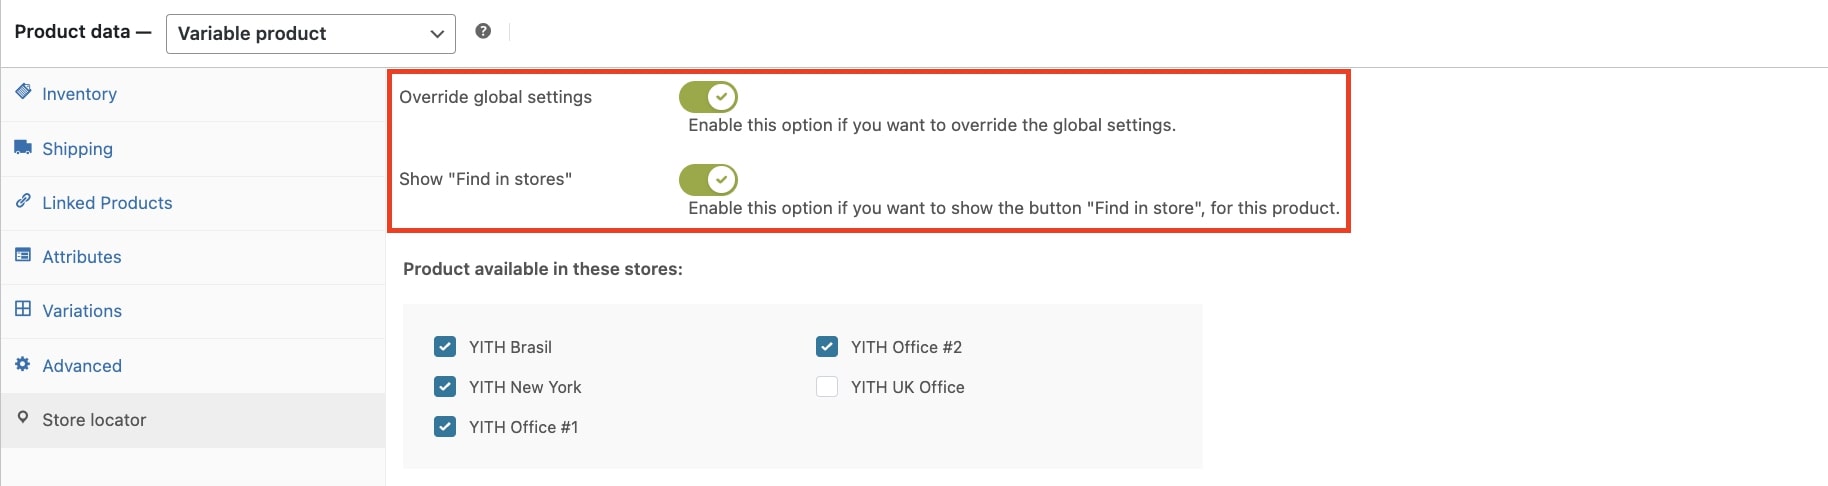
For example, if in the general settings you have set the button as hidden, you can choose to show it on this product or, conversely, if you are showing the button on all the products and want to hide it for a specific item, you can just disable the option from its edit page.

Show Find in stores button on product page

General options

To let users check the product availability in your stores, you can show the button Find in stores on your product pages. Go to WooCommerce options -> General to configure the button general options.

WooCommerce general options
  • Show “Find in stores” in product pages: enable to show the button on your product pages.
  • “Find in stores” position: choose the position to show the button by selecting it from the dropdown (before or after the title, before or after the price, before or after Add to cart button). As an alternative, you can use the shortcode [yith_sl_find_in_stores] and print it anywhere on the product page.
  • “Find in stores” style: select the style of the button by choosing from:
    • text
    • custom button
    • theme button
  • “Find in stores” label: enter the text to show for the Find in stores button.
  • “Find in stores” icon: upload a custom icon for the Find in stores button.
  • “Find in stores” colors: (available only if Custom button is selected) choose the colors for text and background.
  • Hide “Find in stores” in out-of-stock products: enable this option to hide the Find in stores button on out-of-stock products.
WooCommerce general options
  • Button action: choose the behavior of the Find in stores button when users click on it: you can open the Store Locator modal window or redirect them to the Store Locator page.
  • “Find in stores” modal title: (available only after selecting Open the Store Locator modal window) enter the text that will identify the title of the modal window.
  • Store Locator page: choose the default Store Locator page to use for users who want to check the results.
Show Find in stores button on product pages

Modal window options

Modal window info
  • Search
  • View all stores button
  • Geolocation button
  • Filters
  • Map
  • Store image
  • Stock available

Example

Modal window example

Products & Stores

Through the Products & stores settings, you can easily associate or disassociate your WooCommerce products to all your stores through the specific buttons.

Moreover, if you want to automatically associate newly-created products to all your stores without any further action, you can enable the option Automatically associate new products to all stores.

Products and stores options

You can also manage the product stock for each store by enabling the option Enable stock management. When enabled, a new tab named Stock table will show.

Stock table

Finally, by enabling the option Hide shops in store locator if product is out of stock, you can show on the Store locator page only the stores where the product is currently available. In this way, you can improve the user experience by letting your users see only the stores where the product is available and make sure they will find it.

Stock table and management

From the tab Stock Table, you can manage the stock of the products of your stores, choose whether to show or hide the out-of-stock products from the Store Locator, associate a product to one or more stores, and import and export the stock.

To see the table, you must first enable the option Enable stock management available in WooCommerce options -> General > Products & Stores

Enable stock management

The product stock is managed only at the information level and doesn’t reflect in the checkout and orders placed on the site. It has to be updated manually every time it is necessary to change the product quantities.

Through the stock table, you can:

  • manage the stock for each product and store by defining the values in the related fields;
  • associate the product to one or more stores by clicking on Associate now on hover. You’ll be automatically redirected to the product edit page where you can select the stores that you want to associate;
Associate product to the store
  • import/export the stock through a CSV file by clicking on Import stock or Export stock.
Import and export stock

Export/Import procedure

To export and import the stock, click on the button and choose the action in the modal.

Export procedure

When selecting Export stock, the procedure will be automatically processed after clicking on the Continue button. A message will show to notify you about the completed export.

About the import, the procedure is different. After selecting Import stock and clicking on Continue, you will need to upload the CSV file, and define the CSV delimiter (e.g. a comma) and enclosure (e.g. a semicolon).

Import stock procedure

After clicking on Continue, you’ll need to set the Column mapping. To import the data correctly, it is important to associate the information to retrieve from the CSV file columns by selecting it from the field dropdown.

Column mapping

Now, you can click on Run the importer to complete the procedure.