View Product Page

Step 1: users rules

You can configure the plugin’s general settings from YITH > Catalog Mode > Settings.

In this tab you’ll have two different sections. We are going to dive into the Step 1, in which you can configure the user rules for your shop.

Let’s see the first one, Step 1: set your users rules with options that you can enable here.

Step 1: user rules
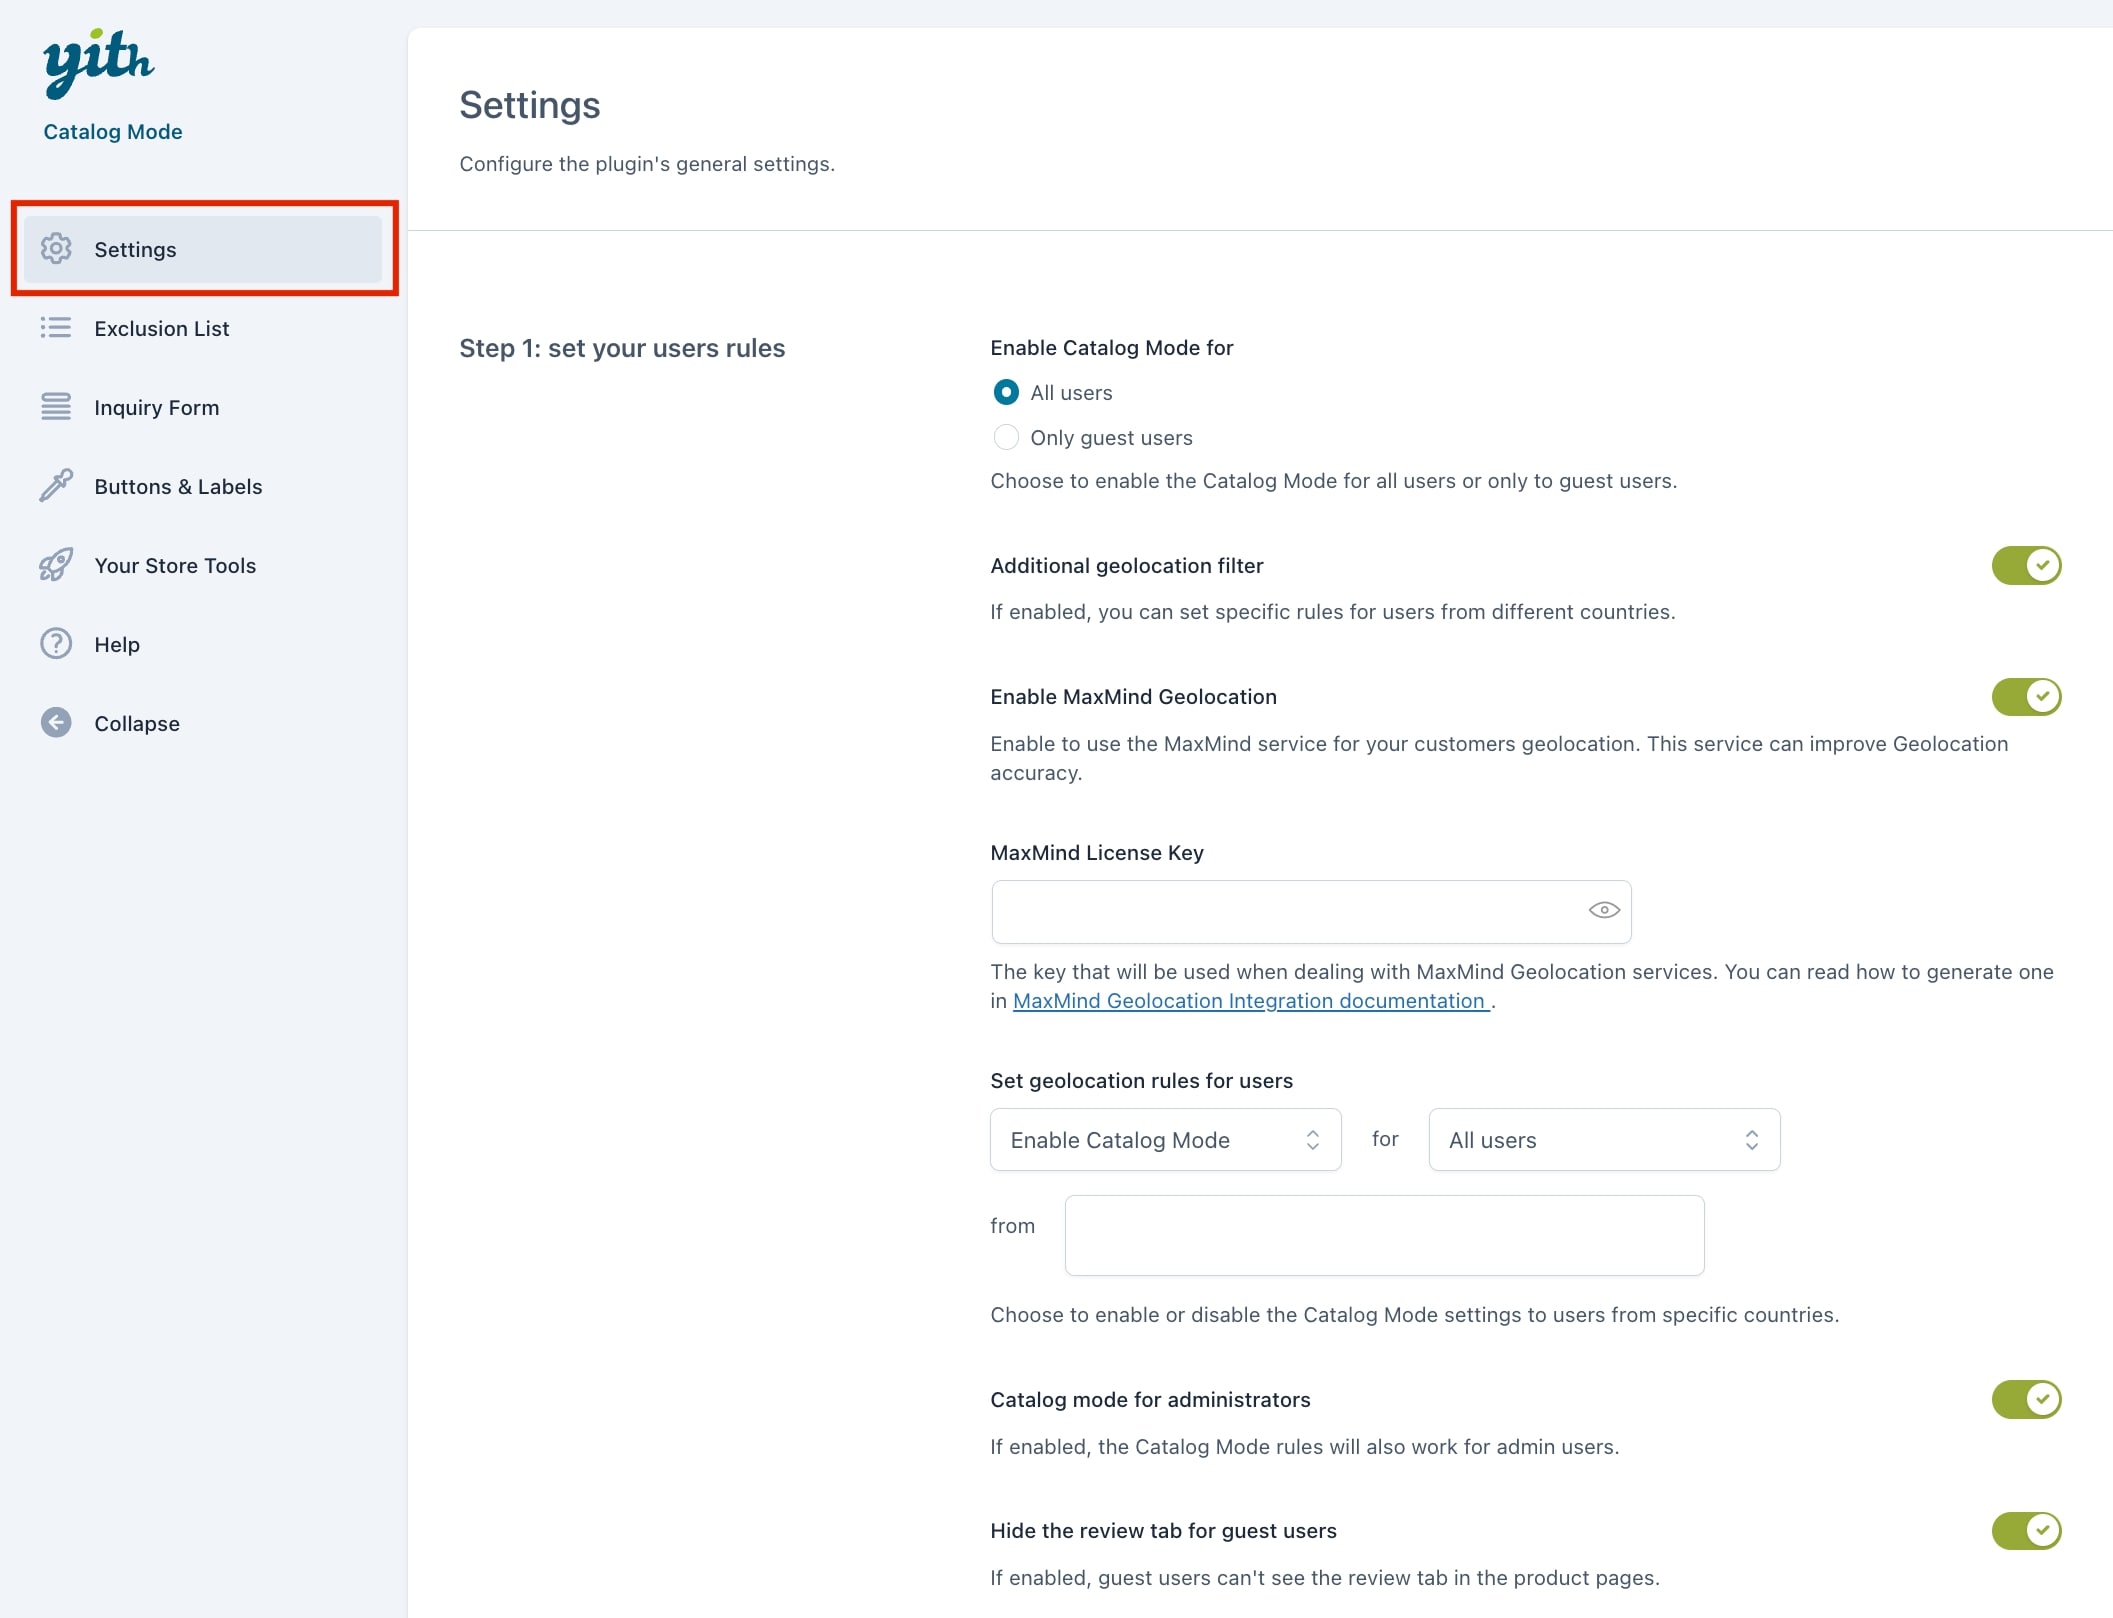
  • Enable Catalog Mode for: choose here whether enabling the catalog mode options for all users or just for guests.
  • Additional geolocation filter: enable this option if you want to apply the catalog mode options only to users from specific countries.
  • Enable MaxMind geolocation: enable this option if you want to use MaxMind service and make the geolocation more accurate.
    • MaxMind License Key: enter your MaxMind key.
  • Set geolocation rules for users: here you can choose whether to Enable or Disable the catalog mode for All users or guest users and select countries.
    For example, if you want to make the catalog mode option for everyone except for customers from Italy who can purchase products, choose Disable catalog mode for All users from Italy.
  • Catalog mode for administrators: enable this option if you want to include also the store administrators in the settings and prevent them also from purchasing products if the catalog mode is enabled for everyone.
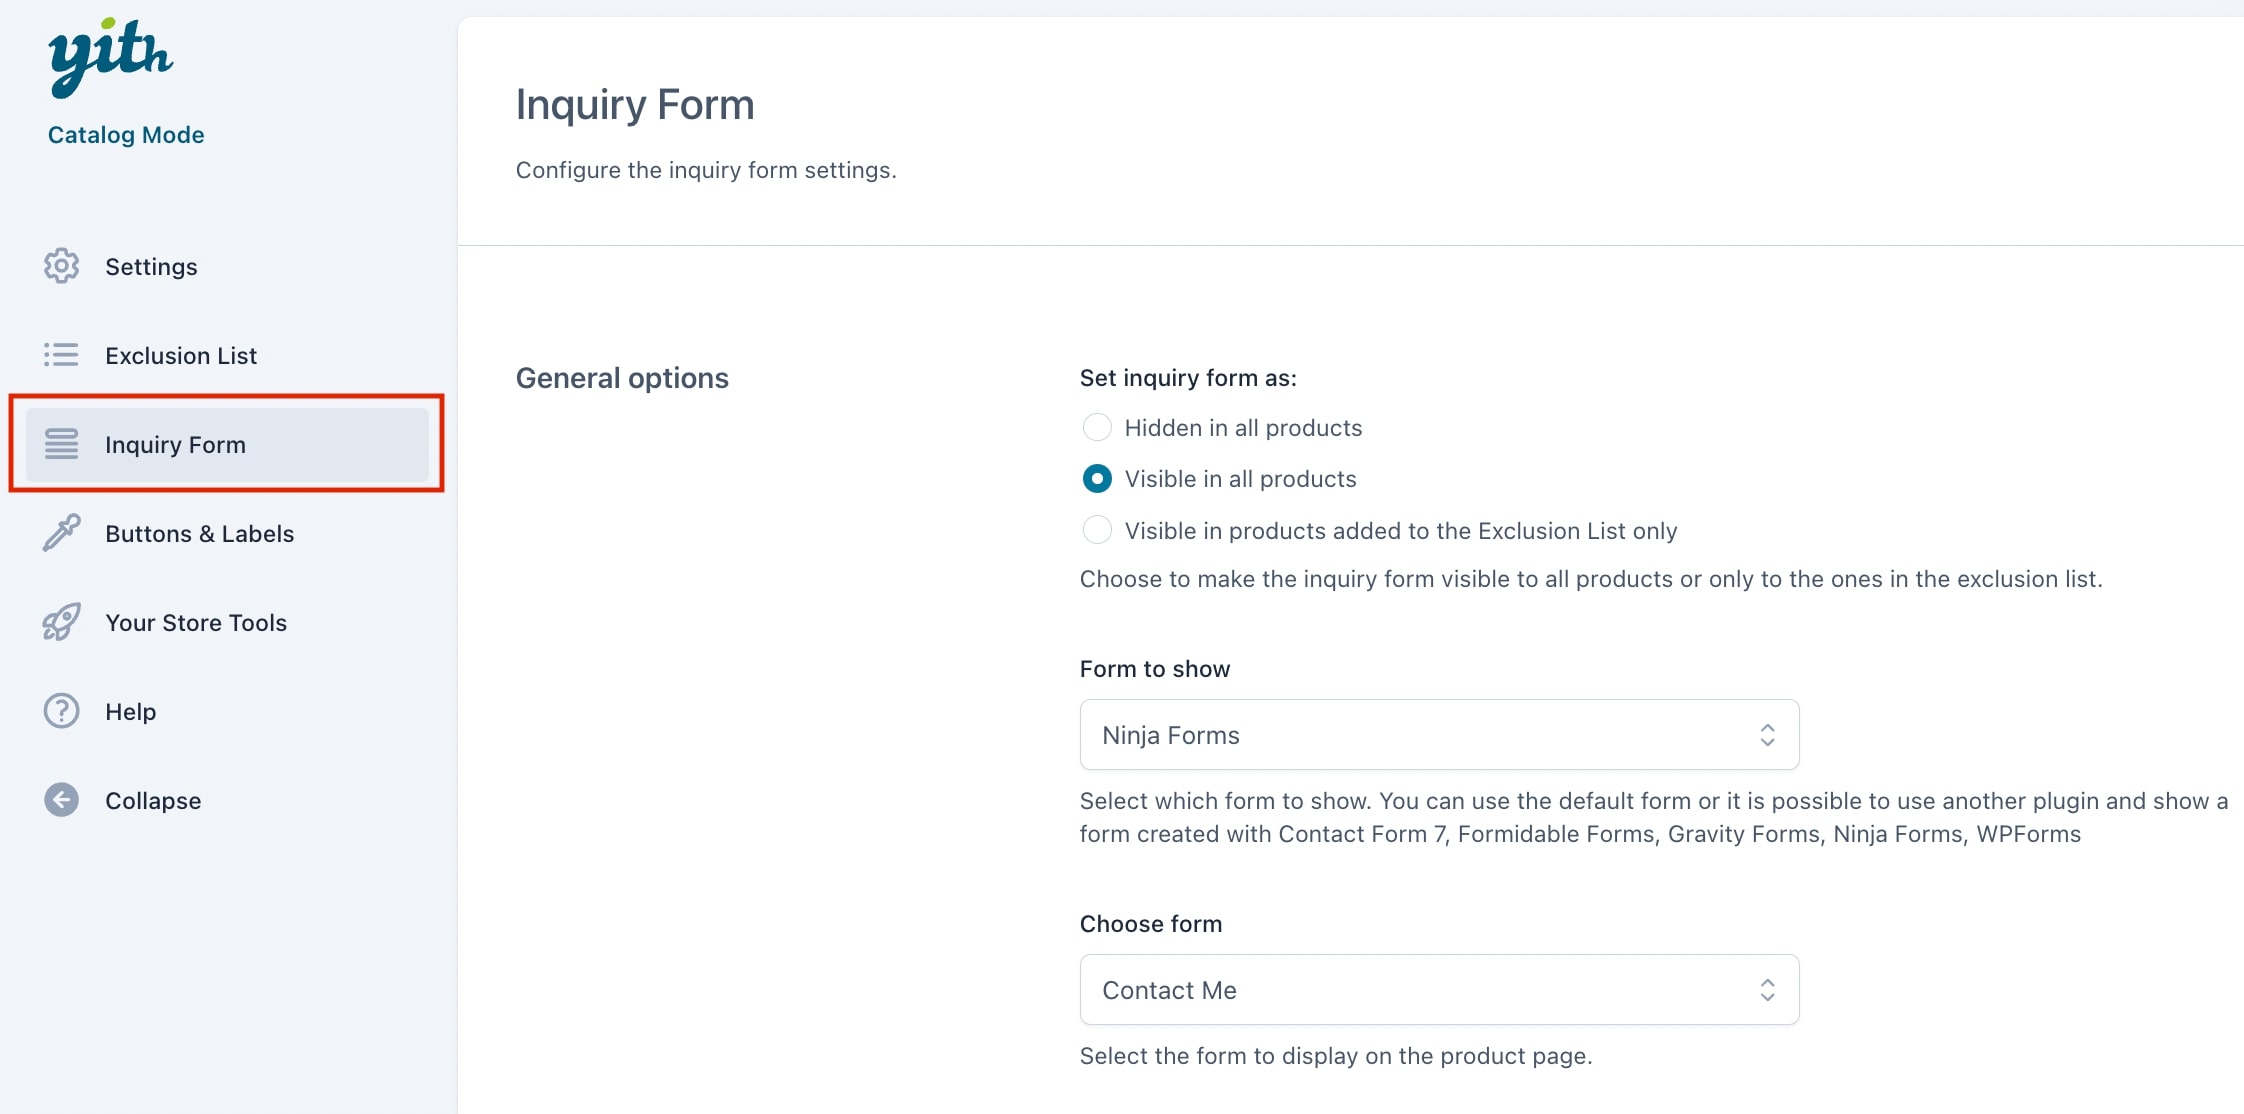
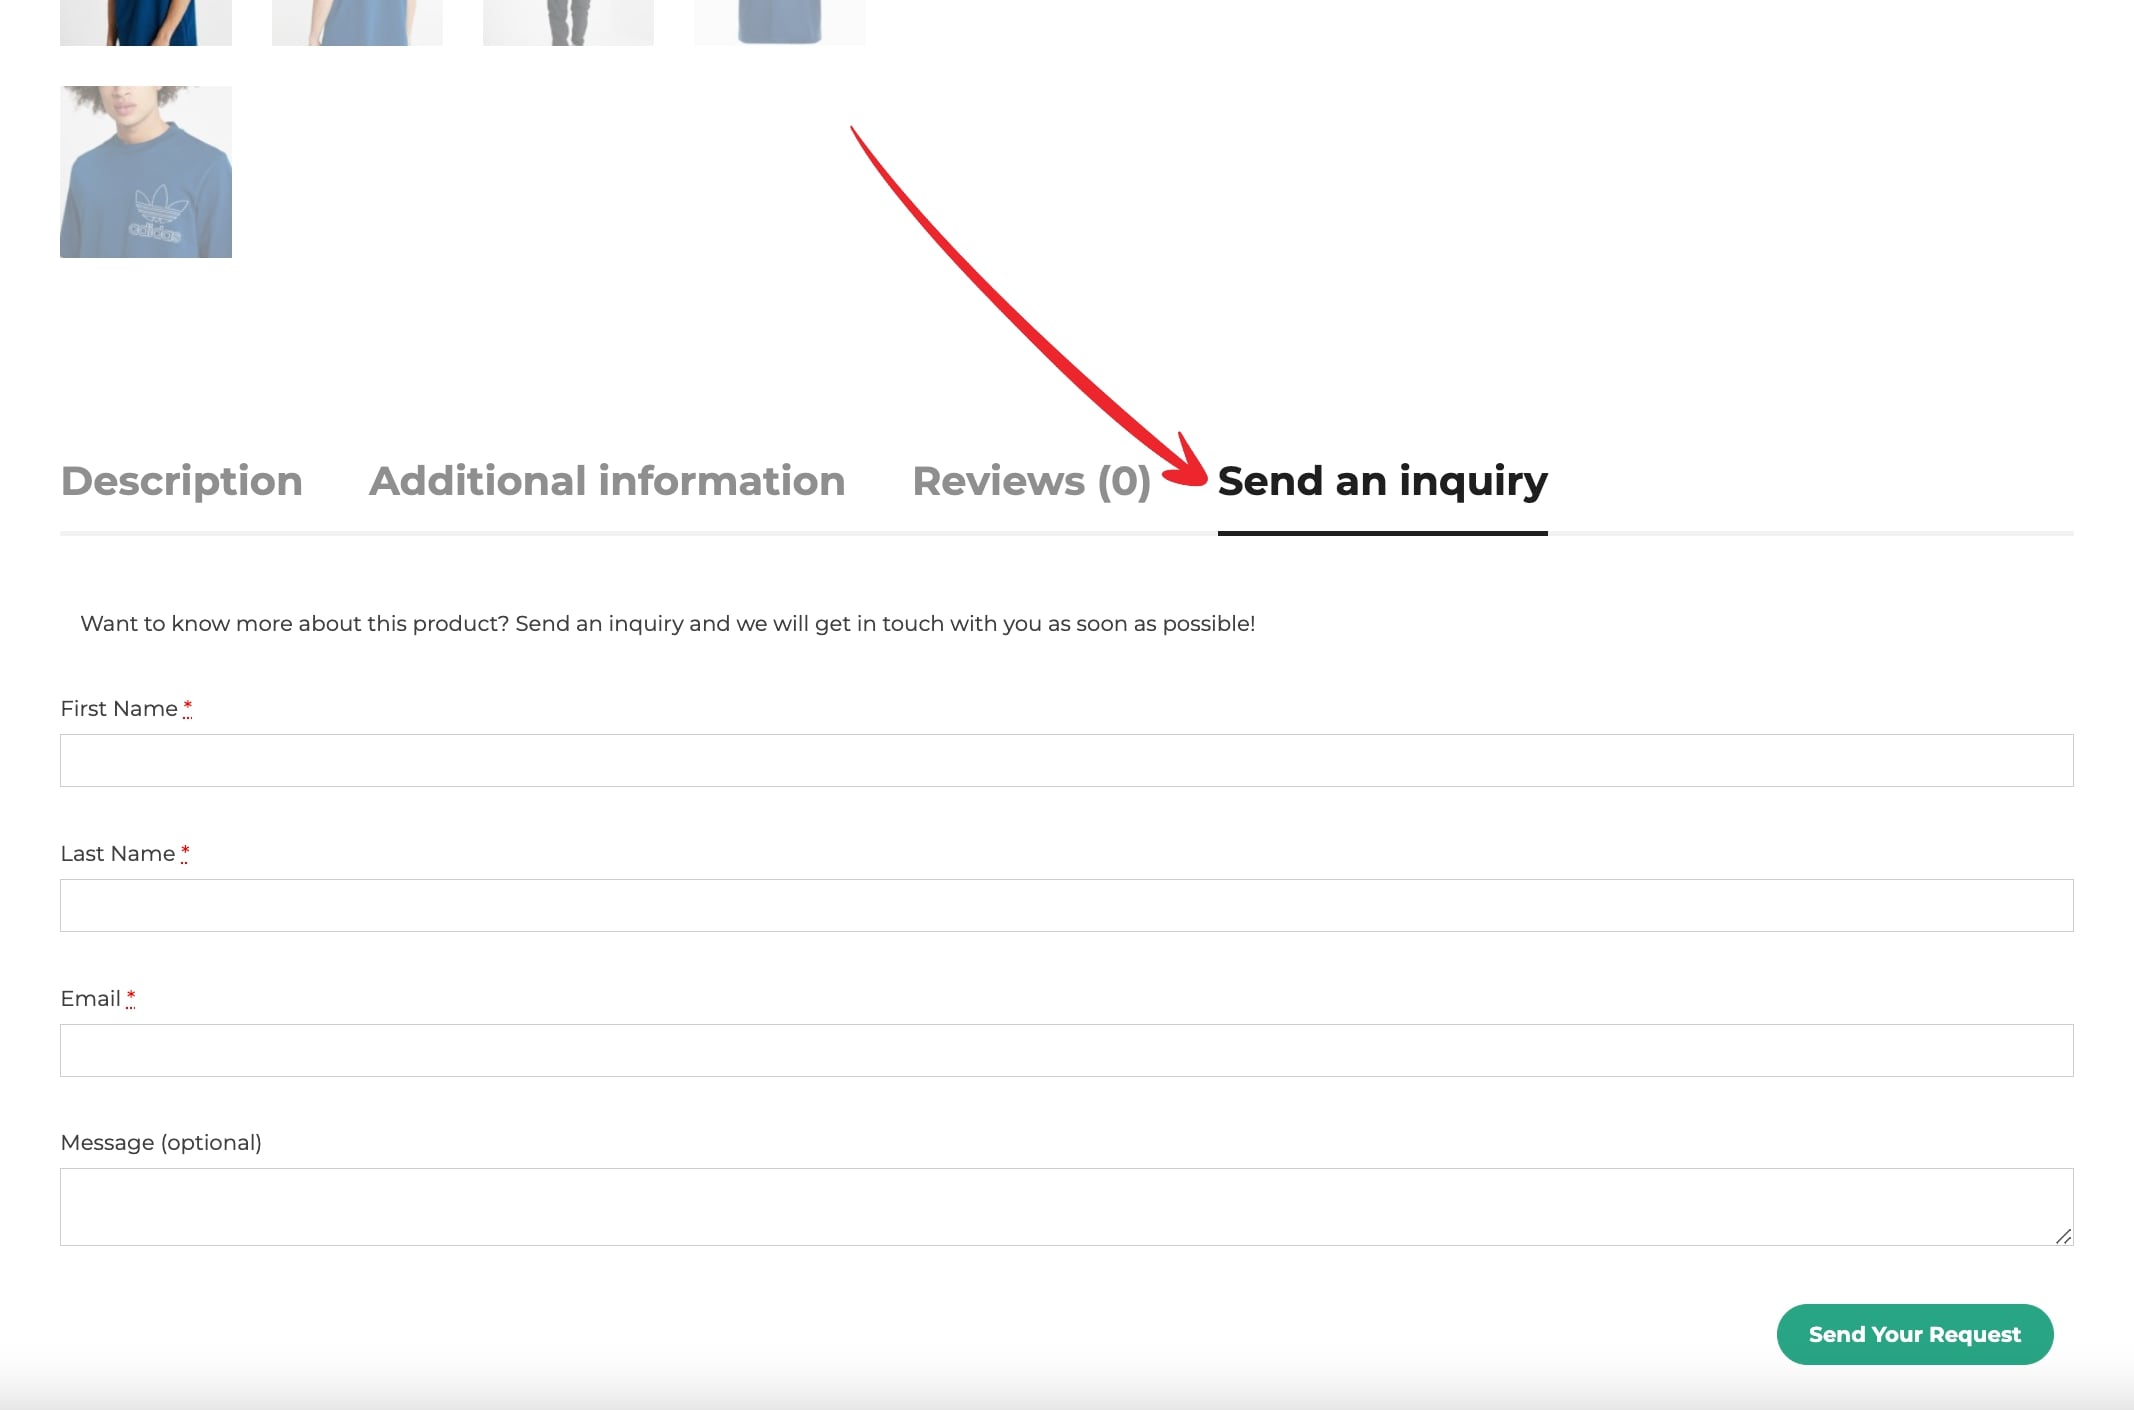
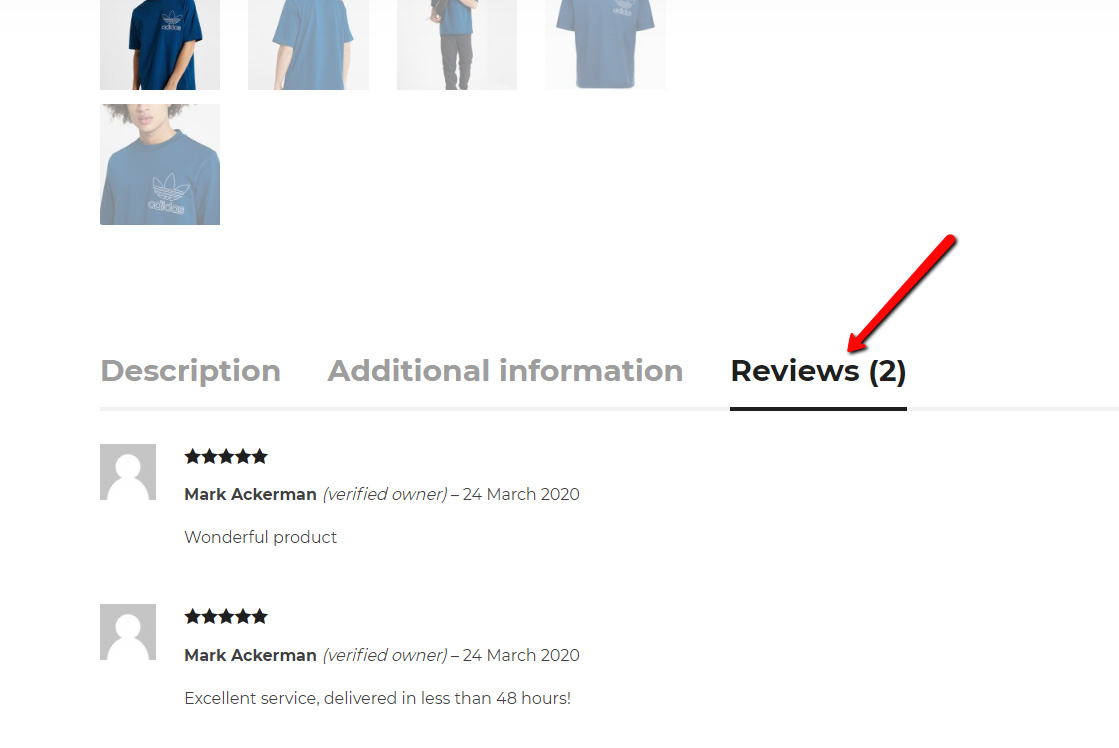
  • Hide the review tab for guest users: if enabled this option will let you hide the Reviews tab on the product page to guest users. So, only logged-in users will be able to read product reviews, whether they can purchase the product (as set to catalog mode) or not.
Hide review tab

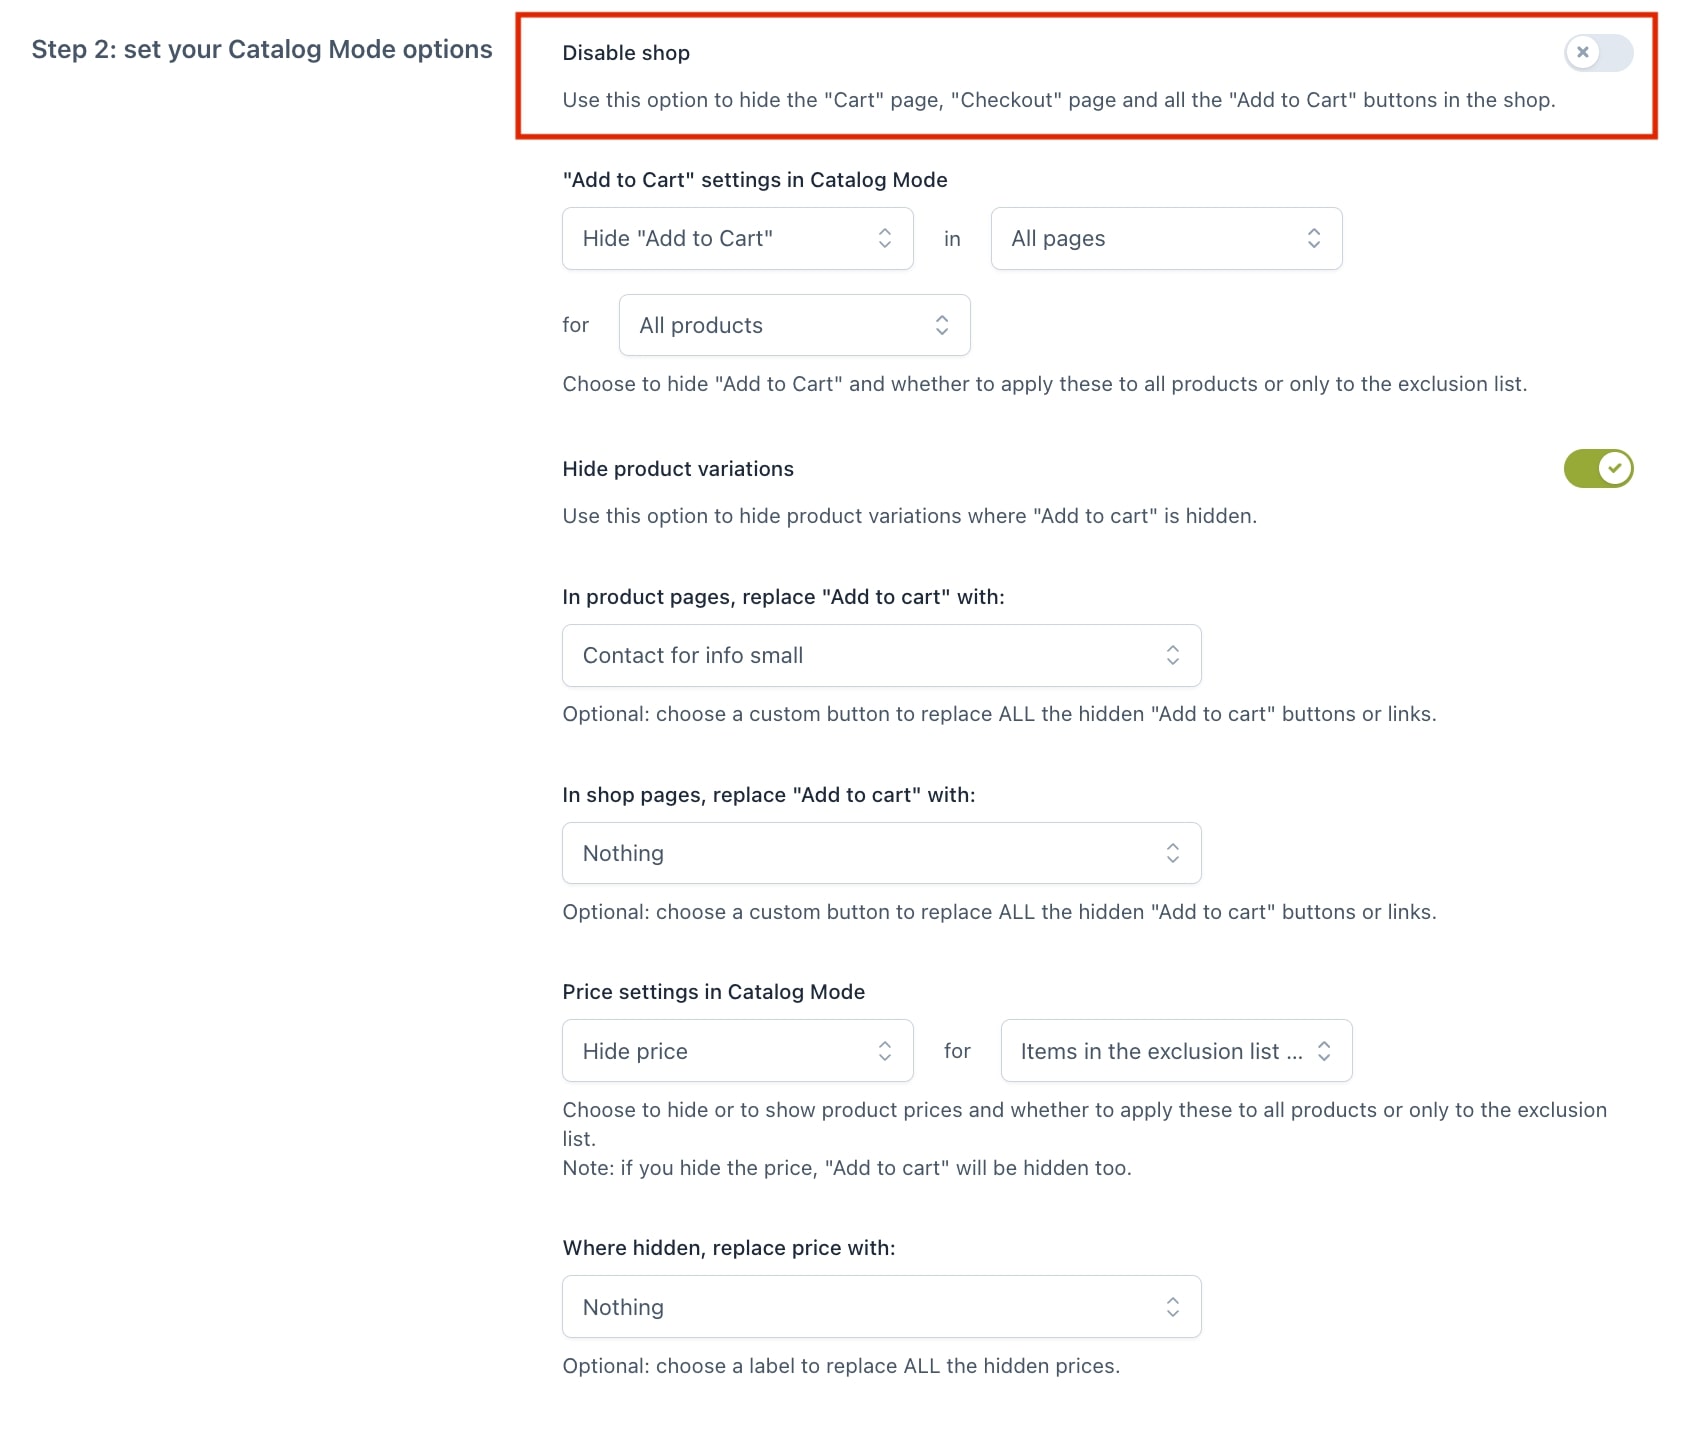
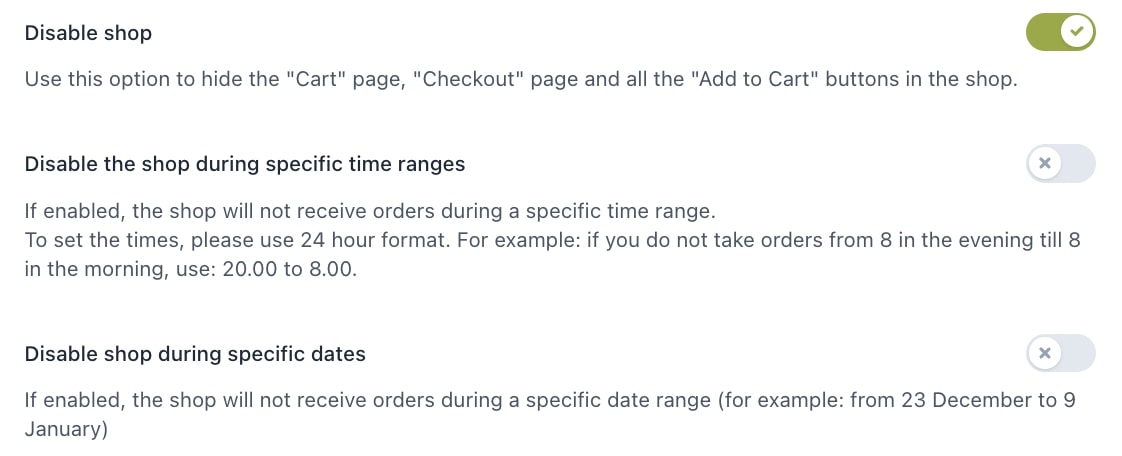
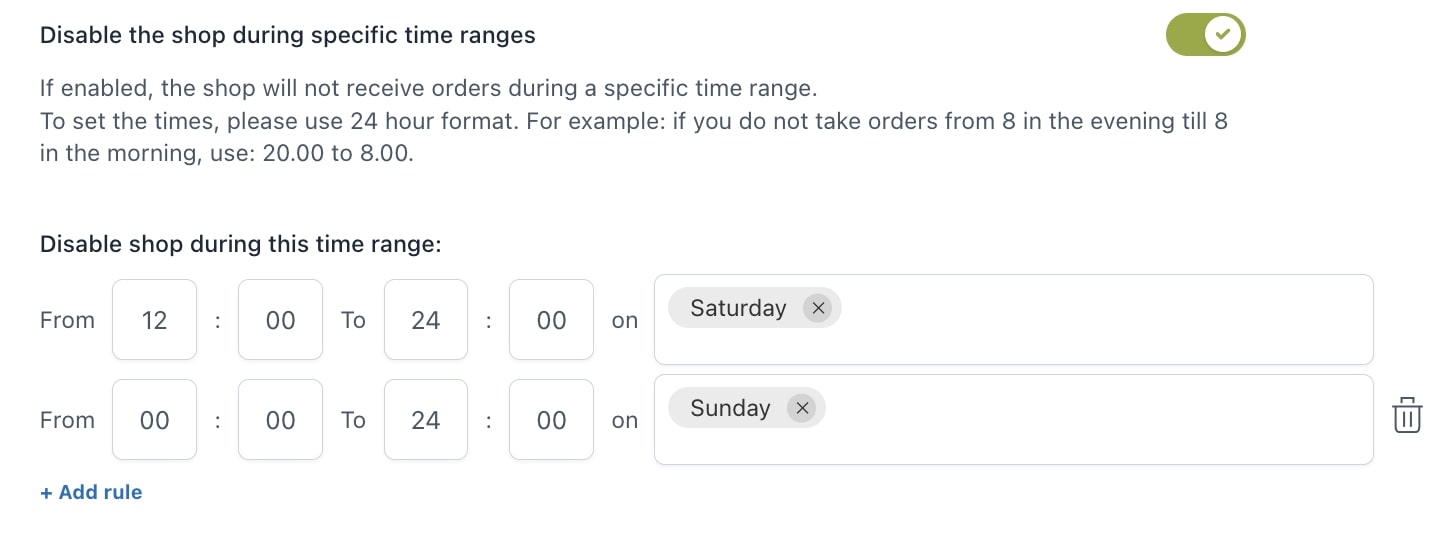
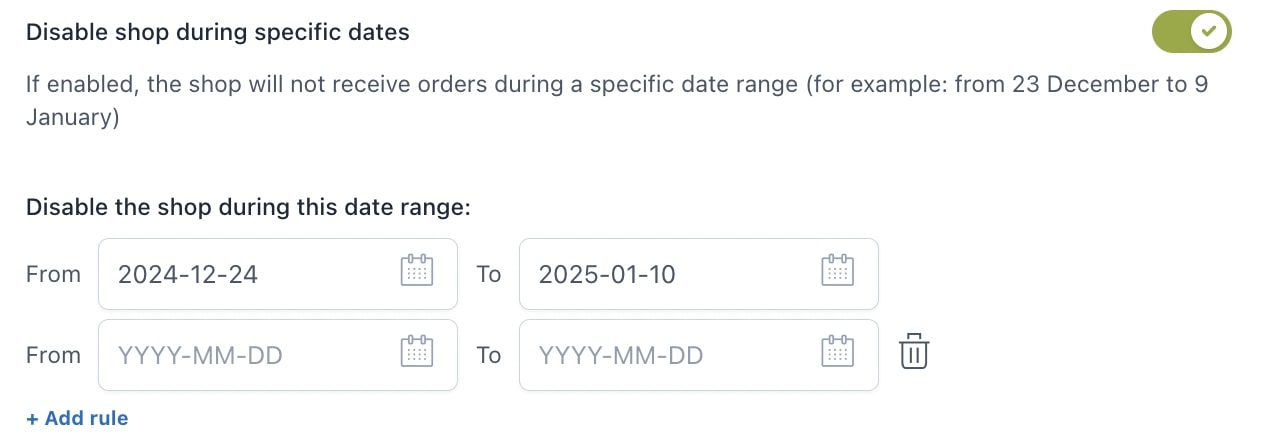
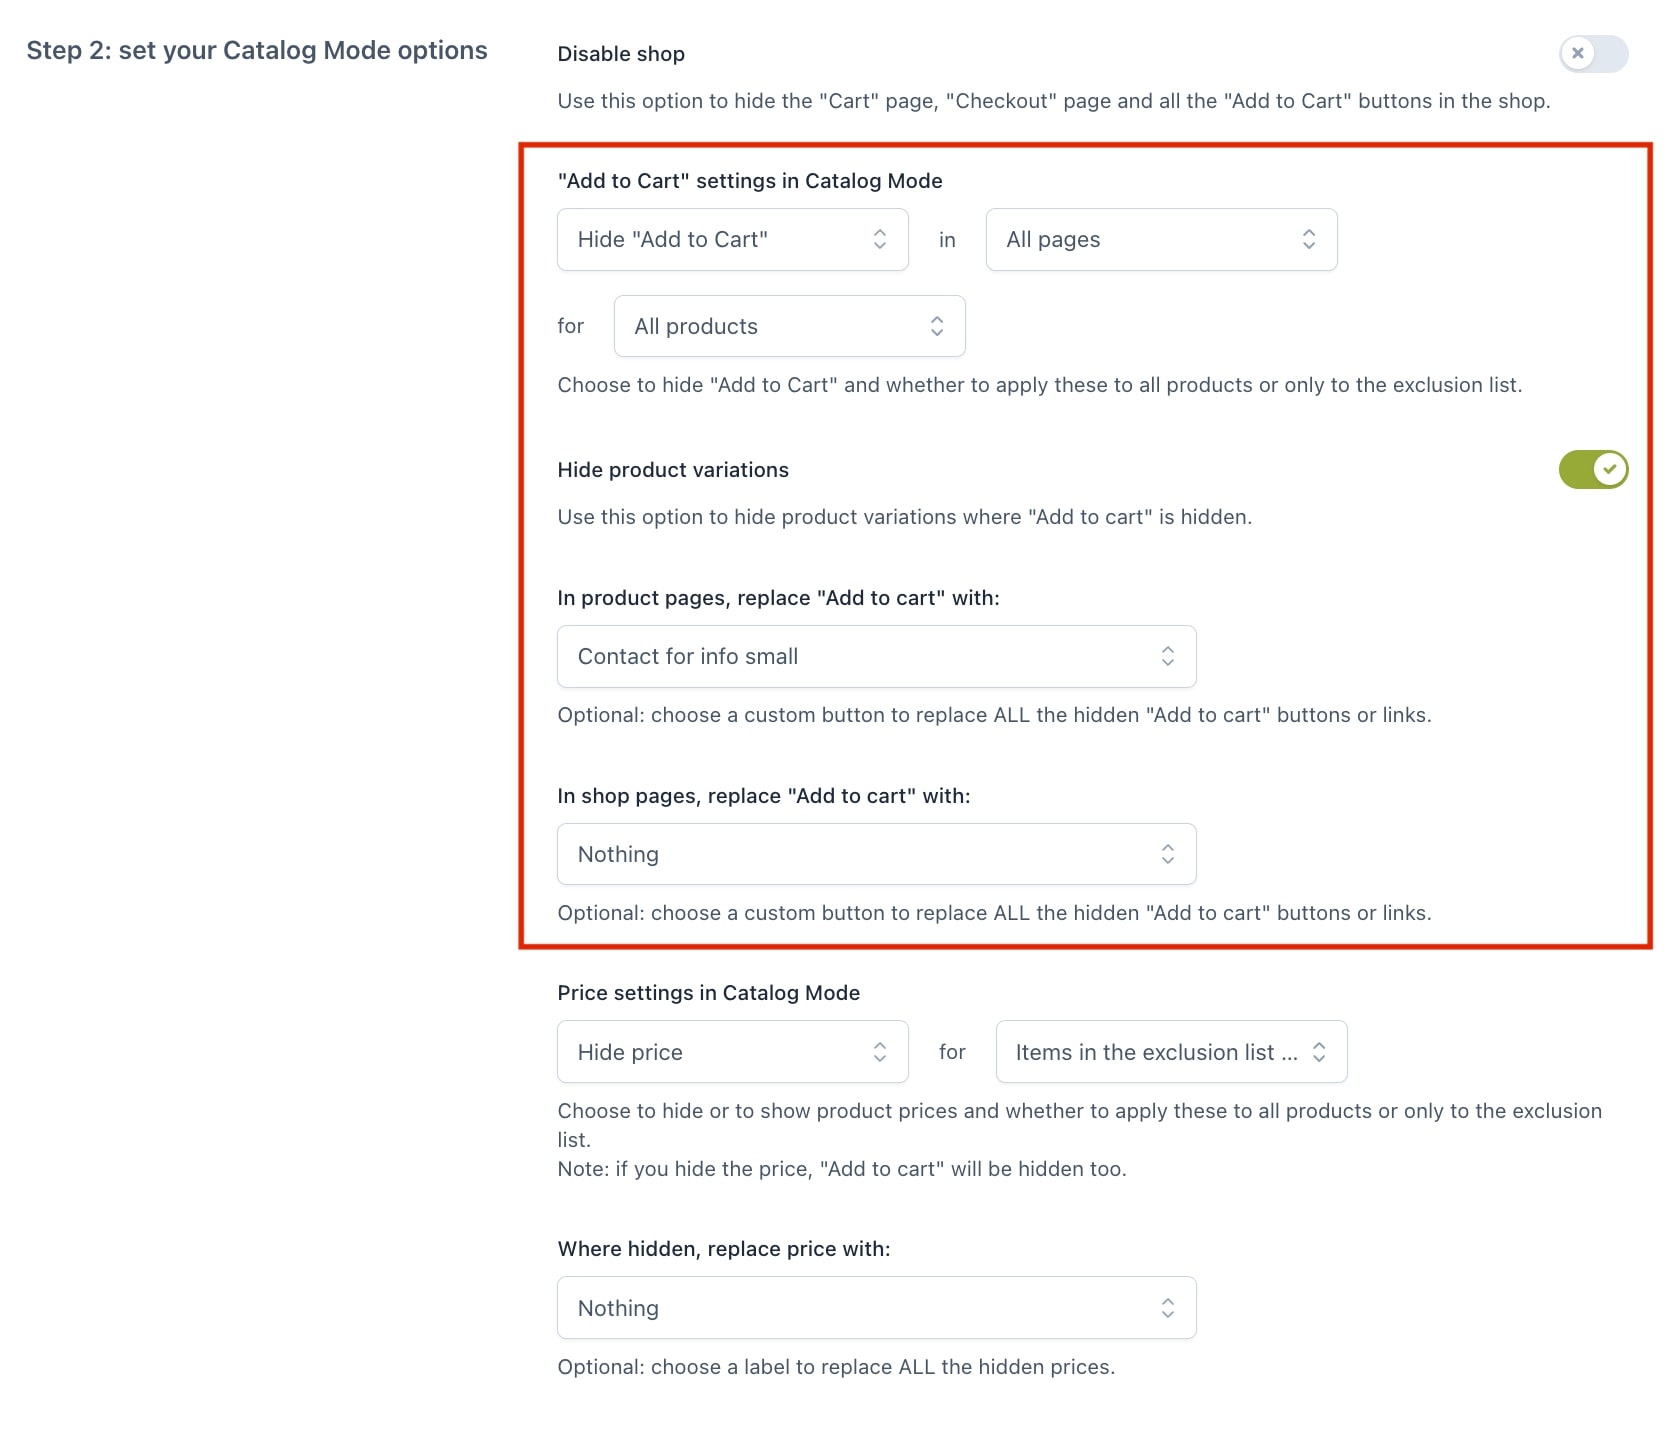
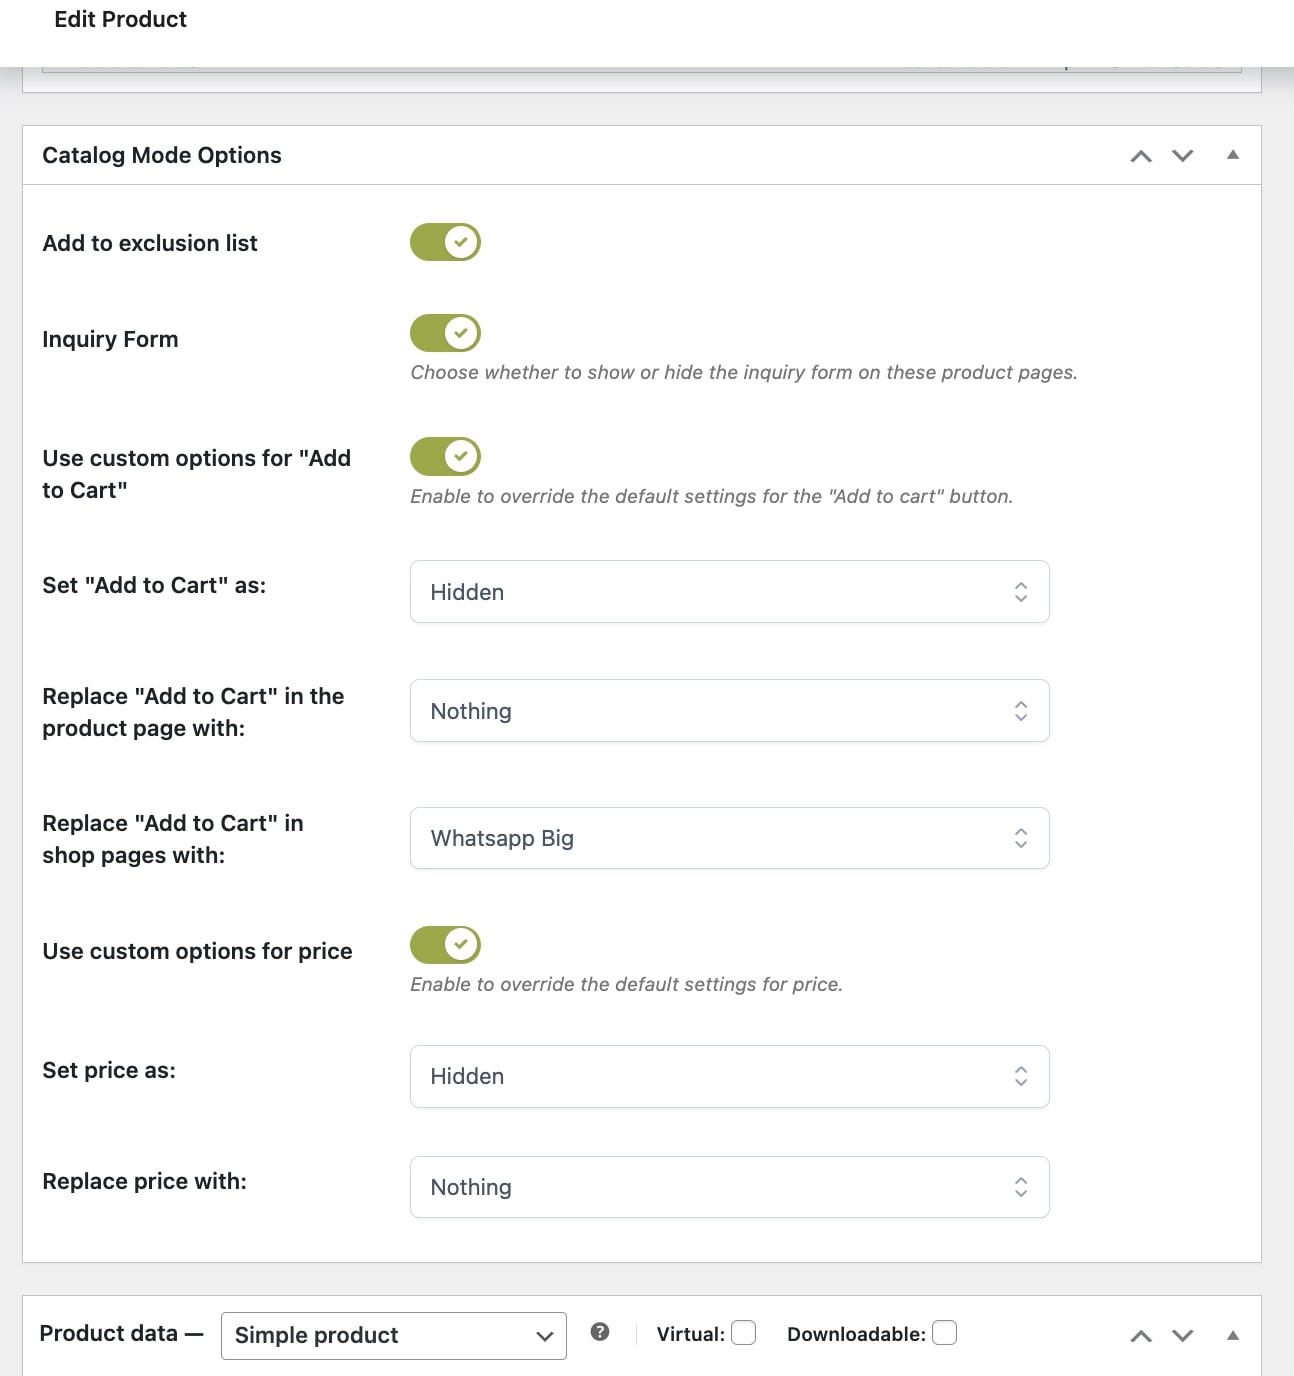
Now, we can go on with Step 2: catalog mode options

Step 2: catalog mode options

After setting up the users rules from the Settings tab in Step 1, we can now dive into Step 2 and configure the catalog mode options.

To facilitate the configuration, we have split it into 3 sections:

  1. Disable shop settings
  2. Cart settings
  3. Price settings

1. Disable shop settings

Disable shop option

If you want to hide “Cart” and “Checkout” pages and all the “Add to Cart” buttons in your shop, then you can enable the Disable shop option.

If you prefer keeping the price anyway and manage the visibility of the “Add to Cart” button separately, keep this option disabled.

When you enable the Disable shop option, you’ll also have the possibility to manage placing orders at specific times of some days and/or on specific dates. In this case, you will only need to enable the options Disable the shop during specific time ranges and/or Disable shop during specific dates.

Disable shop rules

These two options are independent, so you can freely use them according to your needs. Yet, when creating rules both for time ranges and dates, please consider the plugin checks the rules created for time range first, then rules created for dates.

Let’s go over these options with examples:

1.1. Disable the shop during specific time ranges

After enabling the option, you will be able to start creating your rules through the entry Disable shop during this time range.

Disable shop in specific time range

Here, you can specify unlimited time ranges for every day of the week. Click on Add rule for every new rule you want to configure. For example, in the settings above, we have created a rule to disable the shop from 12 to 24 on Saturday and one from 00 to 24 on Sunday. In this way, the shop will be disabled from Saturday at 12 to Sunday at 24.

Please note: if the start time is later than the end time (for example, from 8 pm to 8 am on Saturday), the rule will end on the next day, therefore, at 8 am on Sunday. Rules will apply based on the timezone set in your installation.

1.2. Disable shop during specific dates

After enabling the option, you will be able to start creating your rules through the entry Disable shop during this date range.

Disable shop in specific date range

Here, you can create unlimited date rules by specifying a start and end date for every rule added through the button Add rule. As per the example above, the shop has been disabled from December 24 to January 10.

2. Cart settings

Add to cart settings in catalog mode
  • “Add to Cart” settings in Catalog Mode: choose whether to hide or to show the “Add to Cart” button on all pages/Shop page/Product page and to apply these options to all products or only to selected products set up in the exclusion list (please, refer to this page for Exclusion list settings).

For example, if you Hide the Add to Cart only on the Shop page, your users will be able to purchase the products, but they have to visit the product page to see the Cart button.

Please, consider that if the below option for Price settings is set to hide price, the “Add to Cart” button will be hidden too, regardless of what you’ve set here.

  • Hide product variations: switch this to ON if you want to hide product variations in the product page, as shown in the example below:
Hide product variations example
  • In product pages, replace “Add to cart” with: here you can choose whether to simply hide the Add to cart button or replace it with one custom button of your choice on the product page. Please, refer to this page to see how to create your customized call-to-action button.
  • In shop pages, replace “Add to cart” with: same option as above, but it refers to the Shop page. So, you can have different call-to-action buttons on the Product and Shop page.

3. Price settings

Price settings in catalog mode
  • Price settings in Catalog Mode: choose to hide or to show product prices and whether to apply these to all products or only to the exclusion list. If you hide the price, the “Add to cart” button will be hidden as well (regardless of the Add to Cart behavior set above).
  • Where hidden, replace price with: choose whether to replace the price with one of the custom buttons you’ve set up or to not show anything

Exclusion list

In the Exclusion list tab, you’ll be able to configure what products, categories or tags you can add within a list to manage options for the catalog mode such as the “Add to cart” settings and the Price settings, if you have set them as Items in the Exclusion list only.

Items in exclusion list

To add a new rule to the list, click on the button “Add exclusion“:

Exclusion list

Then, start creating the first rule for products, categories, or tags.

Exclusion list rule
  • Item type: first of all, you can choose here if the rule applies to one or more ProductsCategories, or Tags.
  • Select products/categories/tags: add here one or more products, categories, or tags, based on what you’ve selected in the previous option.
  • Inquiry form: enable if you want to show the inquiry form on the product pages.
  • Use custom options for “Add to Cart”: if you enable this option you will be able to override the options for the Add to Cart button below:
    • Set “Add to Cart” as: visible or invisible. If you choose to hide this button, you can replace it with a custom button in the below options:
      • Replace “Add to Cart” in product page with
      • Replace “Add to Cart” in shop page with
  • Use custom options for price: enable this option to override the global settings.
    • Set price as: choose whether to show or hide the price. If hidden, you’ll be able to replace it with a custom button in the option below:
      • Replace price with: choose one of your custom buttons. Read more about how to set a new one here.

You can create as many exclusion rules as you wish, for Products, Categories, and Tags. They will be listed here and you will be able to see a quick summary of the rule and how the behavior of Add to Cart button and Price have been overridden.

You can filter within the list by either all types, product, category or tags rules and you can also enable or disable the Inquiry form in the product page for the items in the rule through the toggle button:

Exclusion list overview

You can also enable/disable the Inquiry form directly from the product, category or tag page, as explained here. Both options will override what you have configured in Inquiry Form > General options > Set inquiry form as… You can refer to this page to check the settings.

Override catalog mode options

If you need to override the general catalog mode settings and the Exclusion list settings, you can also do this from a product, category or tag level.

Go to the product edit page (or to the category or tag edit page) and you will find the following option.

Catalog mode options in product editing page

These options are the same as you can find in the General catalog mode options of the plugin and in the Exclusion list.

You will find these options reflected in the “Exclusion list” summary table.

Exclusion list summary table

Settings

In YITH Catalog Mode > Inquiry Form you will be able to configure the inquiry form settings:

General options

In the General options, you can manage the visibility of the inquiry forms in products and select form you want to use:

Inquiry form general options
  • Set inquiry form as: this allows you to choose on which products showing the custom inquiry form
    • hidden in all products
    • visible in all products
    • visible in items added to the Exclusion list

This option is overridden by the visibility option in the Exclusion list (please, refer to this page) and in the Product/Category/Tag level (please, refer to this page).

  • Form to show: choose here the plugin through which you’ve created the form.
  • Choose form: select here the form you want to use, you can pick one of those that you’ve previously created.

You can read more information about the supported forms in this page.

Form options

In the Form options, you can customize the position of the form in product pages:

Show form in WooCommerce Tabs or in the Short description area of the product
  • Show form in: here, you will be able to choose where the inquiry form appears on the product page. You can pick between an additional WooCommerce Tab or the product Short description area.

1. WooCommerce tab

If you choose WooCommerce tab, a new tab will be added on your product page and you’ll be able to customize its title, the text before the form and whether to include a permalink to the product page in the email that you’ll receive or not.

WooCommerce tab position

This is how the inquiry form looks in the WooCommerce tab:

WooCommerce tab inquiry

2. Short description

As a second option, you can embed the form in the product page short description area.

Form in product short description area

If you choose this option, you can choose:

  • form position:
    • after price
    • after short description
    • after “Add to Cart” button 
  • Form style:
    • Classic: this will print the form with a shortcode
    • Hidden in toggle: this will add a toggle button and only when the customer clicks on it, the form will appear.

The following customizable options are available for the toggle:

  • Toggle button text
  • Toggle button text colors
  • Toggle button colors
Toggle button customization option

You will be able to set also a text before the form 

Edit the text to show before the form

and whether to include a permalink to the product page in the email that you’ll receive or not.

Product permalink option

Supported forms

From the Inquiry Forms tab > Form to show, you will be able to set up the inquiry form.

Inquiry form tab

The plugin includes a default form, but supports also some third-party external plugins. Here’s the full list and specific settings, if necessary.

Default form

If you want to show the default form on your products and allow users to send you an inquiry, go to the General options section in the Inquiry Form tab and select Default form in Form to show.

Select default form

In the next section, Default form fields, you will be able to manage all the fields shown in the form. The fields available are first namelast nameemailmessageacceptance.

Default form fields

This is how it would look like in the frontend:

Inquiry form example in the frontend

You can activate/deactivate the fields through the related button and edit the available options: Name, Type (Text, Email, Textarea, Acceptance), Class, Label, Label Class, Placeholder, Position (First, Last, Wide), Required (YES/NO).

Note: It is not possible to add new fields to the form. You can only edit and manage the existing fields.

If you want to use the reCAPTCHA in the default form, you must enable the option Add a reCAPTCHA to the default form then insert the site key and secret key in the respective fields.

This is how the form would look like in the frontend with the reCAPTCHA enabled:

ReCaptcha option in the inquiry form

Ninja Forms

From Ninja Forms > Settings, enable “Developer mode”:

Ninja form builder in "Dev mode"

Then, when you create a new form, add a hidden field with the following details:

Ninja hidden field

Add the following placeholder {ywctm-product-id} in the email that you want to create. This will show the link to the product page.

In YITH Catalog Mode > Inquiry Form > General options you will be able to add the form you have created.

Select Ninja form

Formidable Forms

Create the form based on your needs from Formidable forms settings.

From Build section, make sure you add an extra hidden field with the following ywctm-product-id in Advanced > Field key as shown below:

Formidable hidden field

In section Settings > Action & Notifications, in the email body, make sure you include the shortcode [default-message] to add all fields automatically. Alternatively, you can add them one by one using the field-related shortcode created:

Formidable field shortcode

In YITH Catalog Mode > Inquiry form > General options you will be able to add the form you have created.

Select formidable form

If you want to manage the position, text and color options of the form in the Product page, please, refer to the Form options here.

Buttons & Labels

From YITH > Catalog Mode > Buttons & Labels tab you will be able to create many different custom buttons with your own style, so you can use the right one for your products.

Buttons & labels tab

You can have one custom button that replaces the following:

  • Cart button on the Shop page
  • Cart button on product page
  • Price on the Shop page
  • Price on product page

Let’s see how to create custom buttons. First of all, click on the button Create a new button or label.

Create new button or label

There are three sections: Content, Style, and Options and a preview box on the right.

Content

In this section you can customize the text and icon for the button/label.

Button content tab
  • Label text: here you can find a textual editor to add the custom text of your button, with custom formatting. Please, consider that if you select Theme Default from the font dropdown, the button will inherit the font of the theme, but the preview might not be perfect. If you want to, you can also include a file from your Media gallery.
  • Icon: pick a custom icon from the list or upload a custom one. You’ll be able to customize its size in px, alignment, and colors.
Button or label icon customization settings

Style

In this section, you will be able to customize the default and hover colors and style of the button (text, borders, width, margin, padding):

Button or label style
Border and space style settings

In the product page, the button would look like this:

Contact for info button example

Options

In this section, you can configure the link and animation of the button/label.

Button or label options
  • Link to: choose one of the following:
    • Unlinked text label: this lets you simply print a static text without any link.
    • Product page: this will make the button dynamically direct your users to the page of the product where the button appears.
    • Custom URL: enter here a custom URL of your choice.
    • Hover animation: here you can choose the hover animation from Float, Grow, Button, Move Hover Color, Press, Push, Shake, Slide Top, Slide Left.

Once you have create a new button or label, you can apply specific actions directly from the Buttons & Labels list:

  • Edit
  • Duplicate
  • Delete
Buttons & labels actions

Blocks

The plugin includes two Gutenberg blocks to ensure plenty of flexibility when printing the custom button or the inquiry form.

YITH Catalog Mode Button

This block can only be used in product pages and it will print the button you have selected for that specific product, either in the Exclusion list (as explained in this page) or from a Product/Category/Tag level (you can refer to this page for more information).

Catalog mode button block

YITH Catalog Mode Inquiry Form

This block prints the form that you have configured in YITH Catalog Mode > Inquiry Form > General options.

You can add it in any product page so it shows exactly where you want it to be. It does not work in other pages though.

Gutenberg blocks