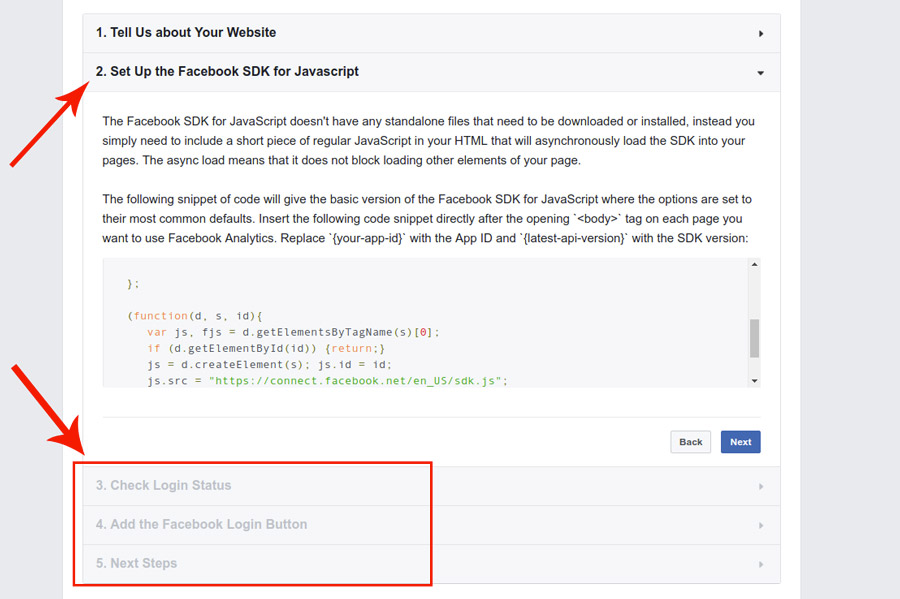
If you want to show the social login buttons on other pages of your site, you can use the shortcode [yith_wc_social_login] or add the widget YITH WooCommerce Social Login.

If you want to show the social login buttons on other pages of your site, you can use the shortcode [yith_wc_social_login] or add the widget YITH WooCommerce Social Login.
You can choose the page where users will be redirected after they log in. The option is available in the tab Settings > General settings of the plugin panel.
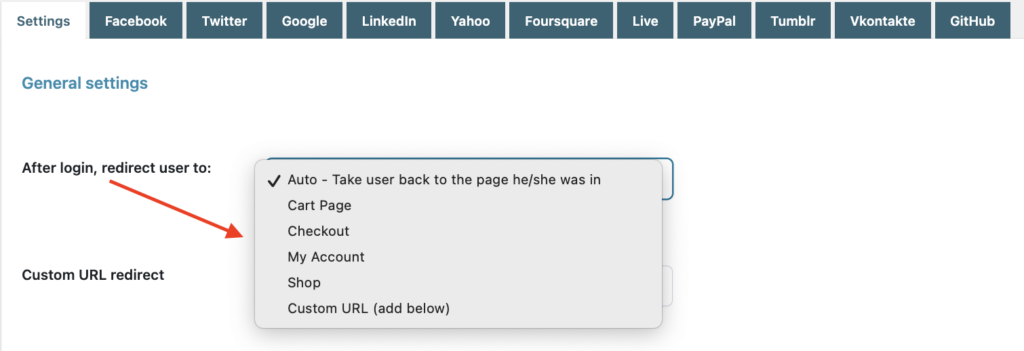
This is where you will find the option After login, redirect users to which allows you to choose from:

Now, let’s configure the other options:

Please note: PayPal login has been deprecated and is no longer possible to enable it. It is currently available for backward compatibility purposes only.

In this section, you can choose where to show the social login buttons from:


Finally, in the section My Account options, you can decide whether and where to show the social connection list:
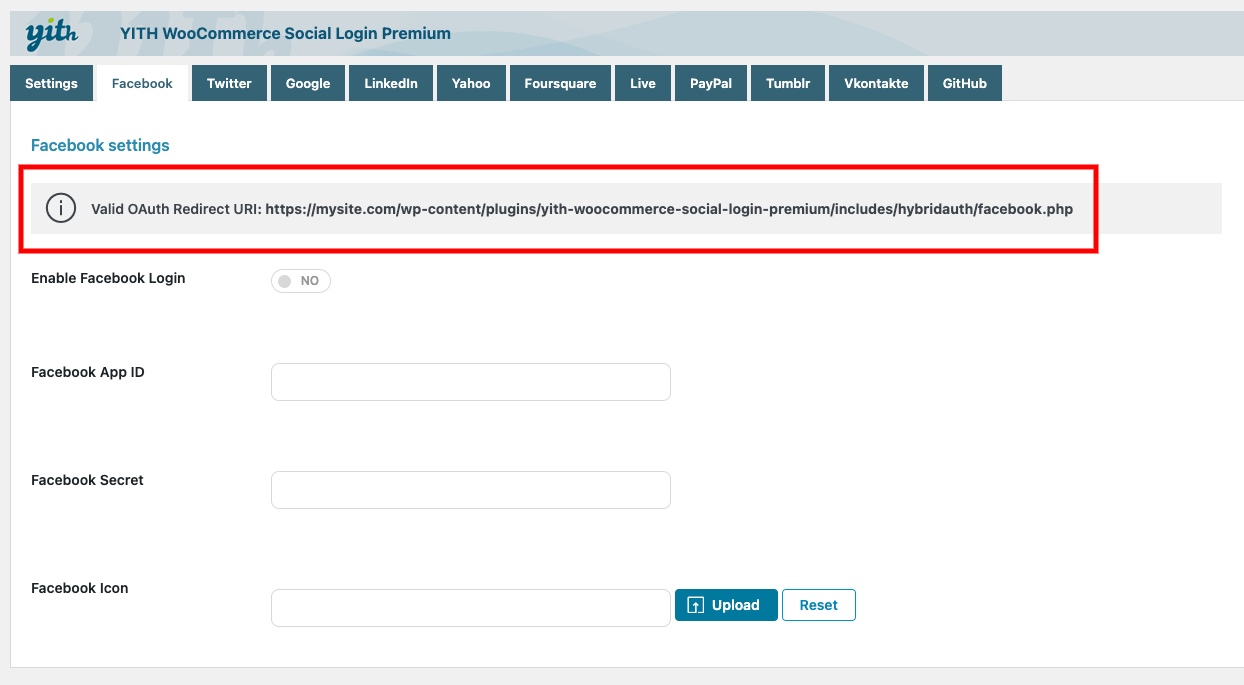
To display the button you must absolutely enable it using the option Enable Facebook Login.
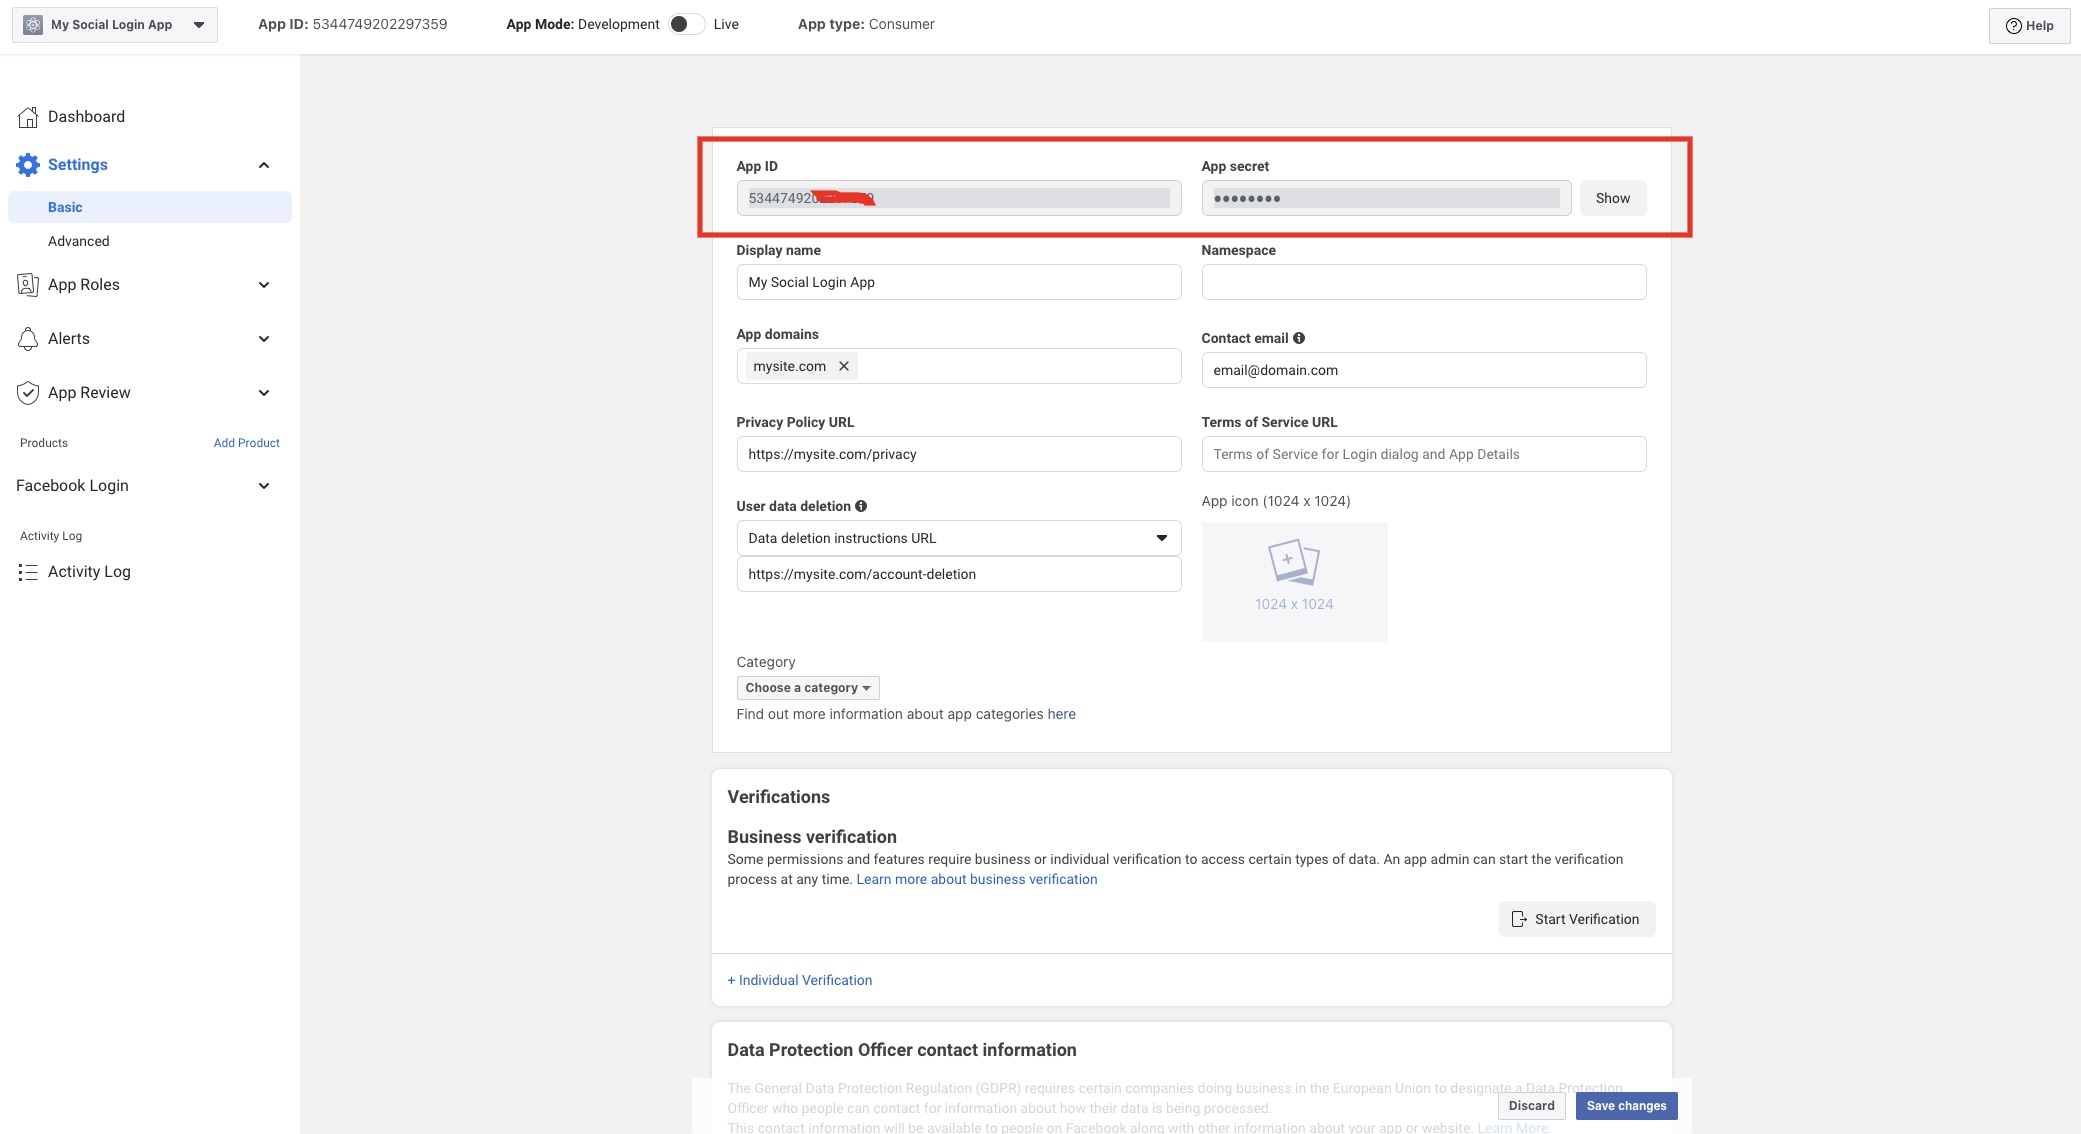
Now, you are asked to enter Facebook App ID and Facebook Secret to allow your users to log in via Facebook.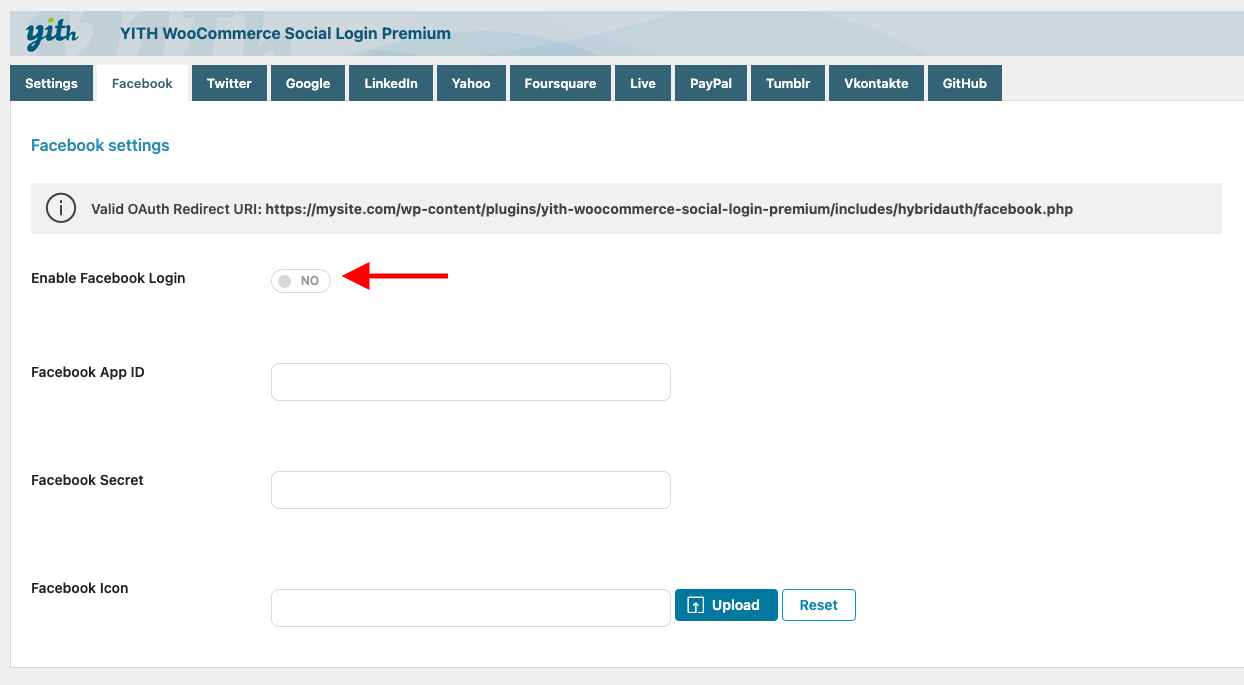
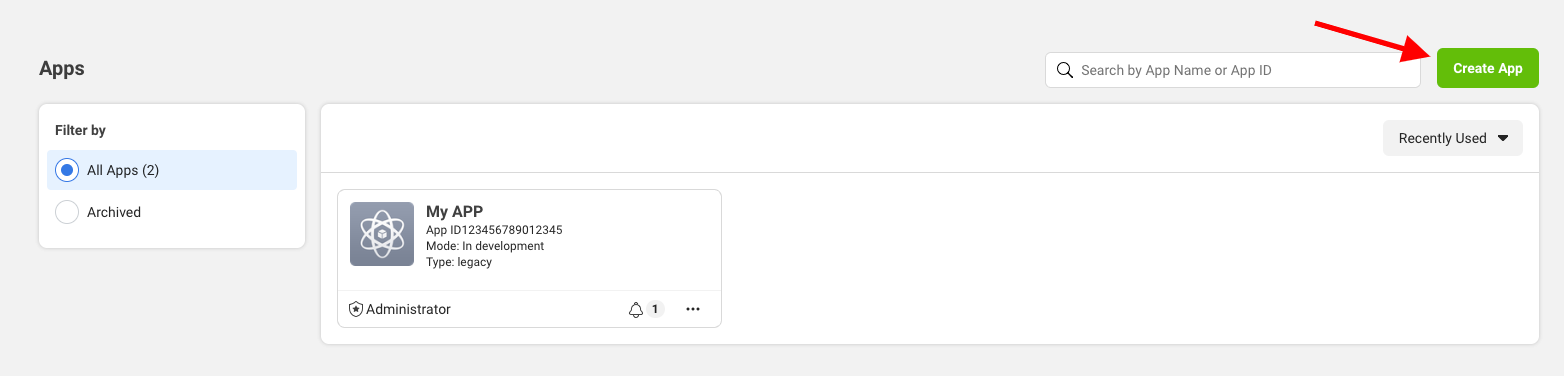
To recover this information, you have to create a new application on the page https://developers.facebook.com/apps.
Create a new application by clicking on Create App.
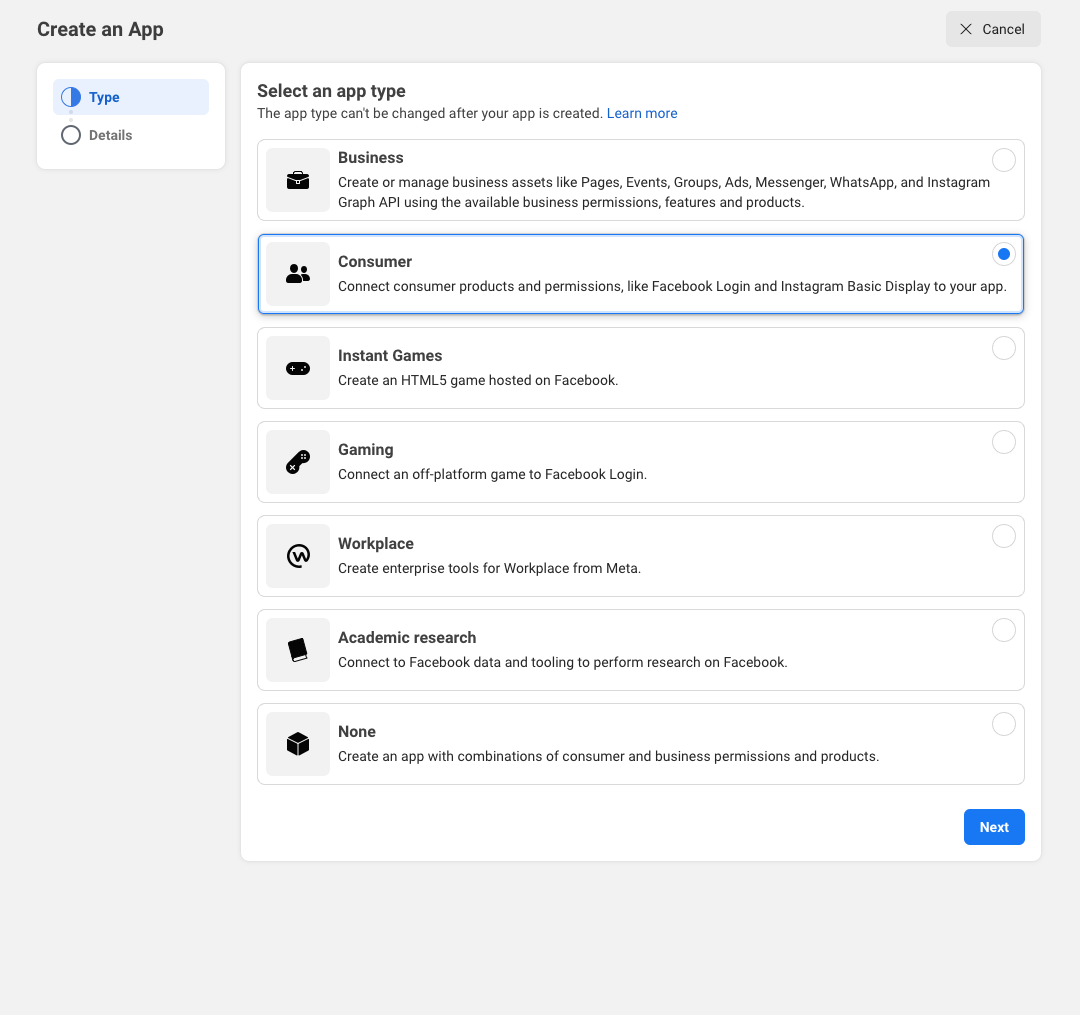
Choose Consumer as app type.
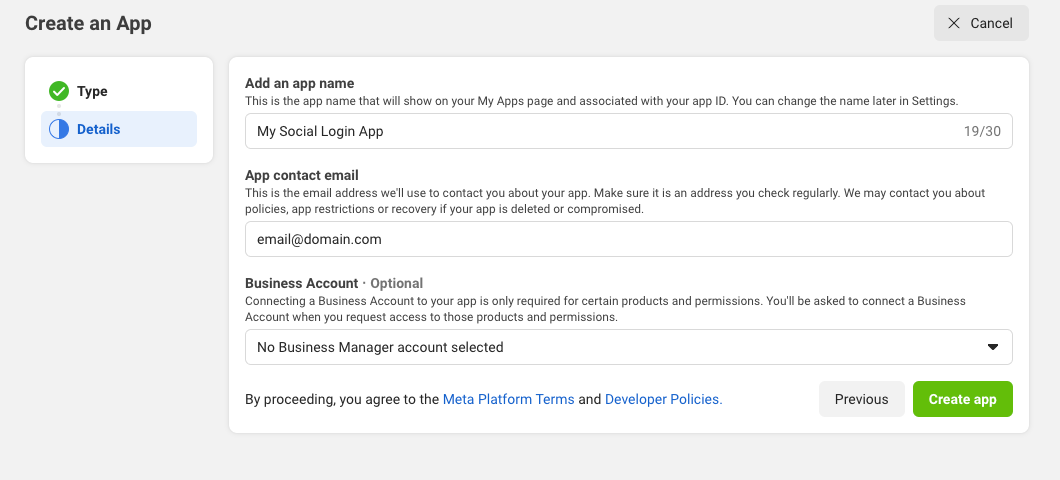
Now, you’ll see a screen like the following. Set the app name and contact email to associate to the app.
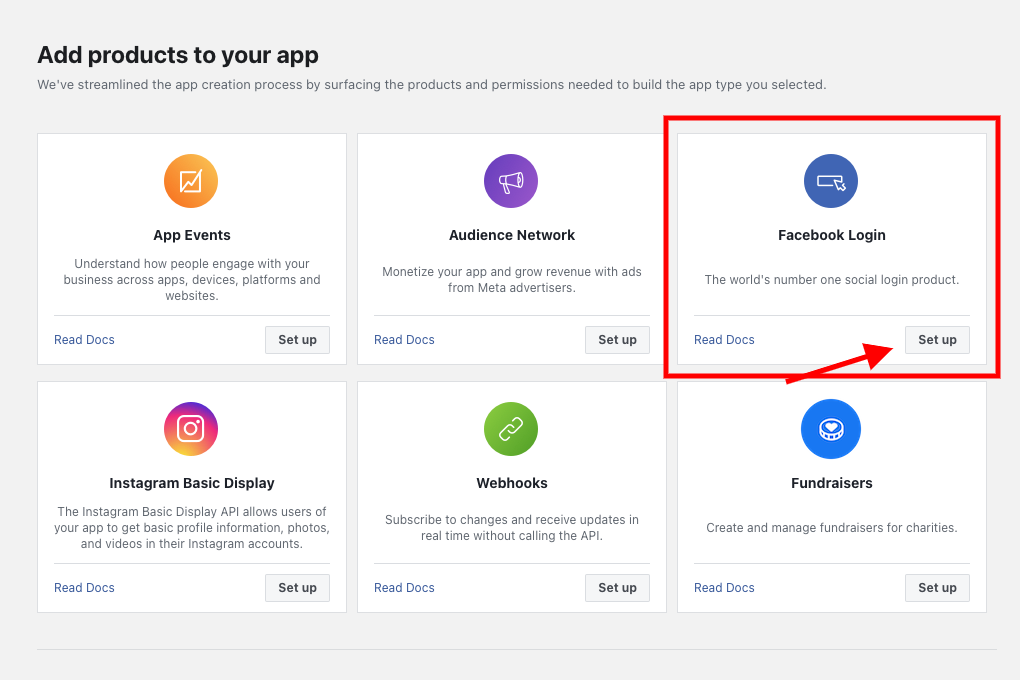
Select Set Up in Facebook Login.
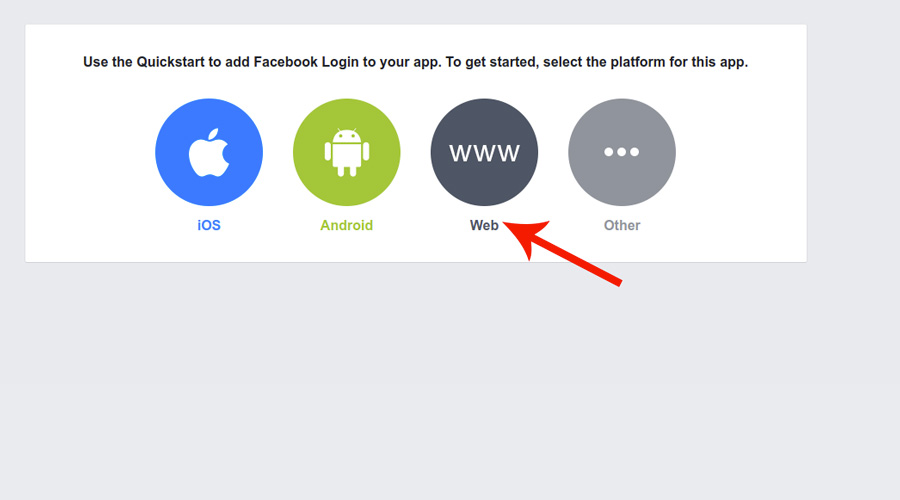
Select Web option.
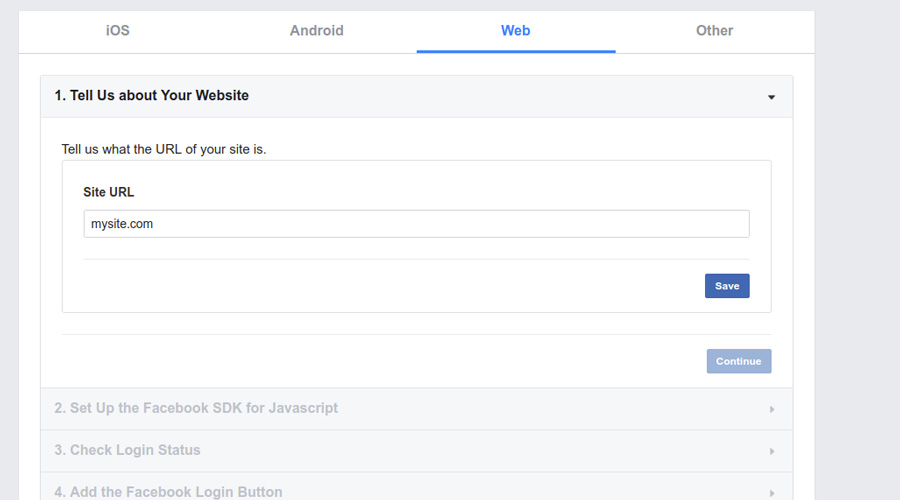
Set your Site URL.
Skip all other steps of the process.
Open Settings and set in the option Valid OAuth redirect URIs the URL that you will find in the Facebook tab of the plugin settings then click on Save changes.
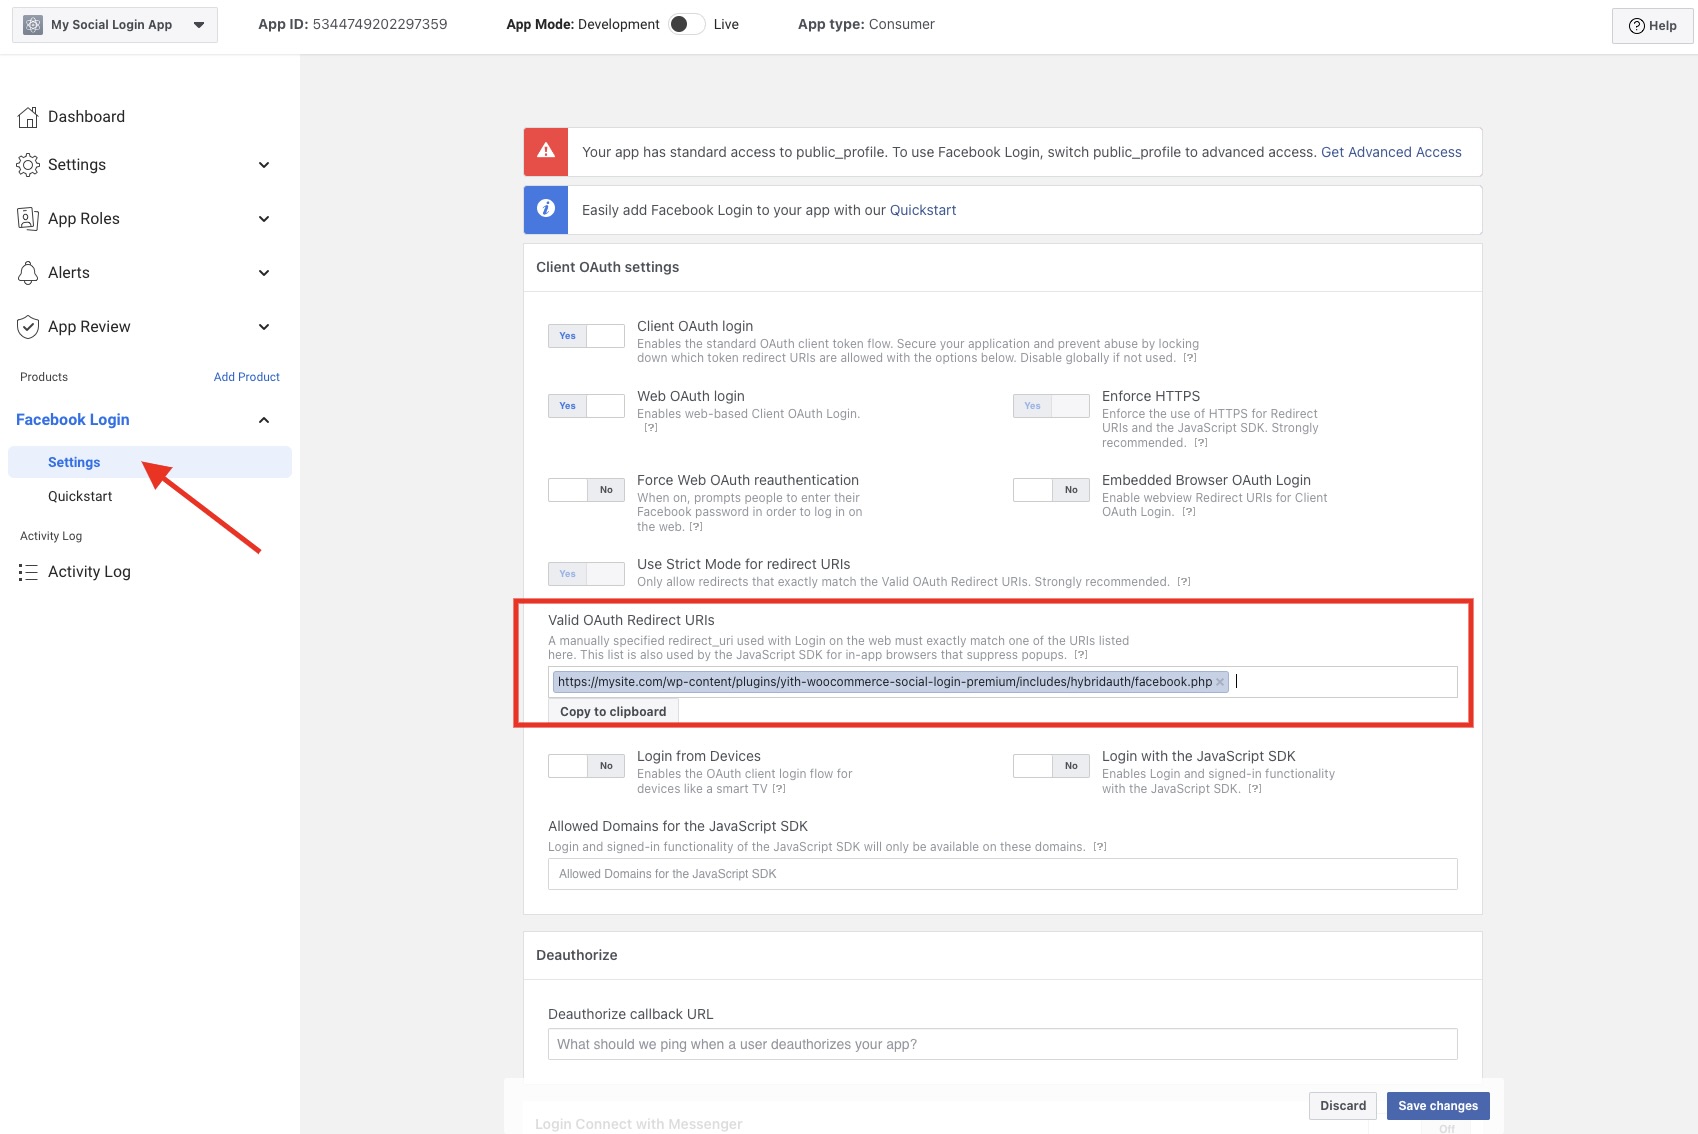
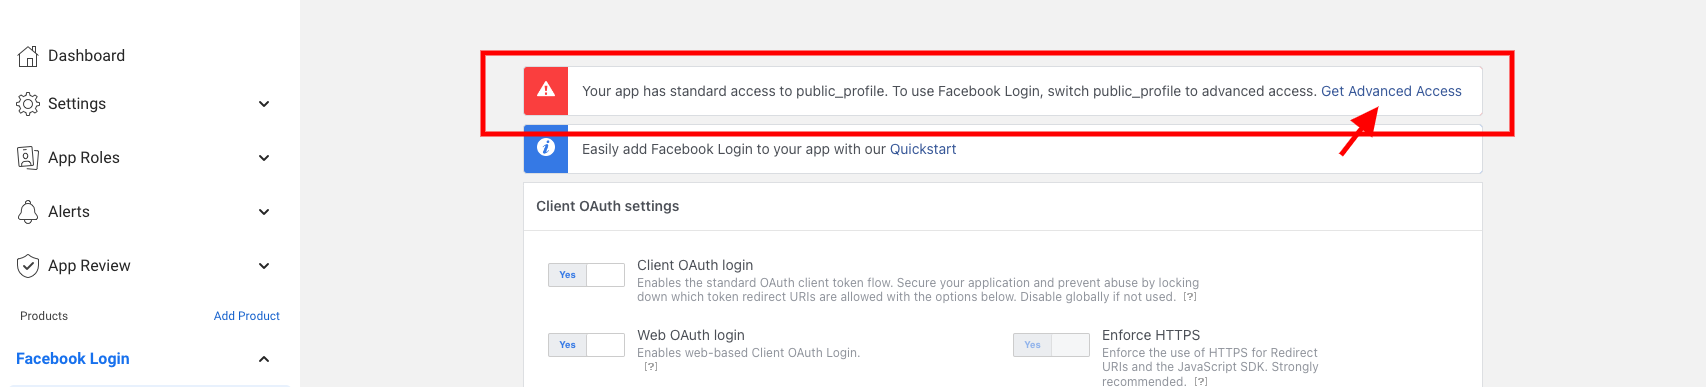
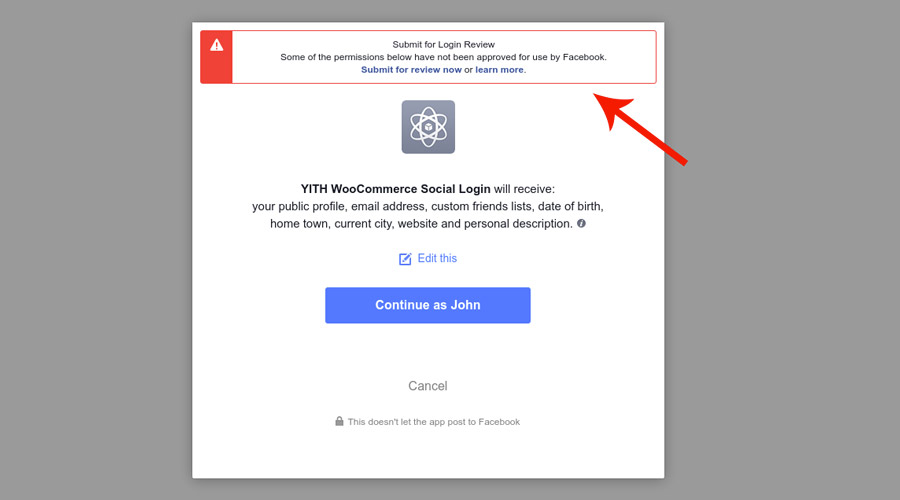
If you see this banner, click on the link Get Advanced Access.
 On the page that will open, search for email and public_profile then click on the Get advanced access button.

You might be prompted to Update Privacy Policy URL or Data Deletion Information: proceed as requested.
Now, skip to Settings > Basic to get App ID and App Secret.
If you have followed the procedure step by step and you have inserted App ID and App Secret in the plugin settings, you have completed the configuration for the login through Facebook.
You are now ready to use it.
On WPEngine hosted sites you should also ask WPEngine to exclude from caching the path wp-content/plugins/yith-woocommerce-social-login-premium/includes/hybridauth/ and the cookie ywsl_wp_session and add the following line in the wp-config.php file:
define( ‘YWSL_FINAL_SLASH’, true );
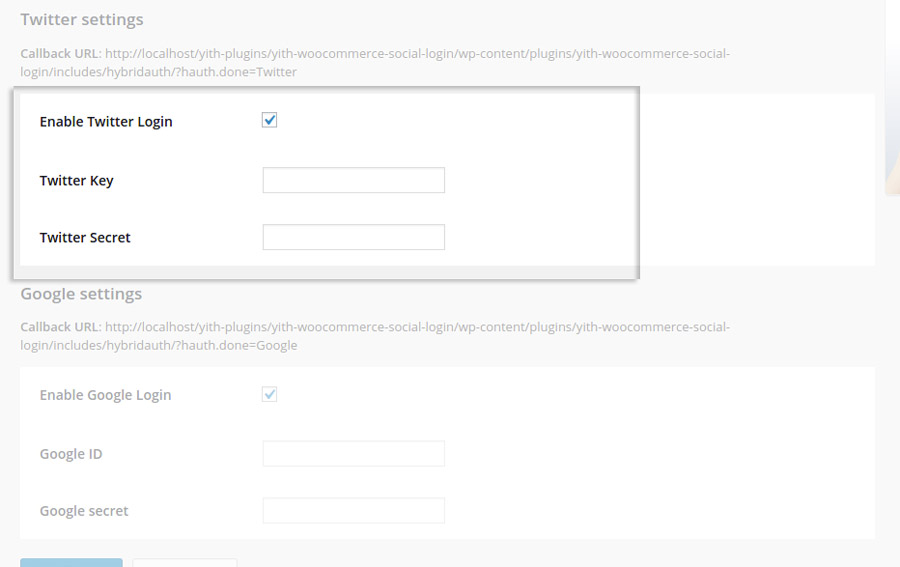
To display the Twitter login button, you have to check the option Enable Twitter Login.
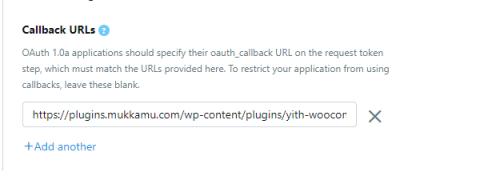
To enter the Twitter Key and Twitter Secret, which are required in the plugin, go to this page and create a new application.
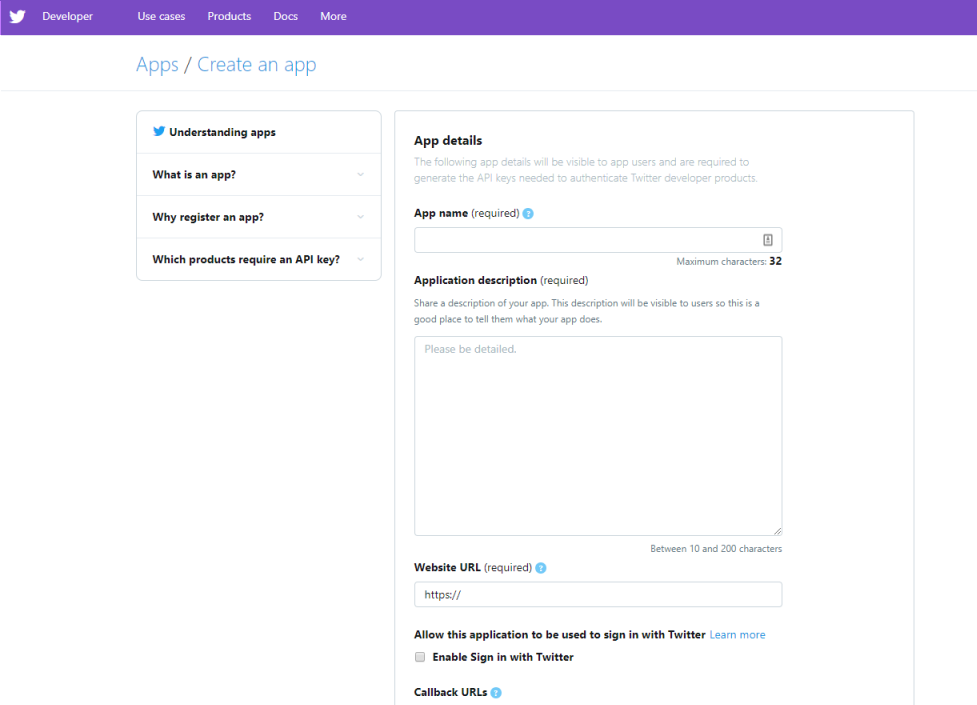
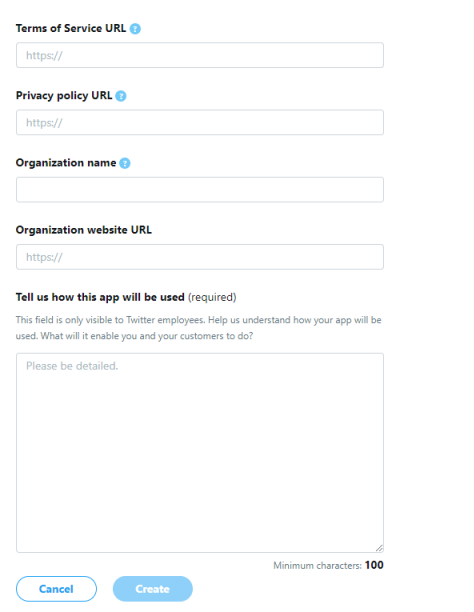
Fill out the application registration form by inserting the following information:
Than complete the other fields.
Go to the section Permissions, and make sure that the “Request email address from users” option is checked:
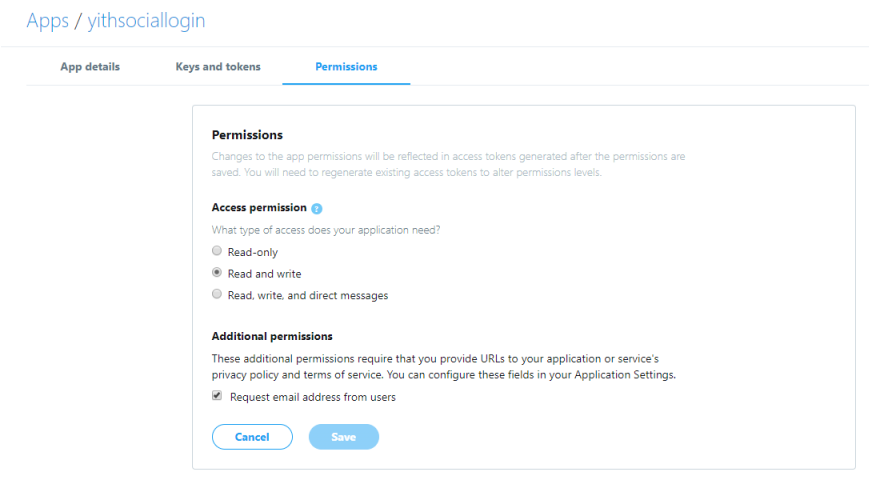
If the data has been entered successfully, go to section Keys and Tokens: you will see a screen like the following:

Copy the values you find in Consumer Key and Consumer Secret and paste them in the corresponding fields in the plugin option panel.
The configuration for Twitter login is now complete.
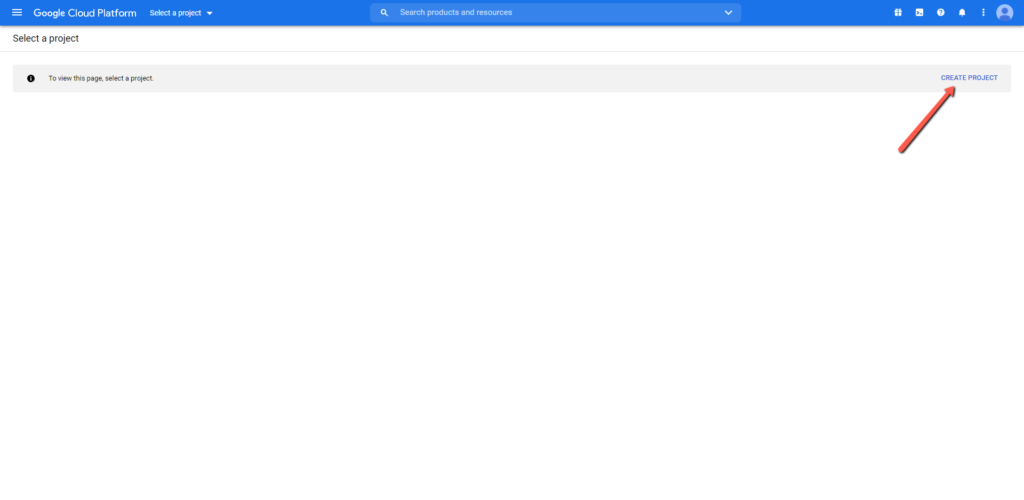
1. Visit the following page: https://console.cloud.google.com/projectselector2
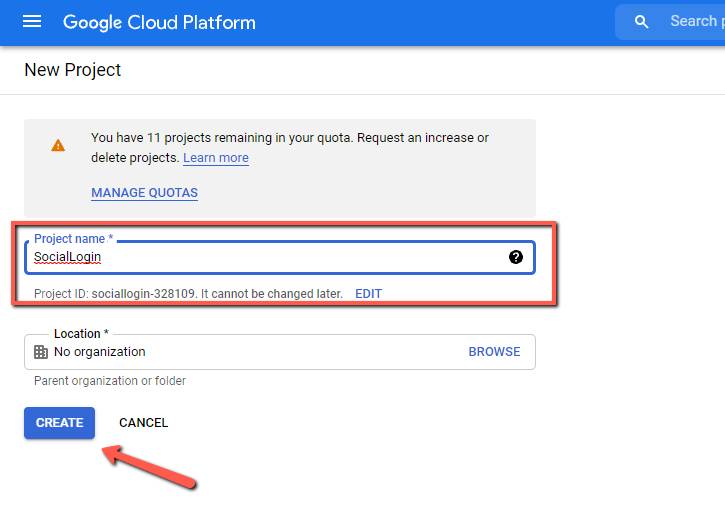
2. Click on Create Project.
3. Give a name to the project and click on “Create”.
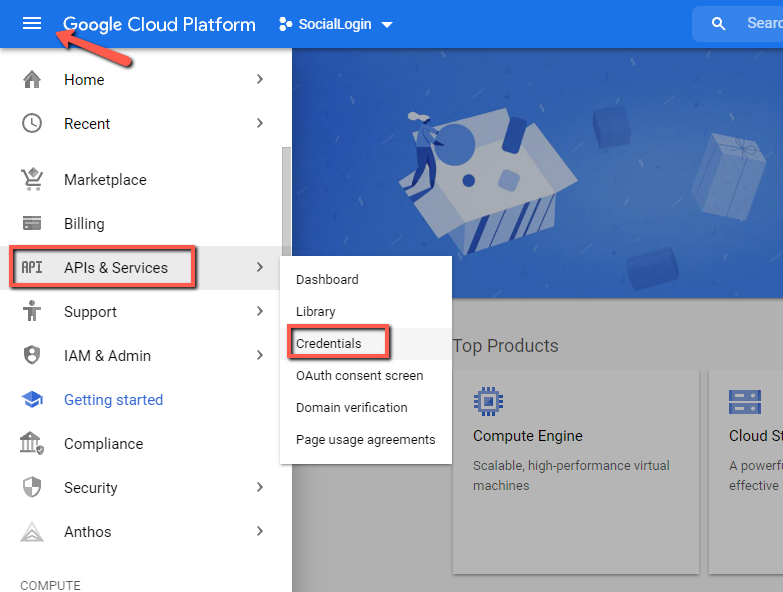
4. Click on the hamburger menu on the left, then, on “APIs & Services” and finally on “Credentials”.
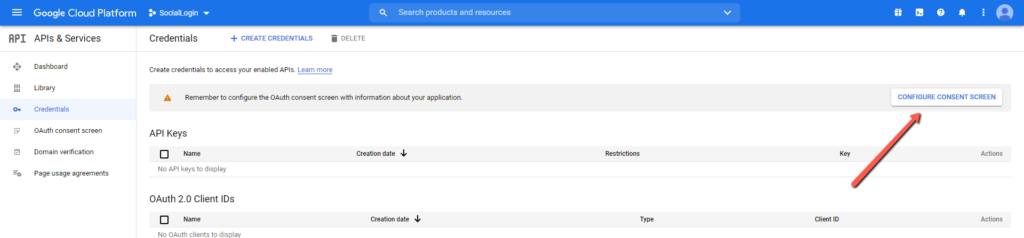
5. Click on “Configure Consent Screen”.
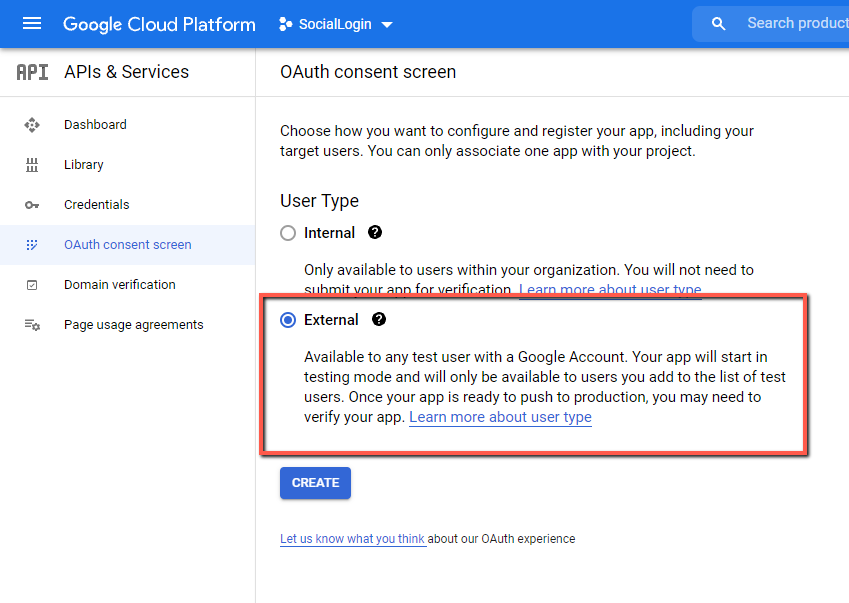
6. Choose “External” and click on “Create”.
7. In the page that will show up, fill all the required fields and click on “Save and Continue”.
8. In the screen that will appear click on “Add or Remove scopes”.
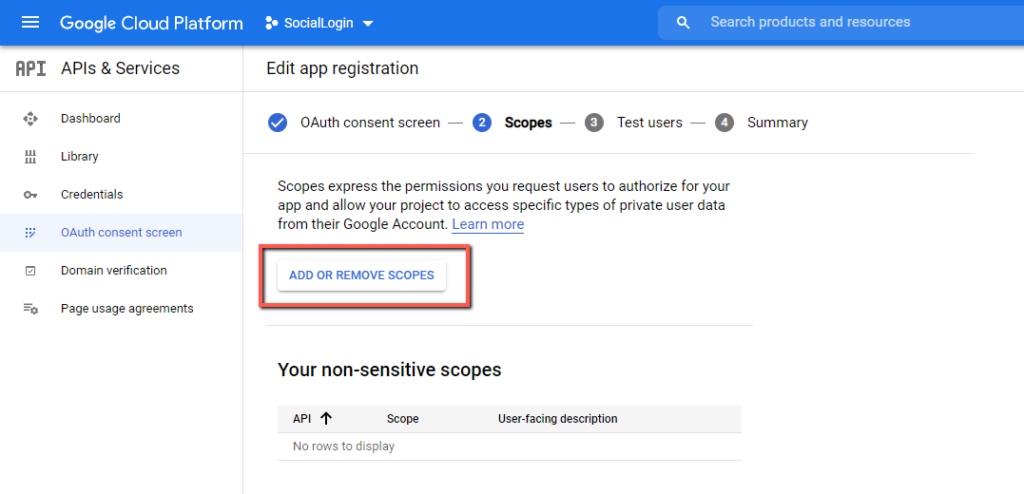
9. From the list only pick the following items:
…/auth/userinfo.email
…/auth/userinfo.profile
Click on the “Update” button at the bottom of the popup and then on “Save and continue” button.

10. Click “Save and continue” button also in the next step.
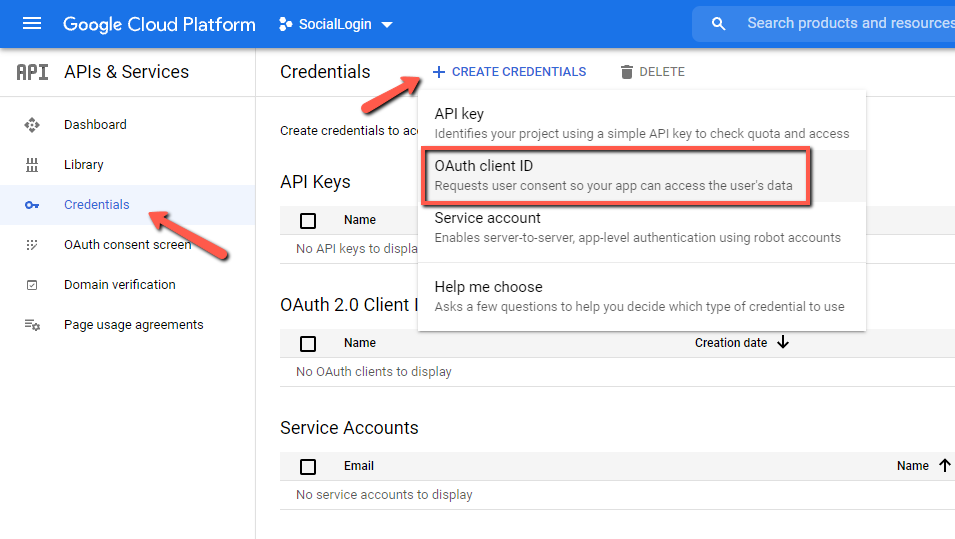
11. Click on “Credentials”, then on “Create Credentials” and finally on “OAuth Client ID”.
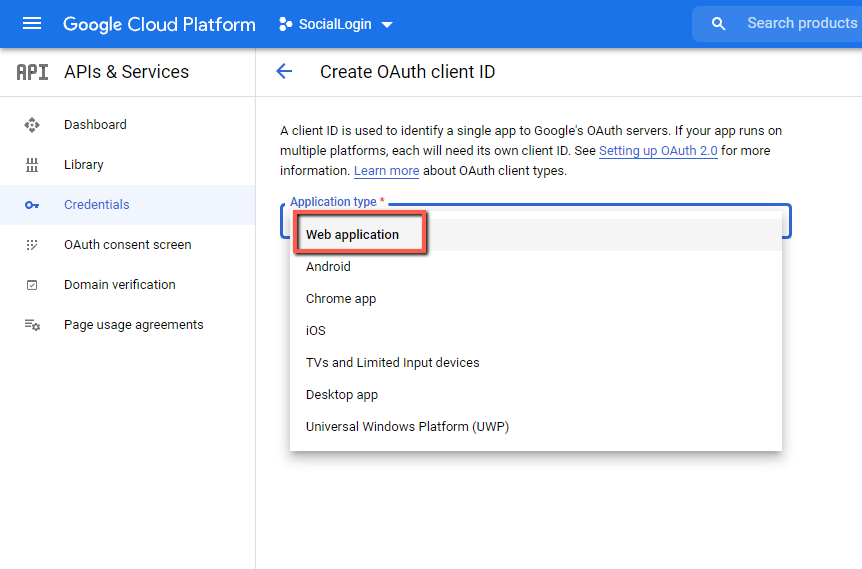
12. Choose “Web Application”.
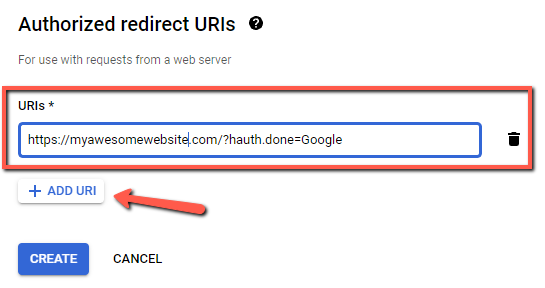
13. Click on “Add URI” and paste the URL that you can find in the Google tab in the plugin settings. Then, click on “Create” button.
14. A popup will appear with the keys that you will have to copy and paste into the Google tab in the plugin settings.
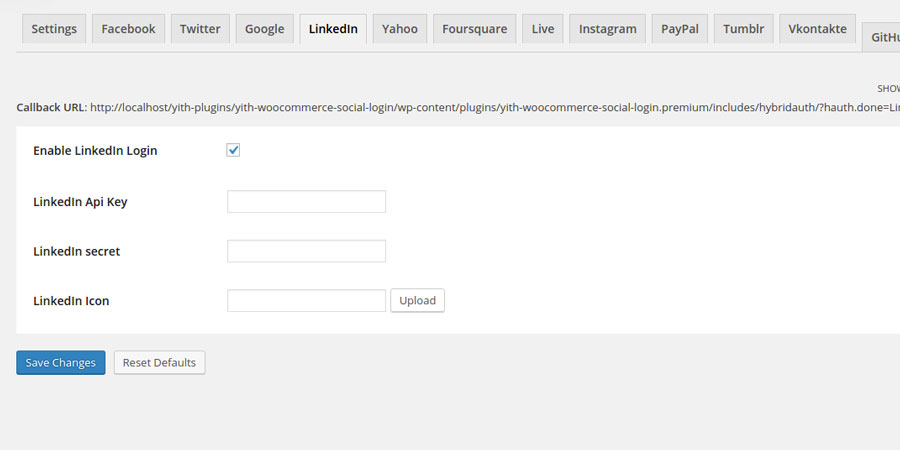
To show LinkedIn login button, you have to enable the option Enable LinkedIn Login that you can find in plugin option panel.
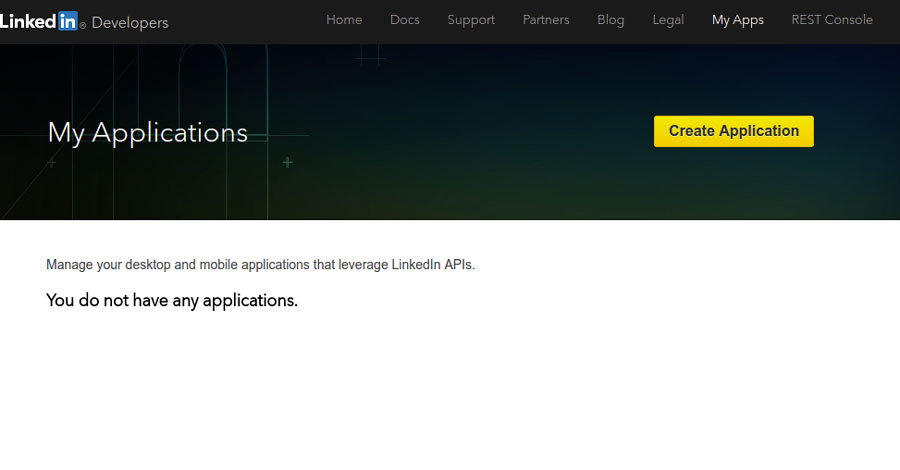
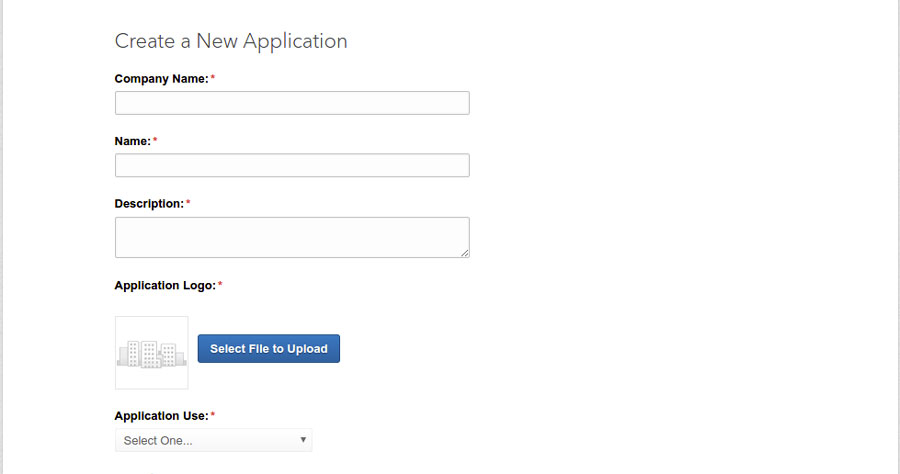
Access your LinkedIn account and create a new application from this page
Fill in the form and be careful you do not neglect required fields.
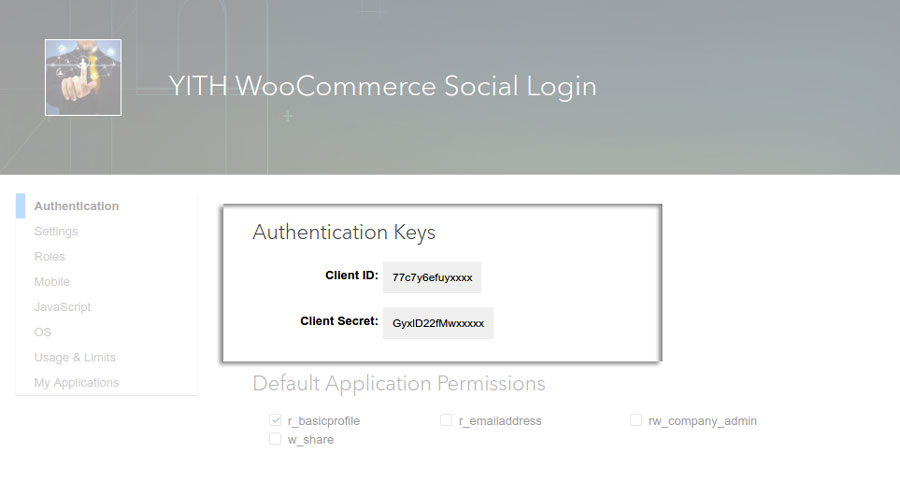
Now, you will get API Key and Secret Key that you can type into plugin panel.
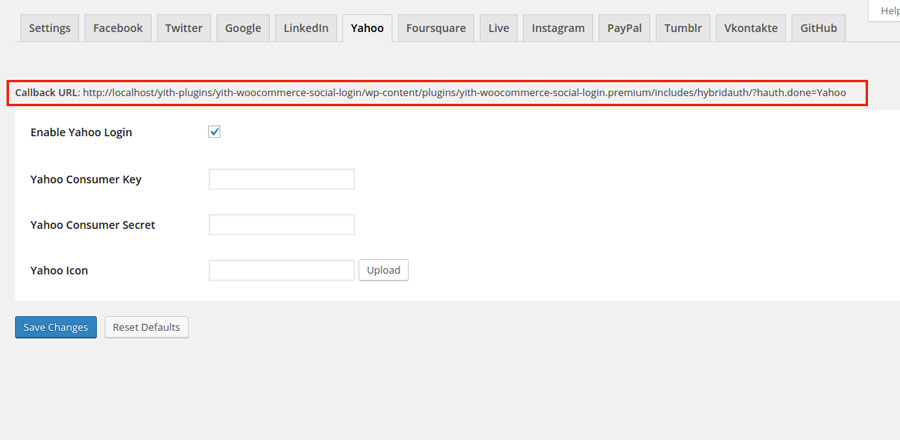
To display the button for Yahoo login, you have to enable the option Enable Yahoo Login that you can find in the plugin option panel.
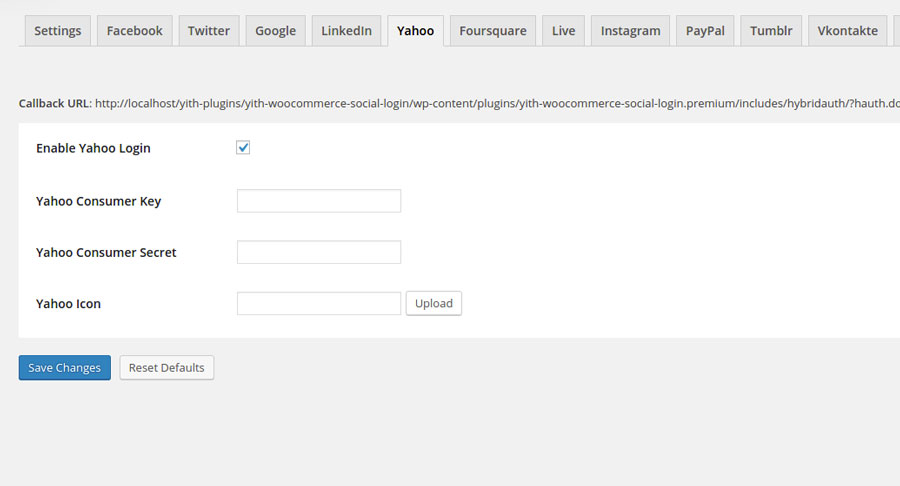
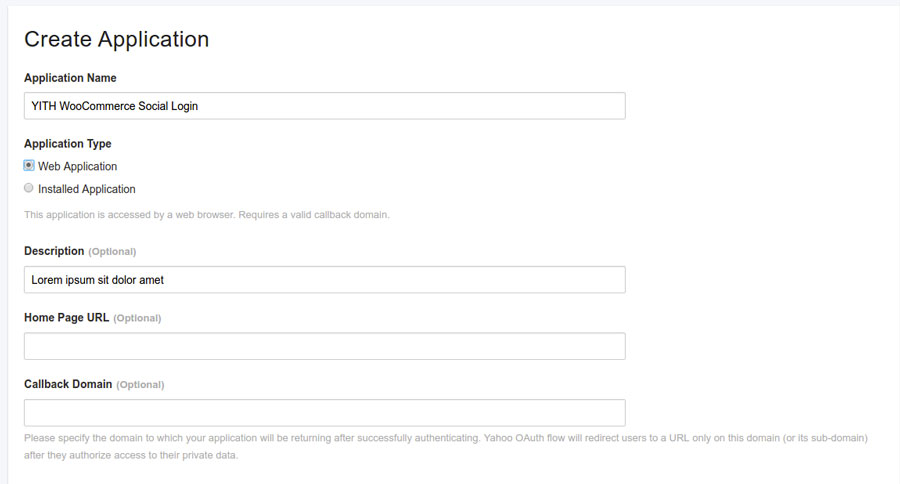
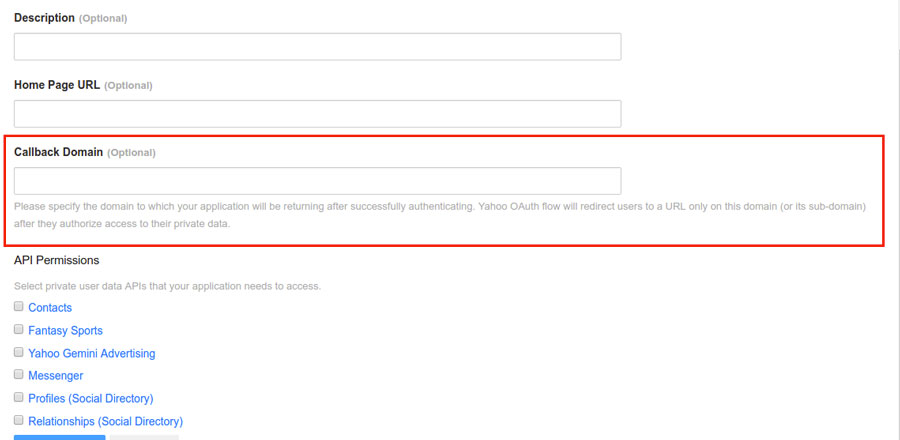
To get the credentials required by the plugin, you have to create an application. Go to the page developer.apps.yahoo.com using your account or create a new one, in case you haven’t done it yet.
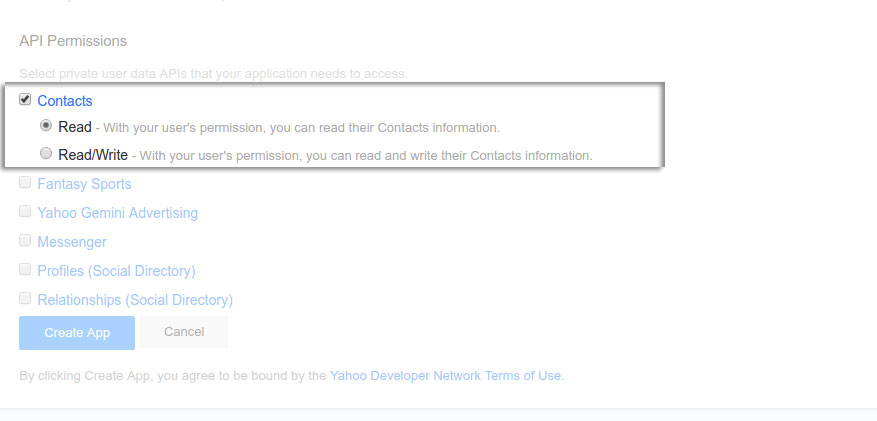
When you create the application, set Contacts as “Read” in section Permissions.
Insert the value specified in the plugin settings dashboard in “Callback Domain” field.
Once you have filled out the form, you will be redirected to the page of your new application to get there Consumer Key and Consumer Secret, that you will be later required in plugin settings.
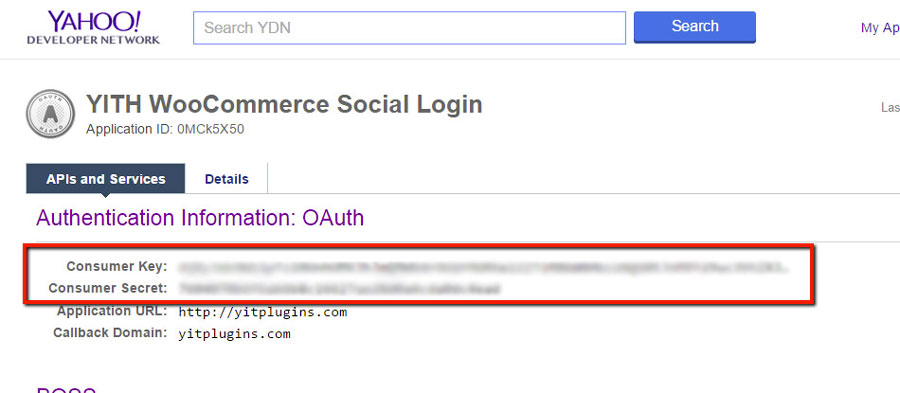
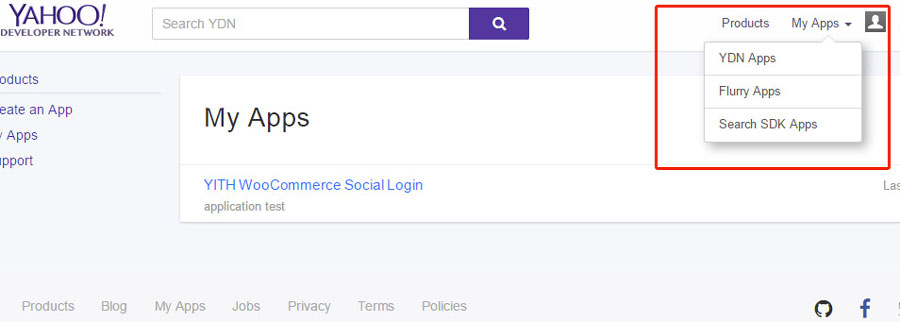
In case you were not redirected to that page, you can access this information by clicking on YDN Apps in the dropdown menu “My Apps” that you find on top right of the page.
Customise the icon for this social network through the specific option Yahoo Icon that you find in the plugin.
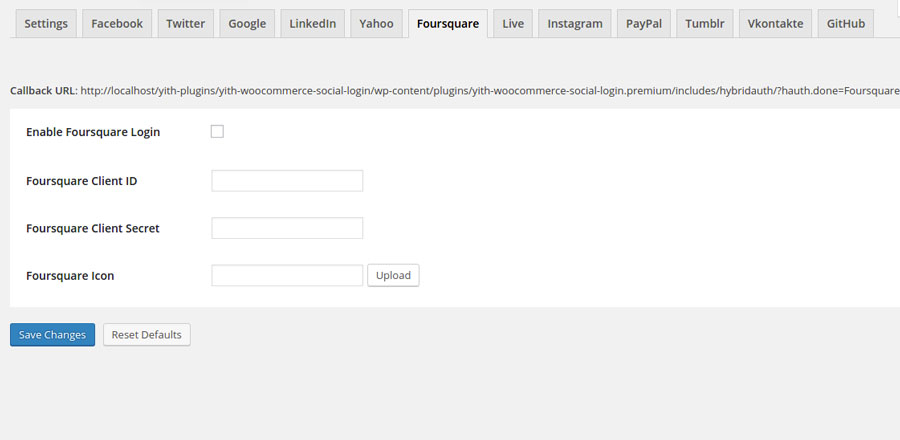
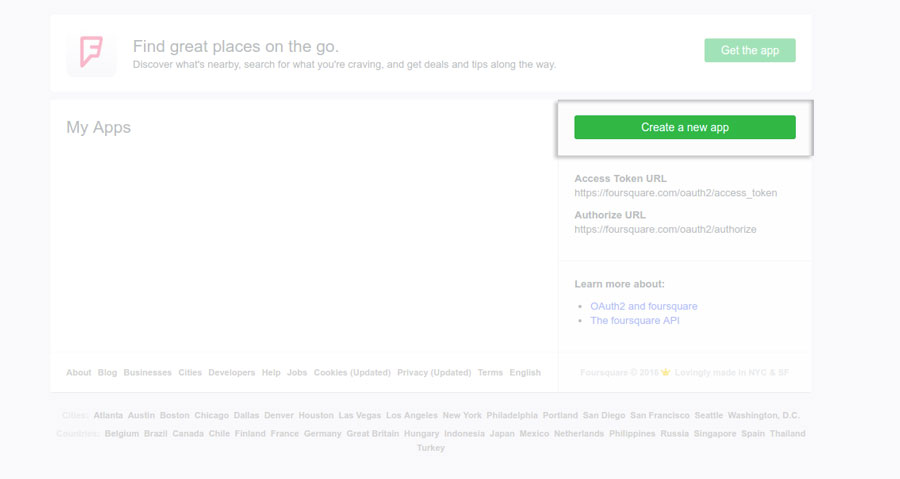
To display Foursquare login button, you have to enable the option Enable Foursquare Login that you can find in the plugin option panel.
Register at Foursquare and go to https://www.foursquare.com/oauth/ to create the application necessary to enable social login through Foursquare.
Click on “Create new app”.
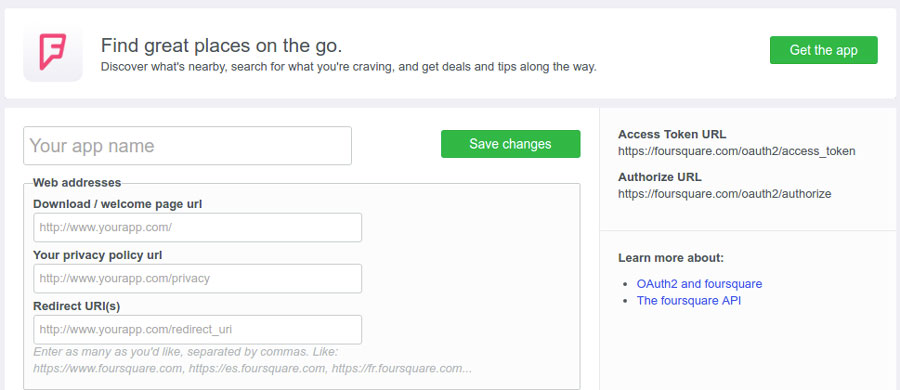
Fill out the form with all required data and be careful you do not forget to type the domain that hosts your site in Download / welcome page url.
If the form has been filled out correctly, you will be redirected to the application page, where you will find credentials required in the plugin, that is Consumer Key and Secret Key.
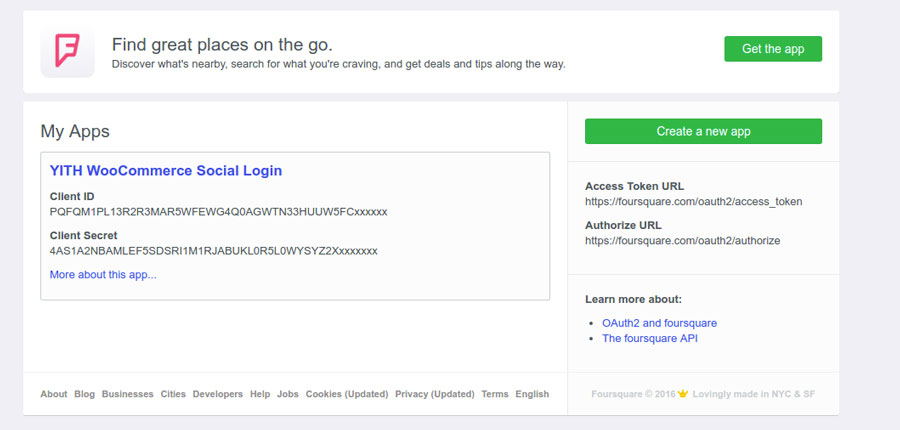
In case you were not redirected to the right page, you can find the application just created here.
If you want to customise the social network icon, just upload the image you have chosen through the specifi option, Foursquare Icon, that you can find in the plugin section called “Foursquare”.
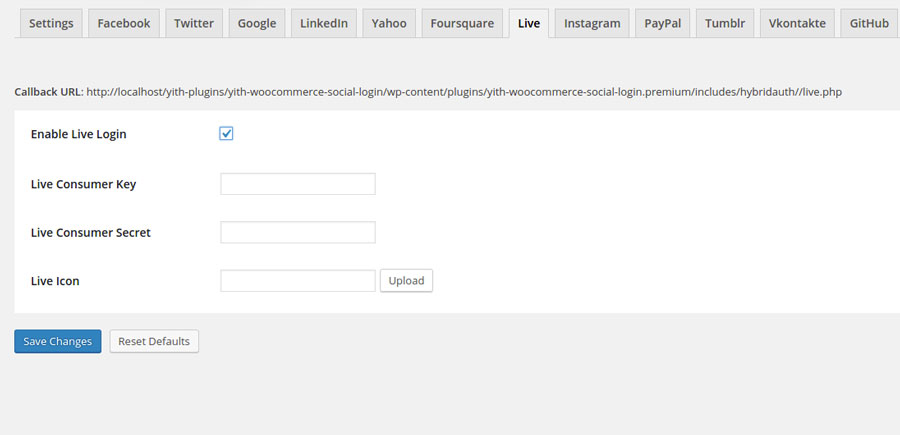
To show Live social login button, you have to enable the option Enable Live Login, that you can find in the plugin option panel.
Access to https://account.live.com, or create a new account in case you did not have one, and create a new application from this page.
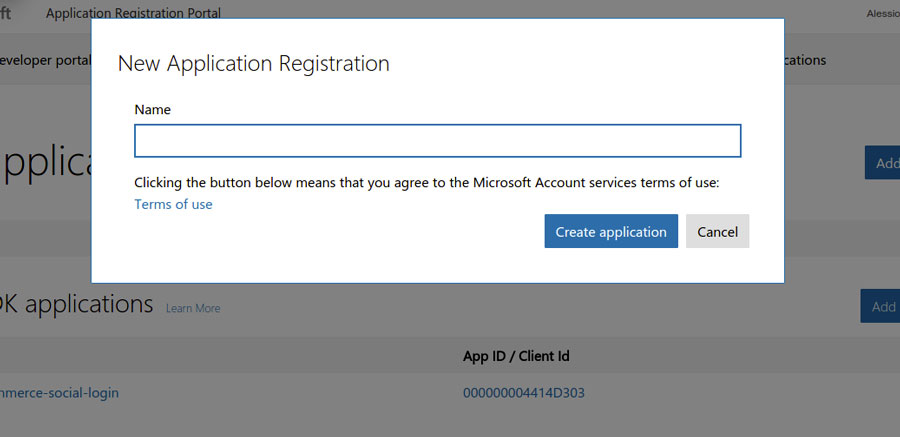
Fill in the application registration form by inserting the required fields.
Insert the “Callback Url” value, that you find in the plugin settings dashboard, in “Redirect URIs” entry.
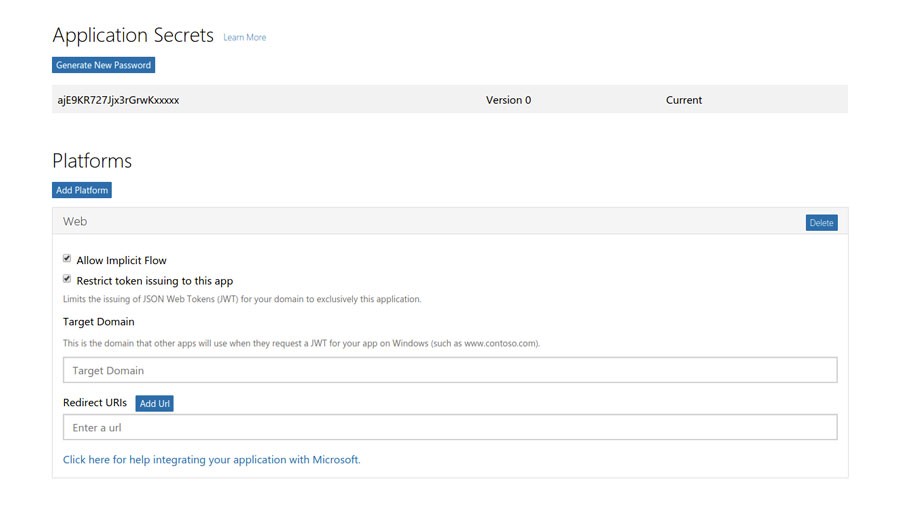
After saving the settings, go to https://apps.dev.microsoft.com/ and select the application just created.
In APP SETTINGS you will find Client ID and Client secret (v1).

These informations have to be pasted respectively into the plugin entries “Live Consumer Key” and “Live Consumer Secret”. If you have done everything correctly, your users will be able to login with their Live account.
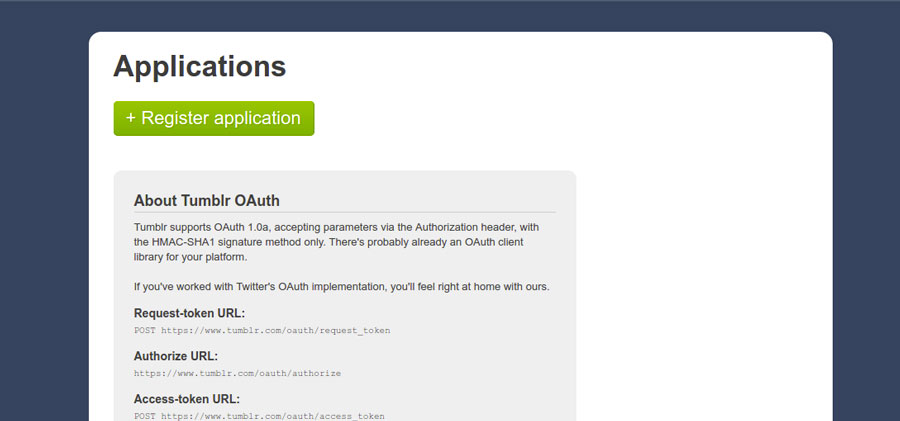
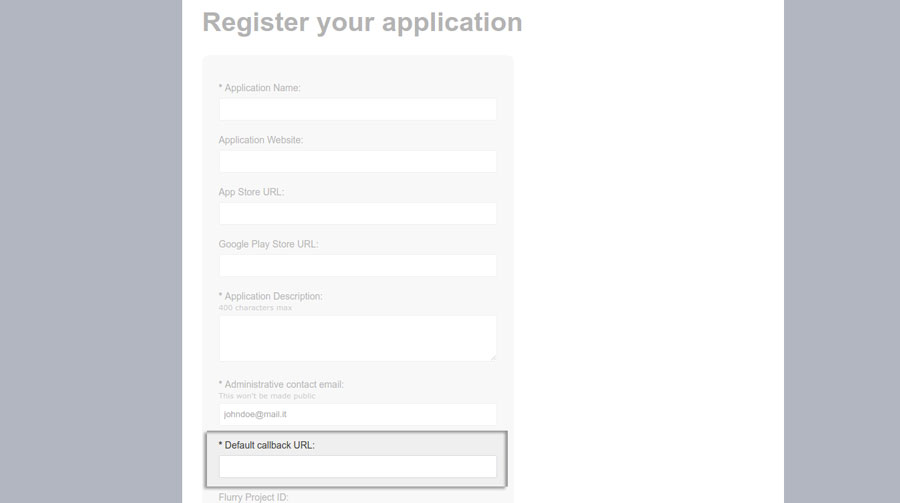
To show the Tumblr login button, you have to activate the option Enable Tumblr Login, that you can find in the plugin option panel.

Access to your Tumblr account and create a new application.
Fill in the form by inserting the address, available in the plugin settings dashboard, in “Default callback URL” entry.
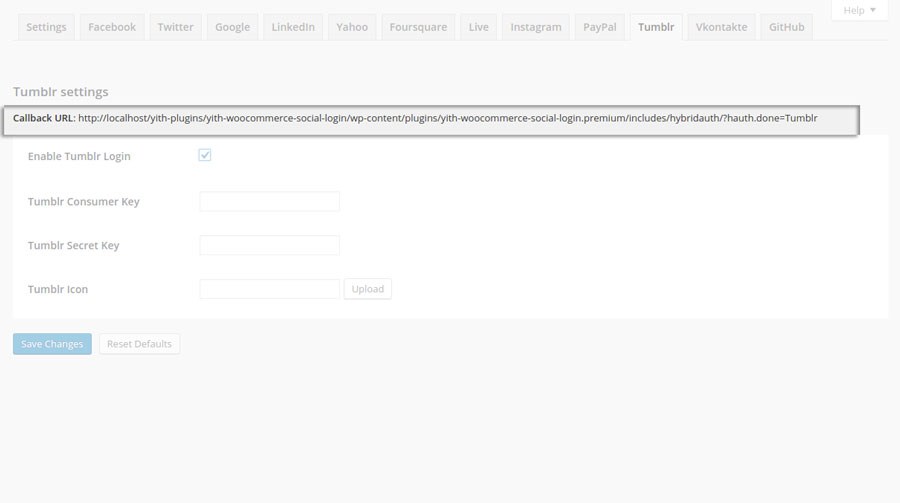
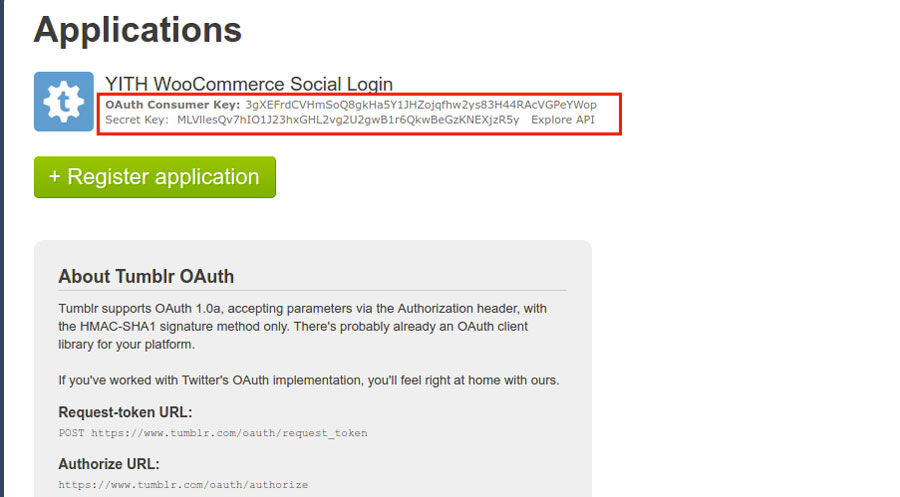
If you have registered the application correctly, now you should have the detail needed for the plugin