View Product Page

Connect admin account

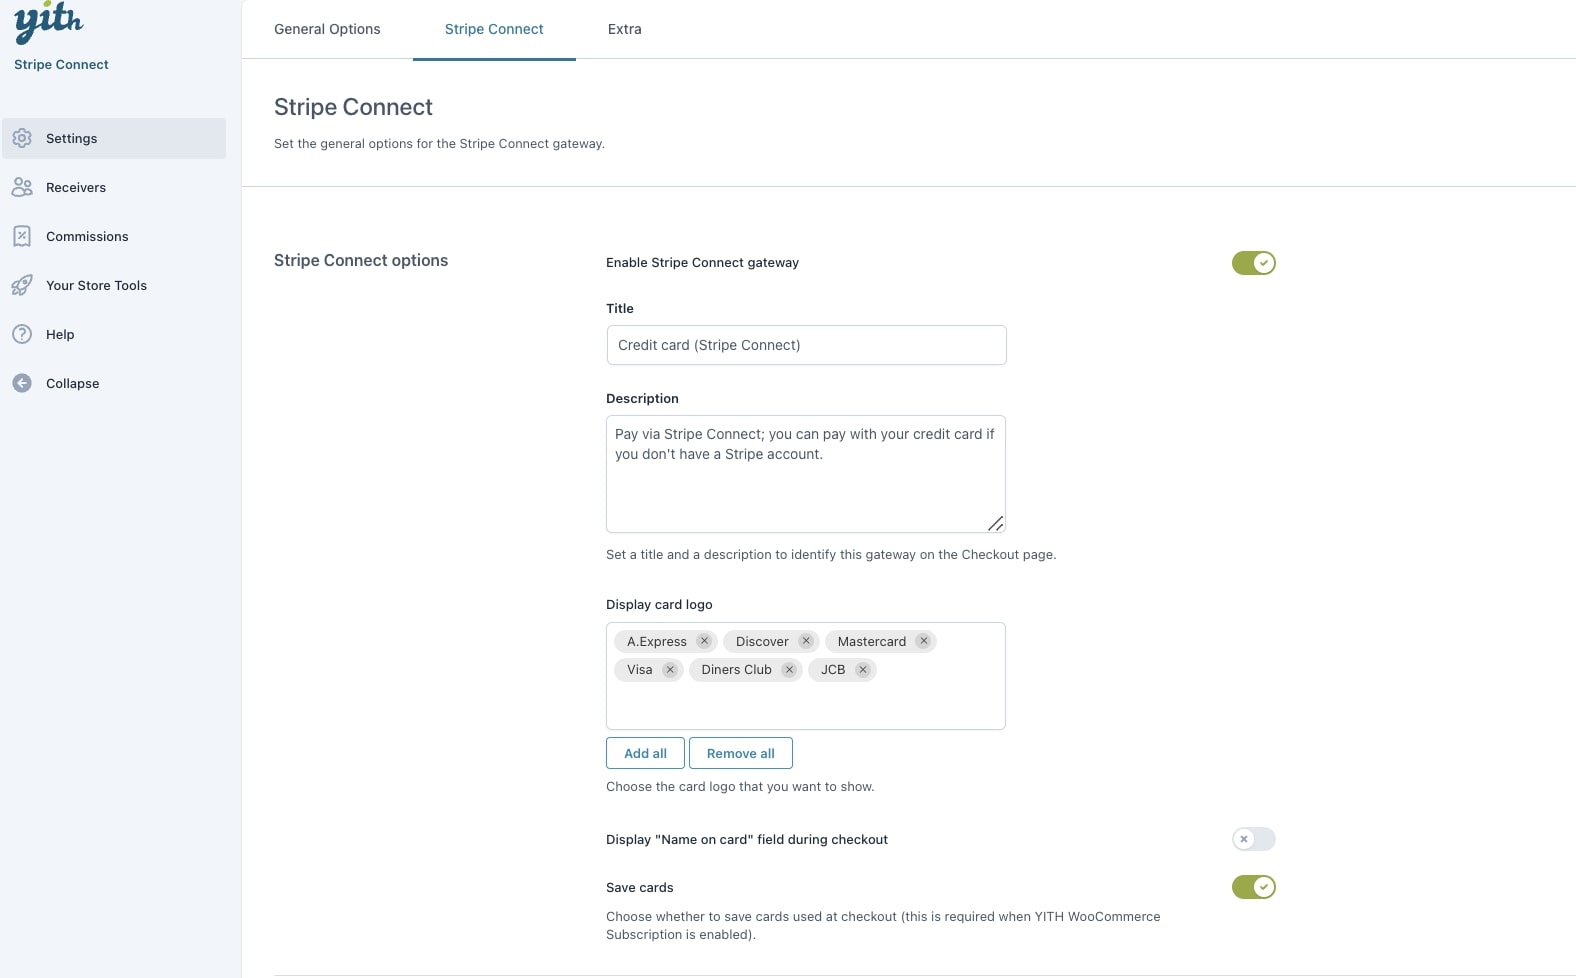
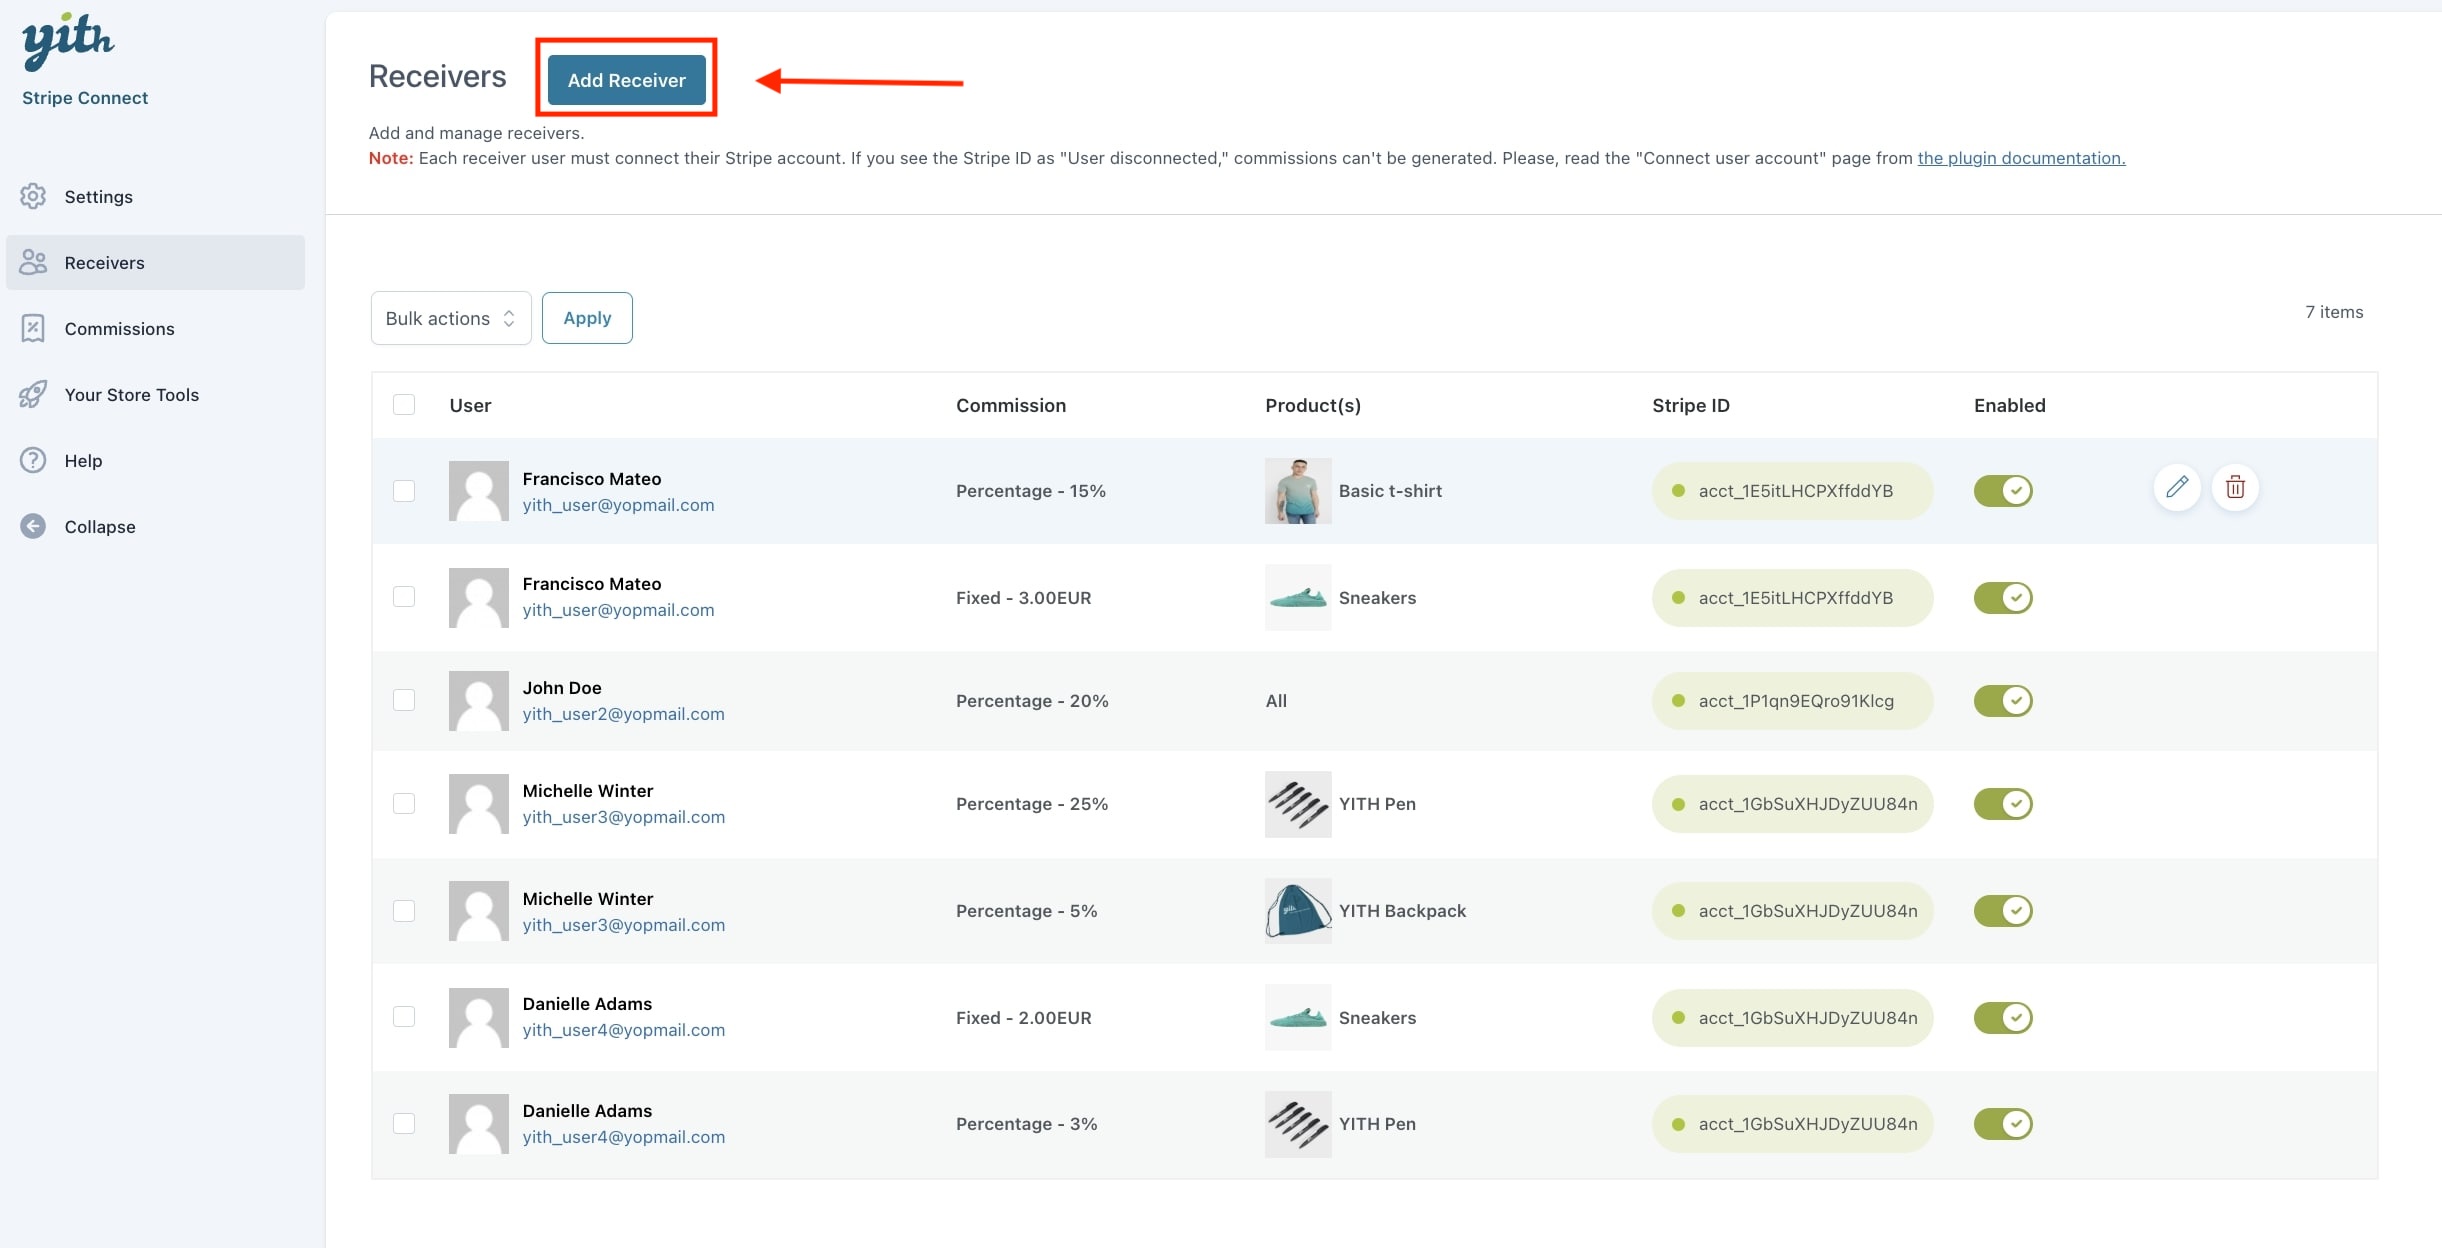
First, make sure you enable the “Stripe Connect Gateway” then you can connect your Stripe Account with our site application.

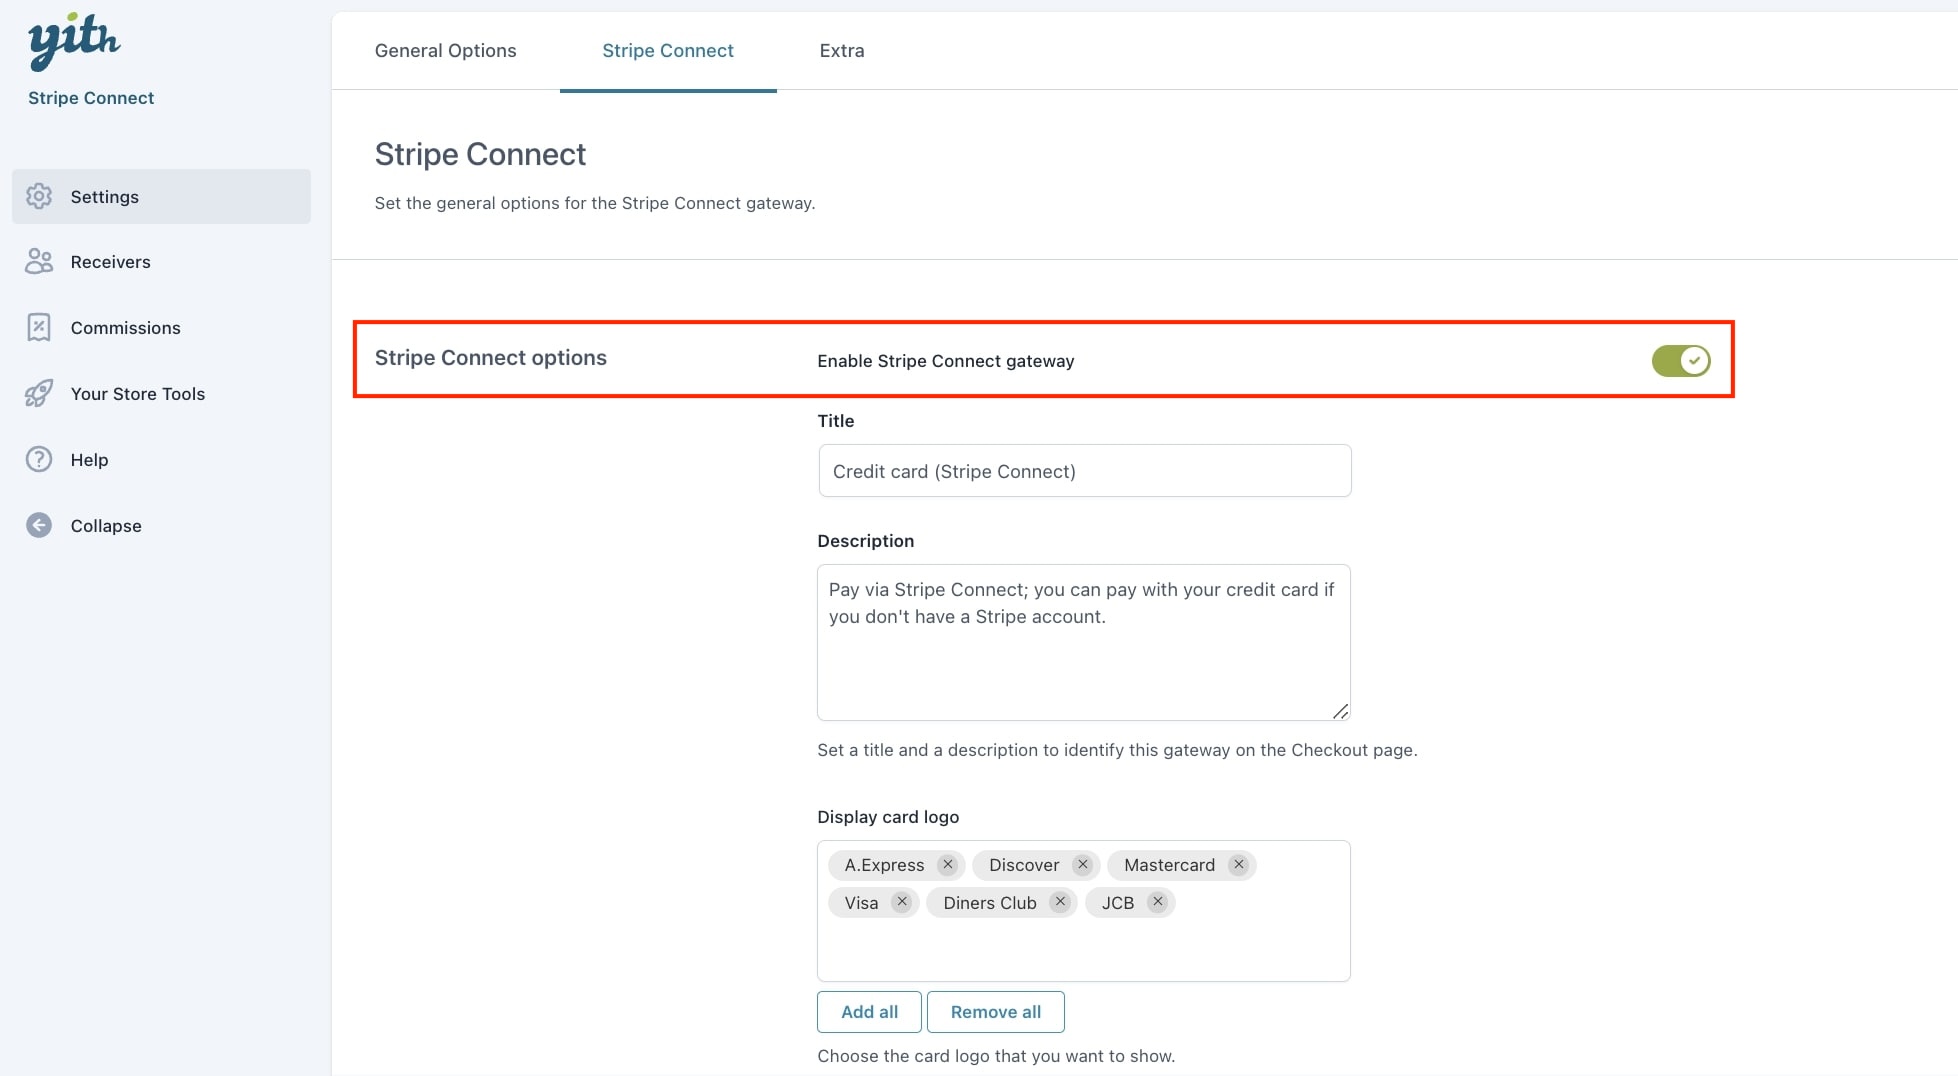
If you do not have a Stripe Account yet, you can make one here. To make the plugin work, you need to connect the plugin with your Stripe Account.

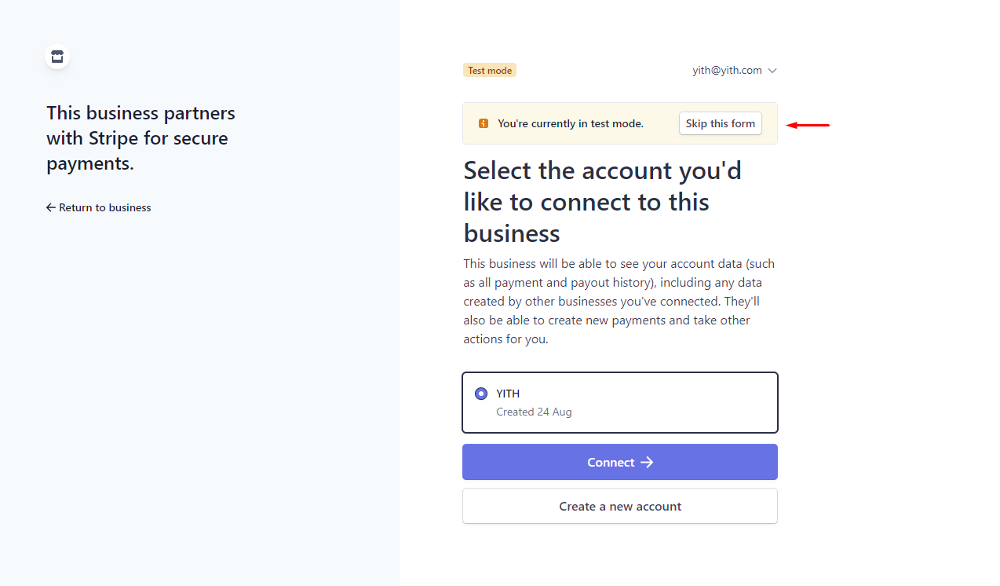
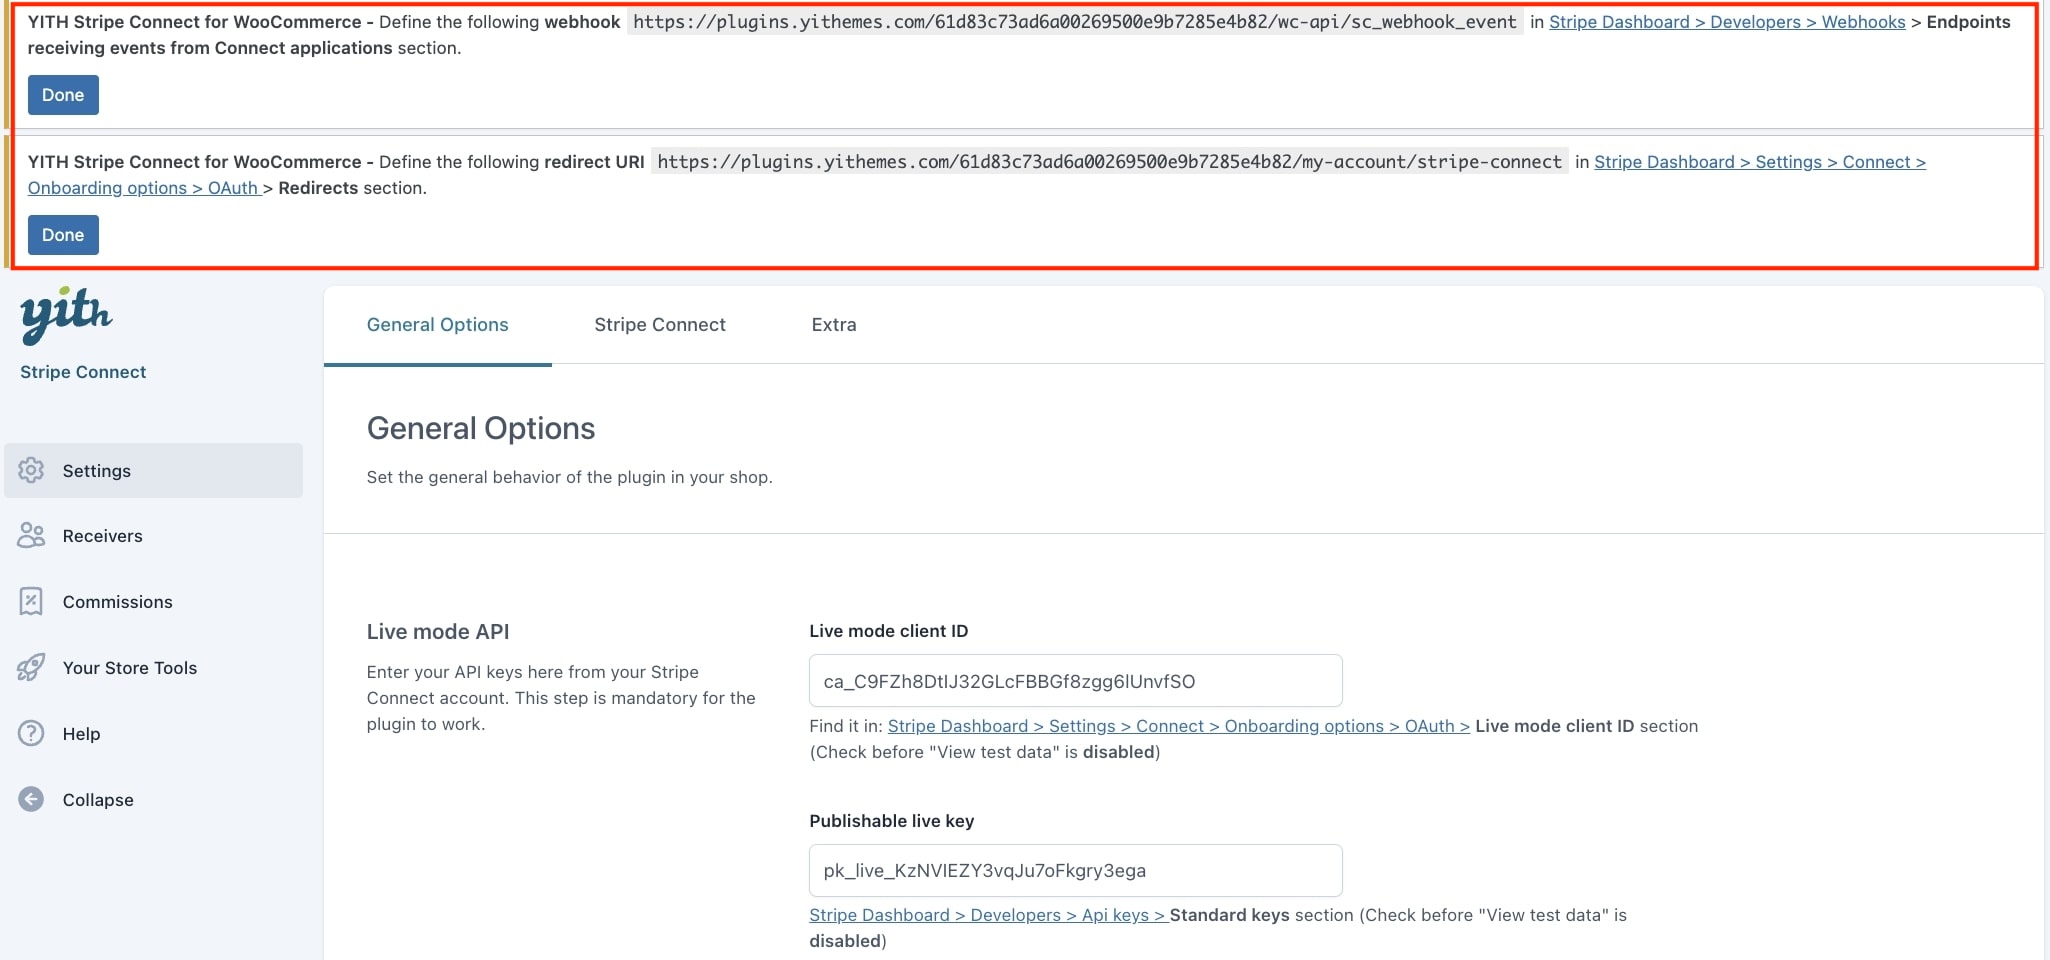
At the top of your screen, you will see several messages, you will need to execute the two steps you’ll see in the image below.

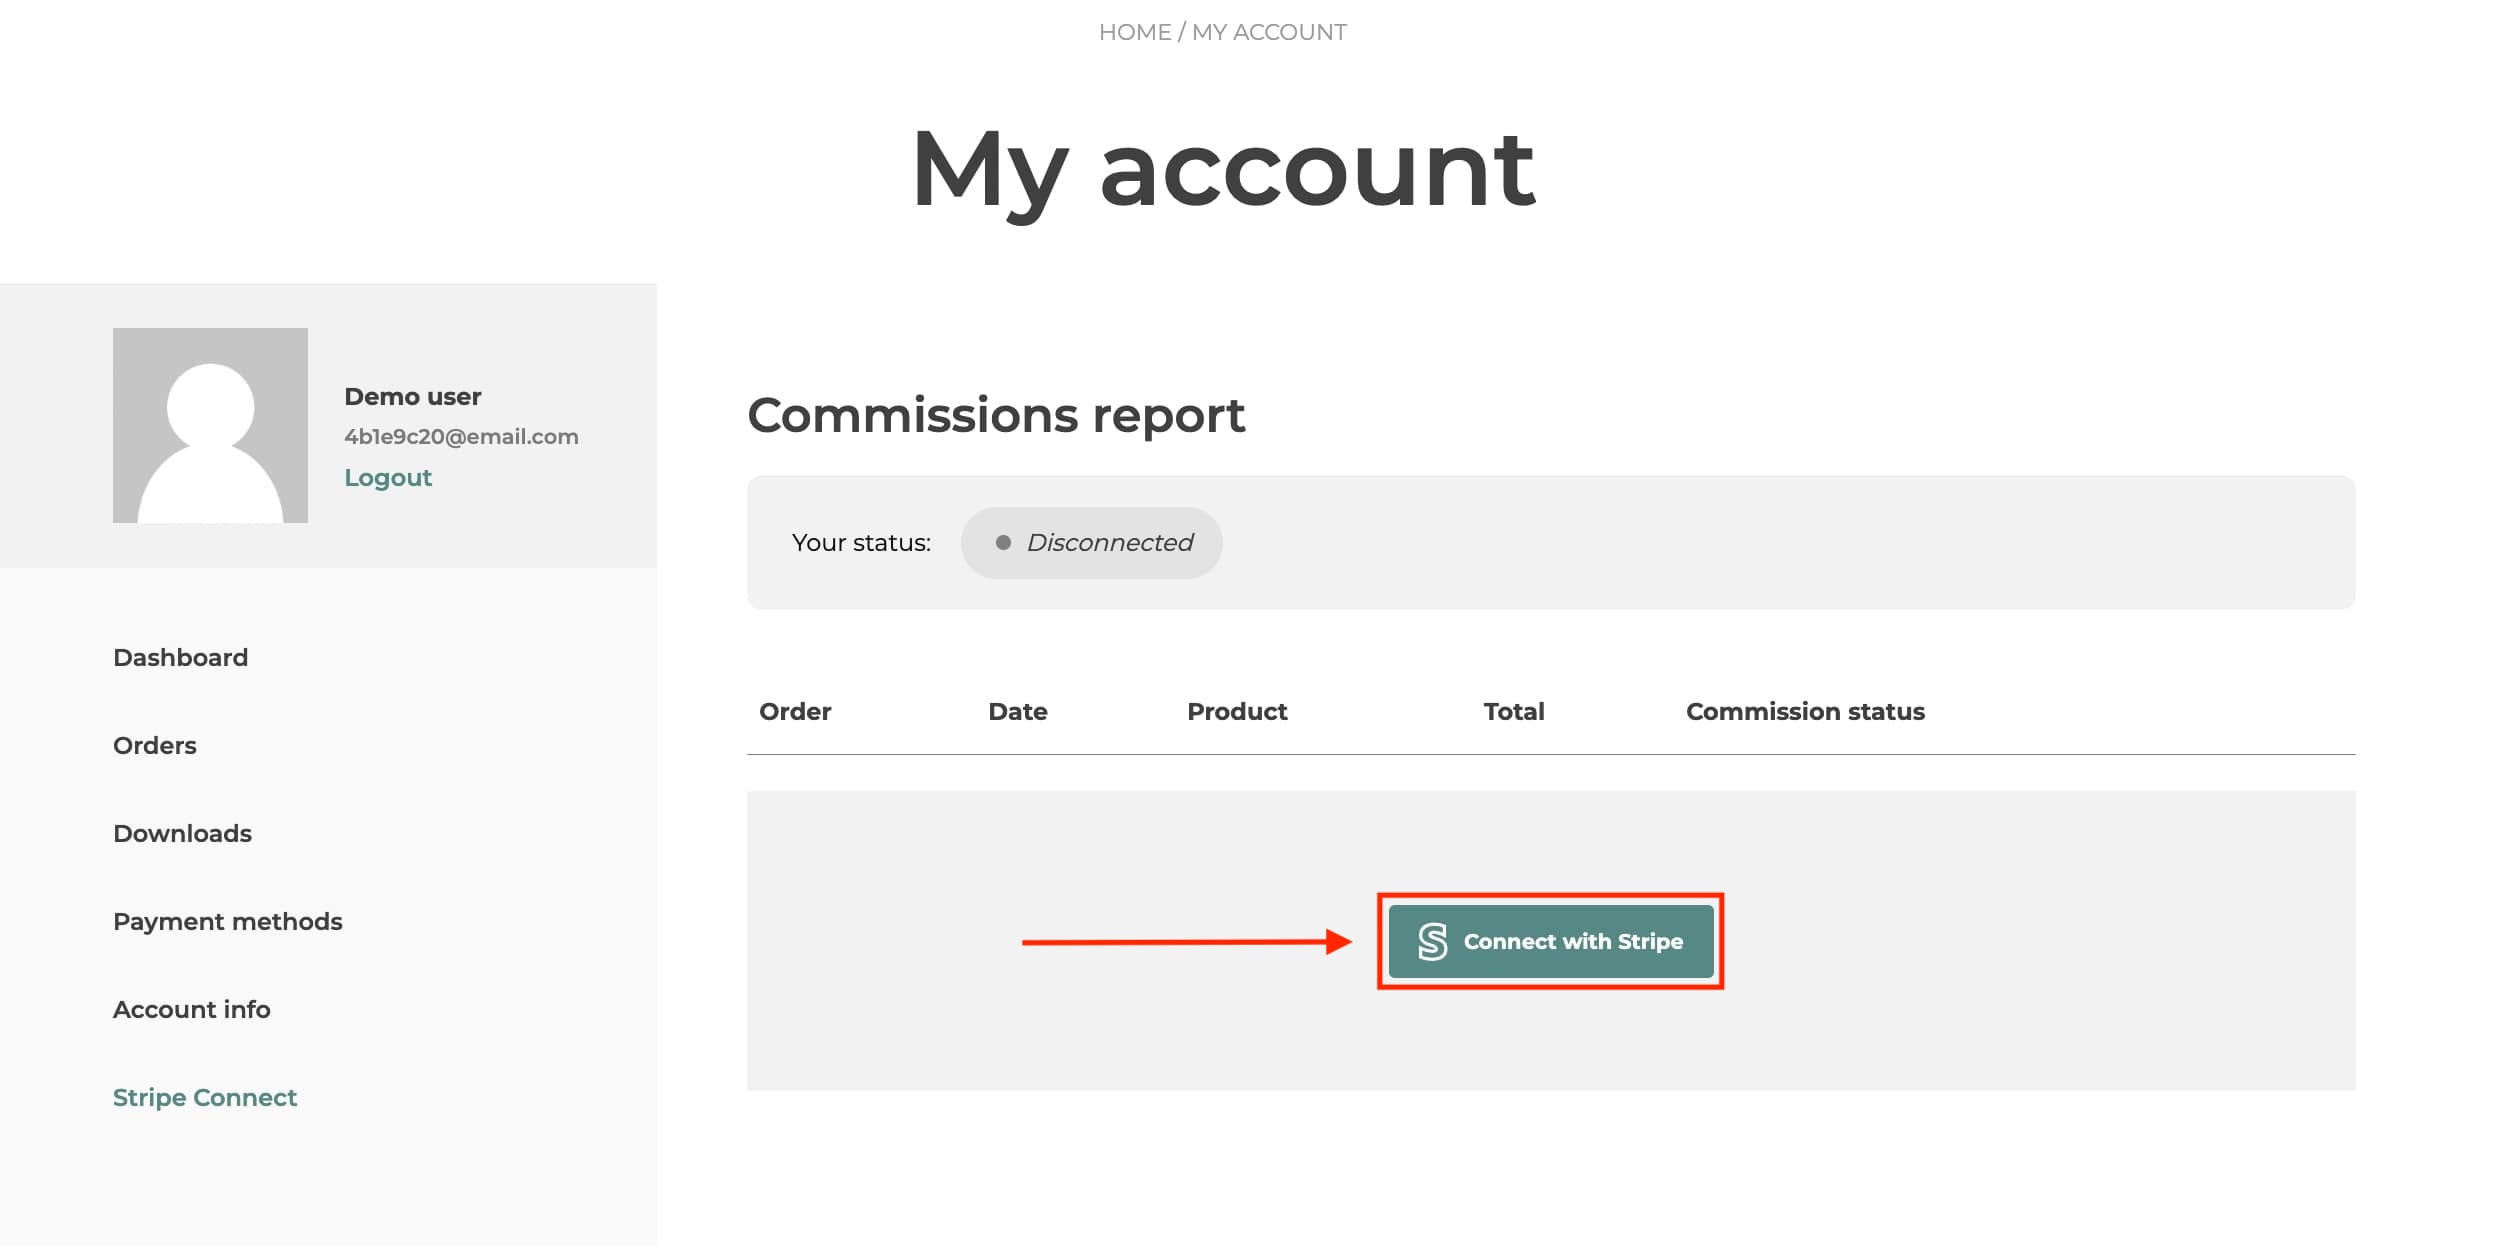
To connect your Stripe Account, you can click on the given link which will redirect you to the correct page in your Stripe Account.

API Keys

Support for API 2024-06-20

The API keys are necessary for the plugin to process the payment requests with Stripe. You have two different pairs of Secret and Publishable keys, one for the test mode and one for the live mode.

So let’s start configuring them.

In the plugin panel you’ll find a link to get the API key.

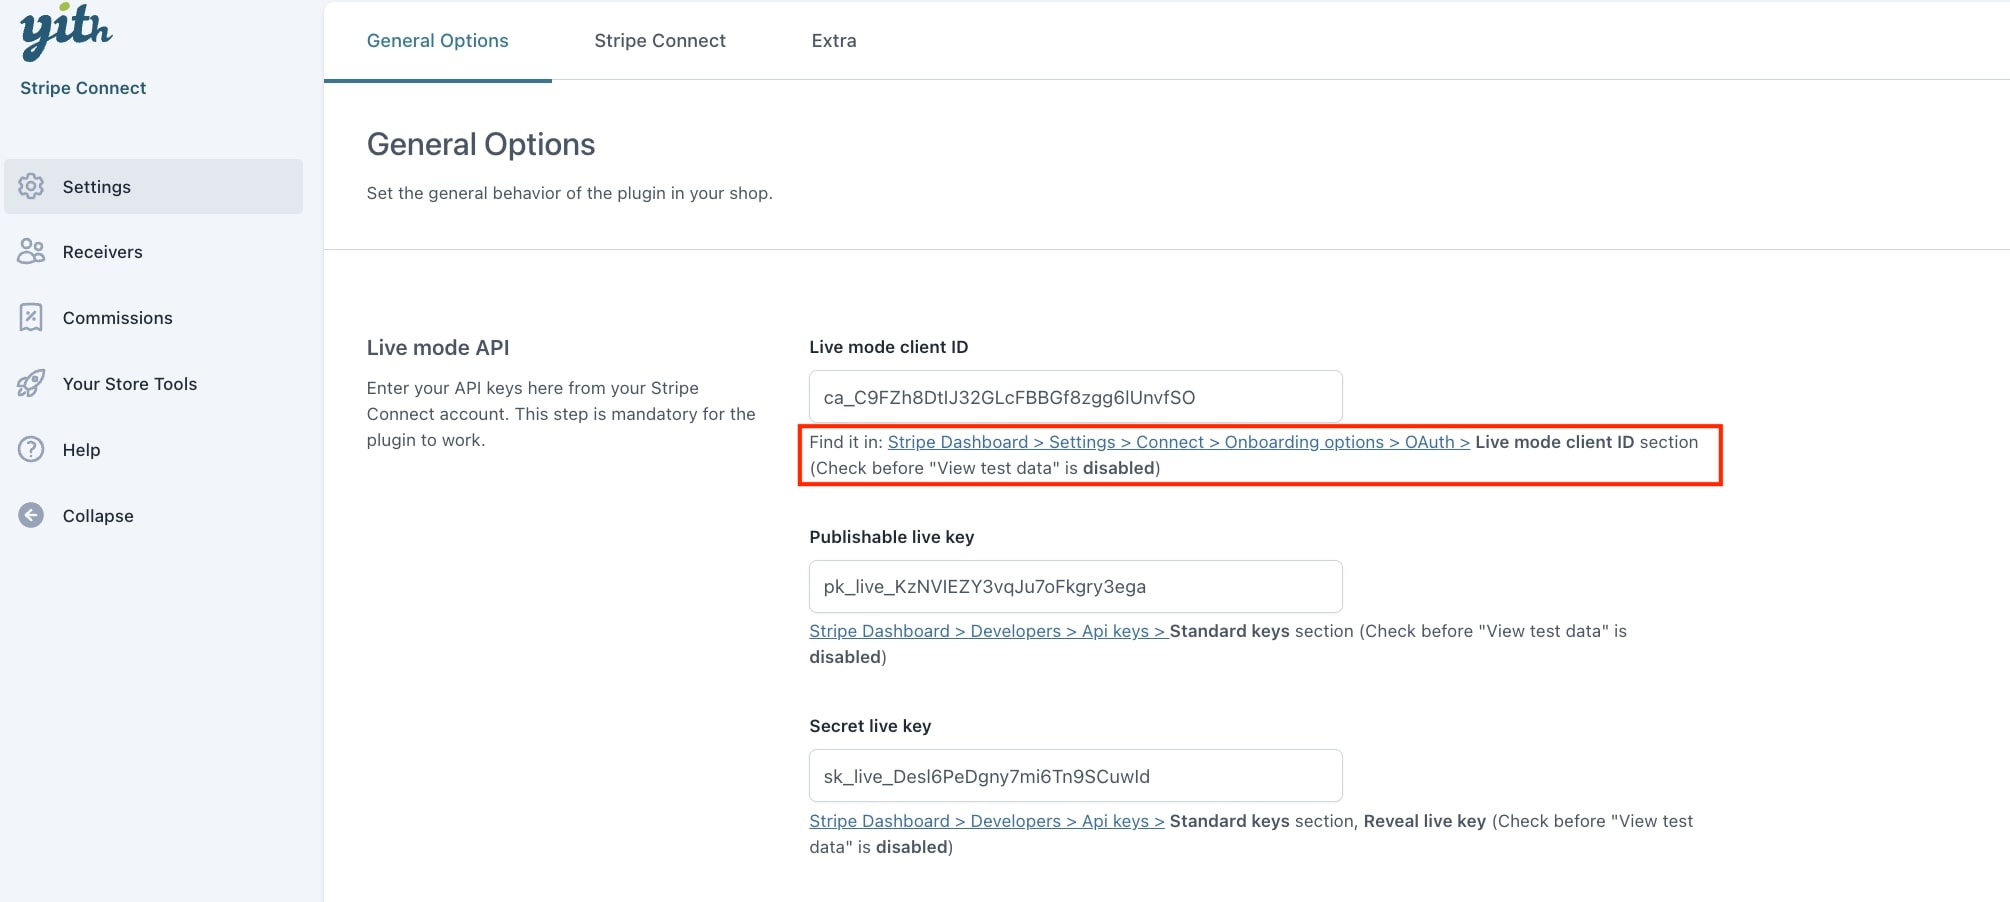
Insert the secret key and publishable keys in the related fields for test and live mode.

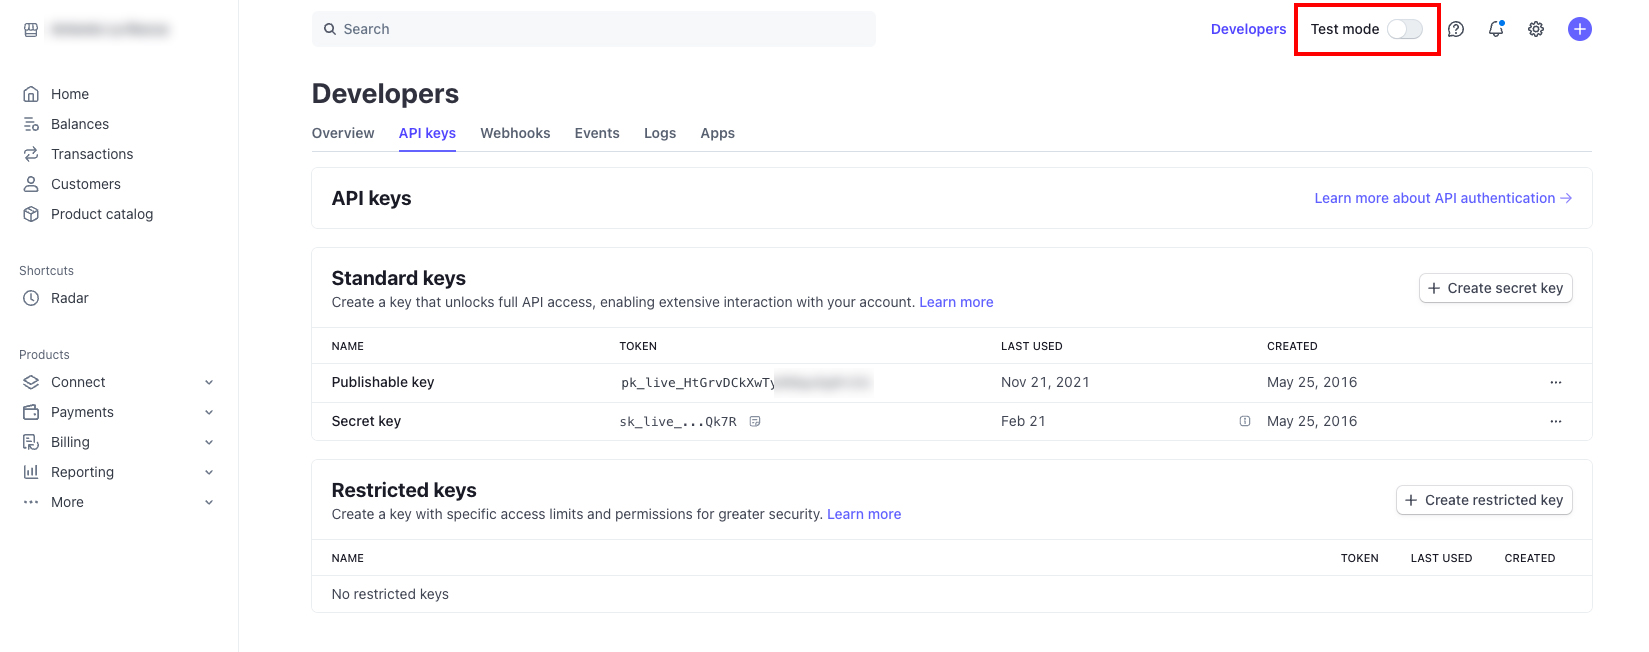
If you still don’t have these keys, go to dashboard.stripe.com and register your account. Once done, go to Developers > API Keys.

Developers > API keys

Here you can find both your Publishable and Secret keys under the Standard keys section: you can copy and paste it into the related field in plugin panel.

Make sure you switch the toggle on the top right between Test or Live mode based on the environment you want to use, as these keys are different.

Restricted keys

Yet, you also have the option to create Restricted keys, and we recommend using this for better control on permissions.

To create one, click on “+ Create restricted key”, then select the “Providing this key to another website” option, and then select the required capabilities.

Providing key to another website
Create restricted key

You can use the default capabilities or customize them. To make sure our plugin works well, you should however select at least the following ones:

  • Core resources
  • Charges
  • Customers
  • Customer session
  • Payment Intents
  • Payment Methods
  • Setup Intents
  • Sources
API key capabilities

Connect user account

To make use of the Stripe commission payments, the user also needs to connect his/her account.

Go to My Account -> Stripe Connect -> Connect with Stripe.

You will be redirected to the Stripe website where you fill out the account form.

If you are an admin in testing mode, you can skip the account form to get access to my account directly.

Skip form test mode

If you are not connected with your Stripe account, the admin will be unable to pay your commission.

Test live mode

There is an option in the plugin to test out all your settings in a live test to make sure all is set up well before you go live and start working with accounts of real clients.

Follow the steps given underneath the API Key fields, they will redirect you to the correct page in your Stripe Account.

Make sure “Viewing test data” is enabled in your Stripe Account. You can doublecheck if it is enabled if you see  “Test mode client ID”.

Test mode stripe connect

Label settings

In Settings > Label settings, you can give a title to the bullet point in the Checkout page.

You can also add the Credit card logos you want to be displayed behind the title on the Checkout page, as shown in the image below.

With the display “Name on Card” function, you can display the field where customers need to fill in the name of the credit cardholder.

Payment settings

Decide after how many days you want the commission to be paid. If you leave it empty or fill in ´0´ there will be an instant commission payment.

Later on, you will be able to see the payment status of all of your commissions in the commission report.

Please, note: if you are using YITH Stripe Connect with YITH Multi Vendor, this option it not supported, so payments to vendors can only be paid instantly and cannot be delayed.

Flow payments

Choosing the best charging approach depends on many factors. With YITH Stripe Connect, you can use Direct Charges, Destination Charges, or Separate charges and transfers.

Refer to your platform profile to see your customized recommendation keeping in mind that both Direct charges and Destination charges apply only on specific conditions.

Direct charges

Direct charges allow making charges directly on the connected account and taking fees in the process. Conversely to Separate charges and transfers, the payment of the order will go directly to the account connected without being first received by the site/platform owner.

The payment itself appears as a charge in the connected account, not in your platform account.

This payment flow is mainly used when end customers directly make transactions with the connected account and are often unaware of the platform’s existence.

PLEASE NOTE – Direct charges work only with one single receiver and can’t be used with subscription-based products created with YITH Subscription, nor in a marketplace environment built with YITH Multi Vendor

Direct charges

Separate charges and transfers is the default payment flow. To use Direct charges go to YITH > Stripe Connect > Settings > Payment flow settings and select it from the dropdown in Alternative flow.

PLEASE NOTE – If Direct charges is not applicable, the system will fallback to Separate Charges and Transfers.

Since the transfer is made at the time of payment, Direct charges won’t allow using Delay settings.

For further details about Direct charges, please refer to Stripe documentation.


Destination charges

With Destination charges, you can create charges on your platform account, take fees, and then transfer remaining funds to your connected account. Destination charges are created on the platform, but as part of the charge operation, funds are transferred to the connected account specified in the parameter of the charge.
This payment flow is mainly used when end customers transact with the platform for products or services provided by a single connected account.

PLEASE NOTE – Destination charges work only with one single receiver.

Destination charges

Separate charges and transfers is the default payment flow. To use Destination charges go to YITH > Stripe Connect > Settings > Payment flow settings and select it from the dropdown in Alternative flow.

PLEASE NOTE – If Destination charges is not applicable, the system will fallback to Separate Charges and Transfers.

Since the transfer is made at the time of payment, Destination charges won’t allow using Delay settings.

For further details about Destination charges, please refer to Stripe documentation


Separate charges and transfers

With Separate charges and transfers, you can make charges on your platform account on behalf of connected accounts, perform transfers separately, and retain funds in the process.

This payment flow is mainly used when multiple connected accounts are involved in the transaction, or a specific connected account isn’t known at the time of charge, or transfer cannot be made at the time of charge.

Separate charges and transfers

For further details about Separate charges and transfers, please refer to Stripe documentation.

Receivers

In the Receivers tab, you will be able to manage the receivers, set up specific rules for each one of them as well as add new receivers manually.

To add new receives click the option ”Add Receivers’‘ and a new popup will show up to set it up.

For Commission, you can either choose for a fixed price or a percentage.

For Products, you can choose one product (per user) or all products.

You can set one or more users/receivers for the same product, with a different commission rate. Per line, you can only add one product (or all products), if you want to give commission on several products for the same receiver. You will have to add a new receiver to each product.

To add a new receiver, you will have to add his/her Stripe ID to make the connection.

Connect account (client)

In the “My Account” page, the client can find the link to connect with his/her Stripe Account. To receive commissions, the client needs to be connected. If he/she is disconnected, he/she will not receive a commission.