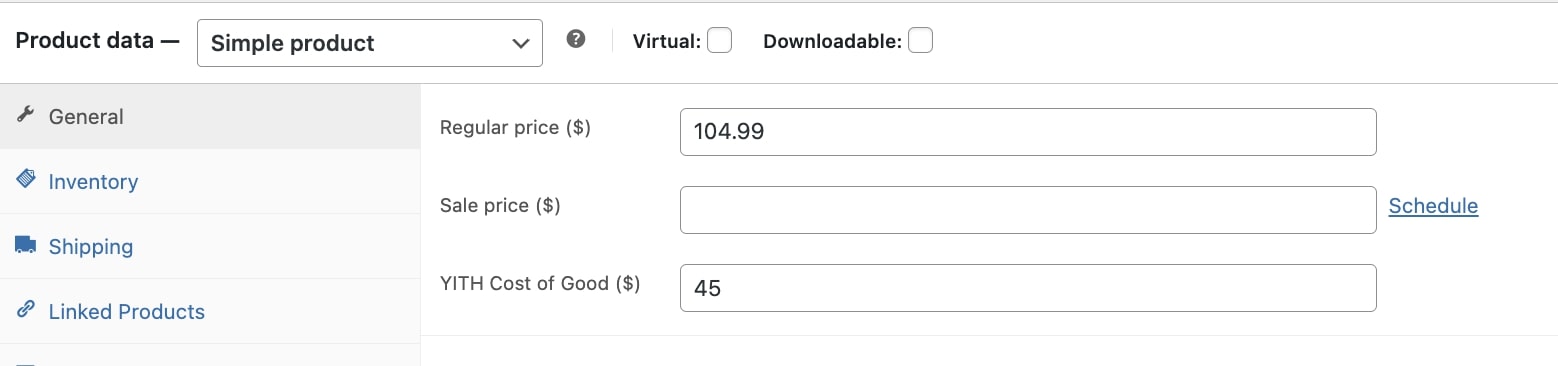
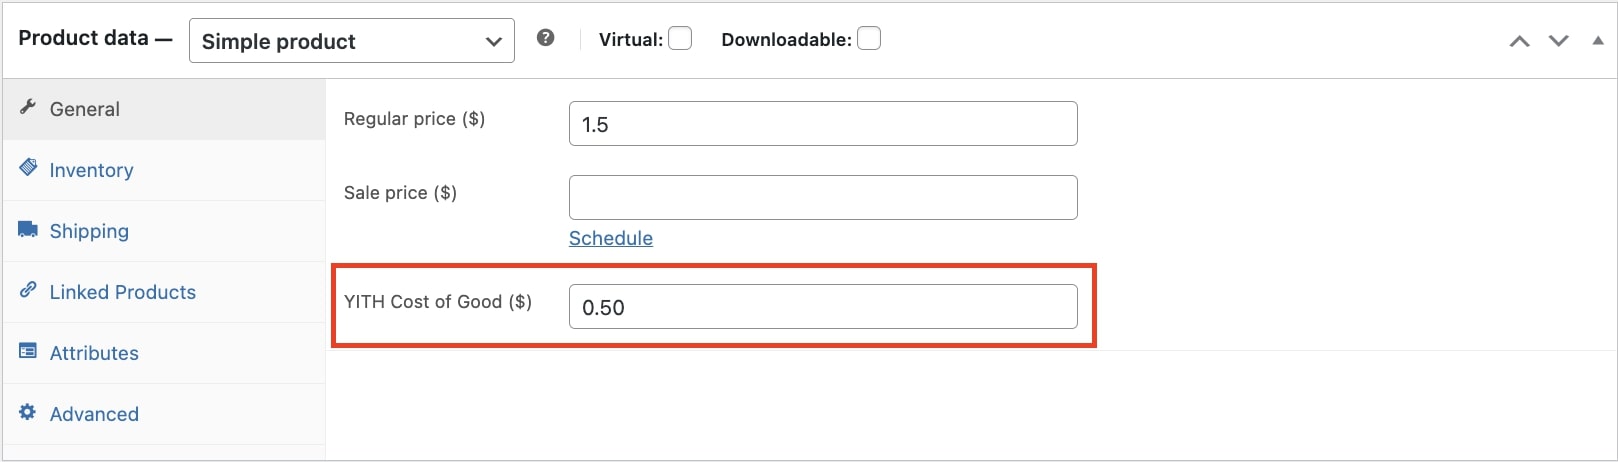
To begin with, it is important to set the cost of the products. For simple products, you can easily set the cost by going to the product edit page Product data> General> YITH Cost of Good.
For variable products, you will be able to add the main cost to all variations or individually cost per variation.
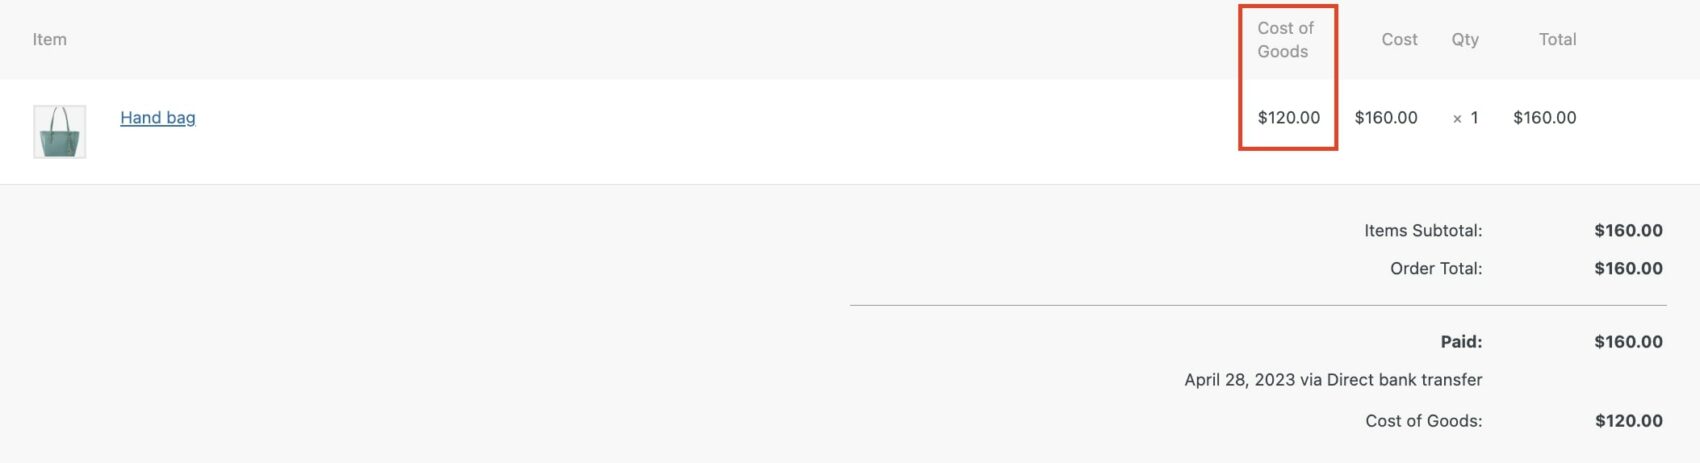
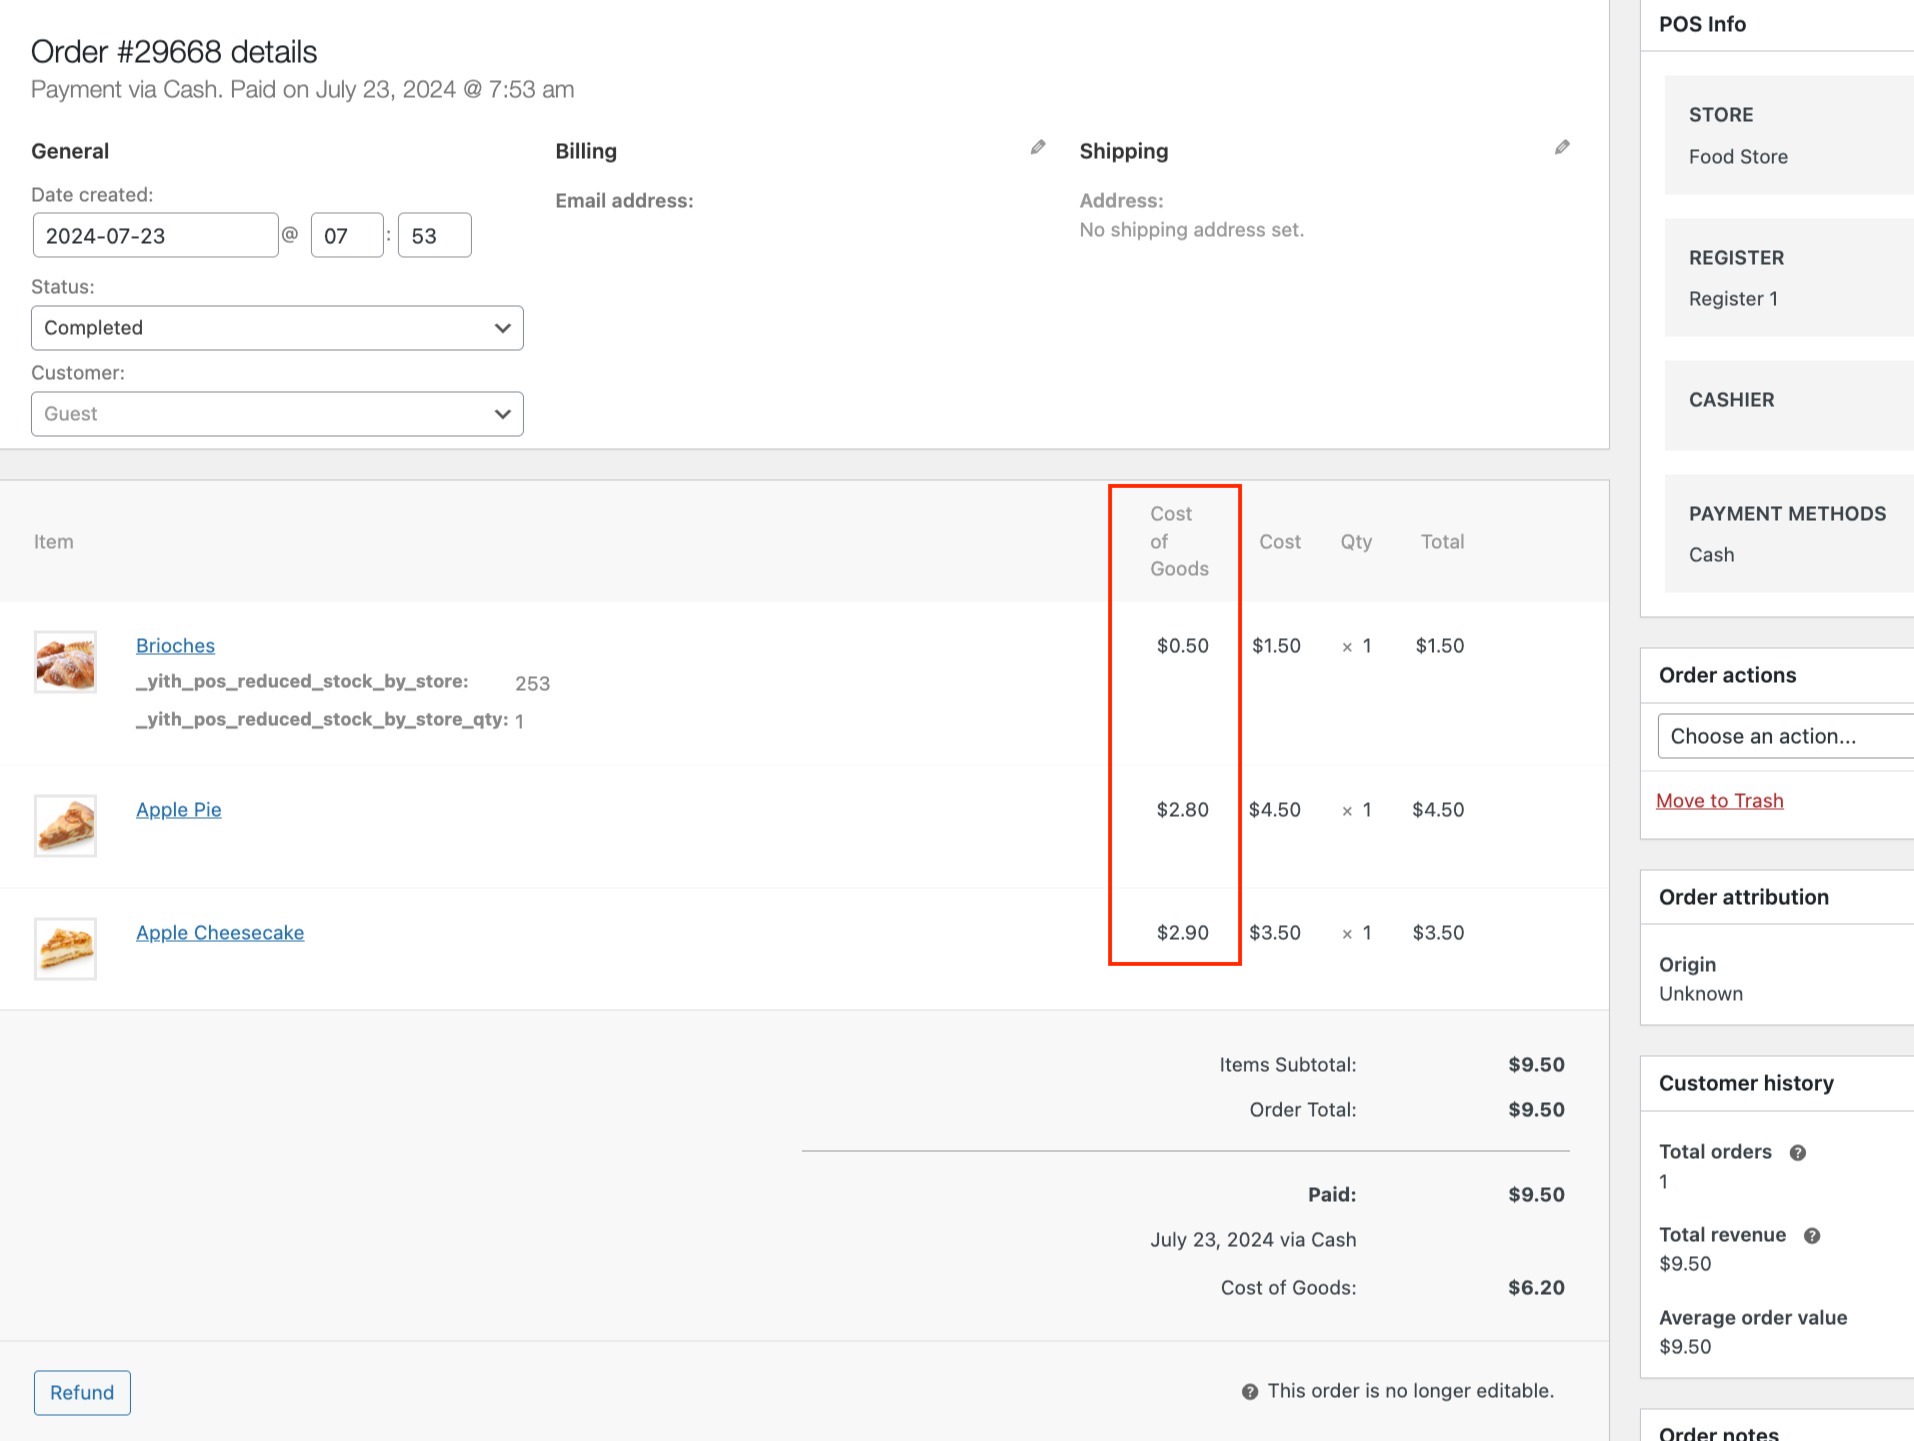
Besides the Reports (read more about them here), the cost of your products will be available in the Orders details, both for every single product and for the entire order, just below the Order totals.
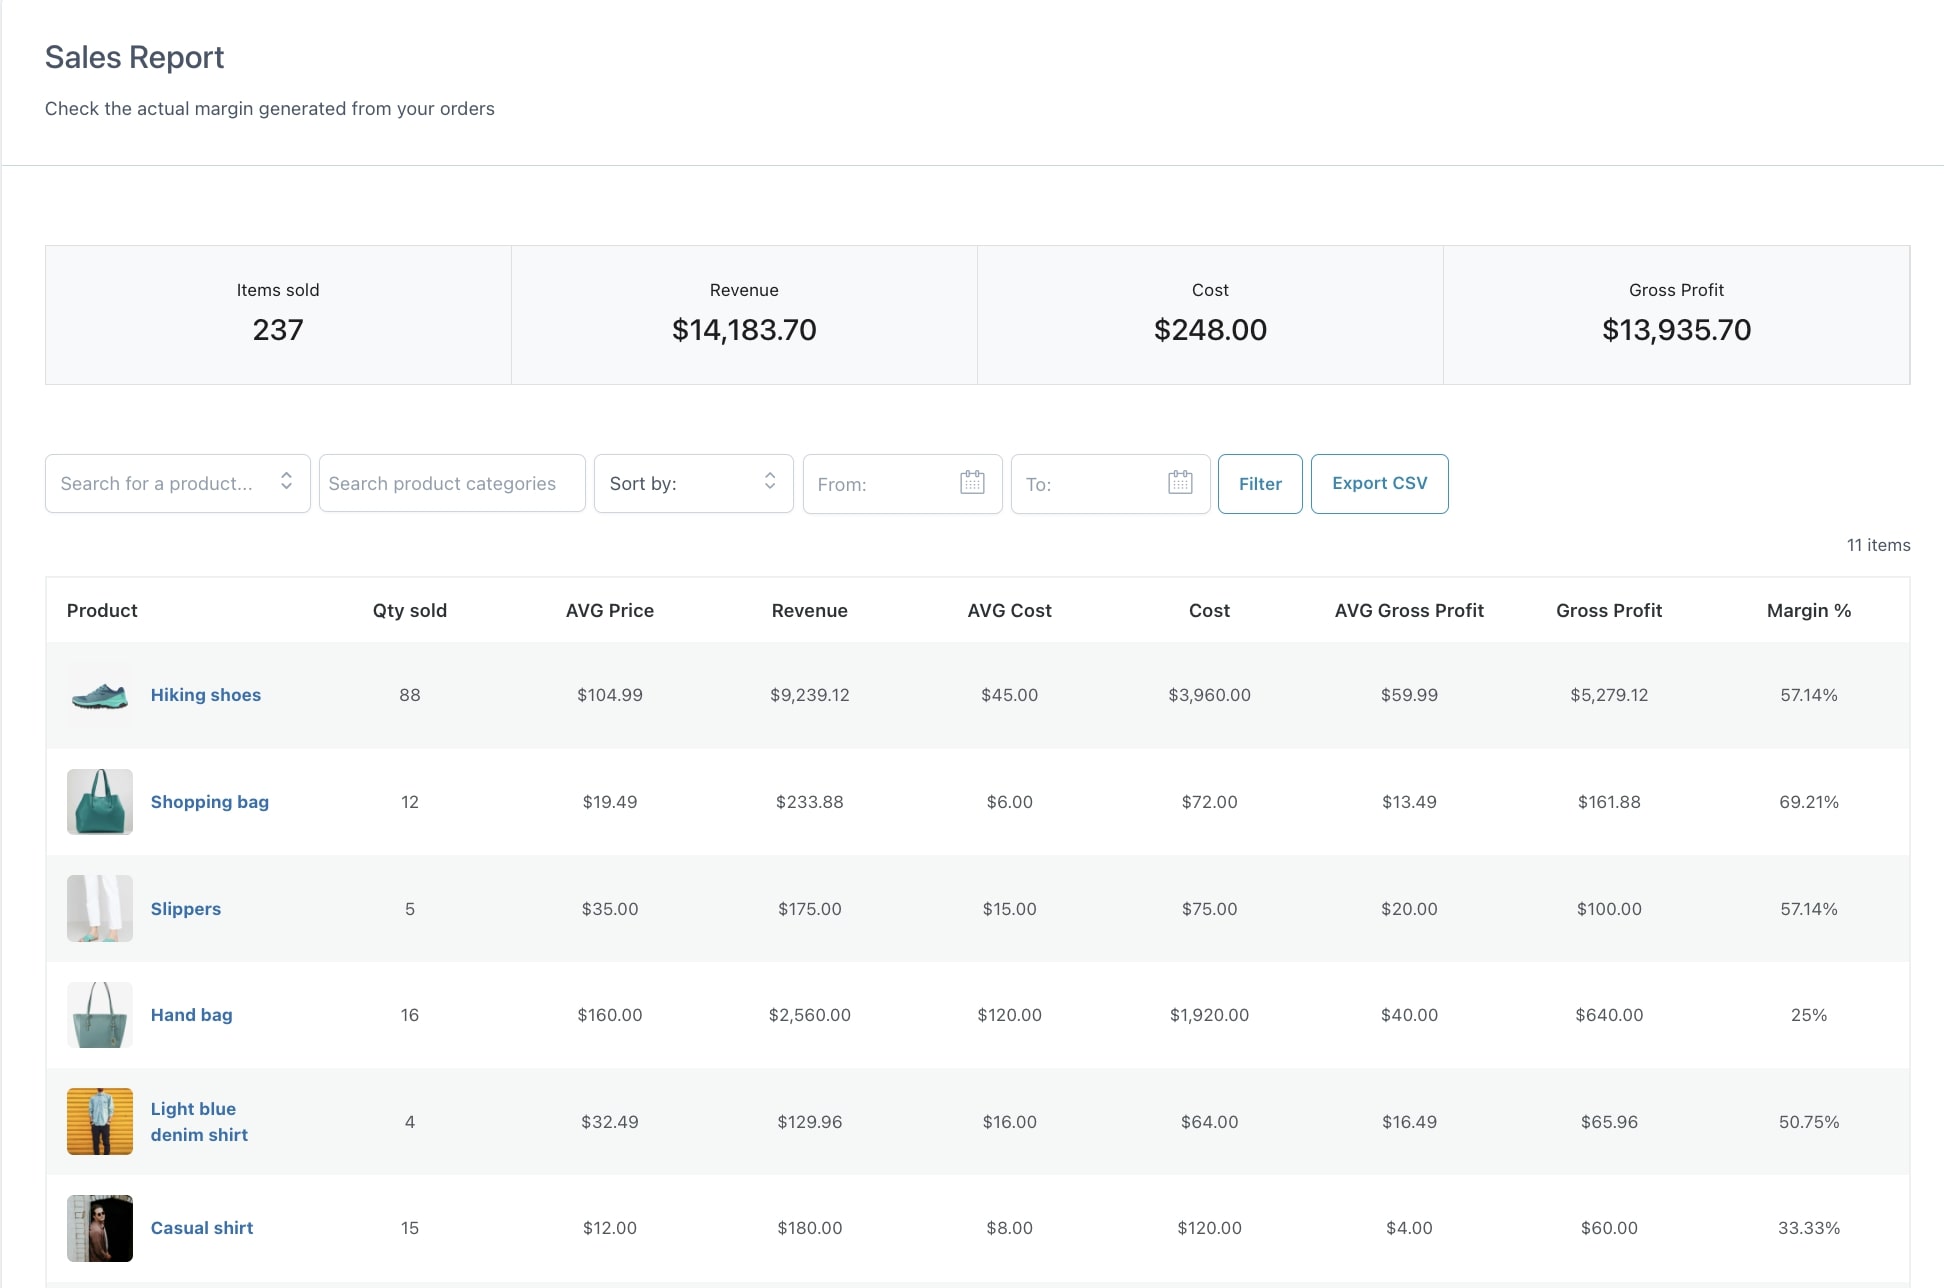
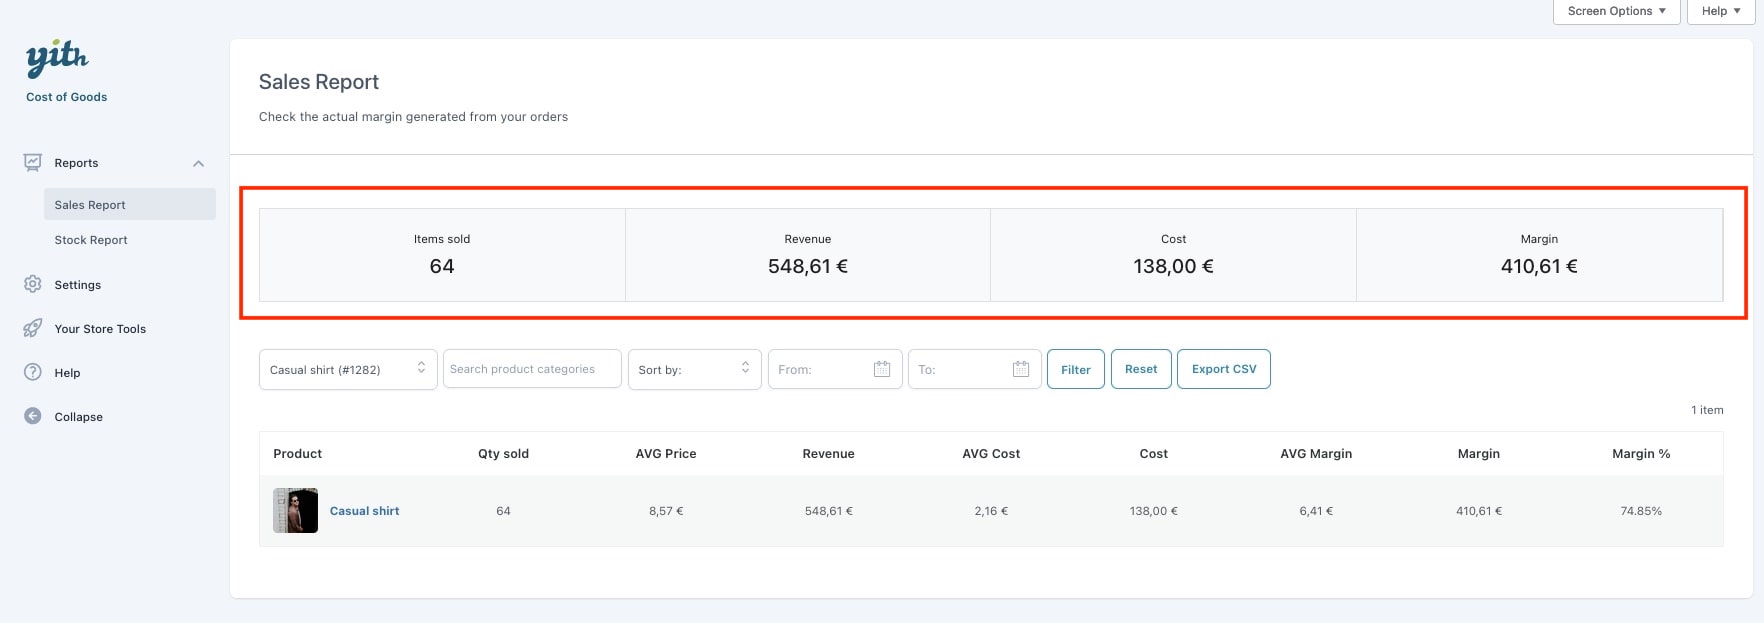
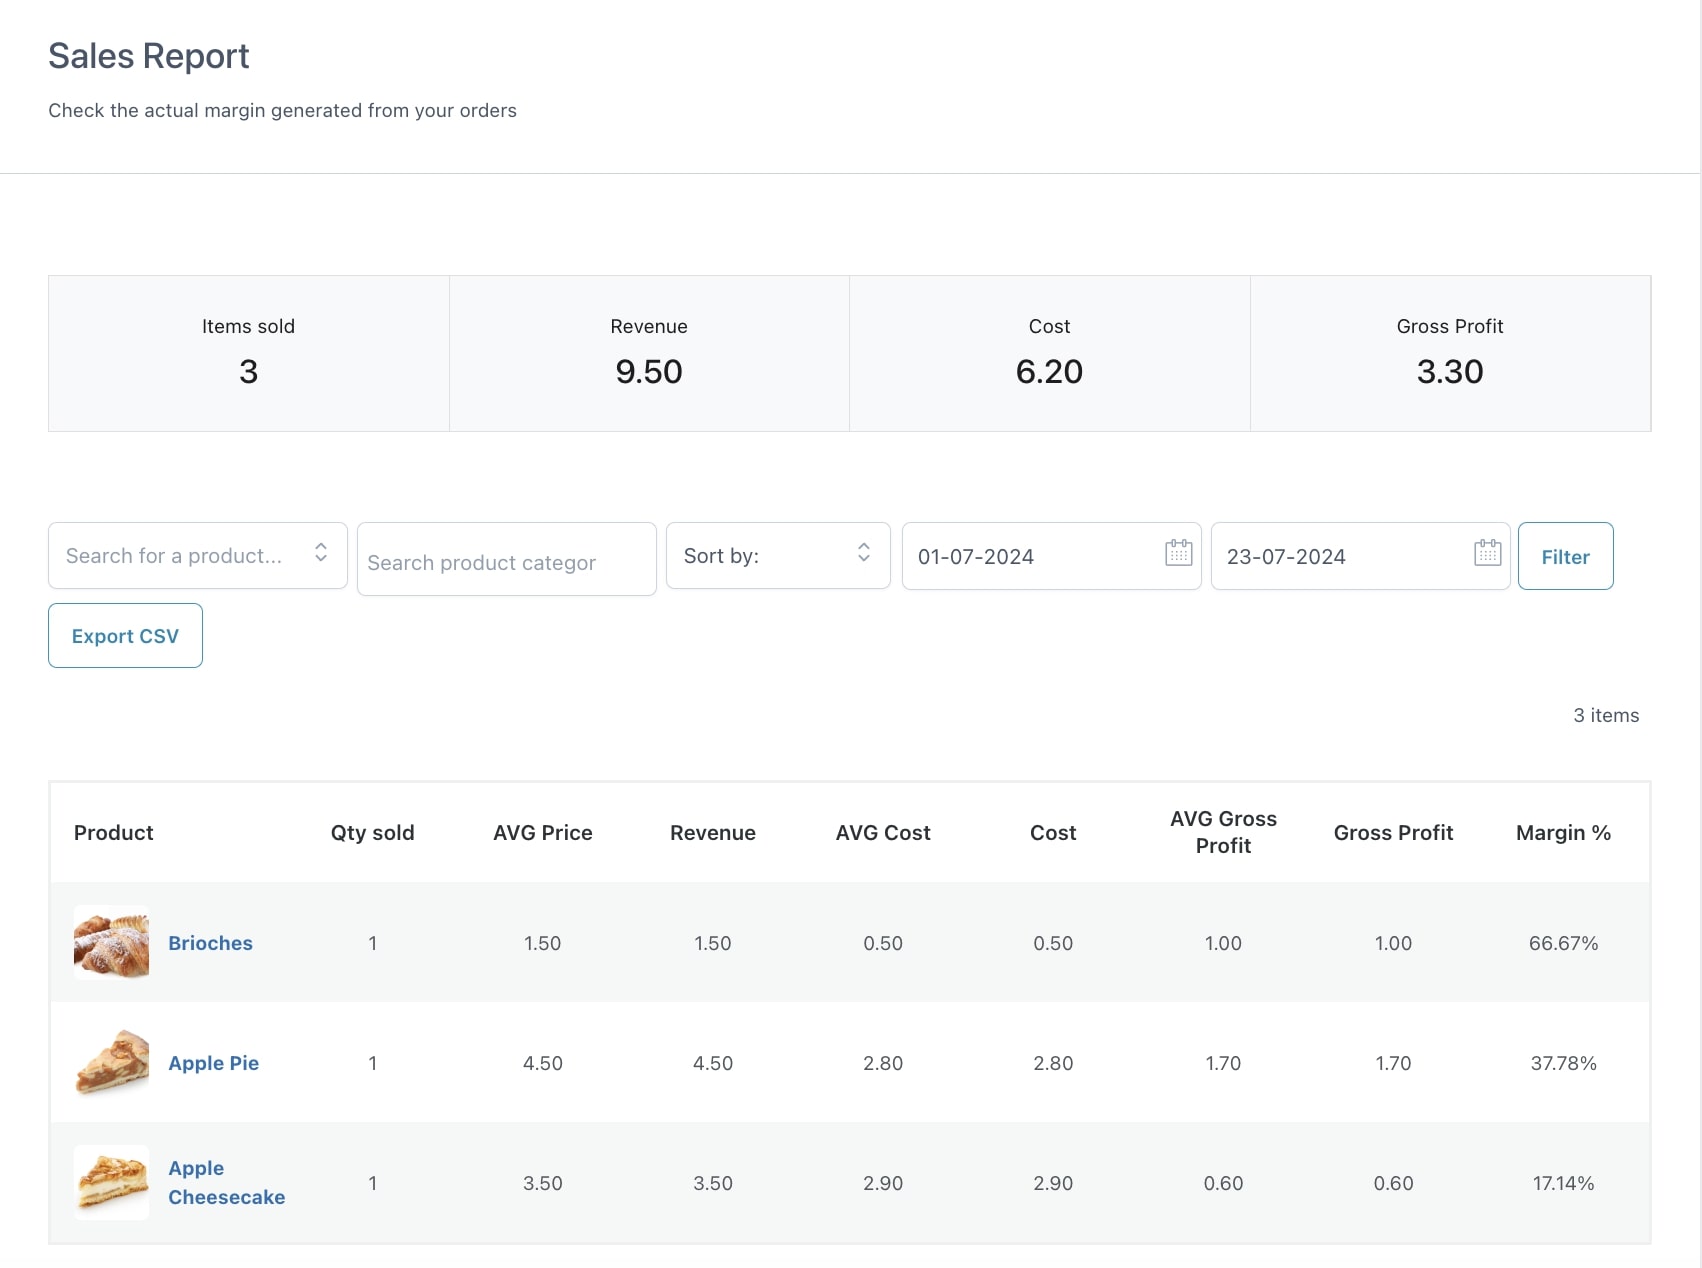
This report is about the actual sales processed and takes into account the historical price and cost changes at product level.
So the main report allows you manage your products giving you the option to have a clear scenario about how your sales are going and the benefit you are making thanks to your products.
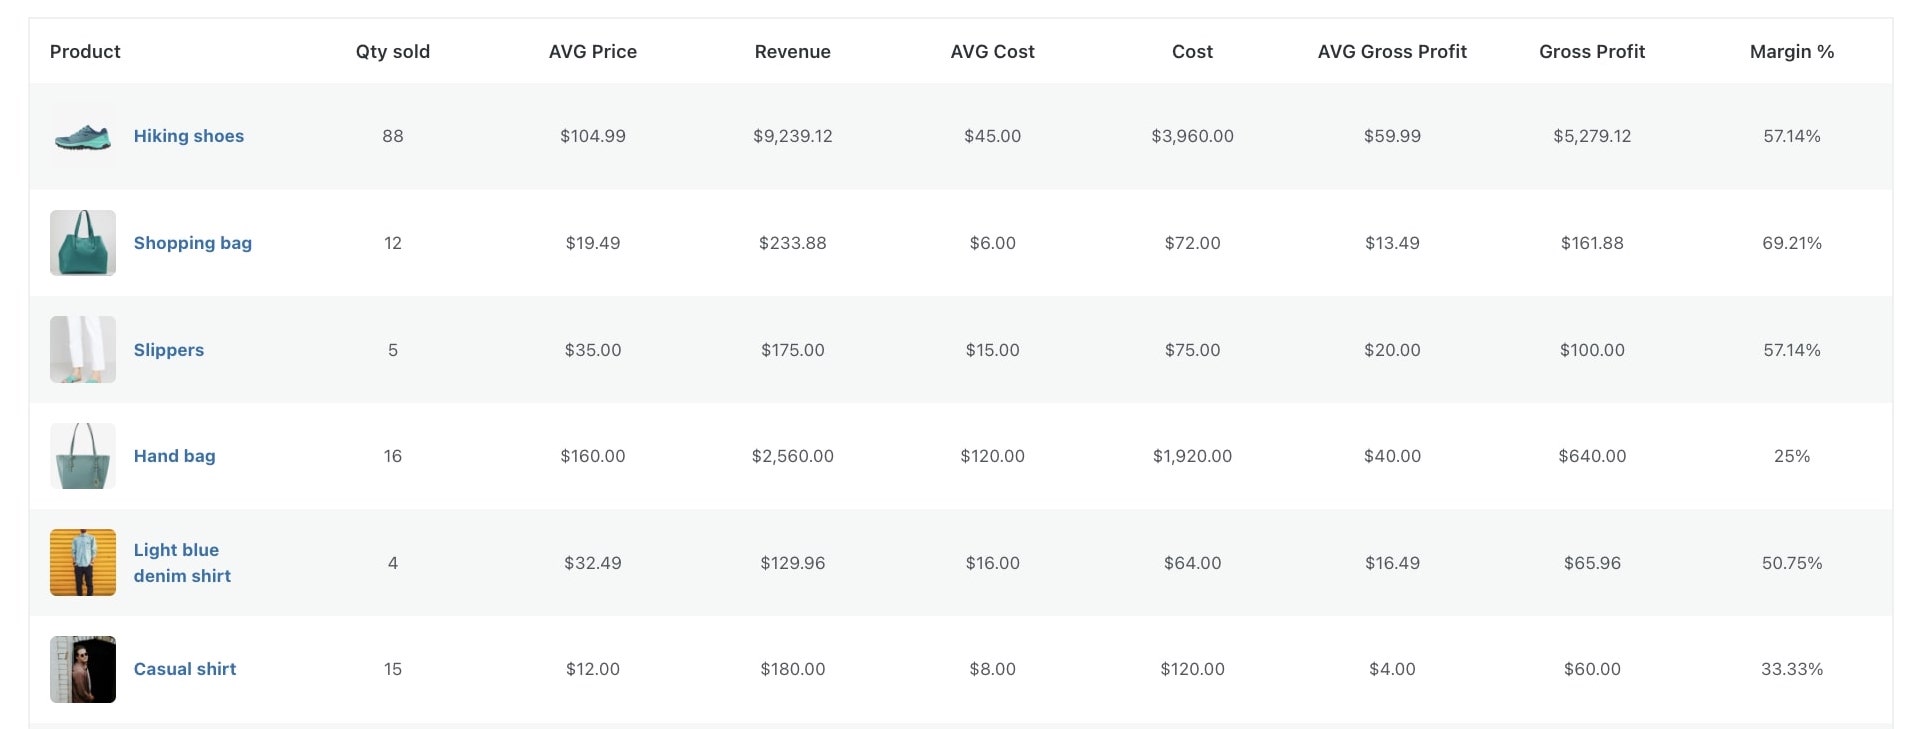
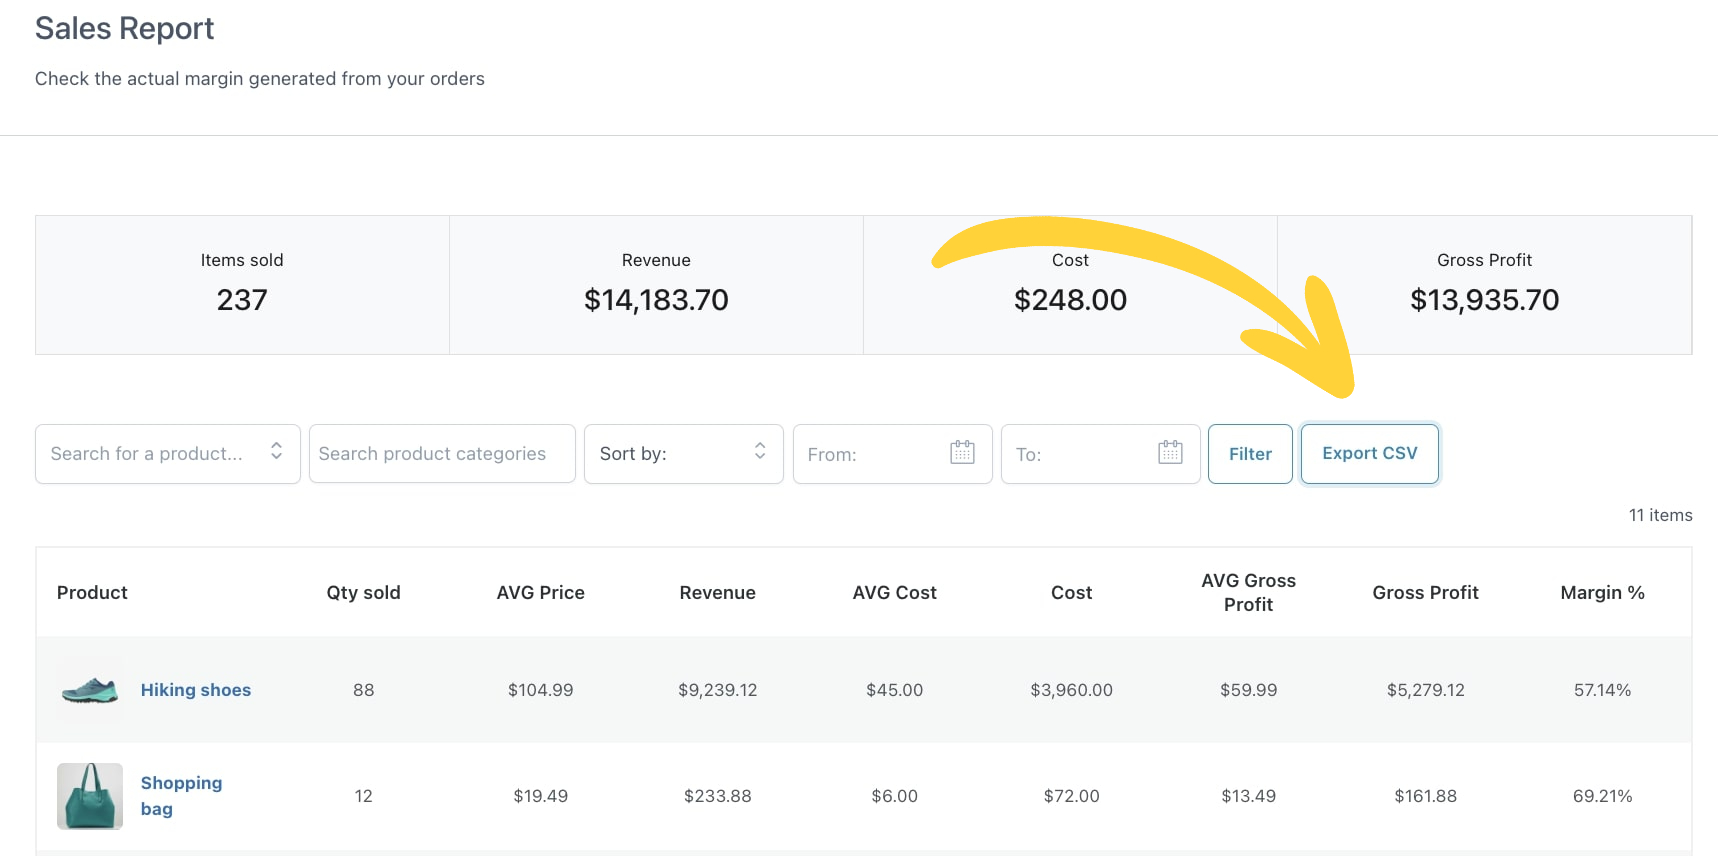
In the Reports you will see the following columns:
Product
Quantity sold
Average Product Price: this is the unit price of the product and will consider an average of the various prices a product had, in case its price changed (it’s calculated as total sales/units sold).
Revenue: this is the income from all actual sales of a product and it takes into account historical prices (so if I sold 3 items at $30 and 4 items at $25, I will see a total of 7 items sold for a total revenue of 190$).
Average Product Cost: similar idea as for the Average Product Price, it takes into account the historical changes (it’s calculated as total cost/units sold).
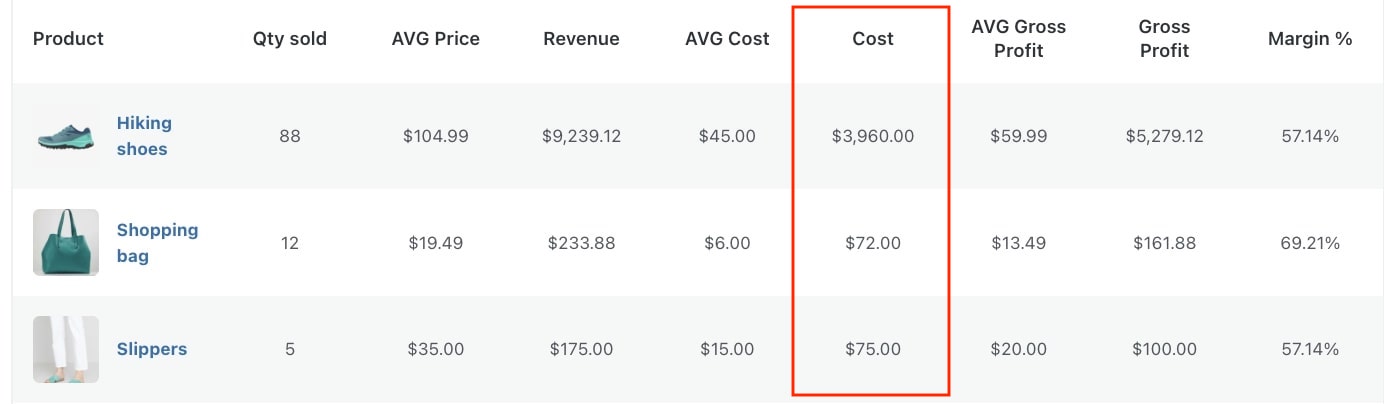
Cost: this is the actual cost of items sold, takes into account the historical cost changes.
Average Gross profit: similar thing as for Cost, it’s calculated as gross profit/units sold.
Gross Profit: this is the total revenue minus total cost.
Margin: this is the profit margin, a % value calculated as profit/revenue.
Any custom fields you’ve added (as explained here).
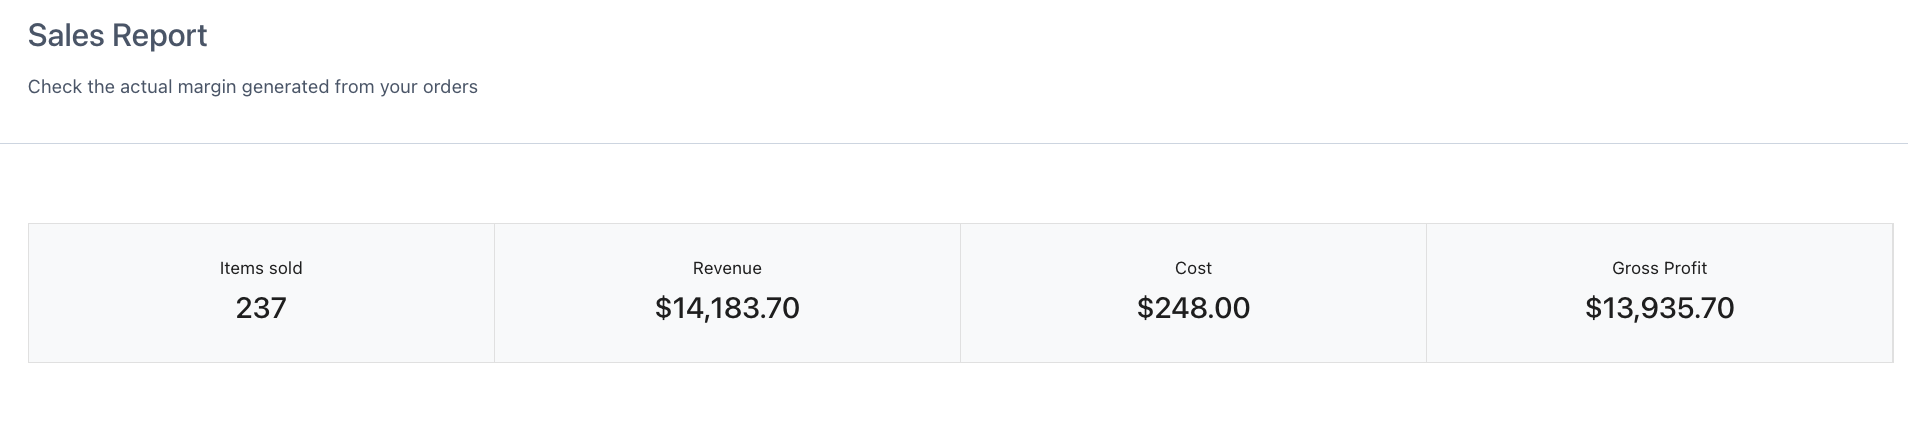
Moreover, you’ll see a recap of the total costs and margin of profits of your shop, some additional information can be included in the totals, more information here.
Note: each item will be calculated in the tables as soon as the order is created, so since the order is ”on-hold”.
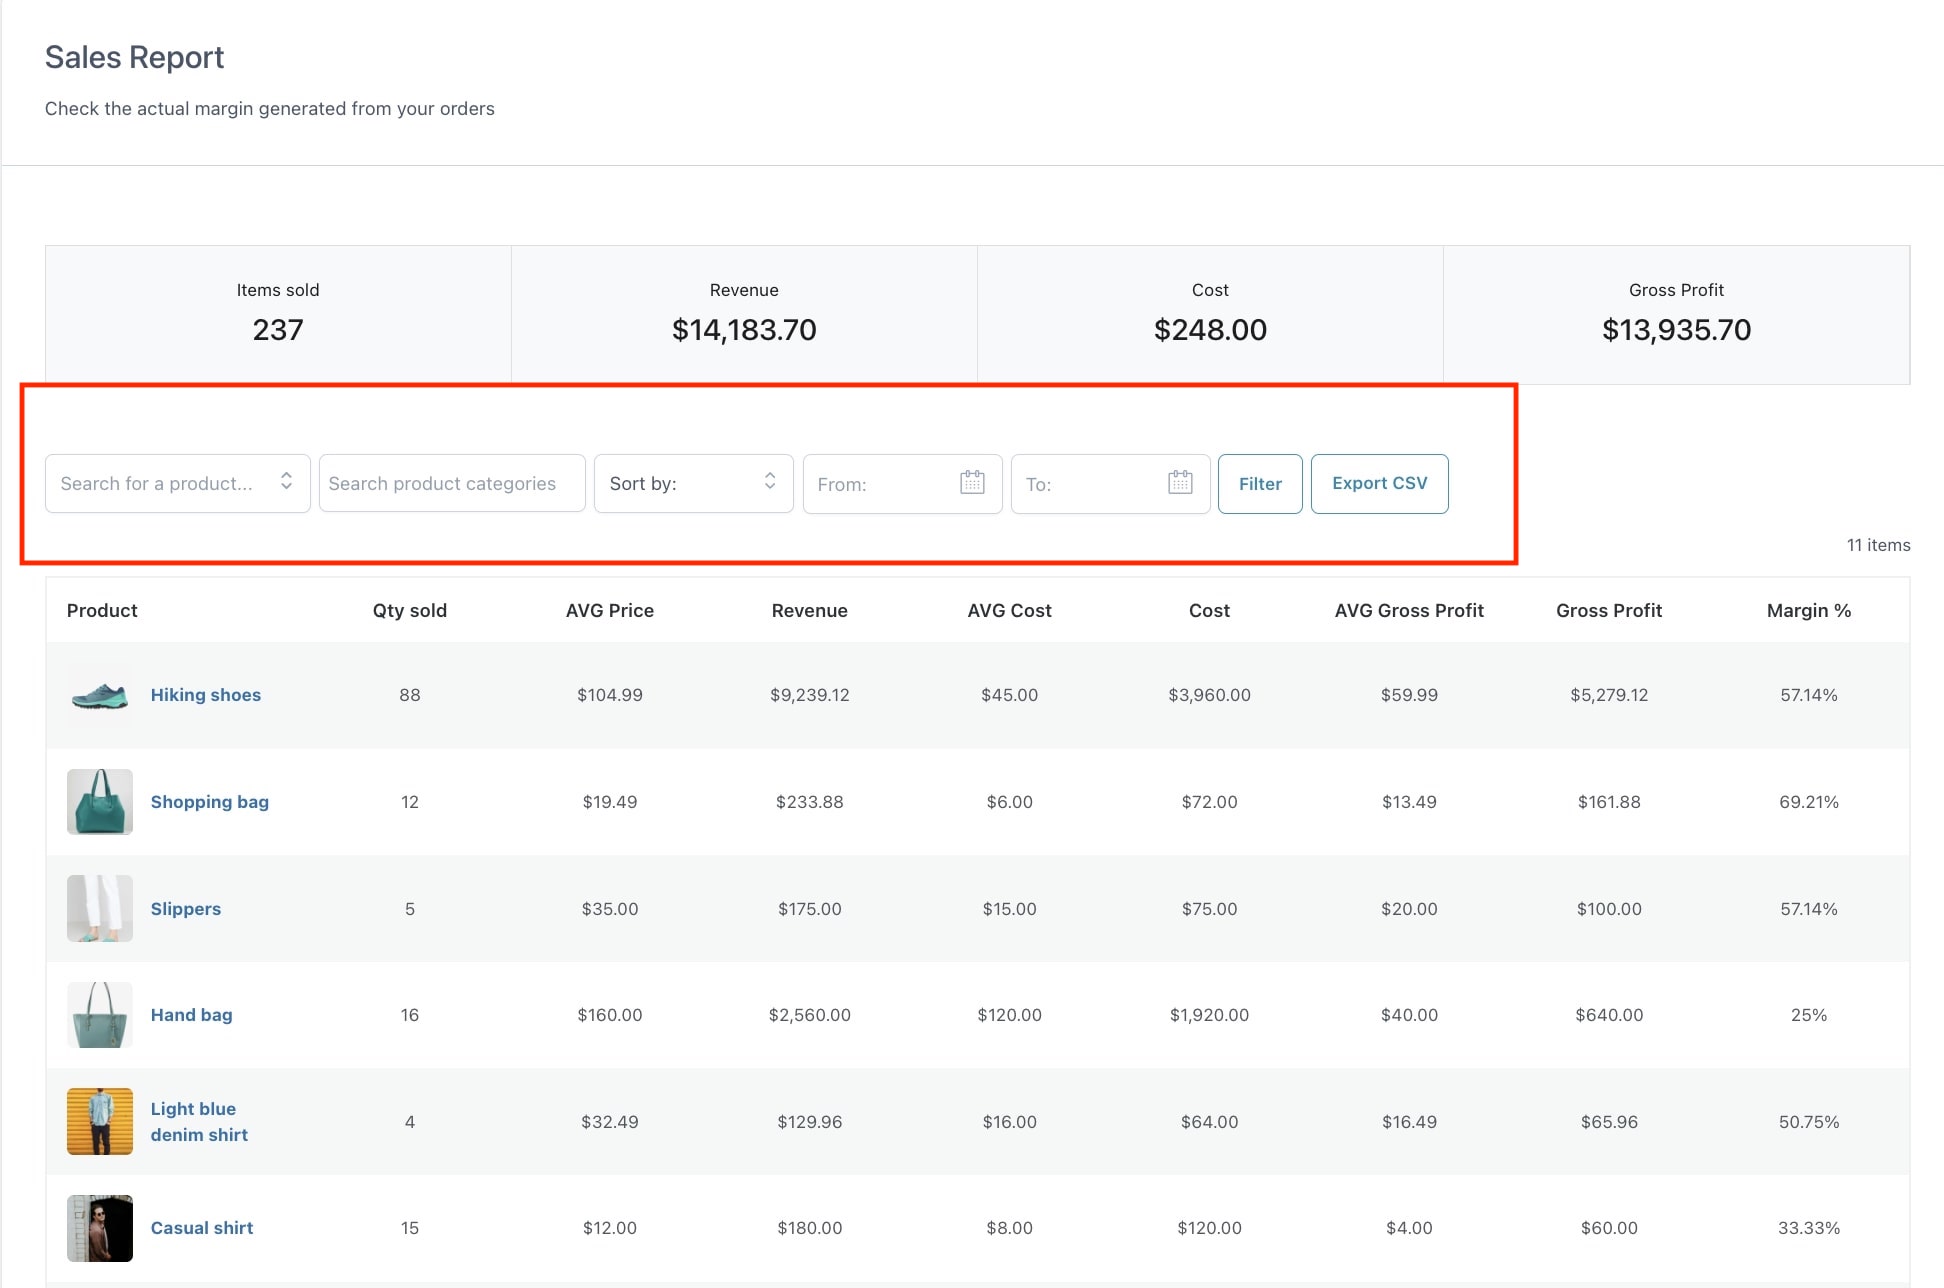
This report is very flexible. You would also be able to filter sales by:
Product
Category
Sort by
Name
Quantity
Revenue
Cost
Gross profit
From
To
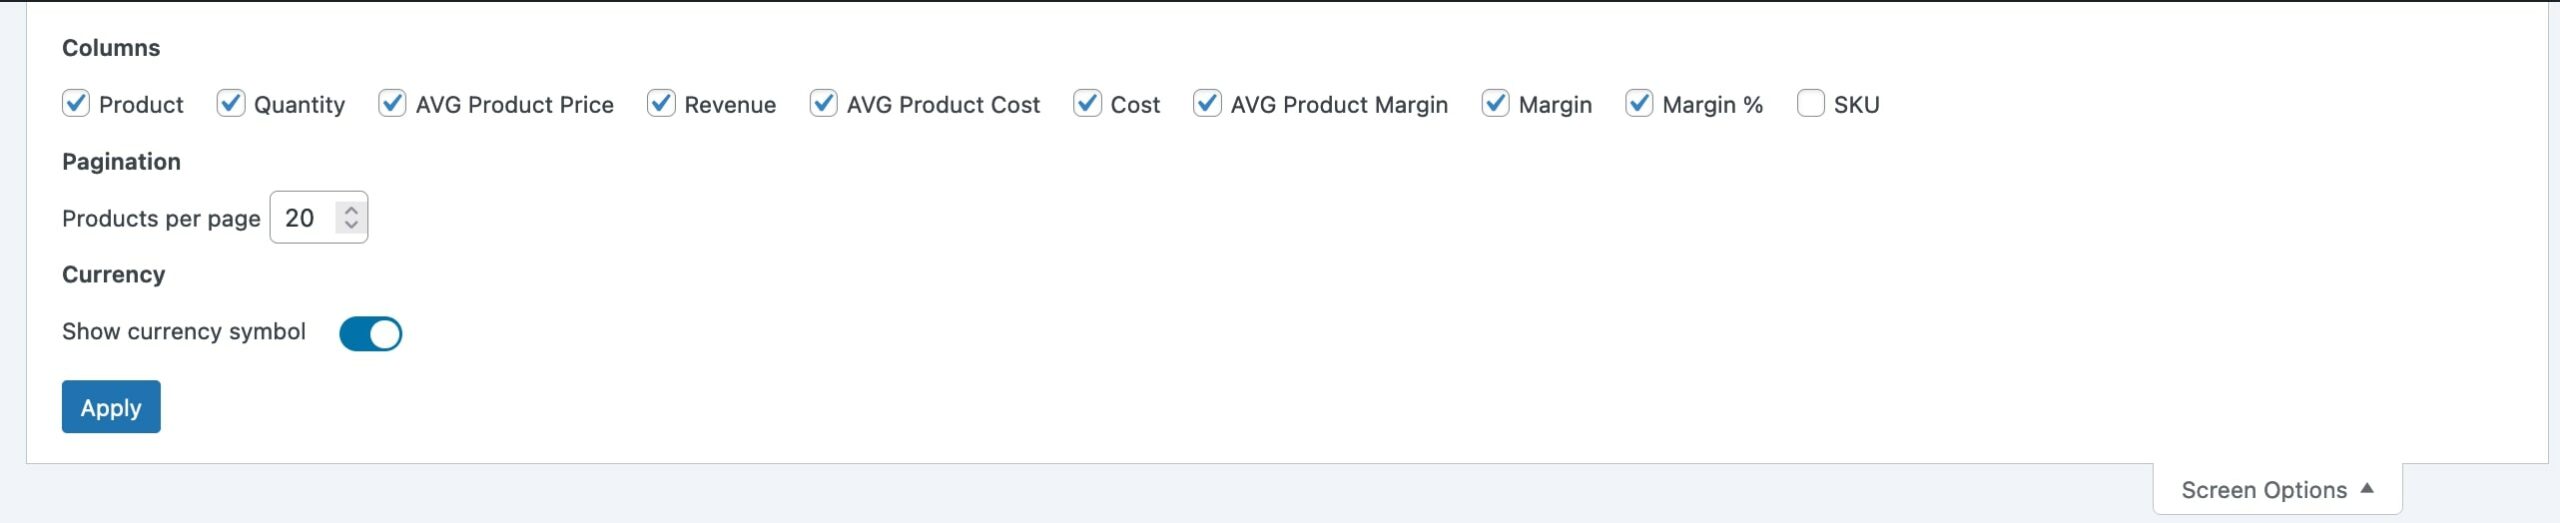
It would be also possible to show/hide the columns available in the report table, modify the product pagination and show/hide the currency symbol by clicking at the top of page and click in ‘‘screen options”.
Once the changes are applied, the report will be modified accordingly.
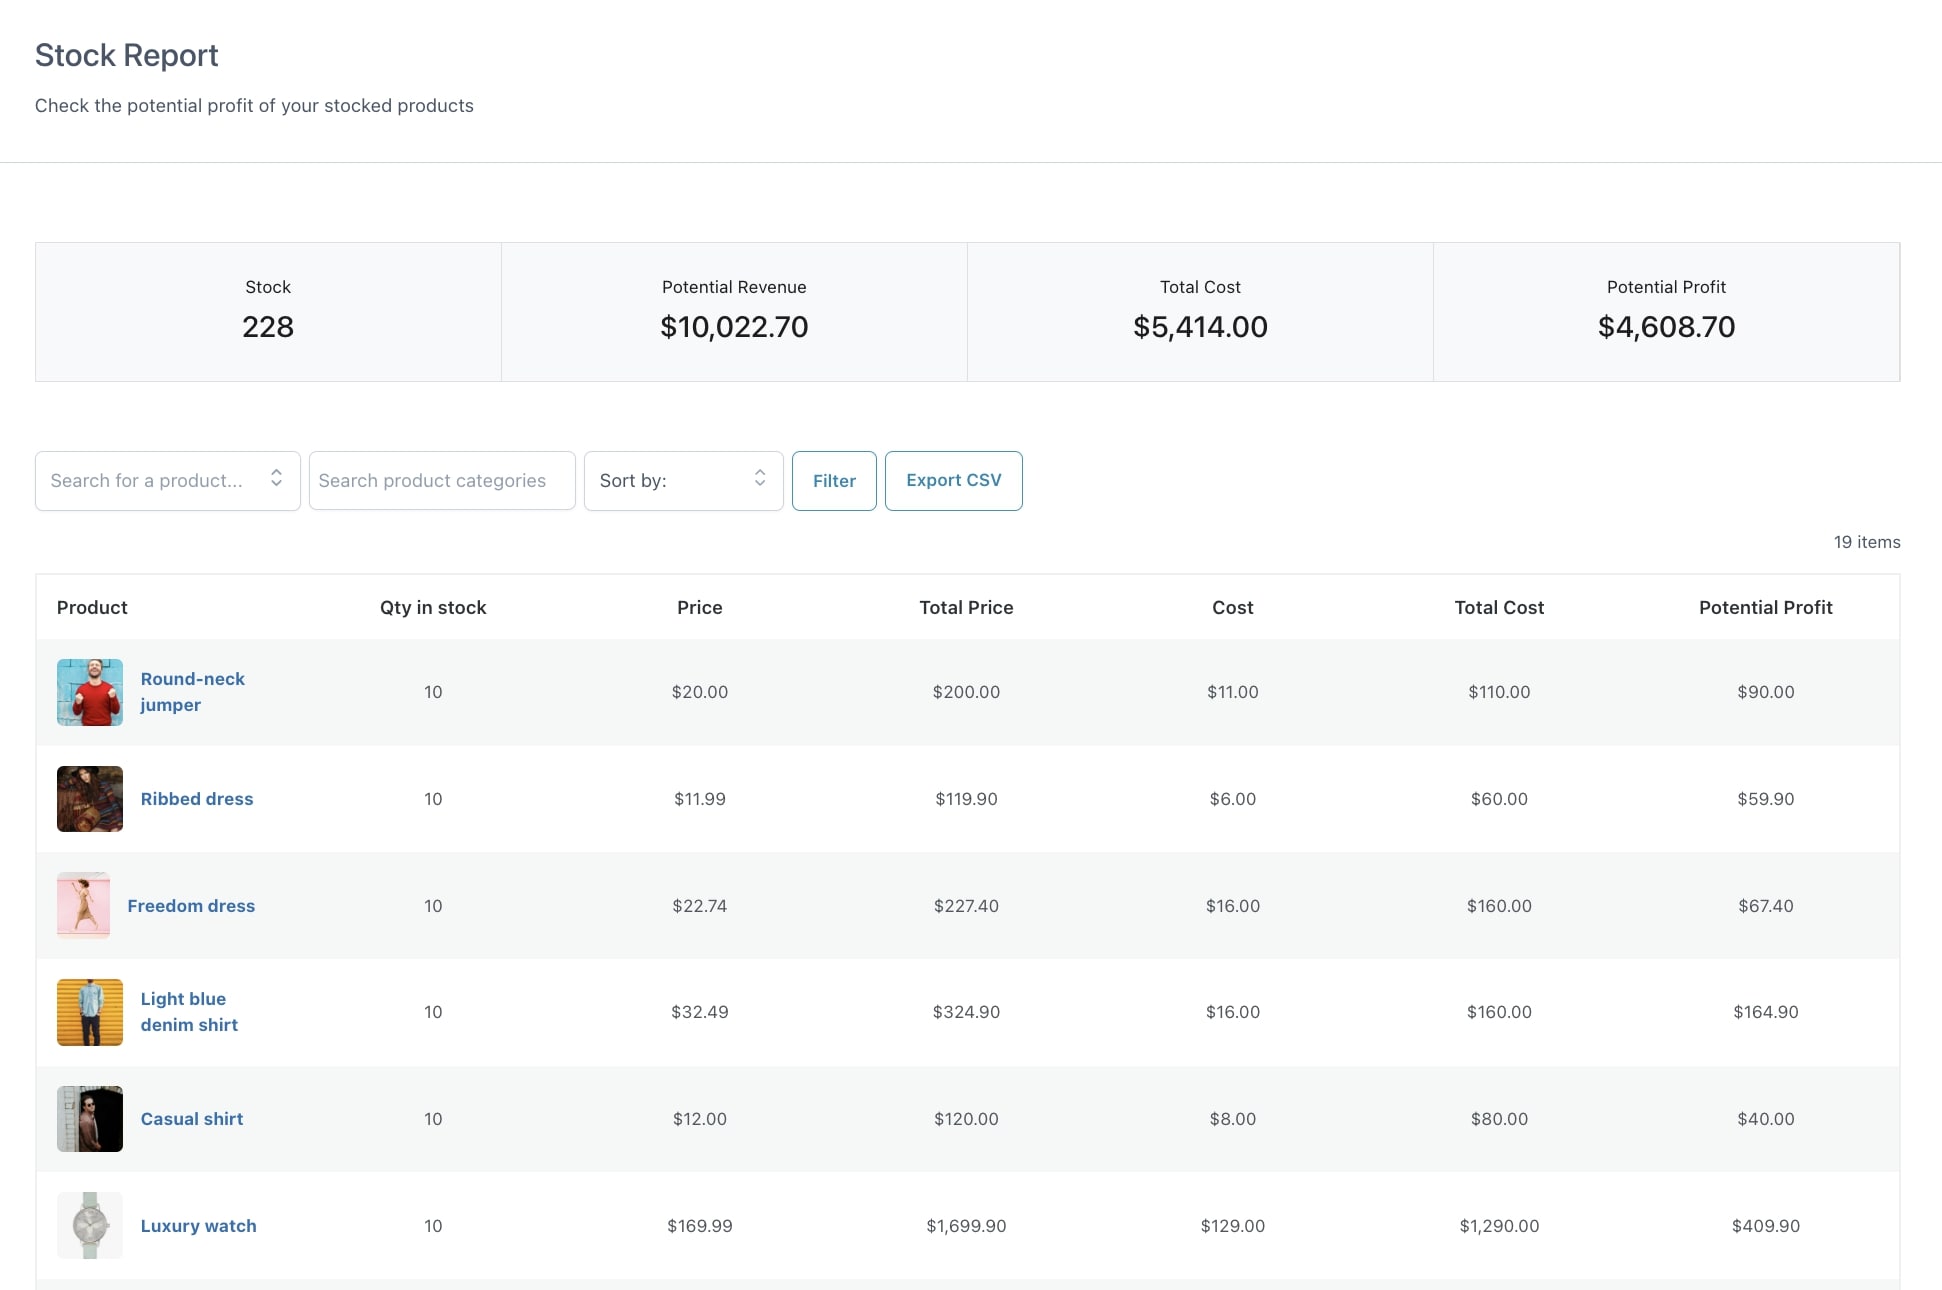
Stock Report
The stock report fulfills the same function with an advantage, it allows you to have an estimate of the potential benefit of your stock.
Also these reports can be filtered by product, category and sort it by.
Note: this report does not take into account the historical changes of the product price and cost when new stock items are added.
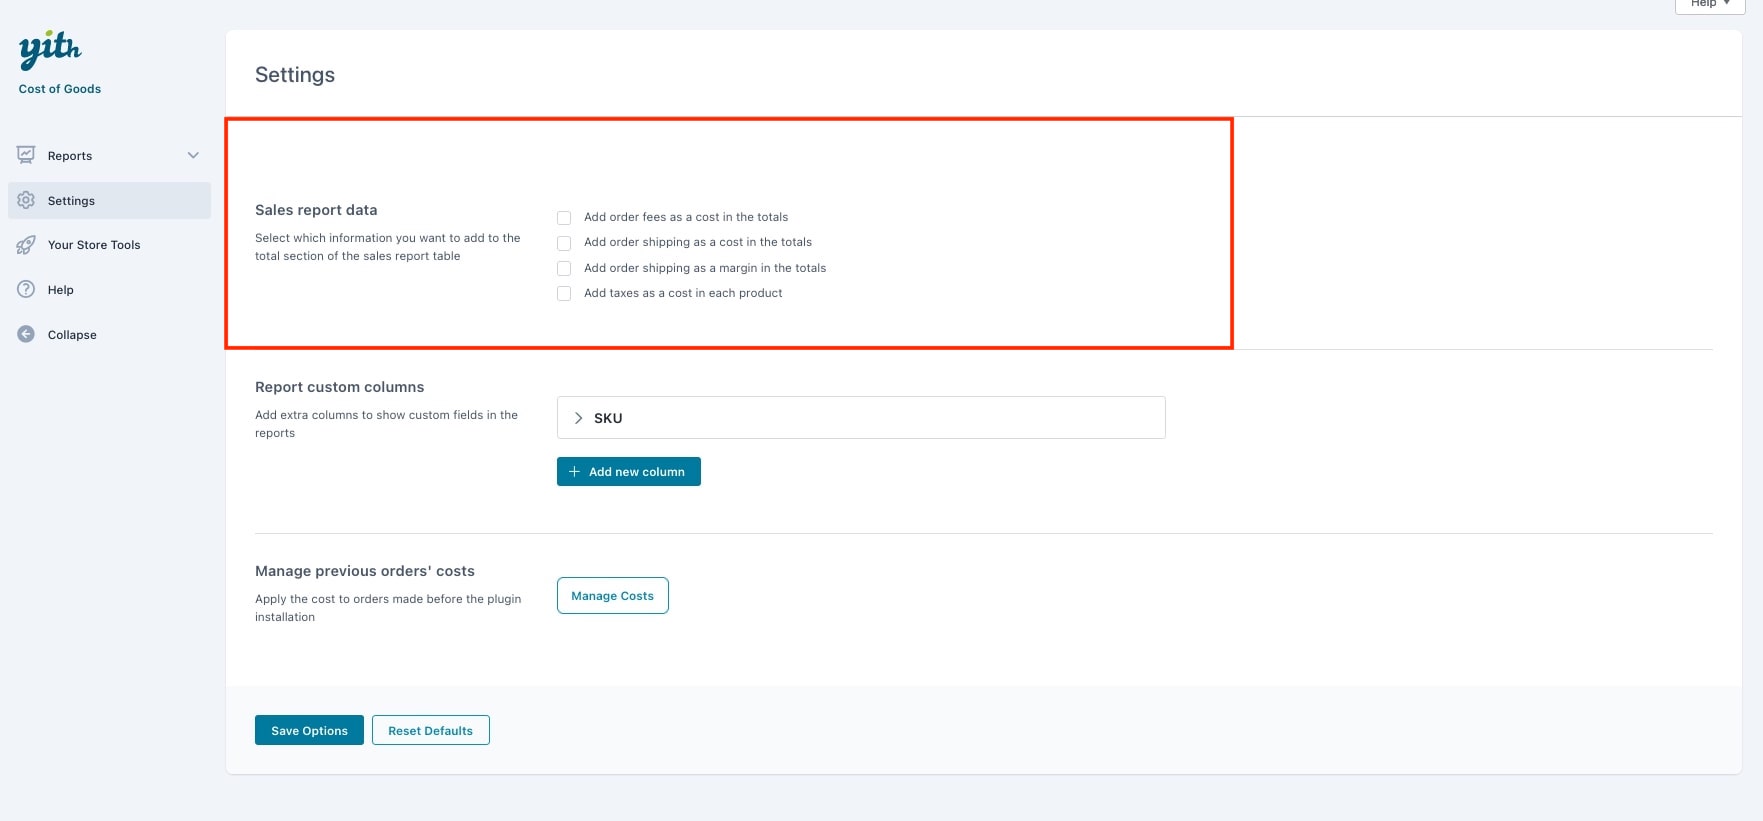
The first section of the Settings tab would allow you to include some additional information to the totals table visible in Reports as well as to the report itself.
Let’s review what additional information we can add to the totals and to the report only.
Add order fees as a cost in the totals
Add order shipping as a cost in the totals
Add order shipping as a profit in the totals
Add taxes as a cost in each product
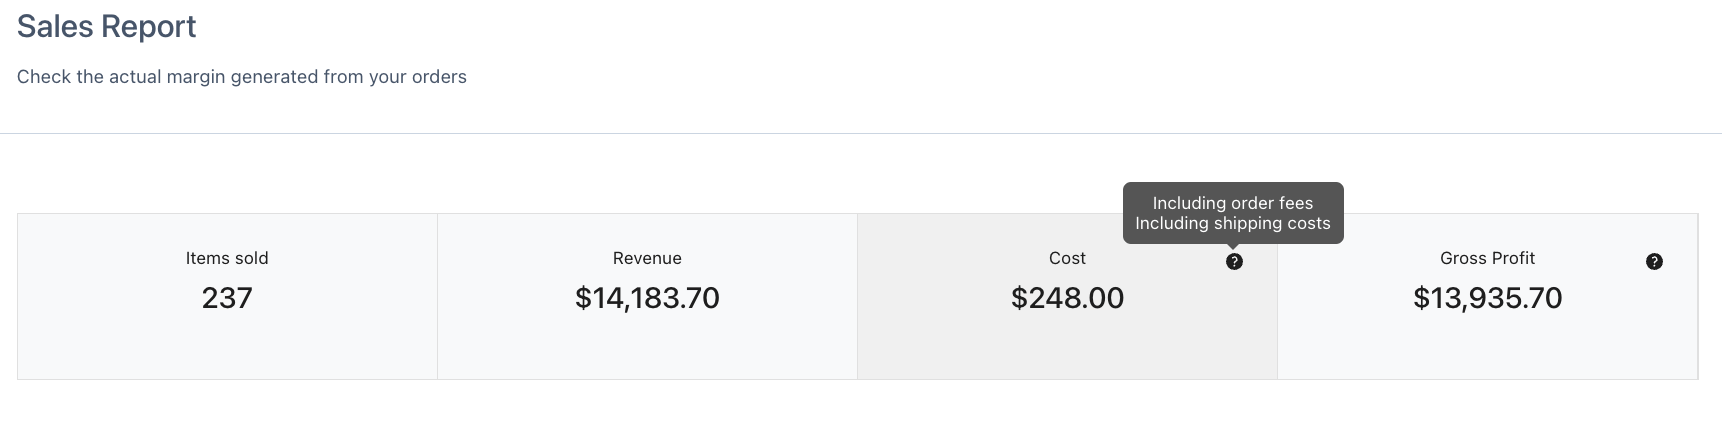
Once any of the three options have been checked, the total table will reflect it and tooltip will be visible to advise that additional costs have been added.
Note: Only the last option ”Add taxes as a cost in each product” can be added to the report table in the cost of the product.
In the settings of the plugin, you have the option of add as many columns as you want using the custom fields. It takes the custom field value of each product in the reports.
You would just need to click ”+ Add a new column” to display the option to insert the ”column name” and the ‘‘custom field”.
Note: In ”Custom Field” option you must enter the custom field or meta name as stored in the database
Once the information has been inserted and saved, it will be visible in both Reports.
The first time you install the plugin, you have to set the cost of the products as explained here, this makes the plugin start generating information based on new orders to the reports but if you want to see old orders included it too, you need some extra steps.
Note: If you want to modify a previous product cost, you only have to set a new cost and apply the cost overriding. Remind this option overrides all the previous costs.
By clicking ”Manage Cost” you will be able have a pop-up with the three options available to apply costs to previous orders:
Only to orders that do not have a cost yet
Overriding costs in all the orders
Only to a specific order
If you select the the ”Only to specific order” option you will have an additional field to enter the order number.
Once the ”Apply Costs’‘ button is clicked the reports will be updated accordingly.
If you are migrating from WooCommerce Cost of Goods, you will be able to import all the costs you’ve previously set up. This way, you don’t have to add the costs again on each of your products and the migration will be as easy as clicking on a button.
In fact, you just have to keep both plugins activated, go to YITH Plugins > Cost of Goods> Settings and click on the button Import Costs.
Note: This option is only visible if the WooCommerce Cost of Goods plugin is activated.
YITH Point of Sale for WooCommerce allows turning your WooCommerce installation into an easy-to-use and powerful cash register for each type of store or business.
Thanks to the integration between the two plugins, the cost of goods will also be assigned to orders generated via POS.
Once plugins are activated and the cost of goods assigned to products, they will be retrieved and shown in the order detail.
Set the cost of good on product
Cost of goods added to the order
The order items will show in the Sales report of YITH Cost of Goods.
For further details about YITH POS settings, please refer to the official documentation.
YITH WooCommerce Multi Vendor allows you to turn your online shop into a marketplace where vendors can sell and manage their own products and the site admin can get a commission on every sale.
The integration with YITH Cost of Goods allows you to control how to calculate the vendors’ commissions when the product has a cost set and choose whether to include the cost of the product in the commission or not.
To set up this to your own convenience, just make sure both premium plugins are installed and activated, then go to YITH > Multi Vendor > Commissions settings and you will be able to activate the following options:
YITH Cost of Goods handling: enable this to include the cost of goods in the commission calculations, disable it if you want to calculate the commissions only out of the product profit. Show YITH Cost of Goods Information: enable this option to show whether the commission includes the product cost or not also in the commission details. For a further configuration of YITH Multi Vendor plugin, please, refer to the official documentation here.
YITH WooCommerce Product Bundles is an extension conceived to create bundles with the combination of some products of your shop. You can assign an ad-hoc price to the bundle or a price given by the sum of the single elements contained in the bundle itself.
By using it in combination with YITH Cost of Goods, you can add a cost of goods to your bundle products.
After installing and activating both plugins, a new field will be added to the bundle option in the product edit page as shown in the image below. Here, you can enter the value expressed in your currency.
For further details about YITH WooCommerce Product Bundles settings, please refer to the official documentation.