View Product Page

Logo & social networks

Logo

To add a default logo to all your emails, go to General settings > Logo options and upload your logo through the dedicated option.

Default logo

You can override this logo from the General section when creating or editing the template.

Social networks

In the section Social networks, you can find all social network sites included in the plugin. You can enable or disable (1) each of them, add your social profile URL (2) and upload a custom icon (3). Customers will be redirected to the website you fill in by clicking on that icon.

Social network options

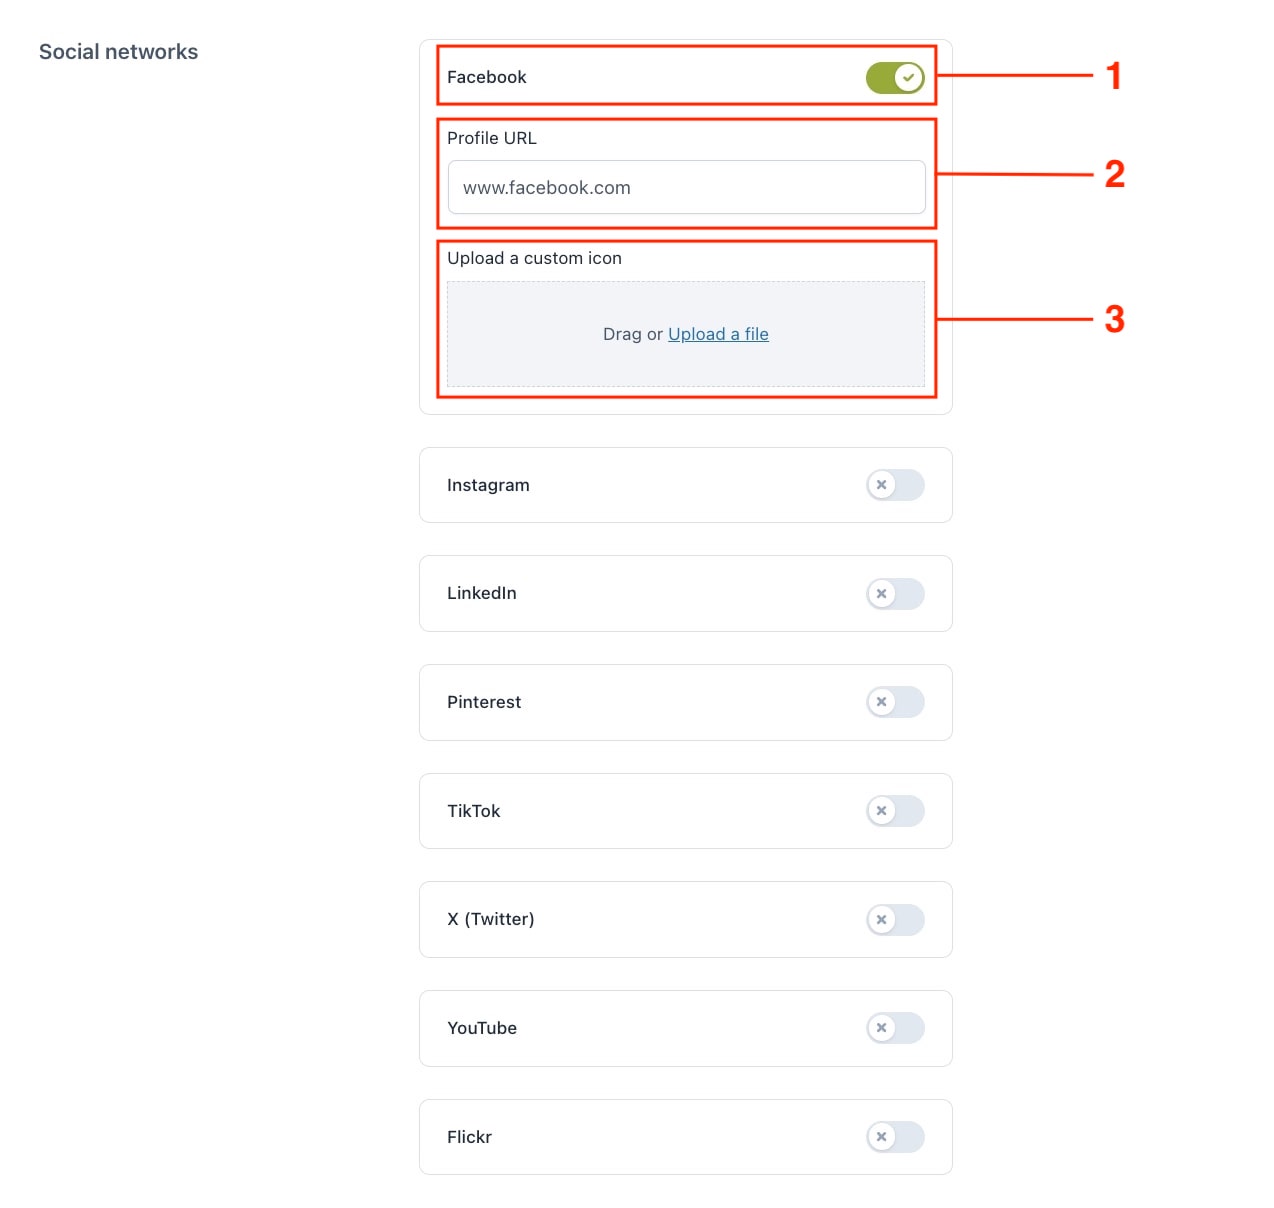
We recommend adding the link without “http://” (e.g., www.facebook.com).
The supported social network sites are:

  • Facebook
  • Instagram
  • LinkedIn
  • Pinterest
  • TikTok
  • X (Twitter)
  • Youtube
  • Flickr

Emails

The Emails section is where you can easily choose the templates to be assigned to emails sent from your e-commerce.

Let’s see how to do it.

Step 1 – Choose the email category

Select the category of emails from the filter‘s dropdown (1). Here, you will find the list of all the email types sent from your e-commerce (WooCommerce, WordPress, and any other emails added by YITH or external plugins).

Filter emails

Step 2 – Select the emails

Choose the emails to which the template has to be applied: you can select specific emails (2) or all emails (3). After selection, the option for bulk actions will be shown next to the filter (4).

Select emails

Step 3 – Apply template with bulk actions

You can now choose the customized template (5) to be applied from those made available by the plugin or previously created, then click on the Apply button (6). To learn how to create your templates, visit this page.

Bulk- apply templates

How to apply templates manually

If you do not need to use bulk actions, you can select and apply the template through the dedicated option available for each email.

Apply template

Templates

The plugin includes four templates: Default, Elegant, Informal, and Casual. You can use these patterns to create your customized templates by editing and adding anything you need to make your emails special according to your needs.

Let’s learn how to create a new template.

Add a new template

Go to the section Emails & Templates > Templates and click on the Add new email template or Create template button.

Add new email template

A new page, the template builder, will open. It is divided into six sections from which you can configure all available options.

Template builder

These sections are:

Default
Default template
informal
Informal template
elegant
Elegant template
casual
Casual

General

In the General section of the template builder, you can configure template, page and logo options.

Step 1 – Template options

Start by giving a name (1) to the template you are creating to easily identify it. Choose the template (2) from the ones included in the plugin (Default, Informal, Elegant, or Casual) and set the background color (3).

Template options

Step 2 – Page options

To further customize the template, you can set the pixels for page width (4), the page padding (5) and border radius (6).

Page options

NOTE: Although provided by the plugin, not all email clients have support for the border radius, such as Outlook. In such cases, the border radius won’t be applied.

Step 3 – Logo options

You can now move the option where you can choose to hide or show the default or custom logo (7) and upload it (if you select the custom logo) to the dedicated box (8). Optionally, you can set the logo height (9) and position – center, left, or right (10).

Logo options

Let’s now move to the header options.

Header

In the Header section, you can set up all the header and heading options.

Step 1 – Colors and padding

Through the first available options, you can choose the header background color (1), the heading padding (2), the heading background color (3), and the heading text color (4).

Header options

NOTE: Although provided by the plugin, not all email clients have support for the padding, such as Outlook. In such cases, the padding won’t be applied.

Step 2 – Heading font and allignment

For the email heading font (5), you can use the default one or choose one of the Google fonts. You can now set the font size (6) and the heading alignment (7), Right, Center, or Left.

Font options

NOTE: Although provided by the plugin, not all email clients have support for Google font, such as Outlook. In such cases, users will see a default font.

It’s time to move to the subheader settings.

Subheader

To populate the subheader with custom links and social networks, go to the Subheader section and set up the following options.

Step 1 – Background color and custom links

Start by setting the subheader background color (1), then add your custom links (2) by clicking on Add custom link.

Subheader options

When adding the custom links, insert the link label (3) and the link URL (4). To add other links, click on Add custom links (5).

Custom links

Step 2 – Separator

When adding one or more custom links, a new option – Show separator (6) – will be displayed. Set to Yes to show a separator between the links, and set to No to show no separator.

Show separator

This is an example of custom links with a separator.

Custom links with separator

Step 3 – Socials

You can now choose whether to show the social networks, which you can enable in the plugin General settings, through the option Show socials below the heading (7). By selecting Yes, you can choose the icon color (8) from White or Black.

Socials

This is an example of socials shown in the subheader.

Socials example

You can now go to this page to learn how to set up the email template body options.

Body

In the Body section, you can configure the options related to the email body, like text, heading, image, etc.

Step 1 – Set colors

The customization of the email template body includes the options to set the colors of the body background (1), text (2), headings (3), links (4), and borders (5).

Email template body colors

Step 2- Set body image

To make the template even more personalized, you can add a custom image that you can upload through the dedicated uploader (6).

Body image

Body image example

Body image example

Step 3 – Set font options

You can now select the body font to use as the default one (7), set the body font size (8) and body line height (9). You can do the same for the body headings: choose the default font (10), and the font size for each of the available headings (11).

Body font options

NOTE: Although provided by the plugin, not all email clients have support for Google font, such as Outlook. In such cases, users will see a default font.

Go to this page to check the Footer options.

Footer

The Footer section allows you to add content to the email template footer. Let’s see the available options.

Step 1 – Logo options

You can optionally hide or show a logo (1) by using the default logo, the header logo or a custom logo. When setting the logo, you can define its height in pixel (2).

Footer logo

Step 2 – Text options

Now, you can enter the footer text (3) also by using basic styles like bold, italic, etc. through HTML code. For the text, you can set the font size (4) and the text alignment – right, center or left (5).

Footer text

Step 3 – Colors and image

You can also customize the footer in terms of background (6), text (7) and links (8) colors and upload a custom image (9).

Footer colors and image

Footer image example

Footer image example

Step 4 – Socials

To show your social icons in the footer, select Yes in the option Show socials in footer (10), then choose the position (11) where to show the icons and the color (12) – white or black.

Social icons in footer

Example of socials shown in the footer

Socials in footer - example

Step 5 – WooCommerce footer

Finally, if you have set WooCommerce footer in WooCommerce settings, you can customize it by defining the colors of the background (13), text (14), and links (15), and also set the font size (16).

WooCommerce footer

Go to this page to check the Extra options.

Extra

The Extra section is where you can manage the order details table shown in some of WooCommerce emails.

Step 1 – Product images

First, you can choose whether or not to show images of the products included in your order by selecting Yes or No in the Show product images option (1).

Show product images

Example of email template with product images shown

Email with product images shown

Step 2 – Table options

Other options to customize the order table include the possibility to set the colors of the table background (2), heading background (3), and heading text (4). Moreover, you can also set the table border width (5) and color (6).

Order table options

Step 3 – Custom CSS

For advanced template customization, the plugin provides a custom CSS (7) option through which you can add your custom code.

Custom CSS

Preview & test email

While creating the template, you will have a real-time preview on the right side of the screen. This will allow you to speed up the changes by seeing the result immediately according to your configuration.

Email template preview

Should you wish to view the template in its final form, you can do so by sending a test email at any time by clicking on the button Send test email.

Test email