View Product Page

General settings

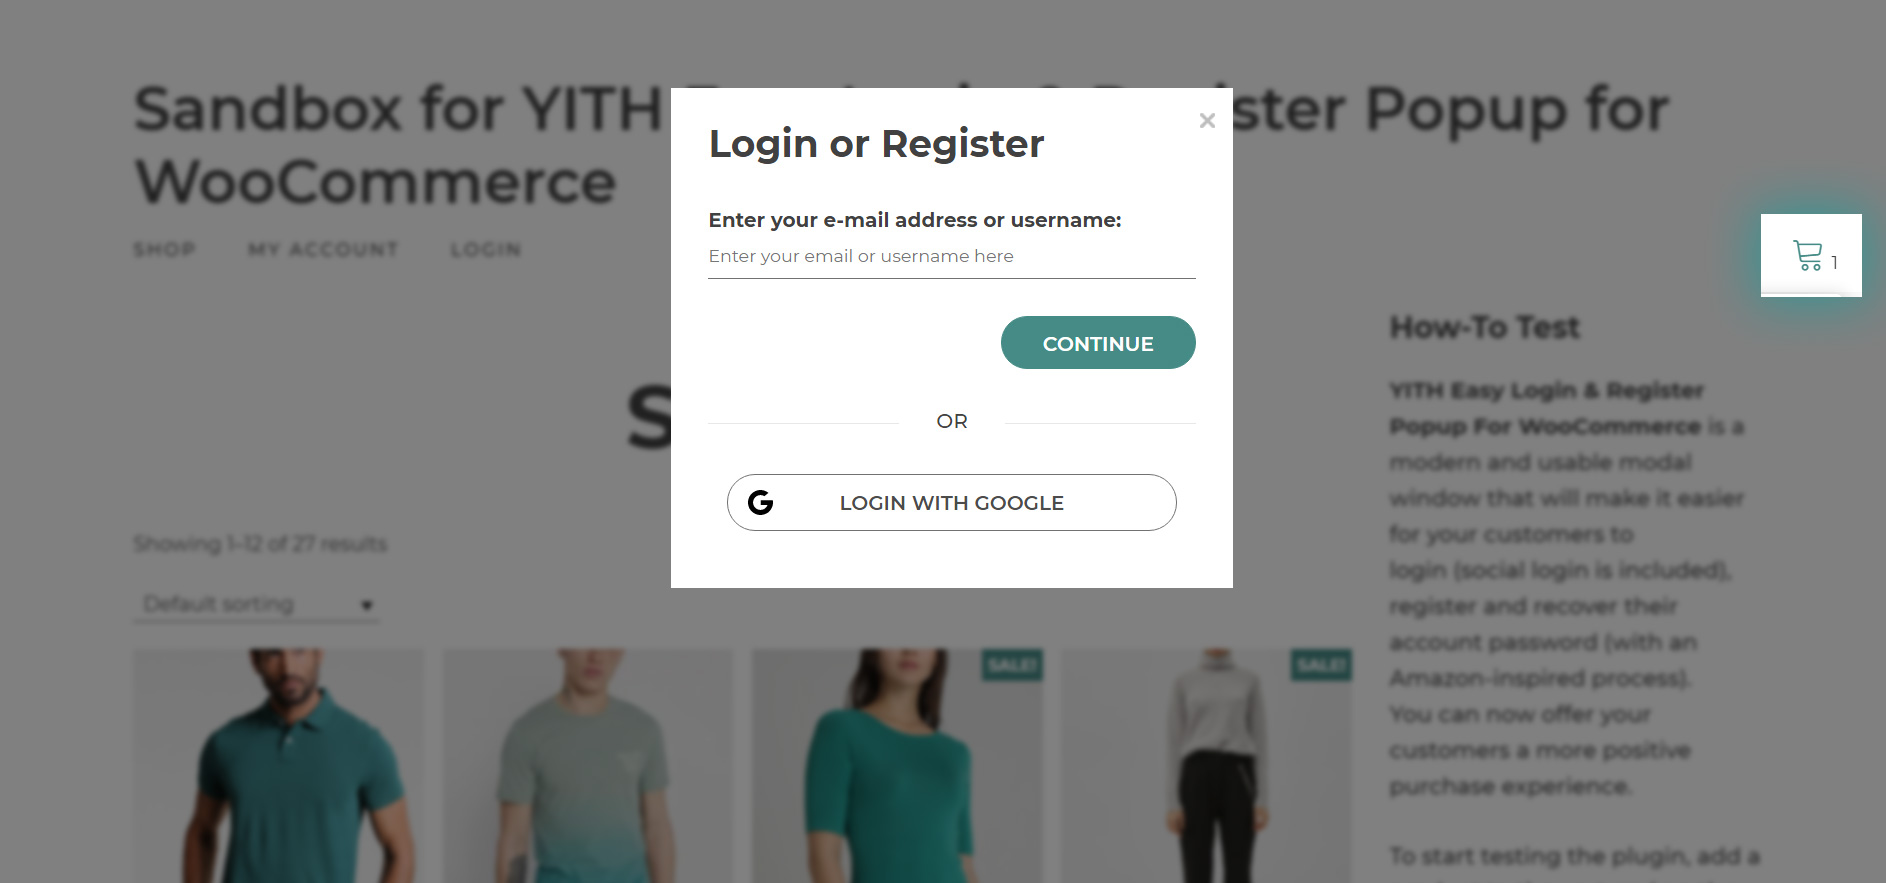
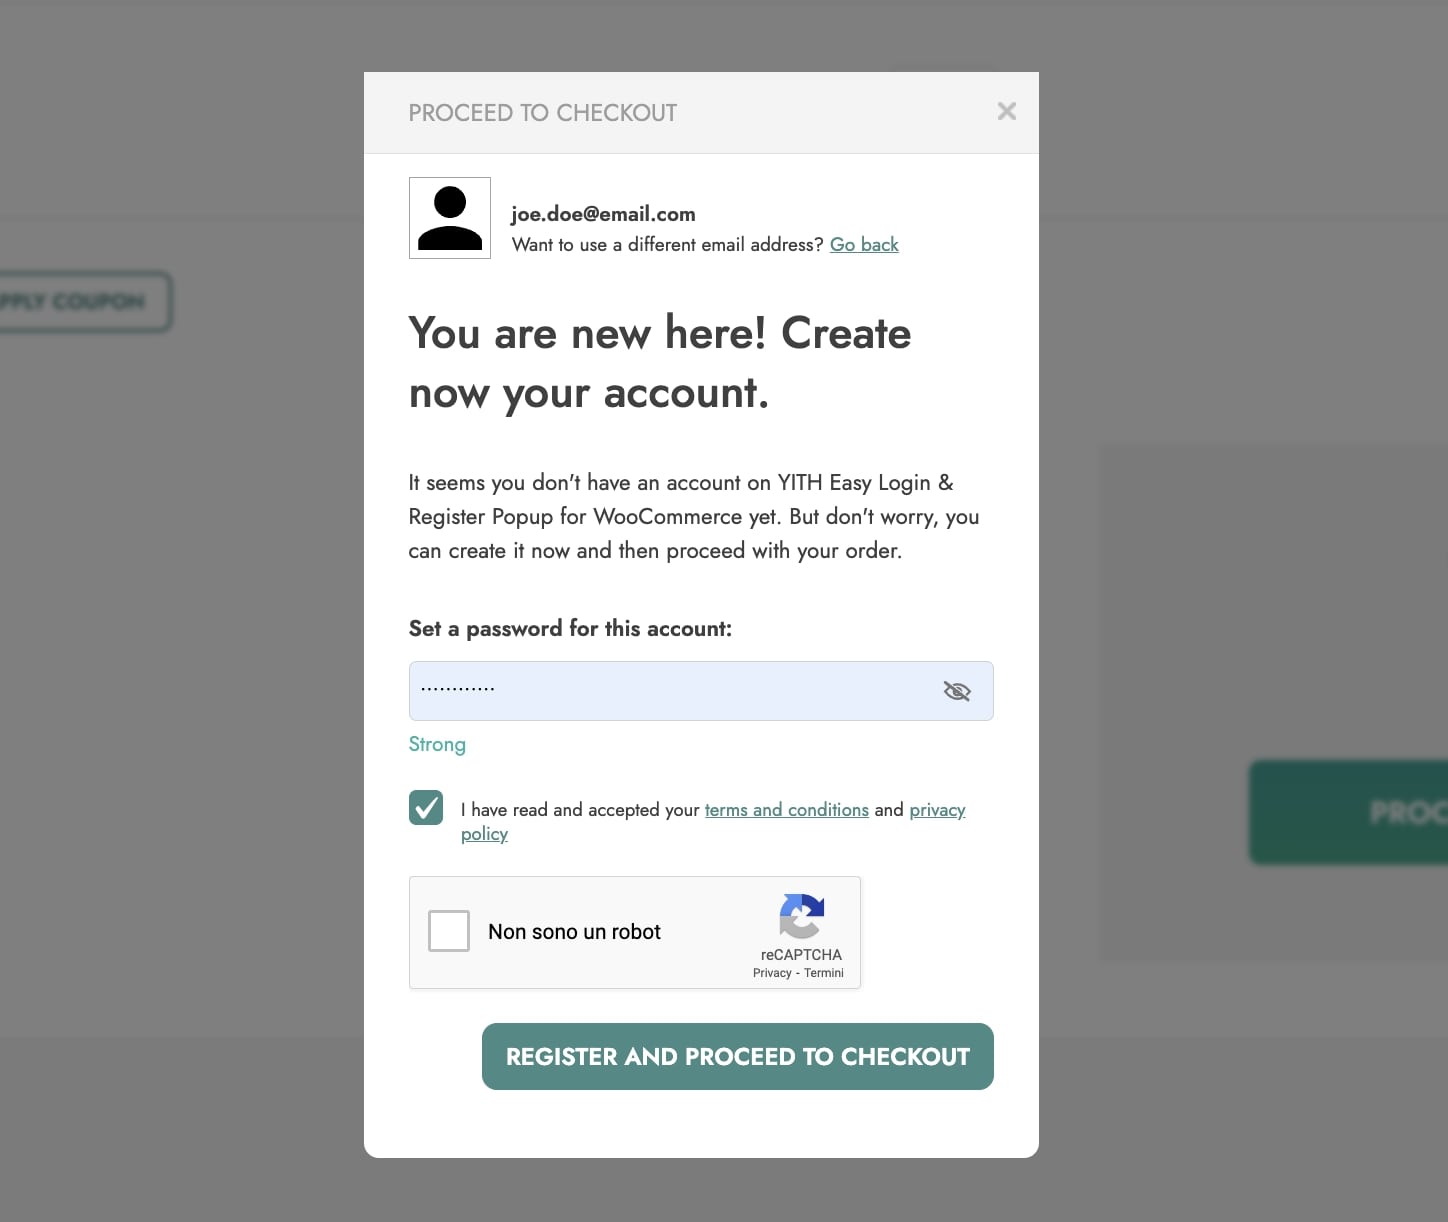
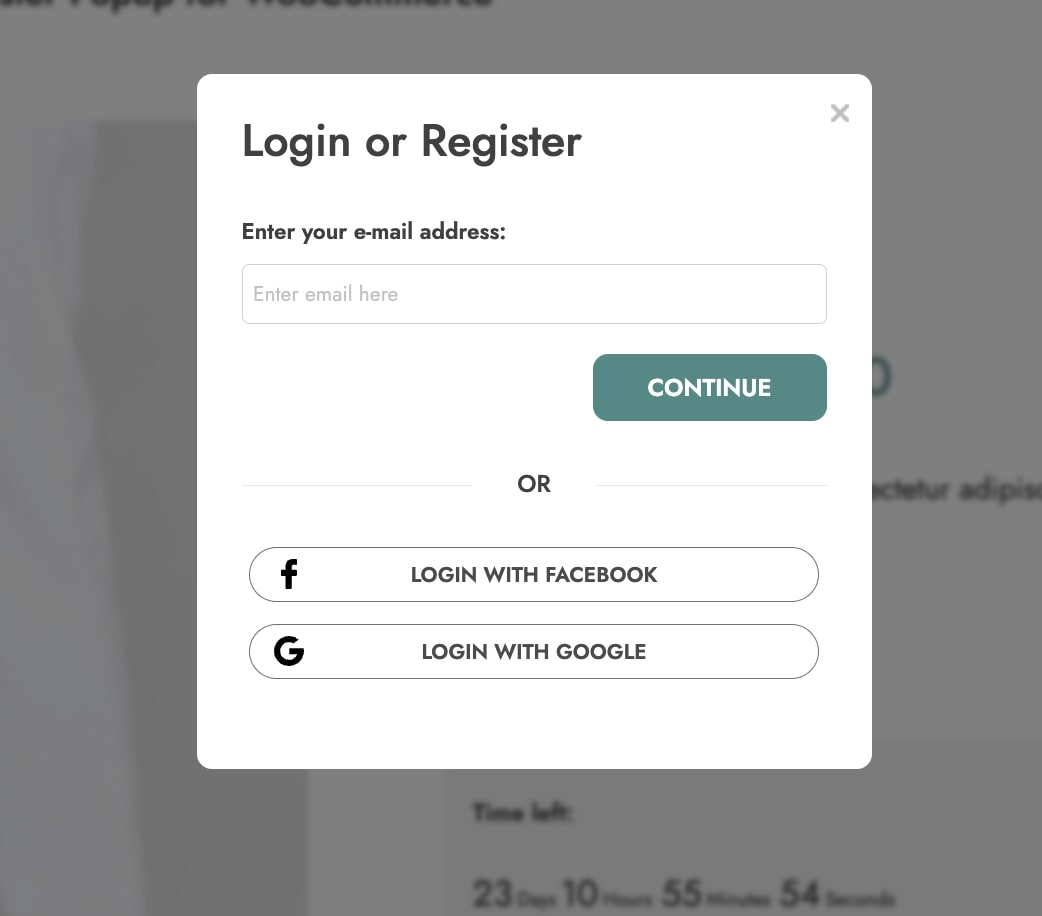
To start using the plugin, you first need to configure the popup that will automatically open if guest customers click on the Proceed to checkout button without being logged in.

They will be able to log in or register, reset their password in a few clicks without leaving the page, and you can configure all these steps in detail, so you can offer your customers the best possible experience when buying from your online shop.

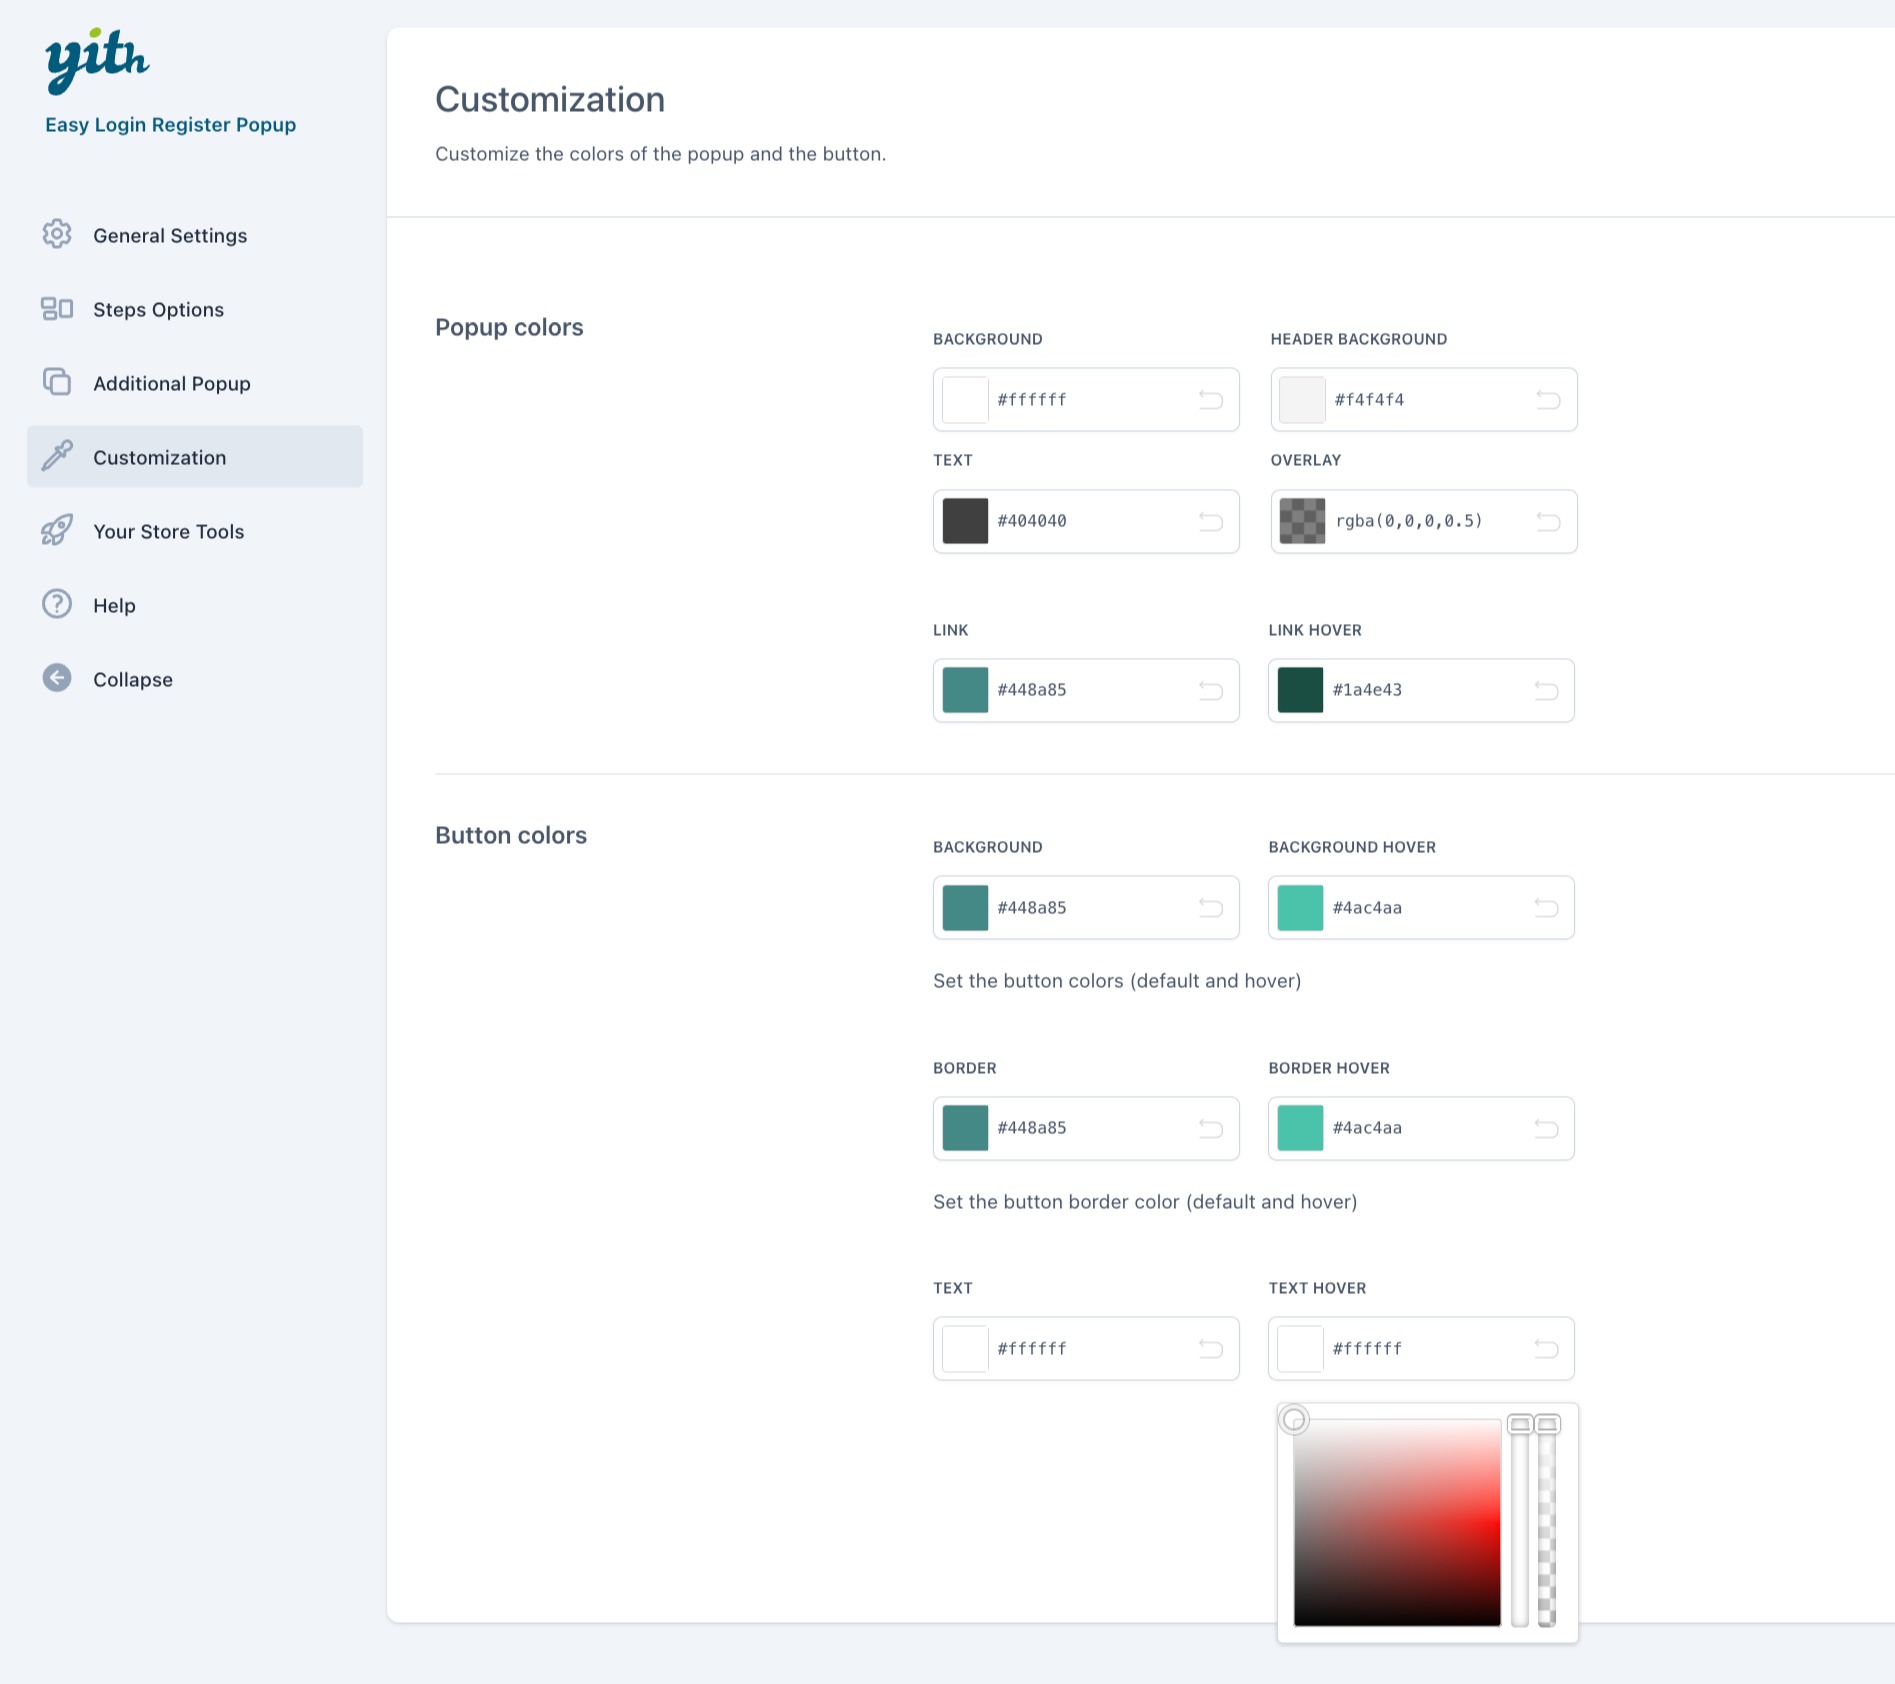
Go to the YITH > Easy Login & Register Popup > General settings tab to start with the popup general settings.

1. Popup general settings

You will find the following options:

Popup general settings

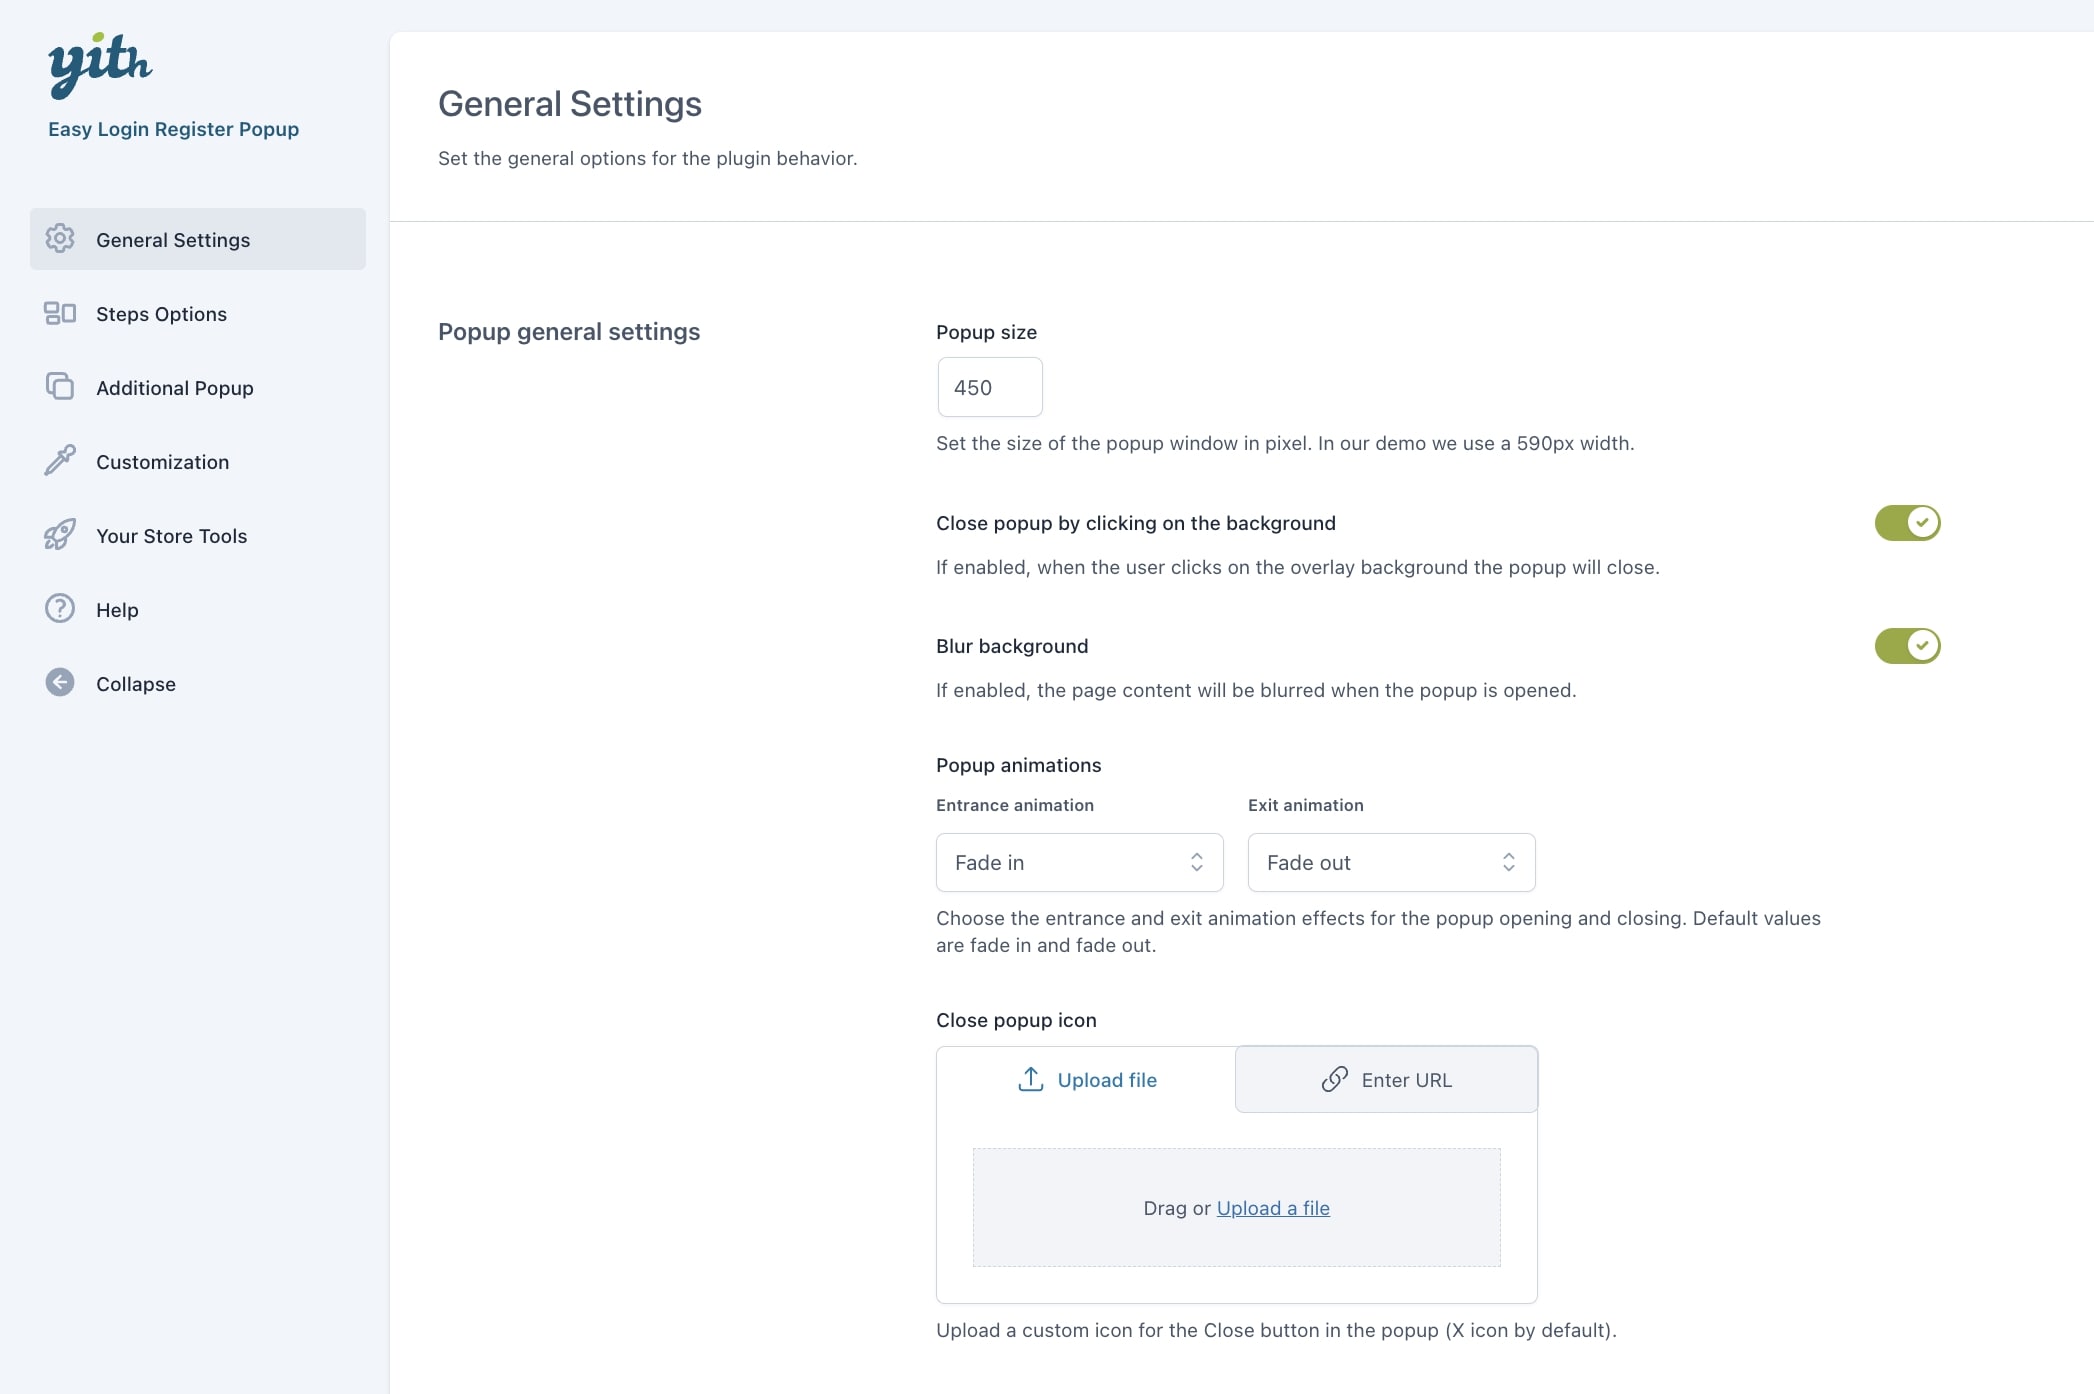
  • Popup size: enter the popup width in pixels (the length will automatically be adjusted depending on the length of the text). Suggested settings: 590px.
  • Close popup by clicking on the background: enable this option if you want the popup to close if users click anywhere outside the popup.
  • Blur background: enable this option if you want to blur the background whenever the popup is open.
  • Popup animations: choose the entrance and exit animations for the opening and closing of the popup. You can choose among many available options for fade, bounce, flip, slide and zoom animations.
  • Close popup icon: upload a custom icon for the Close button. If none is selected, the default button will be an X icon.

2. Colors

Here, you will find all the settings concerning the colors of the popup. You can find all the available options listed below. Please, consider that for all colors you can also set up an opacity/transparency value.

Colors

  • Popup background color
  • Popup header background color: this is the color of the header section of the popup.

Popup header

  • Popup text color
  • Popup link colors
  • Button colors
  • Button border colors
  • Button text colors
  • Overlay background color

First step options

1. First step options

Here you can find all the options to customize the popup content as soon as it opens.

First step options

  • Popup header text: through this option, you can customize the text shown in the top section of the popup.
  • Popup title: here you can customize the popup title text.
  • Allow username: enable this option if you want your users to be able login with their username. Keep it disabled if only the email address is allowed.
  • Custom text before the form: enter a custom text if you want to show more information to your customers. This text will appear right below the popup title.
  • User input label: use this option to set up a custom title for the email input box. Default to ‘Enter your email address or username’.
  • Button text: customize the text of the action button. Default to Continue.

2. Social login options

Here, you can set up the social login options through Facebook and Google, which will be added to the popup as an alternative to the standard login with an email address or username.

Facebook login

To set up the Facebook login, you’ll have to create a Facebook app. Please, refer to this page for details about how to do this.

Once finished with the app configuration, you will be able to find the Facebook App ID and Facebook App Secret in the app and copy and paste them into the plugin settings.

Facebook login options

Now, you can customize also the Facebook button colors (button and border, default and hover color), and add a custom icon for the Facebook login button (recommended size is 20×20 px).

Make sure you switch the login toggle button to YES when you’re ready to show the login button.

Google settings

To connect Google login, you first need to create a Google app. Please, refer to this page for details about how to do this.

Once finished with the app configuration, you will be able to find the Google Client in the app and copy and paste them into the plugin settings.

Google login options

Now, you can customize also the Google button colors (button and border, default and hover color), and add a custom icon for the Google login button (recommended size is 20×20 px).

Make sure you switch the login toggle button to YES when you’re ready to show the login button.

What happens next?

Based on what your customers enter here, they will be either shown different content.

  • If they enter a valid username or an email address linked to an existing account on your website, they will be able to complete the login and enter their password. Please, refer to the Login options page for more details about the content of this step.
  • If they don’t enter a valid username or email address, they will be able to register using that address or enter a new one. Please, refer to the Register options page for more details about the content of this step.

Register options and Privacy Policy

In the “Register options” tab you will find two sections:

Register options

When customers enter an invalid username or if they haven’t registered yet and click on the Register link, they will see the Register form in the popup. It’s here in the Register options tab that you can customize the content of this step, including the Privacy Policy options.

Here, you will find the following options:

register options

  • Popup header text
  • Popup title
  • Custom text before password form: enter here some custom text, if you want to add more information for your customers about how to set up a strong password. This text will appear right below the popup title.
  • Password input label: customize the title of the password input field, where users will enter their new password. Default to ‘Password:’
  • Repeat password option: enable this option if you want to make sure that your users do not make any typos during the password setup and are asked to enter the password twice.
  • Password strength check: decide if you want to disable or enable the option to check the strength of the password while typing it.

password strenght check frontend

  • Privacy policy check box: enable this if you want to show a checkbox that users have to check to be able to go on with the registration.
  • Privacy policy text: enter here the text of the checkbox that your users can check to agree with the Privacy Policy and Terms and Conditions. Use the placeholders [privacy_policy] and [terms] to automatically print a link to the related pages (the standard ones that you can set up in WooCommerce).
    You can customize the text of the Privacy policy from WooCommerce > Settings > Accounts and Privacy > Privacy Policy and of the Terms and Conditions from WooCommerce > Settings > Advanced > Terms and conditions.
  • Check Privacy Policy by default: enable this option if you want to show the Privacy box checked by default.
  • Button text: customize the text of the button here.

Google reCaptcha

In this section, you can enable the Google reCaptcha option and set up the public and private keys (provided in your Google reCaptcha account)

Google reCaptcha

Once it has been set up, your users will be able to see the reCaptcha options in the second step of the Login/Register popup, as you can see below:

Google recaptcha - frontend

Password recovery options

To configure the password recovery options, go to YITH > Easy Login & Register Popup > Lost password options.

Lost password settings

In the first section, you can set up how to guide your users through the first step of password recovery. You will find the following options:

Lost password options

  • Popup header text
  • Popup title
  • Custom text before email form: guide your user through the password recovery with the custom text entered here.
  • User input label: title of the username/email input box
  • Pre-filled email field: enable this option if you want that this field is automatically populated with the email address entered by the user.
  • Button text: default to ‘Reset password’.

Password recovery options

Then, you can guide users through the second step of password recovery. You have two modes at your disposal, so you can choose between the Classic mode and the smartest mode with a Code.

1. Classic mode

Choose this mode in Recover password type text, if you want to use the standard procedure used by default in WooCommerce. The user will get an email with a link. Clicking on this link will let them open the password reset page where they can set up the new password. They will have to go back to the checkout page to complete the order.

Available settings:

  • Popup title
  • Custom text: enter here the text that you want to show to confirm that the email with the password recovery link has been sent.
  • Resend email label: change the text of the link that will let users get another password reset email. Default to ‘Resend email’.

2. Recover password with code

Choose the Code mode in Recover password type text, if you want to let users get a code per email that they can enter in the popup. This way, they will never leave the page where they are: this will help you reduce the cart abandonment rate.

Available settings:

With code

  • Popup title
  • Custom text before password field: enter here the text that you want to show to confirm that the email with a recovery code has been sent.
  • Code input label: enter here the title of the box that appears before the code input box.
  • Send code again: enable this option if you want to let your users ask for a new code.
  • Send code again label: change the text of the link that will let users get another password reset email. Default to ‘Not received the code? Resend it’.
  • Button text: default to ‘Continue’.

After the code validation, users will be able to reset the password right from the popup.

Here, you can configure the new password fields:

Set new password options

  • Popup title
  • Custom text before password: enter here the text to help your users set up a new password.
  • Password input label: title of the password input field.
  • Repeat password option: enable this option if you want that users enter the password twice. This will reduce the possibility of typos.
  • Repeat password input label: title of the repeat-password input field.
  • Button text: default to ‘Save password and proceed to checkout’.

To customize the email with the code, please, refer to this page.

Additional popup

Do you want to choose when the login/register popup has to show up? Well, you can.

This way the popup will not be opened only if you click on the Proceed to checkout button, but also if you click on another specific CSS selector of your choice.

To do that, go to YITH > Easy Login & Register Popup > Additional Popup.

In this tab, you will be able to link the popup to a CSS ID or CLASS, so a link in the menu, in a widget, or similar.

Additional popup

  • ID or CLASS of the element: enter here the CSS selector that will open the popup. As a selector, you can either use the ID or the class of the element that will trigger the popup. Make sure that the ID is preceded by a hashtag # (e.g. #elementID) and the class by a dot . (e.g. .elementClass). You can also specify more elements and separate them with a comma (e.g. #element1, #element2).
  • Popup title
  • Register button text: this is a custom text for the button that will let users register in the additional popup. All the other settings will be the same as for the checkout popup.
  • Save password button in Recover password step: this is a custom text for the button that will let users recover the password through the additional popup. All the other settings will be the same as for the checkout popup.

Example

Let’s take as an example that we want to open the popup whenever a guest user clicks on the Cart icon on the top bar of my website.

This element has both an ID and a CLASS, but we will select the ID and use it as a CSS selector for the plugin’s additional popup.

This is the ID, preceded by a #, that we will enter in the plugin settings: #woocommerce_widget_cart-2

YITH WooCommerce Auctions

From YITH > Auctions > General > Login/Register modal, you can enable the integration between the two plugins.

Easy-login-settings

  • Show a login/register modal: Show a popup asking the user to login/register, before placing a bid.

easy-login

User will see a popup asking him to login/register in order to start bidding.

Please check the settings of the YITH WooCommerce Auctions plugin here.