View Product Page

Deposit options

To offer your users the possibility to leave a deposit to reserve your products and pay the balance at a later time, go to the General options tab and enable the option Enable deposit on all products.

How to set global deposit options

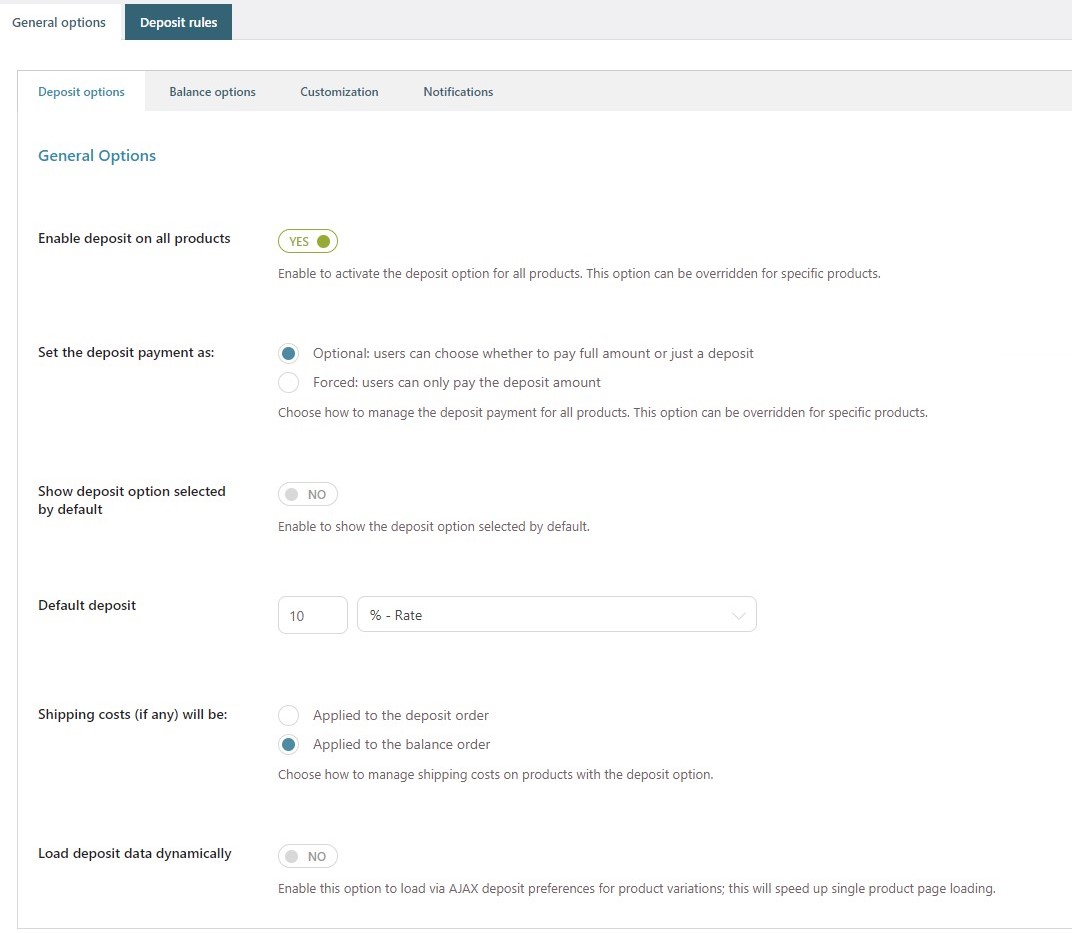
Now you can decide how to manage the deposit payment through the option Set the deposit payment as:

Let users choose to pay full amount or a deposit

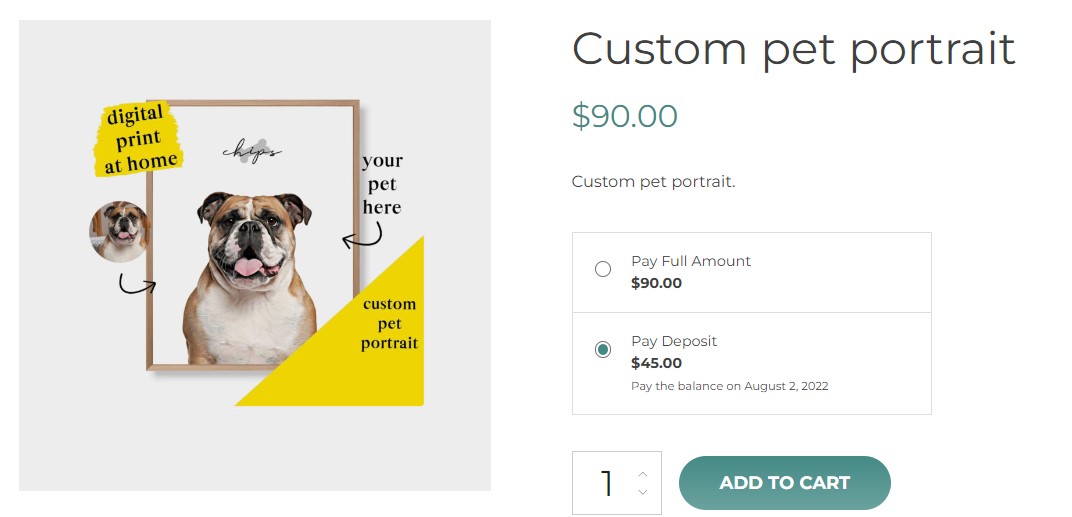
By choosing Optional, your users will be free to decide whether to pay the full product price or just leave a deposit. Optionally, you can also show the deposit as selected by default by enabling the option Show deposit option selected by default.

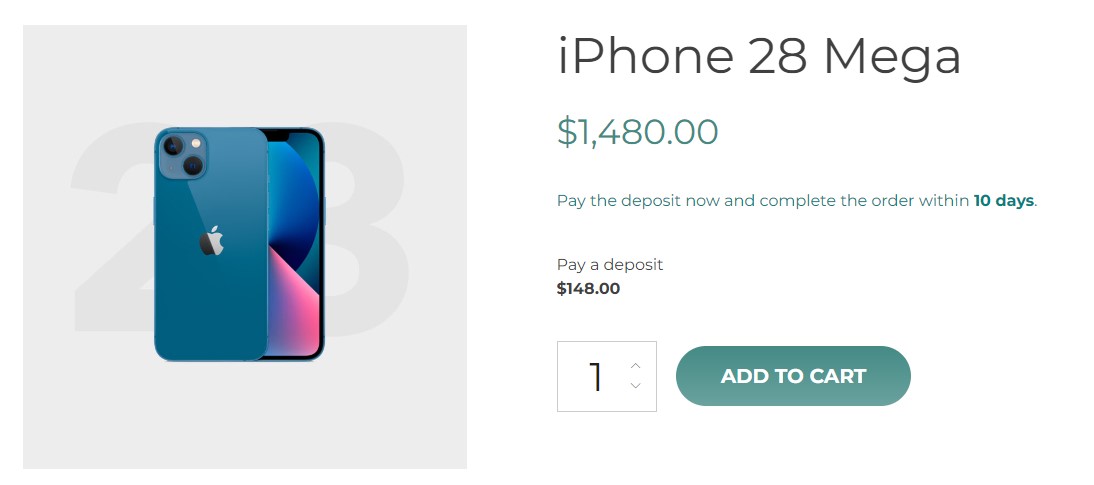
This is what users will see on the product page:

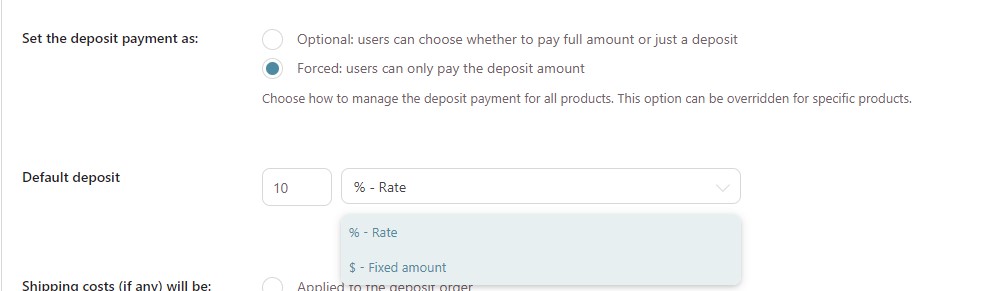
On the contrary, if you want your users to pay only a deposit without giving them the possibility to pay the full amount, you need to select Forced.

Forced deposit example

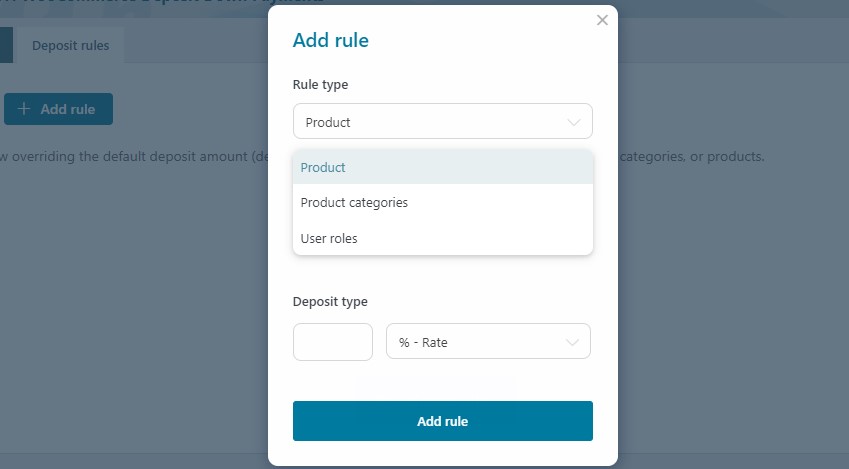
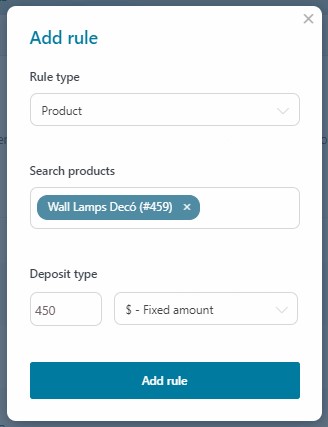
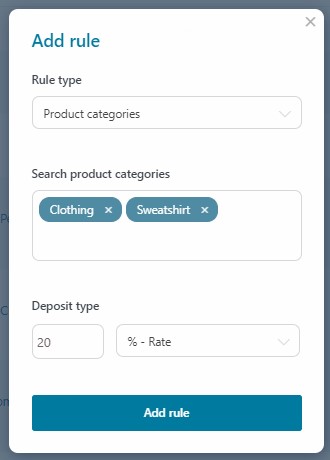
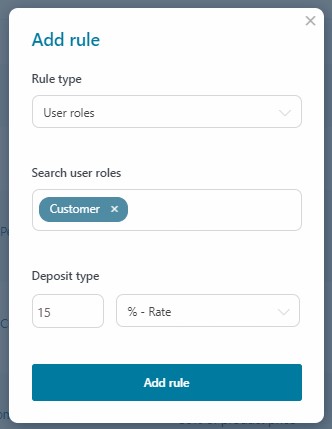
Now you can define the default deposit value by entering it as a percentage of the product price or a fixed amount.

How to force users to pay a deposit

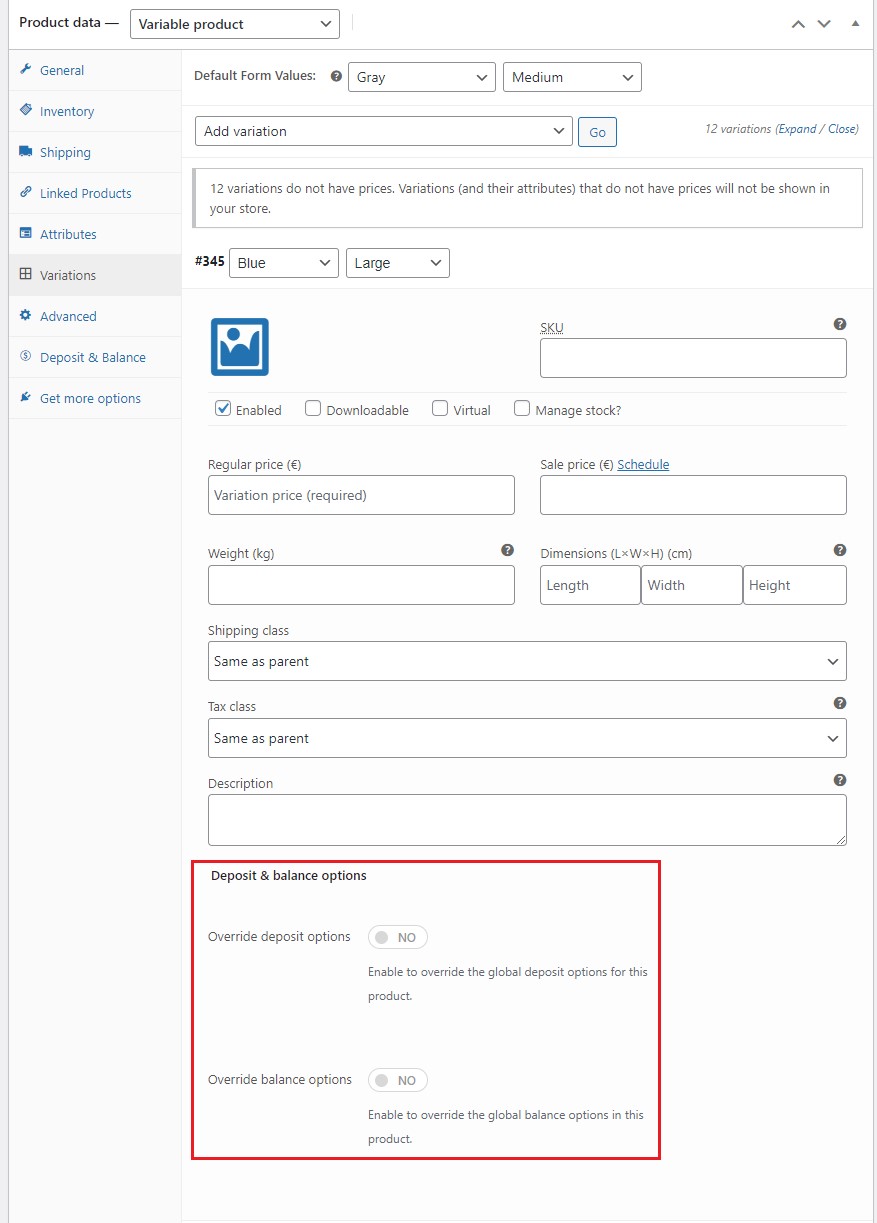
Finally, if you want to load the deposit section in AJAX for product variations, enable the option Load deposit data dynamically . This will have the effect to reduce loading time for variable products but will require a small update every time a new variation is selected.

Load deposit data via Ajax

Manage shipping fees

If you apply shipping costs to your products, you can decide how to manage them through the plugin settings by choosing to apply the costs to the deposit order or the balance order.

Apply shipping costs to deposit or balance orders

Based on the shipping methods made available by the administrator, users can select it during the checkout process.

Below is an example of shipping costs applied to the deposit orders.

Shipping costs on deposit orders


Balance options

Let’s analyze how you can manage balance options through the plugin settings.

First of all, go to the tab Balance options where you will find the option Balance order creation.

How to manage the balance orders

Here, you will need to decide how to manage balance orders by choosing from:

    • Create balance orders with “Pending payment” status, and users will pay the balance online: by selecting this option, balance orders will get the Pending payment status. Users will have to pay the remaining balance on your online store;
    • Create balance orders with “On hold” status, and manage payments manually: by selecting this option, balance orders will get the On hold status. Users will have to pay the remaining balance manually, for example in cash in your physical store;
    • Do not create any balance order: by selecting this option, no balance order will be created.

If you decide to create balance orders, either with Pending payment or On hold status, an additional set of options will show.

You can then, in case of orders including more than one deposit, choose to…

How to manage balance orders with multiple deposits

  • Create a single balance order that includes all products or
  • Create a specific balance order for each product

How to require the balance payment

If you want to push your customers to pay for their balance orders, just enable the option Require balance payment to customers in the plugin tab Balance options.

Now you can define when the payment will be required. You can choose from two options:

  • After a specific range of days from the deposit: this option allows you to specify the number of days from the deposit to require the payment of the balance orders;

How to require balance payment

  • On a specific date: this option allows you to choose a date from the calendar to require the payment of the balance orders.

Require balance payment on a specific date

Unpaid balance orders

But what happens if balance orders are not paid by your customers? No worries, you can decide the action to apply if balance orders are left unpaid.

How to manage unpaid balance orders

You can:

  • Cancel balance order: if the balance won’t be paid within the specified days from the deposit or the specific date previously set, the balance order will be automatically canceled and it will be no longer possible for the customer to complete the payment. You can manually process the refund of the paid deposit from the edit page of the balance order;
  • Cancel balance order and refund deposit: if the balance won’t be paid within the specified days from the deposit or the specific date previously set, the balance order will be automatically canceled and the deposit order refunded (for deposits paid with one of WooCommerce gateways supporting automatic refunds);
  • Send a reminder to customers to invite them to pay for the balance and set an expiration in days. If the balance order won’t be paid within the specified days, you can choose one of the following actions: cancel the balance order or cancel the balance order and refund the deposit.

Additionally, you will be able to decide the action to apply on the product that has the deposit option enabled and requires the balance to be paid within the specified date. Through the option When balance is required on a specific date, and is overdue you can choose to:

Actions for overdue balance payment

  • Do nothing
  • Disable deposit for the product
  • Make product no longer purchasable
  • Hide product from catalog

Stripe options

Balance orders can be automatically charged according to what is defined in the option Require balance payment to customers.

To do it, you first need to install the plugin YITH WooCommerce Stripe.Use YITH Stripe to charge balance orders automatically

Once installed and activated, you will be able to configure the following options:

Stripe options setting

  • Automatically charge balance on customer’s credit card: enable to automatically charge customers’ credit cards to pay their balance orders;
  • Charge balance on credit card: 
    • Only if the customers paid the deposit with a credit card: select this option to automatically charge only those customers who paid the deposit with a credit card;
    • Forced for all customers, regardless of deposit’s payment method: select this option to automatically charge all customers who paid the deposit with any payment method and have a valid credit card registered with Stripe;
  • Notice of automatic charge to show in “Payment Methods” section and at checkout: enter the message to show to your customers to inform them about the automatic charge. This notice will show both in the Payment methods section in their My Account and on the Checkout page.
Balance automatic charge notice in My Account
My Account section
Automatic charge notice on Checkout page
Checkout page


Customization options

Now let’s see how you can customize the plugin button, notices, labels, and messages.

First of all, go to the tab Customization, then start configuring the available options:

Customization tab options

  • Hide “Pay deposit” button on shop pages: enable this option if you don’t want to show the Pay deposit button on your shop pages;
  • Show custom notices on product page: enable this option if you want to show a specific custom notice about the deposit on all your product pages;
    • Notice to show on products with balance payment required online: use the advanced editor to insert the notice to show on product pages for balance payments required online;
    • Notice to show on products with balance payment not managed online: use the advanced editor to insert the notice to show on product pages for balance payments that won’t be managed online;
    • Notice position in product page: choose the position where you want to show your custom notice from:
      • Do not show any note on product
      • Below product title
      • Below product price
      • Below product excerpt
      • Below single Add to Cart
      • Below product meta
      • Below product share

Example of custom notice:

Example of deposit custom notice

Labels and Messages

You can also change the texts of the plugin as they show on the frontend and customize them as you prefer.

In the tab Customization, you will find a dedicated section for labels and messages.

Customize labels and messages

You can customize the text of:

  • Deposit
  • Pay deposit
  • Pay full amount
  • Partially paid
  • Full price label
  • Balance label


Email notifications

We can now see how to manage automatic email notifications from the plugin panel.

Go to the tab Notifications and choose the emails you want to automatically send to the site admin and customers on specific conditions:

How to enable or disable email notifications

  • Notify deposit creation to admin: this email will be sent to the admin whenever a user pays a deposit for a product;
  • Notify deposit creation to customer: this email will be sent to customers whenever they pay a deposit for a product;
  • Notify balance payment to customer: this email will be sent to customers as a balance payment reminder. For automatic charges (check Stripe options here), the email will be sent as a reminder of the upcoming payment for which customers don’t need to execute any further action. For manual payments, the email will include the link that redirects the customer to the payment page;
  • Send the email about the balance payment: choose when the balance payment email will be sent to customers. Specify a value and select days, weeks, or months. For example, if you set 7 days, the customer will receive the notifications 7 days before the payment due date.

Balance payment remind exampleer

To configure the email settings, go to WooCommerce > Settings > Emails.

Deposits email settings

If you want to override your theme default email template, copy the .php template file of the plugin and paste it into the theme. You can either do it manually or by clicking on the Copy file to theme button at the bottom of the page.

How to override email template

A copy of the file in the specified path is created so that you can change it as you prefer. In case you cannot copy the file through the button, to override and edit the email template, copy the path specified on the page into the theme folder.

How to override Deposits email template

Deposit rules

Although you can globally configure deposit options for all your products, the plugin also allows you to create custom deposits by product, category, or user role.

To do it, go to the tab Deposit rules and click on Create rule.

How to create deposit rules

Now, from the popup, select the type of rule you want to create.

How to add deposit rules

Product rule

To create a deposit rule for one or more products, select Product from the dropdown in Rule type, search for the products to which you want to apply the deposit rule, choose the deposit type (fixed amount or rate), and enter a value. Now click on Add rule to save your settings.

Create a deposit rule for products

You can create rules for product variations too by adding the single variations as explained here.

Category rule

To create a deposit rule for one or more products, select Product categories from the dropdown in Rule type, search for the categories to which you want to apply the deposit rule, choose the deposit type (fixed amount or rate), and enter a value. Now click on Add rule to save your settings.Deposit rule for product categories

User role rule

To create a deposit rule for one or more user roles, select User roles from the dropdown in Rule type, search for the user roles to which you want to apply the deposit rule, choose the deposit type (fixed amount or rate), and enter a value. Now click on Add rule to save your settings.

Deposit rule for user roles

All the rules created will then show as a list in the Deposit rules tab. Here, you will be able to edit or delete each rule.Deposit rules list

If you have created more rules that apply to the same product(s), please consider that the system will manage deposit options based on the following descendent priority:
1 – product variation
2 – product (simple or variable)
3 – category
4 – user role

Variable products

The plugin supports variable products and grants you the freedom to request a different deposit for single variations.

If you want, for example, to offer 3 different deposit options based on the product variation selected by the user, you must create 3 deposit rules in the tab Deposit rules.How to set deposit on different variations

For each product variation, you can also override the global deposit and balance options from the product edit page.

Override global deposit and balance options on variations

In case you have created a deposit rule for the variable product and one or more rules for single variations, the plugin will apply the deposit according to the following priority:

  • 1 – deposit on single variation(s)
  • 2 – deposit on the variable product