View Product Page

Configure firebase

The first step in plugin configuration consists in creating a Firebase account (skip to the next step in case you already have one)
Create a new application, so that you can get the parameters required by the plugin.

Please note – we highly recommend following all the steps listed below and pay attention specifically to steps 6 and 7. If you are already using the plugin, follow only the steps from 6 to 11.

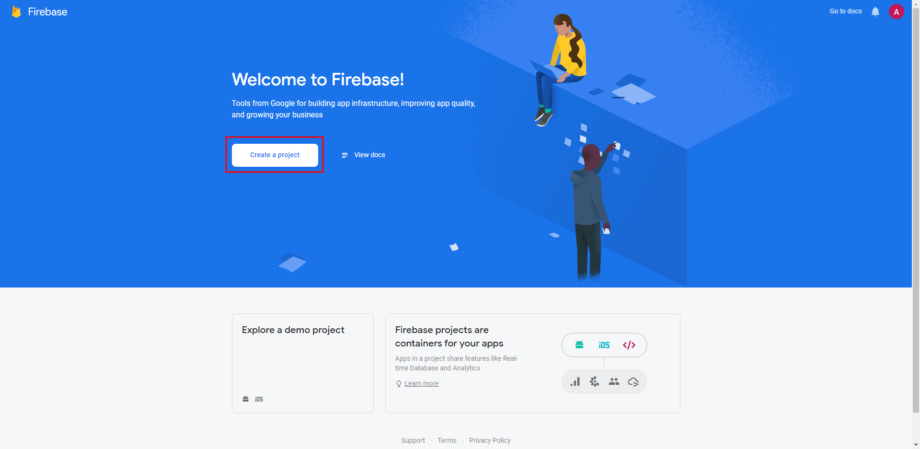
1- Go to https://console.firebase.google.com/ and click on the “Create a project” button.

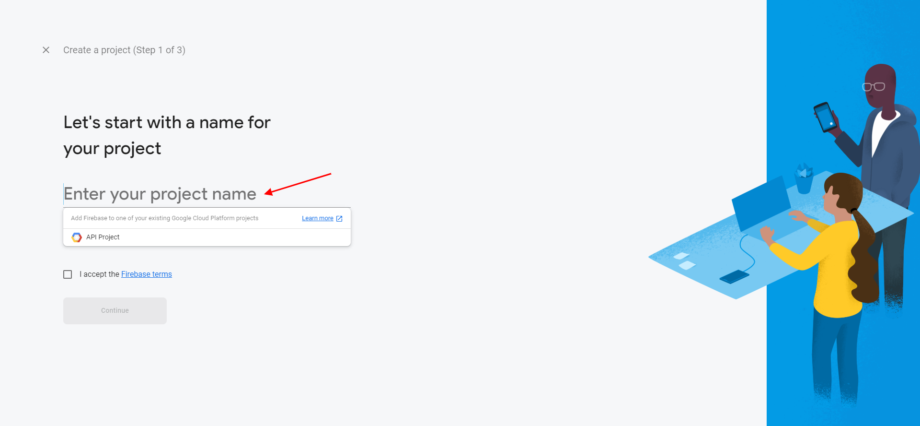
2- Now give a name to your project by entering it to the related field.

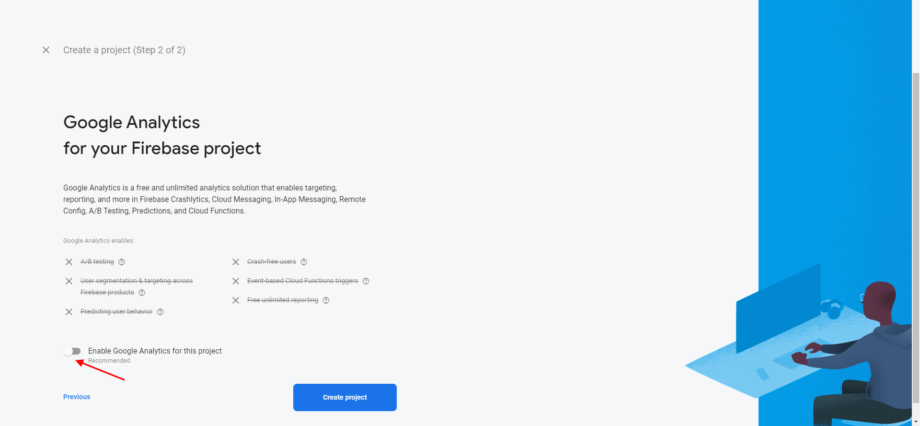
3- Deactivate Google Analytics for your Firebase project by disabling the option Enable Google Analytics for this project and click on Create project.

4- Wait until your project is created then click on Continue.

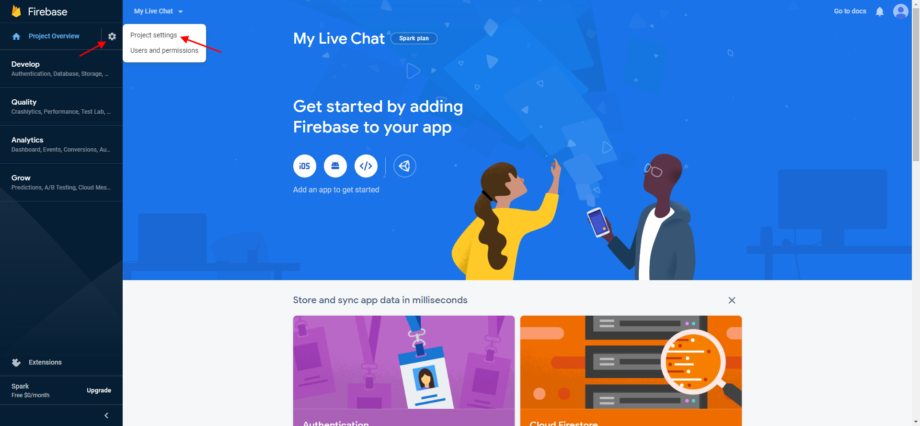
5- Now go to Firebase settings and select Project settings like in the image below.

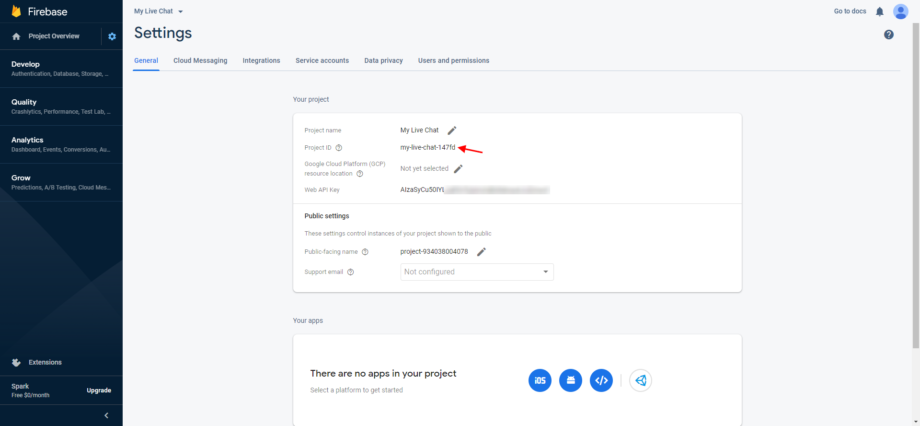
6- In the tab General > Your project of Firebase settingsyou will find the project ID. Copy it…

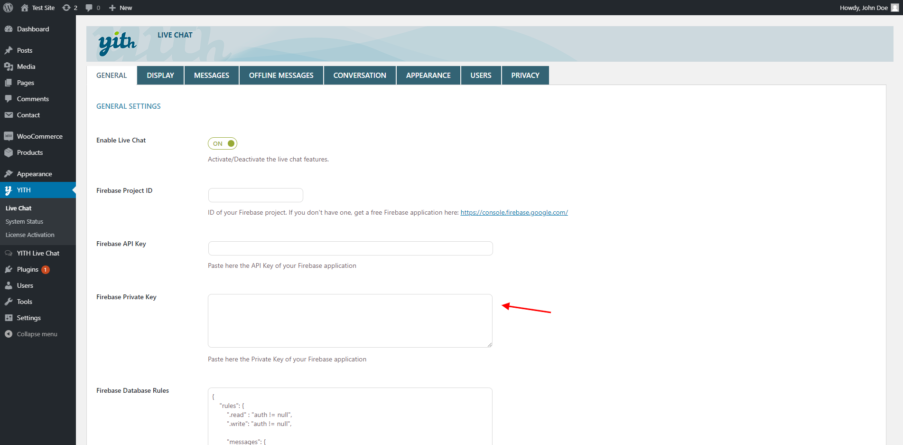
7- …add the -default-rtdb suffix to the project ID (this is not necessary if your Firebase instance was created before 1st December 2020) and paste it in the field Firebase project ID that you find in the plugin General settings.

8- Go back to the tab General > Your project and click on the icon as shown below…

firebase-8a

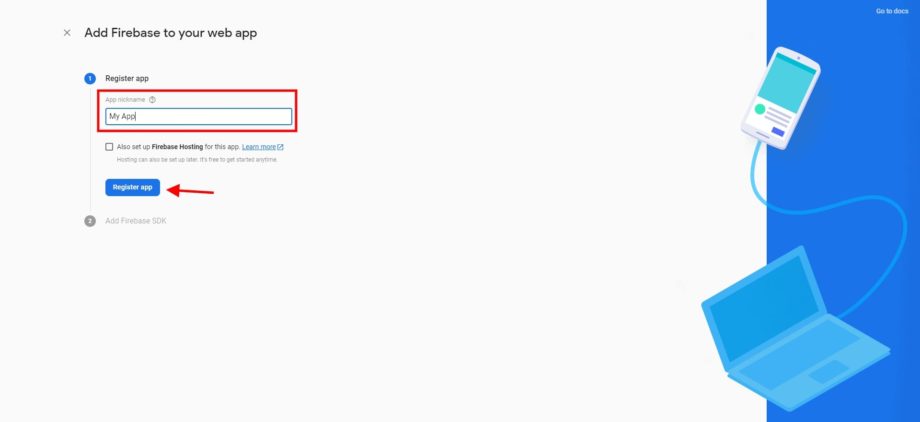
…then enter a nickname and click on “Register App

firebase-8b

Now copy the value without selecting the quotation marks (as highlighted in the image below) and click on “Continue to console“…

firebase-8c

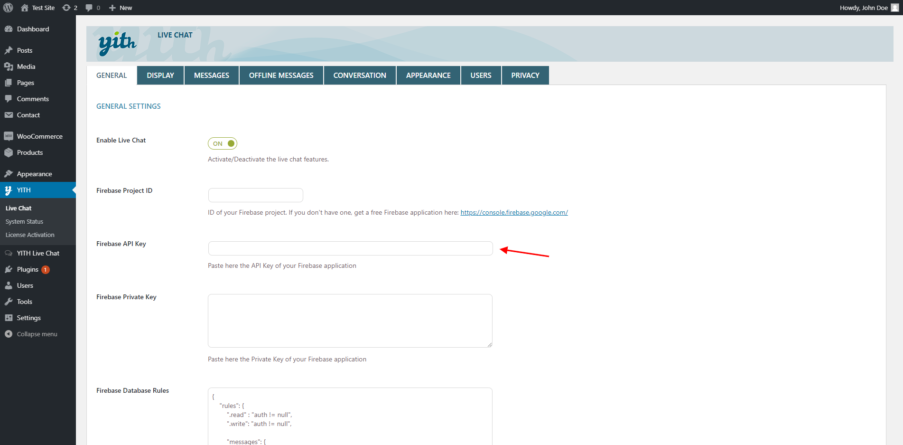
…and paste it in the field Firebase API key that you find in the plugin general settings.

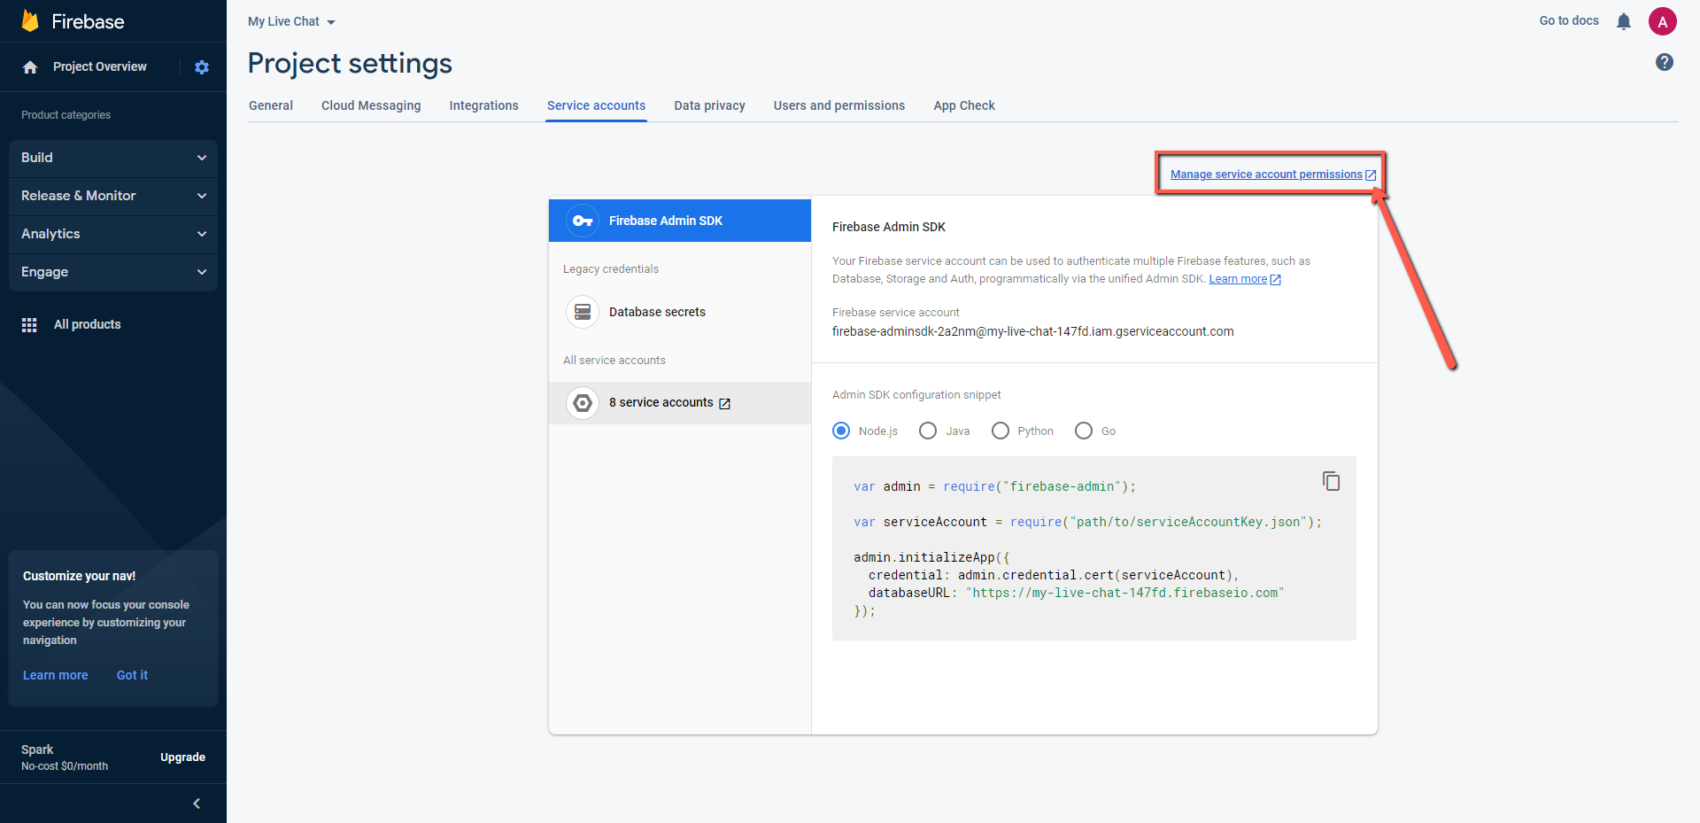
9- Now go to the section Service accounts of your project and click on Manage service account permissions.

Firebase settings

9a – Locate the user described as Firebase Admin SDK Service Agent and click on Manage Keys in the right menu.

Firebase settings

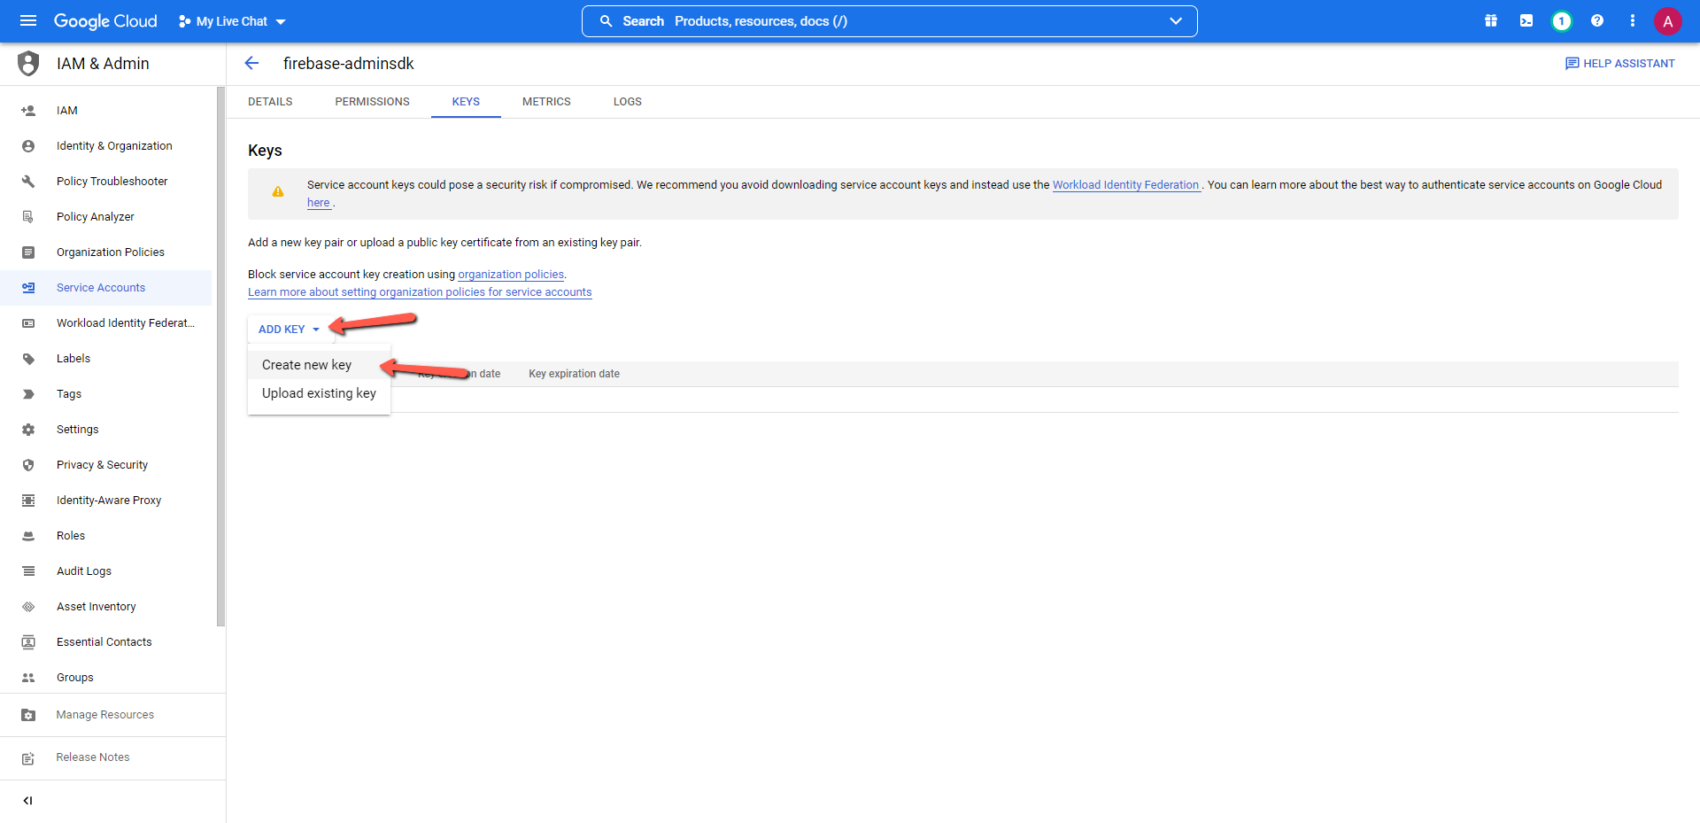
9b – Click on Add Key and then on Create new key.

Firebase settings

9c – Make sure that JSON option is selected and click on Create. After downloading the file, copy its whole content and…

Firebase settings

10- …paste it in the field Firebase Private key that you find in the plugin general settings.

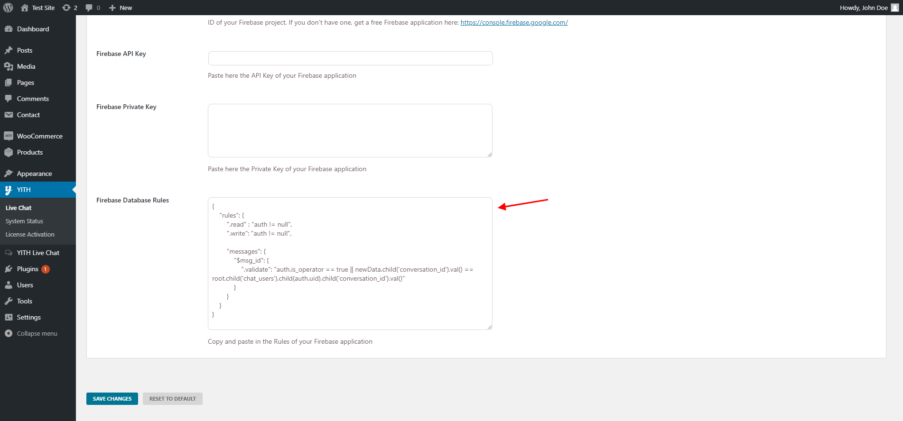
11- From the next field, Firebase Database Rules, copy the text and…

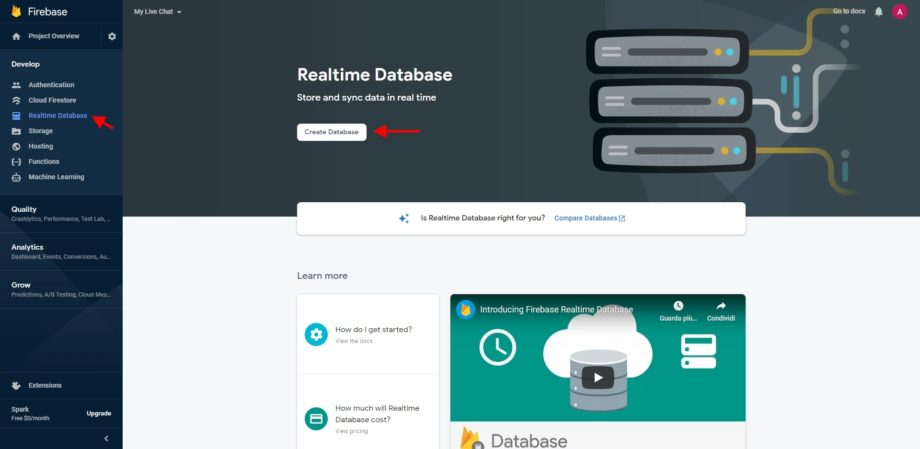
12- …go to Realtime Database and Click on the button Create database.

firebase-12

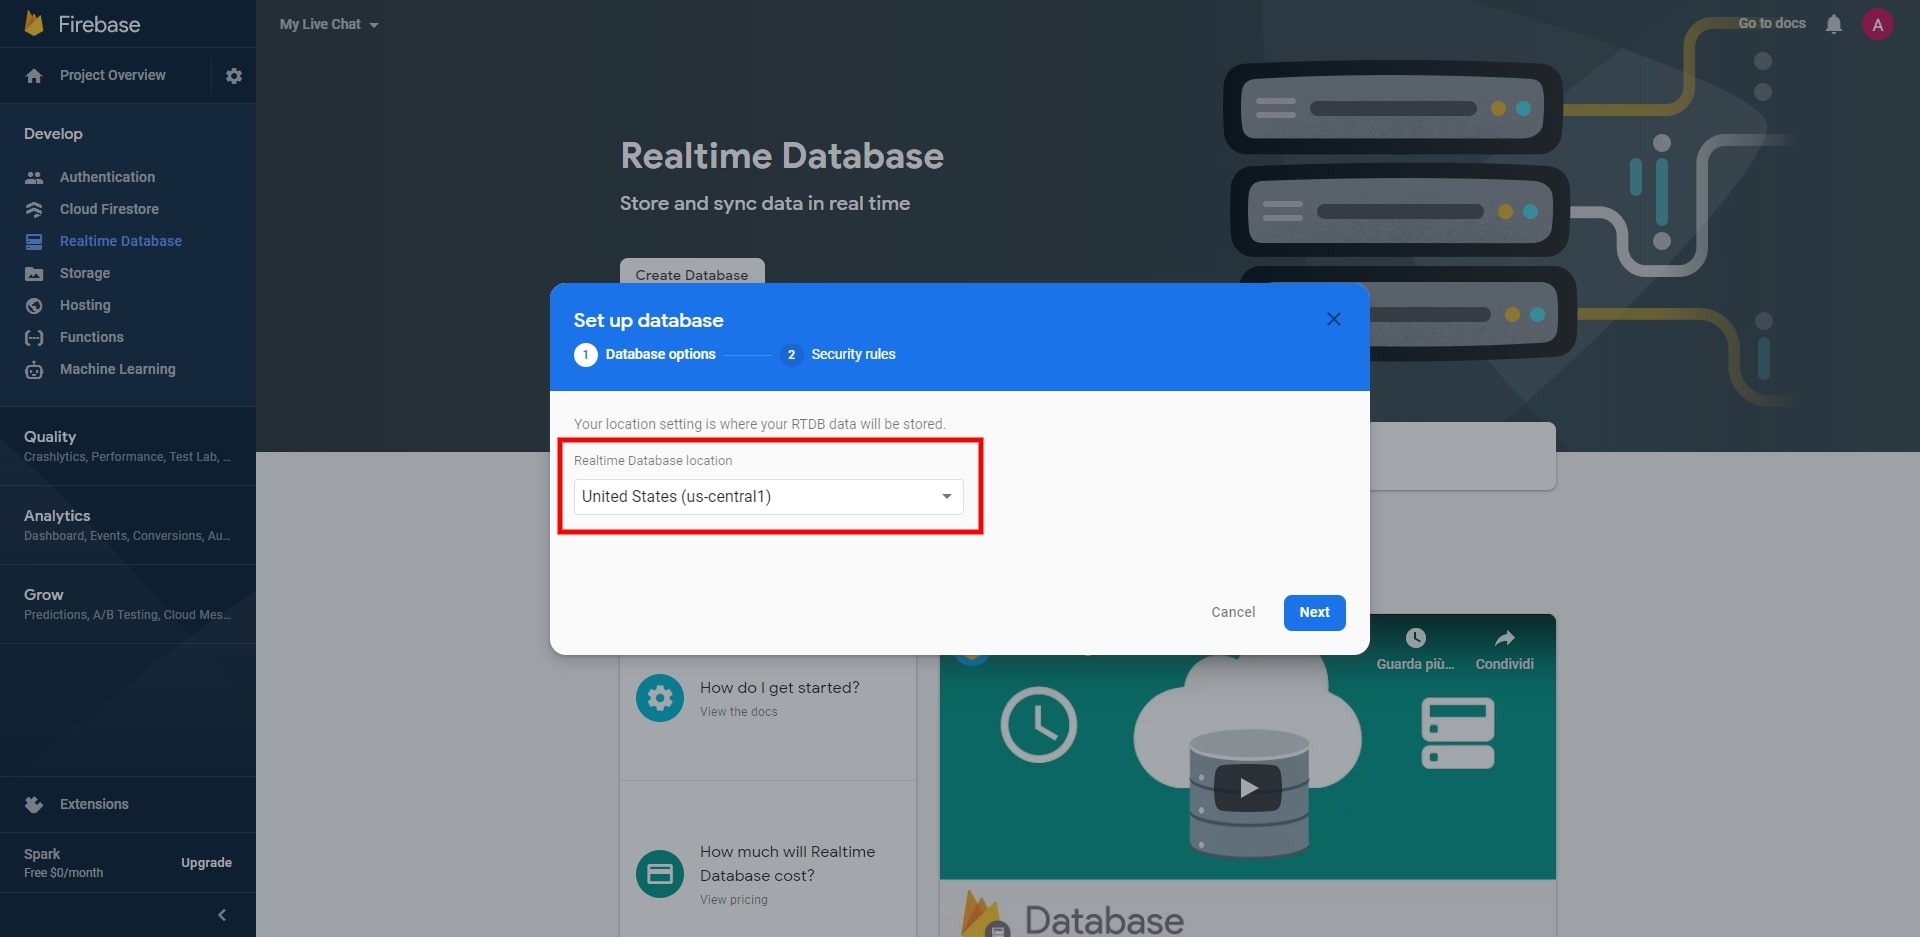
13- Make sure United States is selected. DO NOT CHOOSE Belgium or it won’t work.

firebase-13

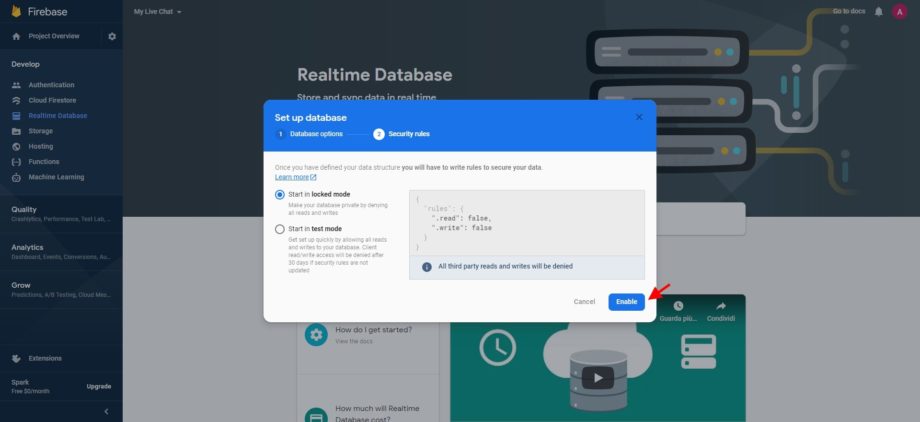
14- Click on Enable.

firebase-14

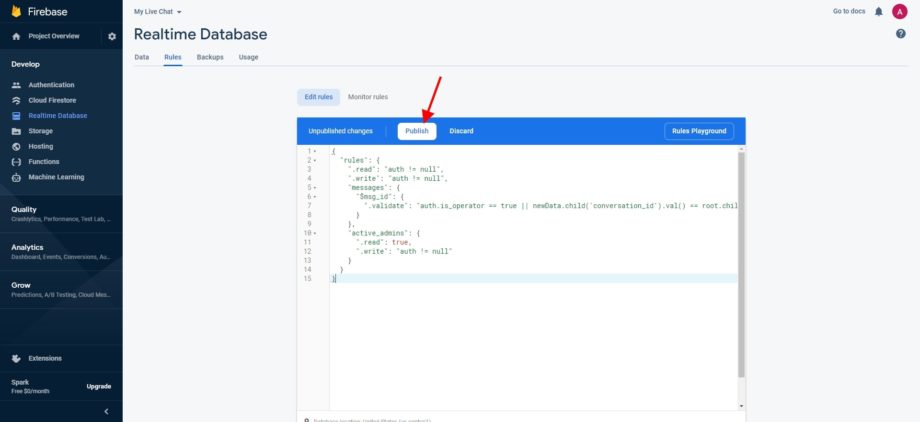
15- In the Rules section, remove the text shown and paste the one you previously copied from Firebase Database Rules then click on Publish.

firebase-15


16 – Click on Authentication

Firebase-authentication

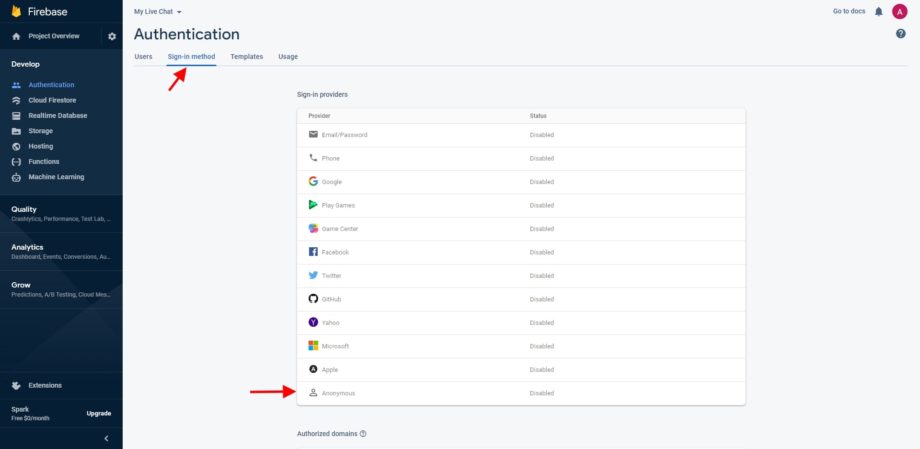
17 – Click on Sign-in method then on Anonymous

firebase-17

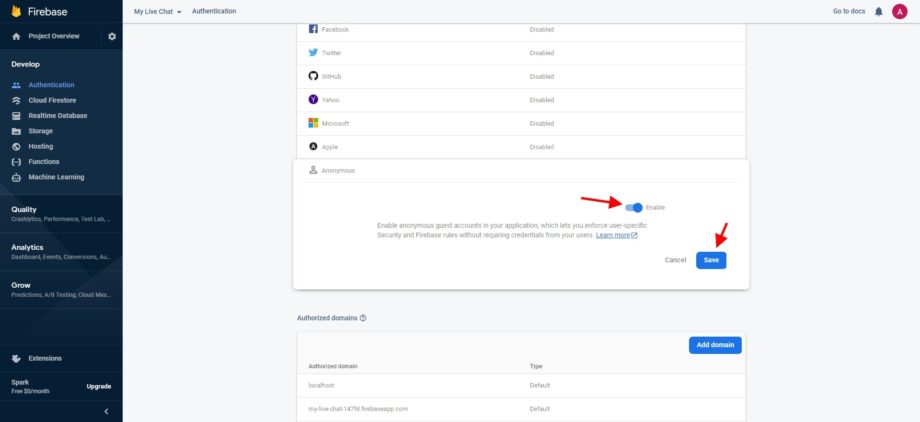
18 – As the last step, enable the authentication method and save.

firebase-18


Choose where to show chat popup

If you have entered the required data correctly and if you have enabled the chat plugin in the General settings, the chat window will be automatically enabled on every page of the site.
If you want to show the popup only on some specific pages, you can select them using the specific entry available in the plugin options panel.
In addition to these pages, you can also choose the show the chat popup on the home page, blog pages, and/or on shop and product pages by enabling the related options.

NOTE: to show the chat popup on Shop and product pages, you must activate WooCommerce

NOTE: to show the chat pop-up correctly, the theme installed on your site needs to use the function “wp_footer()” in its templates. 

Hide chat popup

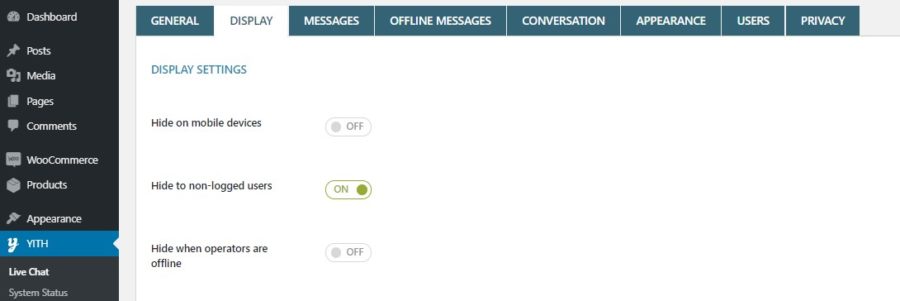
From the same section, you can choose to hide the popup for the following options:

  • on mobile devices
  • to not-logged users
  • when chat operators are offline

Customize messages

In the tab “Messages”, you can find the options to customize the messages shown to users.

  • Chat Title: the title of the chat shown on the pages of your site;
  • Welcome Message: the text shown in the login form of the chat;
  • Starting Chat Message: the initial message shown when opening the chat;
  • Closing Message: the text shown when closing the chat;
  • Offline Message: the message shown when the operator is offline;
  • Busy Message: the message shown to a new user when the maximum number of active chat conversations has been reached.
    With the plugin, you can set the maximum number of simultaneous chat guests in the option Maximum Connected Guests in the plugin options panel.


Customize colors

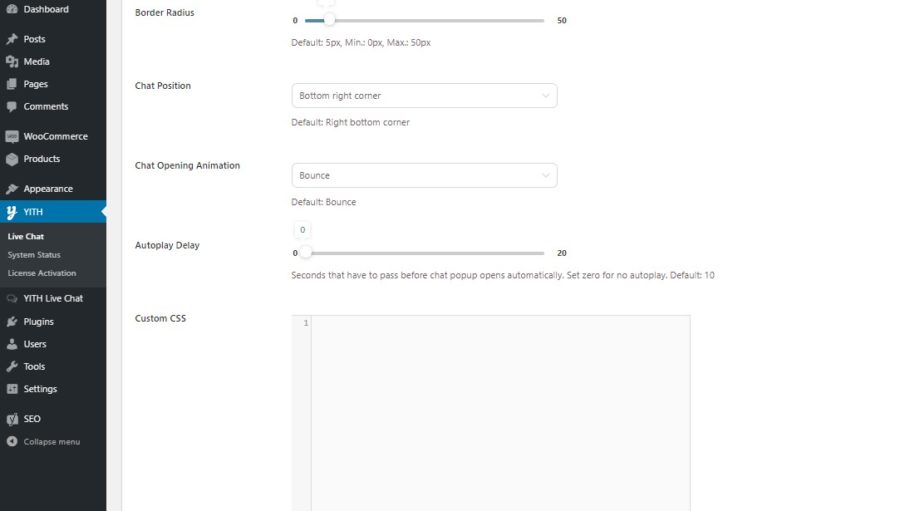
The chat window appearance can be customized in “Appearance” within the plugin options panel.

Offline messages

Offline messages are useful to give users the possibility to submit their request when the chat is busy or when no operator is online.
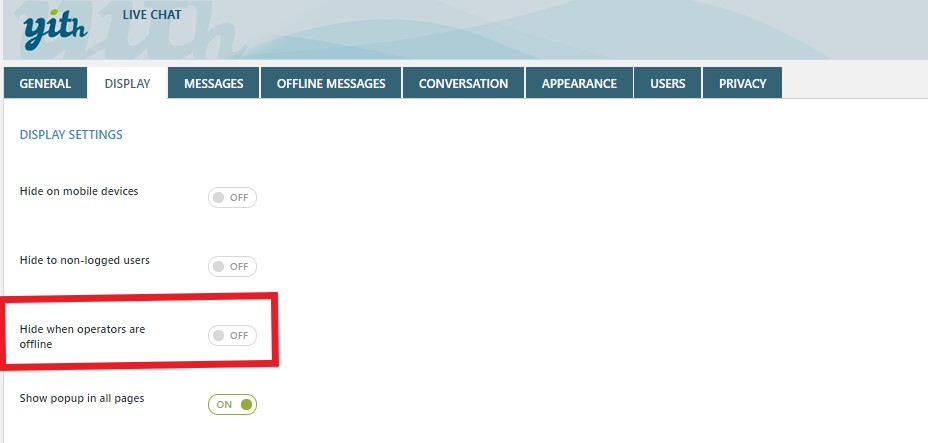
To allow offline messages, you should first make sure that the option “Hide chat popup when operators are offline” in the tab Display has been disabled.

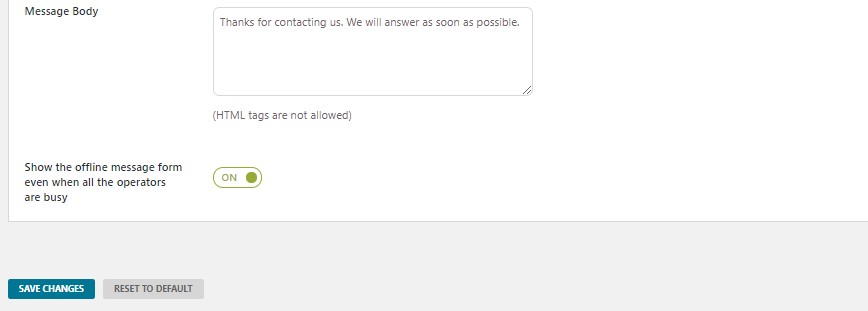
On the contrary, if you want that the form is available when operators are busy, enable the option “Show the offline message form even when all the operators are busy”.

The form appears as in the following image.

Offline message form

Offline messages settings

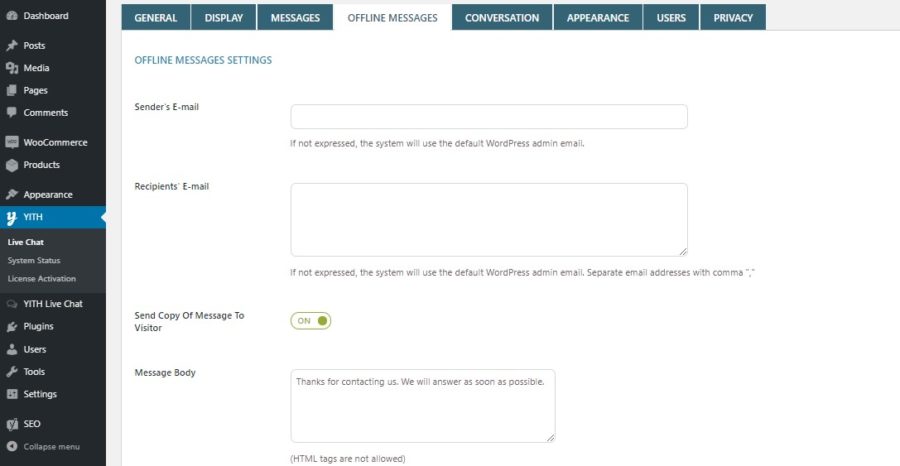
All the offline messages from your users will be sent through the email you have set in Sender’s E-mail. Make sure to use a valid email address in order to receive the messages.

In the Recipients’ E-mail option, you can specify the email address where the offline messages will be forwarded to. If you want to forward the offline messages to more than one recipient, add all the email addresses separated by commas (e.g.,[email protected],[email protected]).

If you want to send an email as an automatic response to the user that sent an offline message, enable the Send Copy Of Message To Visitor option and add your message in Message Body field.

Offline messages sent to users are also stored in “YITH Live Chat > Offline Messages”.

Open chat from a link

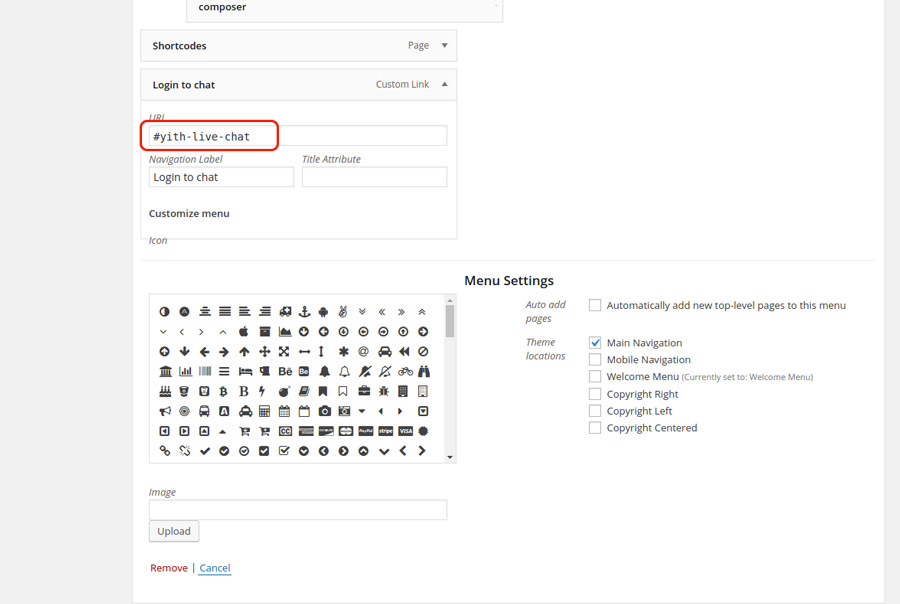
By setting #yith-live-chat as an URL link, the popup will automatically show when clicking on it.
By way of example, you can assign the above-mentioned URL to a new entry in the menu.

Open chat from link

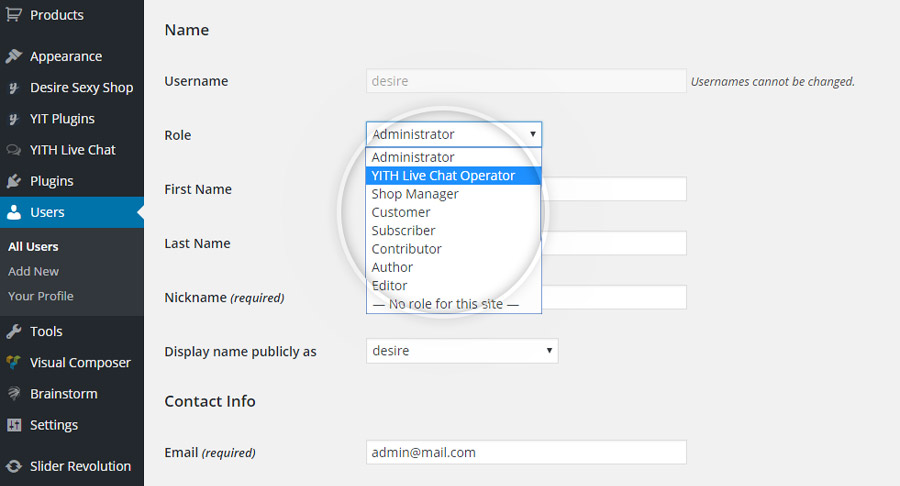
Assign role “Live Chat Operator”

Every user who has been assigned the role “YITH Live Chat Operator” can access the chat console, except for the site admin, who is automatically enabled.

Role chat operator

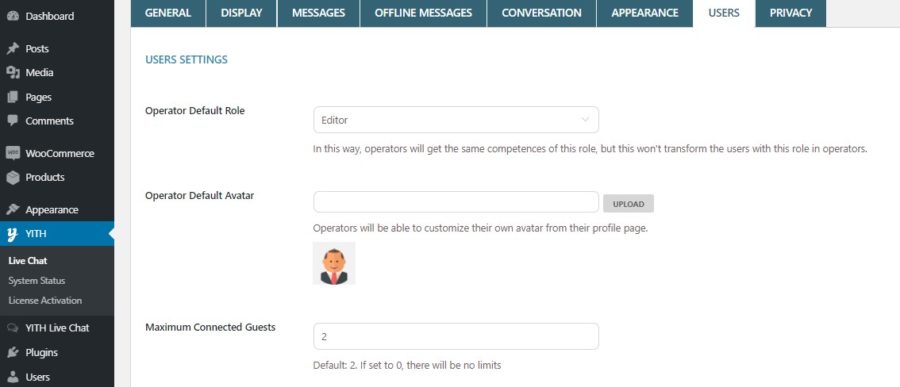
In the tab Users, you can configure general settings about chat operators.

  • Operator Default Role: this option allows “YITH Live Chat Operator” users to have the same privileges as the assigned role once logged in to the site. The “YITH Live Chat Operator” role must be set in the users’ profile.
  • Operator Default Avatar: the default avatar for each operator. It can be modified from each user’s profile and by changing the option of the “YITH Live Chat” section.
  • Maximum Connected Guests: the maximum number of possible conversations to be held at the same time. The default value is 2, but it is possible to manually set the desired limit. If users try to access the chat when it is impossible to start new conversations, they will see the “Busy Message” of the “Messages” section.
To edit the chat operator nickname, go to the user’s profile and insert the new name in the “Operator Nickname” entry.


Chat popup

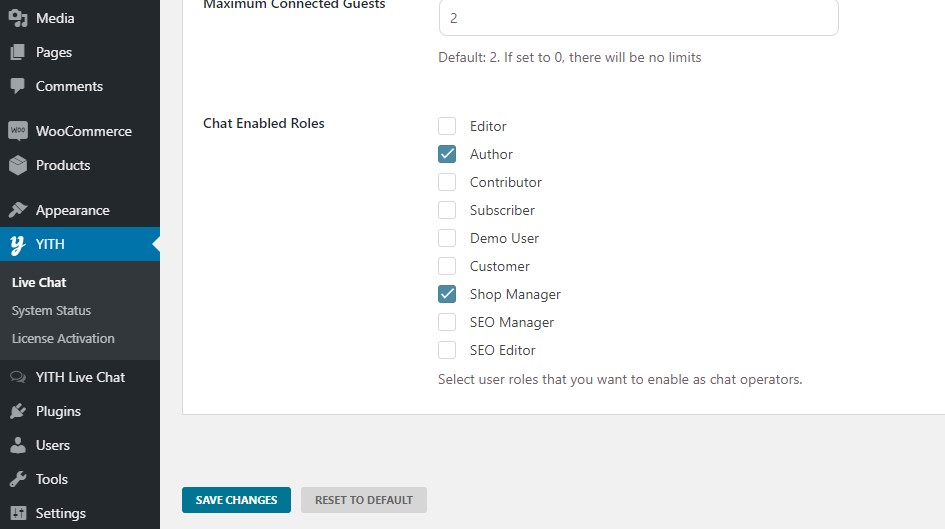
Enable user roles to be chat operators

The plugin allows choosing which user roles you want to enable to give them chat operator capabilities. The roles selected will be able to manage chats just like the other operators.

Enable conversation copy request


By activating the Enable Conversation Copy Request option (from the “Conversation Copy” section), your users will be free to request a copy of the chat session: this will be sent to the email specified when completing the form.
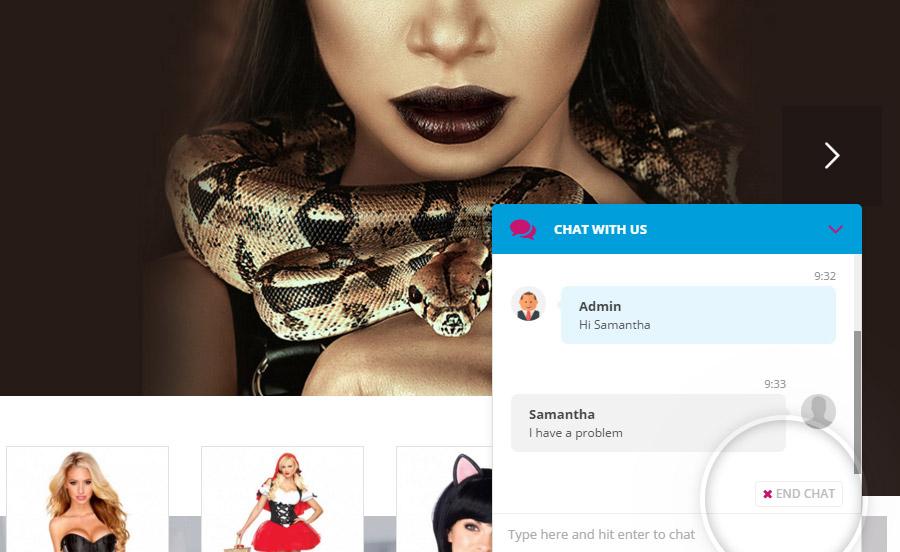
Users can request a copy of the conversation only after one of the two speakers (chat operator or user) has ended it by clicking on the available button.

Button End Chat

Request a chat copy by email

This is an example of the email that users will receive after their request.

Email example

A conversation copy for administrator

Activating the Send A Copy To Administrators option, the copy of the conversation is sent also to all the email addresses added in the Administrator’s Email Addresses option (remember to separate them with commas).
If no email address is specified, the email will be sent to the WordPress email address.

Conversation evaluation

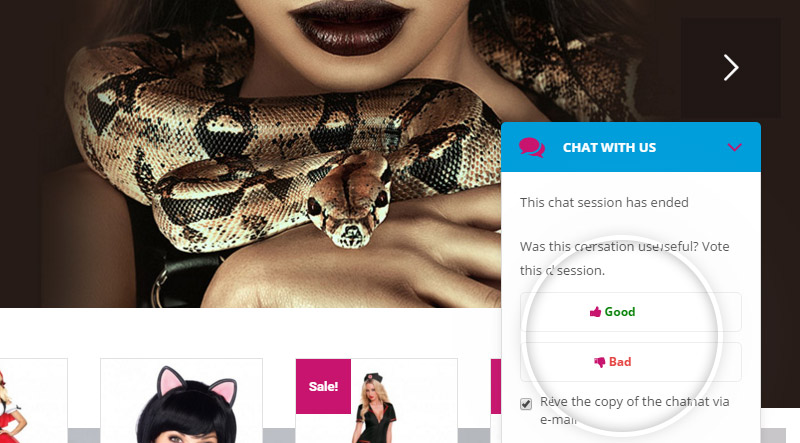
If you want to allow your users to evaluate (positively or negatively) the conversation they had, activate the Enable Conversation Evaluation option: by the end of the conversation, users will see a form with two buttons and a checkbox to ask for a copy of the conversation.

Convesation evaluation

You can see evaluation for each conversation into conversation detail page.

Conversation details

Chat logs

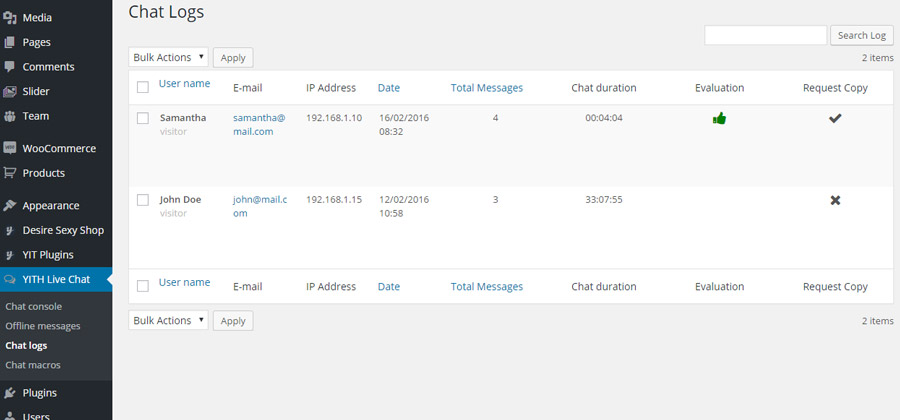
All conversation details, and also its evaluation by the user, are stored in section “Chat logs”.

Chat logs

The Chat logs section includes all the conversations held on your site. As you see in the image above, the main page shows some summarized details about each conversation:

  • User Name: the username used by the user to access the chat.
  • E-mail: the email used by the user to access the chat.
  • IP Address: the IP address of the user.
  • Date: the date of the conversation.
  • Total messages: the number of messages of the conversation.
  • Chat duration: the duration of the conversation.
  • Evaluation: the final evaluation of the user (it is not mandatory).
  • Request Copy: this is shown only if the user requests a copy of the conversation.

Note: if two or more conversations are generated during the same session with a different username, all the previous conversations of the same session will be updated with the username of the last opened conversation.